AWS Web3 Blog
Accelerate Ethereum synchronization time with storage-optimized Amazon EC2 instances
Syncing an Ethereum node can be a time-consuming and costly process if not well optimized, with the need to find the right balance between speed and security.
Compute requirements are different between the initial synchronization phase with the network and the steady-state phase where the node only needs to process new blocks (for additional details, refer to Synchronization modes in the Ethereum documentation). You might consider investing in more powerful hardware to limit the sync time to the minimum, but this power might be underutilized in the post-sync steady phase. This trade-off can be difficult to identify, because it might take several days to synchronize an Ethereum node on a low-spec hardware.
This challenge can be addressed by using different types of Amazon Elastic Compute Cloud (Amazon EC2) instances corresponding to your requirements. In this post, we demonstrate how to use the latest generation of storage optimized EC2 instances during the synchronization process, and switch back to right-sized memory optimized instances for the run phase to minimize cost.
We apply this node synchronization strategy to the Ethereum mainnet using Geth and Lighthouse clients for the execution and consensus layer, respectively. However, the same strategy can be applied to other clients, protocols, and synchronization configurations.
Solution Overview
We provide instructions to manually implement this strategy on i8 and r8 EC2 instance types (those instructions can be automated as part of an infrastructure-as-code pipeline):
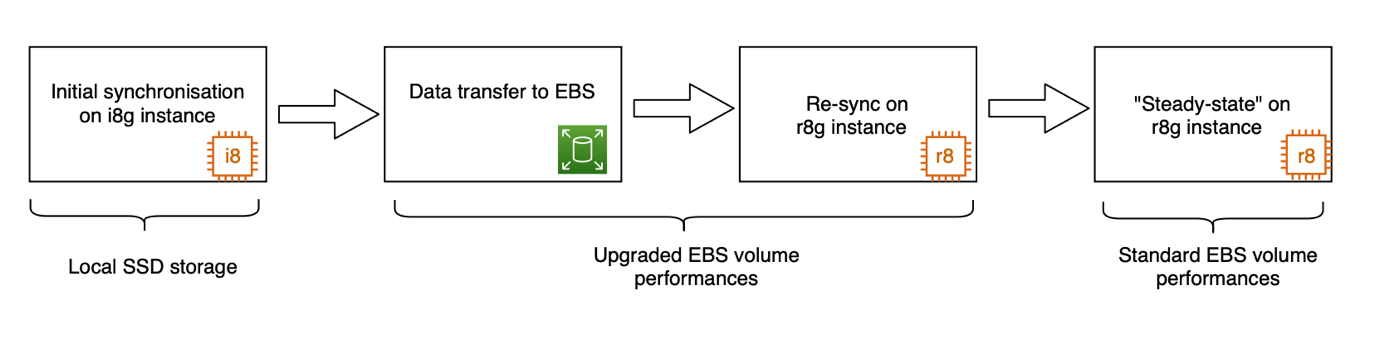
- we perform the initial synchronisation on an i8g instance with local SSD storage
- we then transfer the blockchain data to an EBS volume with upgraded performances and attach the volume to a r8g instance
- we synchronize the r8g instance
- we downgrade the EBS volume to standard performances
Different synchronization strategies exist, with different priorities regarding security and synchronization speed. At one end of the spectrum, you might want to favor security by executing every block starting from the genesis block, while at the other end of the spectrum, you might want to favor speed and rely on third-party snapshot providers. We propose a trust-minimized path to a fully synced node that balances security and sync efficiency, but you can adapt this strategy to your own requirements.
For Geth synchronization, we use snap sync (refer to Sync modes in the Geth documentation for more details). Snap sync downloads state directly from the Ethereum network rather than a single third-party source. This uses the collective security of multiple network participants rather than trusting one snapshot provider.
For Lighthouse synchronization, we use Checkpoint Sync. Checkpoint sync only requires trusting a single recent finalized checkpoint (weak subjectivity checkpoint), which is a fundamental security assumption in proof-of-stake Ethereum.
Prerequisites
To implement the solution, you need to have the following prerequisites:
- an Amazon Web Services (AWS) account with the appropriate permissions
- a basic understanding of Ethereum.
Sync the node on a storage optimized instance
To sync the node on a storage optimized instance, complete the following steps.
Create an instance
To create an i8g.2xlarge instance:
- Download this CloudFormation template
- From the CloudFormation console, choose Create stack
- Choose Upload a template file and upload the previously downloaded template
- Choose Next
- For Stack name, enter
geth-lighthouse-i8g - Choose Next
- Choose Next
- Choose Submit
The template creates a new virtual private cloud (VPC), a public subnet, and an EC2 instance named geth-lighthouse-i8g.2xlarge. It also formats the instance store and mounts it to the /data directory.
Configure a secret
After the stack is deployed, connect to the instance:
- On the Amazon EC2 console, make sure the instance state is Running and that the status check indicates checks passed
- Select the instance and choose Connect
- On the EC2 Instance Connect tab, choose Connect
- Create a secret for Geth and Lighthouse to securely communicate:
Install Geth
To install Geth, follow these steps:
- Download Geth (at the time of this writing, the latest stable release of Geth was 1.16.3, but you might want to use a more recent version):
- Create a systemd config file:
- Start Geth:
- Check Geth status:
Install Lighthouse
To install Lighthouse, follow these steps:
- Download Lighthouse (at the time of this writing, the latest stable release of lighthouse was 7.1.0, but you might want to use a more recent version):
- Create a systemd config file:
- Start Lighthouse:
- Check Lighthouse status:
Check synchronization status
Monitor the logs of both Geth and Lighthouse until the synchronization is complete. For a full explanation of how to interpret those logs, you can refer to the Syncing section of Geth logs in the Geth documentation. In the Lighthouse documentation, refer to the Step 4: Check logs for sync status section of Run a Node. In the following example, we indicate a few logs to look for.
After a few hours, when you encounter the Generated snapshot message in Geth’s logs, your node should be fully synced:
You can also connect to the Geth execution client and request the following information:
When the logs indicate that that node is fully synced, you can double-check that the last block number matches the one from etherscan.
Although the synchronization process could take days on generic hardware, it took us only 8 hours on an i8g.2xlarge instance.
Transfer the data to the EBS volume
Now that the synchronization is complete, you can move to a different instance type to save costs. The r8g.large memory-optimized instance is a good candidate for that. We use Amazon Elastic Block Store (Amazon EBS) gp3 volumes with the default 3,000 IOPS and 125 MiBps throughput. However, to speed up the data transfer from the instance store to the EBS volume, we will temporary boost the volume specific to the maximum input/output operations per second (IOPS) of 16,000 and 1,000 MiBps throughput.
To transfer the Geth and Lighthouse data, create an EBS volume and attach it to the i8g.2xlarge instance. Complete the following steps.
To create the EBS volume:
- On the Amazon EC2 console, under Elastic Block Store in the navigation pane, choose Volumes
- Choose Create volume
- For Volume type, choose General Purpose SSD (gp3)
- For Size (GiB), enter
2000 - For IOPS, enter
16000 - For Throughput (MiB/s), enter
1000 - For Availability Zone, choose us-east-1a
- Choose Create volume
To attach the volume:
- Select the newly created volume
- Choose Actions, then Attach volume
- For Instance, choose the i8g.2xlarge instance
- For Device name, choose /dev/sdz
- Choose Attach volume
To connect back to the instance and configure the volume:
To copy data to the EBS volume:
- Stop the Geth and Lighthouse services:
- Copy the data:
You created the EBS disk with a throughput of 1 GBps. The size of the data being approximately 1.2 TB (at the time of this writing), the copy should take around 20 minutes.
When the data is copied, you can detach the volume and shut down the i8g.2xlarge instance:
- Unmount the volume:
- On the Amazon EC2 console, choose Volumes in the navigation pane and select the EBS volume
- Choose Actions, then Detach volume
- Choose Detach to confirm
Move to a memory optimized instance
A memory optimized instance is well-suited for the run phase because the latest performance improvements of the AWS Graviton processor mean you can limit the number of vCPUs to 2 while meeting the 16 GB memory minimum requirement. We therefore use an r8g.large instance for the run phase, but which EC2 instance you use to host your Ethereum nodes depends on your own requirements. For additional considerations on how to best choose the EC2 instance type, refer to Run Ethereum nodes on AWS.
Delete the previously created geth-lighthouse-i8g CloudFormation stack and create a new one:
- Download this CloudFormation template
- From the CloudFormation console, choose Create stack
- Choose Upload a template file and upload the previously downloaded template
- Choose Next
- For Stack name, enter
geth-lighthouse-r8g - Choose Next
- Choose Next
- Choose Submit
When the stack creation is complete, complete the following steps.
To attach the EBS volume:
- On the Amazon EC2 console, under Elastic Block Store in the navigation pane, choose Volumes.
- Select the EBS volume previously created
- Choose Actions, then Attach volume
- For Instance, choose the r8g.large instance
- For Device name, choose /dev/sdz
- Choose Attach volume
To connect to the instance:
- On the EC2 console, select the instance and choose Connect
- On the EC2 Instance Connect tab, choose Connect
To mount the EBS volume:
Install Geth and Lighthouse
Install Geth and Lighthouse by following the same steps as for the i8g.2xlarge instance. Refer to the previous Install Geth and Install Lighthouse sections.
Check node sync status
To check that the newly created node can start from the previously generated data and catch up with the blockchain, follow these steps:
- Confirm that it says INFO Syncing in the lighthouse logs:
In our case, it took around 5 minutes for Lighthouse to be back in sync.
- Confirm that Geth is catching up with the latest blockchain blocks in the Geth logs:
In our case it took around 5 minutes for Geth to be back in sync.
- You don’t need the 16,000 IOPS and the 1 GBps throughput anymore, so you can update those to the minimum values:
– On the Amazon EC2 console, choose Volumes in the navigation pane, select the EBS volume
– Choose Actions, then Modify volume
– Update the IOPS value to the minimum (3000 IOPS)
– Update the Throughput (MiB/s) value to the minimum (125 MiBps)
– Choose Modify
Analysis of the metrics during the synchronization process
As shown in the following figure, the CPU utilization varied between 30-80% during the synchronization phase and then remained below 10%.

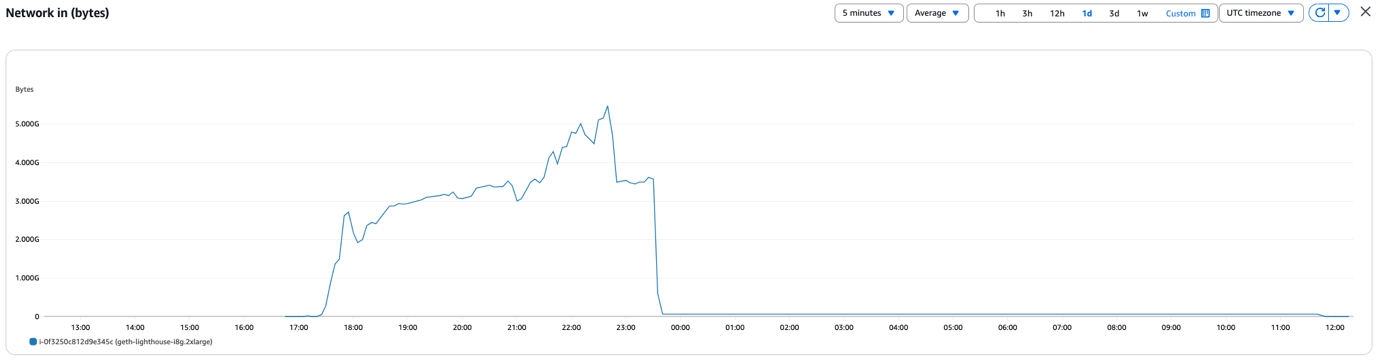
The network utilization was also high during the entire synchronization phase. Interestingly, it was low during the state snapshot generation, as shown in the following screenshot.
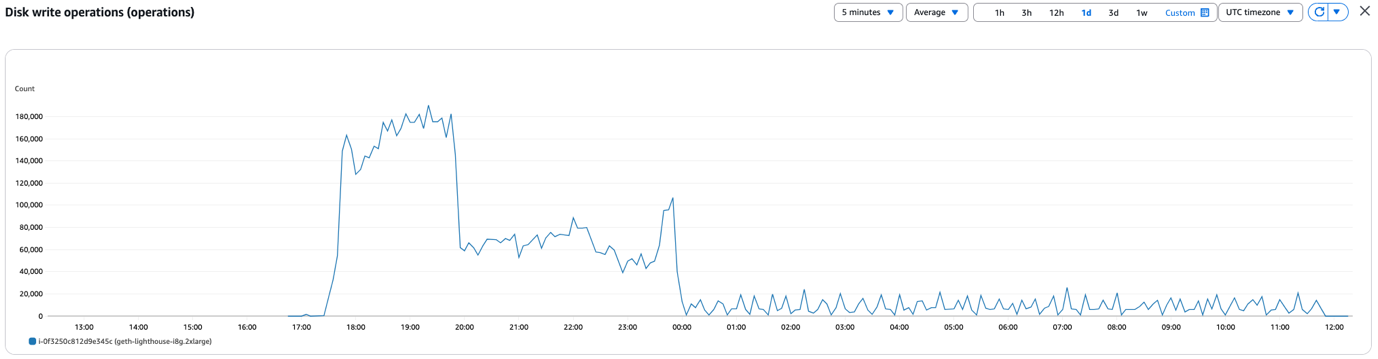
The disk write operations (IOPS) reached the maximum of 160,000, as shown in the following screenshot.
For more details, refer to Specifications for Amazon EC2 storage optimized instances in the Amazon EC2 documentation.
Accessing the node
You might want to access the newly created node remotely, either to host a Web3 application on AWS or to connect a Web3 client such as MetaMask (a popular browser wallet). In both cases, you need to update the Geth service configuration to allow remote access. Refer to JSON-RPC Server in the Ethereum documentation for more details. If you need to access the node from a different VPC or a different account, you might want to use AWS PrivateLink. This service provides private connectivity between VPCs without exposing your traffic to the public internet. Refer to Share your services through AWS PrivateLink in the Amazon Virtual Private Cloud (Amazon VPC) documentation for more details. If you want to access your node from MetaMask on your local computer, refer to Run a serverless Arbitrum full node on AWS in the AWS Web3 Blog, which explains how you can create an AWS Client VPN to privately access your node. Refer to the instructions in the Test the node section of the AWS Web3 Blog post to create such a setup.
Cost considerations
At the time of this writing, the hourly cost of an i8g.2xlarge instance in us-east-1 was below $0.7. Without any other cost considerations (such as data transfer and storage), using such an instance for 10 hours would therefore cost less than $7.Additionally, the incremental cost of using 16,000 provisioned IOPFS and 1GBps throughput for 1 hour on the EBS volume would cost less than $1. These are high-level cost estimates only. For a detailed cost estimate, refer to AWS Pricing and use the AWS Pricing Calculator.
In-memory file system
To improve the node synchronization time even further, you can consider using an in-memory file system. The x8g.24xlarge instance type offers 1.5 TB of memory, which is sufficient to create a file system large enough to hold the node data (approximatively 1.2 TB at the time of this writing).To use an x8g.24xlarge instance instead of the i8g.2xlarge instance, you could follow the same deployment instructions as for the i8g.2xlarge instance with the following modifications:
- Deploy an x8g.24xlarge instance instead of an i8g.2xlarge
- Instead of creating an XFS file system, create a memory file system:
During our tests, we could synchronize the node in 6.5 hours. Although this was a 1.5-hour improvement over the i8g.2xlarge instance, the incremental cost of running an x8g.24xlarge instance is an order of magnitude higher than an i8g.2xlarge instance. We concluded that we reached a point of diminishing returns on storage optimization, and the limiting factor had become the speed of the data download.
Troubleshooting
Troubleshooting Geth or Lighthouse issues is beyond the scope of this post. However, it gives you the option to quickly replace failing Ethereum nodes (in case their database has been corrupted, for example), by reinitiating the synchronization process on a storage optimized instance. For a higher granularity of the monitoring metrics, you can also activate detailed monitoring for your node instance. To monitor the IP traffic going to and from your instance, you should also consider activating VPC Flow Logs.
Clean up
To clean up your environment:
- On the CloudFormation console, delete the geth-lighthouse-r8g stack.
- On the EC2 console, under Elastic Block Store/Volumes in the navigation pane, choose Volumes. Select the volume previously created, then choose Actions and Delete Volume.
Conclusion
In this post, we demonstrated how to use the power and flexibility of the AWS Cloud to bootstrap an Ethereum full node running Geth and Lighthouse. We ran the synchronization process on the latest generation of storage optimized instances, then progressively scaled down our node to a memory optimized instance that was cost-effective but powerful enough to stay in sync with the Ethereum network. The entire process took us around 8 hours and could be automated to further streamline the creation of Ethereum nodes on AWS.
We encourage you to experiment with different instance sizes and share your experience running Web3 workloads on AWS. You can learn more about Web3 on AWS on the AWS Web3 Blog, and contact our team at web3-contact@amazon.com.