AWS Compute Blog
New: Using Amazon EC2 Instance Connect for SSH access to your EC2 Instances
This post is courtesy of Saloni Sonpal – Senior Product Manager – Amazon EC2
Today, AWS is introducing Amazon EC2 Instance Connect, a new way to control SSH access to your EC2 instances using AWS Identity and Access Management (IAM).
About Amazon EC2 Instance Connect
While infrastructure as code (IaC) tools such as Chef and Puppet have become customary in the industry for configuring servers, you occasionally must access your instances to fine-tune, consult system logs, or debug application issues. The most common tool to connect to Linux servers is Secure Shell (SSH). It was created in 1995 and is now installed by default on almost every Linux distribution.
When connecting to hosts via SSH, SSH key pairs are often used to individually authorize users. As a result, organizations have to store, share, manage access for, and maintain these SSH keys.
Some organizations also maintain bastion hosts, which help limit network access into hosts by the use of a single jump point. They provide logging and prevent rogue SSH access by adding an additional layer of network obfuscation. However, running bastion hosts comes with challenges. You maintain the installed user keys, handle rotation, and make sure that the bastion host is always available and, more importantly, secured.
Amazon EC2 Instance Connect simplifies many of these issues and provides the following benefits to help improve your security posture:
- Centralized access control – You get centralized access control to your EC2 instances on a per-user and per-instance level. IAM policies and principals remove the need to share and manage SSH keys.
- Short-lived keys – SSH keys are not persisted on the instance, but are ephemeral in nature. They are only accessible by an instance at the time that an authorized user connects, making it easier to grant or revoke access in real time. This also allows you to move away from long-lived keys. Instead, you generate one-time SSH keys each time that an authorized user connects, eliminating the need to track and maintain keys.
- Auditability – User connections via EC2 Instance Connect are logged to AWS CloudTrail, providing the visibility needed to easily audit connection requests and maintain compliance.
- Ubiquitous access – EC2 Instance Connect works seamlessly with your existing SSH client. You can also connect to your instances from a new browser-based SSH client in the EC2 console, providing a consistent experience without having to change your workflows or tools.
How EC2 Instance Connect works
When the EC2 Instance Connect feature is enabled on an instance, the SSH daemon (sshd) on that instance is configured with a custom AuthorizedKeysCommand script. This script updates AuthorizedKeysCommand to read SSH public keys from instance metadata during the SSH authentication process, and connects you to the instance.
The SSH public keys are only available for one-time use for 60 seconds in the instance metadata. To connect to the instance successfully, you must connect using SSH within this time window. Because the keys expire, there is no need to track or manage these keys directly, as you did previously.
Configuring an EC2 instance for EC2 Instance Connect
To get started using EC2 Instance Connect, you first configure your existing instances. Currently, EC2 Instance Connect supports Amazon Linux 2 and Ubuntu. Install RPM or Debian packages respectively to enable the feature. New Amazon Linux 2 instances have the EC2 Instance Connect feature enabled by default, so you can connect to those newly launched instances right away using SSH without any further configuration.
First, configure an existing instance. In this case, set up an Amazon Linux 2 instance running in your account. For the steps for Ubuntu, see Set Up EC2 Instance Connect.
- Connect to the instance using SSH. The instance is running a relatively recent version of Amazon Linux 2:
[ec2-user@ip-10-1-0-15 ~]$ uname -srv Linux 4.14.104-95.84.amzn2.x86_64 #1 SMP Fri Jun 21 12:40:53 UTC 2019 - Use the yum command to install the ec2-instance-connect RPM package.
$ sudo yum install ec2-instance-connect
Loaded plugins: extras_suggestions, langpacks, priorities, update-motd
Resolving Dependencies
--> Running transaction check
---> Package ec2-instance-connect.noarch 0:1.1-9.amzn2 will be installed
--> Finished Dependency Resolution

........

Installed:
  ec2-instance-connect.noarch 0:1.1-9.amzn2

Complete!
This RPM installs a few scripts locally and changes the AuthorizedKeysCommand and AuthorizedKeysCommandUser configurations in /etc/ssh/sshd_config. If you are using a configuration management tool to manage your sshd configuration, install the package and add the lines as described in the documentation.
With ec2-instance-connect installed, you are ready to set up your users and have them connect to instances.
Set up IAM users
First, allow an IAM user to be able to push their SSH keys up to EC2 Instance Connect. Create a new IAM policy so that you can add it to any other users in your organization.
- In the IAM console, choose Policies, Create Policy.
- On the Create Policy page, choose JSON and enter the following JSON document. Replace $REGION and $ACCOUNTID with your own values:
{
    "Version": "2012-10-17",
    "Statement": [
        {
            "Effect": "Allow",
            "Action": [
                "ec2-instance-connect:SendSSHPublicKey"
            ],
            "Resource": [
                "arn:aws:ec2:$REGION:$ACCOUNTID:instance/*"
            ],
            "Condition": {
                "StringEquals": {
                    "ec2:osuser": "ec2-user"
                }
            }
        }
    ]
}
Use ec2-user as the value for ec2:osuser with Amazon Linux 2. Specify this so that the metadata is made available for the proper SSH user. For more information, see Actions, Resources, and Condition Keys for Amazon EC2 Instance Connect Service.
- Choose Review Policy.
- On the Review Policy page, name the policy, give it a description, and choose Create Policy.
- On the Create Policy page, attach the policy to something by creating a new group (I named mine “HostAdmins”).
- On the Attach Policy page, attach the policy that you just created and choose Next Step.
- Choose Create Group.
- On the Groups page, select your newly created group and choose Group Actions, Add Users to Group.
- Select the user or users to add to this group, then choose Add Users.
Your users can now use EC2 Instance Connect.
Connecting to an instance using EC2 Instance Connect
With your instance configured and the users set with the proper policy, connect to your instance with your normal SSH client or directly, using the AWS Management Console.
To offer a seamless SSH experience, EC2 Instance Connect wraps up these steps in a command line tool. It also offers a browser-based interface in the console, which takes care of the SSH key generation and distribution for you.
To connect with your SSH client
- Generate the new private and public keys mynew_key and mynew_key.pub, respectively:
$ ssh-keygen -t rsa -f mynew_key - Use the following AWS CLI command to authorize the user and push the public key to the instance using the send-ssh-public-key command. To support this, you need the latest version of the AWS CLI.
$ aws ec2-instance-connect send-ssh-public-key --region us-east-1 --instance-id i-0989ec3292613a4f9 --availability-zone us-east-1f --instance-os-user ec2-user --ssh-public-key file://mynew_key.pub { "RequestId": "505f8675-710a-11e9-9263-4d440e7745c6", "Success": true } - After authentication, the public key is made available to the instance through the instance metadata for 60 seconds. During this time, connect to the instance using the associated private key:
$ ssh -i mynew_key ec2-user@ec2-34-204-200-76.compute-1.amazonaws.com
If for some reason you don’t connect within that 60-second window, you see the following error:
$ ssh -i mynew_key ec2-user@ec2-34-204-200-76.compute-1.amazonaws.com
Permission denied (publickey,gssapi-keyex,gssapi-with-mic).
If you do, run the send-ssh-public-key command again to connect using SSH.
Now, connect to your instance from the console.
To connect from the Amazon EC2 console
- Open the Amazon EC2 console.
- In the left navigation pane, choose Instances and select the instance to which to connect.
- Choose Connect.
- On the Connect To Your Instance page, choose EC2 Instance Connect (browser-based SSH connection), Connect.
The following terminal window opens and you are now connected through SSH to your instance.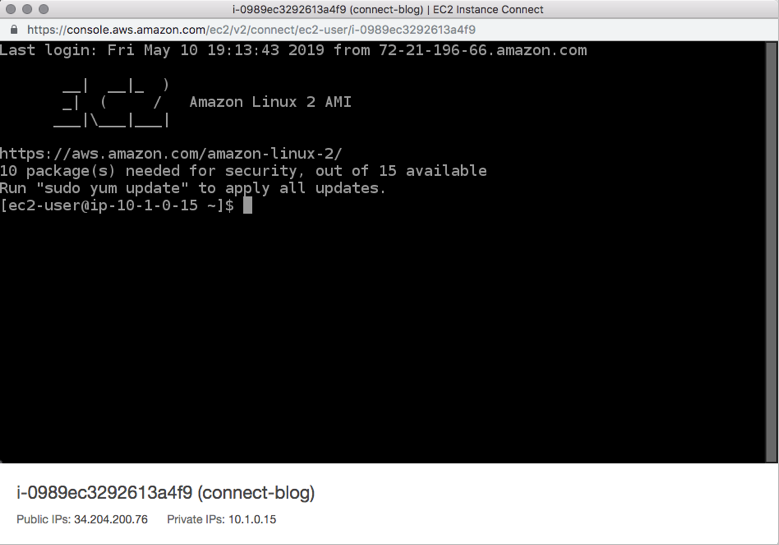
Auditing with CloudTrail
For every connection attempt, you can also view the event details. These include the destination instance ID, OS user name, and public key, all used to make the SSH connection that corresponds to the SendSSHPublicKey API calls in CloudTrail.
In the CloudTrail console, search for SendSSHPublicKey.
If EC2 Instance Connect has been used recently, you should see records of your users having called this API operation to send their SSH key to the target host. Viewing the event’s details shows you the instance and other valuable information that you might want to use for auditing.
In the following example, see the JSON from a CloudTrail event that shows the SendSSHPublicKey command in use:
{
    "eventVersion": "1.05",
    "userIdentity": {
        "type": "User",
        "principalId": "1234567890",
        "arn": "arn:aws:iam:: 1234567890:$USER",
        "accountId": "1234567890",
        "accessKeyId": "ABCDEFGHIJK3RFIONTQQ",
        "userName": "$ACCOUNT_NAME",
        "sessionContext": {
            "attributes": {
                "mfaAuthenticated": "true",
                "creationDate": "2019-05-07T18:35:18Z"
            }
        }
    },
    "eventTime": "2019-06-21T13:58:32Z",
    "eventSource": "ec2-instance-connect.amazonaws.com",
    "eventName": "SendSSHPublicKey",
    "awsRegion": "us-east-1",
    "sourceIPAddress": "34.204.194.237",
    "userAgent": "aws-cli/1.15.61 Python/2.7.16 Linux/4.14.77-70.59.amzn1.x86_64 botocore/1.10.60",
    "requestParameters": {
        "instanceId": "i-0989ec3292613a4f9",
        "osUser": "ec2-user",
        "SSHKey": {
            "publicKey": "ssh-rsa <removed>\\n"
        }
    },
    "responseElements": null,
    "requestID": "df1a5fa5-710a-11e9-9a13-cba345085725",
    "eventID": "070c0ca9-5878-4af9-8eca-6be4158359c4",
    "eventType": "AwsApiCall",
    "recipientAccountId": "1234567890"
}
If you’ve configured your AWS account to collect CloudTrail events in an S3 bucket, you can download and audit the information programmatically. For more information, see Getting and Viewing Your CloudTrail Log Files.
Conclusion
EC2 Instance Connect offers an alternative to complicated SSH key management strategies and includes the benefits of using built-in auditability with CloudTrail. By integrating with IAM and the EC2 instance metadata available on all EC2 instances, you get a secure way to distribute short-lived keys and control access by IAM policy.
There are some additional features in the works for EC2 Instance Connect. In the future, AWS hopes to launch tag-based authorization, which allows you to use resource tags in the condition of a policy to control access. AWS also plans to enable EC2 Instance Connect by default in popular Linux distros in addition to Amazon Linux 2.
EC2 Instance Connect is available now at no extra charge in the US East (Ohio and N. Virginia), US West (N. California and Oregon), Asia Pacific (Mumbai, Seoul, Singapore, Sydney, and Tokyo), Canada (Central), EU (Frankfurt, Ireland, London, and Paris), and South America (São Paulo) AWS Regions.