AWS Compute Blog
Announcing Go Support for AWS Lambda
This post courtesy of Paul Maddox, Specialist Solutions Architect (Developer Technologies).
Today, we’re excited to announce Go as a supported language for AWS Lambda.
As someone who’s done their fair share of Go development (recent projects include AWS SAM Local and GoFormation), this is a release I’ve been looking forward to for a while. I’m going to take this opportunity to walk you through how it works by creating a Go serverless application, and deploying it to Lambda.
Prerequisites
This post assumes that you already have Go installed and configured on your development machine, as well as a basic understanding of Go development concepts. For more details, see https://golang.org/doc/install.
Creating an example Serverless application with Go
Lambda functions can be triggered by variety of event sources:
- Asynchronous events (such as an object being put in an Amazon S3 bucket)
- Streaming events (for example, new data records on an Amazon Kinesis stream)
- Synchronous events (manual invocation, or HTTPS request via Amazon API Gateway)
As an example, you’re going to create an application that uses an API Gateway event source to create a simple Hello World RESTful API. The full source code for this example application can be found on GitHub at: https://github.com/aws-samples/lambda-go-samples.
After the application is published, it receives a name via the HTTPS request body, and responds with “Hello <name>.” For example:
$ curl -XPOST -d "Paul" "https://my-awesome-api.example.com/"
Hello Paul
To implement this, create a Lambda handler function in Go.
Import the github.com/aws/aws-lambda-go package, which includes helpful Go definitions for Lambda event sources, as well as the lambda.Start() method used to register your handler function.
Start by creating a new project directory in your $GOPATH, and then creating a main.go file that contains your Lambda handler function:
package main

import (
 "errors"
 "log"
 "github.com/aws/aws-lambda-go/events"
 "github.com/aws/aws-lambda-go/lambda"
)

var (
 // ErrNameNotProvided is thrown when a name is not provided
 ErrNameNotProvided = errors.New("no name was provided in the HTTP body")
)

// Handler is your Lambda function handler
// It uses Amazon API Gateway request/responses provided by the aws-lambda-go/events package,
// However you could use other event sources (S3, Kinesis etc), or JSON-decoded primitive types such as 'string'.
func Handler(request events.APIGatewayProxyRequest) (events.APIGatewayProxyResponse, error) {

 // stdout and stderr are sent to AWS CloudWatch Logs
 log.Printf("Processing Lambda request %s\n", request.RequestContext.RequestID)

 // If no name is provided in the HTTP request body, throw an error
 if len(request.Body) < 1 {
  return events.APIGatewayProxyResponse{}, ErrNameNotProvided
 }

 return events.APIGatewayProxyResponse{
  Body:       "Hello " + request.Body,
  StatusCode: 200,
 }, nil

}

func main() {
 lambda.Start(Handler)
}
The lambda.Start() method takes a handler, and talks to an internal Lambda endpoint to pass Invoke requests to the handler. If a handler does not match one of the supported types, the Lambda package responds to new invocations served by an internal endpoint with an error message such as:
json: cannot unmarshal object into Go value of type int32: UnmarshalTypeErrorThe lambda.Start() method blocks, and does not return after being called, meaning that it’s suitable to run in your Go application’s main entry point.
More detail on AWS Lambda function handlers with Go
A handler function passed to lambda.Start() must follow these rules:
- It must be a function.
- The function may take between 0 and 2 arguments.
- If there are two arguments, the first argument must implement context.Context.
- The function may return between 0 and 2 values.
- If there is one return value, it must implement error.
- If there are two return values, the second value must implement error.
The github.com/aws/aws-lambda-go library automatically unmarshals the Lambda event JSON to the argument type used by your handler function. To do this, it uses Go’s standard encoding/json package, so your handler function can use any of the standard types supported for unmarshalling (or custom types containing those):
- bool, for JSON booleans
- float64, for JSON numbers
- string, for JSON strings
- []interface{}, for JSON arrays
- map[string]interface{}, for JSON objects
- nil, for JSON null
For example, your Lambda function received a JSON event payload like the following:
{
  "id": 12345,
  "value": "some-value"
}
It should respond with a JSON response that looks like the following:
{
  "message": "processed request ID 12345",
  "ok": true
}
You could use a Lambda handler function that looks like the following:
package main

import (
  "fmt"
  "github.com/aws/aws-lambda-go/lambda"
)

type Request struct {
  ID        float64 `json:"id"`
  Value     string  `json:"value"`
}

type Response struct {
  Message string `json:"message"`
  Ok      bool   `json:"ok"`
}

func Handler(request Request) (Response, error) {
 return Response{
  Message: fmt.Sprintf("Processed request ID %f", request.ID),
  Ok:      true,
 }, nil
}

func main() {
 lambda.Start(Handler)
}
For convenience, the github.com/aws/aws-lambda-go package provides event sources that you can also use in your handler function arguments. It also provides return values for common sources such as S3, Kinesis, Cognito, and the API Gateway event source and response objects that you’re using in the application example.
Adding unit tests
To test that the Lambda handler works as expected, create a main_test.go file containing some basic unit tests.
package main_test

import (
 "testing"
 main "github.com/aws-samples/lambda-go-samples"
 "github.com/aws/aws-lambda-go/events"
 "github.com/stretchr/testify/assert"
)

func TestHandler(t *testing.T) {
 tests := []struct {
  request events.APIGatewayProxyRequest
  expect  string
  err     error
 }{
   {
    // Test that the handler responds with the correct response
    // when a valid name is provided in the HTTP body
    request: events.APIGatewayProxyRequest{Body: "Paul"},
    expect:  "Hello Paul",
    err:     nil,
   },
   {
    // Test that the handler responds ErrNameNotProvided
    // when no name is provided in the HTTP body
    request: events.APIGatewayProxyRequest{Body: ""},
    expect:  "",
    err:     main.ErrNameNotProvided,
   },
  }

  for _, test := range tests {
   response, err := main.Handler(test.request)
   assert.IsType(t, test.err, err)
   assert.Equal(t, test.expect, response.Body)
  }
}
Run your tests:
$ go test
PASS
ok      github.com/awslabs/lambda-go-example    0.041s
Note: To make the unit tests more readable, this example uses a third-party library (https://github.com/stretchr/testify). This allows you to describe the test cases in a more natural format, making them more maintainable for other people who may be working in the code base.
Build and deploy
As Go is a compiled language, build the application and create a Lambda deployment package. To do this, build a binary that runs on Linux, and zip it up into a deployment package.
To do this, we need to build a binary that will run on Linux, and ZIP it up into a deployment package.
$ GOOS=linux go build -o main
$ zip deployment.zip main
The binary doesn’t need to be called main, but the name must match the Handler configuration property of the deployed Lambda function.
The deployment package is now ready to be deployed to Lambda. One deployment method is to use the AWS CLI. Provide a valid Lambda execution role for –role.
$ aws lambda create-function \
--region us-west-1 \
--function-name HelloFunction \
--zip-file fileb://./deployment.zip \
--runtime go1.x \
--tracing-config Mode=Active \
--role arn:aws:iam::<account-id>:role/<role> \
--handler main
From here, configure the invoking service for your function, in this example API Gateway, to call this function and provide the HTTPS frontend for your API. For more information about how to do this in the API Gateway console, see Create an API with Lambda Proxy Integration. You could also do this in the Lambda console by assigning an API Gateway trigger.
Then, configure the trigger:
- API name: lambda-go
- Deployment stage: prod
- Security: open
This results in an API Gateway endpoint that you can test.
Now, you can use cURL to test your API:
$ curl -XPOST -d "Paul" https://u7fe6p3v64.execute-api.us-east-1.amazonaws.com/prod/main
Hello Paul
Doing this manually is fine and works for testing and exploration. If you were doing this for real, you’d want to automate this process further. The next section shows how to add a CI/CD pipeline to this process to build, test, and deploy your serverless application as you change your code.
Automating tests and deployments
Next, configure AWS CodePipeline and AWS CodeBuild to build your application automatically and run all of the tests. If it passes, deploy your application to Lambda.
The first thing you need to do is create an AWS Serverless Application Model (AWS SAM) template in your source repository. SAM provides an easy way to deploy Serverless resources, such as Lambda functions, APIs, and other event sources, as well as all of the necessary IAM permissions, etc. You can also include any valid AWS CloudFormation resources within your SAM template, such as a Kinesis stream, or an Amazon DynamoDB table. They are deployed alongside your Serverless application.
Create a file called template.yml in your application repository with the following contents:
AWSTemplateFormatVersion: 2010-09-09
Transform: AWS::Serverless-2016-10-31
Resources:
  HelloFunction:
    Type: AWS::Serverless::Function
    Properties:
      Handler: main
      Runtime: go1.x
      Tracing: Active
      Events:
        GetEvent:
          Type: Api
          Properties:
            Path: /
            Method: post
The above template instructs SAM to deploy a Lambda function (called HelloFunction in this case), with the Go runtime (go1.x), and also an API configured to pass HTTP POST requests to your Lambda function. The Handler property defines which binary in the deployment package needs to be executed (main in this case).
You’re going to use CodeBuild to run your tests, build your Go application, and package it. You can tell CodeBuild how to do all of this by creating a buildspec.yml file in your repository containing the following:
version: 0.2
env:
  variables:
    # This S3 bucket is used to store the packaged Lambda deployment bundle.
    # Make sure to provide a valid S3 bucket name (it must exist already).
    # The CodeBuild IAM role must allow write access to it.
    S3_BUCKET: "your-s3-bucket"
    PACKAGE: "github.com/aws-samples/lambda-go-samples"

phases:
  install:
    commands:
      # AWS Codebuild Go images use /go for the $GOPATH so copy the
      # application source code into that directory structure.
      - mkdir -p "/go/src/$(dirname ${PACKAGE})"
      - ln -s "${CODEBUILD_SRC_DIR}" "/go/src/${PACKAGE}"
      # Print all environment variables (handy for AWS CodeBuild logs)
      - env
      # Install golint
      - go get -u github.com/golang/lint/golint

  pre_build:
    commands:
      # Make sure we're in the project directory within our GOPATH
      - cd "/go/src/${PACKAGE}"
      # Fetch all dependencies
      - go get -t ./...
      # Ensure that the code passes all lint tests
      - golint -set_exit_status
      # Check for common Go problems with 'go vet'
      - go vet .
      # Run all tests included with the application
      - go test .

  build:
    commands:
      # Build the go application
      - go build -o main
      # Package the application with AWS SAM
      - aws cloudformation package --template-file template.yml --s3-bucket ${S3_BUCKET} --output-template-file packaged.yml

artifacts:
  files:
  - packaged.yml
This buildspec file does the following:
- Sets up your GOPATH, ready for building
- Runs golint to make sure that any committed code matches the Go style and formatting specification
- Runs any unit tests present (via go test)
- Builds your application binary
- Packages the binary into a Lambda deployment package and uploads it to S3
For more details about buildspec files, see the Build Specification Reference for AWS CodeBuild.
Your project directory should now contain the following files:
$ tree
.
├── buildspec.yml    (AWS CodeBuild configuration file)
├── main.go          (Our application)
├── main_test.go     (Unit tests)
└── template.yml     (AWS SAM template)
0 directories, 4 files
You’re now ready to set up your automated pipeline with CodePipeline.
Create a new pipeline
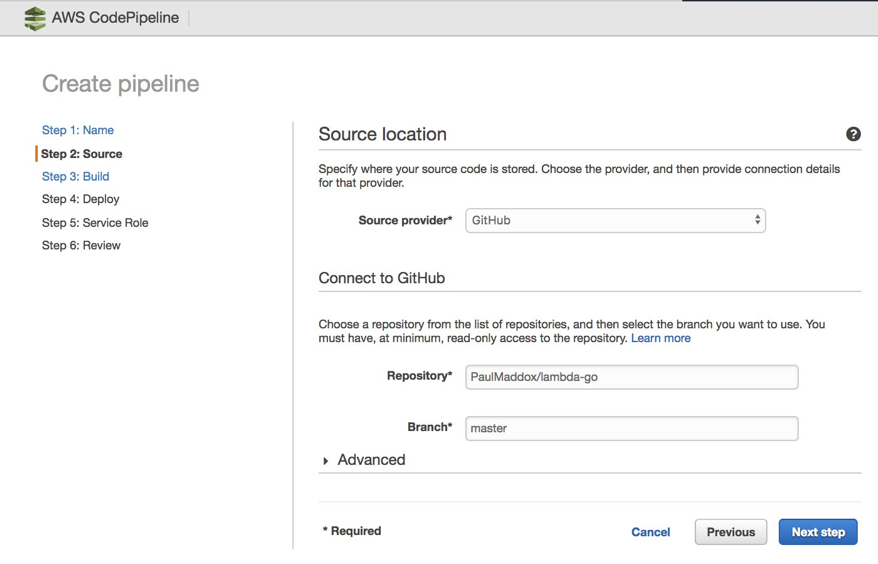
Get started by navigating to the CodePipeline console. You need to give your new pipeline a name, such as HelloService.
Next, select the source repository in which your application code is located. CodePipeline supports either AWS CodeCommit, GitHub.com, or S3. To use the example GitHub.com repository mentioned earlier in this post, fork it into your own GitHub.com account or create a new CodeCommit repository and clone it into there. Do this first before selecting a source location.
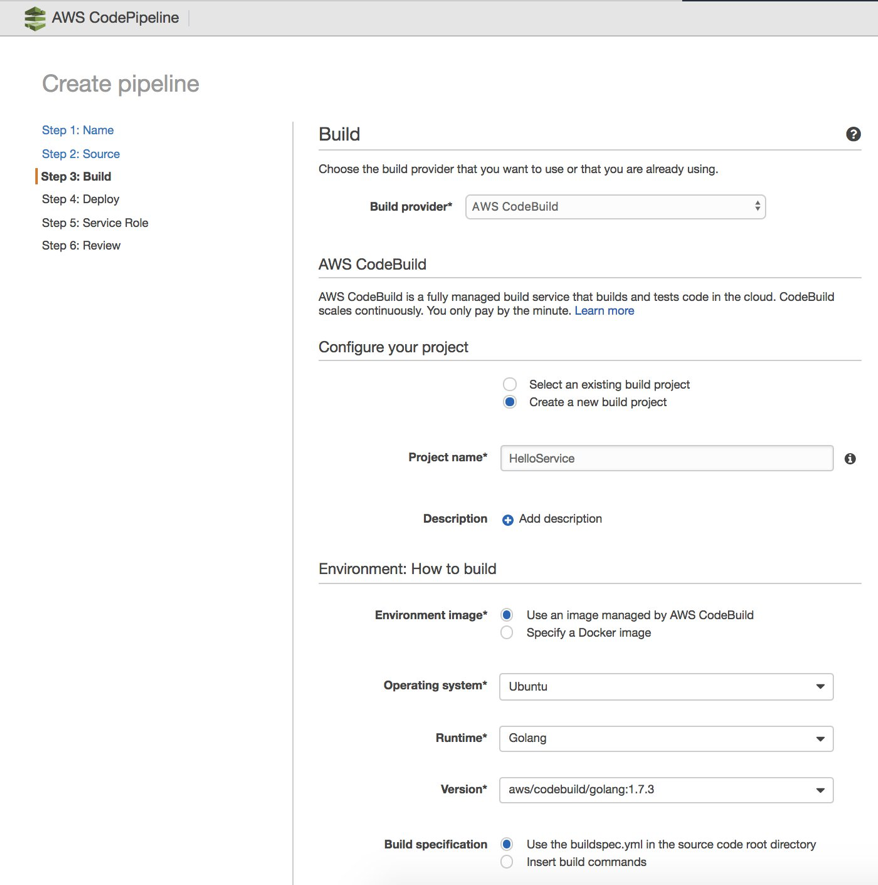
Tell CodePipeline to use CodeBuild to test, build, and package your application using the buildspec.yml file created earlier:
Important: CodeBuild needs read/write access to the S3 bucket referenced in the buildspec.yml file that you wrote. It places the packaged Lambda deployment package into S3 after the tests and build are completed. Make sure that the CodeBuild service role created or provided has the correct IAM permissions. For more information, see Writing IAM Policies: How to grant access to an Amazon S3 bucket. If you don’t do this, CodeBuild fails.
Finally, set up the deployment stage of your pipeline. Select AWS CloudFormation as the deployment method, and the Create or replace a change set mode (as required by SAM). To deploy multiple environments (for example, staging, production), add additional deployment stages to your pipeline after it has been created.
After being created, your pipeline takes a few minutes to initialize, and then automatically triggers. You can see the latest commit in your version control system make progress through the build and deploy stages of your pipeline.
You do not need to configure anything further to automatically run your pipeline on new version control commits. It already automatically triggers, builds, and deploys each time.
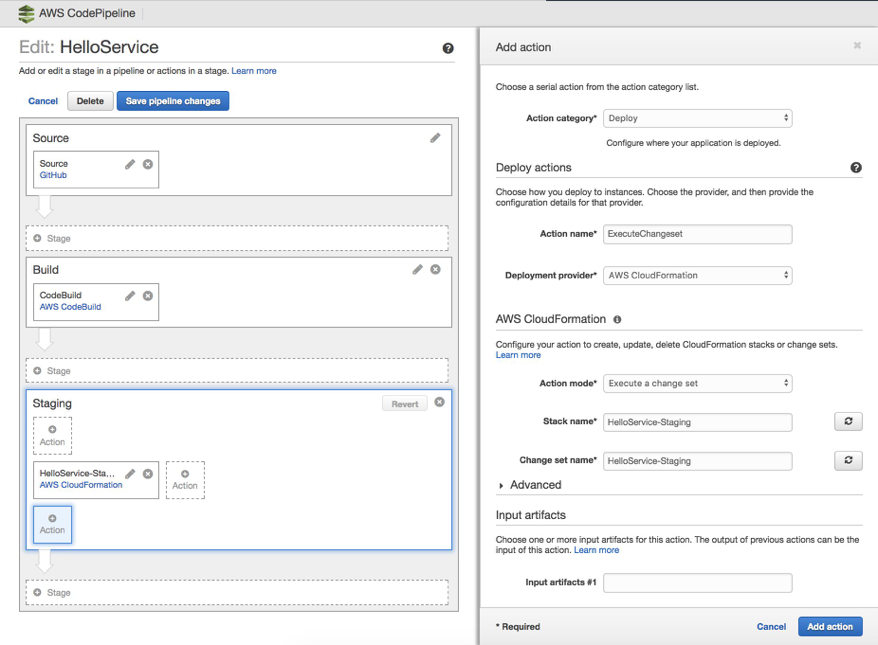
Make one final change to the pipeline, to configure the deployment stage to execute the CloudFormation changeset that it creates. To make this change, choose the Edit button on your pipeline, choose the pencil icon on the staging deployment stage, and add a new action:
After the action is added, save your pipeline. You can test it by making a small change to your Lambda function, and then committing it back to version control. You can see your pipeline trigger, and the changes get deployed to your staging environment.
See it in Action
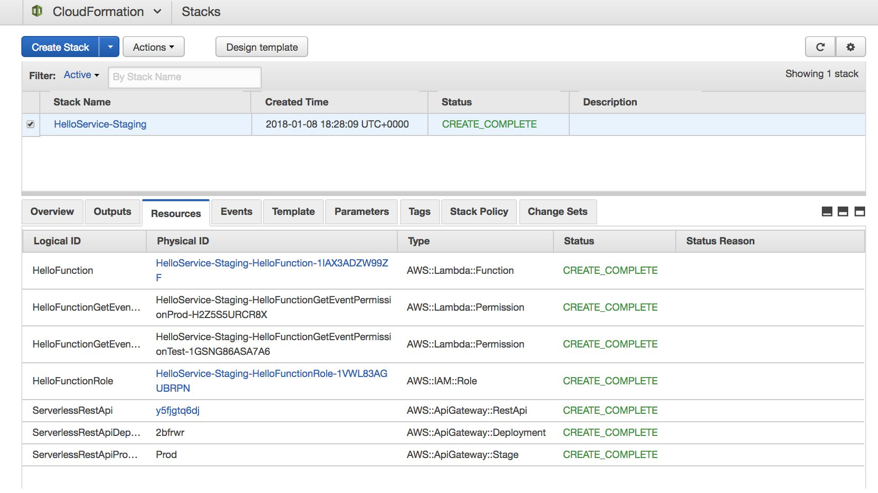
After a successful run of the pipeline has completed, you can navigate to the CloudFormation console to see the deployment details.
In your case, you have a CloudFormation stack deployed. If you look at the Resources tab, you see a table of the AWS resources that have been deployed.
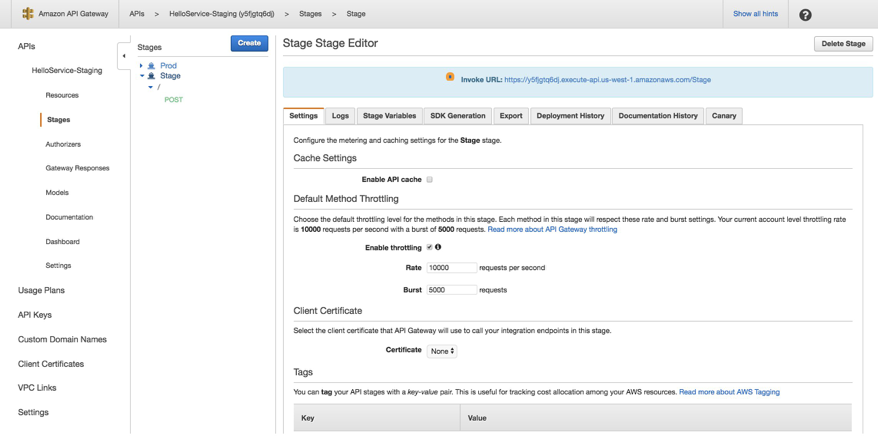
Choose the ServerlessRestApi item link to navigate to the API Gateway console and view the details of your deployed API, including the URL,
You can use cURL to test that your Serverless application is functioning as expected:
$ curl -XPOST -d "Paul" https://y5fjgtq6dj.execute-api.us-west-1.amazonaws.com/Stage
Hello Paul
One more thing!
We are also excited to announce that AWS X-Ray can be enabled in your Lambda runtime to analyze and debug your Go functions written for Lambda. The X-Ray SDK for Go works with the Go context of your Lambda function, providing features such as AWS SDK retry visibility and one-line error capture.

You can use annotations and metadata to capture additional information in X-Ray about your function invocations. Moreover, the SDK supports the net/http client package, enabling you to trace requests made to endpoints even if they are not X-Ray enabled.
Wrapping it up!
Support for Go has been a much-requested feature in Lambda and we are excited to be able to bring it to you. In this post, you created a basic Go-based API and then went on to create a full continuous integration and delivery pipeline that tests, builds, and deploys your application each time you make a change.
You can also get started with AWS Lambda Go support through AWS CodeStar. AWS CodeStar lets you quickly launch development projects that include a sample application, source control and release automation. With this announcement, AWS CodeStar introduced new project templates for Go running on AWS Lambda. Select one of the CodeStar Go project templates to get started. CodeStar makes it easy to begin editing your Go project code in AWS Cloud9, an online IDE, with just a few clicks.
Excited about Go in Lambda or have questions? Let us know in the comments here, in the AWS Forums for Lambda, or find us on Twitter at @awscloud.


