Containers
Deep Dive on AWS App Runner Private Services
AWS App Runner is a fully managed service for running web applications and API servers. App Runner simplifies the experience to build and run secure web applications with little to no infrastructure in your account. You provide the source code or a container image, and App Runner builds and deploys your application containers for you, automatically scaling and load-balancing requests across them behind the scenes. Once deployed, your App Runner service will get a service URL where your clients can send HTTPS requests to.
Today, App Runner announced support for private services, enabling private access to App Runner services from within an Amazon Virtual Private Cloud (VPC). By default, your App Runner service endpoint is accessible over the internet. Now, you can choose a private endpoint for your App Runner service which makes the service URL accessible only in your VPCs. This feature is powered by an AWS PrivateLink interface VPC endpoint. This blog post provides an overview of App Runner networking configurations and details of how the incoming traffic flows privately from your VPC to the App Runner service. We will demonstrate the functionality with a demo application.
App Runner Networking Overview
When App Runner first launched, it provided a public endpoint for incoming traffic and a public networking mode for outgoing traffic. It allowed incoming traffic to the App Runner service only from the public internet and on the outgoing traffic side, the application could only connect to public endpoints (Figure 1).

Figure 1: Architecture diagram showing an App runner service with public incoming and public outgoing traffic
Earlier this year we announced the general availability of App Runner VPC support which enabled your services to communicate with private resources such as databases and other services hosted in your Amazon Virtual Private Cloud (Amazon VPC) for outgoing traffic (Figure 2).
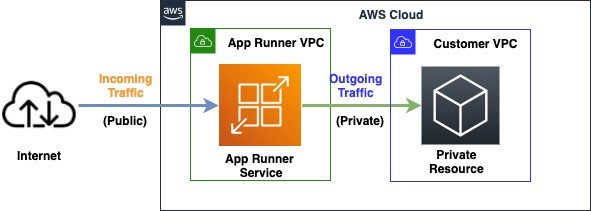
Figure 2: Architecture diagram showing an App runner service with public incoming and private outgoing traffic
Today’s launch provides additional functionality with the ability to access App Runner services using private endpoints in your own VPC. This allows you to securely expose the service to other services and resources inside your VPC, while using all of the other App Runner features (Figure 3).
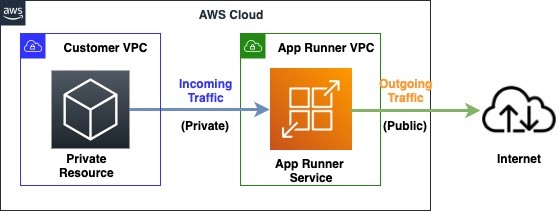
Figure 3: Architecture diagram showing an App runner service with private incoming and public outgoing traffic
This new feature together with the previously released App Runner VPC support feature (Figure 2) allows you to build an architecture where both the incoming traffic to your application, as well as outgoing traffic from your application can be private and secure (Figure 4).
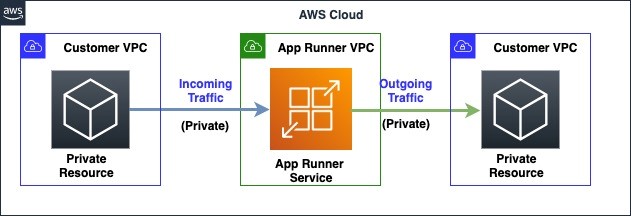
Figure 4: Architecture diagram showing an App runner service with private incoming and private outgoing traffic
Private Services Traffic Routing
App Runner private services feature is powered by an AWS PrivateLink interface endpoint which provides private connectivity from your VPC to the App Runner service. For a private App Runner service, the service URL resolves to the private IP addresses of the VPC interface endpoint. Within the VPC, the traffic flows from the VPC interface endpoint to the App Runner service, and cannot be accessed via the public internet.
To create a VPC interface endpoint, you need to configure subnets and security groups. Within each configured subnet, an Elastic Network Interface (ENI) is provisioned through which the traffic flows to the App Runner service, eliminating the need for an internet gateway or NAT gateway. You can control the availability of the private connection to your private App Runner service by configuring the subnets of the VPC interface endpoint. Our recommendation is to provide at least 2 subnets spread across multiple Availability Zones (AZ) in your VPC. Security groups attached to the VPC interface endpoint control which services or resources within the VPC can access an App Runner service. For more information about endpoint limits, please refer to Interface VPC Endpoints. Here is the picture depicting how the request flows from your VPC to the App Runner service via the VPC interface endpoint (Figure 5).
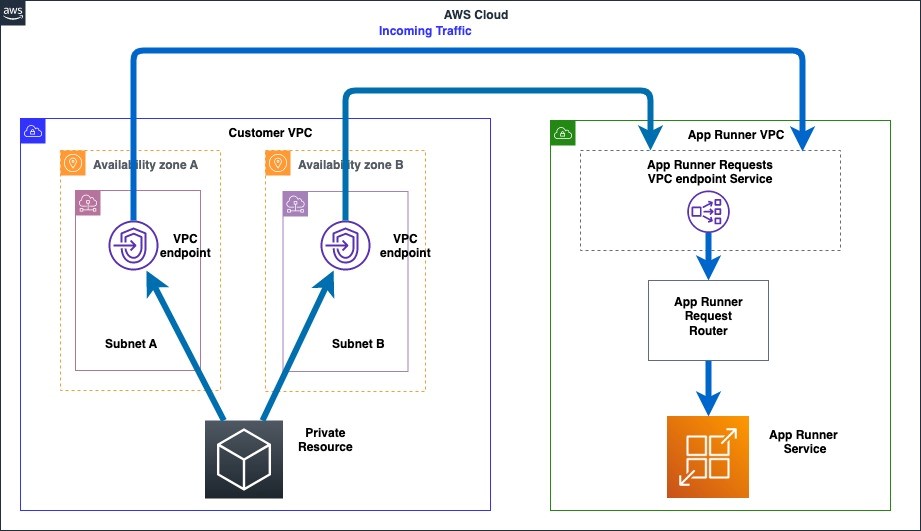
Figure 5: Architecture diagram showing request routing from customer VPC to the private App Runner service
Multiple App Runner services can be configured to be accessed privately in a VPC using the same VPC interface endpoint (Figure 6).
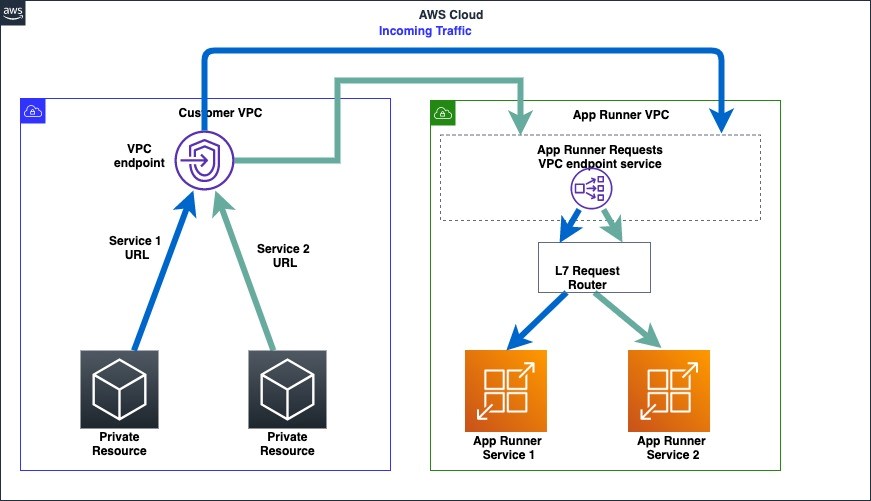
Figure 6: Architecture diagram showing request routing for 2 private App Runner services from a customer VPC
Sample Leaderboard Application
Gaming leaderboards enable players to gauge their performance against each other. Leaderboards are generally read-heavy applications which players constantly check to view the latest rankings. We will separate the UI part of the application from the backend part which is responsible for rankings calculation. In this blog post, we will build a gaming leaderboard application using two microservices hosted on App Runner.
The first microservice is a frontend UI application which has a public endpoint and the second microservice is a backend application which has a private endpoint. The frontend application communicates with the backend application to retrieve leaderboard data and displays that to the user. It has the networking configuration as described in Figure 2. The backend application retrieves the leaderboard data by communicating with an Amazon ElastiCache Redis cluster in a VPC and has the networking configuration as described in Figure 4. Here is the networking architecture that the sample application will setup (Figure 7).
- The incoming traffic will enter the public frontend service
- The frontend service communicates through a private connection to your VPC
- The backend service is configured to receive traffic from your VPC
- The backend service will retrieve data from the ElastiCache Redis cluster in your VPC
- The ElastiCache Redis cluster returns the data to the backend service
- The backend service will provide the response to the frontend service
- The frontend service will provide the response to the user
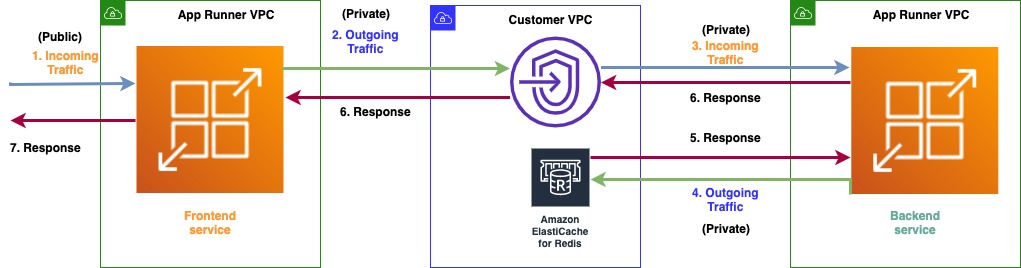
Figure 7: Architecture diagram showing the networking setup for the leaderboard application
Prerequisites
- A VPC in a region of your choice (you can also use an existing VPC in your account) and for the purposes of this blog post we will be using the N. Virginia (us-east-1) region
ElastiCache Redis Cluster setup
1. To set up an ElastiCache Redis cluster, go to the ElastiCache Console and select Create Redis Cluster. Enter the desired name of cluster, set port as 9000, leave other settings as default and go to Subnet Group Settings.
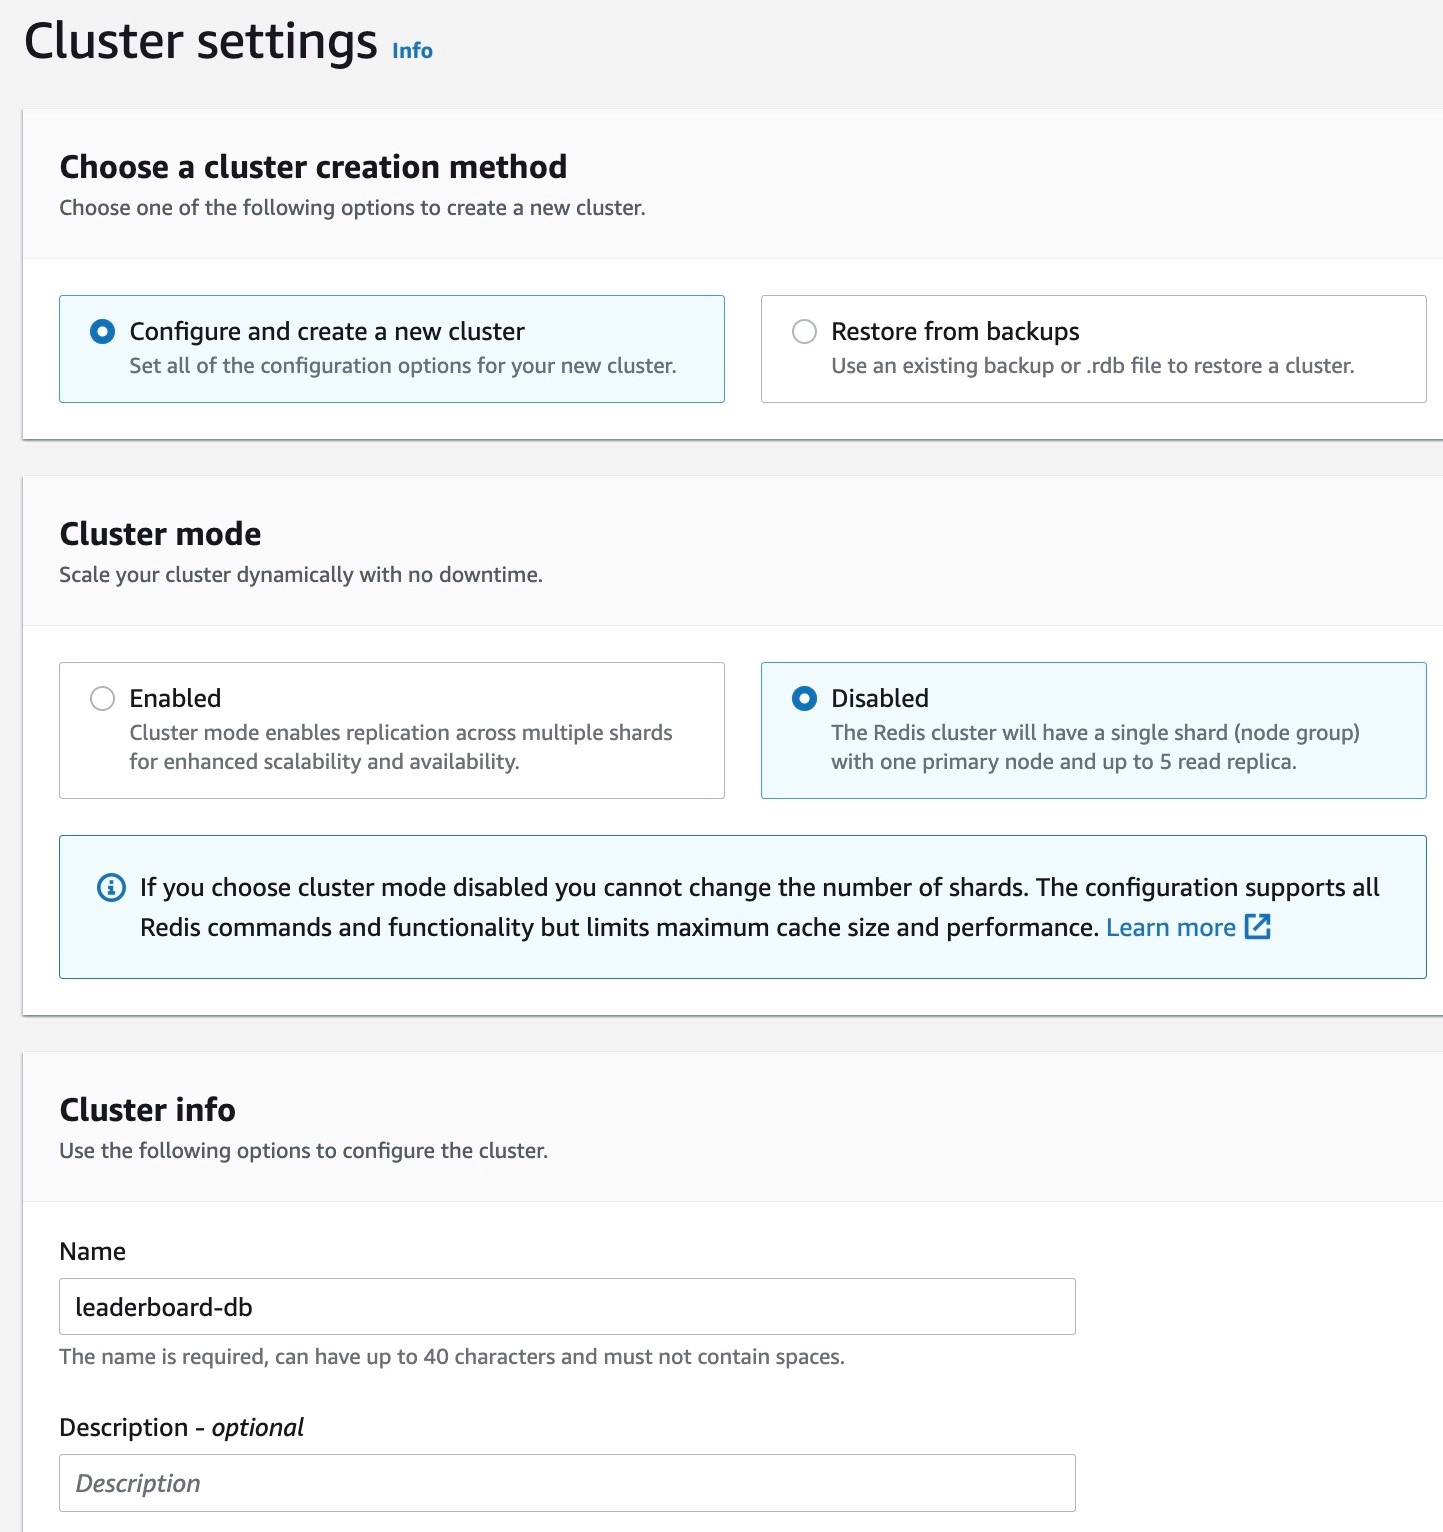
Figure 8: Console screenshot to configure the name for an ElastiCache Redis cluster
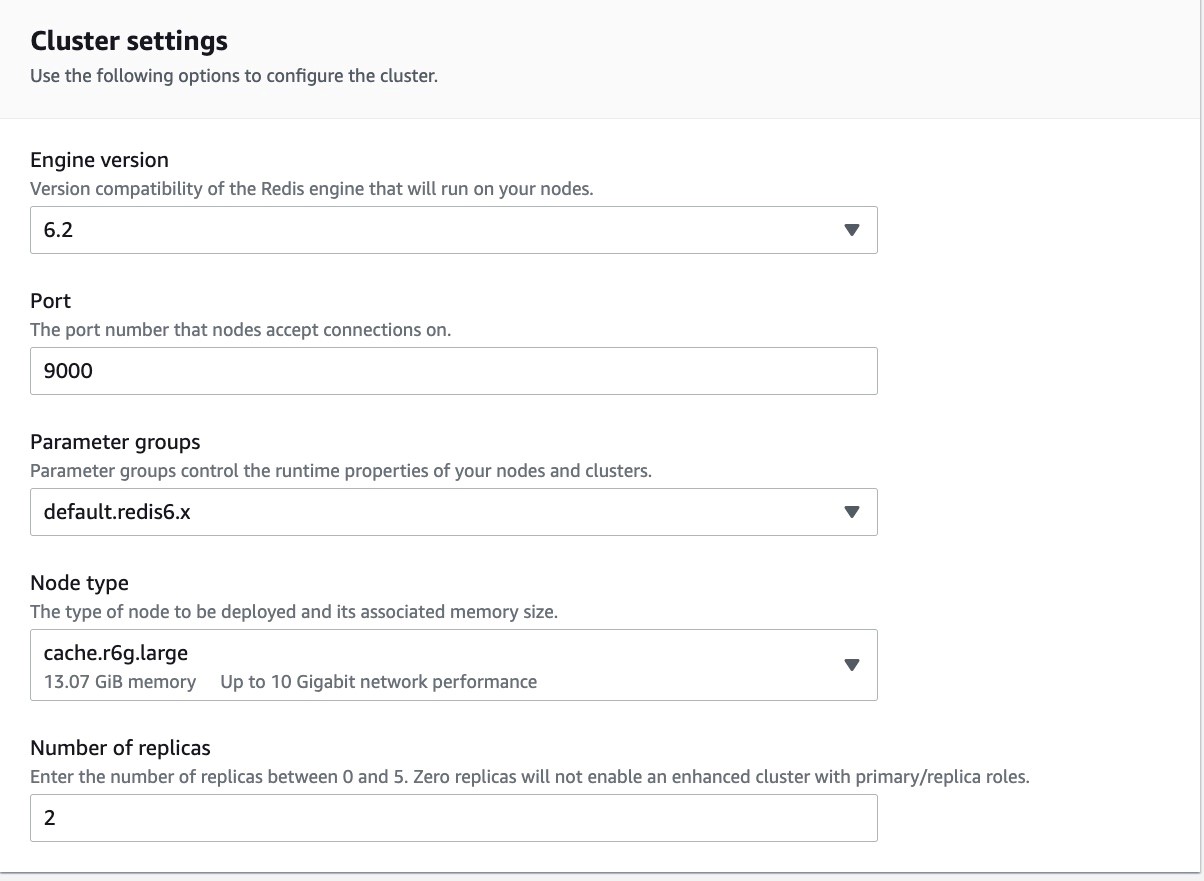
Figure 9: Console screenshot to configure the port for an ElastiCache Redis cluster
2. Within the Subnet group Settings section, select “Create a new subnet group”, choose a VPC and subnets within that VPC. Make sure to select at least 2 subnets from different availability zones for high availability.

Figure 10: Console screenshot to configure the VPCs and subnets for an ElastiCache Redis cluster
3. Leave everything as default on the console and select Enable encryption and configure security groups under Advanced Configuration. Select the default VPC security group. Keep all other settings as default and create the ElastiCache Redis cluster.
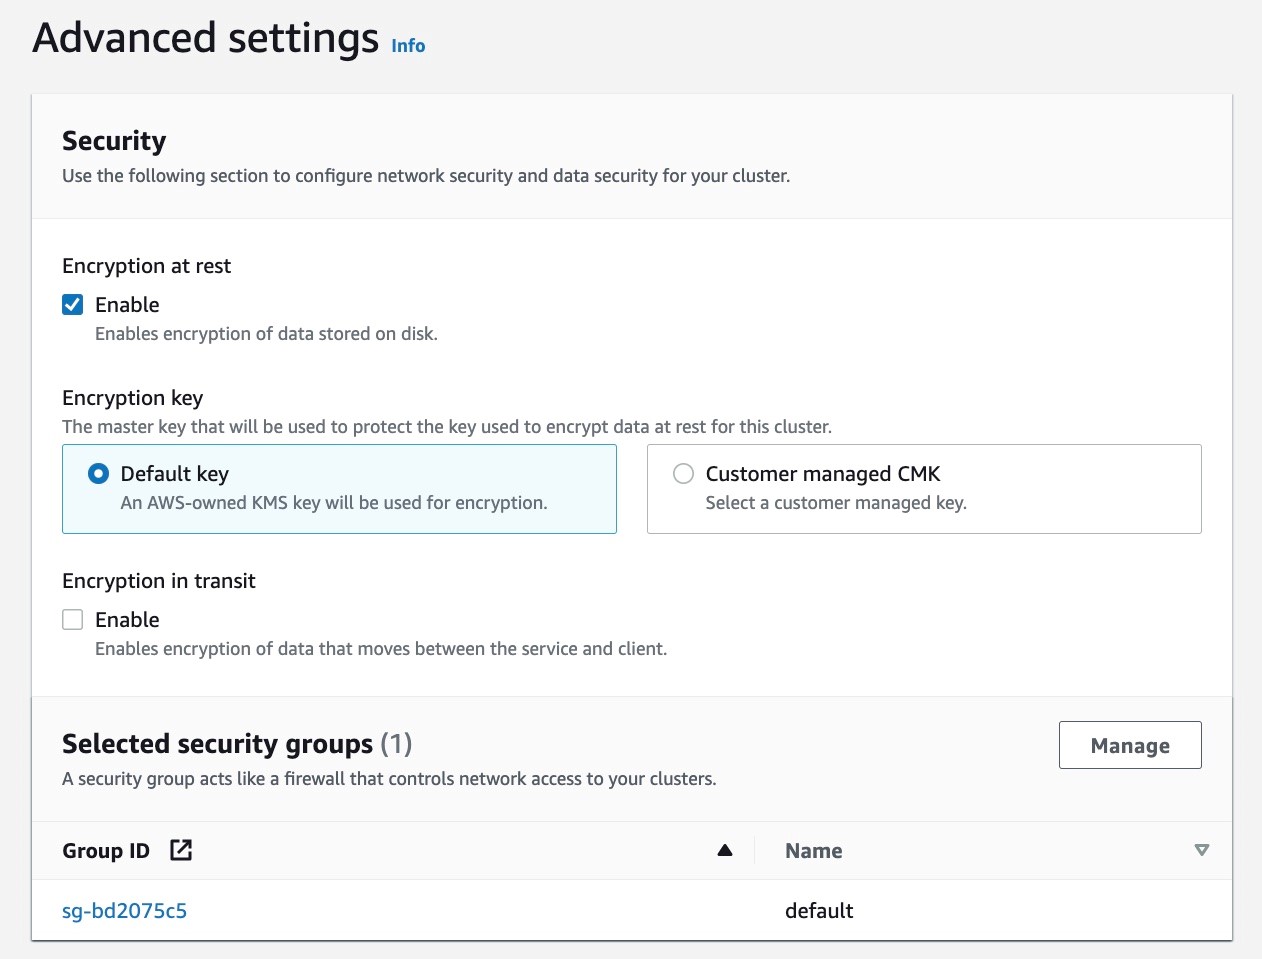
Figure 11: Console screenshot to enable encryption and configure the security groups for an ElastiCache Redis cluster
4. The picture below shows the configuration of the ElastiCache Redis cluster. Note down the Primary endpoint as it will be used in a later step.
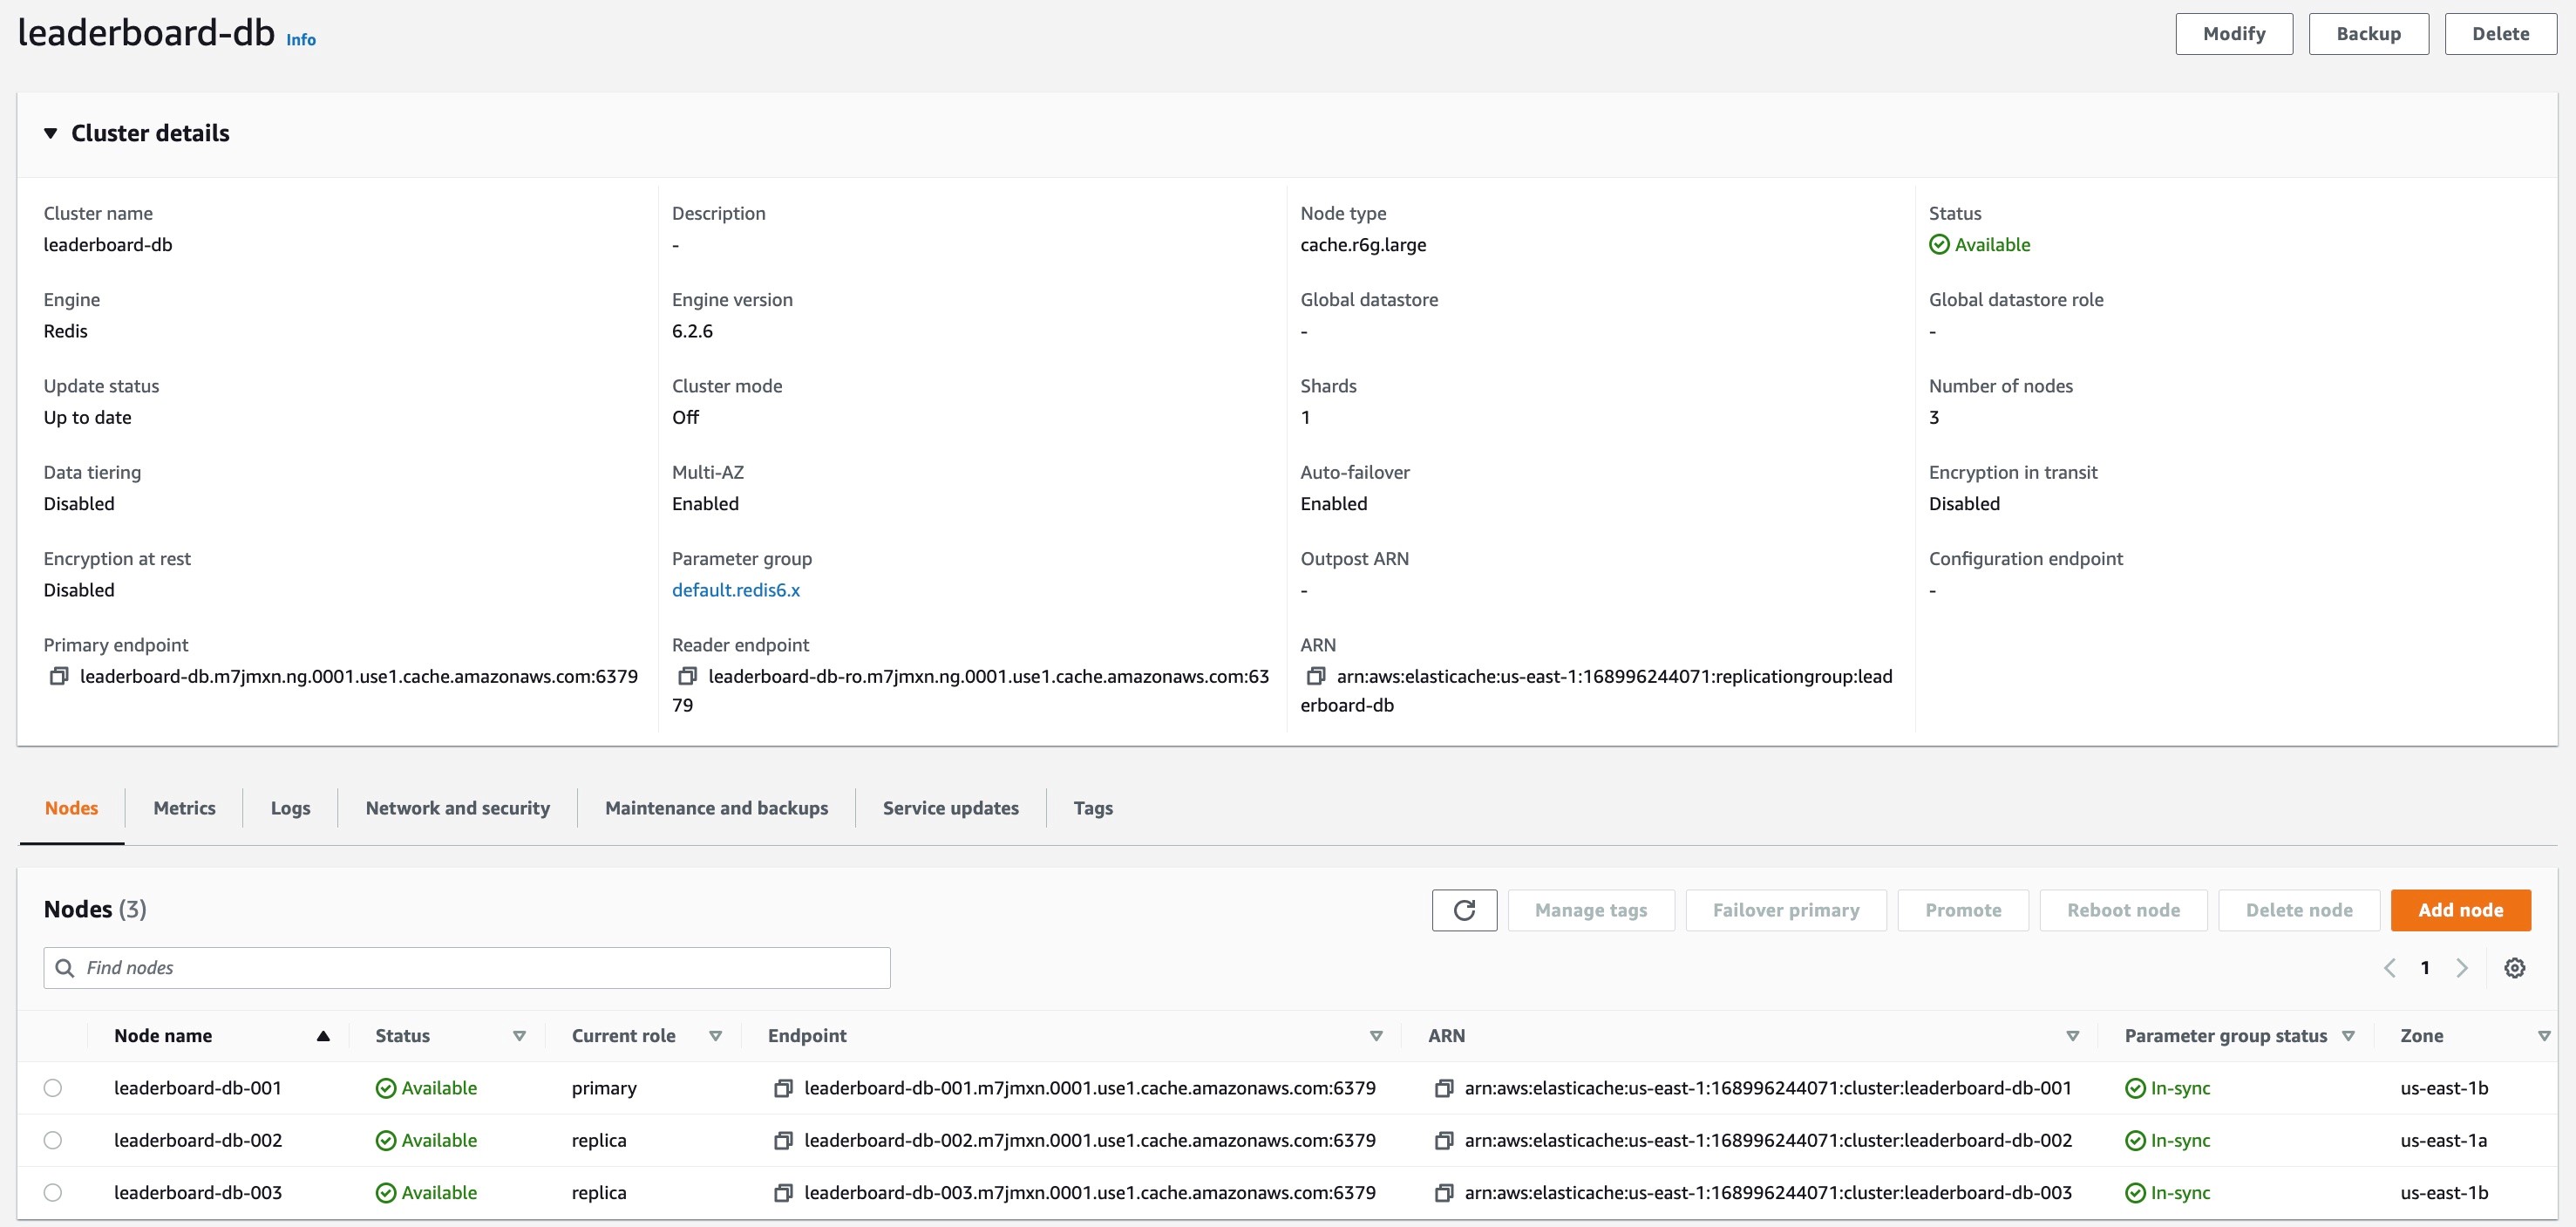
Figure 12: Console screenshot for an overview of an ElastiCache Redis cluster configuration
5. Let’s populate some data into the ElastiCache Redis cluster for the backend application. Set up a Redis CLI on an EC2 instance within the same VPC as the ElastiCache Redis cluster following the instructions here. Now connect to the Redis cluster from the EC2 instance and populate data with the names and ids of players playing the leaderboard game by running the following commands using the Redis CLI.
Backend application setup
Now we will set up the backend application on App Runner which privately communicates with the ElastiCache Redis cluster in your VPC. We will use the newly released private services feature and will have a private endpoint for the backend service. This private endpoint will be used by the frontend service to access the private backend service.
The source code for this application can be accessed here. The app.js exposes a path /getdata which retrieves the player ids from ElastiCache Redis cluster, generates their scores, and returns the data as part of the response.
1. Set up the service with Repository Type as Source Code repository. We will use a GitHub Connection to access the source code and select the Repository and Branch for this service. In case you don’t have any existing connection, go through the Add new flow in App Runner console to create a new GitHub connection.
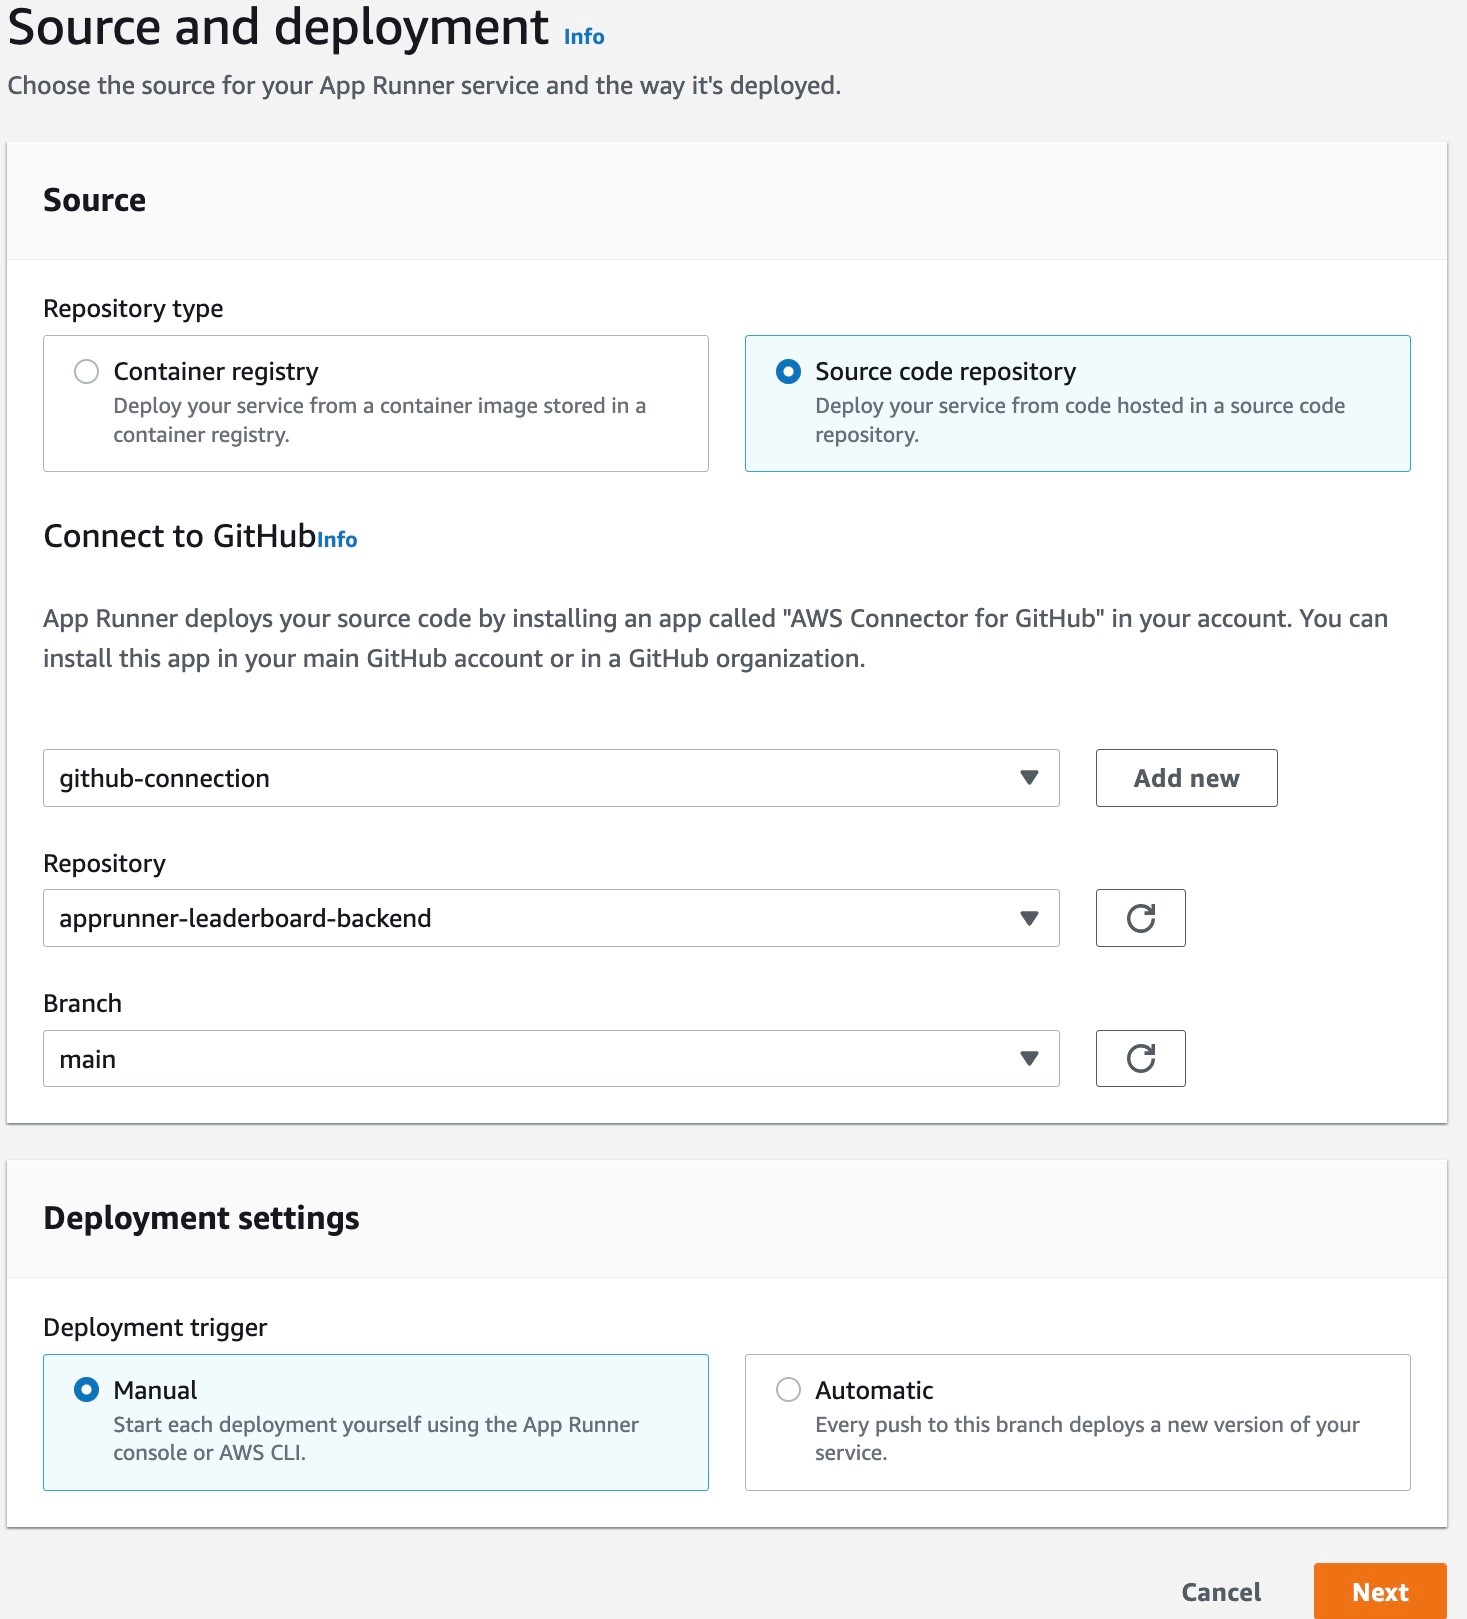
Figure 13: Console screenshot to configure the name and GitHub connection for an App Runner service
2. Select Python 3 as the Runtime, pip install -r requirements.txt as the Build Command, gunicorn server:app –-log-level=debug as the Start Command and Port 8000 for the service.
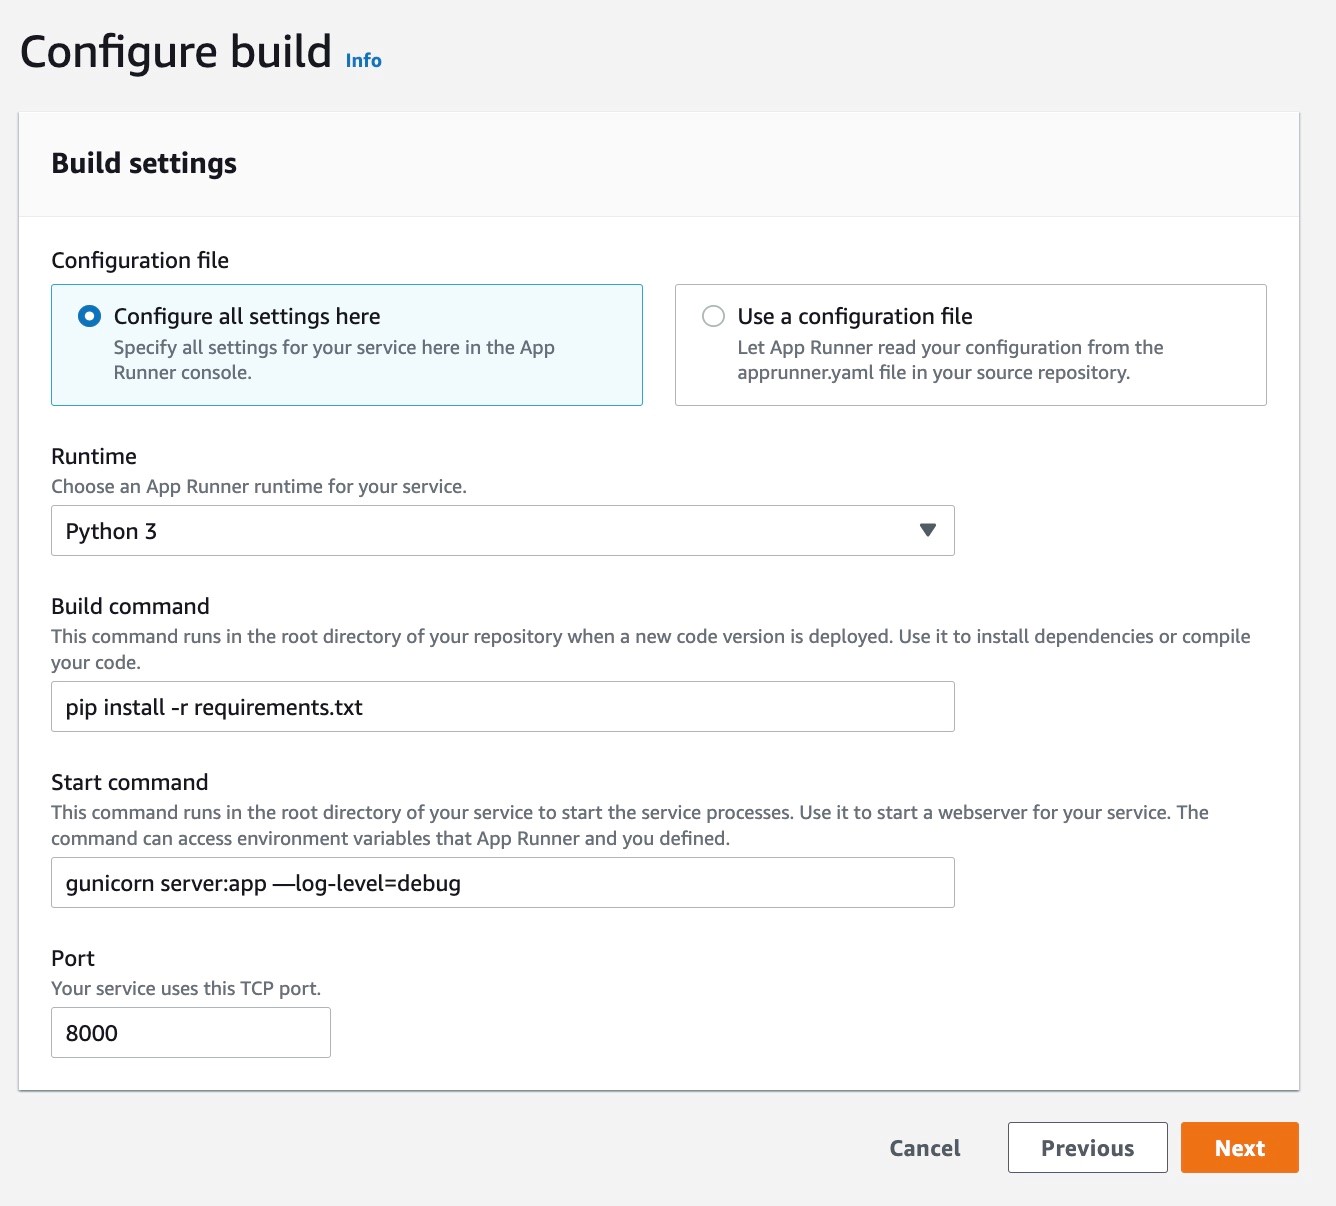
Figure 14: Console screenshot to configure the Runtime, Build and Start Commands for an App Runner service
3. Name the service as leaderboard-backend-service, and add REDIS_URL as an environment variable. REDIS_URL stores primary endpoint for the ElastiCache Redis cluster which is used by this service for communication. You can get this URL from Primary endpoint of the ElastiCache Redis cluster which we configured above in the ElastiCache Redis Cluster Setup section in Step 4.
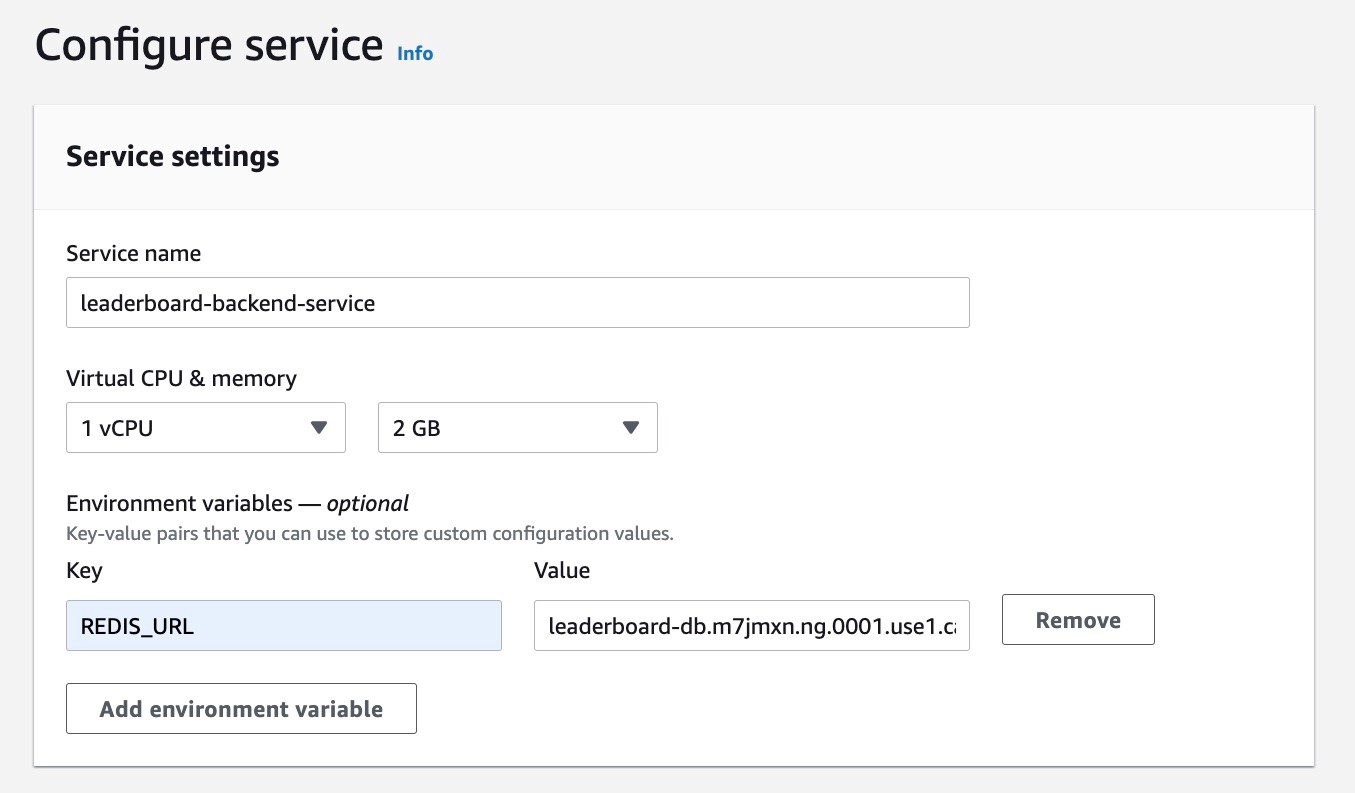
Figure 15: Console screenshot to configure the service name and environment variables for an App Runner service
4. Keep the defaults for the following sections and jump to the Networking section. Select the Private endpoint and create a new VPC interface endpoint. Select the VPC, subnets and security groups for the VPC interface endpoint in the same VPC where the frontend service will communicate privately to backend service. In case you already have an existing VPC interface endpoint you can use that as well.
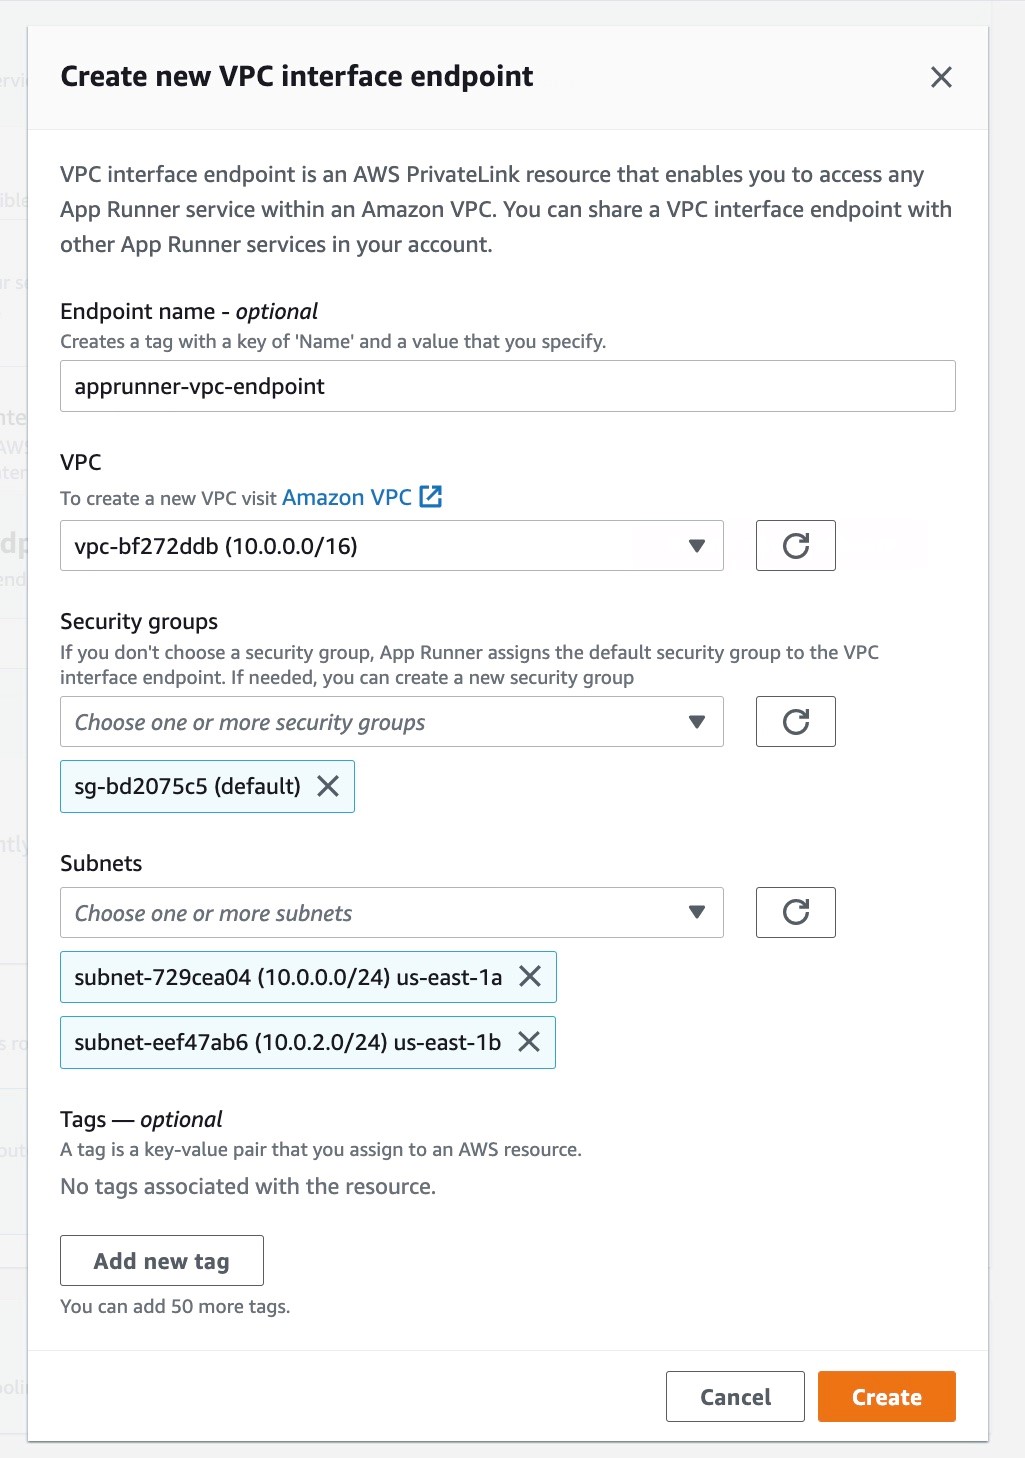
Figure 16: Console screenshot to create a VPC interface endpoint for a private App Runner service
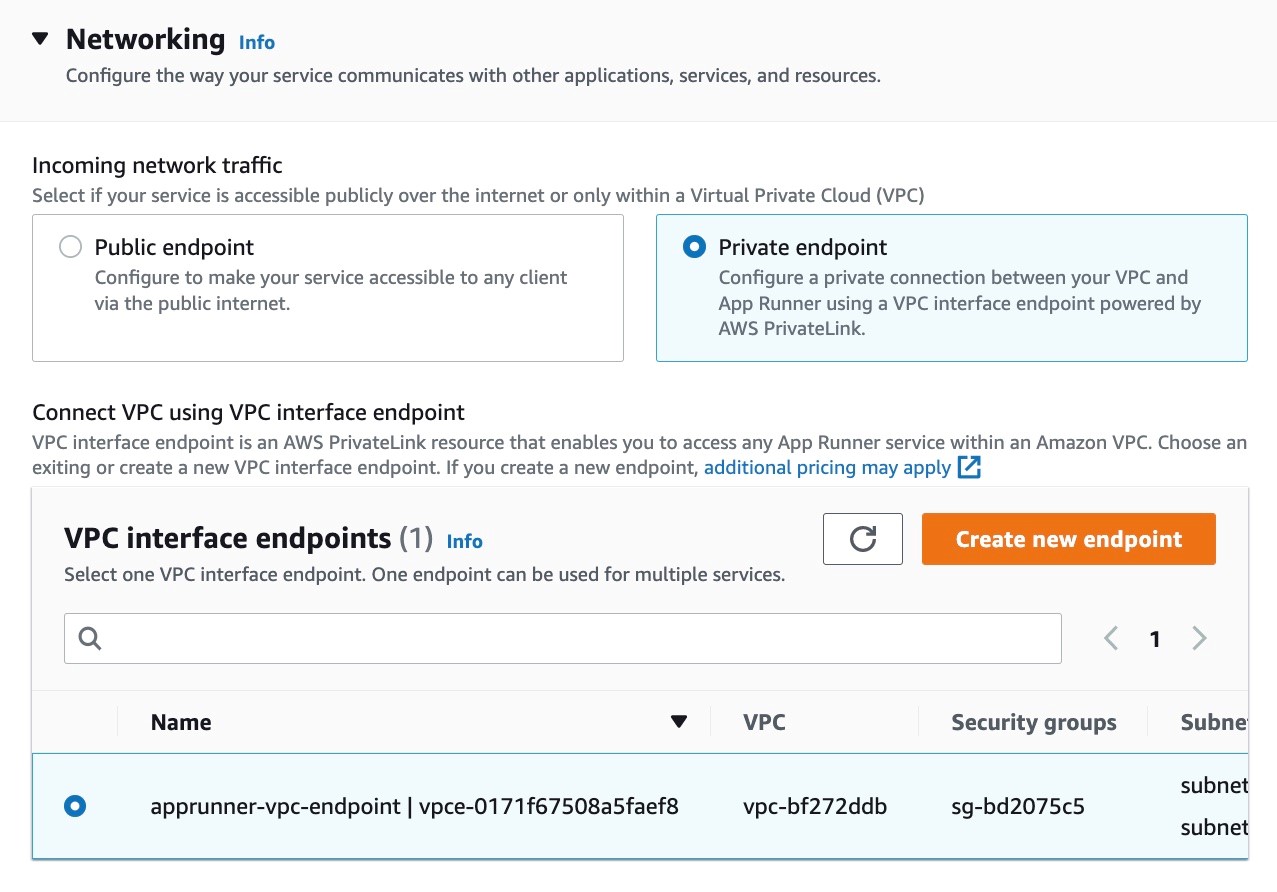
Figure 17: Console screenshot to configure the incoming traffic for an App Runner service
5. Configure the outgoing traffic to communicate privately to the ElastiCache Redis cluster in your VPC. Select the Custom VPC option and add a new VPC connector. Configure the VPC, subnets and security groups for this connector. This is the same VPC where we deployed the ElastiCache Redis cluster. For simplicity, we use the same subnets and security groups in all configurations.

Figure 18: Console screenshot to create a new VPC connector for an App Runner service
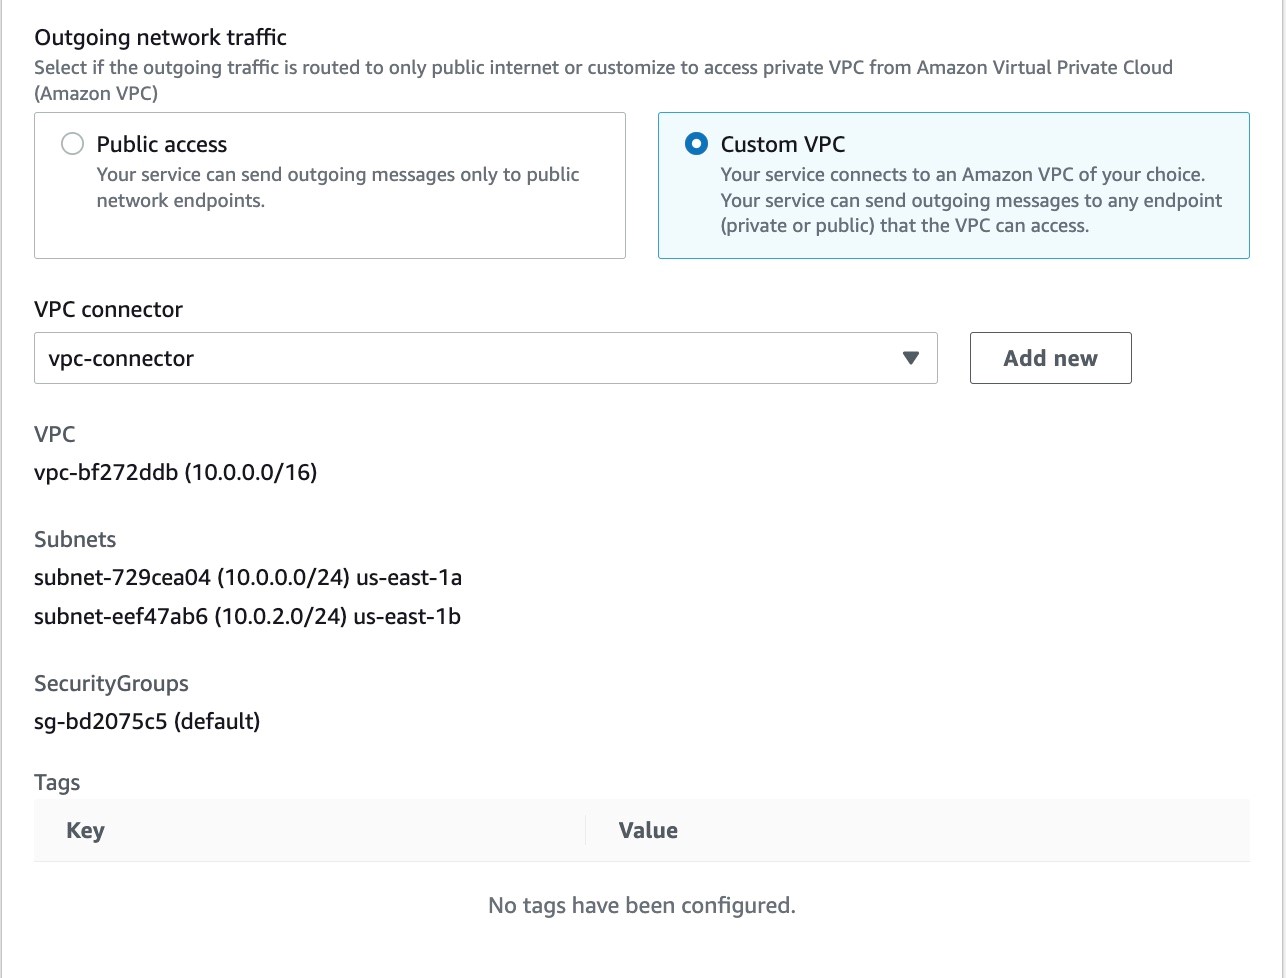
Figure 19: Console screenshot to configure the outgoing traffic of an App Runner service
6. Keep the defaults for the following sections, review it, and select Create & deploy to create the backend service. The picture below shows the configuration overview of the backend service. Note the service URL from the Default domain value as it will be used in the frontend application setup.
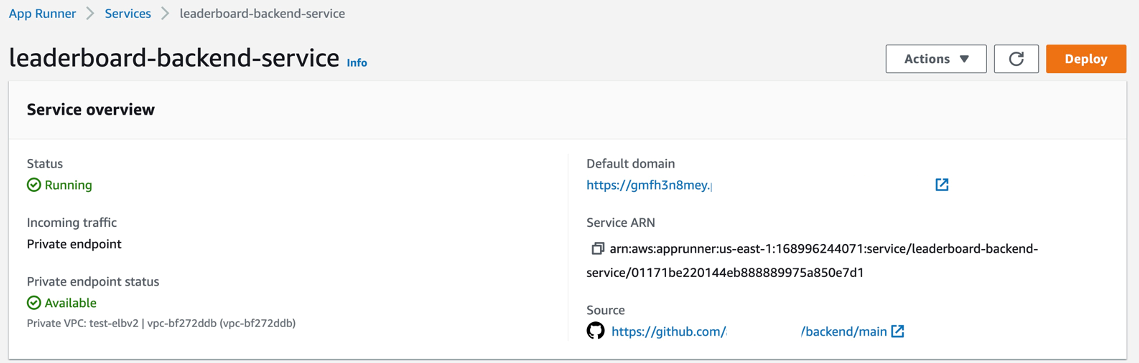
Figure 20: Console screenshot for an overview of an App Runner service configuration
Frontend application setup
Until this point, we have deployed an ElastiCache Redis cluster with the player ids and names stored in it. We have also deployed a backend service which retrieves the leaderboard data privately from the ElastiCache Redis cluster and has a private endpoint in a VPC.
Now let’s set up the frontend application which displays the leaderboard data on the browser. It requests the backend service and gets the leaderboard data as part of response. The frontend service has a public endpoint and it communicates to the backend service through the VPC connector, sending requests to the private endpoint of the backend service in your VPC. The source code for this application is accessible here.
1. The setup of the frontend service is similar to that of the backend service with a few differences.
Set up the service using the same GitHub connection (from Step 1 in the Backend Application Setup section), with the backend application repository, and branch values. We will also select the same Runtime, Build and Start Commands and the port. We will set the BACKEND_URL environment variable which holds the service URL for the backend service. You can get the service URL from Step 6 from the backend service setup.
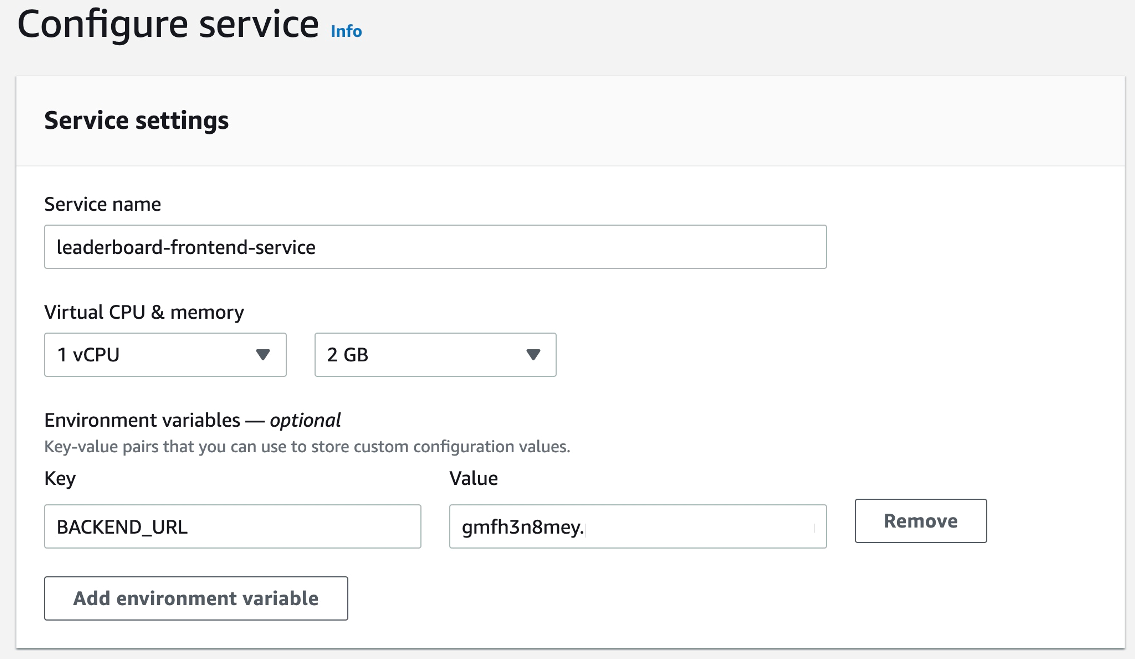
Figure 21: Console screenshot to configure the service name and environment variables for an App Runner service
2. On the networking side, select the Public endpoint for the incoming traffic and the Custom VPC with the VPC connector for outgoing traffic. This is the same VPC where the backend service has a private endpoint.

Figure 22: Console screenshot to configure the incoming and outgoing traffic for an App Runner service
3. Keep going through the console steps and select Create & deploy to create the frontend service.
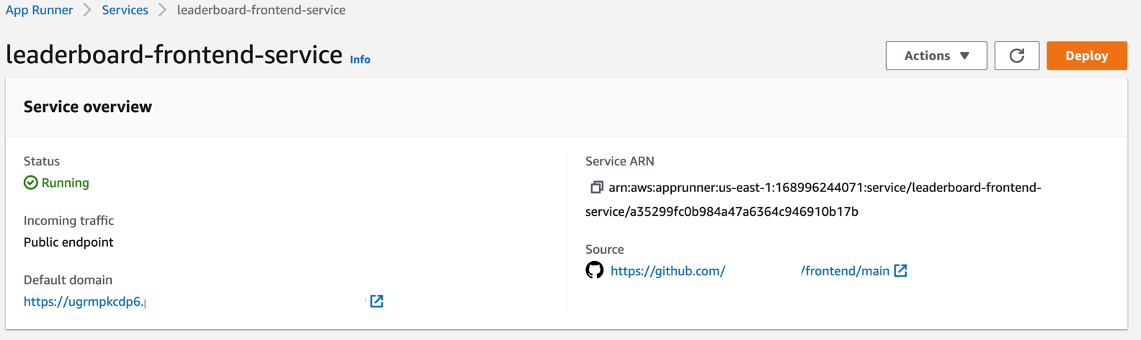
Figure 23: Console screenshot for an overview of an App Runner service configuration
Voila! Get the frontend service URL from the Default domain name from the Service Overview and open it in a browser and you will see the below picture.
4. Clicking the Refresh Scores button will make a request to backend service and show the leaderboard data on the browser.
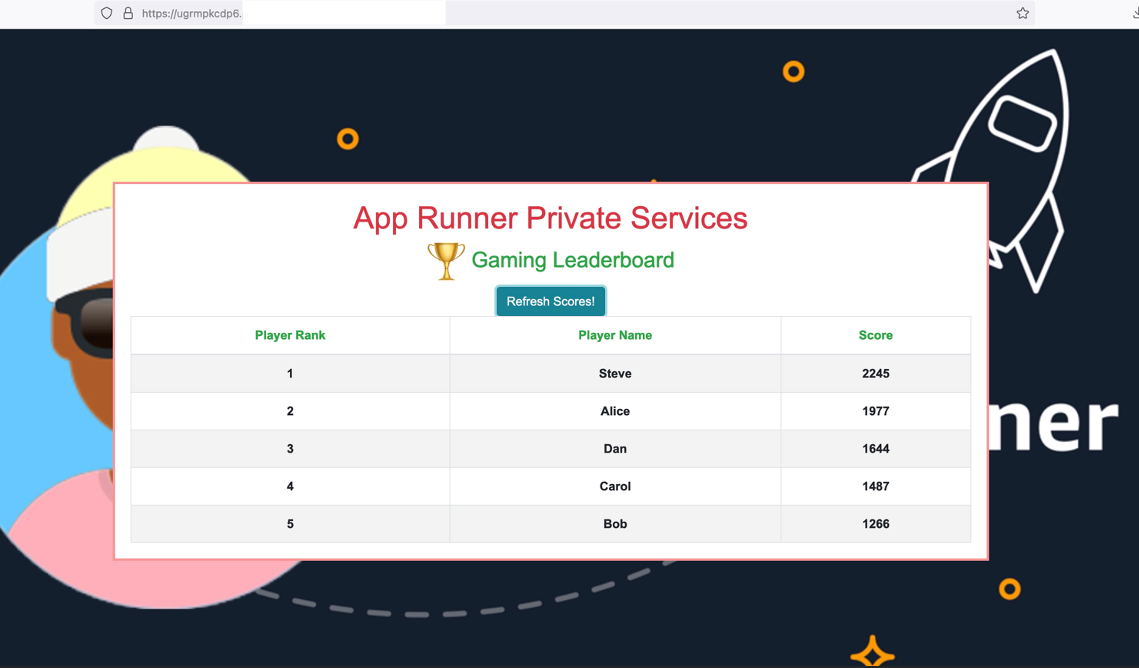
Figure 24: Browser screenshot for accessing an App Runner service
5. Let’s also validate from the application logs of the frontend and backend services to make sure that communication is indeed happening. To find the application logs for your service, go to the Logs tab of the service and select Application logs.
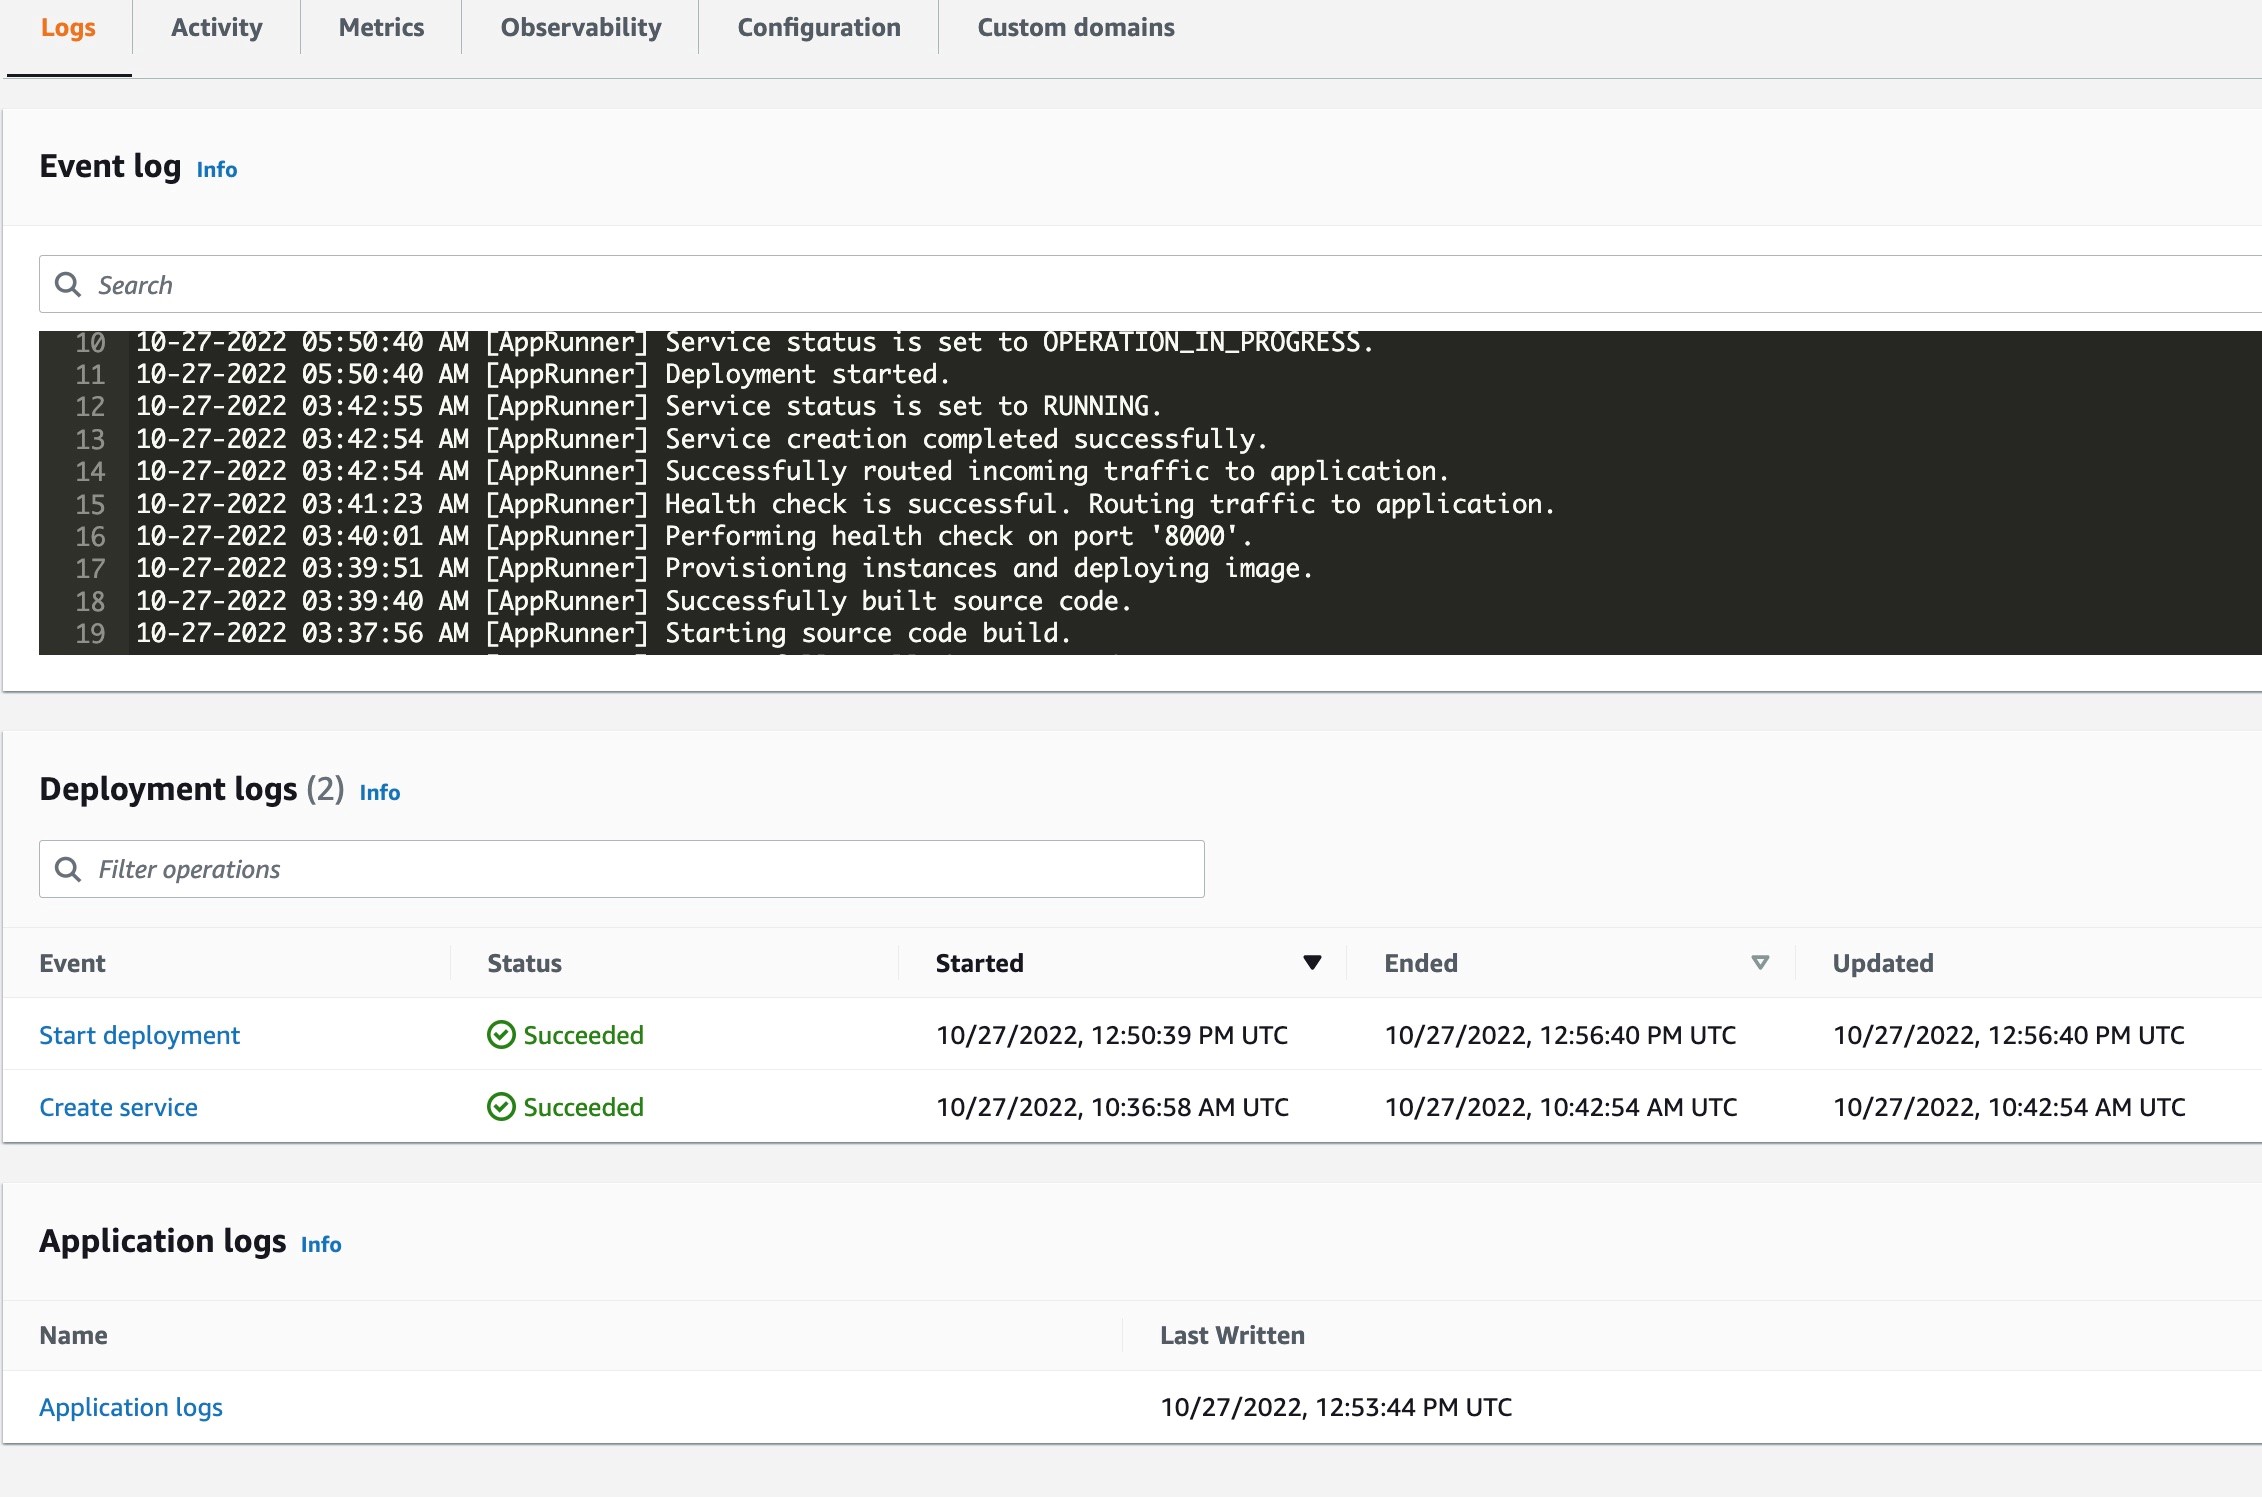
Figure 25: Console screenshot to view logs for an App Runner service
You will find the below snippets in the application logs of frontend and backend services showing how the request is going from the frontend service to the backend service.
Troubleshooting
There are multiple communication paths which are protected by security groups. Make sure that the security groups allow that communication over those paths. For communication between the frontend and the backend service, the VPC interface endpoint security group in your VPC should allow access from security group of the VPC connector which is associated with the frontend service. Similarly for communication between backend service and the ElastiCache Redis cluster, the ElastiCache Redis cluster security group in your VPC should allow access from the security group of the VPC connector associated with backend service. In this demo, we are using the default VPC security group on all services and resources and it allows ingress from itself, making the communication possible on all desired paths.
Cleanup
To remove the resources that you created during this post, please complete the following steps:
1. Delete both the frontend and backend App Runner services.
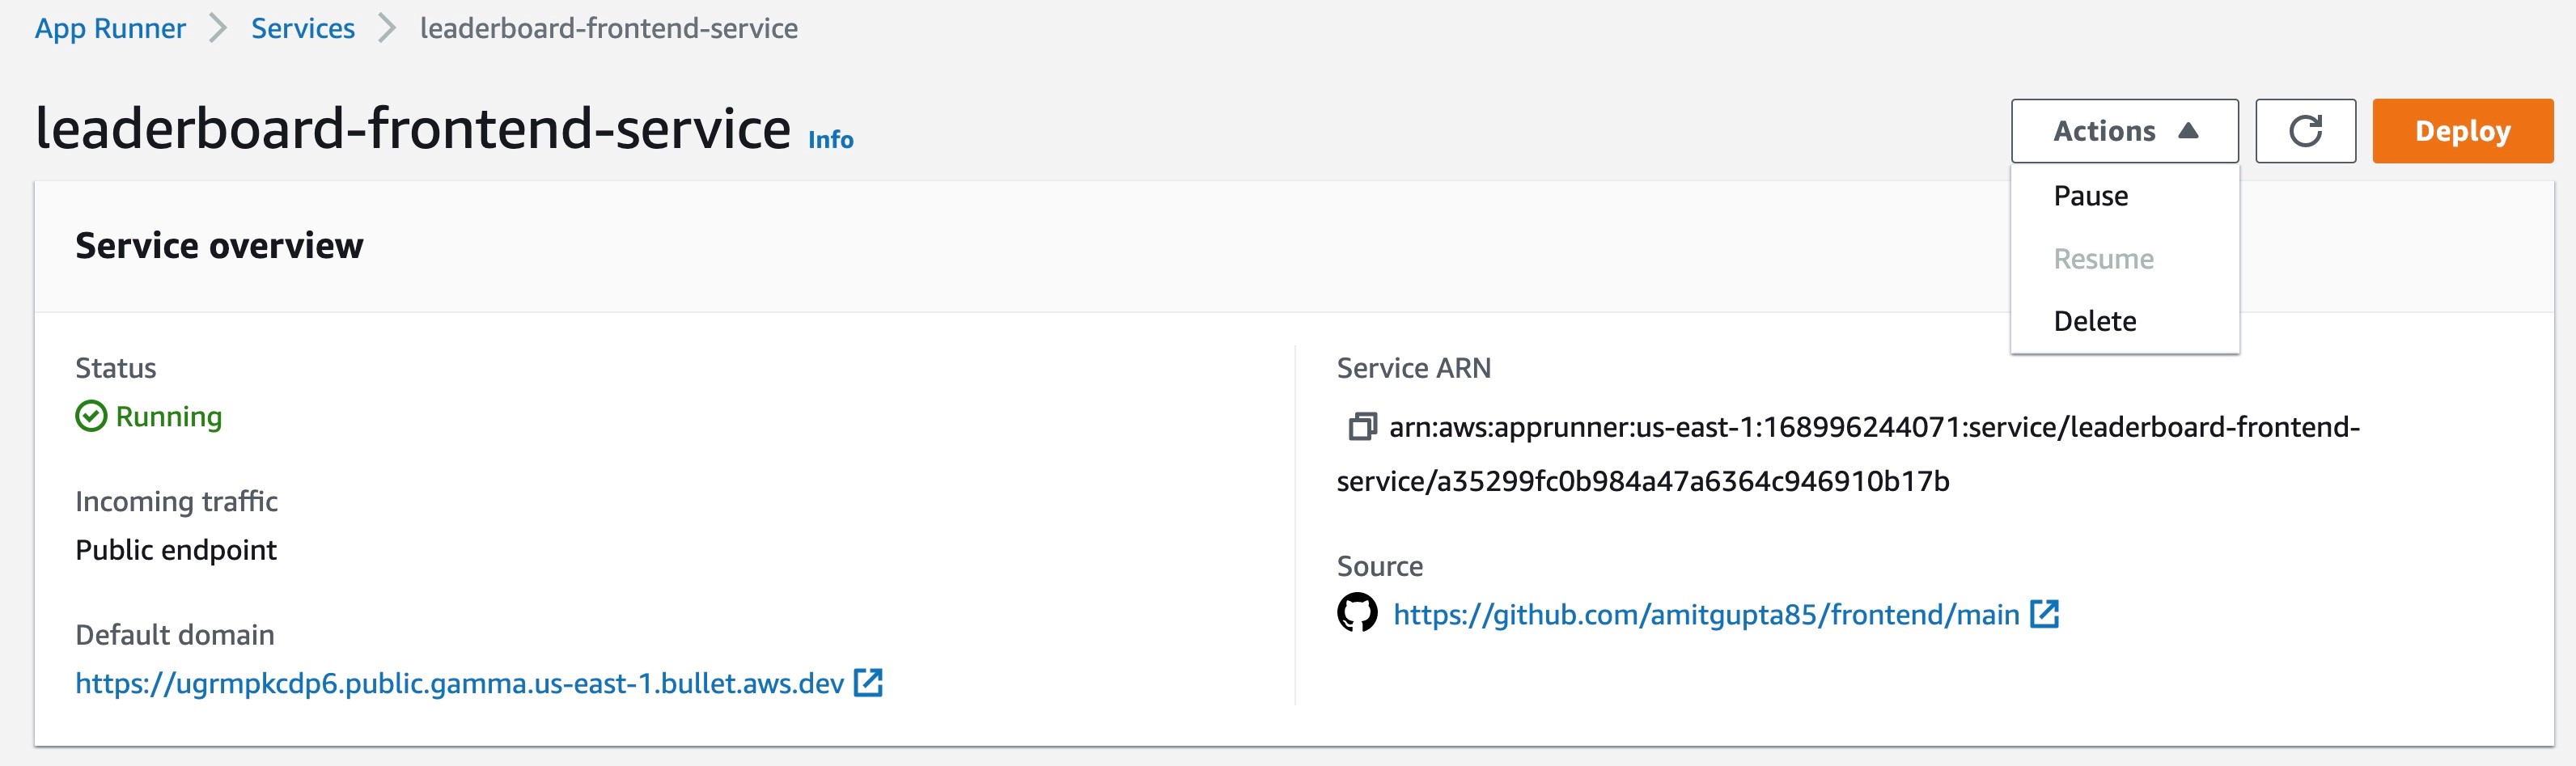
Figure 26: Console screenshot for an overview of the frontend App Runner service configuration
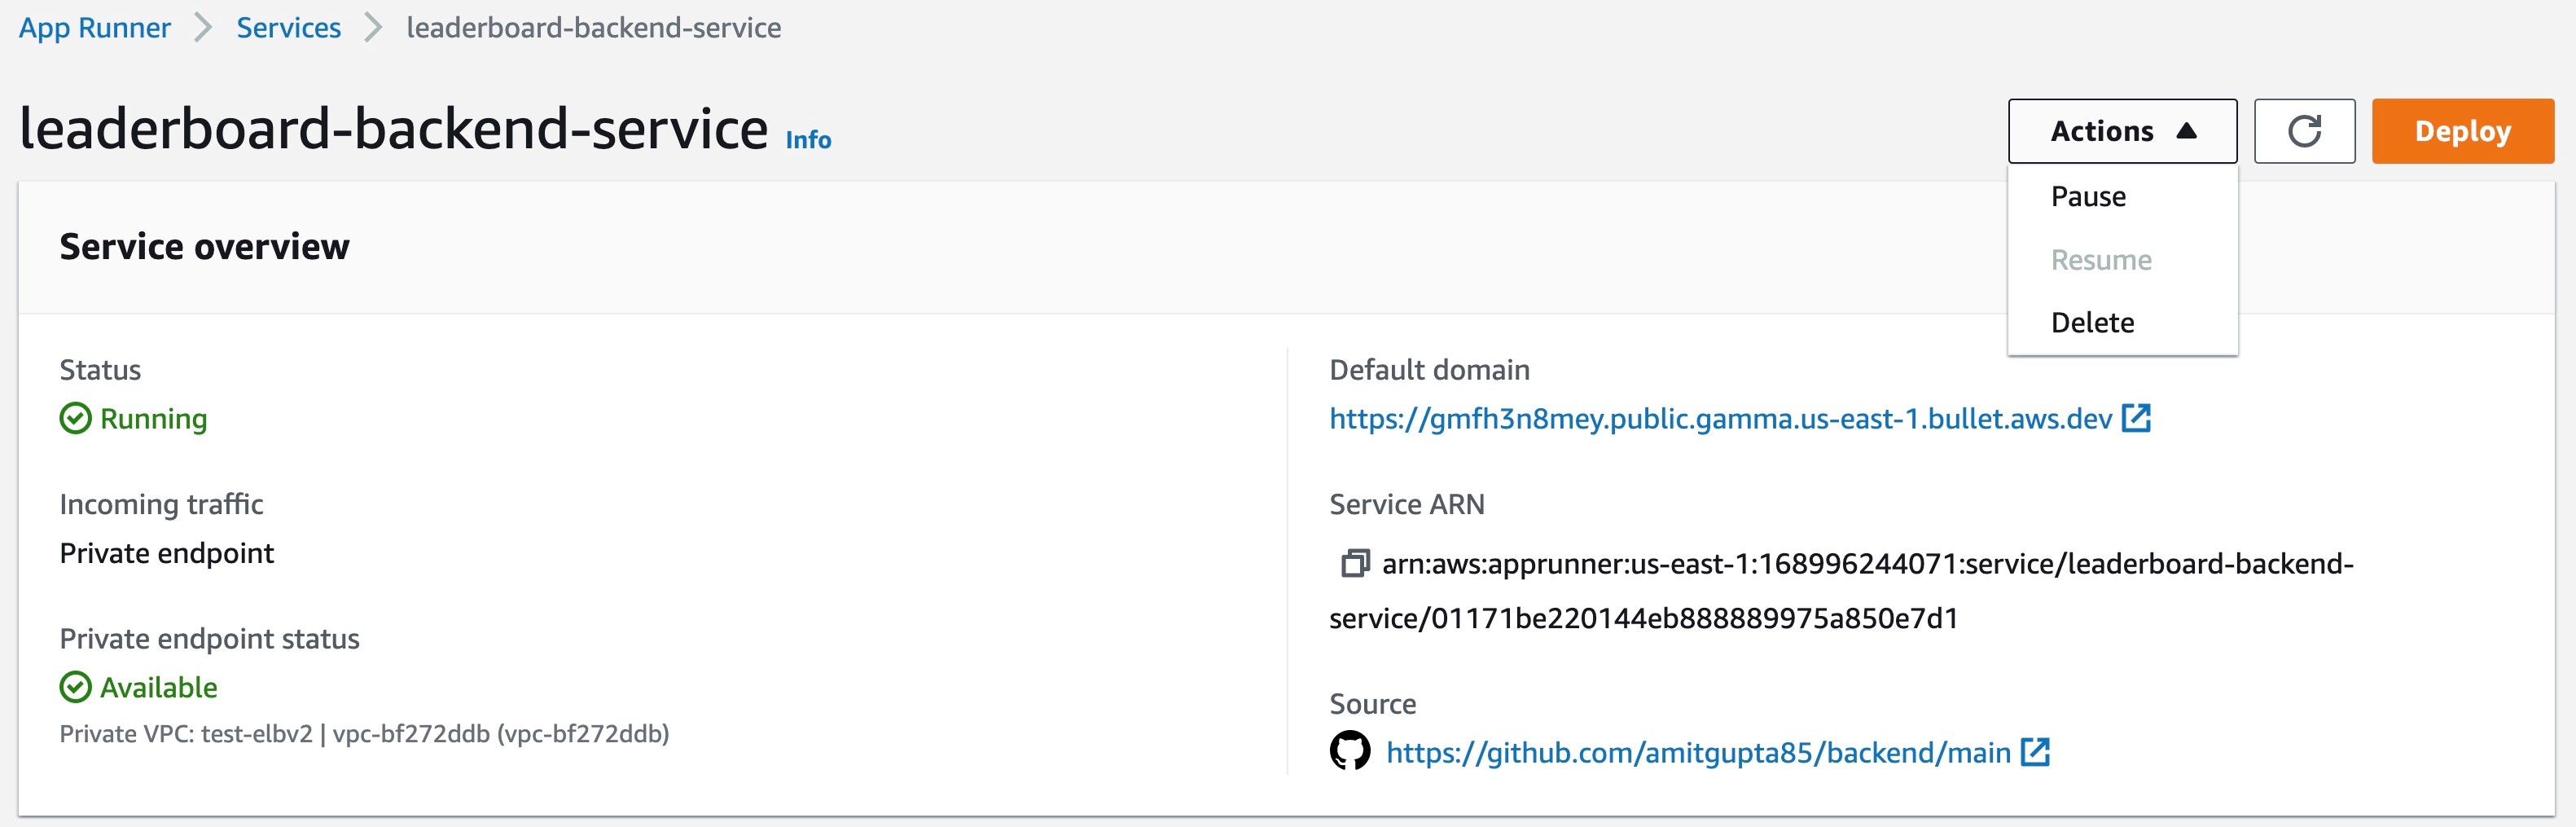
Figure 27: Console screenshot for an overview of the backend App Runner service configuration
2. Delete the VPC interface endpoint used to setup a private endpoint for backend service. This can be done under the Networking Configuration view on App Runner console. Go to the VPC interface endpoint under Incoming Traffic and delete it. This can be done after above services are deleted successfully.
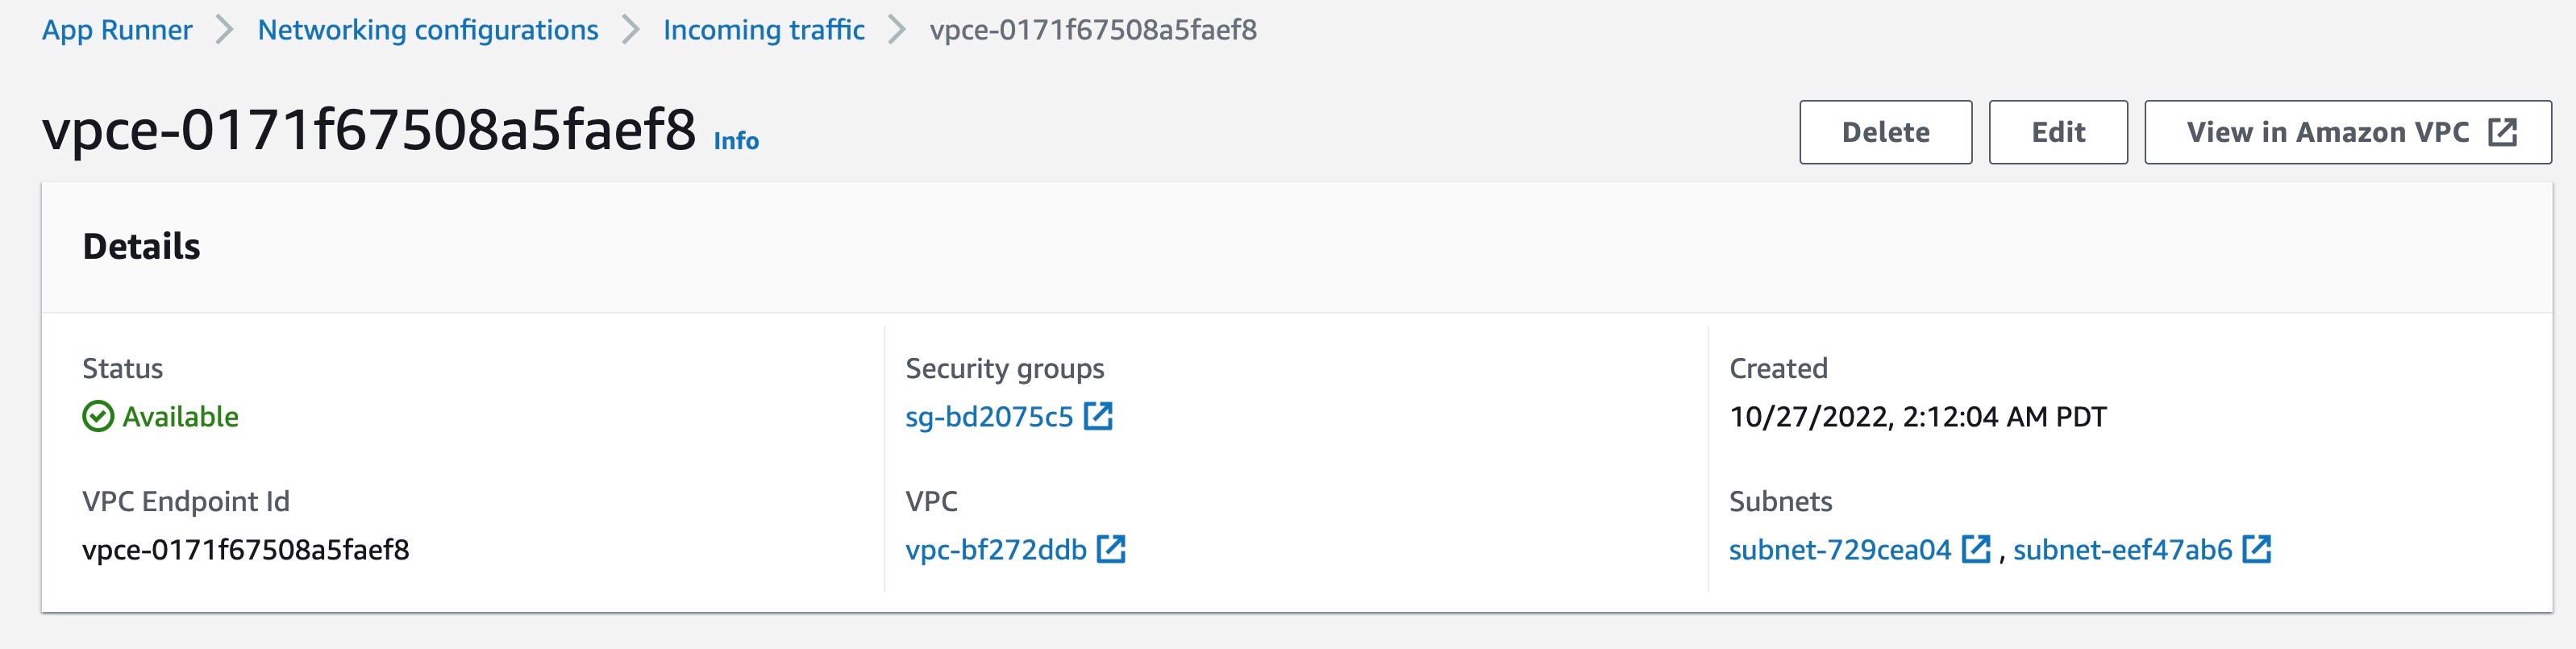
Figure 28: Console screenshot to delete a VPC interface endpoint
3. Delete the ElastiCache Redis cluster and the EC2 instance used to setup Redis CLI.
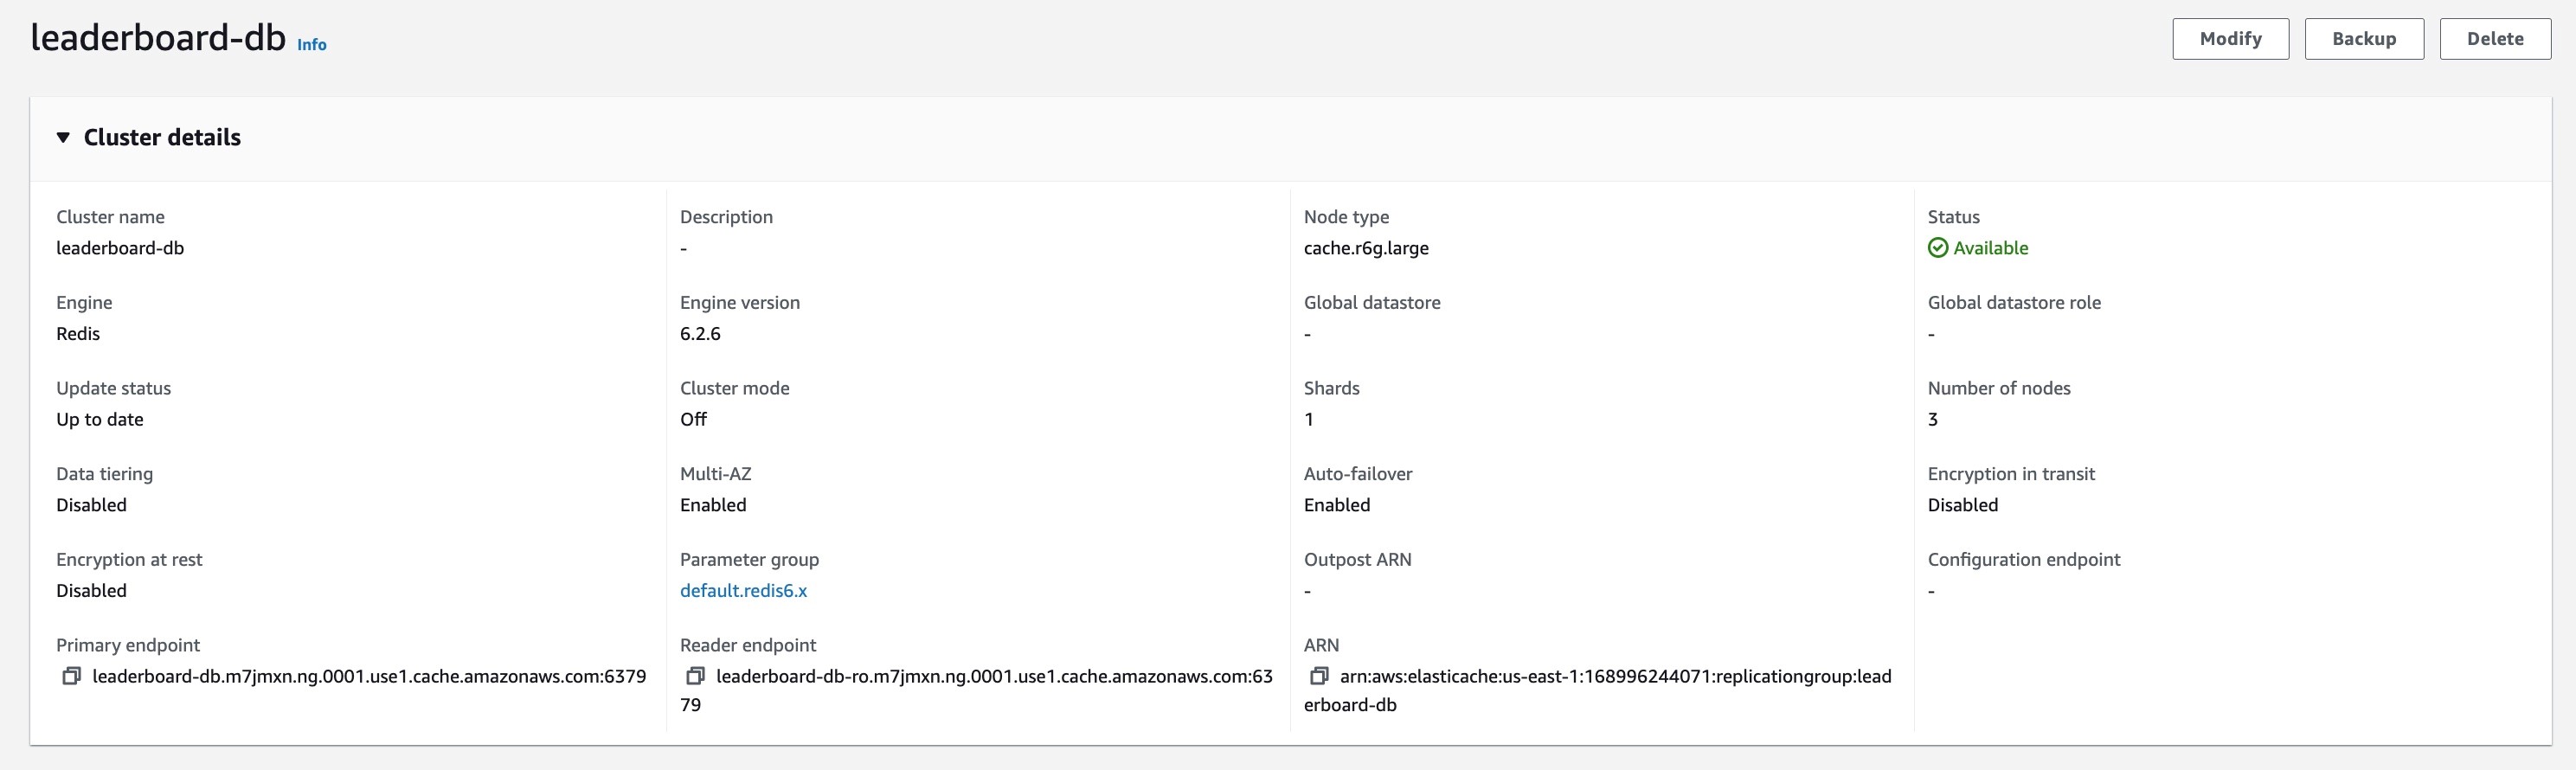
Figure 29: Console screenshot to delete an ElastiCache Redis Cluster
4. If you set a GitHub connection as part of this post, delete it as well from the App Runner console. Also remove the GitHub application in your GitHub account which was authorized while setting up the connection. You can do that from Settings in your GitHub account.

Figure 30: Console screenshot to delete an App Runner GitHub connection
Benefits
This feature allows you to build mid-tier or backend internal applications which are part of a bigger microservices architectures and need to be accessed privately from other microservices. You can also build standalone corporate internal websites and non-internet facing applications securely. You can keep your application privately accessible while it is still in development. It also enables configuring an API Gateway and an AWS Load Balancer in front of the App Runner service by leveraging their integrations with PrivateLink, and thus, making your App Runner service possible to be part of your overall existing architecture. We will cover this use case in a separate blog post.
Conclusion
In this post, we discussed different networking configurations available in App Runner today with the private services feature launch. App Runner now supports public and private endpoint modes for incoming traffic to your App Runner service. With the private endpoint mode, you can restrict the incoming traffic to your VPC making it private and secure. You can select a specific outgoing traffic mode – public or custom VPC in conjunction with a specific incoming traffic mode depending your use case. We also built a sample leaderboard application in a microservices-based architecture enabling private communication between a public App Runner service, a private App Runner service and an ElastiCache Redis cluster. The Private Services feature has been one of the most requested features and we are excited to bring this to you. We look forward to hearing your feedback on the App Runner roadmap on GitHub.