AWS Database Blog
Automating Amazon RDS and Amazon Aurora recommendations via notification with AWS Lambda, Amazon EventBridge, and Amazon SES
Amazon RDS and Amazon Aurora provide automated recommendations for RDS and automated recommendations for Aurora to optimize your database instances and Aurora clusters and follow best practices. These recommendations are essential for maintaining the performance, security, and reliability of your database environment. Without notification automation, you must manually check the console for new recommendations, which is time consuming and risks overlooking important optimization opportunities.
In this post, we walk through a solution that automates the notification of Amazon RDS and Aurora recommendations through email using AWS Lambda, Amazon EventBridge and Amazon Simple Email Service (Amazon SES).
Solution overview
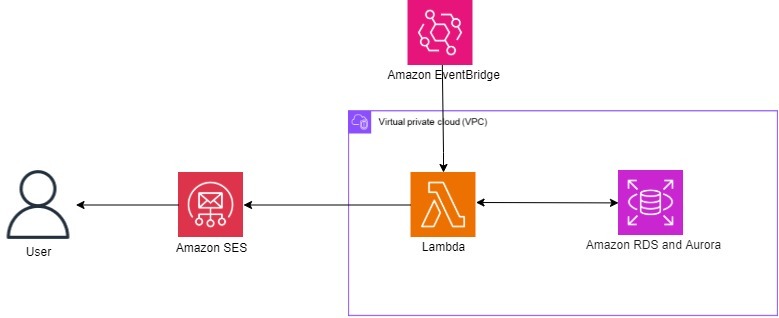
This solution uses AWS Lambda and Amazon EventBridge to retrieve RDS and Aurora recommendations periodically and send them as formatted HTML email messages using Amazon SES. The following architecture diagram illustrates how EventBridge triggers the Lambda function, which interacts with RDS and Aurora to retrieve recommendations, processes this information, and uses Amazon SES to deliver formatted reports to users, creating a fully automated notification system.
Note: This solution retrieves recommendations for RDS and Aurora instances within a single AWS Region. If you need to monitor recommendations across multiple Regions, you will need to deploy this solution separately in each Region.
To implement this solution, you need to complete the following high-level steps:
- Set up tagging on RDS and Aurora DB instances to filter recommendations by environment type.
- Set up Amazon SES to enable email delivery of recommendations.
- Create an AWS Identity and Access Management (IAM) policy and role for Lambda to securely access required services.
- Create the Lambda function to retrieve and format Amazon RDS and Aurora recommendations as emails.
- Create an EventBridge schedule to invoke the Lambda function execution at defined intervals.
Prerequisites
- An AWS Account
- One or more RDS/Aurora instances
Set up tagging on Amazon RDS instances, Aurora DB instances, and Aurora clusters
To tag your Amazon RDS instances for proper filtering:
- In the Aurora and Amazon RDS console, choose Databases in the left navigation pane.
- Choose the instance and cluster you want to tag.
- Choose the Tags tab on the instance details page.
- Choose Manage tags.
- Choose Add new tag.
- For Key, enter Environment.
- For Value, enter one of the following: Production, Staging, Development, or Test.
- Choose Save changes.
You’ve now tagged your Amazon RDS instances, Aurora DB instances and Aurora clusters with environment information that allows the Lambda function to filter recommendations based on operational importance, focusing on critical environments like production and staging while excluding less critical ones.
Set up Amazon SES for email delivery of notifications
To configure Amazon SES:
- In the Amazon SES console, choose Identities in the left navigation pane under Configuration.
- Choose Create identity.
- Choose Email address and enter the email address you want to use as both sender and recipient.
- Follow the verification process by selecting the link in each verification email you receive.
After verifying your email address with Amazon SES, you have established a trusted sender identity that the Lambda function will use to deliver recommendation notifications.
Create an IAM policy and role for Lambda
Create an IAM policy and role for the Lambda function to be able to execute the RDSRecommendations API and perform essential tasks including retrieving recommendation data, filtering based on tags, accessing CloudWatch logs, and sending emails through Amazon SES. First, complete the following steps to create the IAM policy:
- In the IAM console, choose Policies in the left navigation pane.
- Choose Create policy.
- On the JSON tab, paste the following into the policy editor:
Replace the following placeholders:
| Placeholder | Description | Example |
| ${REGION} | Your AWS region | us-east-1 |
| ${ACCOUNT_ID} | Your AWS account ID | 123456789012 |
| ${LAMBDA_FUNCTION_NAME} | Your Lambda function name | Send-RDS-Recommendations-Email |
| ${VERIFIED_EMAIL_ADDRESS} | Your verified Sender email address in SES | Alejandro_rosalez@example.com |
- Choose Review policy.
- For Policy Name, enter a policy name (such as Recommendationsv1-IAM-policy).
- Choose Create policy.
This policy you have created grants your Lambda function the specific permissions needed to publish CloudWatch logs, sending emails via SES, and accessing RDS and Aurora recommendations data along with resource tags.
Now you can create your IAM role to attach these permissions to your Lambda function:
- Choose Roles in the left navigation pane.
- Choose Create role.
- For Select type of trusted entity, choose AWS service.
- For Use case, choose Lambda.
- Choose Next.
- For IAM policy name, enter a name (such as Recommendationsv1-IAM-policy).
- Under Permissions policies, select the policy you created in the preceding procedure.
- Choose Next.
- For Role name, enter a name (such as Recommendationsv1-IAM-Role).
- Choose Create role.
You have now created an IAM role that links the permissions policy to your Lambda function. This role establishes the security boundary for your function, ensuring it has exactly the access needed to retrieve recommendations and send notifications.
Create the Lambda function to retrieve and format Amazon RDS and Aurora recommendations as emails
To create the Lambda function:
- In the Lambda console, choose Create function.
- Choose Author from scratch.
- For Function name, enter a name (such as Send-RDS-Recommendations-Email).
- For Runtime, choose Python 3.13 or higher.
- For Architecture, leave x86_64 which is default.
- For Execution role, select Use an existing role.
- Change default execution role to use an existing role, choose the role you created in the preceding procedure.
- Choose Create function.
- On the Lambda function’s details page, go to the Configuration tab.
- Choose General configuration in the left navigation pane.
- Choose Edit.
- For Timeout, enter 10 seconds or higher (the default timeout of 3 seconds may not be sufficient for retrieving and processing multiple recommendations).
- Choose Save.
- Now, go to the Code tab. In the Code Source section replace the lambda_function.py sample code with the following (change the Sender and Recipient email addresses to match the Amazon SES identity that you created and verified earlier in this post):
Note: When implementing this solution, you can customize several key parameters
Email Configuration:
- SENDER_EMAIL: Your verified SES sender email address
- RECIPIENT_EMAILS: List of verified SES recipient email addresses
- MAX_RECOMMENDATIONS_PER_EMAIL: Number of recommendations per email (default: 20)
Environment Filtering:
- REQUIRED_TAGS: List of environments to monitor (default: [‘Production’, ‘Staging’])
- TAG_KEY: Tag key for environment identification (default: ‘Environment’)
Category Filtering:
- DESIRED_CATEGORIES: Types of recommendations to include. Valid options:
- performance efficiency
- security
- operational excellence
- reliability
- cost optimization
- sustainability
You can customize DESIRED_CATEGORIES to focus on specific aspects of your database infrastructure. The categories are independent, allowing you to choose any combination. For example, below desired categories filter the recommendations to security and performance efficiency.
The following Python code retrieves RDS and Aurora recommendations, filters them based on your environment tags, formats them into a readable HTML email, and sends them via Amazon SES.
- Choose Deploy.
Create an EventBridge schedule to invoke the Lambda function execution at defined intervals
Let’s say you want to send the Amazon RDS and Aurora recommendation notifications every day at 21:00 UTC. Complete the following steps to create such a schedule in EventBridge:
- In the EventBridge console, choose Schedules in the left navigation pane.
- Choose Create schedule.
- For Name, enter a name (for example, SendRDSDBRecommendationEmail).
- For Occurrence, select Recurring schedule.
- For Time zone, choose UTC.
- For Schedule type, select Cron-based schedule.
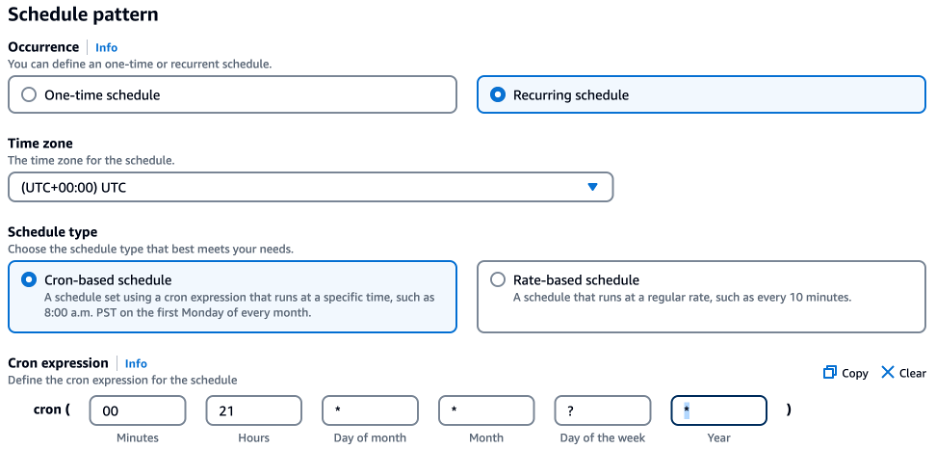
- For Cron expression, enter the following values:
- Minutes: 00
- Hours: 21
- Day of month: *
- Month: *
- Day of the week: ?
- Year: *
- For Flexible time window, select 10 minutes
- Choose Next.
- For Target API, select Templated targets.
- Select AWS Lambda Invoke.
- Choose the Lambda function (such as Send-RDS-Recommendations-Email) to be invoked and then choose Next.
- Choose Next on Settings.
- Choose Create schedule.
Recommendations notification provides a comprehensive assessment including the recommendation type, description, category, impact, affected resource details, severity level, and recommended actions for database improvements. When you receive these notifications, review the severity and impact to prioritize your actions. For high and medium severity items, consider implementing the recommended actions promptly to avoid potential performance issues or outages. For low severity recommendations, you can plan implementation during your next maintenance window. Each notification includes specific steps on how to implement the recommendation, making it easier to take action.
Sample email

Clean up
To clean up your resources, complete the following steps:
- Delete the Amazon SES identity.
- Delete the Lambda function.
- Delete the EventBridge Schedule.
- Delete the IAM Role.
- Delete the IAM Policy.
Conclusion
In this post, we shared a solution to guide you through setting up sending an automated notifications for Amazon RDS and Aurora recommendations. This post’s solution covers all the major steps, including Amazon SES setup, IAM policy and role creation, Lambda function creation, and scheduling using EventBridge. By implementing this solution, you can stay proactive about RDS optimizations without manual monitoring, while ensuring critical recommendations aren’t missed. You can also customize the filtering logic to match your organization’s priorities. If you have any comments or questions, leave them in the comments section