Desktop and Application Streaming
Enabling default OS and application settings for your users in Amazon AppStream 2.0
When your users first stream applications on Amazon AppStream 2.0, you want to get them started quickly. You may want each user to start with default settings for bookmarks, plug-ins, application view, database connections, environment variables, and Internet Explorer security settings. We recently launched default application settings for Amazon AppStream 2.0 to make this easier. You can now define the default OS and application settings in an image builder, and have your users avoid the set up they had to go through previously. You can also define the Internet Explorer security settings to enable applications that rely on it to load data, such as Adobe Photoshop and ESRI ArcGIS Pro.
In this post, I describe how you can define the default settings for users, with an example using SQL WorkBench. SQL WorkBench is a data warehouse and database query tool you can use to query databases.
Customers can stream SQL WorkBench with AppStream 2.0 to provide their users a low latency, high bandwidth, and secure environment for querying data sources such as Amazon Redshift data warehouses from anywhere in the world. With AppStream 2.0, only the encrypted pixels are delivered to the user, so queries requiring large amounts of data complete within seconds.
With the new default application settings for AppStream 2.0, you can create and save default Amazon Redshift connection profiles so that your users don’t need to provide them each time that they stream SQL WorkBench.
Walkthrough
The following sections show how to configure the default connection profiles for SQL WorkBench:
- Define the default settings for your application using the template user.
- Configure the default settings for users.
- Test the default settings in the image builder.
- Test the default settings in the fleet.
Prerequisites:
- An AWS account.
- An AppStream 2.0 image builder with SQL WorkBench installed. I recommend the Stream.standard.medium instance.
- An existing AppStream 2.0 stack with an associated fleet.
- If you are new to AppStream 2.0, see Stream Desktop Applications.
Define the default settings for your application
1. Log in to the AppStream 2.0 console.
2. Choose your preferred AWS Region.
3. In the left navigation, choose Images, Image Builders.
4. Select the running image builder with SQL WorkBench, and choose Connect. If your image builder isn’t running, select it and choose Actions, Start.
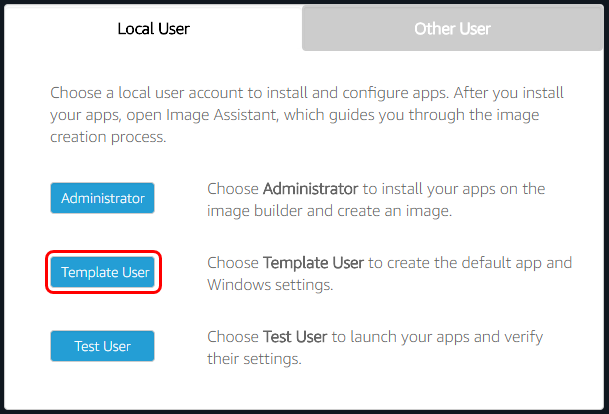
5. In the user selection dialog box, choose Template User and log in.
6. From the desktop, open Image Assistant and choose SQL WorkBench to launch it.

7. In SQL Workbench, create the connection to your Amazon Redshift data warehouse using the Amazon Redshift driver. For more information, see Connect to Your Cluster over a JDBC Connection in SQL Workbench/J. Choose the Save icon once complete. Note: Leave the username and password fields blank so they aren’t saved with the connection profile.

8. Test the connection by typing your user name and password, then choose Test.

9. If it connects, close SQL WorkBench without saving your user name and password.

You have now configured the default settings for SQL Workbench.
Configure the default settings for users
1. In the image builder, choose Admin Commands, Switch Users.
2. In the user selection dialog box, choose Administrator and log in.
3. From the desktop, launch Image Assistant.
4. On step 1. Add Apps, choose Next.
5. If the image builder isn’t joined to an Active Directory domain, proceed to step 6. Otherwise, select Template User on step 2. Configure Apps.
6. To reset the test user settings, choose Save settings.

You have now saved the default settings for all users.
Test the default settings in image builder
1. In Image Assistant, on step 3. Test, choose Switch User, Test User.
 2. From the desktop, open Image Assistant and choose SQL WorkBench to launch it.

3. Make sure that you see the Amazon Redshift data warehouse connection that you created earlier.
4. Type your user name and password and choose Test.

5. Verify that the Amazon Redshift connection works as expected.
6. In Image Assistant, choose Switch User, Administrator.
7. To change the default app and Windows settings, choose Previous and repeat the steps to create default settings. Otherwise, choose Next and finish creating the image.
You have now validated that the default settings for SQL Workbench were saved and work as expected.
Test the default settings in fleet
To test the default settings, use a stopped fleet so that all of the instances have the newly created image.
- When the image has completed and is available, update a stopped AppStream 2.0 fleet with the new image.
- Start the fleet and start a streaming session.
- Verify that the Amazon Redshift data warehouse connection details were saved, but the user name and password weren’t.
Now your users need only type their user name and password to get low latency and high-bandwidth access to your data warehouse!
Summary
That’s it! When your users launch their app, they already have the connection profile that you configured. They won’t need to create it each time they stream SQL WorkBench. You can use this process to create the default settings for your other applications so that your users can get started as soon as their application launches.
For more information, see the following resources: