The Internet of Things on AWS – Official Blog
Connect your devices to AWS IoT using the Sigfox network
Connectivity is a key element to evaluate when designing IoT systems as it will weigh heavily on the performance, capabilities, autonomy of battery powered objects, and cost of the overall solution. There is no one network that fits all scenarios which is why AWS partners with many different network providers. By partnering, you can then choose the most relevant network to satisfy your business requirements. In this blog post, we’ll explore providing LPWAN connectivity to your objects using the Sigfox network. Pierre Coquentin (Sigfox – Software Architect) will explain what Sigfox is and how to connect objects while Jean-Paul Huon (Z#bre – CTO) will share his experience using Sigfox with AWS in production.
Why Sigfox?
Sigfox provides global, simple, cost-effective, and energy-efficient solutions to power the Internet of Things (IoT). Today, Sigfox’s worldwide network and broad ecosystem of partners are already enabling companies to accelerate digital transformation and to develop new services and value.
In order to connect devices to its global network, Sigfox uses an ultra-narrow-band (UNB) radio technology. The technology is key to providing a scalable, high-capacity network with very low energy consumption, while maintaining a light and easy-to-rollout infrastructure. The company operates in the ISM bands (license-free frequency bands), on the 902MHz band in the U.S., as well as the 868MHz band in Europe.
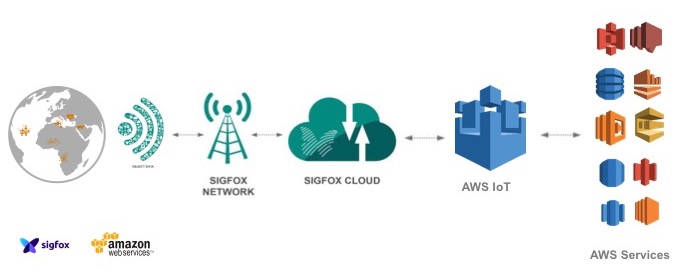
Once devices are connected to the Sigfox network, data can be transmitted to AWS IoT, enabling customers to create IoT applications that deliver insight into and the ability to act upon their data in real-time.
Please find more information at https://www.sigfox.com/
Send data from Sigfox to AWS IoT
We’ll start from the assumption that you already have objects connected and sending data to the Sigfox network. All that is left to do, is to configure the native AWS IoT connector to push your data to the AWS Cloud. To make things a bit more interesting, we will store all the data sent by your devices in an Amazon DynamoDB table.
In order to implement this architecture, we are going to perform the following steps:
- Configure the AWS IoT Connector in the Sigfox Console
- Provision the necessary resources on AWS so Sigfox can send data into your AWS account securely through the AWS IoT connector using a CloudFormation script that will generate IAM roles and permissions.
- Manually create a rule in AWS IoT and a DynamoDB table so we can store the data coming from Sigfox into the DynamoDB table
In our example, we are using the US East 1 region. We recommend you go through this tutorial once by using the exact same configuration. Once you gain knowledge on how to configure the different pieces, then customize the implementation to fit your needs.
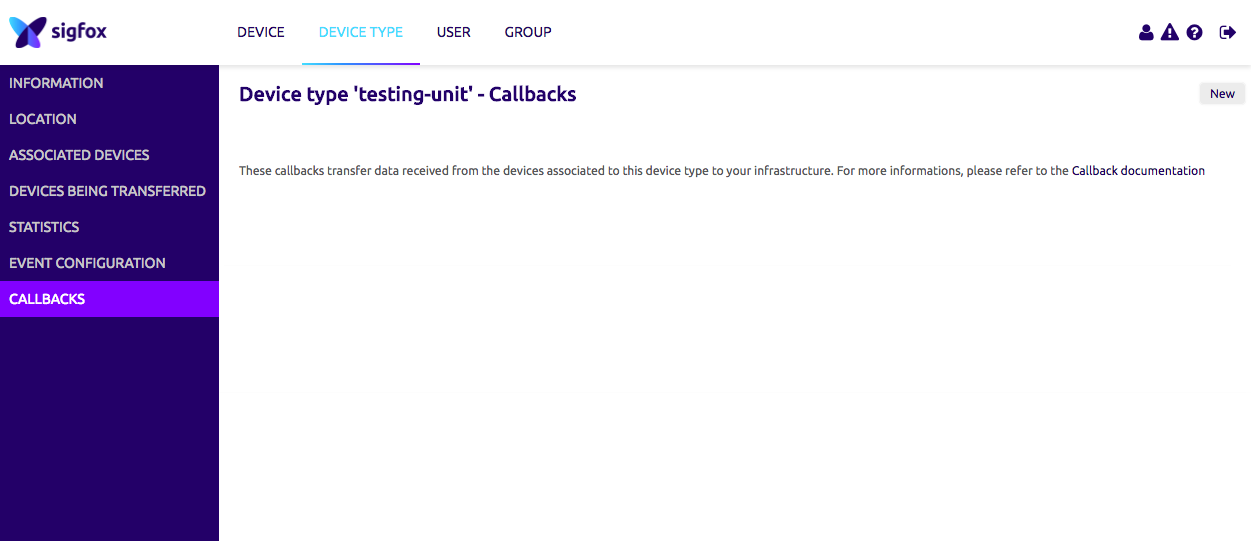
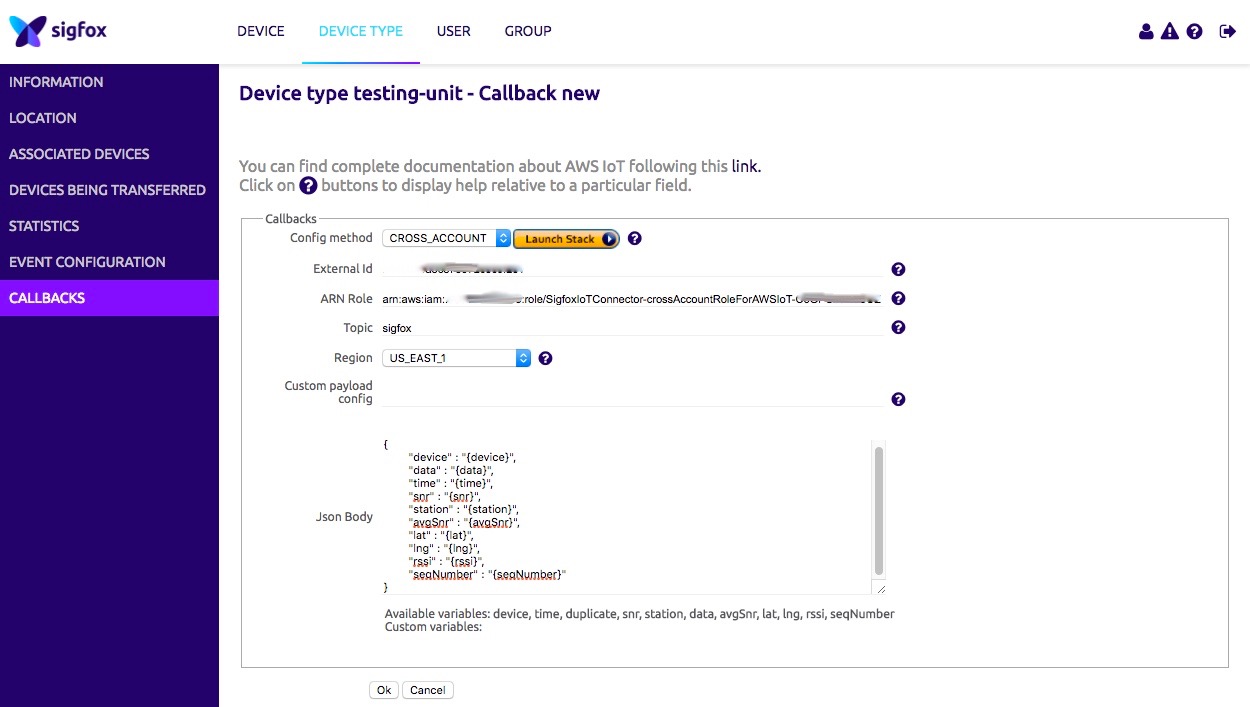
First, log into the Sigfox console, go to the “Callbacks” section and click on the “New” button to create a new “Callback”.
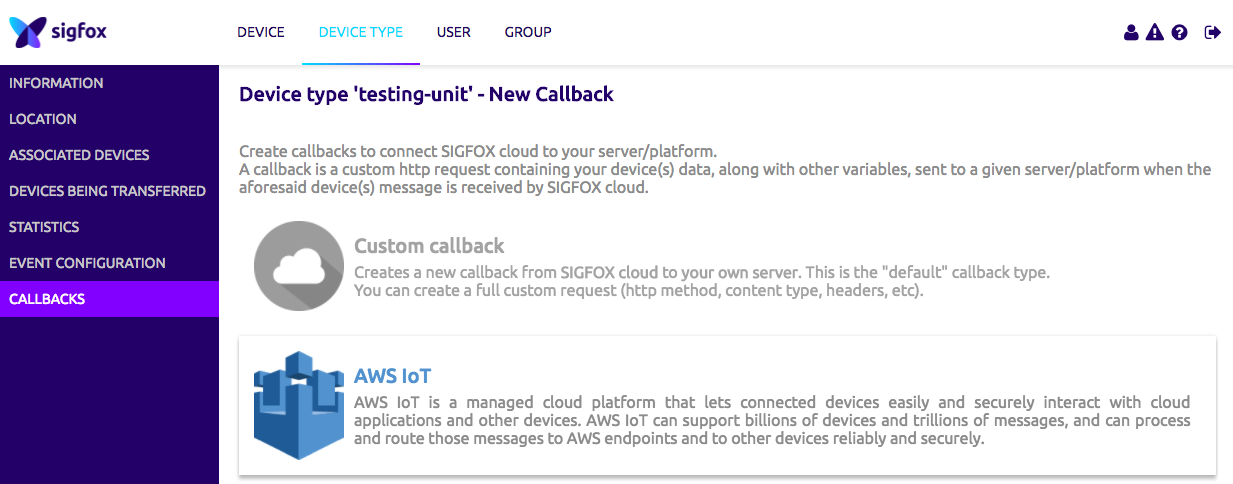
Now select the “AWS IoT” option as the type of “Callback”.
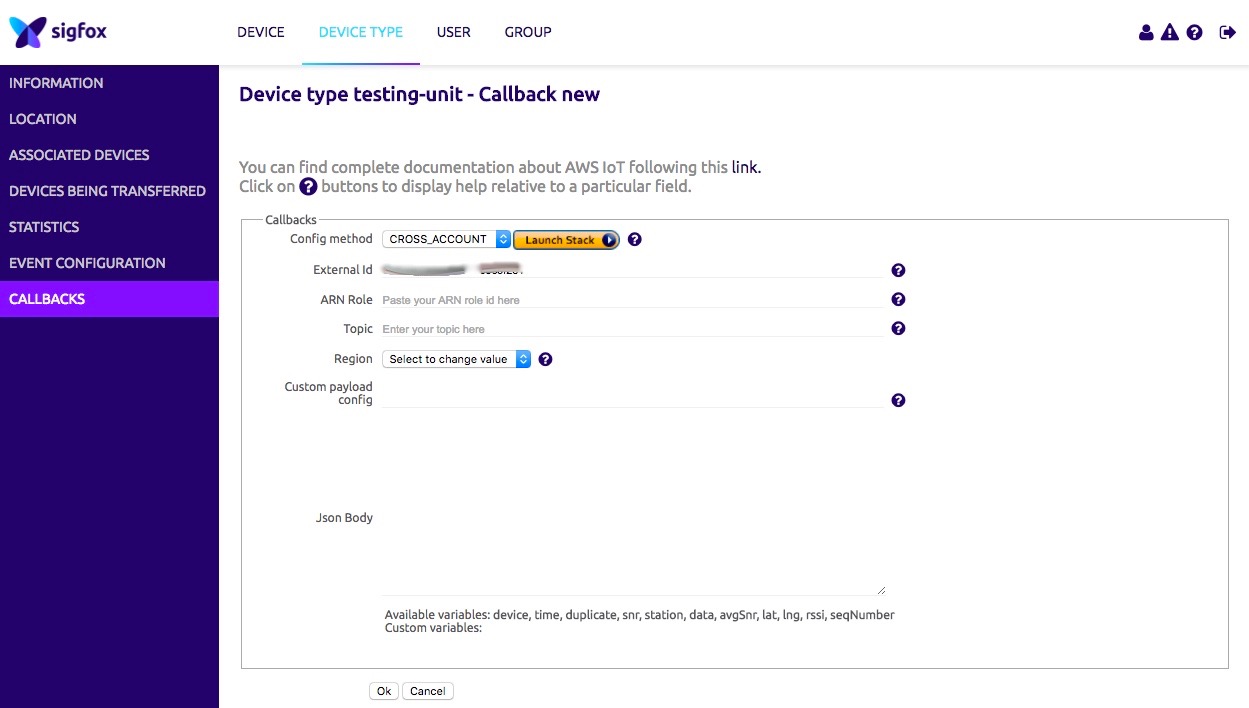
Please copy the “External Id” given to you in your clipboard, it will be useful later. The “External Id” is unique to your account and enables greater security when authorizing third party to access your AWS resources, you can find more information here.
Next click on “Launch Stack” and leave the “CROSS_ACCOUNT” option selected.
This will redirect you to the AWS CloudFormation console, click “Next” on the first screen.
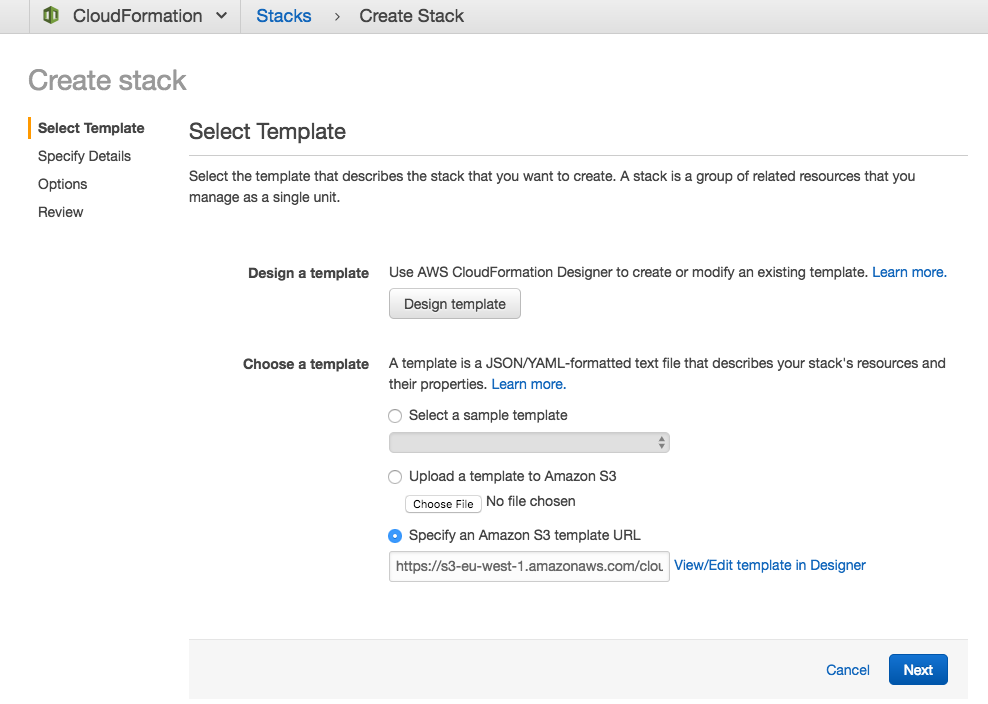
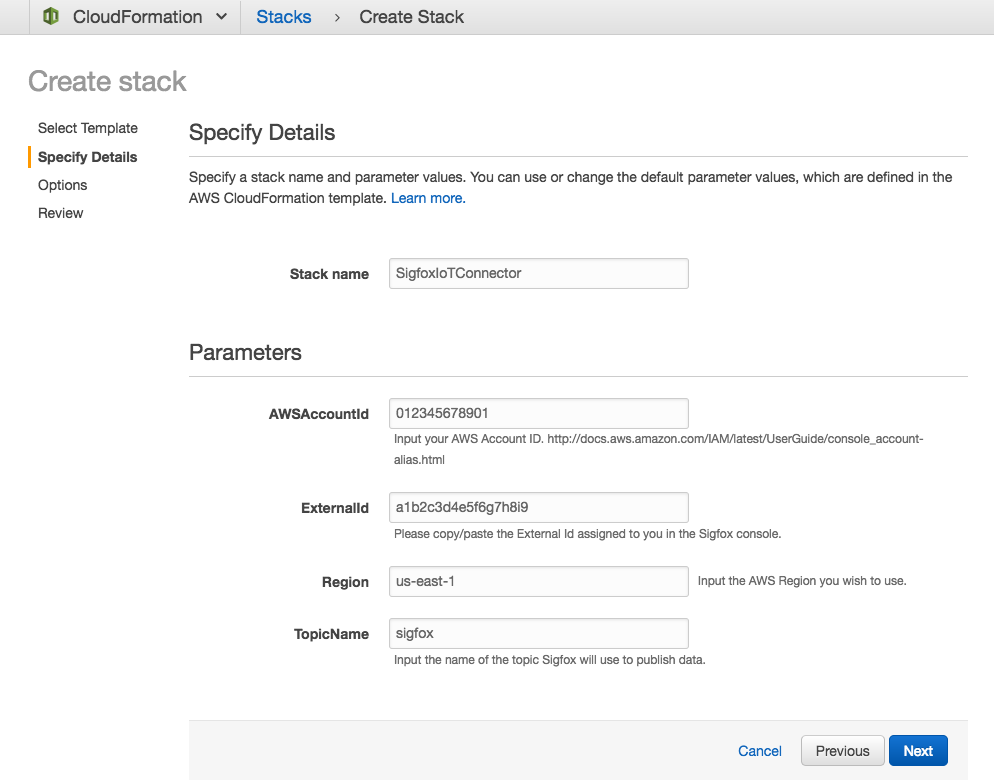
On the following screen, enter the following inputs:
- Stack name: Choose a meaningful name for the connector.
- AWSAccountId: Input your AWS Account Id, you can find it here.
- External Id: Copy/paste the external Id given to you in the Sigfox console.
- Region: Choose the region where AWS IoT will be used.
- Topic Name: Choose the topic name you wish to send data to.
Click “Next” once you are ready.
The next screen is optional, if you wish you can customize options (Tags, Permissions, Notifications) otherwise click on “Next” to continue with the default options. You should now be on the review screen, check the “I acknowledge that AWS CloudFormation might create IAM resources” box and click on “Create” to launch the CloudFormation stack.
After a few minutes the provisioning should be completed.

After selecting the AWS CloudFormation stack, click on the “Outputs” tab and copy the value for the “ARNRole” key, the “Region” key and the “Topic” key.

Go Back to the Sigfox console and paste the values you copied from the “Output” section of the AWS CloudFormation stack. Please also fill out the “Json Body” field in the Sigfox console. This JSON represents the payload that will be sent to AWS IoT using the native connector and contains the payload from the connected device as well as some metadata. This is a point for future customization using the Sigfox documentation if you wish to do so.
{
  "device" : "{device}",
  "data" : "{data}",
  "time" : "{time}",
  "snr" : "{snr}",
  "station" : "{station}",
  "avgSnr" : "{avgSnr}",
  "lat" : "{lat}",
  "lng" : "{lng}",
  "rssi" : "{rssi}",
  "seqNumber" : "{seqNumber}"
}
Finally, click “Ok”.
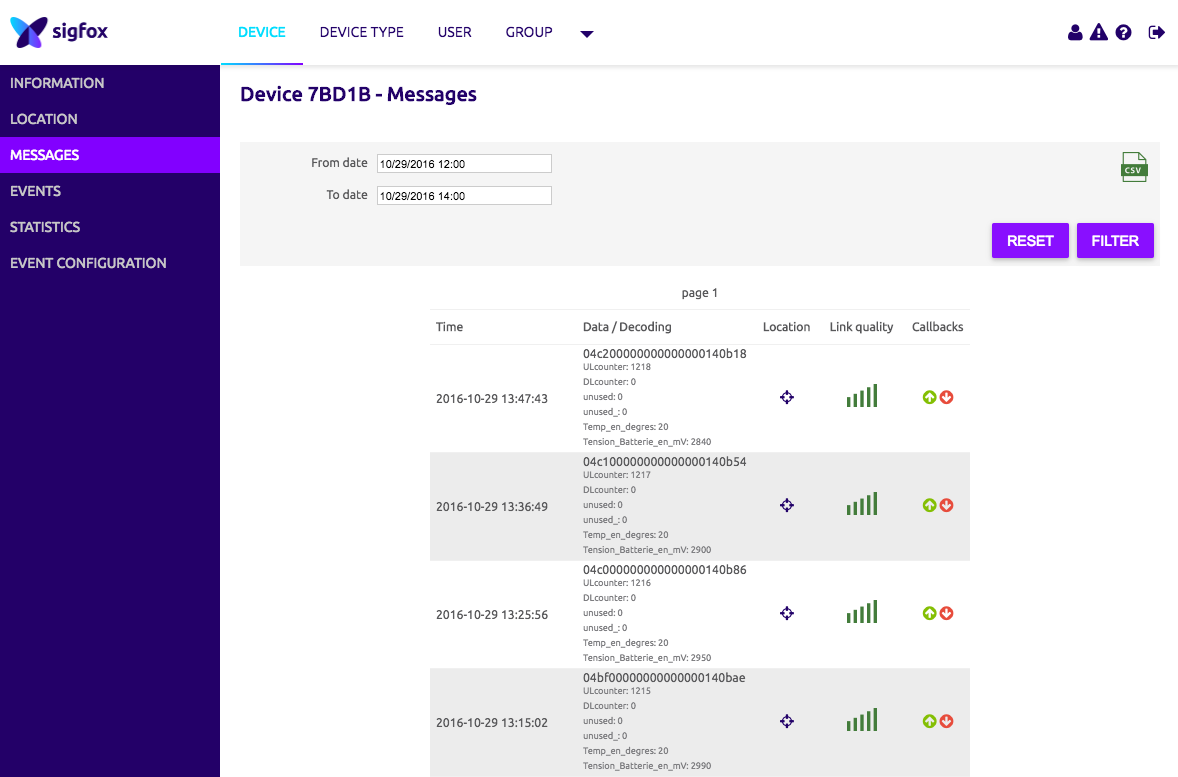
You now have successfully created your callback and can visualize the data sent to it.
Now that the data is being sent to AWS IoT via the native connector, we will create an AWS IoT Rule to store the data into an Amazon DynamoDB table.
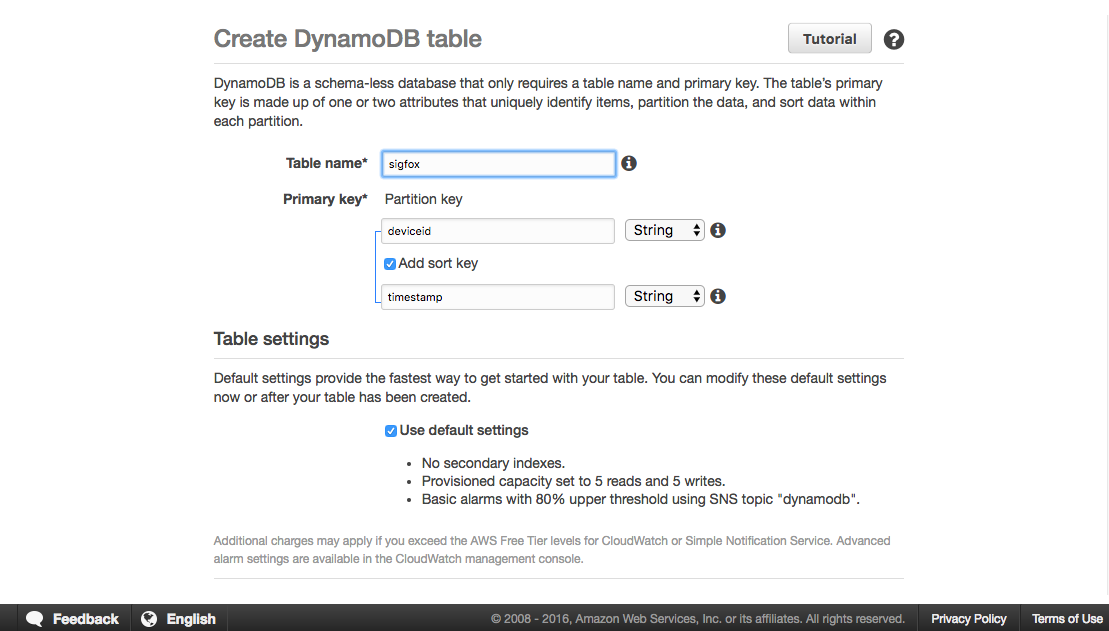
Start by logging into the Amazon DynamoDB table and then click “Create table”.
Give the table the name “sigfox” and create a Partition Key “deviceid” as well as a Sort Key “timestamp”. Then create the table.
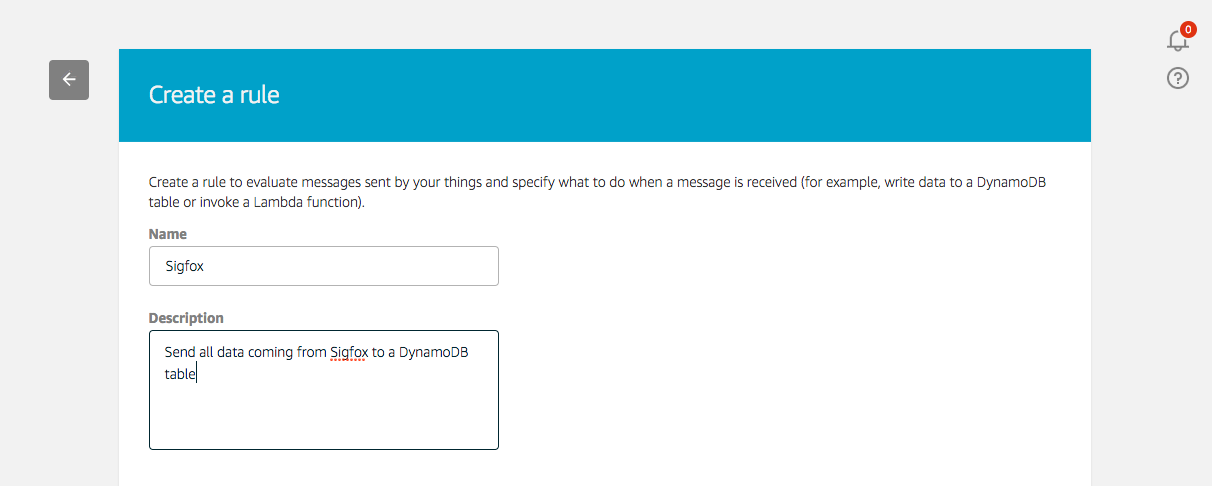
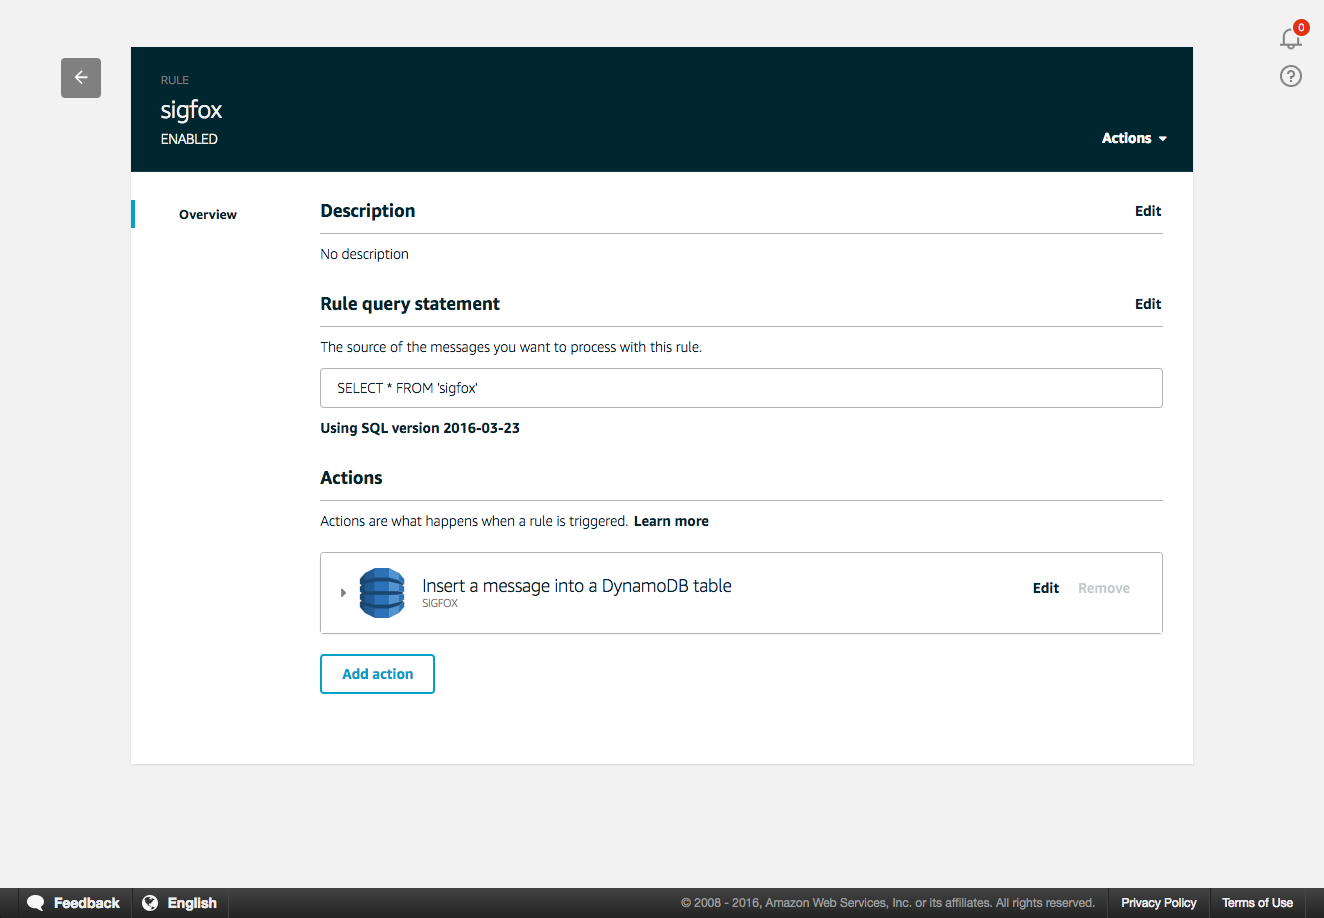
After a couple minutes, the Amazon DynamoDB table is created. Now, go to the AWS IoT console and create a new rule.
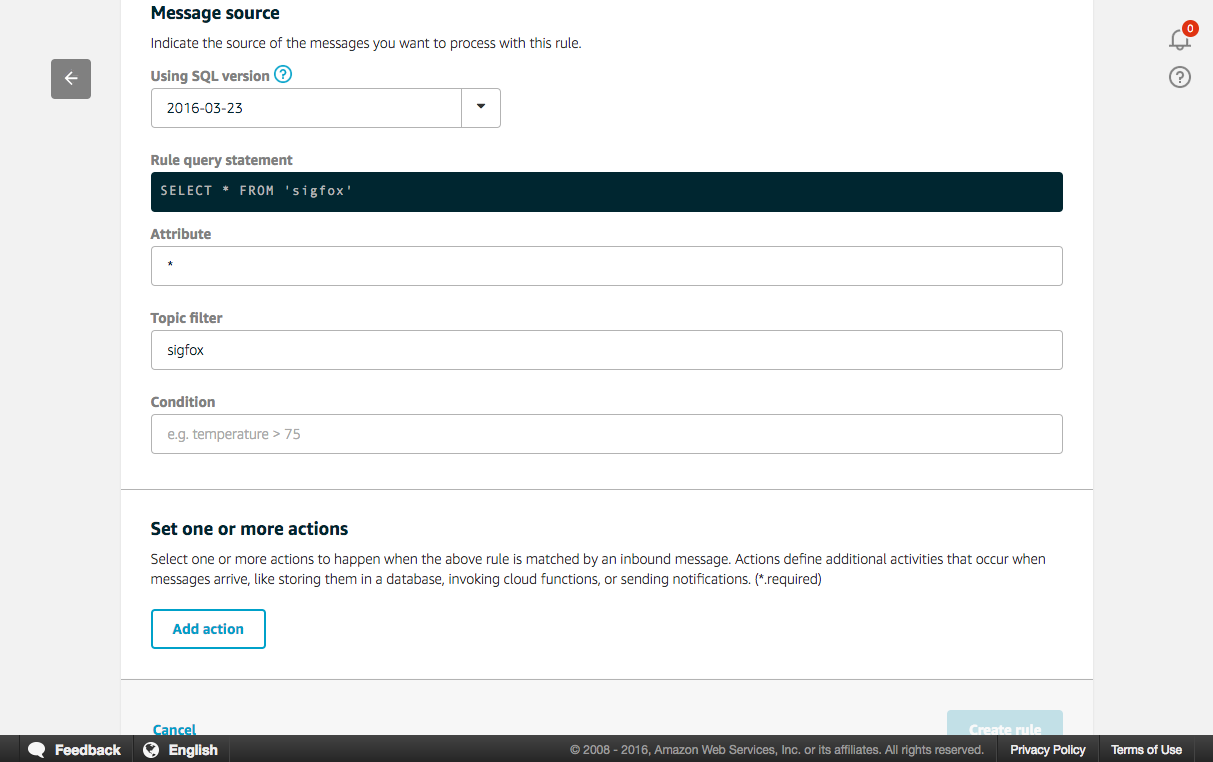
Now we will send every message payload coming from Sigfox in its entirety to the DynamoDB table. To do this we are using “*” as the attribute, “sigfox” as the topic filter, and no conditions.
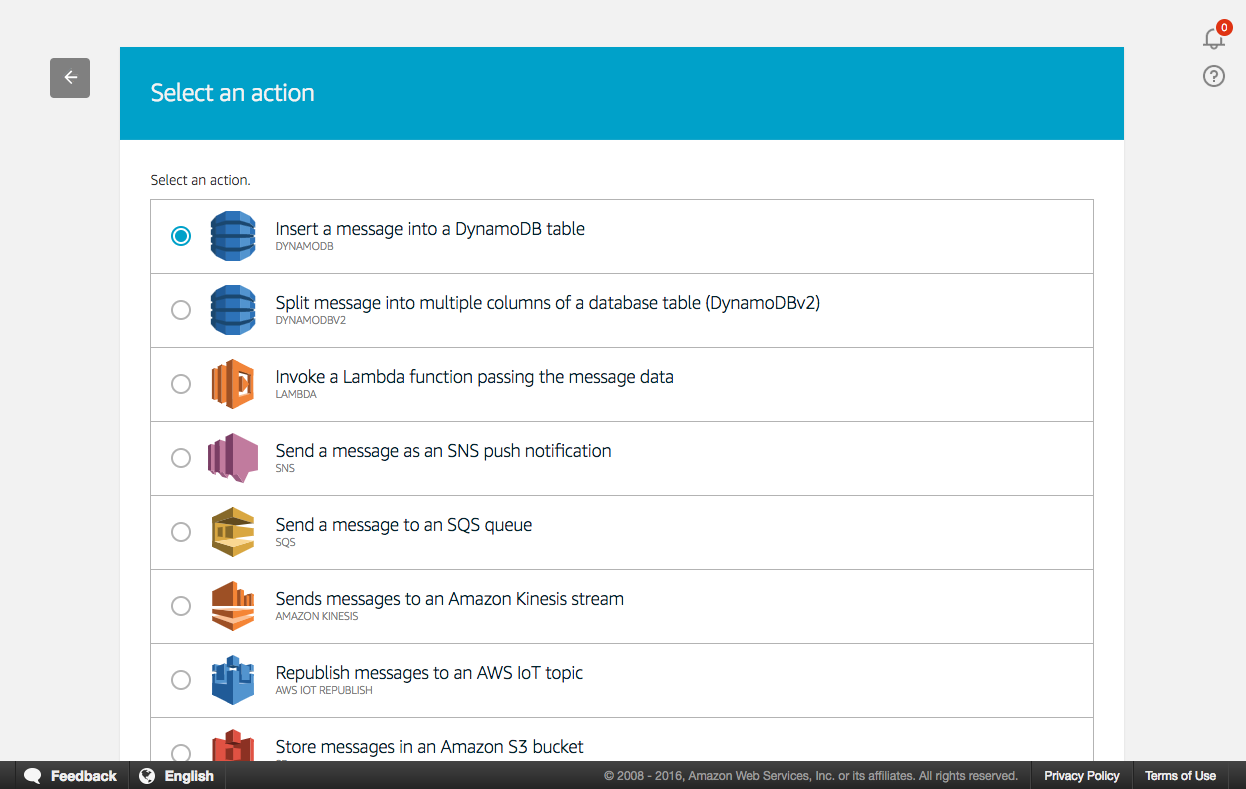
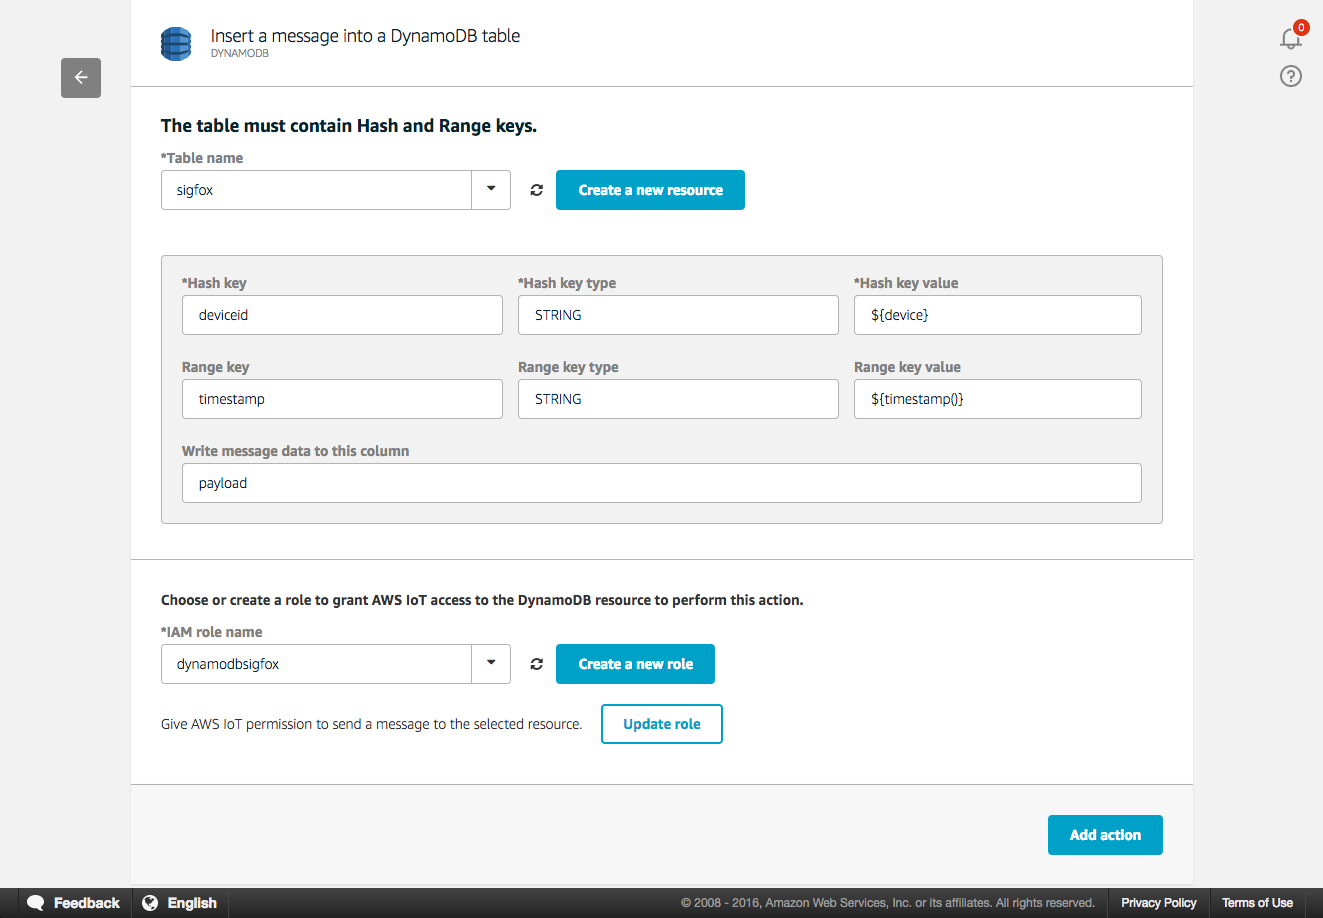
Next add an action, select “Insert a message into a DynamoDB table”.
Select the Amazon DynamoDB table we created previously. In the Hash Key value input “${device}” and “${timestamp()}” for the Range Key value. With this configuration, each Device’s ID will represent a Hash Key in the table and data stored under that Hash Key will be ordered using the timestamp generated by the AWS IoT Rules Engine and used as the Sort Key. Finally, create a new role by clicking on the “Create a new role” button. Name it “dynamodbsigfox” and click again on the “Create a new role”, you can now select it in the drop-down list. Thanks to this IAM role, AWS IoT can push data on your behalf to the Amazon DynamoDB table using the “PutItem” permission.
Add the action to the rule and create the rule. You should now be able to visualize the newly created rule in the AWS Console.
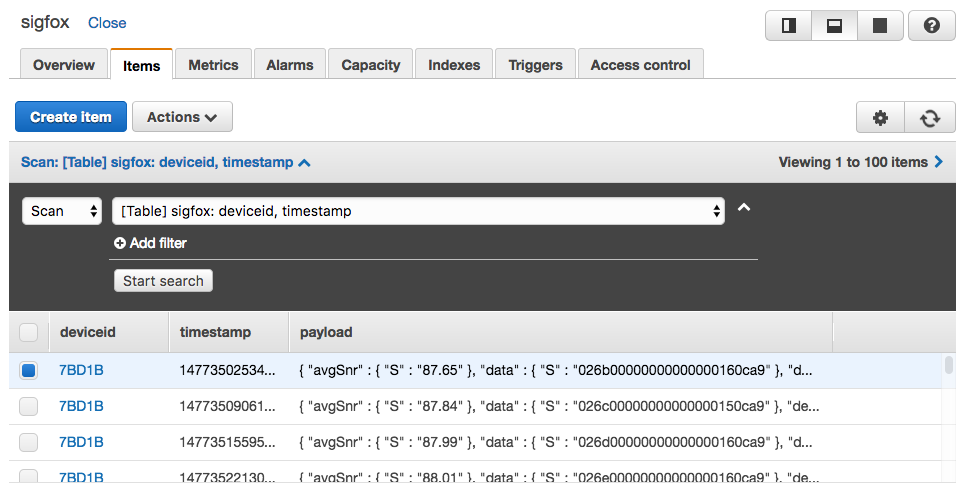
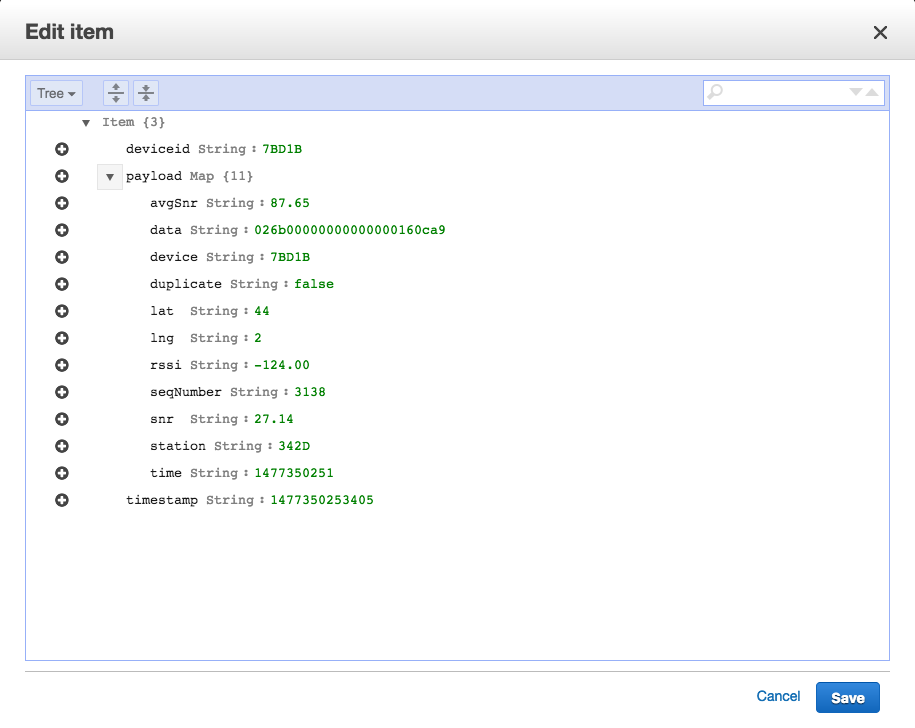
The final step is to go back to the Amazon DynamoDB Console and observe the data sent from Sigfox to AWS IoT thanks to the native connector. That can be achieved by selecting your table and use the “item” tab to observe the items. Once you see the item tab, click on a record to see the payload value.
Using this example’s basic flow, you can now create other AWS IoT rules that route the data to other AWS services. You might want to perform archiving, analytics, machine learning, monitoring, alerting and other functions. If you want to learn more about AWS IoT, here are a few links that should help you:
- AWS IoT website
- AWS IoT State of the Union at RE:Invent 2016
- Youtube playlist of the IoT MiniCon at RE:Invent 2016
Z#BRE testimony – Use case with Sigfox
Z#BRE has developed an IoT solution for social care based on AWS IoT and Sigfox: “Z#LINK for Social Care”. The goal is to improve efficiency of social care & create a social link for elderly people. Society is increasingly connected and people are sharing more real-time information with their community. In the context of elderly people, this means they are sharing information with their community, in particular about care they are receiving each day.
We have developed a smart object that enables the elderly community (relatives, neighbors, care companies, etc.) to inform their community in real-time whenever a care practitioner delivers care. These real-time insights coming from care data enable public institutions to work better with care companies and to optimize costs while improving care quality.
Thanks to Sigfox connectivity we have created an object that does not require any setup nor Internet connection and can work at least two years with 4 batteries. This object’s use of Sigfox is key when it comes to the simplicity and setup of the overall solution.
Thanks to that simple setup, Sigfox allow faster deployments time of the hardware. With low power consumption and the use of batteries, there is also no need for elderly people to plug or unplug the device, resulting in no risk that they will forget to recharge the device.
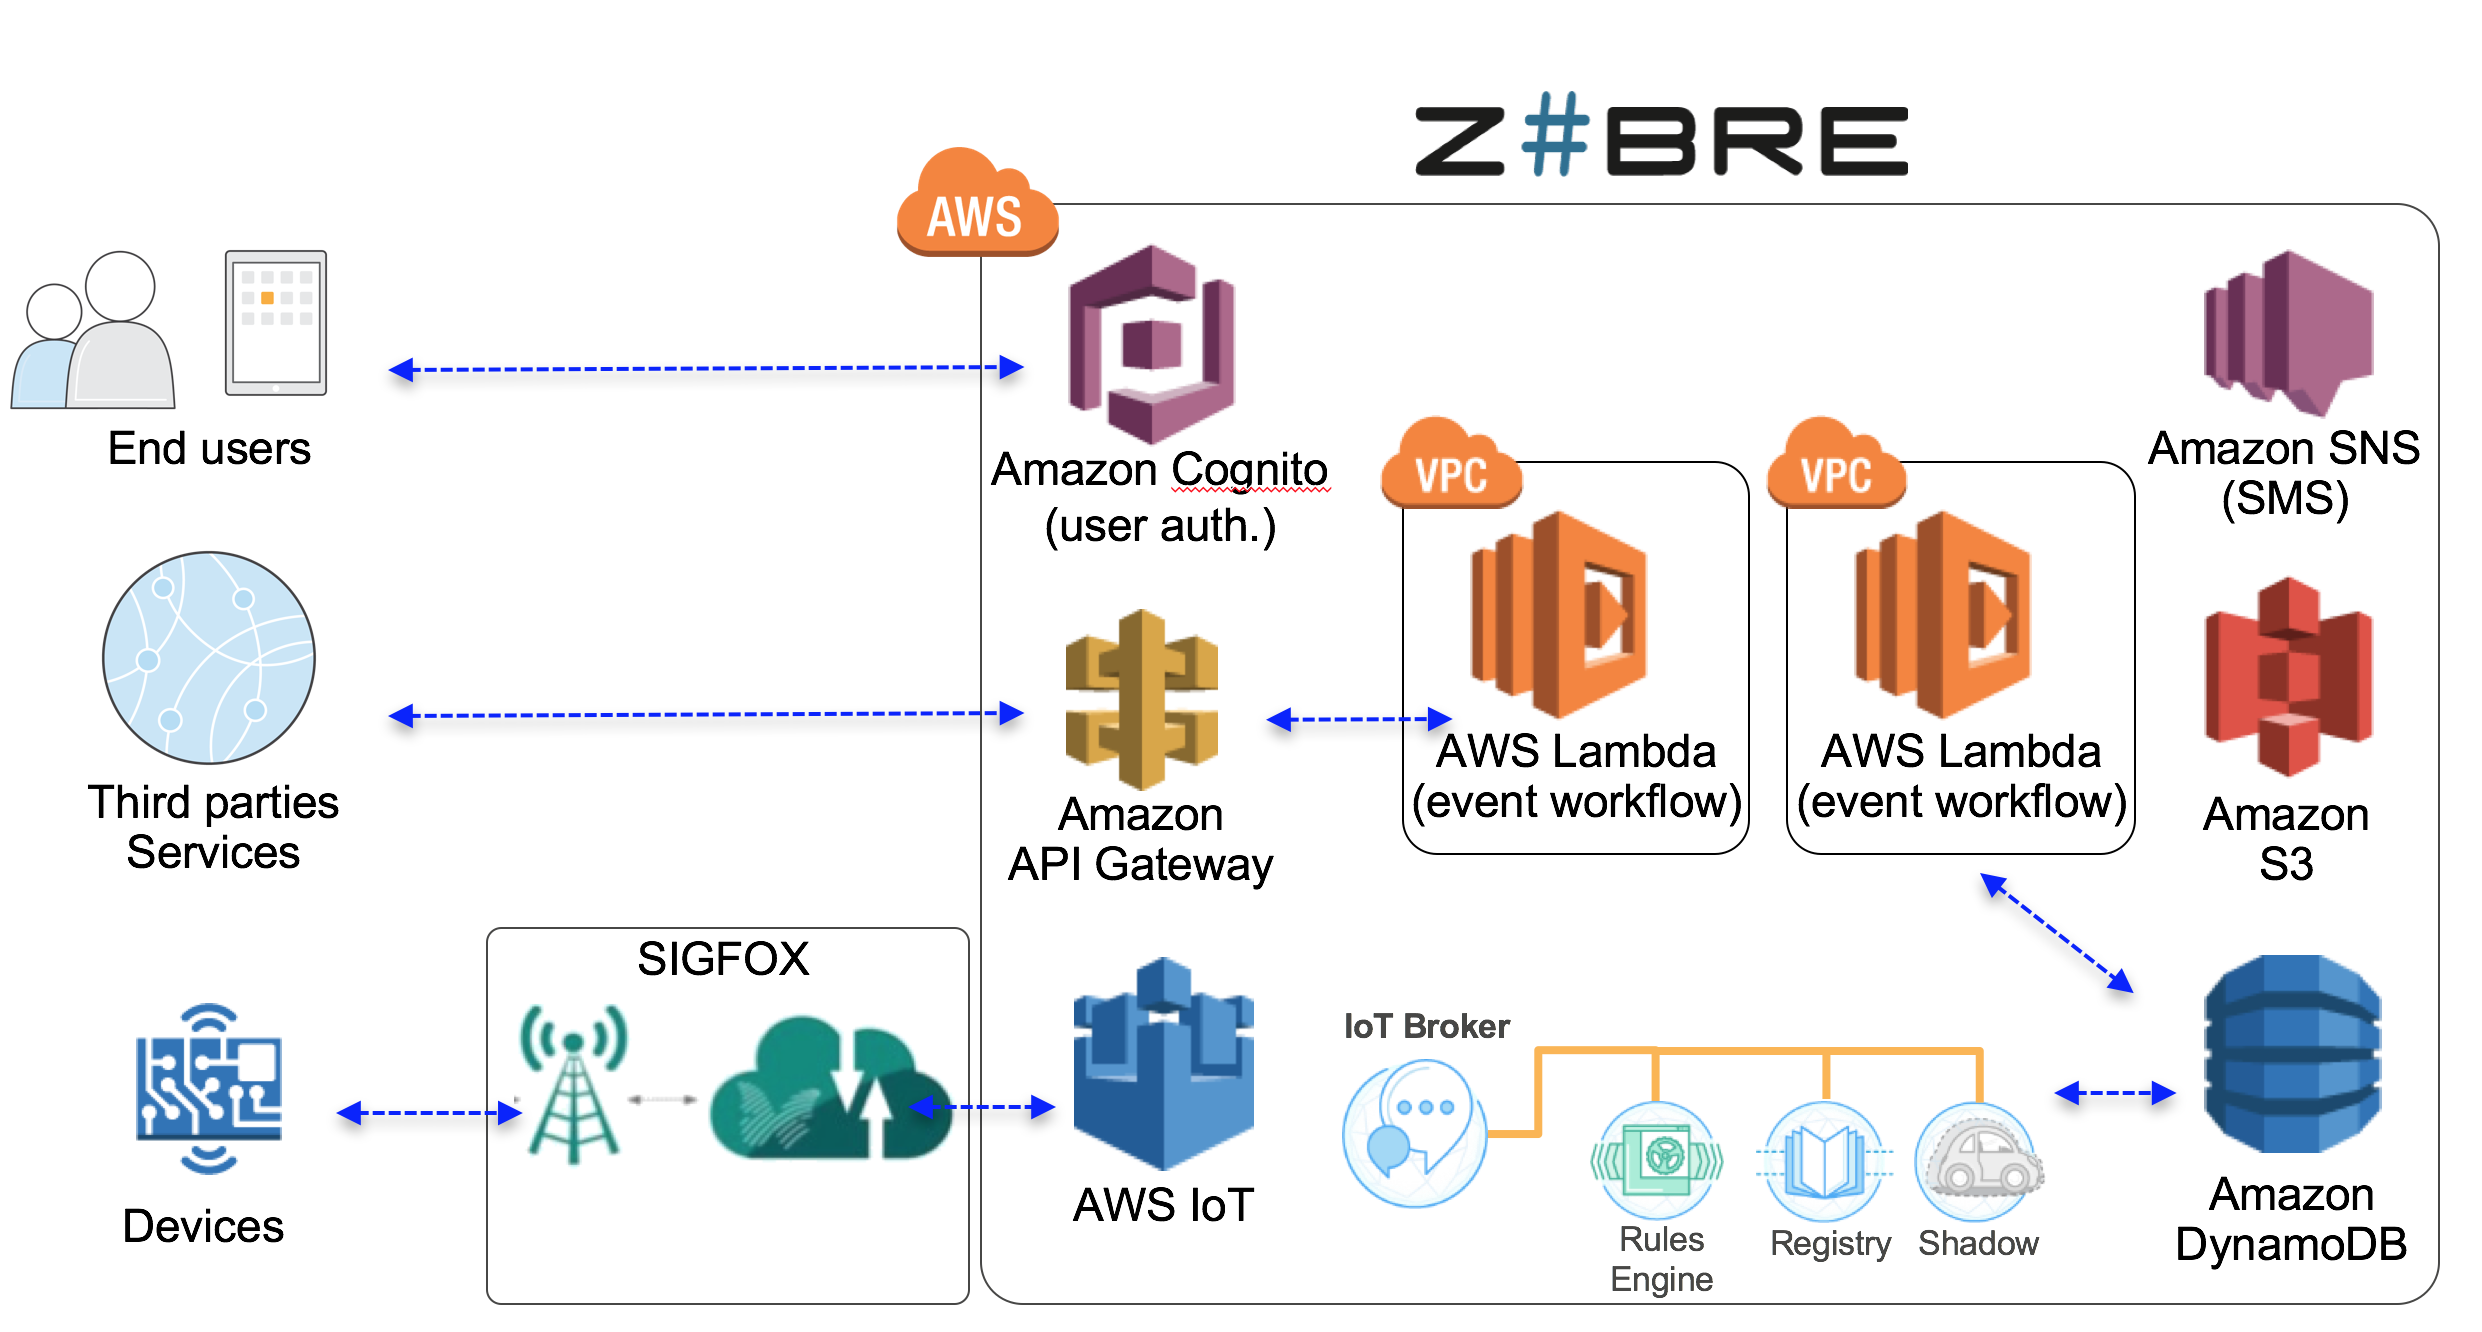
Our infrastructure is based on different AWS services as shown in the following diagram:
Our customer, the public council of the Loiret (a department in France), saves 3 million euros per year thanks to the implementation of this solution. More than 10,000 elderly people were equipped over a period of 5 months and more than 70 home care associations were involved in the project. As a result, this initiative was shown to have brought better care quality to elderly people.
Please find more information at https://zbre.io/
Next steps
The release of this native connector is the first step in making it easier for customers to connect Sigfox-enabled objects to the AWS Cloud in order to make use of all the Cloud Computing services available on the AWS platform.
We are actively listening to any feedback from customers to continue iterating on this integration in the future and to add more capabilities. Please reach out to sigfox@amazon.com to provide feedback.
As the Sigfox network is growing fast globally, and the AWS IoT platform is adding new features, we are really looking forward to see what new projects customers will be deploying!