The Internet of Things on AWS – Official Blog
Convert Messages from IoT Devices to Voice Commands Using AWS IoT Core and Amazon Polly
AWS IoT Core is a fully managed service that lets you connect billions of IoT devices and route trillions of messages to AWS services without managing infrastructure. One of the key features of AWS IoT Core is Rules Engine.
With Rules Engine, you can send data from your IoT devices to other services in AWS. This gives you the ability to take immediate actions on your IoT data, such as triggering alarms and notifications, collecting logs, or running analytics and machine learning models. In this post, we will show how you can take JSON messages coming in from your device and convert them to audio using the Amazon Polly text to speech machine learning model. Amazon Polly uses deep learning technologies to synthesize natural-sounding human speech, so you can convert articles to speech. With dozens of lifelike voices across a broad set of languages, you can use Amazon Polly to build speech-activated applications.
Scenario
For this example, we will be working with cleaning robots that are navigating through a supermarket to clean the floors. The robots send messages on an MQTT topic, robot/<clientID>/data, whenever the robots change states [running, waiting, stuck, charging]. The messages include the robot’s current state as well as its location in the supermarket.
Here is sample MQTT message coming in from a robot:
Topic: robot/cleaning_robot_1/data
{
"state": "stuck",
"location": "aisle 6"
}
In our example, the supermarket intends to notify its employees through wireless headsets whenever a robot is stuck. They want the announcement to play an audio clip identifying which robot is stuck and where it is located at, so the staff can easily navigate to the robot and resolve the issue.
Here is an example of the audio the employees will hear:
sample-audio-message.mp3 (Clip playing: “Cleaning robot 1 is stuck on aisle 6.”)
Download the file and play in your computer
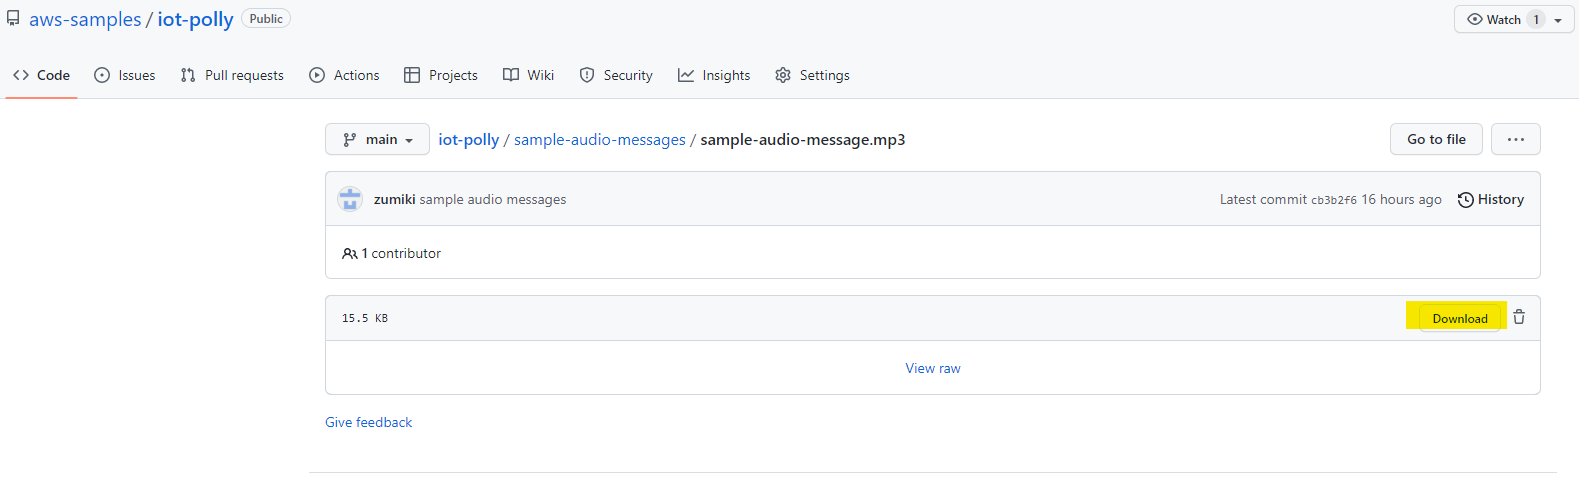
Figure 1 – Download Sample Audio
Solution overview
In order to provide the supermarket with this solution, you will need to build the following:
- IoT device to represent the robot that publishes messages when the robot changes state.
- IoT device to represent the speaker that plays audio messages.
- IoT Rule that:
- Listens to messages on the topic
robot/+/data. - Converts the JSON message to the desired String sentence when the robot is in a “stuck” state.
- Publishes a new message to topic
speaker/message.
- Listens to messages on the topic
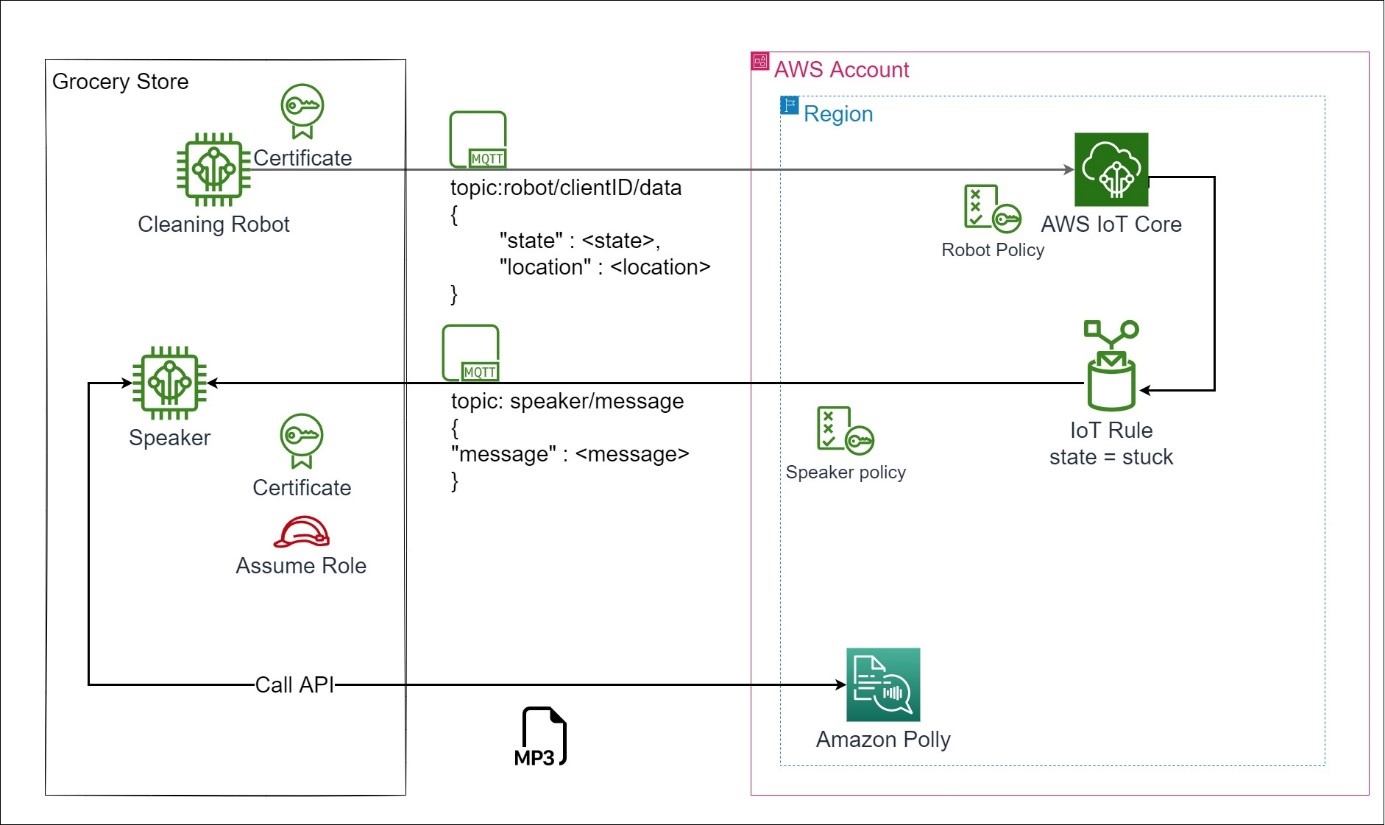
Figure 2 – Solution Diagram
Prerequisites
For this walk through, you should have the following prerequisites:
- An AWS account. If you don’t have an AWS Account, follow the instructions to create one.
- A user role with administrator access (service access associated with this role can be constrained further when the workflow goes to production).
- Recent modern browser (latest version of Firefox or Chrome)
- Python and Pip installed
- No specialized knowledge is required to build this solution, but basic Linux and Python knowledge will help.
Walkthrough
Step 1: Clone the GitHub repository and download the AWS IoT Device SDK
- Clone the GitHub repository for the sample applications that simulate the robot and speaker.
If you want to try this workflow on a real robot and speaker, copy the robot1 and speaker1 folders to their respective devices. Otherwise, you can leave both to simulate locally on your computer.
git clone https://github.com/aws-samples/iot-polly - Install the AWS IoT Device SDK for python.
- If you are running the robot and speaker separately, you will need to run this command for all devices.
python3 -m pip install AWSIoTPythonSDK
Step 2: Set up permissions for the devices
Robot
- First, set up the proper permissions for any robots. The robots need to be able to connect to AWS IoT and publish to the topic
robot/<robotID>/data. This can be done with an IoT policy. - Navigate to the AWS IoT Core console. In the navigation menu, under Security, choose Policies.
- Choose Create policy.
- For Policy name enter
policy_robot. - For Policy statements choose JSON and then paste in the following policy document:
{ "Version": "2012-10-17", "Statement": [ { "Effect": "Allow", "Action": "iot:Connect", "Resource": "arn:aws:iot:<region>:<accountID>:client/${iot:Connection.Thing.ThingName}" }, { "Effect": "Allow", "Action": "iot:Publish", "Resource": "arn:aws:iot:<region>:<accountID>:topic/robot/${iot:Connection.Thing.ThingName}/data" } ] } - Insert your
<region>and<accountID>into the policy and then choose Create.
Figure 3 – IoT Policy Robot
Speaker
- Next, set up the proper permissions for the speaker device. The speaker needs to be able to connect to AWS IoT and subscribe to the topic
speaker/message. The speaker also needs permissions to access Amazon Polly for converting text to audio. To give an IoT device access to other AWS services, you will need to give the device permission to assume a role alias. - Choose Create policy.
- For Policy name enter
policy_speaker. - For Policy statements choose JSON and then paste in the following policy:
{ "Version": "2012-10-17", "Statement": [ { "Effect": "Allow", "Action": "iot:AssumeRoleWithCertificate", "Resource": "arn:aws:iot:<region>:<accountID>:rolealias/speaker-role-alias" }, { "Effect": "Allow", "Action": "iot:Connect", "Resource": "arn:aws:iot:<region>:<accountID>:client/${iot:Connection.Thing.ThingName}" }, { "Effect": "Allow", "Action": "iot:Subscribe", "Resource": "arn:aws:iot:<region>:<accountID>:topicfilter/speaker/message" }, { "Effect": "Allow", "Action": "iot:Receive", "Resource": "arn:aws:iot:<region>:<accountID>:topic/speaker/message" } ] } - Insert your
<region>and<accountID>into the policy and then choose Create.
Figure 4 – IoT Policy Speaker
Step 3: Set up permissions for Amazon Polly actions
To give the speaker permissions to access Amazon Polly you will need to create an AWS Identity and Access Management(IAM) role and then create an IoT role alias to attach the IAM role to an IoT thing.
- Navigate to AWS IAM console. In the navigation menu choose Roles.
- Choose Create Role.
- Select Custom trust policy.
- Paste the following JSON policy:
{ "Version": "2012-10-17", "Statement": [ { "Effect": "Allow", "Principal": { "Service": "credentials.iot.amazonaws.com" }, "Action": "sts:AssumeRole" } ] } - Choose Next.
- Under Permissions policies, search for
pollyand select the checkbox for AmazonPollyReadOnlyAccess. - Choose Next.
- For role name, enter
speaker_role. - Choose Create role.
- Navigate to the AWS IoT Core console. In the navigation menu, under Security, choose Role Aliases.
- Select Create role alias.
- For role alias name, enter
speaker-role-alias. - For role, select speaker_role from the dropdown.
- Leave the credentials duration as 3600 seconds (1 hour) and choose Create.
Step 4: Connect the devices to AWS IoT Core
Create IoT things in AWS IoT Core for your robot and speaker devices.
- Navigate to the AWS IoT Core console. In the navigation menu, under Manage, choose All devices, Things.
- Choose Create things.
- Choose Create single thing. Choose Next.
- First, create the robot. Give the robot a Thing name of
cleaning_robot_1. - Leave the rest as is, and choose Next.

Figure 5 – Creating IoT Thing on AWS IoT Core
- Choose Auto-generate a new certificate (recommended). Choose Next.
- Select the checkbox next to the policy_robot. Choose Create thing.

Figure 6 – Attach Policy
- Download all four files: Device certificate, Public Key file, Private key file, RSA 2048 bit key: Amazon Root CA 1.
- Choose Done.

Figure 7 – Download Certificates
- Move the four files to the folder in the iot-polly repository titled robot1.
- Rename the private key and certificate files as follows:
- xxxx-private.pem.key to robot1-private.pem.key
- xxxx-certificate.pem.crt to robot1.certificate.pem.crt
- Repeat the steps above for the speaker device with the following changes:
- Name the IoT thing:
speaker_1. - Select the IoT policy:
policy_speaker. - Rename the private key and certificate files as follows:
- xxxx-private.pem.key to speaker1-private.pem.key
- xxxx-certificate.pem.crt to speaker1.certificate.pem.crt
- Name the IoT thing:
Step 5: Test the robot and speaker
- In the AWS IoT Core console navigation menu, choose MQTT test client.
- For Subscribe to a topic, enter
robot/+/data. - In the navigation menu, choose Settings. Copy the Device data endpoint.
- Enter the following commands in your terminal. Navigate to the iot-polly repository.
cd robot1# on a PC:
py -m venv env
cd env\Scripts\
activate
cd ../..
# on a Mac/Ubuntu:
python3 -m venv env source env/bin/activate - Replace
<iot endpoint>with the device data endpoint you just copied.pip install -r requirements.txt aws iot describe-endpoint --endpoint-type iot:Data-ATS python3 robot.py --clientId cleaning_robot_1 --endpoint <iot endpoint> --key robot1-private.pem.key --cert robot1-certificate.pem.crt --rootCA AmazonRootCA1.pem - Navigate back to the MQTT test client to see a message come through from
robot/cleaning_robot_1/data:{ "state": "stuck", "location": "aisle 17", "robotID": "cleaning robot 1" } - Keep robot1 running in the background as you will come back to it later.
- In a new tab in your terminal, navigate to the iot-polly repository.
cd speaker1# on a PC:
py -m venv env
cd env\Scripts\
activate
cd ../..
# on a Mac/Ubuntu:
python3 -m venv env
source env/bin/activate
# on both:
pip install -r requirements.txtGet your IoT endpoint and credential provider url:
aws iot describe-endpoint --endpoint-type iot:Data-ATS aws iot describe-endpoint --endpoint-type iot:CredentialProvider --region <region> - Ensure the audio on your computer is on. Run the speaker device: (Make sure to replace your endpoint and credential provider with the outputs of the commands above).
python3 speaker-device.py --thingname speaker_1 --region <region> --endpoint <iot endpoint> --key speaker1-private.pem.key --cert speaker1-certificate.pem.crt --rootCA AmazonRootCA1.pem --credentials_url https://<credential-provider-endpoint>/role-aliases/speaker-role/alias/credentials - Navigate back to the MQTT test client.
- Choose the tab Publish to a Topic.
- Topic name:
speaker/message - Message payload:
{ "message": "Hello from AWS IoT console" } - Choose Publish
- speaker1 uses the boto3 library in the speaker-device.py file to call the Amazon Polly API to convert the text received in the message to an MP3 audio file. It then automatically plays the audio using the playsound library.
- You should hear the message “Hello from AWS IoT console” and see the following message come through in your terminal window:
Received a new message:
b'{\n "message": "Hello from AWS IoT console"\n}'
from topic:
speaker/message - Keep speaker1 running as you will come back to it later.
Step 6: Create the IoT rule
- In the AWS IoT Core console, choose Message routing, Rules.
- Choose Create rule.
- For rule properties, give your rule a name:
robot_stuckand description. Choose Next.
Figure 8 – Specify Rule Properties
- Leave the SQL_version as is, and then enter the follow as the SQL_statement:
SELECT concat(robotID, ' is stuck on ', location) as message FROM 'robot/+/data' WHERE state = "stuck"
Figure 9 – SQL Statement
- This SQL statement receives any messages on the wildcard topic ‘
robot/+/data‘ where the state is “stuck” and then concatenates the data into a sentence format of “<robotID>is stuck on<location>”. - Choose Next.
- For Rule actions, choose Republish to AWS IoT topic, and then type the topic
speaker/message.
Figure 10 – Rule Actions
- Choose Create new role.
- Name the role,
Role_IoTVoice_rule. - Choose Create.
- Choose Next.
- Chose Create.
- You should see a new rule successfully created.

Figure 11 – New IoT Rule Created
Step 7: Test the IoT rule
- Ensure robot1 and speaker1 are still running in your terminal and your audio is on.
- Open the JSON file robot_payload.json (found in the robot1 folder) in your desired text editor.
- Edit the location in the JSON and save.
{ "state": "stuck", "location": "aisle 12" } - You will see that robot1 published a message:
Published topic robot/cleaning_robot_1/data: {"state": "stuck", "location": "aisle 12", "robotID": "cleaning robot 1"} - The topic is then automatically routed through your IoT rule and published back to speaker1.
Received a new message:
b'{"message":"cleaning robot 1 is stuck on aisle 12"}'
from topic:
speaker/message - speaker1 converts the text received from your IoT Rule to an MP3 audio file and automatically plays the message. “Cleaning robot 1 is stuck on aisle 12”.
- Try editing the robot_payload.json file again, but this time change the state to “running”. Save the file.
{ "state": "running", "location": "aisle 2" } - You will see that robot1 receives the message, but the message is never forwarded to speaker1 because it is not stuck so the rule filters it out.
Congratulations! You have successfully created an IoT rule that converts and routes messages to another device for conversion to audio with Amazon Polly.
Summary
In this blog, you learned how you can use AWS IoT Core’s Rule Engine and Amazon Polly to listen to IoT messages, but what you learned can be applied in a variety of solutions, for example:
- Smart Vehicle can notify drivers with voice message “Current range is 30 miles; next gas station is 5 miles way”.
- Smart Freezer: “Temperature inside the freezer is high. It went from 0oF to 5oF in 10 minutes”
- Blood Sugar Monitor: “Your blood sugar is too high, 210mg/DL”
To learn more about how to utilize the IoT Rules Engine, check out our course, Deep Dive into AWS IoT Rules Engine. Let us know how you are acting on your IoT data to improve your business operations.