Networking & Content Delivery
Scaling VPN throughput using AWS Transit Gateway
A virtual private network (VPN) is one of the most common ways that customers connect securely to the AWS Cloud from on-premises or data center environments. Customers establish VPN connectivity to AWS using AWS managed VPN solutions like AWS Site-to-Site VPN, transit gateways, or partner solutions running on Amazon EC2. In this post, we demonstrate how you can use AWS Transit Gateway to scale an AWS Site-to-Site VPN throughput beyond a single IPsec tunnel’s maximum limit of 1.25 Gbps limit.
Virtual private gateways and AWS Transit Gateway
Virtual private gateways are a highly available logical function that provides routing to VPCs by VPN or AWS Direct Connect gateway. You can use static or dynamic routing to route to and from the VPC. Before the launch of AWS Transit Gateway, virtual private gateways were the only choice for VPN connectivity, other than third-party solutions. Virtual private gateways with a VPN are suitable for single-VPC connectivity.
Typically, when connecting multiple VPCs to the on-premises environment, each VPC must have a separate VPN connection through a respective virtual private gateway, or follow the transit VPC architecture. VPN connection is a secure connection between your on-premises equipment and your VPCs. Each VPN connection has two VPN tunnels which you can use for high availability. VPN tunnel is an encrypted link where data can pass from the customer network to or from AWS. The following diagram shows the high-level connectivity with virtual private gateways.
Virtual Private Gateway with Multiple VPCs and VPN Connections

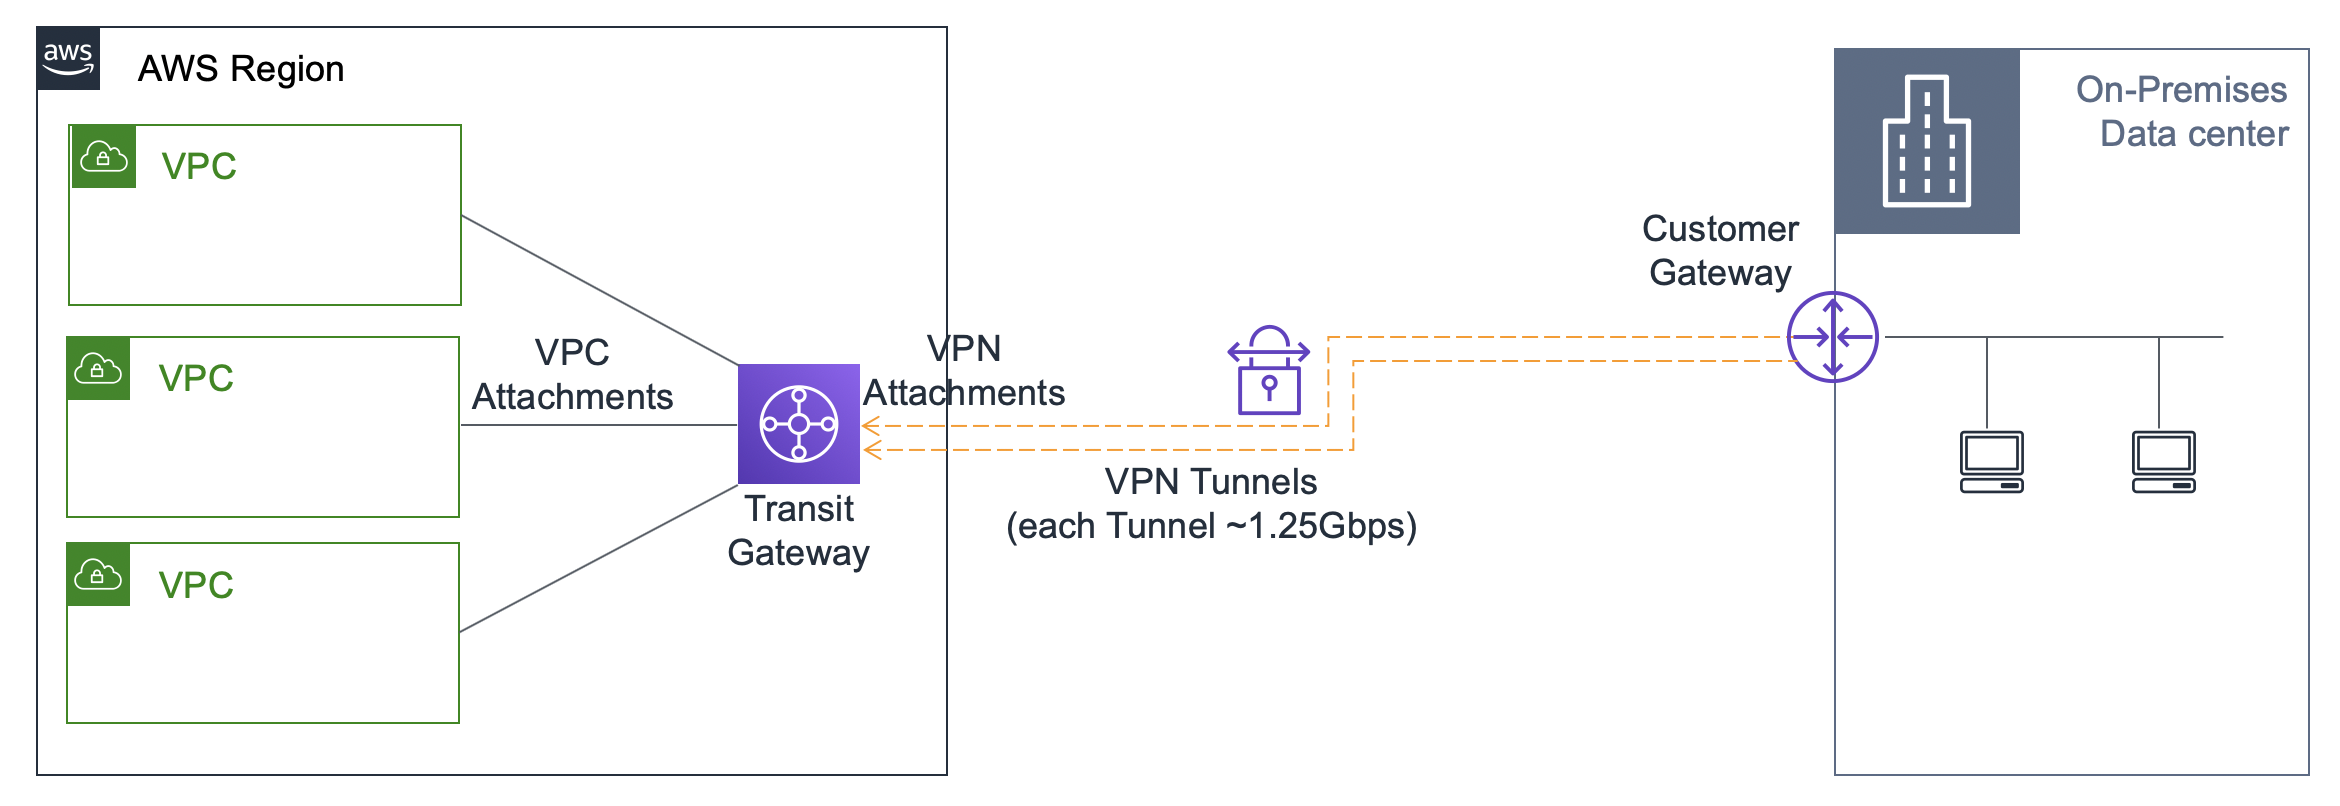
With AWS Transit Gateway, you can simplify the connectivity between multiple VPCs and also connect to any VPC attached to AWS Transit Gateway with a single VPN connection. AWS Transit Gateway also enables you to scale the IPsec VPN throughput with equal cost multi-path (ECMP) routing support over multiple VPN tunnels. A single VPN tunnel still has a maximum throughput of 1.25 Gbps. If you establish multiple VPN tunnels to an ECMP-enabled transit gateway, it can scale beyond the default maximum limit of 1.25 Gbps. You also must enable the dynamic routing option on your transit gateway to be able to take advantage of ECMP for scalability. ECMP in transit gateway uses 5-tuple hash (protocol number, source IP address, destination IP address, source port number, destination port number) to make packets take one of the paths or VPN tunnels. Similarly, customers must configure customer gateway (CGW) to leverage ECMP thereby performing the hash to forward packets equally over multiple paths.
To validate the traffic over multiple tunnels, suggestion is to use multiple flows while sending traffic to make full use of maximum tunnels. Single flow is mapped to single tunnel, so it cannot get more than 1.25Gbps throughput. In the following walkthrough, parallel streams are used in iperf command (-P Parameter) to use different tunnels.
Five-tuple hashing with ECMP results in asymmetric routing with multiple tunnels, which is okay because IP routing is stateless. In the case of the customer gateway being a stateful firewall, it might be necessary to create a source NAT rule for the traffic to make sure that there are symmetric flows.
In this post, you configure four tunnels sequentially to demonstrate higher throughput with a transit gateway with the increase in the number of tunnels. The following diagram shows the high-level connectivity with AWS Transit Gateway.
Transit gateway with multiple VPC attachments and VPN connection
Prerequisites
This post assumes that you know the basics about the following concepts:
- VPC networking
- AWS Transit Gateway
- VPN technology
- BGP dynamic routing
An ECMP-capable on-premises router is also required to achieve higher throughput beyond the default VPN throughput limits.
Transit gateway detailed configuration
In this configuration, the AWS side is represented with a VPC along with a transit gateway in the us-east-1 Region and an on-premises data center simulated with a Cisco CSR in us-west-1 Region.
Transit gateway with ECMP over multiple VPN connections

AWS Cloud in US-east-1 Region
VPC configuration
- Create a VPC Alpha with CIDR range 10.36.0.0/16 in us-east-1 Region.
- Create an internet gateway, and attach it to VPC Alpha.
- Create one public subnet (10.36.0.0/24) for the NAT gateway and jump server.
- Create a public route table for a public subnet with a default route pointing to the internet gateway.
- Create two private subnets (10.36.1.0/24, 10.36.2.0/24) in different Availability Zones.
- Create a private route table in this VPC, and attach the two private subnets, adding a default route to point to the NAT gateway.
Transit Gateway configuration
- Create a transit gateway with ASN 64536, DNS, and ECMP enabled and Default route table association and Default route table propagation disabled, because you are using non-default route tables.
- Create a transit gateway VPC attachment to VPC Alpha.
- Create a transit gateway route table. Create association with the VPC attachment, and create propagation with the VPC attachment.
- The transit gateway route table should show the VPC CIDR in the list of routes.
Transit gateway route table with VPC CIDR in the routes

5. Edit the private route table in VPC Alpha to add a route to the on-premises CIDR range (172.16.0.0/16) with the transit gateway.
VPC route table with routes to on-premises range with transit gateway

On-premises simulation in us-west-1 Region with a Cisco CSR as the customer gateway
- Create a VPC on-premises with CIDR range 172.16.0.0/16 in us-west-1 Region.
- Create an internet gateway and attach it to the VPC on-premises.
- Create one public subnet (172.16.0.0/24) for the Cisco CSR and server instance.
- Create a public route table for a public subnet with a default route pointing to the internet gateway.
- Create a Cisco CSR instance with a security package (from AWS Marketplace) in the public subnet. To test high throughput, the suggested instance type is C5.4xLarge.
- Configure the security group to allow SSH, UDP 500, and UDP 4500 ports.
- Associate an Elastic IP address to CSR, and make a note of this Elastic IP address.
- Log in to CSR and configure the following in the interface GigabitEthernet1 configuration to set up the CSR to go beyond default 1-Gbps throughput.
- no negotiation auto
- speed 10000
Configuration in Cisco CSR for the interface
 9. Edit the public route table in VPC on-premises to add a specific route to the VPC Alpha CIDR range (10.36.0.0/16) with a CSR elastic network interface.
AWS Cloud: Transit gateway VPN configuration
- In the us-east-1 Region VPC console, create a transit gateway VPN attachment with the following options:
- Dynamic routing
- Elastic IP address of the CSR as the IP address for the new customer gateway
- ASN 65016
- The default for tunnel options
Transit gateway configuration options
2. In the transit gateway route table, choose Create Association with this VPN Attachment, Create Propagation with this VPN Attachment.
3. Under Site-to-Site VPN Connections, choose Download the Configuration for Cisco Systems/CSRv AMI.
On-premises: CSR VPN configuration
- Log in to the CSR created in the us-west-1 Region.
- Configure the router with the VPN configuration downloaded earlier. For this setup, you can ignore the default-originate configuration in the BGP section. To advertise on-premises subnet to the transit gateway, configure network 172.16.0.0 mask 255.255.255.0 in BGP section.
- Make sure to perform the Tunnel 2 configuration as well.
- At this stage, the VPN tunnels in the us-east-1 Region should move to the UP state.
- Check the BGP table and route table to make sure that the route to the VPC Alpha CIDR is present:
- show ip bgp
- show ip route bgp
BGP and route table outputs in Cisco CSR with one tunnel

Set up for the traffic test
For the on-premises environment (simulated in us-west-1 Region):
- Create a server endpoint instance (c5.large) in the on-premises public subnet using the Amazon Linux AMI, and make a note of the instance’s private IP address.
- Allow traffic from 10.36.0.0/16 (VPC Alpha CIDR range) in the associated security group.
- Connect by using SSH to the server endpoint instance:
- Download iperf3 package (sudo yum install -y iperf3).
- Start the iperf server process (sudo iperf3 -s -p 5003).
For the AWS Cloud environment (us-east-1 Region):
- Create a jump server-alpha (t2.micro) in the Alpha VPC public subnet using the Amazon Linux AMI.
- Create a client endpoint instance (c5.large) in the Alpha VPC private subnet using the Amazon Linux AMI.
- Allow traffic from 172.16.0.0/16 (VPC on-premises CIDR range) in the associated security group.
- Connect to client endpoint instance by using SSH:
- To make sure that VPN connectivity is okay, ping the server endpoint IP address (172.16.0.X).
- Download iperf3 package (sudo yum install -y iperf3).
- Start the iperf traffic (sudo iperf3 -c <IP-of-Server-instance> -P 25 -i 1 -t 60 -V -p 5003).
(iPerf is starting 25 parallel client streams (-P parameter) to maximize the throughput.).
At this stage, you should be getting close to 1-Gbps throughput because only one tunnel is active for forwarding traffic although both tunnels are up. You may see a delay before your throughput increases to ~1Gbps over single tunnel. This is an automatic process that is initiated when AWS detects high usage on your VPN.
Enable BGP multipath and traffic load sharing in CSR.
- Under BGP, for address-family ipv4, configure maximum-paths 4. Maximum-paths is configured as 4 because the four VPN tunnels are planned for this test (which is two VPN connections).
- Run the following command:
- ip cef load-sharing algorithm include-ports destination
- This load-sharing algorithm merits special consideration. The destination is configured here in the test because there is more port variation on the destination side.
- To make sure that traffic is now multipath-enabled, check the BGP table and the route table:
- show ip bgp shows two paths to VPC Alpha CIDR with BGP multipath flag set.
- show ip route bgp shows two equal paths to VPC Alpha CIDR.
Tunnel, BGP, and route table outputs in Cisco CSR with two tunnels

4. Check the transit gateway route table. It should show two attachments for on-premises network.
Transit gateway route table with two VPN attachments

At this point, two tunnels are active and load-sharing the traffic.
- Run iperf traffic test again. With each new tunnel, increase the number of parallel threads in iperf command (-P parameter). The throughput should be approximately double the throughput of one tunnel.
- Create another VPN attachment at the transit gateway to the same existing customer gateway.
- Under Site-to-Site VPN Connections, choose Download the Configuration for Cisco Systems/CSRv AMI.
- Connect using SSH to the CSR, and configure additional tunnels (as Tunnel3 and Tunnel4).
- At this point, check the following, demonstrated in the following screenshot:
- show ip int brief shows four tunnel interfaces active.
- show ip bgp shows four paths to the VPC Alpha CIDR with BGP multipath flag set.
- show ip route bgp shows four equal paths to the VPC Alpha CIDR.
Tunnel, BGP, and route table outputs in Cisco CSR with four tunnels

6. Check the transit gateway route table. It should show four attachments for the on-premises network, as shown in the following screenshot
Transit gateway route table with four VPN attachments

7. Run the iperf traffic test again. You should be getting approximately four times the throughput of a single tunnel. Notice the increase in parallel threads for iperf command with an increase in the number of active tunnels. There are other factors that may influence the performance of aggregated throughput like latency, congestion, packet loss, and protocol operations. So, you may not see exact 4x increase in throughput over four tunnels. The idea behind running the tests with more tunnels is to show how you can scale beyond the default maximum limit of 1.25 Gbps for the IPsec VPN tunnel. For more information, see AWS VPN FAQs.
Traffic tests output with different number of active tunnels

8. To observe the network statistics and pattern, review the Amazon CloudWatch metrics for the CSR instance after multiple traffic test runs. The following screenshot shows example Amazon CloudWatch metrics.
Cloudwatch metrics for CSR instance

9. Optionally, continue to add more VPN attachments to the transit gateway, and repeat steps 9–12 to scale the VPN throughput up to 50 Gbps. You might have to run sustained traffic tests to see an increase in effective throughput.
Summary
This post shows you how to scale out VPN throughput capacity by using the ECMP routing feature of AWS Transit Gateway. The VPN throughput increases with the increase in the number of VPN attachments (each attachment creates two tunnels). The increase in the throughput is subject to the customer gateway’s VPN throughput capacity and support for dynamic routing and equal-cost multipath feature.
About the authors

Vinod Kataria
Vinod Kataria is a senior partner solutions architect at Amazon Web Services.

Sreekanth Krishnavajjala
Sreekanth Krishnavajjala is a senior solutions architect at Amazon Web Services.