Integration & Automation
Toward a bastion-less world
Using a bastion or jump server has been a common way to allow access to secure infrastructure in your virtual private cloud (VPC) and is integrated into several Quick Starts. Amazon Web Services (AWS) has recently released two new features that allow us to connect securely to private infrastructure without the need for a bastion host.
This greatly improves your security and audit posture by centralizing access control and reducing inbound access. With Session Manager, you don’t have to open inbound access to secure shell (SSH) ports and remote Microsoft Windows PowerShell ports. To learn more about the benefits, see the AWS Systems Manager Session Manager documentation.
In this first part of this two-part blog series, I present an overview of the automation required to enable SSH access by using AWS Session Manager. Instructions for access using Amazon Elastic Compute Cloud (Amazon EC2) Instance Connect will follow in the second blog post.
Before you start
For details on Session Manager, see the Getting Started with Session Manager documentation.
To work through this blog post, if you are testing the connection by using SSH, you need the name of an existing public/private key pair, which allows you to connect securely to your instance after it launches. If you don’t have a key pair, create one before following the rest of the steps below. A key pair is not required if you are testing the connection using only the AWS CLI or the AWS Systems Manager console.
Setup
To enable connection by using Session Manager, you need to have AWS Systems Manager Agent (SSM Agent) installed on the Amazon EC2 instance, and you need to add an AWS Identity and Access Management (IAM) role to the instance that grants access to Systems Manager. The following role is the minimum required for the connection. Additionally, you can set up an optional custom S3 Bucket Policy that I have not covered here for simplicity.
The Amazon EC2 instance must have the latest SSM Agent installed to allow connection using SSH. On Amazon Linux 2, you can install the latest SSM Agent by using the following command.
Testing
For testing, I’ve provided an AWS CloudFormation template that sets up the following environment.
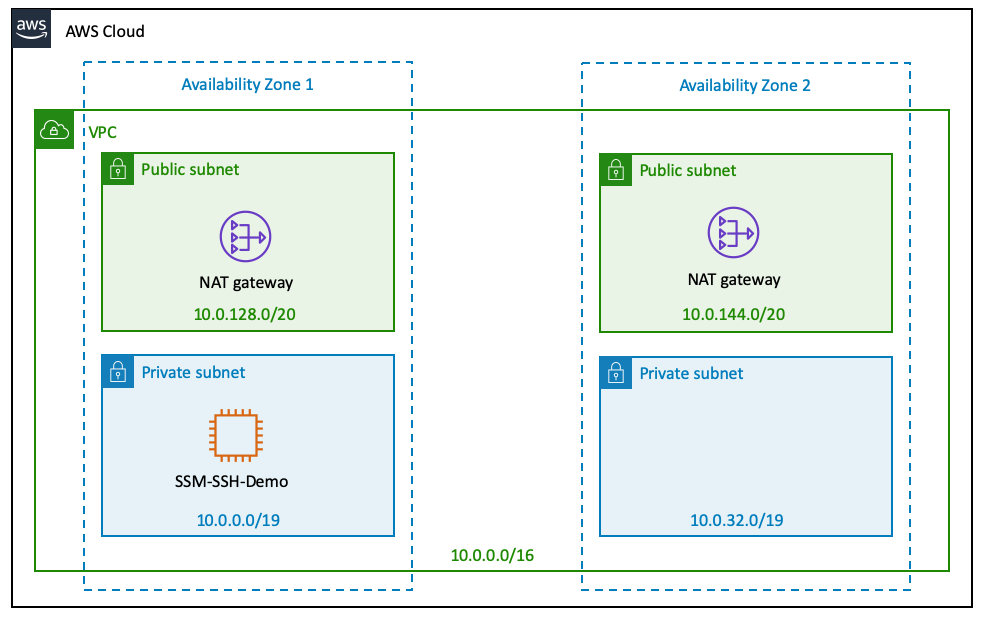
- A VPC, using the AWS VPC Quick Start, with two public and two private subnets spanning two Availability Zones.
- The required IAM role to enable Systems Manager.
- In one of the private subnets, an Amazon Linux 2 demo instance with the latest SSM Agent. Although this instance doesn’t have any direct connectivity from the internet, it can be accessed securely by using Session Manager without requiring a bastion host.
Deployment steps
- Deploy the CloudFormation stack in the AWS Ohio Region (us-east-2) in one of two ways:
- To test the connection using only AWS CLI or the AWS Systems Manager console, deploy the provided CloudFormation template without a key pair in the AWS Ohio Region (us-east-2) using the AWS CloudFormation console.
- To test the connection using SSH, deploy the provided CloudFormation template with a key pair in the AWS Ohio Region (us-east-2) using the AWS CloudFormation console.
- Once the CloudFormation stack reaches CREATE_COMPLETE status, go to the Outputs tab and get the value of MyEC2Instance.
Start a session
There are three ways to start a session.
Start a session using the AWS CLI
To start a session using the AWS CLI, use the following command, substituting the value of MyEC2Instance with the output from the previous step and the Region where you deployed the template.
Notice that you are able to establish a session on the instance without needing to open ports or use a key pair to connect to the instance.
Start a session using AWS Systems Manager console
- In the AWS Systems Manager console, navigate to Session Manager and choose Start Session.

- Under Target instances, choose the MyEC2Instance instance that you created and choose Start session.

A new browser tab will open with a terminal window where you can run any operating system commands.

Start a session using SSH
This option requires that the latest Session Manager Plugin for the AWS CLI is pre-installed, and that you are using AWS CLI version 1.16.12 or later. If not, please do that first before proceeding to the rest of the steps. Also, for testing this, you must have chosen the second link in the Deployment steps section and launched your your instance with a key pair.
- On your local machine you need to update your SSH config to enable running a proxy command. Add the following in your SSH config, typically located at
~/.ssh/config.For more information, see the documentation.
- Open a terminal and ensure that you have a SHELL variable set. You can verify that by running the
echo $SHELLcommand. If this returns no value or/bin/false, in the terminal session, run the following command. - If your instance is in a different AWS Region than the default AWS Region configured in your AWS CLI, add the following variable to ensure you reach the correct Region.
- Start a session by using the following command.
ssh -i /path/my-key-pair.pem ec2-user@instance-id
Clean up
After you are done testing, go to the AWS CloudFormation console and delete the ssm-ssh-demo stack to avoid incurring charges for any resources created by the template.
Conclusion
I have demonstrated above a simple way of adding an IAM role to your EC2 instances in the private subnets to enable secure session using Session Manager without the need of a bastion host. With this approach, you no longer have to open inbound remote access to your instances, and only users who are authorized to invoke SSM commands can initiate a session. This provides an improved security and audit posture. I hope you enjoyed reading this post. If you have any feedback on the steps in this post, please add your comments.