AWS Thai Blog
AgentCore in Action Part3 : ทำความเข้าใจ AgentCore Identity
AgentCore in Action Series
ซีรีส์นี้จะพาคุณไปทำความเข้าใจวิธีการรัน AI agents อย่างมีประสิทธิภาพด้วย Amazon Bedrock AgentCore โดยครอบคลุมตั้งแต่การ deploy, scale ไปจนถึงการรักษาความปลอดภัยตามมาตรฐาน enterprise โดยไม่ต้องกังวลเรื่อง infrastructure management
AgentCore in Action: การสร้างและจัดการ AI Agents จาก Deploy ถึง Scale
- Part 1: การ Host MCP Servers ด้วย AgentCore Runtime
- Part 2: การจัดการ MCP Servers หลายตัวด้วย AgentCore Gateway
- Part 3: ทำความเข้าใจ AgentCore Identity (บทความนี้)
- Part 4: ควบคุมสิทธิ์การใช้งาน Tools ด้วย AgentCore Policy (Coming soon)
Part 3: ทำความเข้าใจ AgentCore Identity
ใน Part 1 ได้อธิบายการ deploy MCP servers บน AgentCore Runtime และใน Part 2 ได้รวม MCP servers หลายตัวเข้าด้วยกันผ่าน AgentCore Gateway
ตลอดทั้งสอง Part ที่ผ่านมา มีการ configure authentication ไว้หลายจุด ทั้ง IAM/SigV4, OAuth/JWT และ Cognito User Pool แต่ยังไม่ได้มีการอธิบายว่าสิ่งเหล่านี้เชื่อมโยงกันอย่างไรภายใต้ AgentCore
Part 3 นี้จะไม่มีการ build อะไรใหม่ แต่จะพาย้อนกลับไปดูสิ่งที่สร้างไว้แล้วใน Part 1 และ 2 ผ่านมุมมองของ AgentCore Identity เพื่อทำความเข้าใจว่า component นี้ทำหน้าที่อะไร และทำไมถึงสำคัญ
AgentCore Identity คืออะไร?
AgentCore Identity คือ identity และ credential management service ที่ออกแบบมาเฉพาะสำหรับ AI agents โดยทำหน้าที่จัดการทั้ง authentication, authorization และ credential management ให้กับ agents และ tools ที่ทำงานอยู่บน AgentCore
สามารถมองว่า AgentCore Identity เป็นเหมือน “ศูนย์กลางด้านความปลอดภัย” ของ AgentCore ที่ดูแลทุกเรื่องเกี่ยวกับ identity ตั้งแต่การตรวจสอบว่าใครเรียก agent ไปจนถึงการจัดการ credentials สำหรับ agent ที่ต้องไปเชื่อมต่อกับระบบอื่น

หลักการทำงาน: Delegation ไม่ใช่ Impersonation
สิ่งสำคัญที่ต้องเข้าใจคือ AgentCore Identity ทำงานบนหลักการ delegation ไม่ใช่ impersonation
แทนที่ agent จะใช้ credentials ของ user โดยตรง agent จะ authenticate ในฐานะตัวเอง (ด้วย identity ของ agent เอง) พร้อมแนบ user context ที่ตรวจสอบได้ไปด้วย วิธีนี้ทำให้:
- สามารถควบคุม access control ได้ละเอียดในระดับ agent
- มี audit trail ที่ชัดเจนว่า agent ทำอะไร ในนามของ user คนไหน
- สามารถ revoke สิทธิ์ของ agent ได้โดยไม่กระทบ user access
ส่วนประกอบหลักของ AgentCore Identity
- Workload Identity Directory – สร้างและจัดการ identity ของ agents แต่ละตัว โดยแต่ละ agent จะมี identity เป็นของตัวเอง พร้อม metadata เช่น ชื่อ, ARN และ OAuth return URLs
- Agent Authorizer – ตรวจสอบว่า user หรือ service ที่เข้ามาเรียก agent นั้นได้รับอนุญาตหรือไม่ (Inbound Auth)
- Resource Credential Provider – เก็บ configuration สำหรับ agent ที่ต้องไปขอ credentials เพื่อเข้าถึง downstream services เช่น GitHub, Salesforce หรือ Google
- Resource Token Vault – เก็บ OAuth access tokens, client secrets และ API keys แบบ encrypted อย่างปลอดภัย
Dual Authentication Model: Inbound และ Outbound
หัวใจสำคัญของ AgentCore Identity คือ Dual Authentication Model ที่แบ่ง authentication ออกเป็น 2 ทิศทาง:
- Inbound Authentication – ใครสามารถเรียก agent ได้?
- Outbound Authentication – agent สามารถเข้าถึงอะไรได้บ้าง?
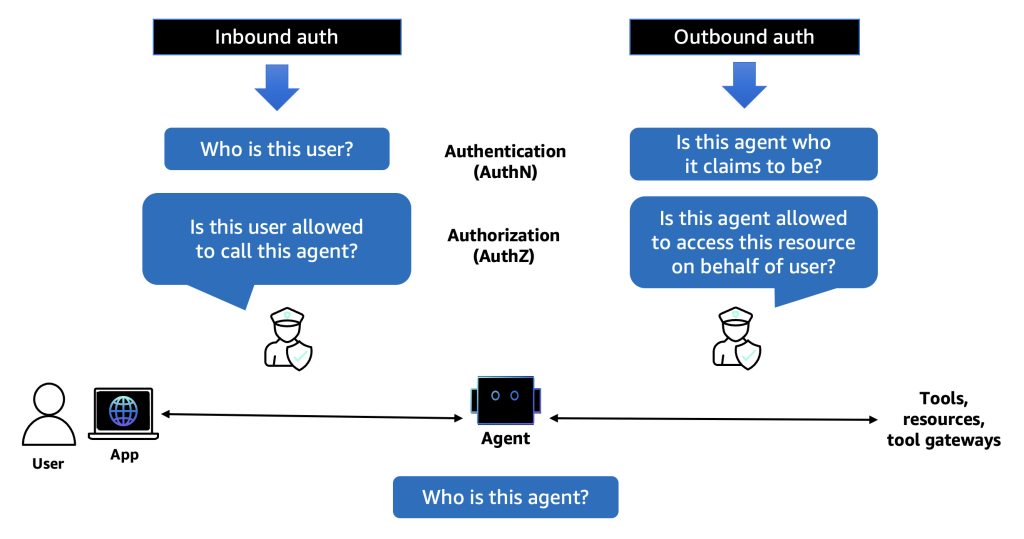
Inbound Authentication: ใครเรียก Agent ได้?
Inbound Authentication คือการตรวจสอบ identity ของผู้ที่เข้ามาเรียกใช้งาน Runtime หรือ Gateway
สิ่งที่ configure ไว้แล้ว:
| Component | Inbound Auth Type | Part | รายละเอียด |
| Runtime (Part 1) | IAM (SigV4) | Part 1 | Kiro ใช้ AWS credentials + mcp-proxy-for-aws เพื่อ sign requests |
| Runtime (Part 2) | JWT (OAuth) | Part 2 | Reconfigure Runtime ให้ใช้ JWT authorizer ผ่าน Cognito |
| Gateway | IAM (SigV4) | Part 2 | Kiro เรียก Gateway ด้วย IAM credentials |
Inbound Auth ที่ AgentCore Identity รองรับ
- IAM (SigV4) – ใช้ AWS credentials ในการ authenticate เหมาะสำหรับ AWS-native clients
- OAuth 2.0 / OpenID Connect – ใช้ identity providers เช่น Amazon Cognito, Okta หรือ Microsoft Entra ID
- JWT Token Validation – ตรวจสอบ JWT tokens จาก OIDC-compliant providers
ใน Part 1 ใช้ IAM เป็น default ซึ่งง่ายและเหมาะกับการใช้งานภายในทีมที่มี AWS credentials อยู่แล้ว แต่พอมาถึง Part 2 ที่ต้องให้ Gateway เรียก Runtime จำเป็นต้องเปลี่ยนเป็น JWT เพราะ Gateway → Runtime (MCP targets) ต้องใช้ OAuth authentication
นี่คือเหตุผลที่ต้อง reconfigure Runtime ทั้งสองตัวใน Part 2 โดยเพิ่ม authorizer_configuration ลงใน bedrock_agentcore.yaml:
# ส่วนที่เพิ่มเข้าไปใน bedrock_agentcore.yaml
authorizer_configuration:
  customJWTAuthorizer:
    discoveryUrl: https://cognito-idp.ap-southeast-1.amazonaws.com/ap-southeast-1_XXXXXXX/.well-known/openid-configuration
    allowedClients:
    - xxxxxxxxxxxxxxxxxxxxx
เมื่อ configure แบบนี้ AgentCore Identity จะทำหน้าที่เป็น Agent Authorizer ที่ validate JWT token ทุกครั้งที่มี request เข้ามา โดยตรวจสอบว่า:
- Token ถูก sign โดย identity provider ที่ระบุไว้ใน
discoveryUrl - Client ID อยู่ใน
allowedClientslist - Token ยังไม่หมดอายุ
Outbound Authentication: Agent เข้าถึงอะไรได้บ้าง?
Outbound Authentication คือการจัดการ credentials ให้ agent สามารถไปเรียกใช้ downstream services ได้อย่างปลอดภัย
ลองนึกภาพว่า agent ต้องไปดึงข้อมูลจาก Google Drive, สร้าง issue บน GitHub หรือส่งข้อความผ่าน Slack สิ่งที่ agent ต้องมีคือ credentials ที่ถูกต้องสำหรับแต่ละ service
AgentCore Identity จัดการเรื่องนี้ผ่าน 2 components:
1. Resource Credential Provider
เก็บ configuration ว่า agent ต้องใช้ credentials แบบไหนในการเข้าถึง service ไหน จากนั้นจะไปดึง credentials จาก downstream resource servers เช่น Google หรือ GitHub เพื่อให้ agent เข้าถึงได้
สิ่งที่ทำไว้แล้วใน Part 2:
ตอนที่สร้าง OAuth client ชื่อ gateway-to-runtime-oauth ใน AgentCore Identity นั่นคือการสร้าง Resource Credential Provider
Configuration ที่ใส่ไว้:
- Provider type: Custom OAuth2
- Client ID: จาก Cognito App Client
- Client Secret: จาก Cognito App Client
- Discovery URL: Cognito OIDC discovery endpoint
เมื่อ Gateway ต้องเรียก Runtime จะเกิดขั้นตอนดังนี้:
- Gateway ขอ OAuth token จาก AgentCore Identity
- AgentCore Identity ใช้ credentials จาก credential provider ไปขอ token จาก Cognito
- Cognito ออก access token กลับมา
- AgentCore Identity ส่ง token ให้ Gateway
- Gateway แนบ token ไปกับ request ที่ส่งไป Runtime
- Runtime validate token แล้วอนุญาตให้เข้าถึง
ทั้งหมดนี้เกิดขึ้นโดยอัตโนมัติ Gateway ไม่ต้องจัดการ token เอง ไม่ต้อง refresh token เอง AgentCore Identity ดูแลให้ทั้งหมด
2. Resource Token Vault
Token Vault คือที่เก็บ credentials แบบ encrypted ที่ AgentCore Identity ใช้ในการจัดการ tokens และ secrets ต่างๆ
สิ่งที่ Token Vault เก็บ:
- OAuth 2.0 access tokens และ refresh tokens – tokens ที่ได้จากการ authenticate กับ identity providers
- OAuth client credentials – client ID และ client secret ของ OAuth apps
- API keys – สำหรับ services ที่ใช้ API key authentication
คุณสมบัติด้านความปลอดภัย:
- Encryption – credentials ทั้งหมดถูก encrypt
- Access control – credentials ถูกผูกกับ agent-user combination ที่เฉพาะเจาะจง
- Zero token sharing – ไม่มีการแชร์ credentials ข้าม users หรือ agents ป้องกัน unauthorized cross-access
- Automatic lifecycle management – จัดการ token refresh และ rotation ให้อัตโนมัติ รวมถึง reuse token ที่ยังไม่หมดอายุเพื่อลด user consent ซ้ำ
ย้อนกลับไปดูใน Part 2 ตอนที่สร้าง OAuth credential provider นั้น client secret ที่ใส่เข้าไปจะถูกเก็บใน Token Vault โดยอัตโนมัติ Gateway ไม่เคยเห็น secret โดยตรง แต่จะขอ token ผ่าน AgentCore Identity ซึ่งจะไปดึง secret จาก vault มาใช้เอง
ภาพรวม Authentication Flow ทั้งหมด
มาดูภาพรวมของ authentication flow ทั้งหมดที่สร้างไว้ใน Part 1 และ 2 ผ่านมุมมองของ AgentCore Identity:
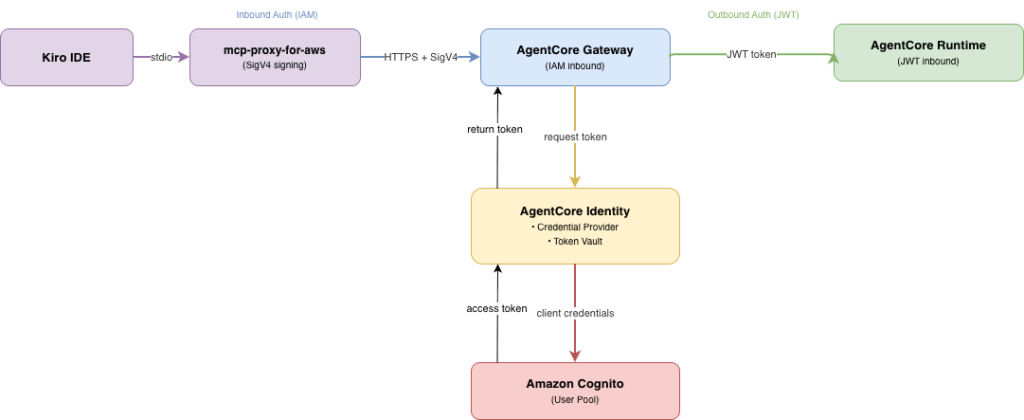
Flow ทีละขั้นตอน:
| ขั้นตอน | From and To | Auth Type | ใช้ AgentCore Identity |
|---|---|---|---|
| 1 | Kiro → Gateway | IAM (SigV4) | ไม่ – IAM จัดการเอง |
| 2 | Gateway → AgentCore Identity | Internal | ใช่ – Gateway ขอ OAuth token |
| 3 | AgentCore Identity → Cognito | Client Credentials | ใช่ – ใช้ credentials จาก Token Vault |
| 4 | Gateway → Runtime | JWT (Bearer token) | ใช่ – Runtime ใช้ Agent Authorizer validate token |
สังเกตว่า AgentCore Identity เข้ามามีบทบาทใน 3 จาก 4 ขั้นตอน ทั้งการเก็บ credentials (Token Vault), การขอ token (Credential Provider) และการ validate token (Agent Authorizer)
Outbound Auth สำหรับ Lambda Targets
ใน Part 2 นอกจาก MCP Runtime targets แล้ว ยังมีการเพิ่ม Lambda function เป็น Gateway target ด้วย
สำหรับ Lambda targets นั้น outbound authentication ใช้ IAM Role แทน OAuth:
Gateway ──IAM Role──▶ Lambda ──IAM Execution Role──▶ DynamoDB
ในกรณีนี้ AgentCore Identity ไม่ได้เข้ามาเกี่ยวข้อง เพราะ Lambda เป็น AWS service ที่ใช้ IAM ในการจัดการ authentication ได้โดยตรง
หลักการง่ายๆ:
- เรียก AWS services (Lambda, DynamoDB, S3) → ใช้ IAM Role ไม่ต้องใช้ AgentCore Identity
- เรียก external services (GitHub, Google, Salesforce) → ใช้ AgentCore Identity จัดการ OAuth/API keys
Credential Provider Types
AgentCore Identity รองรับ credential providers หลายประเภท ขึ้นอยู่กับ service ที่ agent ต้องเข้าถึง:
1. OAuth 2.0 Credential Provider
สำหรับ services ที่ใช้ OAuth 2.0 authentication
Built-in Providers (pre-configured):
| Provider | Use Case |
|---|---|
GoogleOauth2 |
Google services (Drive, Calendar, Gmail) |
GitHubOauth2 |
GitHub repositories, issues, pull requests |
SalesforceOauth2 |
Salesforce CRM |
SlackOauth2 |
Slack messaging |
CognitoOauth2 |
Amazon Cognito – user authentication flows |
Custom Provider:
CustomOauth2– สำหรับ OIDC-compliant service ใดๆ ที่ไม่อยู่ใน built-in list
ใน Part 2 ใช้ CustomOauth2 กับ Cognito discovery URL สำหรับ Gateway → Runtime authentication เพราะเป็น machine-to-machine (M2M) flow ที่ใช้ client credentials grant ไม่ต้องมี user interaction
หมายเหตุ:
CognitoOauth2(built-in) ออกแบบมาสำหรับ user authentication flows (3-legged OAuth ที่ต้องมี user login) ส่วนCustomOauth2กับ Cognito discovery URL เหมาะสำหรับ M2M authentication ที่ใช้ client credentials grant โดยไม่ต้องมี user interaction ซึ่งเป็นสิ่งที่ใช้ใน Part 2
2. API Key Credential Provider
สำหรับ services ที่ใช้ API key authentication เช่น OpenAI, Anthropic หรือ weather APIs โดย API key จะถูกเก็บใน Token Vault แบบ encrypted และ agent สามารถดึงมาใช้ได้ผ่าน AgentCore SDK
OAuth Flows ที่รองรับ
AgentCore Identity รองรับ OAuth 2.0 flows 2 แบบ:
| Flow | ชื่อเรียก | Use Case | ตัวอย่าง |
|---|---|---|---|
| 2-Legged OAuth | Client Credentials Grant | Machine-to-machine ไม่ต้องมี user consent | Gateway → Runtime (ที่ทำใน Part 2) |
| 3-Legged OAuth | Authorization Code Grant | Agent ทำงานแทน user ต้องมี user consent | Agent ดึงไฟล์จาก Google Drive ของ user |
ใน Part 2 ใช้ 2-Legged OAuth (Client Credentials) เพราะเป็นการสื่อสารระหว่าง Gateway กับ Runtime โดยตรง ไม่มี user เข้ามาเกี่ยวข้อง
แต่ถ้า agent ต้องทำงานแทน user เช่น ดึง email จาก Gmail หรือสร้าง issue บน GitHub ของ user จะต้องใช้ 3-Legged OAuth ซึ่ง AgentCore Identity จะจัดการ consent flow ให้ทั้งหมด:
- Agent ขอ resource access token จาก AgentCore Identity
- ถ้ายังไม่มี token ใน vault, AgentCore Identity จะ return URL สำหรับ user consent
- User ยืนยันสิทธิ์กับ resource provider (เช่น Google)
- Resource provider ออก access token กลับมาที่ AgentCore Identity
- AgentCore Identity เก็บ token ไว้ใน Token Vault สำหรับใช้ซ้ำในครั้งถัดไป
Token ที่เก็บไว้จะถูกผูกกับ agent-user combination ที่เฉพาะเจาะจง ทำให้ครั้งถัดไปที่ agent ต้องเข้าถึง resource เดิมในนามของ user คนเดิม ไม่ต้องขอ consent ซ้ำอีก
SDK Integration
สำหรับ developers ที่ต้องการให้ agent เข้าถึง external services, AgentCore SDK มี declarative decorators ที่ช่วยจัดการ credentials ให้อัตโนมัติ:
@requires_access_token– สำหรับ OAuth services เช่น GitHub, Google Drive โดย decorator จะจัดการ OAuth flow ทั้งหมดรวมถึง user consent และ inject access token เข้ามาใน function parameter โดยอัตโนมัติ@requires_api_key– สำหรับ API key services เช่น OpenAI, weather APIs โดย decorator จะดึง API key จาก Token Vault มา inject ให้โดยไม่ต้อง hardcode ใน code
Decorators เหล่านี้ช่วยลด boilerplate code และลดความเสี่ยงด้าน security เพราะ credentials ไม่เคยถูก hardcode ใน source code ทั้งหมดถูกจัดการผ่าน Token Vault
What’s Next
ตอนนี้เข้าใจแล้วว่า AgentCore Identity จัดการ authentication ทั้ง inbound และ outbound อย่างไร แต่ยังมีคำถามที่ยังไม่ได้ตอบ:
ปัจจุบัน user ที่ authenticated แล้วสามารถเรียก tool ใดก็ได้บน MCP server หากต้องการให้สมาชิกแต่ละคนในทีมเข้าถึง tools ที่แตกต่างกัน เช่น User A เข้าถึงได้เฉพาะ mcp-games table แต่ User B เข้าถึงได้เฉพาะ mcp-movies table จะทำอย่างไร?
นั่นคือสิ่งที่ AgentCore Policy จะเข้ามาช่วย โดยเพิ่ม fine-grained authorization ที่ควบคุมได้ว่าใครเรียก tool ไหนได้บ้าง
Coming in Part 4: ควบคุมสิทธิ์การใช้งาน Tools ด้วย AgentCore Policy
Summary
ในบทความนี้ได้ทำความเข้าใจ AgentCore Identity ผ่านสิ่งที่สร้างไว้แล้วใน Part 1 และ 2:
1. Dual Authentication Model
- Inbound – ตรวจสอบว่าใครเรียก agent ได้ รองรับทั้ง IAM (SigV4) และ JWT (OAuth)
- Outbound – จัดการ credentials ให้ agent เข้าถึง downstream services ได้อย่างปลอดภัย
2. ส่วนประกอบหลัก
- Workload Identity Directory – จัดการ identity ของแต่ละ agent
- Agent Authorizer – validate JWT tokens สำหรับ inbound requests
- Resource Credential Provider – เก็บ configuration สำหรับ OAuth และ API key authentication
- Resource Token Vault – เก็บ credentials แบบ encrypted ด้วย AWS KMS
AgentCore Identity ทำให้การจัดการ authentication ของ AI agents เป็นเรื่องที่ตรงไปตรงมา ไม่ต้องสร้าง token management system เอง ไม่ต้องเขียน OAuth flow เอง และไม่ต้องกังวลเรื่องการเก็บ credentials อย่างปลอดภัย ทุกอย่างถูกจัดการให้ผ่าน service เดียว
สำหรับข้อมูลเพิ่มเติมเกี่ยวกับ AgentCore Identity สามารถเข้าไปอ่านเพิ่มเติมได้ที่ AWS AgentCore Identity documentation