AWS Cloud Financial Management
Launch: AWS Marketplace Vendor Metered Tagging
Customers want to view all AWS related costs via one single pane of glass, whether it be AWS service charges, or third party tools and software licenses purchased through AWS Marketplace. Read this blog “Monitoring your AWS Marketplace Costs and Usage” to learn how you can use AWS Cost Management tools to monitor your software expenses. In addition, customers want to organize and trace 3rd party software cost and usage back to individual business units and cost centers, as how you’ve been organizing your AWS cost and usage information with AWS Cost Allocation Tags, AWS Cost Categories, etc. We are excited to announce that starting today you can tag the software purchased in AWS Marketplace with our newly launched feature AWS Marketplace Vendor Metered Tagging.
AWS Marketplace is a digital catalog with thousands of software listings from independent software vendors, which makes it easier to find, test, buy, and deploy software on AWS. Using AWS Marketplace, you can buy a wide variety of software solutions that meet your business needs, such as database, storage, security, and business intelligence.
In this blog post, we will show you how you can leverage tags that software vendors provide to gain visibility into your underlying cost drivers and allocate costs across your business units or cost centers. We assume familiarity with the Cost Allocation Tags. If you are new to using Cost Allocation Tags, you can start by reading this blog “AWS-Generated vs. User-Defined Cost Allocation Tag”.
As we shared in our blog “Cost Allocation Basics That You Need to Know”, it is important to establish the cost accountability and tagging is a great way to organize and assign ownership to your resources, allowing you to quickly manage and filter your resources and trace costs back to the right entities. For example, if you have software usage running on Amazon EC2 instances, they automatically inherit the tags of the underlying instances.
Independent Software Vendors (ISV) can now apply tags to software purchased in AWS Marketplace. This enables you to enable tags for software that is purchased and deployed by a central management account, or as Software as a Service (SaaS). To check if the software you are using has associated tags provided by the ISV, you can look at the product listing page on AWS Marketplace. All metered tags will now be made available as cost allocation tags.
You can activate the ISV provided tags in the AWS Billing and Cost Management console with three easy steps:
- Sign in to the AWS Management Console and open the Billing and Cost Management console.
- In the navigation pane, choose Cost allocation tags.
- Under AWS-generated cost allocation tags, select the tags you want to activate and click Activate.
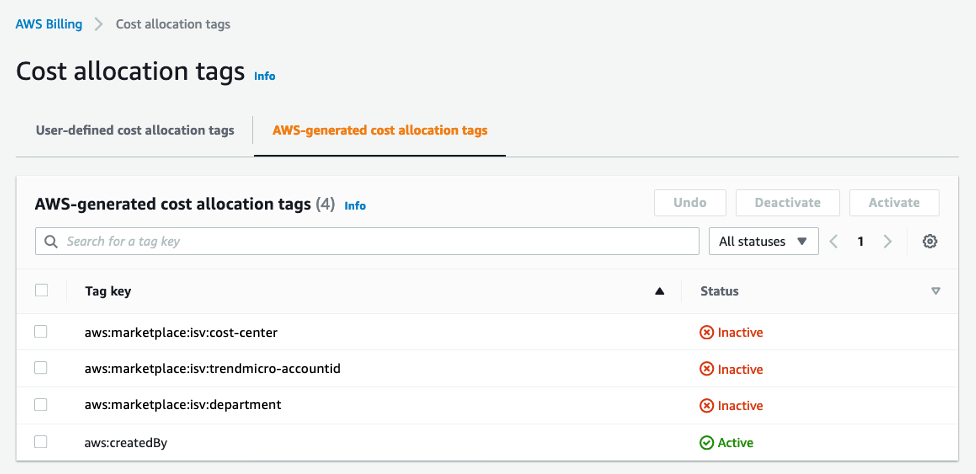
Once the tag is activated, all of your member accounts will have these tags enabled by default.
In order to view, or analyze your AWS Marketplace software spend with the newly activated tags, you can go use AWS Cost Explorer.
- Navigate to Cost Explorer on AWS Billing and Cost Management console and click Launch Cost Explorer.
- Click Explore Costs
- Select the time-frame for which you want to view costs and add filters.
In this example, we’ll filter by Billing Entity as AWS Marketplace. You can narrow down to desired accounts, services or tag values in addition to the Billing Entity.

- Select Group by Tag. You might have to click More to view the option to filter by Tag. Choose the desired Tag name. In this example, we selected aws:marketplace:isv:cost-center.

You can also use the tags to create budgets for each cost-center or department based on the information from the tags. You can create these in AWS Budgets using the following steps:
- Navigate to Budgets on the Billing and Cost Management console.
- Click Create budget.
- Select Cost budget and click Set your budget.
- Configure the desired budget period, and amount for the cost center or department you are creating the budget.
In this example, we selected a Monthly Recurring budget of $1,000.

- Select Billing Entity as AWS Marketplace. You might have to click More Filters to see this option.
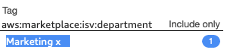
- Choose the Tag name and values for which you are creating the budget.
In this example, we have chosen tag aws:marketplace:isv:department to create a budget for our marketing department.
- Click Configure thresholds.
- Choose the alert thresholds and notifications.
We have selected an alert at 90% of the Actual cost that notifies the budget owner and our marketing head via email. - Click Confirm budget, review the details, and click Create.
You can also view the detailed information for each usage line item in the AWS Cost and Usage Report, or leverage your favorite Cost Management product from AWS Marketplace to manage your costs.
Conclusion
Now that you learned about the new AWS Marketplace tags provided by the software vendors, and how you can use them to get more spend visibility using AWS Cost Management services. Try out AWS Marketplace Vendor Metered Tagging today and set up your unique cost and budget reports, so you can stay on top of your 3rd party software spend and make the right decisions for your business.