AWS Big Data Blog
Enforce IAM permissions boundaries for Amazon SageMaker Unified Studio Tooling blueprints
Amazon SageMaker Unified Studio now supports custom permissions boundaries for IAM roles created by the Tooling blueprint. Organizations that enforce Service Control Policies (SCPs) requiring permissions boundaries on all AWS Identity and Access Management (IAM) roles can now adopt Amazon SageMaker Unified Studio without modifying their security posture.
Amazon SageMaker Unified Studio is a unified development environment that brings together data engineering, machine learning, and analytics tools into a single workspace. In Amazon SageMaker Unified Studio, a project is a collaborative workspace that bundles people, tools, and access permissions together. It builds every project from a project profile, which defines a list of blueprints. Blueprints are pre-configured infrastructure templates that provision AWS resources at project creation time or on demand, along with their default parameters. The Tooling blueprint is the only mandatory one. Amazon SageMaker Unified Studio deploys it with every project, creating foundational resources such as the project IAM role and security groups.
In this post, you learn how to create a permissions boundary that restricts AI agent capabilities. You then configure it on the Tooling blueprint using the AWS Command Line Interface (AWS CLI). Finally, you validate that the boundary is enforced on all provisioned roles.
The problem
Enterprises in regulated industries use SCPs to require that every IAM role in an account carries a permissions boundary. A well-scoped boundary prevents privilege escalation and verifies no role exceeds the maximum permissions defined by the organization’s security team. Before this feature, Amazon SageMaker Unified Studio Tooling blueprints created IAM roles without permissions boundaries. When an SCP enforced permissions boundaries, project creation failed with an explicit deny:
Amazon SageMaker Unified Studio surfaces the blocked role creation as a Tooling environment provisioning failure, as shown in Figure 1.
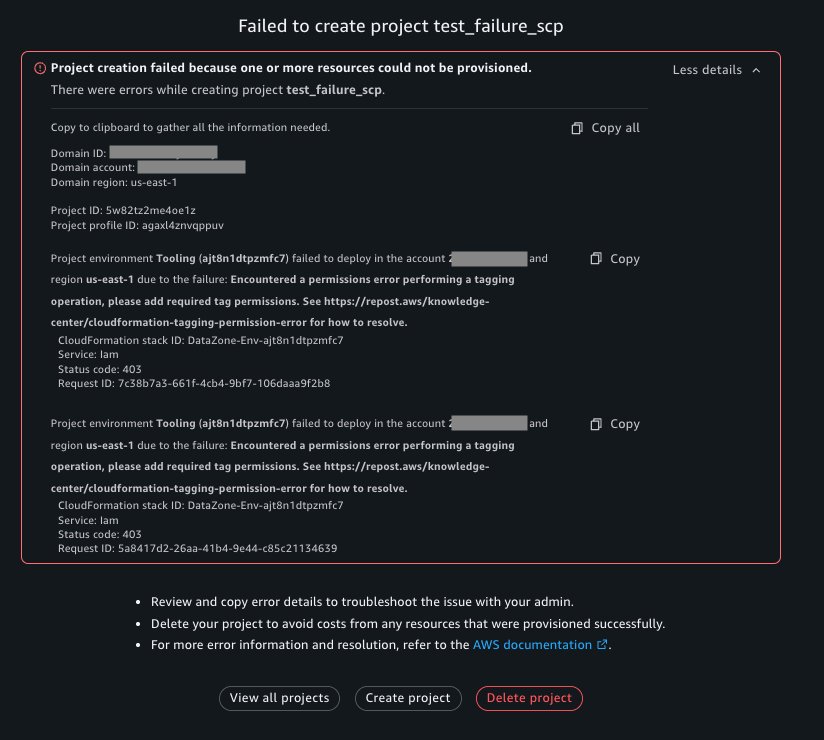
Figure 1: Project creation fails when the SCP requires a permissions boundary that is not attached
The project is marked as failed because its Tooling environment couldn’t deploy in the US East (N. Virginia) AWS Region (us-east-1). The details show a 403 permissions error, while the preceding IAM message identifies the underlying iam:CreateRole SCP denial. This blocked adoption for any organization with SCP-enforced permissions boundaries. The AWS CloudFormation event for the Tooling stack exposes the IAM failure behind the project-level error, as shown in Figure 2.
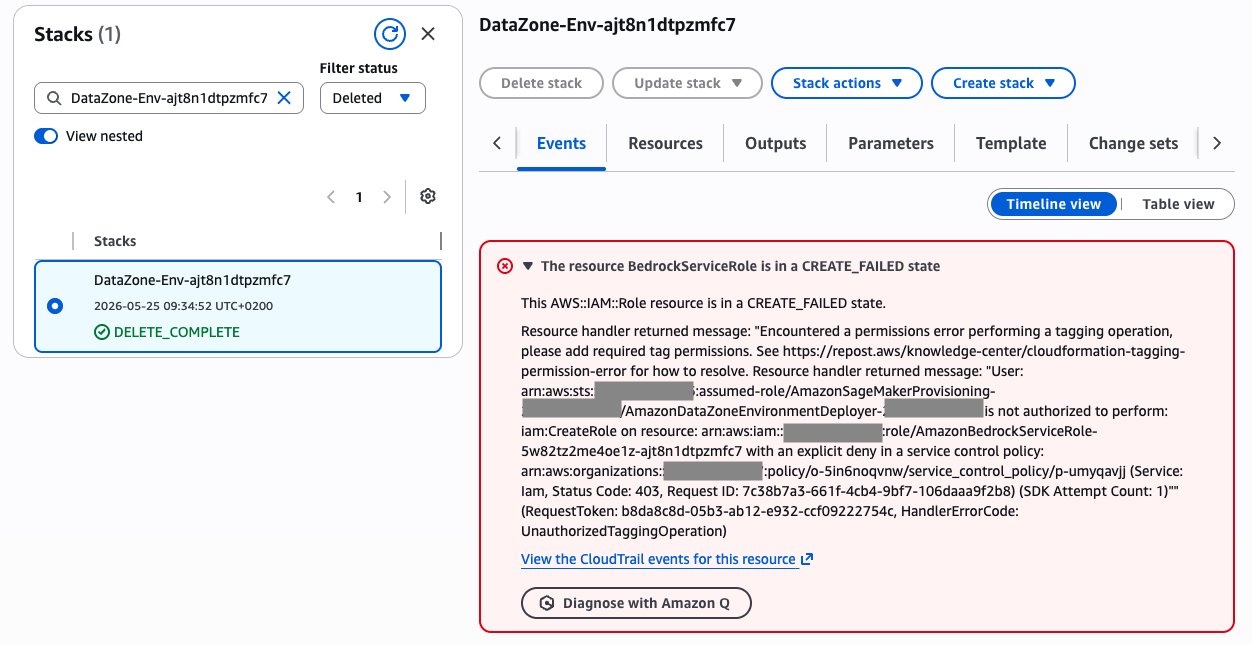
Figure 2: Detailed error showing the SCP denial in the Tooling blueprint AWS CloudFormation stack
The AmazonBedrockServiceRole resource entered CREATE_FAILED because iam:CreateRole was explicitly denied by the SCP, even though AWS CloudFormation surfaced the wrapper error as UnauthorizedTaggingOperation.
Granular control using a permissions boundary: Example use case
Beyond satisfying SCP requirements, permissions boundaries give administrators granular control over what the Tooling blueprint roles can do. For instance, some organizations have SecOps policies that require disabling Data Agent and Data Notebook capabilities across their accounts. These organizations want project members to access data connections and run SQL queries directly, but must block conversational AI, code generation, and notebook cell execution through the agent.
When PermissionsBoundaryArn is configured on the Tooling blueprint, SageMaker Unified Studio attaches the specified customer-managed permissions boundary to all IAM roles provisioned by that blueprint. If your governance requires a boundary, configure it explicitly and verify the resulting roles.
The following permissions boundary policy scopes the roles to the AWS services that Amazon SageMaker Unified Studio uses and then explicitly denies the Amazon DataZone actions that power the AI agent. This permissions boundary is provided for illustrative purposes only and isn’t a recommendation or reference for environment configuration. You should tailor your permissions boundaries to your specific workloads in accordance with the principle of least privilege.
Warning: validate before using in production. This example scopes the roles to the service namespaces Amazon SageMaker Unified Studio uses, but it is still coarse (it allows each listed service in full) and is provided only for illustration. Because a permissions boundary is a ceiling, it must remain a superset of everything the three Tooling roles (datazone_usr_role, AmazonBedrockServiceRole, and AmazonBedrockLambdaExecutionRole) actually need. If Amazon SageMaker Unified Studio adds a dependency that isn’t listed, provisioning or in-console actions will fail with an access denied error. Validate in a non-production domain first.
With this boundary attached, the Tooling blueprint provisions normally, project members can access data connections and run SQL queries. However, any attempt to invoke the AI assistant or execute notebook cells through the agent returns an access denied error. The boundary acts as a ceiling that no policy attached to the role can override.
How it works
The custom permissions boundary feature operates at the blueprint configuration level. An administrator sets a PermissionsBoundaryArn in the Tooling blueprint’s regional parameters. When a user creates a new project that includes the Tooling blueprint, Amazon SageMaker Unified Studio provisions an AWS CloudFormation stack that creates three IAM roles and attaches the specified boundary to each:
datazone_usr_role– the role that all project members assume to access data and resources in that project.AmazonBedrockServiceRole– for Amazon Bedrock operations.AmazonBedrockLambdaExecutionRole– for Amazon Bedrock-related AWS Lambda functions.
Because the boundary is set at the blueprint level, it applies to every project created under that blueprint. No per-project configuration is needed.
Prerequisites
Before you begin, make sure that you have:
- An AWS account with a Amazon SageMaker Unified Studio Identity Center-based domain created.
- The Tooling blueprint enabled in the domain.
- AWS CLI v2 configured with administrator access.
If your organization uses AWS Organizations with SCPs that require permissions boundaries, you will also need an organization with the target account as a member and permissions to create and attach SCPs in the management account.
Setting up the SCP (optional)
This section provides instructions to create an SCP and attach it to your AWS Organizations organizational unit or accounts. If your organization already enforces permissions boundaries through SCPs, skip this section. Otherwise, create an SCP in your AWS Organizations management account that denies IAM role creation unless an approved permissions boundary is attached. This also prevents the boundary from being removed, swapped, or weakened afterward:
This policy does three things:
DenyRoleWithoutApprovedBoundaryblocks creating a role, or attaching a boundary to an existing role, with anything other than the approved boundary ARN. Denyingiam:PutRolePermissionsBoundaryin addition toiam:CreateRolestops a privileged principal from swapping in a weaker boundary after the role exists.DenyRemovingBoundaryblocksiam:DeleteRolePermissionsBoundaryoutright, so the boundary cannot be stripped off. (This action doesn’t support theiam:PermissionsBoundarycondition key, so it must be denied unconditionally.)ProtectBoundaryPolicyprevents tampering with the boundary policy itself. Deleting it, or publishing and defaulting a new version that quietly widens what it allows.
Note: Scope these denies so you don’t lock yourself out. A broad deny on iam:PutRolePermissionsBoundary and iam:DeleteRolePermissionsBoundary also applies to your own administrators. Add an exception for a break-glass or IAM-admin role (for example, an aws:PrincipalArn StringNotLike condition) so a trusted principal can still manage boundaries.
To create the SCP, sign in to the AWS Organizations console with your management account and go to AWS Organizations → Policies → Service control policies. If SCPs aren’t enabled for your organization yet, choose Enable service control policies first. Choose Create policy, give it a name (for example, test_scp), and replace the default content in the policy editor with the JSON above substituting <account-id> with your account ID. Choose Create policy to save it.
After creating the SCP in the management account, verify its content before attaching it. Figure 3 shows the core create-role control. The full example above adds controls that prevent replacing or removing the boundary and modifying the protected policy.
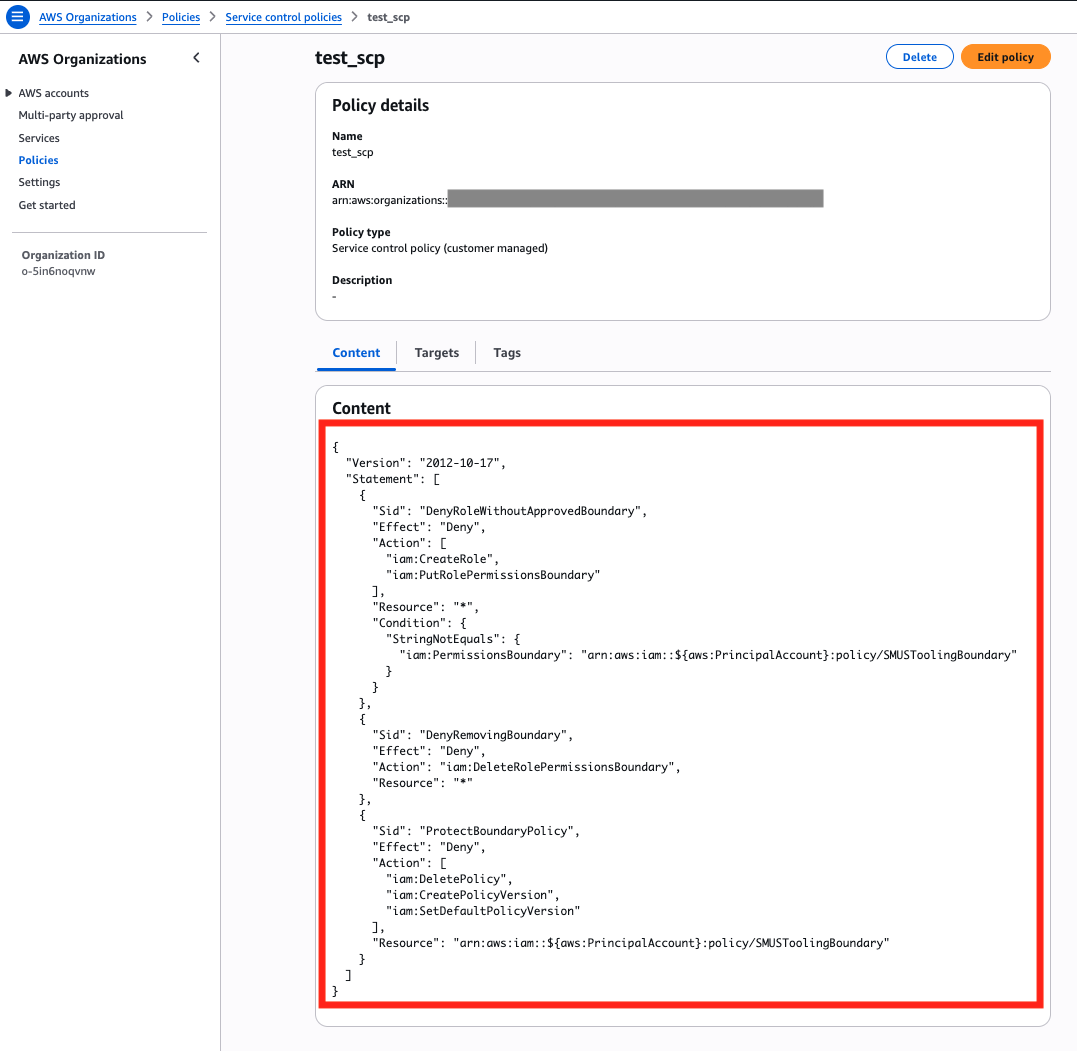
Figure 3: Service Control Policy defined in the AWS Organizations management account
The AWS Organizations Content tab displays the customer-managed test_scp policy. Its visible statement denies iam:CreateRole unless the request uses the SMUSToolingBoundary policy.
Attach this SCP to the organizational unit or account where your Amazon SageMaker Unified Studio domain and domain-associated accounts reside. To do so, open the test_scp service control policy, choose the Targets tab, and choose Attach. The AWS organization structure appears; select the OU or account where the SCP should apply, then choose Attach policy.
Figure 4 identifies the member account that must inherit the SCP in this example organization. The target member account, datazone-account2, resides under OU2, while datazone-account1 is the organization’s management account. Attaching the SCP to the target account or a parent organizational unit enforces it there.
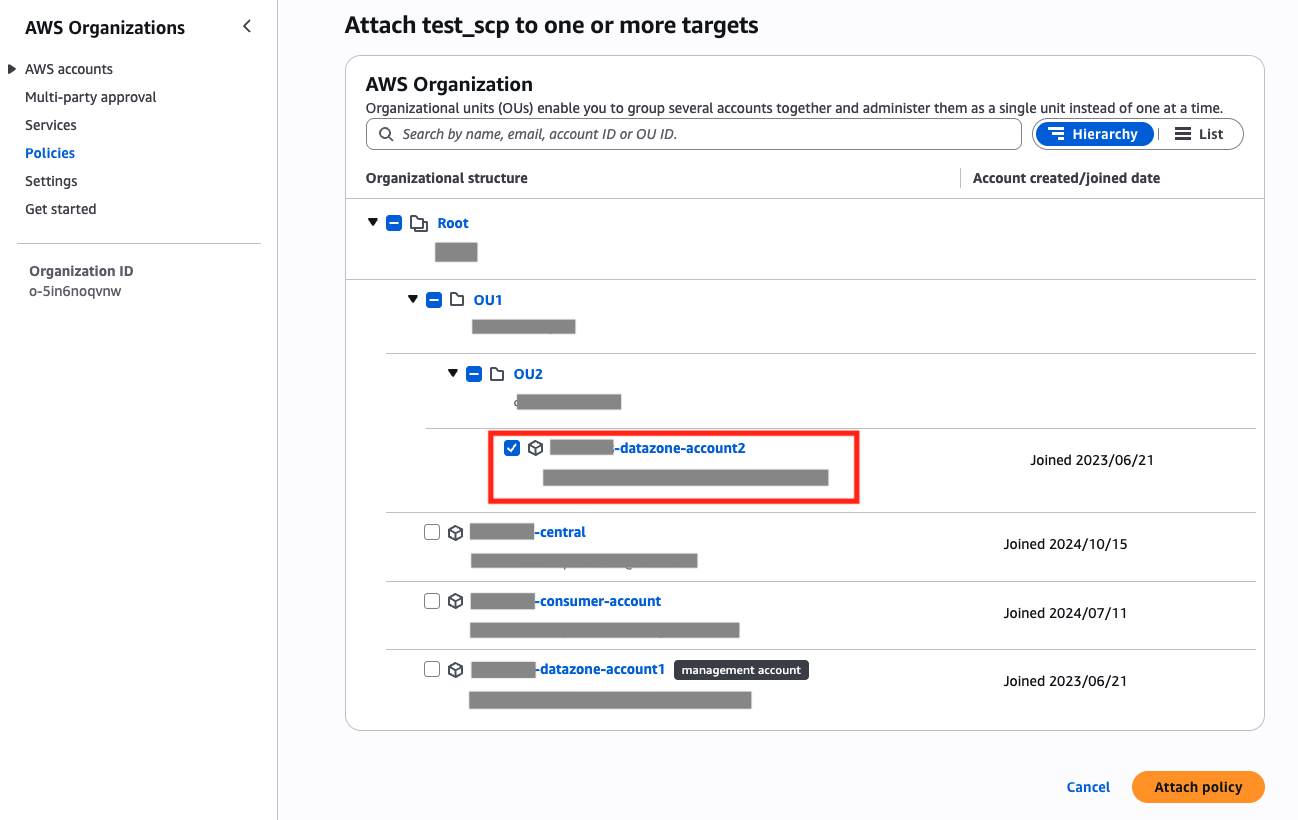
Figure 4: AWS Organizations account structure showing the management account and the target member account
After attaching the policy, verify the association on the SCP’s Targets tab, as shown in Figure 5.
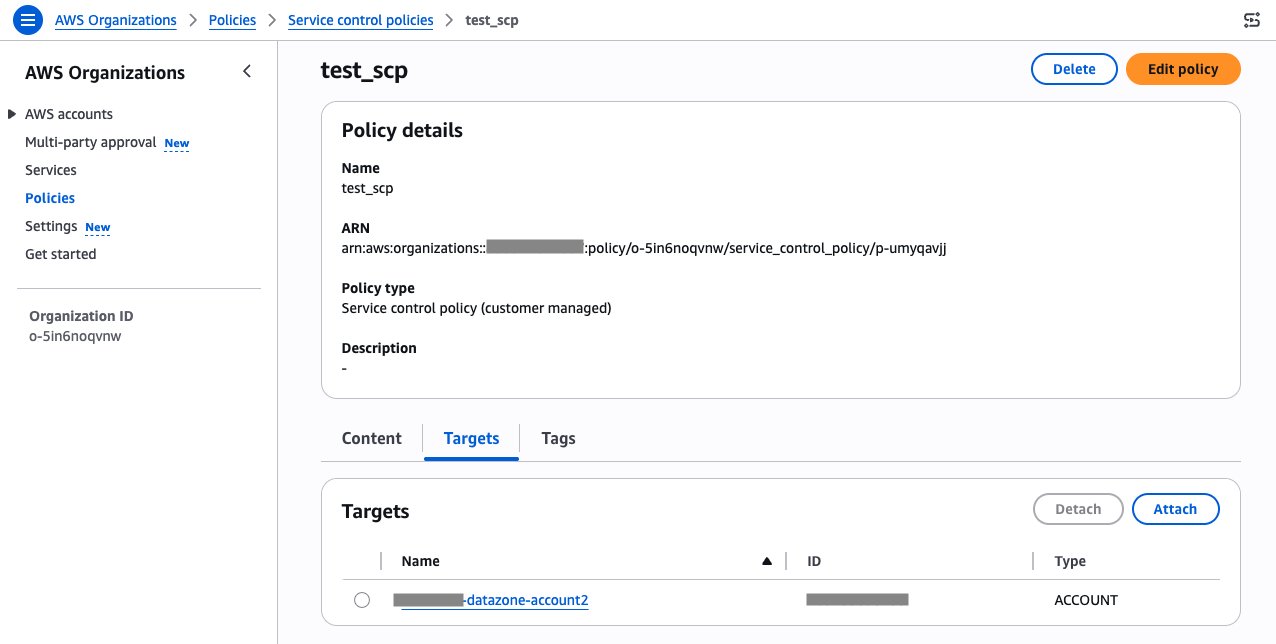
Figure 5: Service Control Policy attached to the target account where it should be enforced
The Targets tab lists datazone-account2 as an ACCOUNT target, confirming that test_scp is enforced directly on the intended member account.
Configuring the permissions boundary
In this section you will execute the required steps to create the permissions boundary and enable it in the Tooling blueprint. The example in this walkthrough uses us-east-1. Change it to the Region where your Amazon SageMaker Unified Studio domain is deployed. You must execute the configuration in the account where you plan to create your project. This can be your Amazon SageMaker Unified Studio domain account or accounts associated to your Amazon SageMaker Unified Studio domain.
Step 1: Create the permissions boundary policy
If you haven’t already created the boundary policy, save the following JSON document as a boundary-policy.json file on your workstation:
As noted previously, this illustrative policy is scoped to the services Amazon SageMaker Unified Studio uses but is still coarse, and its allow list must stay a superset of what all three Tooling roles need.
Then create the policy using the following command:
Note the policy ARN from the output, because it will be used later in the procedure.
Step 2: Retrieve the ID of your domain
Retrieve the ID of your domain by running the following command. Replace <YOUR_DOMAIN_NAME> with the name of your SageMaker Unified Studio domain.
Note the returned ID, because it will be used later in the procedure.
Step 3: Identify the Tooling blueprint
Retrieve the Tooling blueprint ID by running the following command. Replace <domain-id> with the ID you noted in Step 2.
Note the returned ID, because it will be used later in the procedure.
Step 4: Read the current configuration
Retrieve the current Tooling blueprint configuration by executing the following command. Replace <domain-id> with the ID from Step 2 and <tooling-bp-id> with the ID from Step 3.
Important: Back up the output of get-environment-blueprint-configuration before making any changes. The command above pipes the response to tooling-bp-config-backup.json so you have a restore point if you need to revert.
Note the values of provisioningRoleArn, manageAccessRoleArn, enabledRegions, and all fields inside regionalParameters (AZs, S3Location, Subnets, VpcId). You will need all of these in the next step.
Step 5: Set the permissions boundary
Update the blueprint configuration to include PermissionsBoundaryArn in the regional parameters using the following command.
Important: The put-environment-blueprint-configuration API operates in overwrite mode, it replaces the entire configuration with what you provide. You must include all existing values from the previous step’s output. The only new addition is PermissionsBoundaryArn inside the regional parameters. Omitting any existing parameter removes it.
Make sure to replace <domain-id> with the ID you noted in Step 2, <tooling-bp-id> with the ID you noted in Step 3, and all other <placeholder> values with the corresponding values from Step 4’s output.
The following anonymized example is based on an existing Tooling blueprint configuration. Its S3Location reflects the bucket naming pattern used in that environment. Copy the exact S3Location returned in Step 4. Don’t use the following illustrative value. Here’s an example:
Step 6: Verify the configuration was applied
Confirm the permissions boundary ARN is now set in the blueprint configuration using the following command. Make sure to replace <domain-id> with the ID you noted in Step 2 and <tooling-bp-id> with the ID you noted in Step 3.
The output should return your boundary policy ARN:
Validating the configuration
After configuring the permissions boundary, in this section you will get instructions to create a new project to verify it works end to end and that the IAM roles created with the project actually include the permissions boundary.
Step 1: Select a project profile in enabled state
Use the following command to list project profiles configured in your domain. Make sure to replace <domain-id> with the ID you noted in Step 2 of the “Configuring the permissions boundary” section.
Choose a project profile that has "status": "ENABLED". Note the id of any project profile returned in the previous command.
Step 2: Create a test project
Create a new project using the following command. Make sure to replace <domain-id> with the ID you noted in Step 2 of the “Configuring the permissions boundary” section and to replace <profile-id> with the project profile ID noted in Step 1 of this section.
Note the id (project ID) returned in the response. Wait for the Tooling blueprint to provision. This typically takes a minute or two. After provisioning completes, confirm that the validation project reaches the Active state, as shown in Figure 6.

Figure 6: Project created successfully with the permissions boundary configured
The Projects list shows the timestamped PB-Validation-* project with an Active status, confirming that project creation succeeded with the custom boundary configured.
Step 3: Verify the roles have the boundary attached
In this section you check that the IAM roles created with the project have the permissions boundary attached. Use the following commands to get the configuration for the IAM roles created with the project you just created. Replace <domain-id> and <project-id> with the values from the previous steps.
All three roles should return a response showing the permissions boundary ARN:
You can also verify each role in the IAM console. Figure 7 shows the permissions boundary for the project user role.
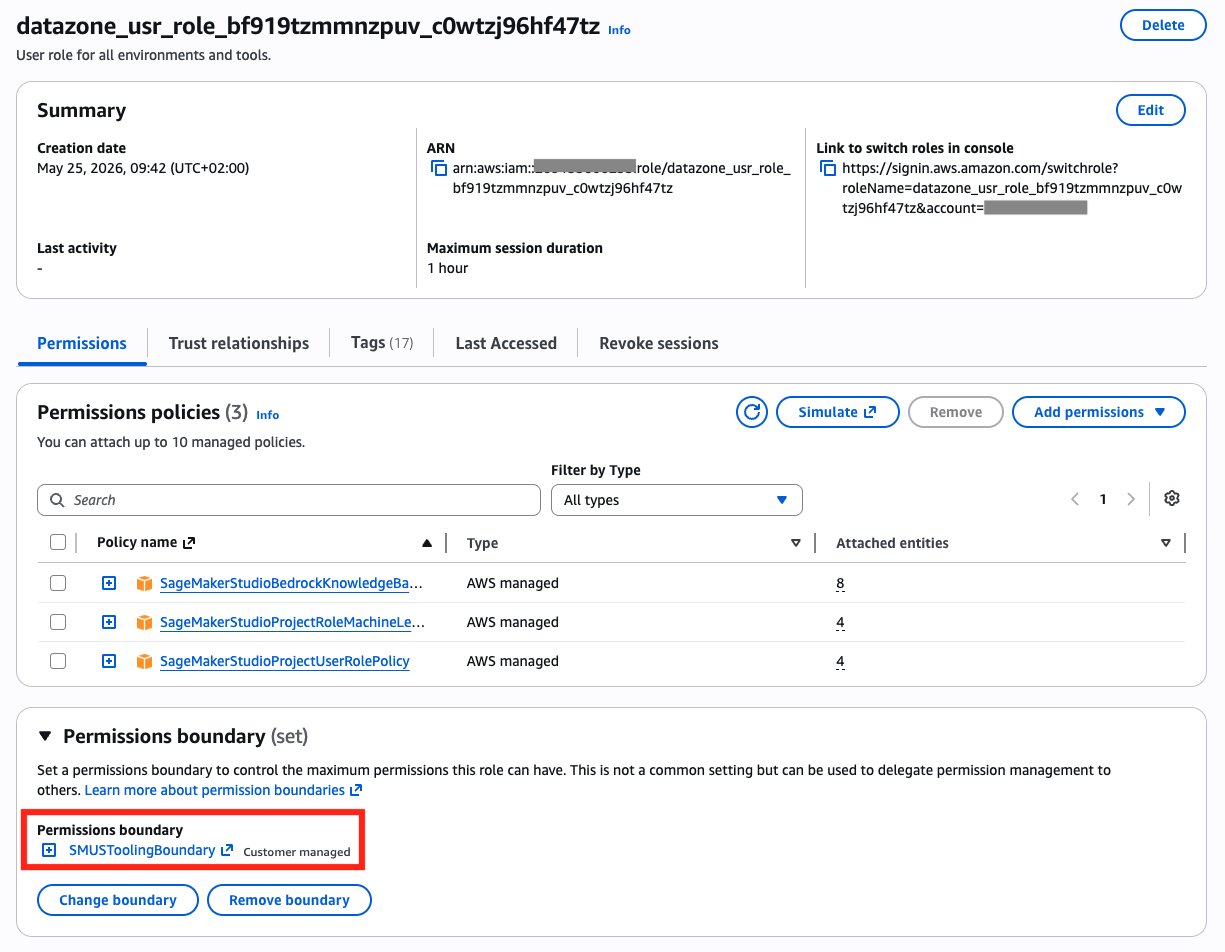
Figure 7: IAM console showing the permissions boundary attached to the datazone_usr_role
The datazone_usr_role Permissions tab displays SMUSToolingBoundary as its customer-managed permissions boundary.
Figure 8 confirms that the same boundary is attached to the Amazon Bedrock service role.
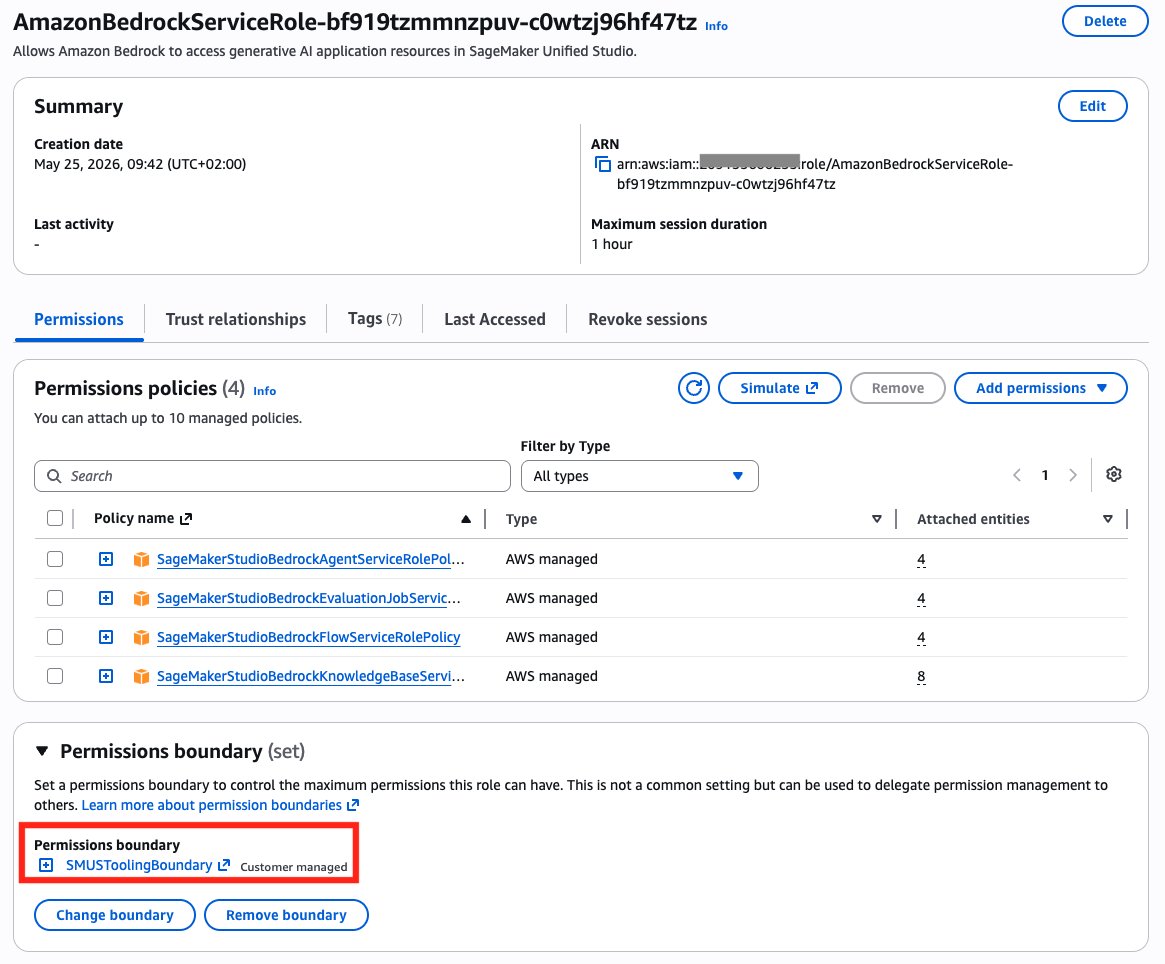
Figure 8: IAM console showing the permissions boundary attached to the AmazonBedrockServiceRole
The AmazonBedrockServiceRole also displays SMUSToolingBoundary as its customer-managed permissions boundary.
Figure 9 verifies the boundary on the third Tooling role, the Bedrock Lambda execution role.
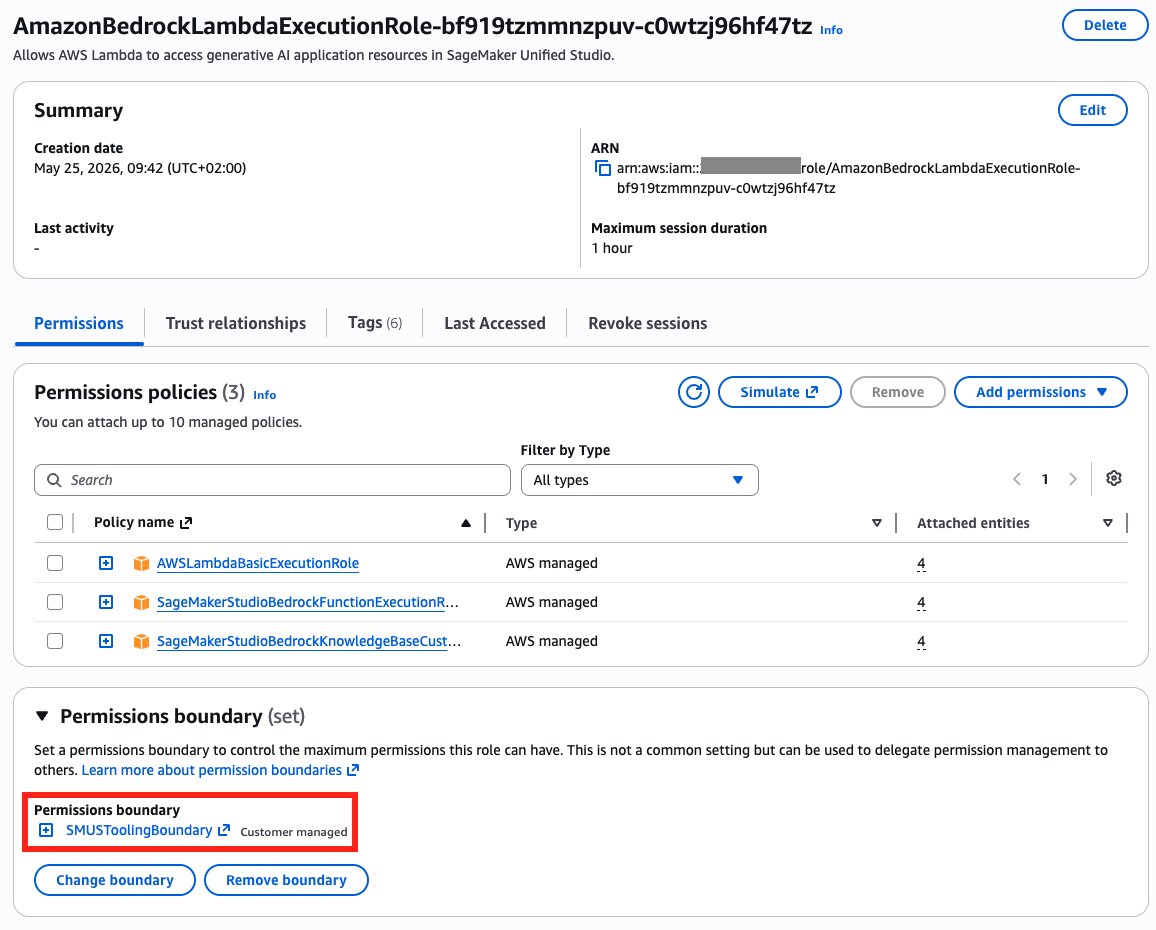
Figure 9: IAM console showing the permissions boundary attached to the AmazonBedrockLambdaExecutionRole
The AmazonBedrockLambdaExecutionRole likewise displays SMUSToolingBoundary, confirming that all three provisioned roles carry the boundary.
Step 4: Verify the boundary denies AI agent actions
In this section you verify the boundary actually denies AI agent actions. If you configured the boundary from the use case section earlier, the boundary blocks Data Notebooks and messages to the Data Agent, such as the Query Editor assistant. Any such attempt returns an access denied error. The project user role has the boundary attached, so even if the role’s identity policies grant the relevant APIs, the boundary’s explicit deny takes precedence.
To confirm, navigate to your project in SageMaker Unified Studio and test the following actions:
- Attempt to create a notebook – In the left sidebar, select Notebooks. Select Create notebook. The operation will fail because the permissions boundary prevents the
datazone:CreateNotebookaction (Figure 10).
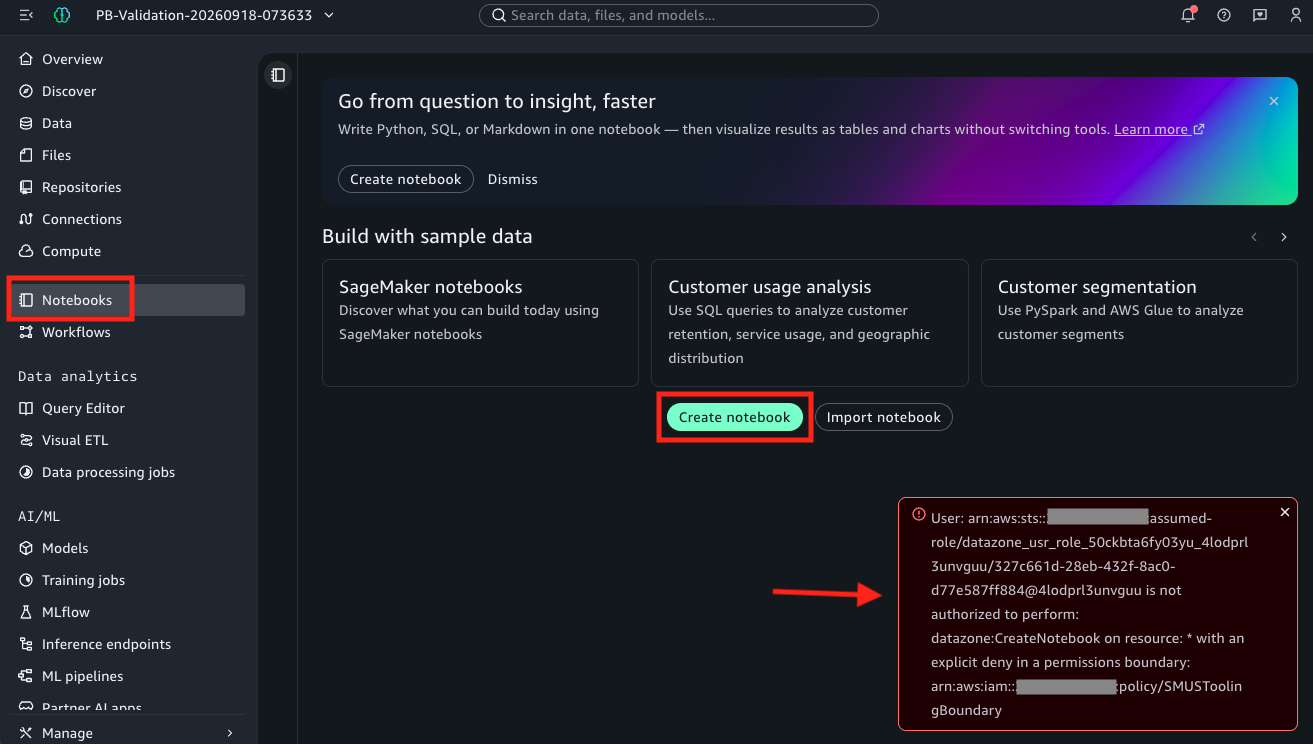
Figure 10: Permissions boundary preventing creation of Data Notebooks
After the create action, Amazon SageMaker Unified Studio reports Failed to create notebook and identifies datazone:CreateNotebook as explicitly denied by SMUSToolingBoundary.
- Attempt to use Data Agent in the Query Editor – In the left sidebar, select Query Editor, then select the Chat with AI icon. The agent chat will fail to load because the permissions boundary blocks the APIs required by Data Agent (Figure 11).
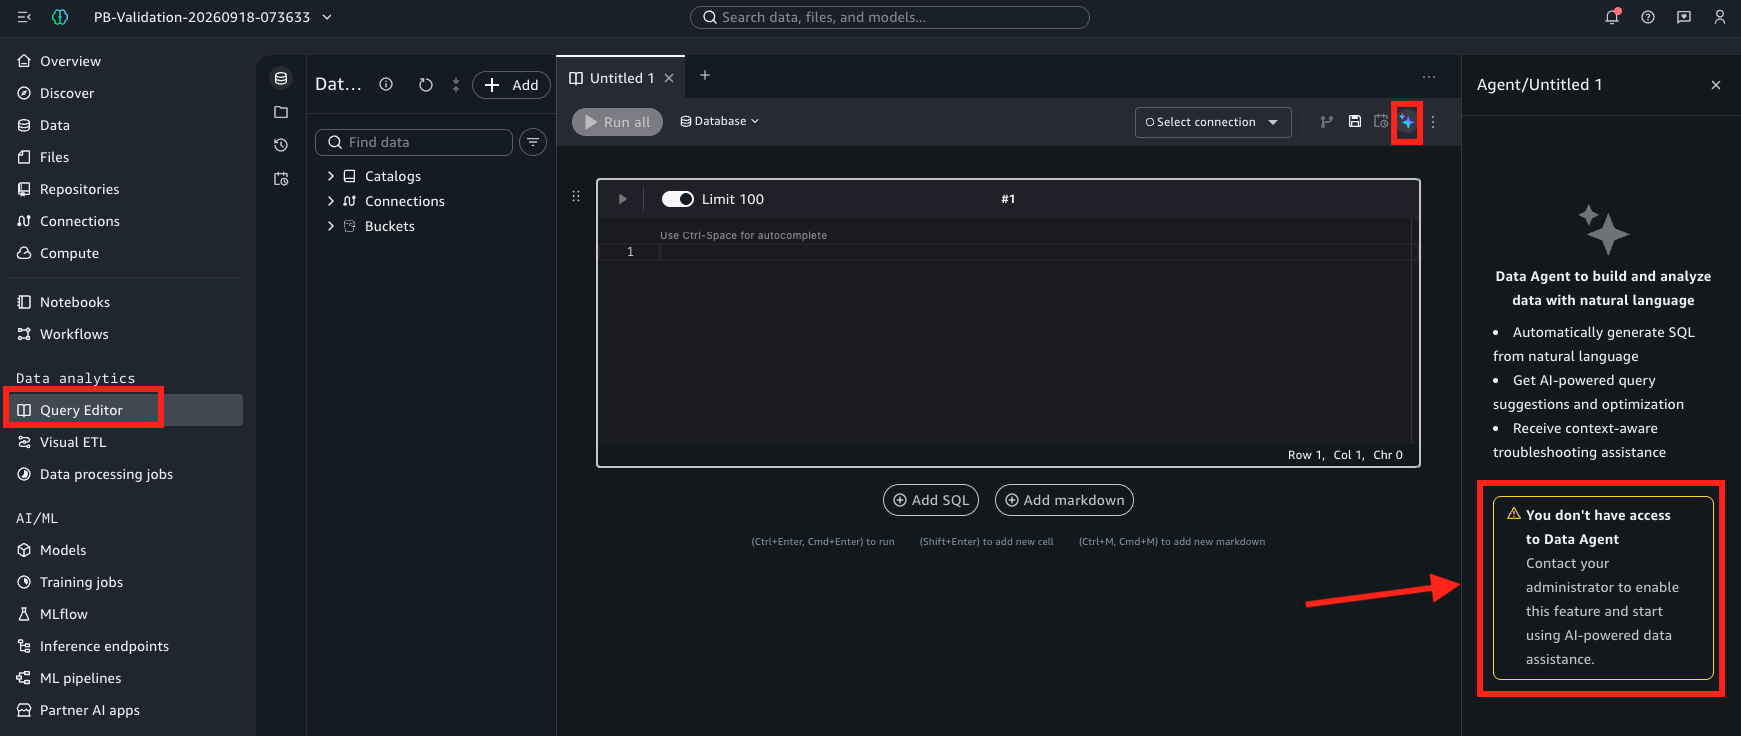
Figure 11: Permissions boundary preventing using Data Agent on Query Editor
The Query Editor remains available, but the Agent panel reports “You don’t have access to Data Agent“. In this configured test, that message is the user-visible result of denying the Data Agent APIs. The screenshot itself doesn’t display the denied API or boundary ARN.
Important considerations
- Immutable after project creation – The permissions boundary is set at provisioning time. Changing the boundary ARN on the blueprint configuration only affects new projects. Existing projects retain their original boundary.
- Applies to all Tooling-provisioned roles – When
PermissionsBoundaryArnis configured on the Tooling blueprint, SageMaker Unified Studio attaches the specified customer-managed permissions boundary to all three IAM roles created by that blueprint. It’s applied uniformly — you can’t selectively apply it to individual roles. No boundary is attached unless you configure one, so if your governance requires a boundary, set it explicitly and verify the resulting roles rather than assuming one is present by default. - Policy must exist – The IAM policy referenced by
PermissionsBoundaryArnmust exist in the account before project creation. If the policy is deleted or the ARN is invalid, provisioning will fail. - Tooling blueprint only – Among Amazon SageMaker Unified Studio provided blueprints, only the Tooling blueprint supports custom permissions boundaries. Other provided blueprints that create IAM roles (for example, the EmrOnEc2 blueprint) don’t currently support this feature. If your organization requires permissions boundaries on roles created by additional blueprints, you can build custom blueprints that include a permissions boundary configuration so you can extend this security control across your entire project infrastructure.
Clean up
To remove test resources, delete the test project from the SageMaker Unified Studio UI. On the project’s Overview page, choose the ⋮ (more actions) menu in the top-right and choose Delete project.

Figure 12: Deleting the test project from the project Overview page.
In the Delete project dialog, type confirm in the text box to acknowledge that the action is final, then choose Delete project. This permanently deletes the project and its underlying resources, and triggers an asynchronous AWS CloudFormation stack deletion.
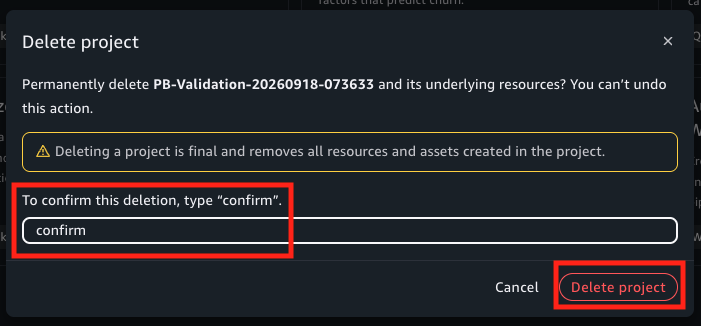
Figure 13: Confirming project deletion.
To remove the boundary from future projects, re-run the put-environment-blueprint-configuration command from Step 5: Set the permissions boundary, but omit the PermissionsBoundaryArn field from the regional parameters. Because you backed up the original configuration in Step 4: Read the current configuration (tooling-bp-config-backup.json), you can reuse the exact same provisioningRoleArn, manageAccessRoleArn, enabledRegions, and regionalParameters values (AZs, S3Location, Subnets, VpcId) — just without PermissionsBoundaryArn — so the blueprint returns to provisioning roles with no permissions boundary.
Conclusion
With the custom permissions boundary feature for Amazon SageMaker Unified Studio, organizations can adopt Amazon SageMaker Unified Studio Tooling blueprints without compromising their IAM governance posture. By configuring a single parameter on the Tooling blueprint, all IAM roles provisioned by future projects automatically carry the specified permissions boundary. This satisfies SCPs that mandate a boundary on every role and gives administrators granular control over what the Tooling roles can do, for example disabling AI agent and notebook capabilities. Remember that the example boundary in this post is illustrative, because it scopes to the services SageMaker Unified Studio uses but is still coarse.
“I just updated the EnvironmentBlueprintConfiguration for the Tooling blueprint to include the new PermissionsBoundaryArn param. After that the blueprint provisioned successfully with the required permissions boundary attached to all the IAM roles, in line with our security policies. In the end it was a one-line change.”
— Nat Noordanus, Data Tech Lead at Nexthink
To get started, create your permissions boundary policy, configure it on the Tooling blueprint using the CLI, and create a project to verify the boundary is attached.
For more information, see the documentation for Amazon SageMaker Unified Studio, IAM permissions boundaries, and Service Control Policies.