AWS Big Data Blog
Federate access to SageMaker Unified Studio with AWS IAM Identity Center and Okta
Many organizations are using an external identity provider to manage user identities. With an identity provider (IdP), you can manage your user identities outside of AWS and give these external user identities permissions to use AWS resources in your AWS accounts. External identity providers (IdP), such as Okta Universal Directory, can integrate with AWS IAM Identity Center to be the source of truth for Amazon SageMaker Unified Studio.
Amazon SageMaker Unified Studio supports a single sign-on (SSO) experience with AWS IAM Identity Center authentication. Users can access Amazon SageMaker Unified Studio with their existing corporate credentials. AWS IAM Identity Center enables administrators to connect their existing external identity providers and allows them to manage users and groups in their existing identity systems such as Okta which can then be synchronized with AWS IAM Identity Center using SCIM (System for Cross-domain Identity Management).
This post shows step-by-step guidance to setup workforce access to Amazon SageMaker Unified Studio using Okta as an external Identity provider with AWS IAM Identity Center.
Prerequisites
Before you start , make sure you have:
- An AWS account with AWS IAM Identity Center enabled . It is recommended to use an organization-level AWS IAM Identity Center instance for best practices and centralized identity management across your AWS organization.
- Okta account with users and a group
- A browser with network connectivity to Okta and Amazon SageMaker Unified Studio
Solution Overview
The steps in this post are structured into the following sections:
- Enable AWS IAM Identity Center
- Create an Amazon SageMaker domain
- Setup Okta users and groups
- Configure SAML in Okta for AWS IAM Identity Center
- Configure Okta as an identity provider in AWS IAM Identity Center
- Connect AWS IAM Identity Center to Okta
- Set up automatic provisioning of users and groups in AWS IAM Identity Center
- Complete Okta Configuration
- Configure Amazon SageMaker Unified Studio for SSO
- Test the setup
- Cleanup
Enable AWS IAM Identity Center
To enable AWS IAM Identity Center, follow the instructions in Enable IAM Identity Center in the AWS IAM Identity Center User Guide.
Create an Amazon SageMaker domain
- Sign into the AWS Management console and navigate to the Amazon SageMaker console. To create a new Amazon SageMaker Unified Studio domain follow the instructions in Create a Amazon SageMaker Unified Studio domain – manual setup
- From the Amazon SageMaker domain Summary page, copy the Domain ARN and save the value as shown Figure 1 for later use.

Figure 1: Amazon SageMaker Domain
Setup Okta users and groups
Step 1: Sign up for an Okta account
- Sign up for an Okta account, then choose the Sign up button to complete your account setup.
- If you already have an account with Okta, login to your Okta account.
Step 2: Create Groups in Okta
- Choose Directory in the left menu and choose Groups to proceed.
- Click on Add Group and enter name as unifiedstudio. Then choose the Save button.
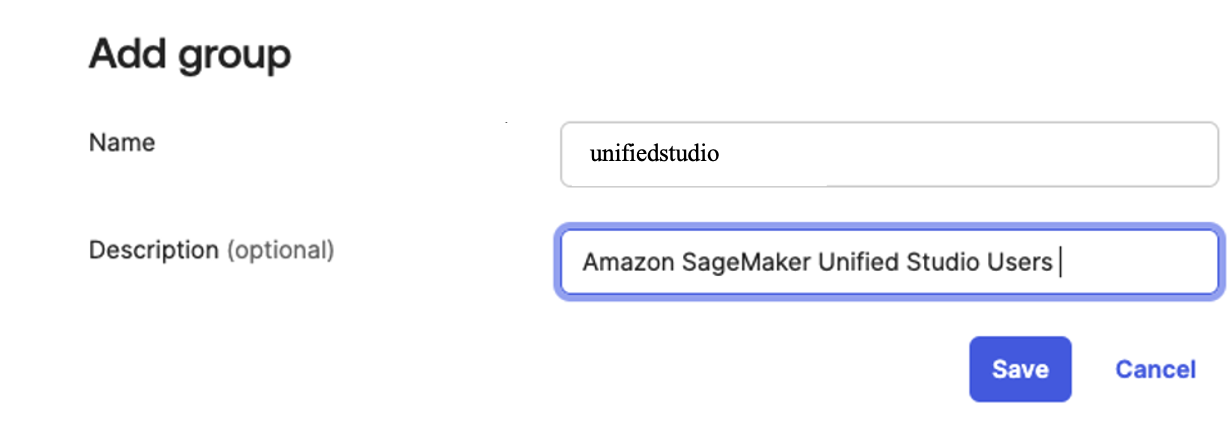
Figure 2. Creating a group in Okta
Step 3: Create users in Okta
- Choose People in left menu under Directory section and choose +Add Person.
- Provide First name, Last name, username (email ID), and primary email. Then select I will set password and choose first time password. Use the Save button to create your user.
- Add more users as needed.
Step 4: Assign Groups to users
- Choose Groups from the left menu, then choose the unifiedstudio group created in Step 2.
- Use Assign People to add users to the sagemaker group. Next, use + for each user you want to add.
Configure SAML In Okta
- Login to your okta domain and choose Applications from the left menu. Choose Applications, then choose Browse App Catalog
- In the search box, enter AWS IAM Identity Center, then choose the app to add the AWS IAM Identity Center app and then, choose + Add Integration button.
The following image shows the SAML app integration setup:
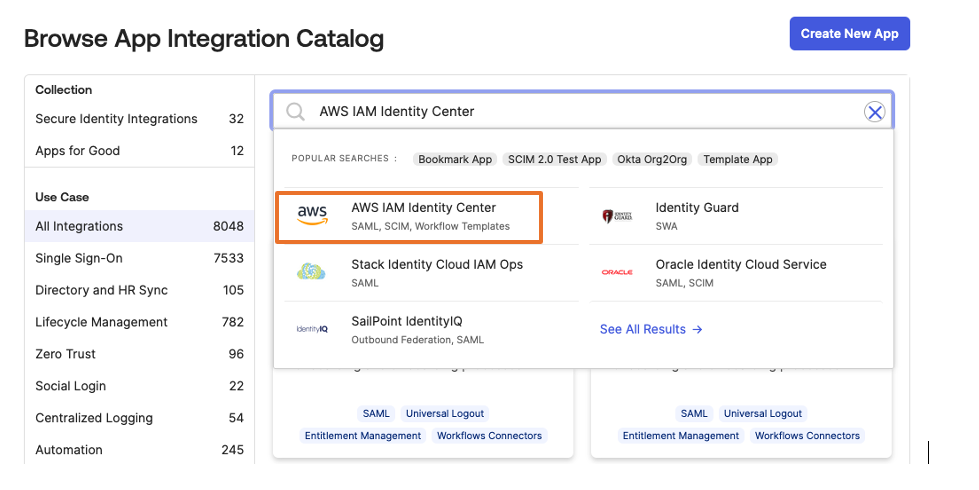
Figure 3. Creating a SAML app integration in Okta - For this example, we are creating an application called “unifiedstudio”. Under General Settings: Required enter the following
- Application label = Replace IAM Identity Center with unifiedstudio and then, choose Save
- Under Sign on menu. Copy Metadata URL under SAML 2.0 section and then, open Metadata URL in a new browser window to download the Okta identity provider metadata and save it as metadata.xml. You will use this for the SAML configuration in AWS IAM Identity Center to setup Okta as an Identity Provider.The following image shows where to find the metadata URL:
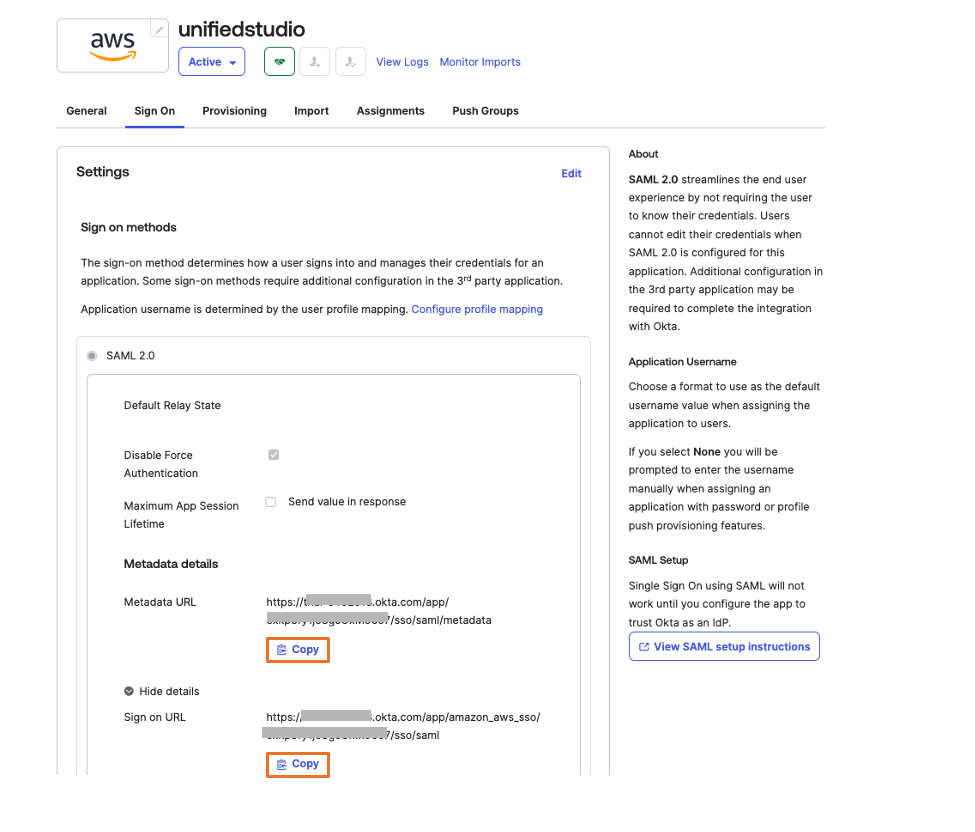
Figure 4: Downloading Okta identity provider metadata for SAML configuration - Choose More details and copy Sign on URL into text file; you will use this for the SAML configuration in Amazon SageMaker Unified Studio.
You are now ready to move to the AWS IAM Identity Center console to create an identity provider integration for your Okta instance.
Configure Okta as an identity provider in AWS IAM Identity Center
- Sign in to the AWS IAM Identity Center console as a user with administrative privileges
- In the left navigation menu, choose Settings and then, open the Identity source tab, choose Change Identity source from Actions dropdown as shown in Figure 5
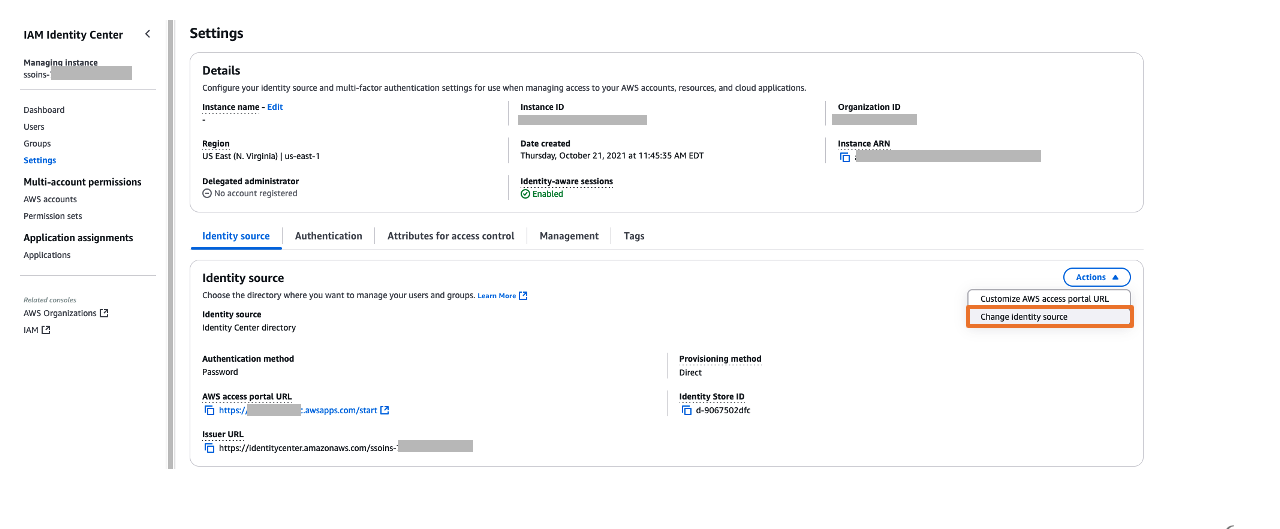 Figure 5: Selecting identity source in AWS IAM Identity Center
 - From Under Identity source, choose External Identity provider as shown in Figure 6
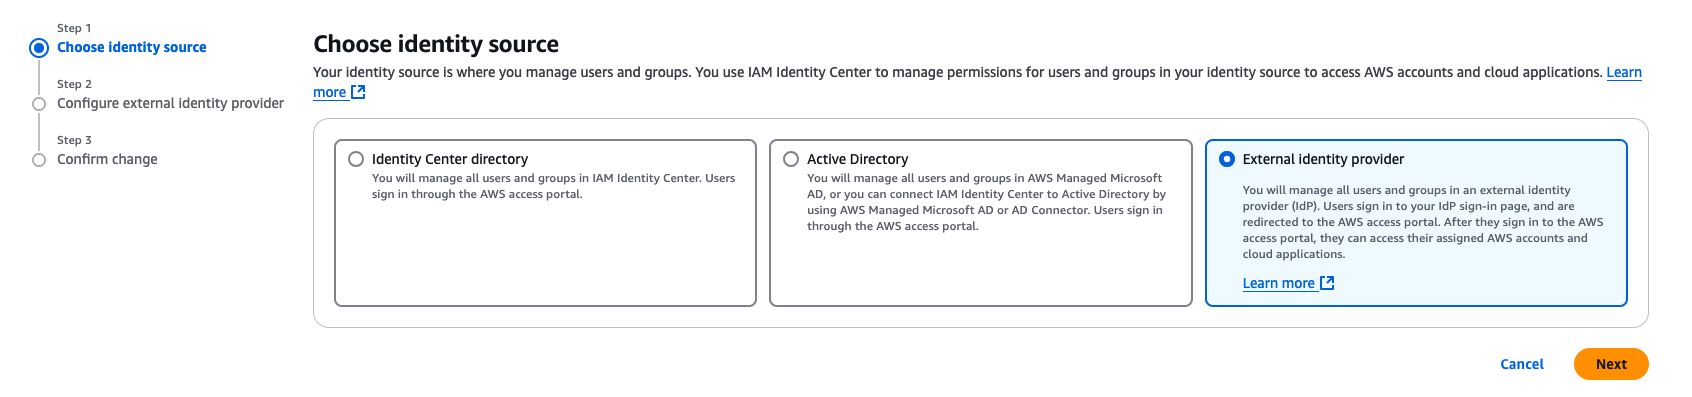
Figure 6: Choosing External Identity provider in AWS IAM Identity Center - You’ll need these configuration parameters for the next step. In Configure external identity provider section, under Service Provider metadata, do the following:
- Choose Download metadata file to download the AWS IAM Identity Center metadata file and save it on your system
- Copy these Service Provider metadata into a text file
- IAM Identity Center Assertion Consumer Service (ACS) URL
- IAM Identity Center issuer URL
- In Identity provider metadata section, under Idp SAML metadata, click on choose file and upload the metadata.xml file which you downloaded from okta in the previous step and then, choose Next as shown in Figure 7
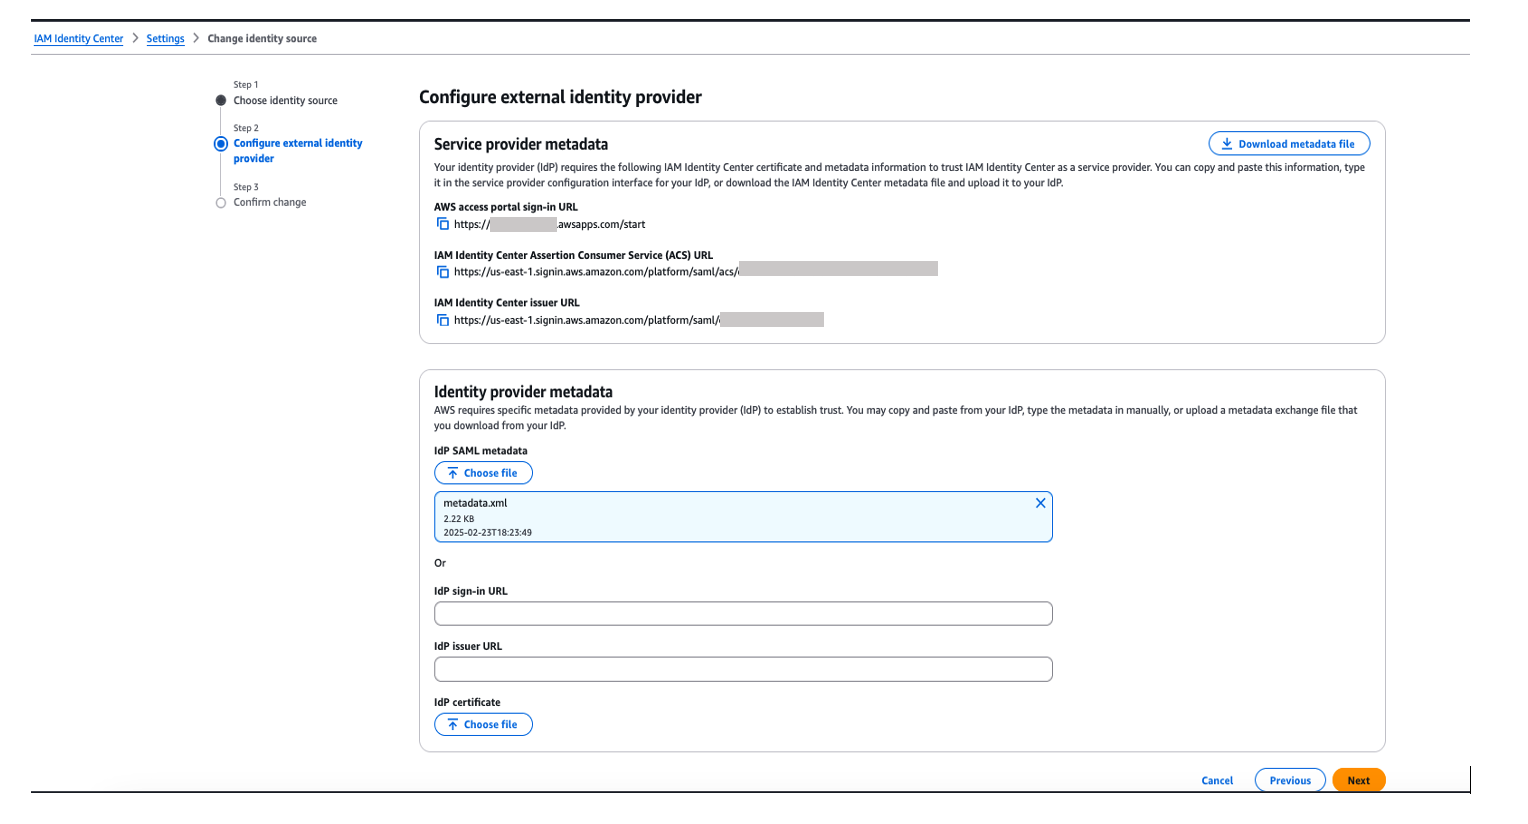
Figure 7. Configuring okta as Identity Provider in AWS IAM Identity Center
- After you read the disclaimer and are ready to proceed, enter ACCEPT and then choose Change identity source to complete Okta as an Identity Provider in IAM Identity Center.
Connect AWS IAM Identity Center to Okta
- Sign into Okta and go to the admin console.
- In the left navigation pane, choose Applications, and then choose the Okta application called unifiedstudio which you created in the previous section
- In Sign On, choose Edit to complete SAML configuration. Under Advanced Sign-on Settings enter the following and then, choose Save to complete configuration as shown Figure 8.
- For the AWS SSO ACS URL, enter IAM Identity Center Assertion Consumer Service (ACS) URL
- For the AWS SSO issuer URL, enter IAM Identity Center issuer URL
- For the Application username format, choose Okta username from dropdown
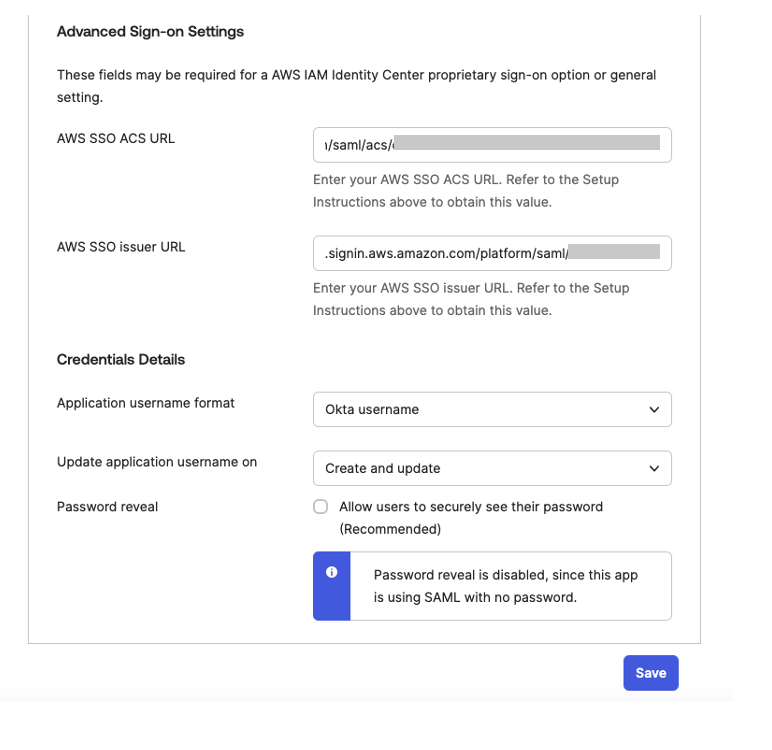 Figure 8. Configuring okta sign-on settings
Set up automatic provisioning of users and groups
In the AWS IAM Identity Center console, on the Settings page, locate the Automatic provisioning information box, and then choose Enable as shown in Figure 9. Copy these values to enable automatic provisioning.
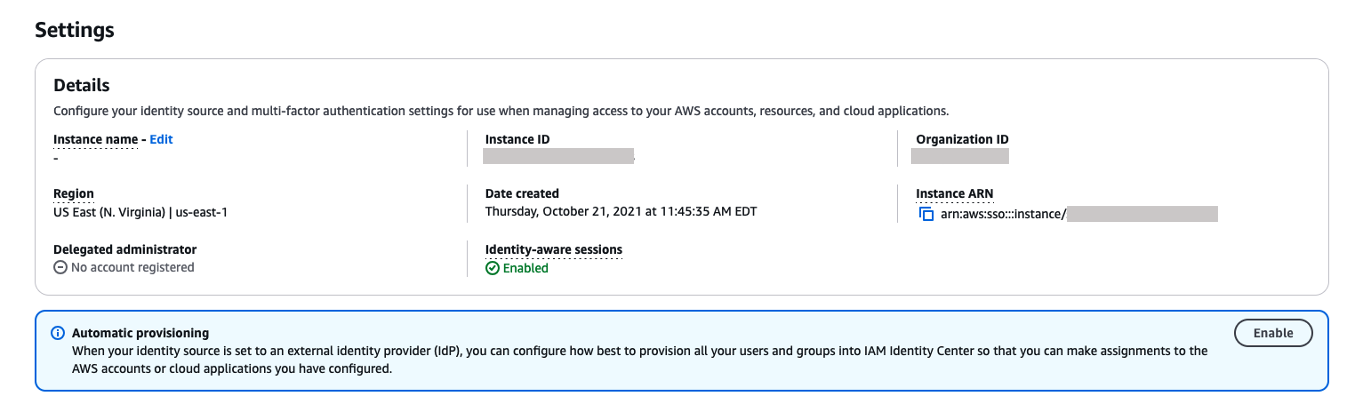
Figure 9. Enabling automatic provisioning in AWS IAM Identity Center
In the Inbound automatic provisioning dialog box, copy each of the values for the following options as shown in Figure 10 and then, choose Close
-
- SCIM endpoint
- Access token
You will use these values to configure provisioning in Okta in the next step.
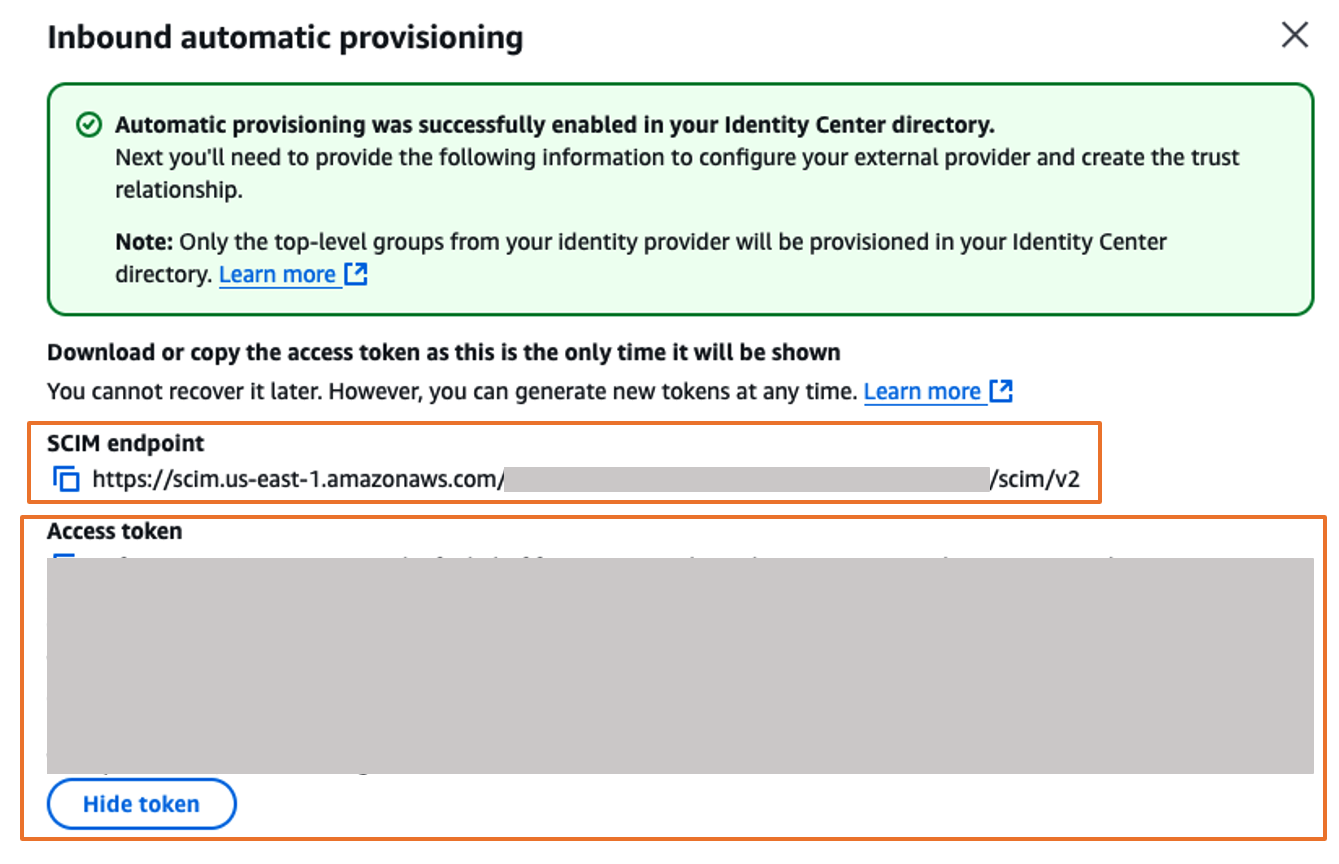 Figure 10. Automatic provisioning configuration parameters in AWS IAM Identity Center
Complete the Okta integration
- Sign into Okta and go to the admin console.
- In the left navigation pane, choose Applications, and then choose the Okta application called unifiedstudio which you created earlier.
- In Provisioning tab, choose Edit to complete auto provisioning between okta and AWS IAM Identity Center.
- Under Settings, choose Integration and then, choose Configure API integration and then, select Enable API integration to enable provisioning and enter the following using the SCIM provisioning values from AWS IAM Identity Center that you copied from the previous step as shown in Figure 11
For the Base URL, enter SCIM endpoint from IAM Identity Center
For the API Token, enter Access token from IAM Identity Center
For Import Groups, select Import groups option
And then, choose Test API Credentials to validate the SCIM provision and then, choose Save.
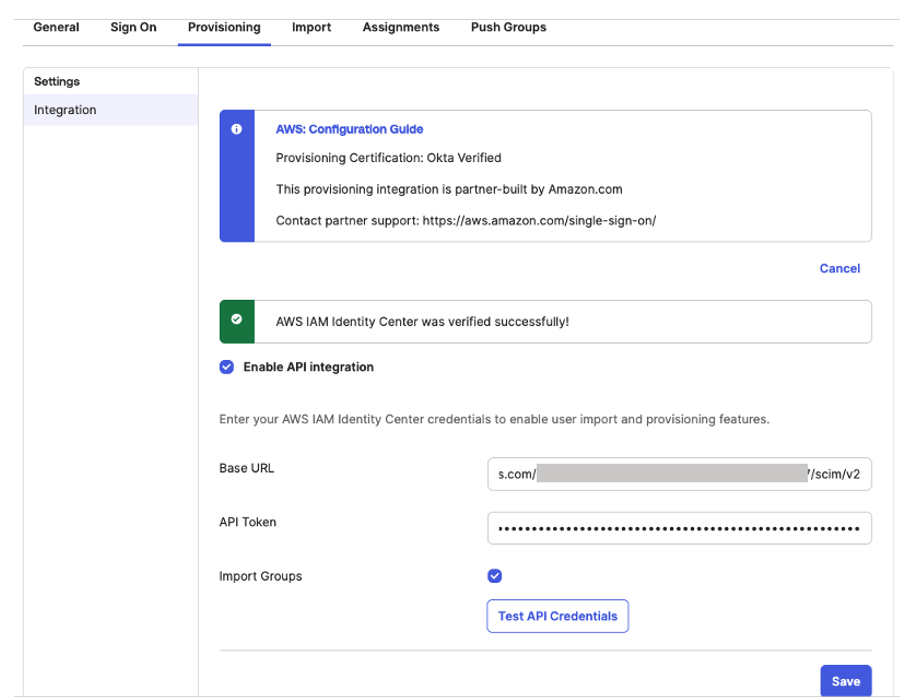
Figure 11: Automatic provisioning configuration in Okta
- Under Settings, choose Integration and then, choose Configure API integration and then, select Enable API integration to enable provisioning and enter the following using the SCIM provisioning values from AWS IAM Identity Center that you copied from the previous step as shown in Figure 11
- In the Provisioning tab, in the navigation pane under Settings, choose To App in the left navigation. Choose Edit, to Enable all options such as Create Users , Update User Attributes , Deactivate Users as shown in Figure 12 and then, choose Save.
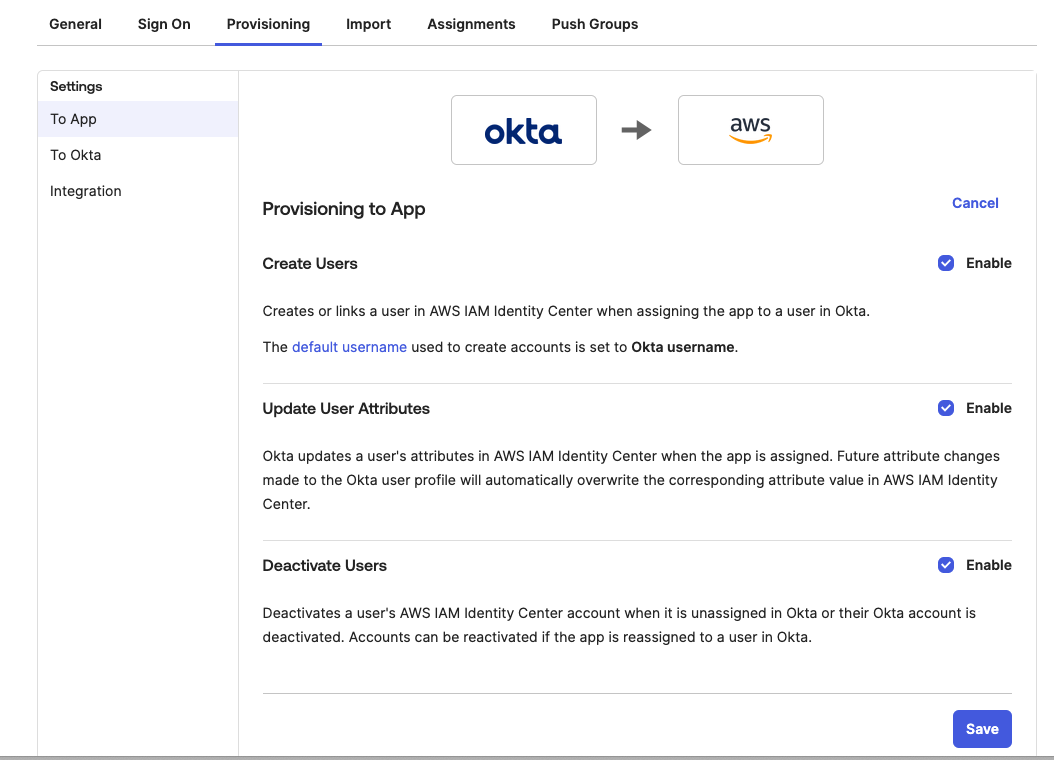
Figure 12: Enabling Automatic provisioning configuration in Okta
- In the Assignments tab, choose Assign, and then Assign to Groups.
- Select the unifiedstudio group, choose Assign, and then, leave it to defaults on popup and then, choose Done to complete the Group assignment, as shown in Figure 13.
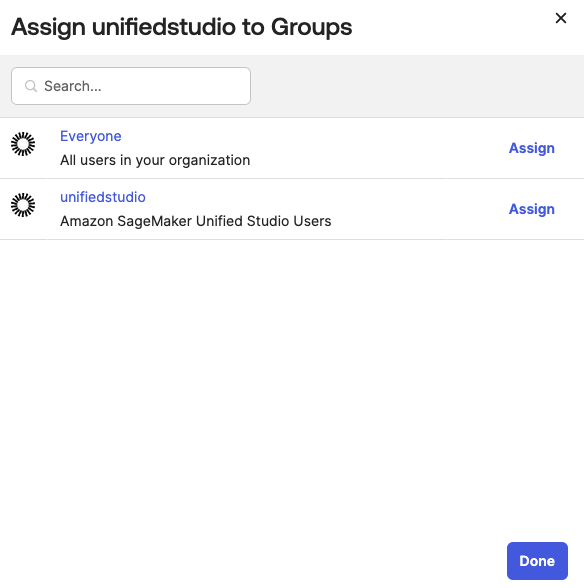 Figure 13: Assigning unifiedstudio group to SAML application called unifiedstudio
 - In the Push Groups tab, under Push Groups drop-down list, select Find groups by name as shown in Figure 14.

Figure 14: Choosing okta groups to push them to AWS IAM Identity Center
- Select the unifiedstudio group, leave Push group memberships immediately default option and then, choose Save as shown in Figure 15.
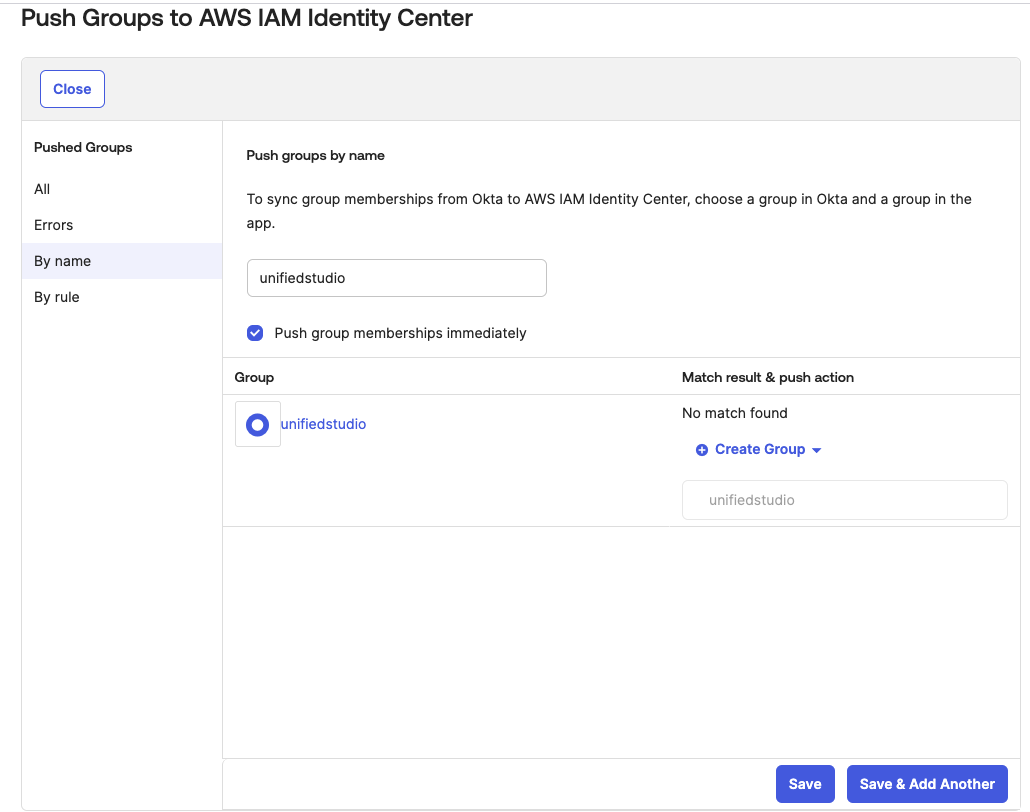
Figure 15: Pushing okta groups to AWS IAM Identity Center
Return to AWS IAM Identity Center, and you should be able to see Okta group and Okta users in AWS IAM Identity Center groups and users as shown In Figure 16.

Figure 16: Okta user groups in AWS IAM Identity Center
Configure SageMaker Unified Studio for SSO
In this step, you will configure SSO user access to Amazon SageMaker Unified Studio for your Amazon SageMaker platform domain.
- Navigate to the Amazon SageMaker management console.
- In the left navigation menu, select Domains.
- Choose the Domain from the list for which you want to configure SAML user access.
- On the domain’s details page, choose Configure next to the Configure SSO user access.
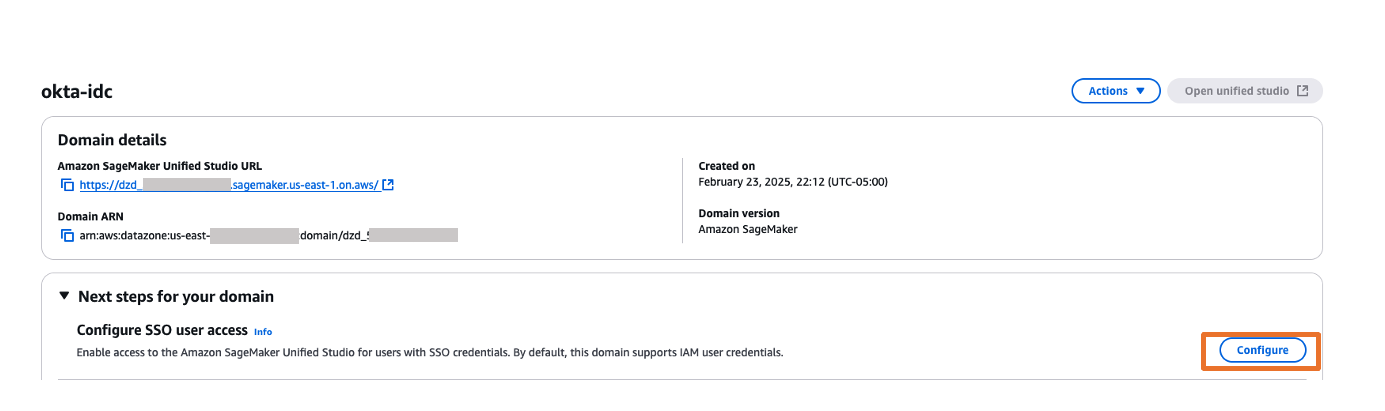
Figure 17: Amazon SageMaker Unified Studio SSO configuration - On the Choose user authentication method page, choose IAM Identity Center. With IAM Identity Center, users configured through external Identity Providers (IdPs) get to access the domain’s Amazon SageMaker Unified Studio. Choose Next.

Figure 18: Choosing authentication - You can choose either Require assignments – which means you explicitly select users/groups that can access the domain or Do not require assignments – which allows all authorized Okta users and groups access to this domain.
- You have two options to configure how your users will access to Amazon SageMaker Unified studio with AWS IAM Identity Center federation with Okta
- Do not required Assignments – The access will be provided to Amazon SageMaker Unified Studio based on your Okta SAML application assignments either through Group assignments or Individual user assignments. For this example, when you choose Do not required assignments option, all the users within unifiedstudio Okta group will have access to Amazon SageMaker Unified Studio as we have assigned unifiedstudio Okta user group to unifiedstudio SAML application in Okta.
- Require Assignments – You need to add either Okta users or Okta group to Amazon SageMaker domain as shown in step 8. In step 8, you’ll add unifiedstudio Okta group into Amazon SageMaker domain so that all unifiedstudio Okta group users will get access to Amazon SageMaker Unified Studio. You can also provide an Individual Okta group users access to Amazon SageMaker unified studio through Amazon SageMaker domain console by adding SSO (okta user) user into the domain.
- Note that either an Individual user or group within Okta must be assigned to the AWS Identity center application (AWS IAM Identity Center from Okta application catalog. We renamed application label as unifiedstudio for this example) for both Do not require Assignments and Require Assignments options.
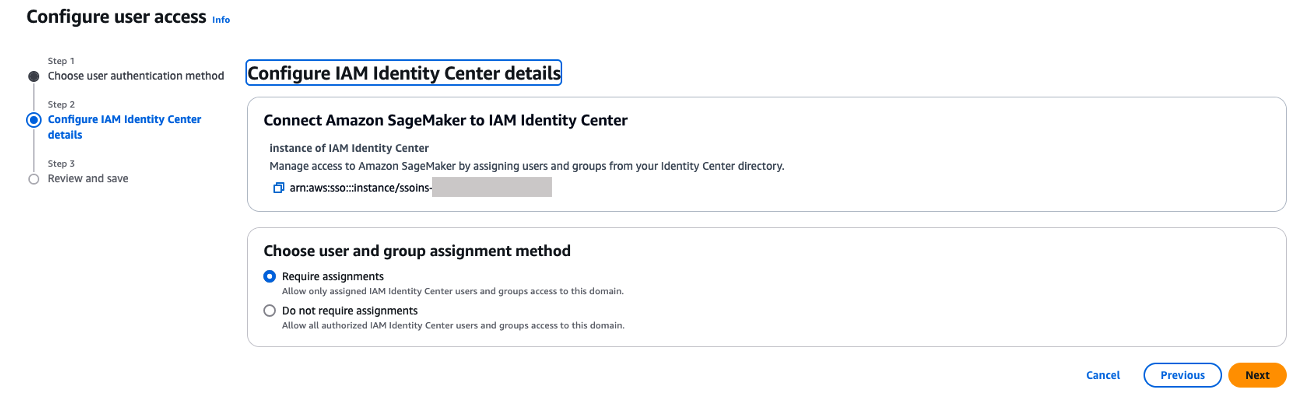
Figure 19. Amazon SageMaker Unified Studio SAML configuration
- You have two options to configure how your users will access to Amazon SageMaker Unified studio with AWS IAM Identity Center federation with Okta
- On the Review and save page, review your choices and then choose Save. Note that these settings are permanent once saved.
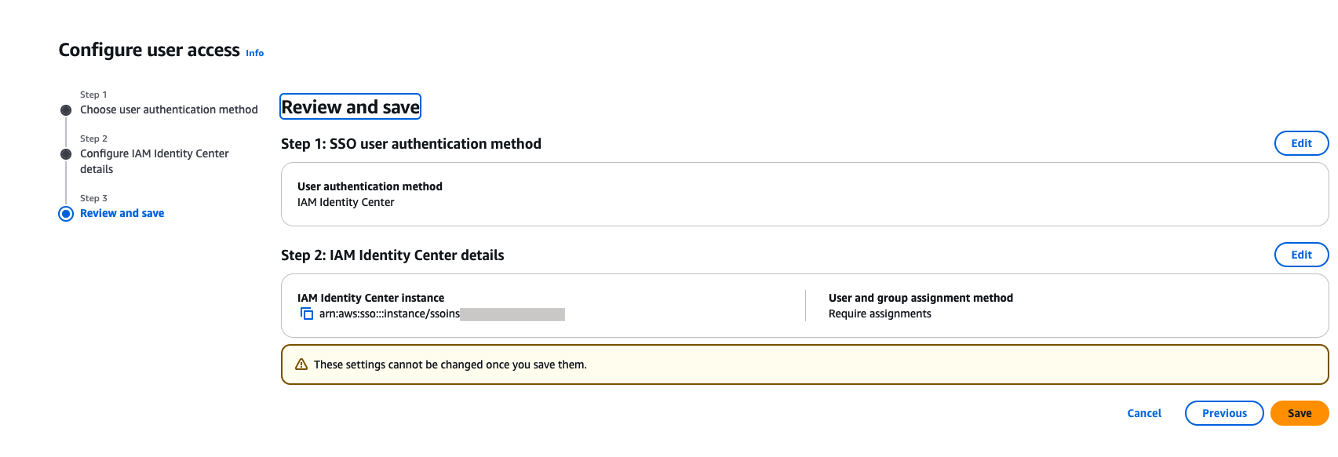
Figure 20. Review and confirm SAML configuration
- If you’ve chosen to require assignments, use the Add users and groups to add SAML users and groups to your domain.
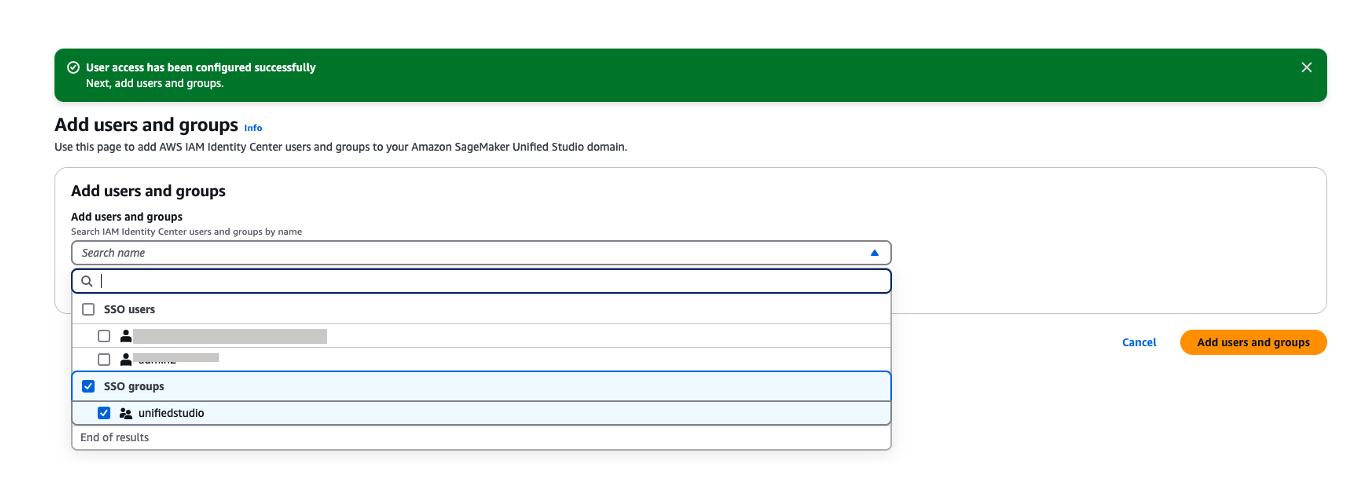
Figure 21. Adding okta group into Amazon Sagemaker domain
- Now, users will be able to access the Amazon SageMaker Unified Studio using the Domain URL with their SSO credentials.
- You can explore different projects for your users and assign those projects based on your SAML user groups for fine-grained access controls. For example, you can create different SAML user groups based on their job function in Okta, assign those Okta groups to AWS IAM Identity Center app in Okta and then, assign those Okta SAML groups to respective project profiles in Amazon SageMaker Unified Studio. To perform project profiles assignments to respective groups, choose project profiles tab, click on respective project profiles like SQL analytics, choose Authorized users and groups tab and then, choose Add and pick SSO groups from drop down as shown in Figure 22. Finally choose Add users and groups to complete project profile assignment.
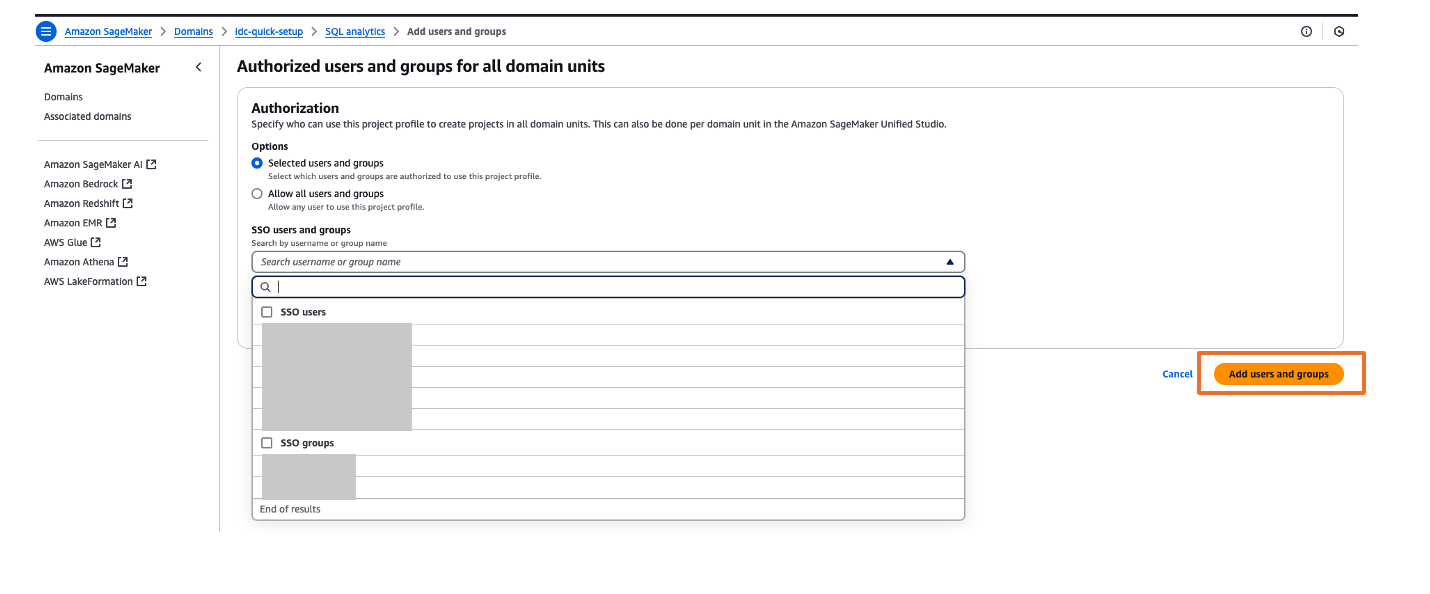
Figure 22. Assigning a project profile to okta group
Test the setup
- The Amazon SageMaker Unified Studio URL can be found on the domain details page as shown in Figure 23. The first access to Amazon SageMaker Unified Studio URL redirects you to the Okta login screen.
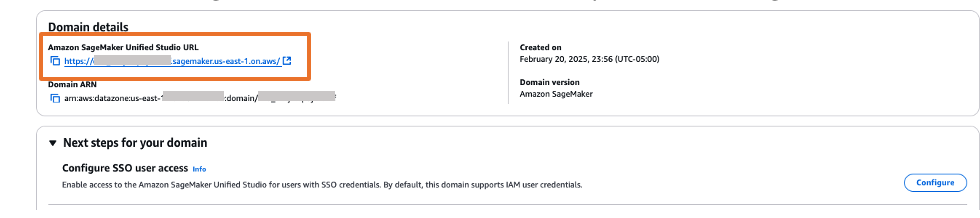
Figure 23. Validating Okta user access with Amazon SageMaker Unified Studio
- Copy and paste the Amazon SageMaker Unified Studio URL in your browser and enter the user credentials.
- After successful login, you will be redirected to the Amazon SageMaker Unified Studio home page.

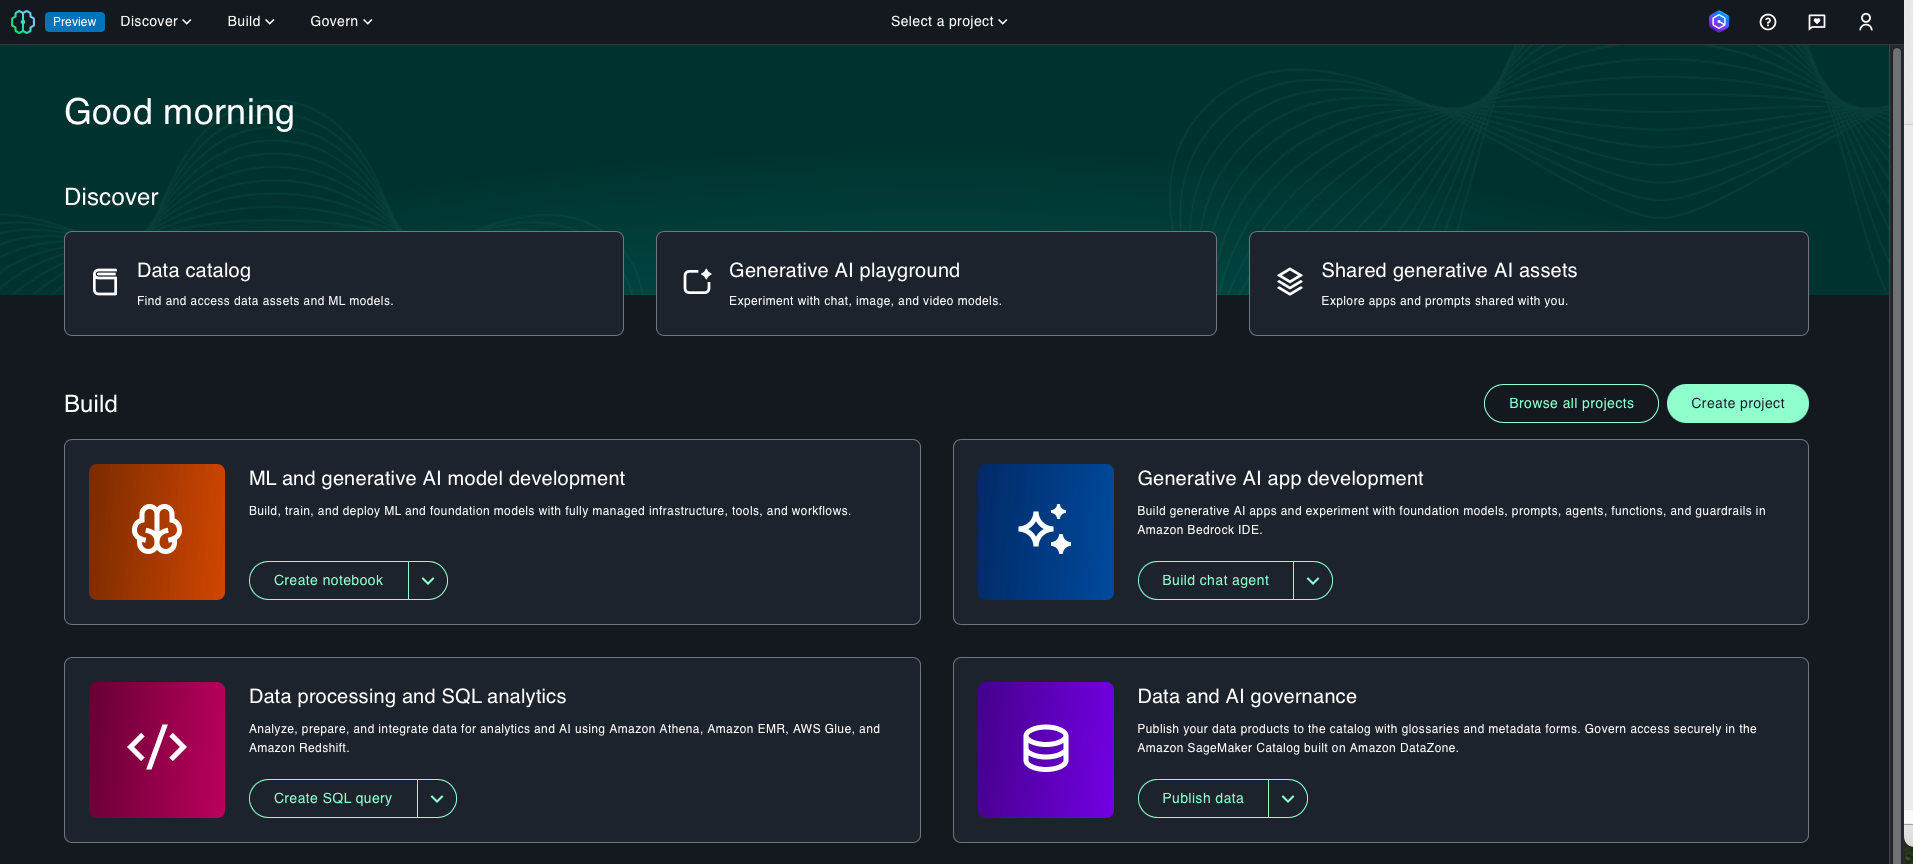
Figure 24. SAML authenticated Amazon SageMaker Unified Studio
- Once logged into Amazon SageMaker Unified Studio, you can assign authorization policies based on your requirements. Choose Govern and then choose, Domain units and choose your SageMaker domain to select suitable authorization policies. For this example, we are choosing project creation policy as shown in Figure 25.
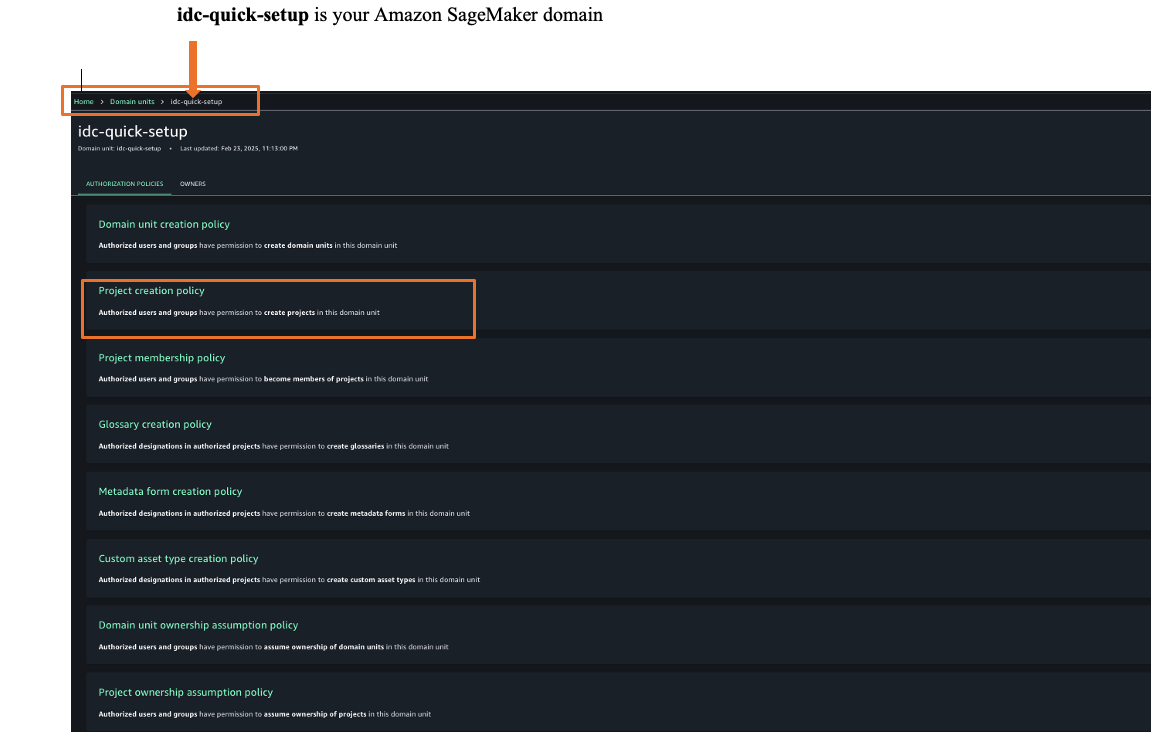

Figure 25. Amazon SageMaker unified studio authorization policies - Choose Project membership policy and then choose ADD POLICY GRANT option to assign user groups or users to respective project. For this example, we are choosing project membership policy as shown in Figure 26.
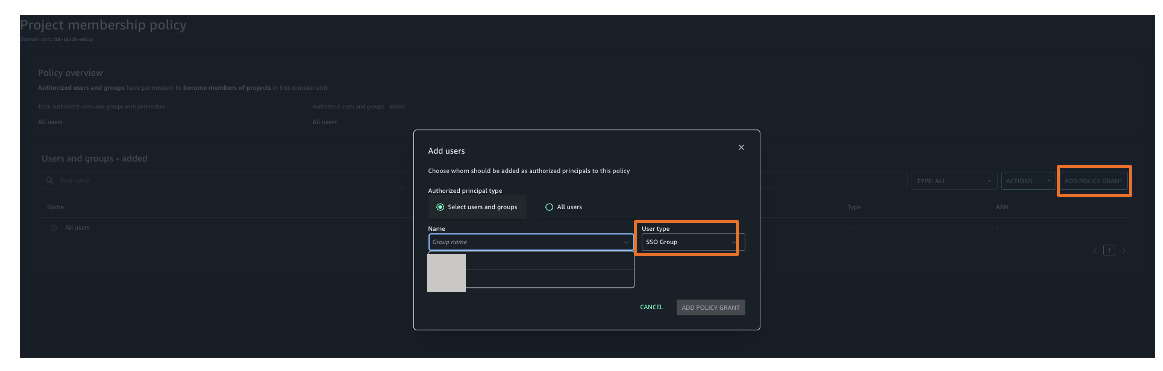

Figure 26. Amazon SageMaker unified studio authorization policies assignment
You’ve now successfully configured single sign-on for Amazon SageMaker Unified Studio using Okta credentials through AWS IAM Identity Center.
Clean up
To avoid ongoing charges, delete the resources you created:
- Deleting your Amazon SageMaker Unified Studio domain
- Deleting your Okta account (if needed)
Conclusion
In this post, we showed you how to set up Okta as an identity provider using SAML authentication for Amazon SageMaker Unified Studio access through AWS IAM Identity Center federation. This setup allows your users to access SageMaker Unified Studio with their existing corporate credentials, eliminating the need for separate AWS accounts.
Get started by checking the Amazon SageMaker Unified Studio Developer Guide, which provides guidance on how to build data and AI applications using Amazon SageMaker platform