AWS Compute Blog
Building a Jenkins Pipeline with AWS SAM
This post is courtesy of Tarun Kumar Mall, SDE at AWS.
This post shows how to set up a multi-stage pipeline on a Jenkins host for a serverless application, using the AWS Serverless Application Model (AWS SAM).
Overview
This tutorial uses Jenkins Pipeline plugin. A commit to the main branch of the repository starts and deploys the application, using the AWS SAM CLI. This tutorial deploys a small serverless API application called HelloWorldApi.
The pipeline consists of stages to build and deploy the application. Jenkins first ensures that the build environment is set up and installs any necessary tools. Next, Jenkins prepares the build artifacts. It promotes the artifacts to the next stage, where they are deployed to a beta environment using the AWS SAM CLI. Integration tests are run after deployment. If the tests pass, the application is deployed to the production environment.
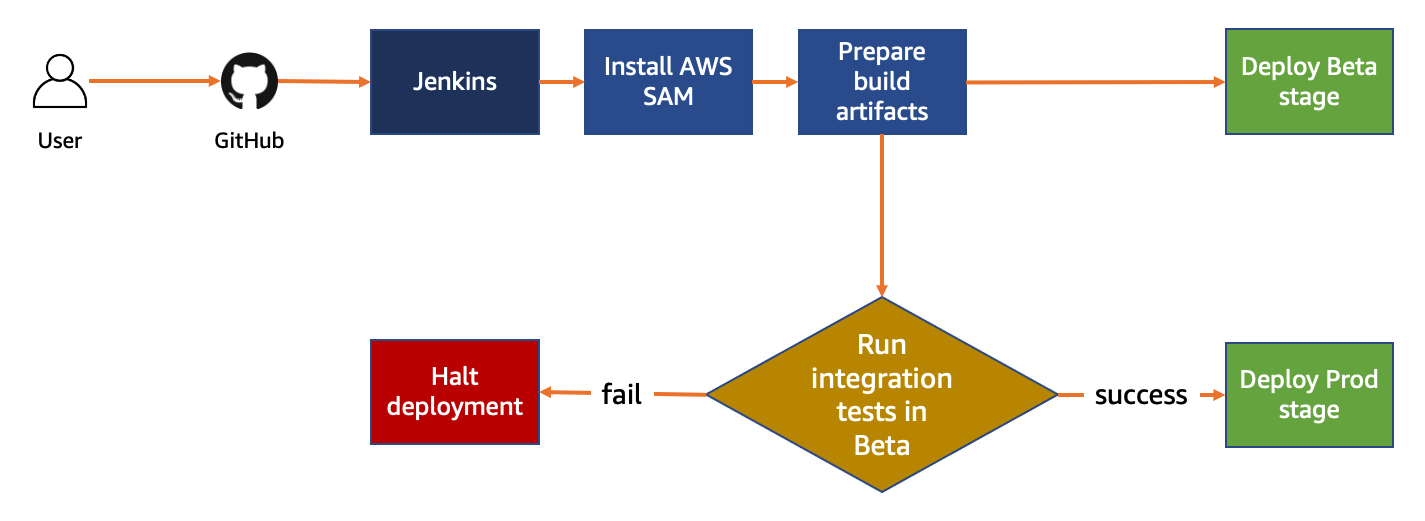
CICD workflow diagram
The following prerequisites are required:
- A working Jenkins setup with version 2.249.3 or greater.
- Python3 and python3-venv installed on your Jenkins host.
- Node.js installed on your Jenkins host.
- An AWS account and credentials configured for local testing.
Setting up the backend application and development stack
Using AWS CloudFormation to define the infrastructure, you can create multiple environments or stacks from the same infrastructure definition. A “dev stack” is a copy of production infrastructure deployed to a developer account for testing purposes.
As serverless services use a pay-for-value model, it can be cost effective to use a high-fidelity copy of your production stack. Dev stacks are created by each developer as needed and deleted without having any negative impact on production.
For complex applications, it may not be feasible for every developer to have their own stack. However, for this tutorial, setting up the dev stack first for testing is recommended. Setting up a dev stack takes you through a manual process of how a stack is created. Later, this process is used to automate the setup using Jenkins.
To create a dev stack:
- Clone backend application repository https://github.com/aws-samples/aws-sam-jenkins-pipeline-tutorial
git clone https://github.com/aws-samples/aws-sam-jenkins-pipeline-tutorial.git - Build the application and run the guided deploy command:
cd aws-sam-jenkins-pipeline-tutorial
sam build
sam deploy --guided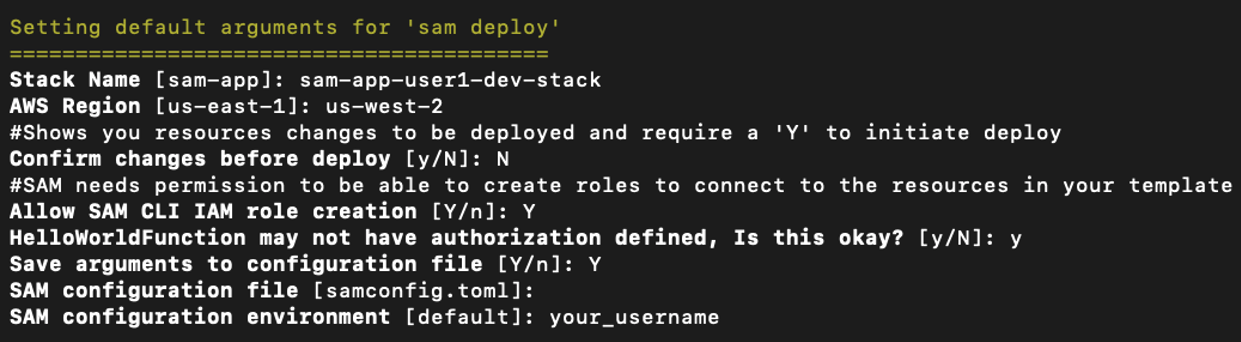
AWS SAM guided deploy output
This sets up a development stack and saves the settings in the samconfig.toml file with configuration environment specific to a user. This also triggers a deployment.
- After deployment, make a small code change. For example, in the file hello-world/app.js change the message Hello world to Hello world from user <your name>.
- Deploy the updated code:
sam build
sam deploy -–config-env <your_username>
With this command, each developer can create their own configuration environment. They can use this for deploying to their development stack and testing changes before pushing changes to the repository.
Once deployment finishes, the API endpoint is displayed in the console output. You can use this endpoint to make GET requests and test the API manually.

Deployment output
To update and run the integration test:
- Open the hello-world/tests/integ/test-integ-api.js file.
- Update the assert statement in line 32 to include <your name> from the previous step:
it("verifies if response contains my username", async () => { assert.include(apiResponse.data.message, "<your name>"); }); - Open package.json and add the line in bold:
{ ... "scripts": { "test": "mocha tests/unit/", "integ-test": "mocha tests/integ/" } ... } - From the terminal, run the following commands:
cd hello-world
npm install
AWS_REGION=us-west-2 STACK_NAME=sam-app-user1-dev-stack npm run integ-test
If you are using Microsoft Windows, instead run:
cd hello-world
npm install
set AWS_REGION=us-west-2
set STACK_NAME=sam-app-user1-dev-stack
npm run integ-test
Test results
You have deployed a fully configured development stack with working integration tests. To push the code to GitHub:
- Create a new repository in GitHub.
- From the GitHub account homepage, choose New.
- Enter a repository name and choose Create Repository.
- Copy the repository URL.
- From the root directory of the AWS SAM project, run:
git init
git commit -am “first commit”
git remote add origin <your-repository-url>
git push -u origin main
Creating an IAM user for Jenkins
To create an IAM user for the Jenkins deployment:
- Sign in to the AWS Management Console and navigate to IAM.
- Select Users from side navigation and choose Add user.
- Enter the User name as sam-jenkins-demo-credentials and grant Programmatic access to this user.
- On the next page, select Attach existing policies directly and choose Create Policy.
- Select the JSON tab and enter the following policy. Replace <YOUR_ACCOUNT_ID> with your AWS account ID:
{ "Version": "2012-10-17", "Statement": [ { "Sid": "CloudFormationTemplate", "Effect": "Allow", "Action": [ "cloudformation:CreateChangeSet" ], "Resource": [ "arn:aws:cloudformation:*:aws:transform/Serverless-2016-10-31" ] }, { "Sid": "CloudFormationStack", "Effect": "Allow", "Action": [ "cloudformation:CreateChangeSet", "cloudformation:DeleteStack", "cloudformation:DescribeChangeSet", "cloudformation:DescribeStackEvents", "cloudformation:DescribeStacks", "cloudformation:ExecuteChangeSet", "cloudformation:GetTemplateSummary" ], "Resource": [ "arn:aws:cloudformation:*:<YOUR_ACCOUNT_ID>:stack/*" ] }, { "Sid": "S3", "Effect": "Allow", "Action": [ "s3:CreateBucket", "s3:GetObject", "s3:PutObject" ], "Resource": [ "arn:aws:s3:::*/*" ] }, { "Sid": "Lambda", "Effect": "Allow", "Action": [ "lambda:AddPermission", "lambda:CreateFunction", "lambda:DeleteFunction", "lambda:GetFunction", "lambda:GetFunctionConfiguration", "lambda:ListTags", "lambda:RemovePermission", "lambda:TagResource", "lambda:UntagResource", "lambda:UpdateFunctionCode", "lambda:UpdateFunctionConfiguration" ], "Resource": [ "arn:aws:lambda:*:<YOUR_ACCOUNT_ID>:function:*" ] }, { "Sid": "IAM", "Effect": "Allow", "Action": [ "iam:AttachRolePolicy", "iam:CreateRole", "iam:DeleteRole", "iam:DetachRolePolicy", "iam:GetRole", "iam:PassRole", "iam:TagRole" ], "Resource": [ "arn:aws:iam::<YOUR_ACCOUNT_ID>:role/*" ] }, { "Sid": "APIGateway", "Effect": "Allow", "Action": [ "apigateway:DELETE", "apigateway:GET", "apigateway:PATCH", "apigateway:POST", "apigateway:PUT" ], "Resource": [ "arn:aws:apigateway:*::*" ] } ] } - Choose Review Policy and add a policy name on the next page.
- Choose Create Policy button.
- Return to the previous tab to continue creating the IAM user. Choose Refresh and search for the policy name you created. Select the policy.
- Choose Next Tags and then Review.
- Choose Create user and save the Access key ID and Secret access key.
Configuring Jenkins
To configure AWS credentials in Jenkins:
- On the Jenkins dashboard, go to Manage Jenkins > Manage Plugins in the Available tab. Search for the Pipeline: AWS Steps plugin and choose Install without restart.
- Navigate to Manage Jenkins > Manage Credentials > Jenkins (global) > Global Credentials > Add Credentials.
- Select Kind as AWS credentials and use the ID sam-jenkins-demo-credentials.
- Enter the access key ID and secret access key and choose OK.
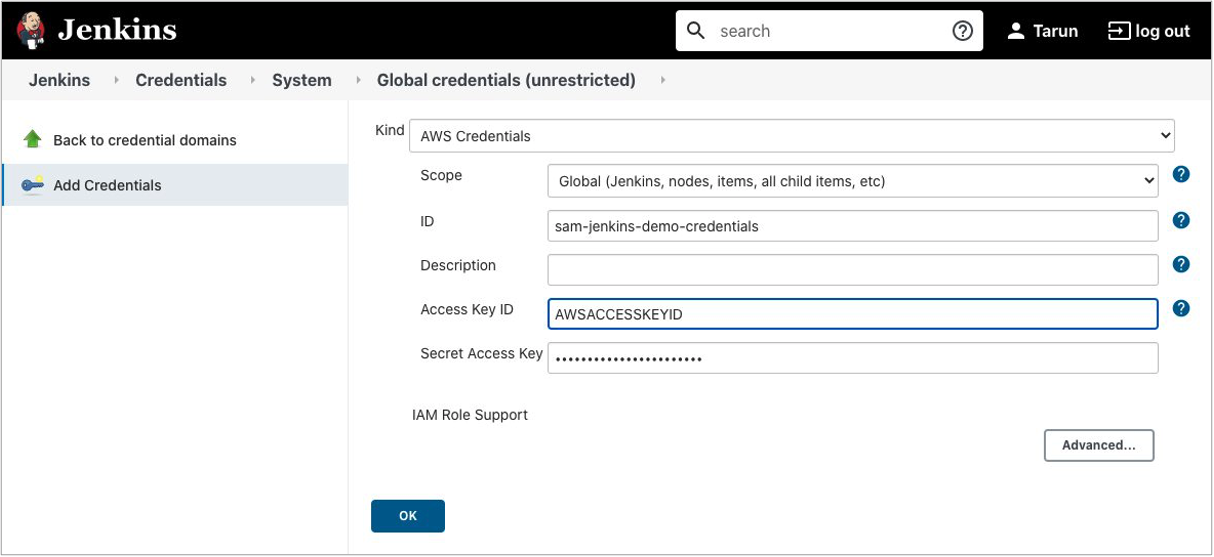
Jenkins credential configuration
- Create Amazon S3 buckets for each Region in the pipeline. S3 bucket names must be unique within a partition:
aws s3 mb s3://sam-jenkins-demo-us-west-2-<your_name> --region us-west-2
aws s3 mb s3://sam-jenkins-demo-us-east-1-<your_name> --region us-east-1 - Create a file named Jenkinsfile at the root of the project and add:
pipeline { agent any stages { stage('Install sam-cli') { steps { sh 'python3 -m venv venv && venv/bin/pip install aws-sam-cli' stash includes: '**/venv/**/*', name: 'venv' } } stage('Build') { steps { unstash 'venv' sh 'venv/bin/sam build' stash includes: '**/.aws-sam/**/*', name: 'aws-sam' } } stage('beta') { environment { STACK_NAME = 'sam-app-beta-stage' S3_BUCKET = 'sam-jenkins-demo-us-west-2-user1' } steps { withAWS(credentials: 'sam-jenkins-demo-credentials', region: 'us-west-2') { unstash 'venv' unstash 'aws-sam' sh 'venv/bin/sam deploy --stack-name $STACK_NAME -t template.yaml --s3-bucket $S3_BUCKET --capabilities CAPABILITY_IAM' dir ('hello-world') { sh 'npm ci' sh 'npm run integ-test' } } } } stage('prod') { environment { STACK_NAME = 'sam-app-prod-stage' S3_BUCKET = 'sam-jenkins-demo-us-east-1-user1' } steps { withAWS(credentials: 'sam-jenkins-demo-credentials', region: 'us-east-1') { unstash 'venv' unstash 'aws-sam' sh 'venv/bin/sam deploy --stack-name $STACK_NAME -t template.yaml --s3-bucket $S3_BUCKET --capabilities CAPABILITY_IAM' } } } } } - Commit and push the code to the GitHub repository by running following commands:
git commit -am “Adding Jenkins pipeline config.”
git push origin -u main
Next, create a Jenkins Pipeline project:
- From the Jenkins dashboard, choose New Item, select Pipeline, and enter the project name sam-jenkins-demo-pipeline.

Jenkins Pipeline creation wizard
- Under Build Triggers, select Poll SCM and enter * * * * *. This polls the repository for changes every minute.

Jenkins build triggers configuration
- Under the Pipeline section, select Definition as Pipeline script from SCM.
- Select GIT under SCM and enter the repository URL.
- Set Branches to build to */main.
- Set the Script Path to Jenkinsfile.
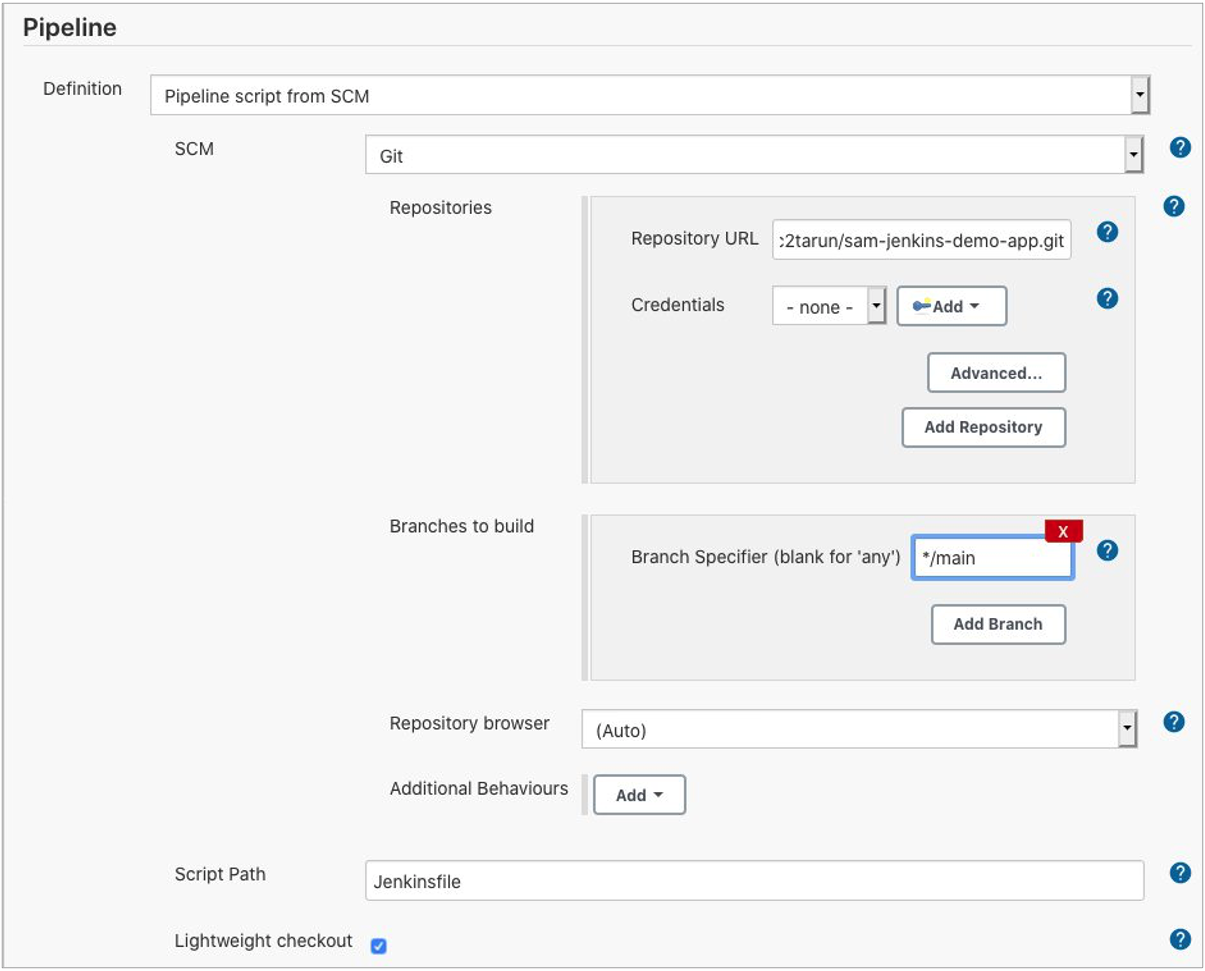
Jenkins pipeline configuration
- Save the project.
After the build finishes, you see the pipeline:

Jenkins pipeline stages
Review the logs for the beta stage to check that the integration test is completed successfully.
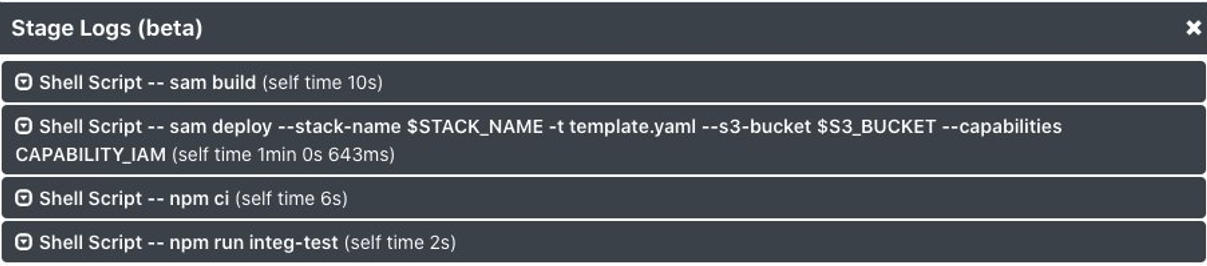
Jenkins stage logs
Conclusion
This tutorial uses a Jenkins Pipeline to add an automated CI/CD pipeline to an AWS SAM-generated example application. Jenkins automatically builds, tests, and deploys the changes after each commit to the repository.
Using Jenkins, developers can gain the benefits of continuous integration and continuous deployment of serverless applications to the AWS Cloud with minimal configuration.
For more information, see the Jenkins Pipeline and AWS Serverless Application Model documentation.
We want to hear your feedback! Is this approach useful for your organization? Do you want to see another implementation? Contact us on Twitter @edjgeek or via comments!