AWS Compute Blog
How to import split disks into AWS
Contributed by Raphael Sack
In an amusing coincidence, I was recently asked by two separate customers a nearly identical question: how to import split disks in the form of VMDK to AWS. This post covers one way to do this.
There are quite a few names, official and unofficial, for split disks. These include: non-monolithic, split disks, multi-part disks, delta parts, and more. For consistency, I refer to them as split disks in this post. The Image Formats page of VM Import/Export’s documentation specifies the officially supported formats when importing disks and virtual machines.
How to import split disks:
- Set up a conversion instance.
- Convert and build out the new disk image.
- Import the image.
After the image is imported, you can validate the import and start using the image.
Setting up a conversion instance
First things first—you need an instance to be used for the conversion job. You can use any machine that is able to run the QEMU image utility.
For convenience, spin up an Amazon EC2 instance running Amazon Linux. The only modification that you apply to the instance is installing the qemu-img disk image utility. To install the utility on Amazon Linux, use YUM:
yum install qemu-img
The instance requires the ec2:ImportImage and ec2:DescribeImportImageTasks permissions to be able to run the commands detailed in the steps below.
Converting and building out the new disk image
Next, you need your source VMDK files to be available on the machine. In this case, store on Amazon S3 and copy them over to the EC2 instance.
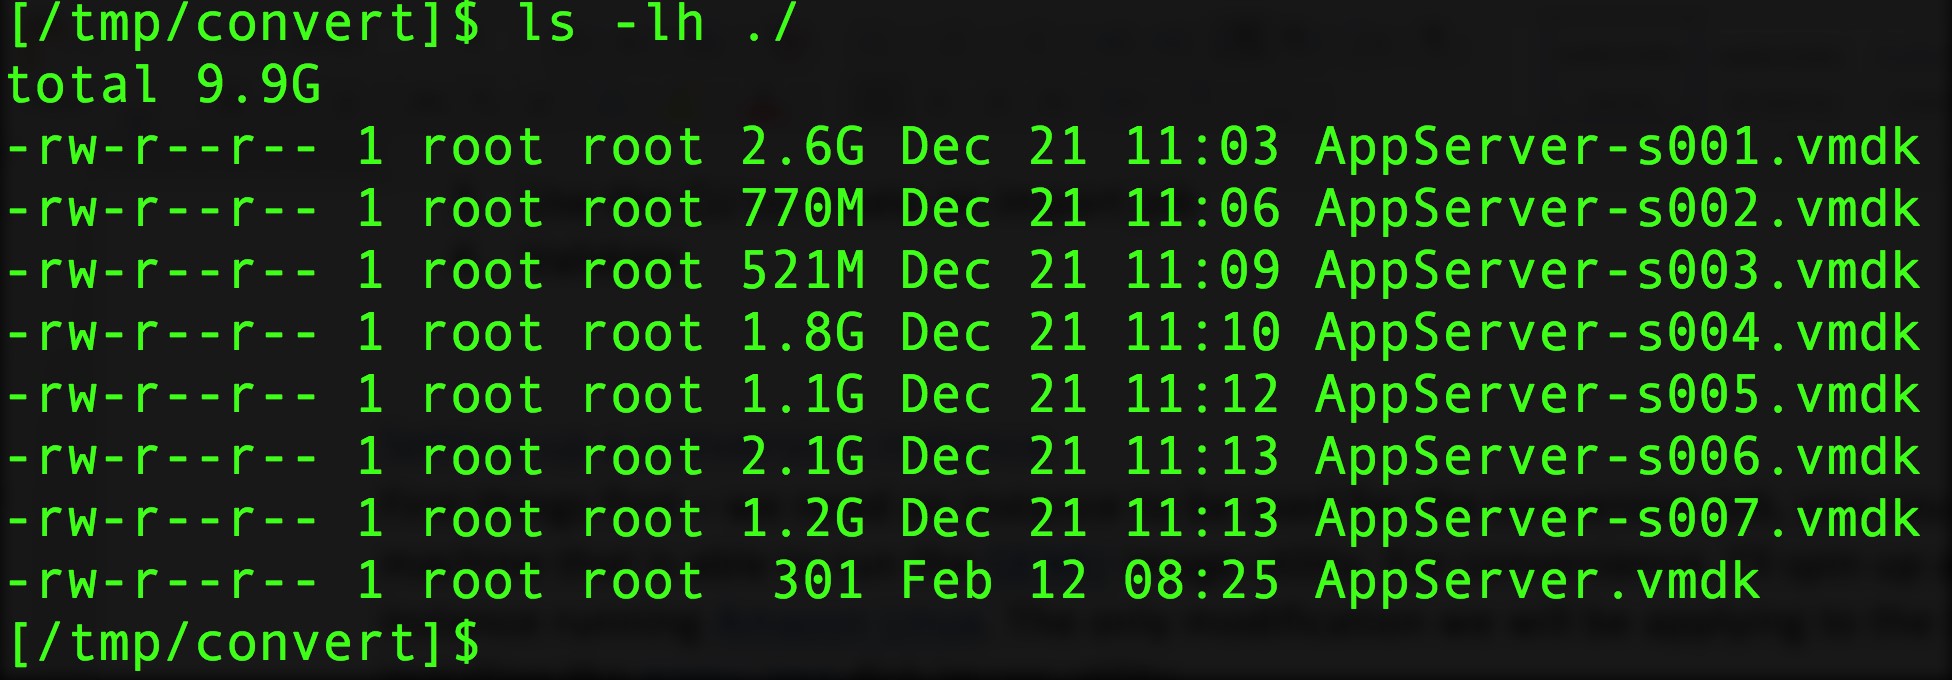
If you examine your source machine’s main .vmdk file, you find the “Extent description” section that specifies the disk parts. Make sure that you’ve got all of them.

As mentioned previously, you use qemu-img to convert the disks. Use the following command format:
qemu-img convert -f [SOURCE FORMAT] [SOURCE DISK FILENAME] -O [OUTPUT FORMAT] [OUTPUT FILENAME]
For example:
qemu-img convert -f vmdk MyDisk.vmdk -O raw MyDisk.raw
Because there are multiple parts, you can use a quick Bash one-liner loop:
for i in *-*.vmdk; do qemu-img convert -f vmdk $i -O raw $i.raw; done
A quick note about this command, it creates files such as AppServer-s001.vmdk.raw. You could use some command line tinkering and improve the naming convention. Because this post is only a temporary conversion, you can also leave the names as they are.
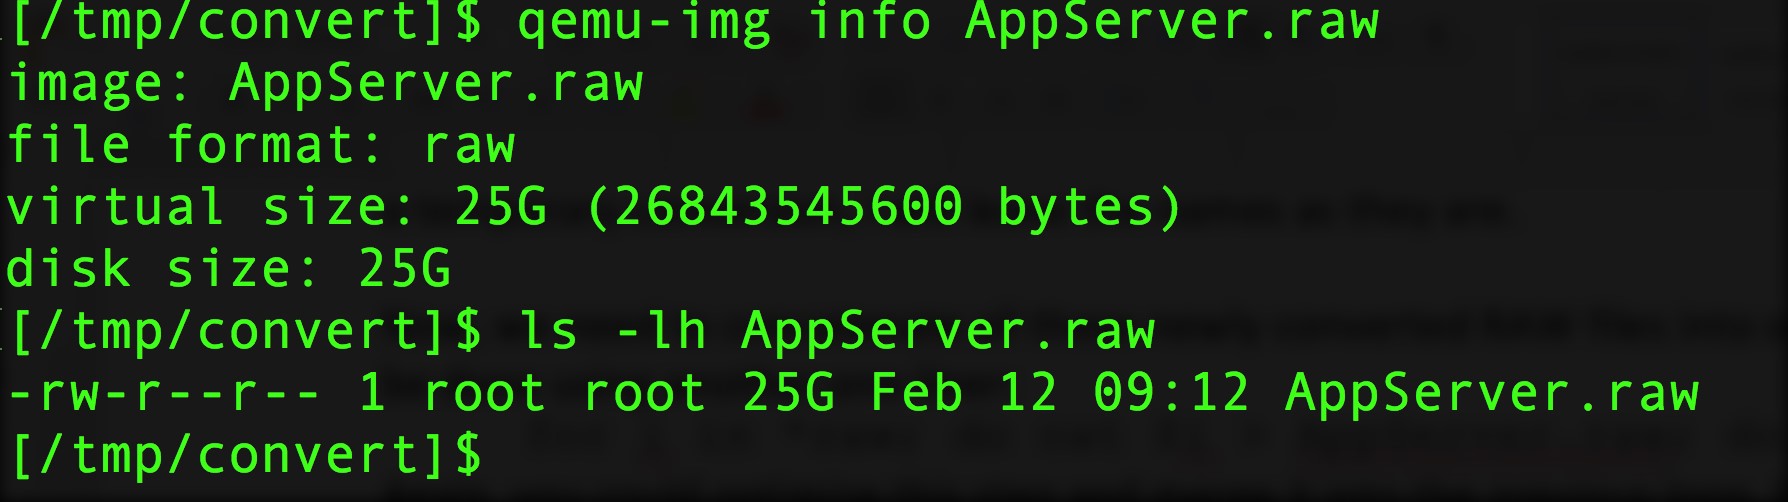
Now, concatenate all these newly converted RAW files into one large file, using the following command:
for i in *raw; do cat $i > AppServer.raw; done
Again, you could optimize this step and merge it into the previous loop. For the sake of clarity, I separated them out.
If you use qemu-img, you can now see that you have a single, RAW disk image:
Importing the disk image
The final step is to import the image, either as a snapshot, or as an image. In this example, use the image option and you can launch several instances off these disks.
To import an image or snapshot, the source has to be in an S3 bucket. Create a bucket named “import-blog-post”. Using the AWS CLI, upload the source to the bucket.
The last step is to create an import job. Jobs can represent a physical import (where you ship a physical device containing the data), or an upload of such data.
The corresponding CLI command for importing images is import-image and supports specifying parameters using command line arguments, or using a JSON file. For this post, use a combination of both for readability:
aws ec2 import-image --description <DESCRIPTION FOR THE IMPORT TASK> --license-type <LICENSE TYPE> --disk-containers <INFORMATION ABOUT THE DISKS>
Your command:
aws ec2 import-image --description "Blog import job" --license-type BYOL --disk-containers file://import-task.json
The contents of the JSON file:
[
        {
                "Description": "AppServer Ubuntu Image",
                "Format": "raw",
                "UserBucket": {
                        "S3Bucket": "import-blog-post",
                        "S3Key": "AppServer.raw"
                }
        }
]
You are specifying the source image format, location (in S3), and a description to be used for the AMI created from it.
Important: VM Import requires a service role to perform certain operations (such as downloading from S3, creating an image). If you do not have a vmimport role, follow the steps from the VM Import Service Role section in the Import Your VM as an Image topic. Additionally, before running the commands, I recommend that you verify that the role has the required access to the S3 bucket used for storing the image.
After you issue the command, a JSON response is displayed indicating that a task has been created:
{
    "Status": "active",
    "SnapshotDetails": [
        {
            "UserBucket": {
                "S3Bucket": "import-blog-post",
                "S3Key": "AppServer.raw"
            },
            "DiskImageSize": 0.0,
            "Format": "RAW"
        }
    ],
    "Progress": "2",
    "StatusMessage": "pending",
    "ImportTaskId": "import-ami-ffffffff"
}
The ImportTaskId value can be used to track or cancel the task:
aws ec2 describe-import-image-tasks --import-task-id import-ami- ffffffff
Looking at the task’s status, you can clearly see that it is active, with a percentage progress to help you understand where you are in the process:
{
    "ImportImageTasks": [
        {
            "Status": "active",
            "Progress": "7",
            "SnapshotDetails": [
                {
                    "UserBucket": {
                        "S3Bucket": "import-blog-post",
                        "S3Key": "AppServer.raw"
                    },
                    "DiskImageSize": 26843545600.0,
                    "Format": "RAW"
                }
            ],
            "StatusMessage": "validated",
            "ImportTaskId": "import-ami-ffffffff"
        }
    ]
}
The task progresses through the various import stages:
- Converting
- Updating
- Updated
- Preparing to boot
- Booting
- Booted
- Preparing AMI
- Completed
After the status transitions to Completed, you can find a value for ImageId in the response JSON. Start using your newly imported image, via the console, API, or CLI.
Conclusion
In this post, I presented a process for converting VMDK files, single or multiple, and importing them into AWS. This same process could be used for other source formats, such as QCOW, QCOW2, VDI, and more.
For those of you interested in other options, I would strongly recommend looking at AWS Server Migration Service, which makes it easier and faster to migrate workloads. For information about both partners and software solutions to assist you in such migrations, see Migration Partner Solutions.