AWS Contact Center
Optimize activity placement in Amazon Connect Customer scheduling
1. Introduction
When you manage a contact center schedule, you face a recurring challenge: fitting non-phone activities (coaching sessions, team meetings, training blocks, and one-on-one reviews) into agent schedules without degrading service levels. These activities support agent development, compliance, and operational goals, but every minute an agent spends in a coaching session is a minute they are unavailable to handle customer contacts.
The traditional approach to scheduling these activities is manual. You review each agent’s shift, check queue coverage at each interval, and find time slots where pulling agents off the phone will have the least impact. For a team of 50 agents, this process can take hours. For an enterprise with 500+ agents across multiple staffing groups, it becomes a weekly burden that consumes your valuable time better spent on strategic workforce optimization.
Manual placement also produces suboptimal results. You might cluster activities at convenient times — scheduling all coaching at 2 PM, for example, which creates predictable staffing valleys that degrade service levels during those windows. When activities need to span multiple days, such as training on Monday and Wednesday, the complexity multiplies because each day’s placement must account for that day’s unique demand pattern.
1.1. Strategic uses for activity placement
Timing shrinkage around volume patterns. Rather than anchoring activities to a fixed clock time, you slot them into natural lulls in inbound volume. When coaching sessions, breaks, and meetings are positioned in intervals where demand is already low, they stop creating coverage gaps and start filling time that would otherwise be underutilized. Maintaining availability during peak intervals while keeping development and compliance activities on track requires treating every non-phone activity as a movable piece — one whose placement should be determined by the forecast, not by convenience.
Driving adherence and reducing attrition. Activity placement directly shapes how agents experience their workday. Schedules that accommodate personal needs through flexible split shifts or well-timed micro-breaks create a daily flow agents are more likely to follow. When agents have predictable, manageable schedules, they show up on time, stay focused, and are less prone to burnout. This makes the schedule itself a tool for improving adherence rates and reducing attrition — both of which carry measurable cost implications.
Coordinating readiness before campaign surges. When a major marketing push or product launch is approaching, any agent pulled for briefings or administrative tasks during the surge is a gap in coverage at the worst possible moment. Front-loading these activities during quieter pre-surge intervals ensures every agent is briefed and call-ready before volume climbs. This eliminates reactive training during peak periods and prevents the service level degradation that comes with it.
Controlling cost and improving customer experience. When activities are placed in intervals that are already overstaffed relative to demand, you extract value from hours already on the clock rather than adding them through overtime or emergency scheduling. This reduces the cost of non-phone time. Agents who receive coaching and training during low-demand periods — rather than being rushed through development activities — are better prepared for customer interactions, resulting in shorter handle times and higher first-contact resolution.
1.2. The solution — optimize activity
Amazon Connect Customer’s Forecasting, Capacity Planning, and Scheduling (FCS) now offers an optimize activity feature that eliminates manual activity placement. When you add an activity to an agent’s schedule, you can choose to optimize its placement — and the scheduling algorithm will automatically find the time that minimizes impact on service level goals.
The algorithm considers the demand forecast, current staffing levels, and service level targets across all intervals in the schedule. It evaluates every possible placement window and selects the one that preserves the highest service level attainment. What previously required hours of manual analysis now completes in under a minute.
This post walks you through how to configure optimized activities using all three placement modes, demonstrate both shared and individual activity types, show multi-day scheduling, and provide best practices for choosing the right configuration for each use case.
1.3. Three placement modes
Optimize activity supports three modes that give you flexible control over where the algorithm can place activities:
| Placement Mode | Description | When to Use |
|---|---|---|
| Any time within shift | The algorithm has full freedom to place the activity anywhere within the agent’s shift | Maximum optimization — use when there are no timing constraints on the activity |
| Time window | The activity must be placed within a user-defined start and end time (e.g., 10 AM to 4 PM) | When the activity must occur during specific hours (e.g., trainer availability, meeting room booking) |
| Relative to shift | The activity is constrained relative to shift boundaries (e.g., 2 hours after shift start, 30 minutes before shift end) | When the activity should occur at a consistent point in the shift (e.g., end-of-day wrap-up, post-ramp coaching) |
Figure 1: The three placement modes for optimized activities.
1.4. Shared vs. individual activities
Optimized activities can be created as either shared or individual:
- Shared activities: All selected agents participate in the same activity at the same time. The algorithm finds a single optimal time slot that works for the entire group. Use for team coaching, group training, or all-hands meetings. Requires a minimum attendance setting — the percentage of selected agents who must be available for the activity to be placed.
- Individual activities: Each agent gets their own independently optimized activity placement. The algorithm finds the best time for each agent separately. Use for one-on-one meetings, individual coaching, or self-paced training. Supports multi-day scheduling — the activity can span up to 31 days with independent optimization per day.
| Feature | Shared Activity | Individual Activity |
|---|---|---|
| Timing | All agents at the same time | Each agent at their own optimal time |
| Multi-day | Single day | Up to 31 days |
| Min. attendance | Required (configurable %) | Not applicable |
| Use case | Group coaching, team training | One-on-ones, individual reviews |
Figure 2: Comparison of shared and individual optimized activities.
2. Prerequisites
Before using optimize activity, make sure you have the following:
- An active Amazon Connect Customer instance with Forecasting, Capacity Planning, and Scheduling (FCS) enabled
- At least one published schedule with configured staffing groups and agents
- A generated forecast with demand data for the scheduling period
- Shift activities defined in FCS (e.g., coaching, training, meeting) that you want to optimize
- Appropriate security profile permissions to manage schedules and activities in Connect Customer
3. Creating a shared optimized activity
Let’s start with the most common use case: scheduling a group coaching session for multiple agents. We’ll use the “any time within shift” placement mode to give the algorithm maximum flexibility.
Step 1: Select agents
- Navigate to the Scheduling page in the Connect Customer admin console.
- Select the agents you want to include in the activity. You can select agents individually or filter by staffing group.
- With the agents selected, select Add shift activity.
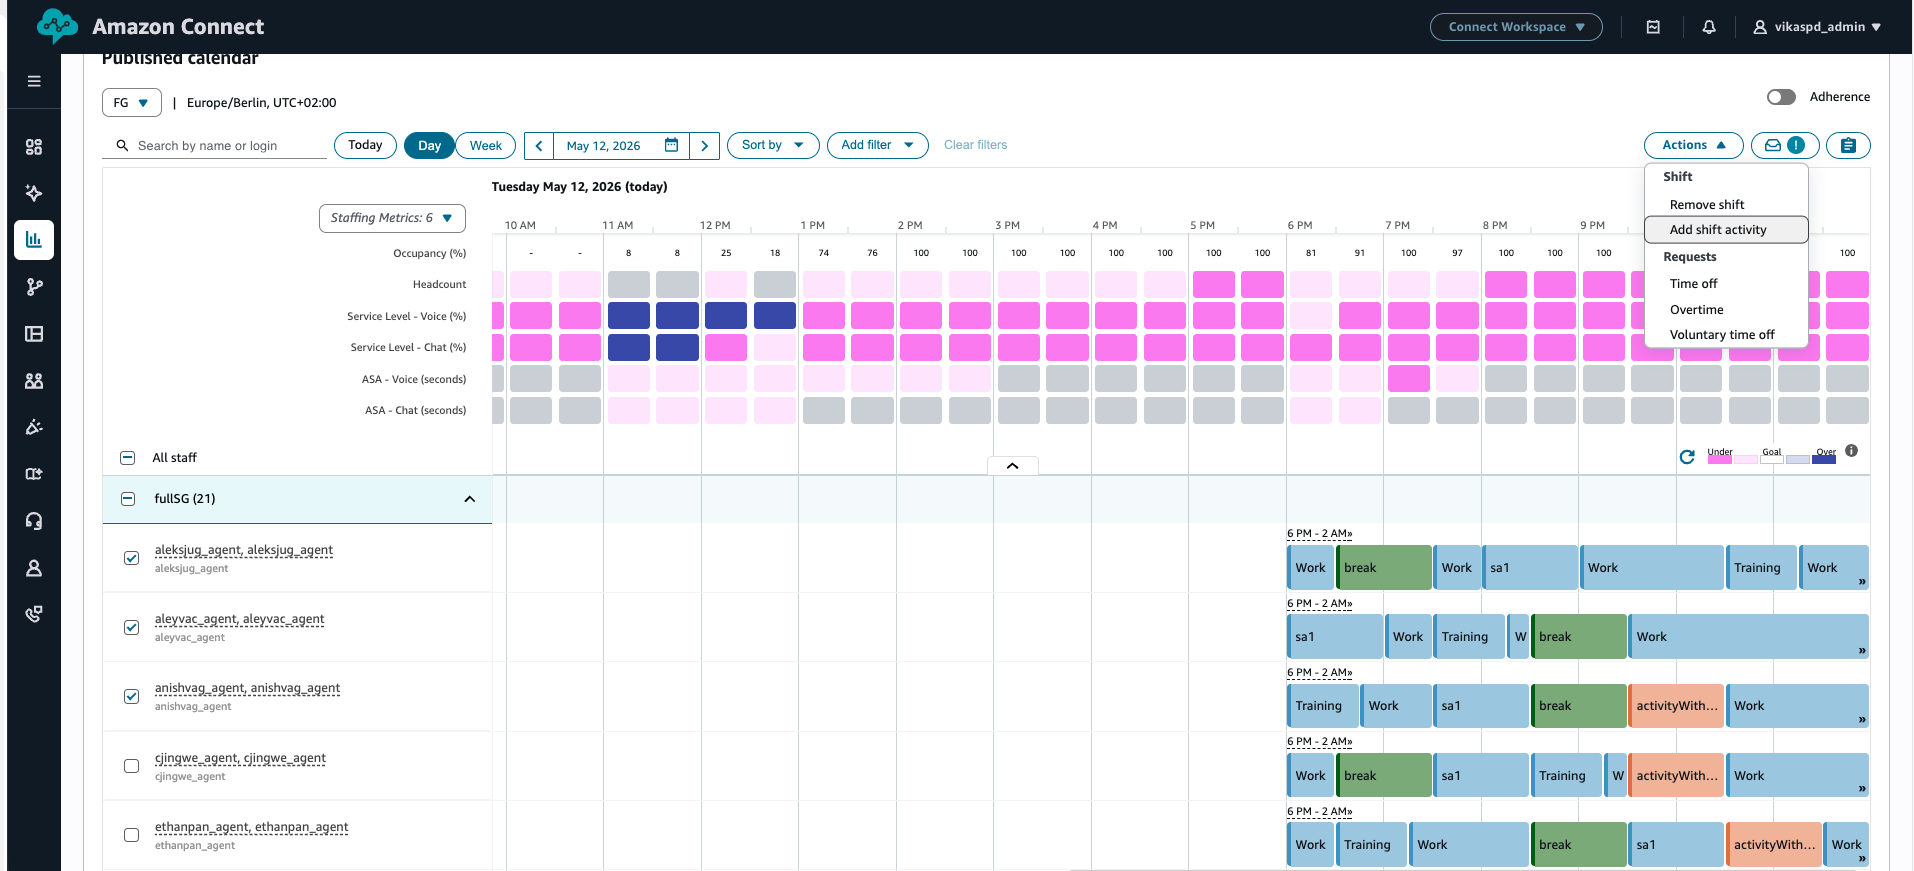
Figure 3: Selecting agents for a shared optimized activity.
Step 2: Configure the activity
- Select the activity type from the dropdown (e.g., Coaching).
- Choose Shared activity as the activity type. This ensures all selected agents participate at the same time.
- Under placement, select Optimize — Any time within shift. This gives the algorithm full freedom to find the best slot.
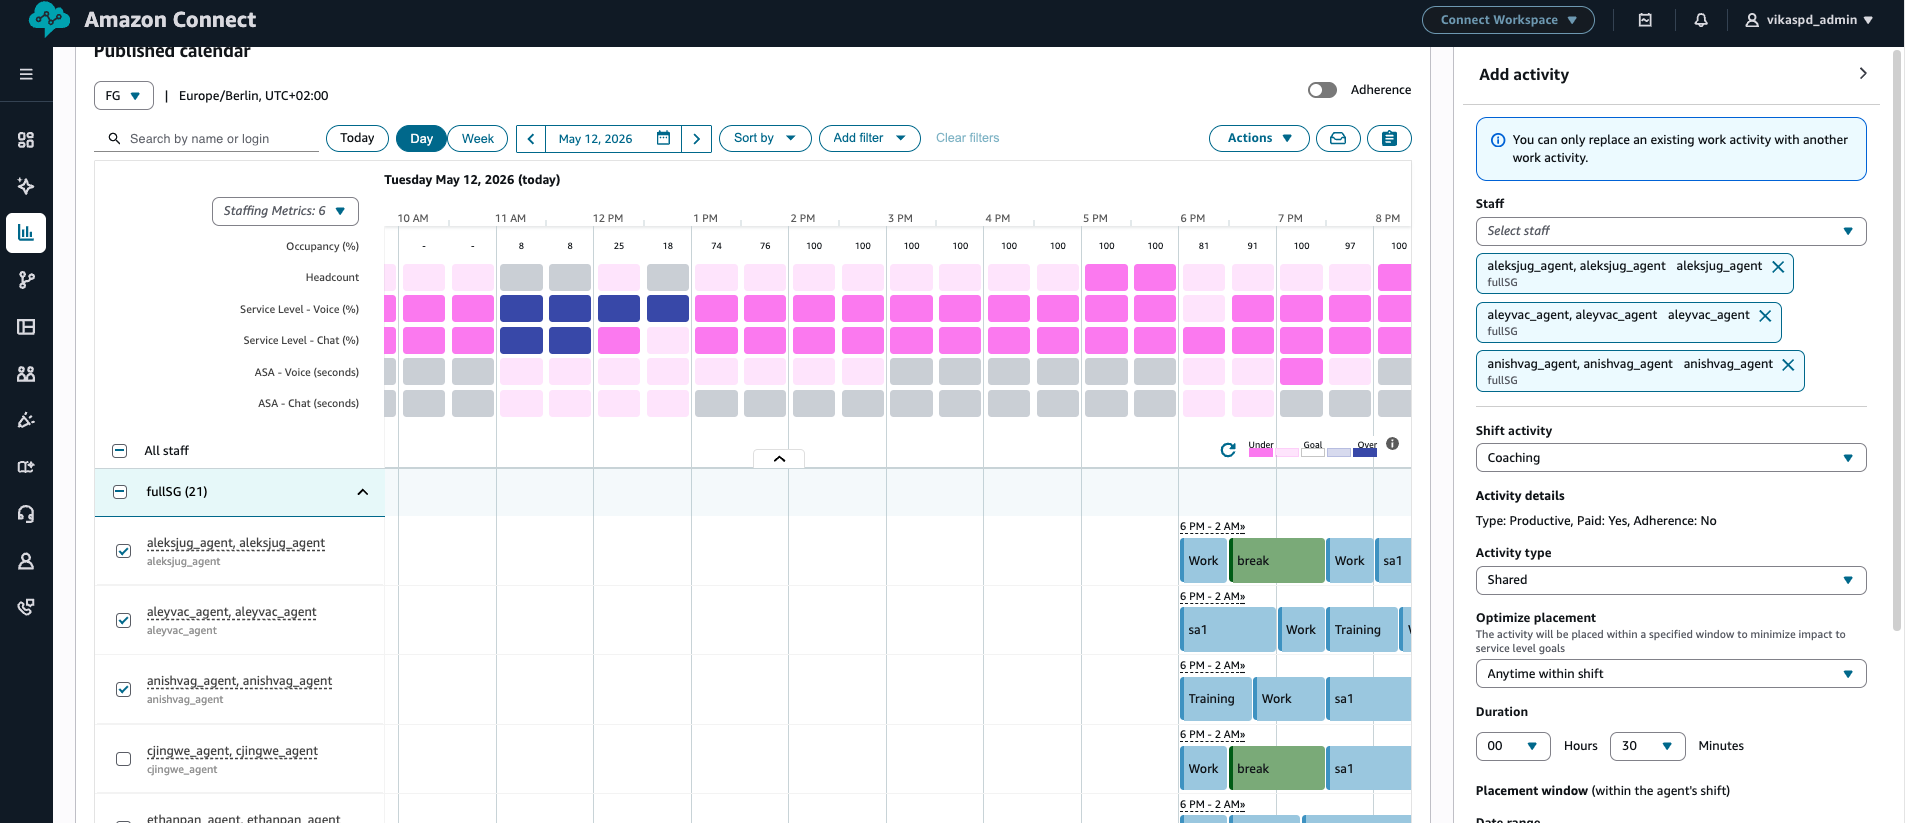
Figure 4: Configuring a shared coaching activity with optimized placement.
Step 3: Set minimum attendance
For shared activities, you must specify a minimum attendance percentage. This tells the algorithm the minimum proportion of selected agents who must be available for the activity to be placed.
For example, if you select 10 agents and set minimum attendance to 80%, the algorithm will only place the activity at a time when at least 8 agents are available. Tip: to make sure the activity gets placed with at least one agent, set minimum attendance to 1%.
- Enter the minimum attendance percentage (e.g., 80%).
- Select Apply to start the optimization.
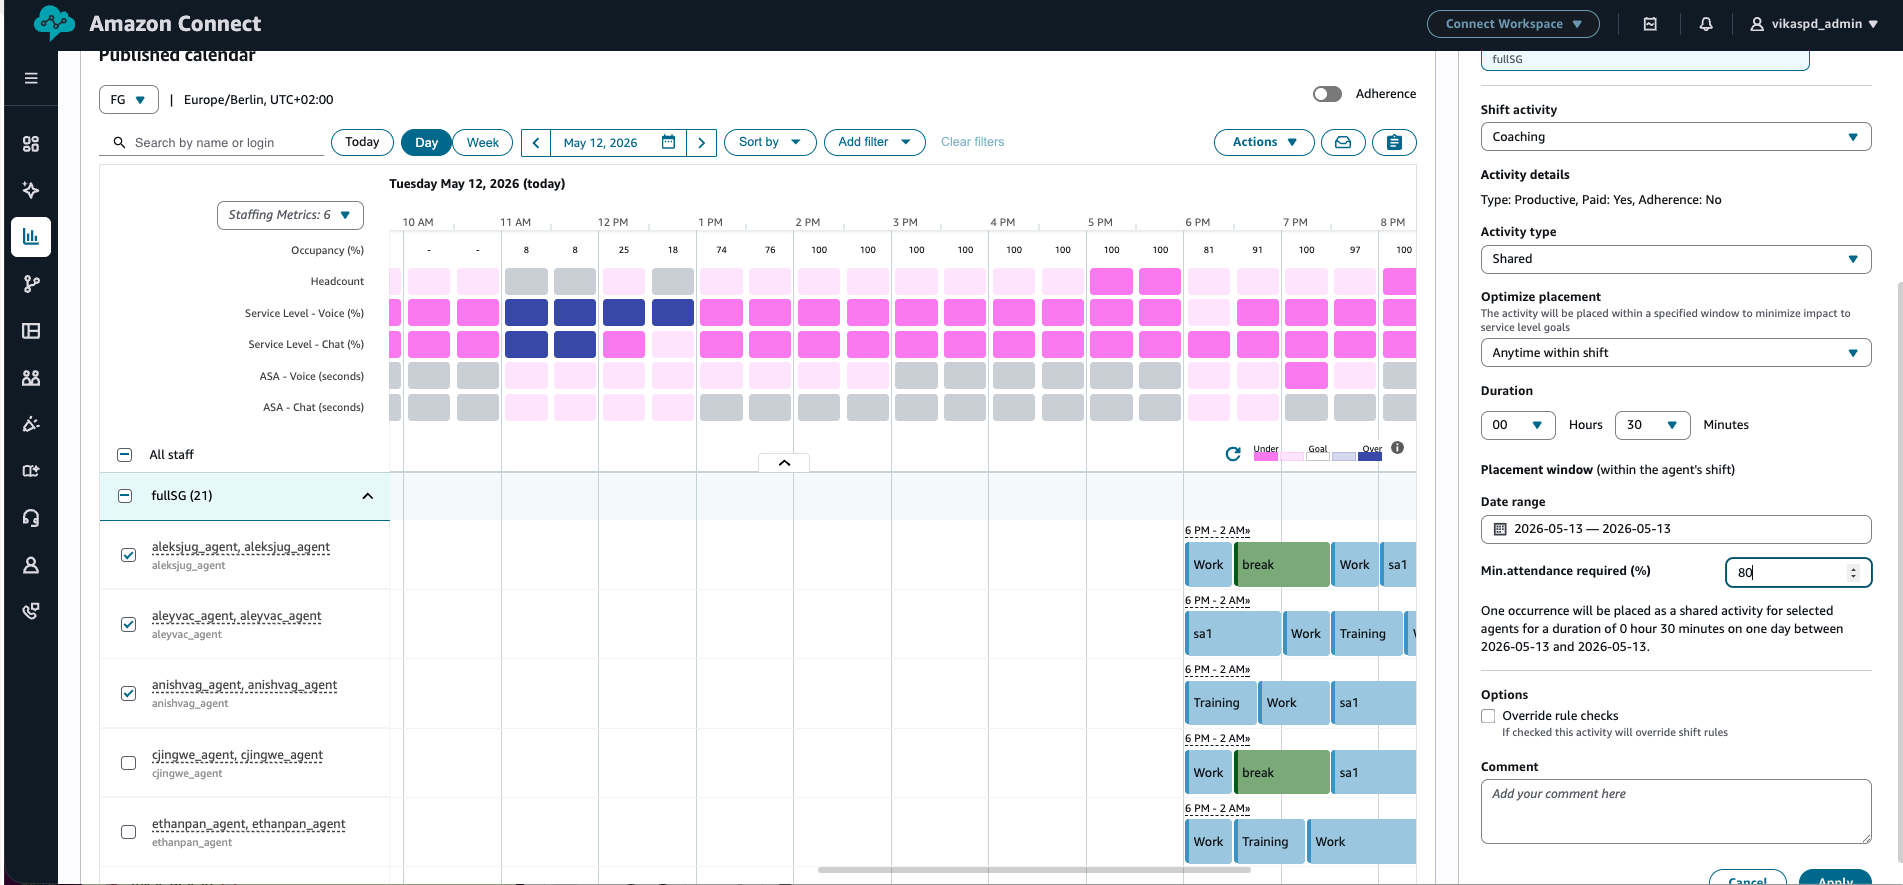
Figure 5: Setting minimum attendance for a shared activity.
3.4. Step 4: Review the placement
The optimization typically completes within one minute. While the system is finding the optimal placement, agent shifts in the placement window are locked and cannot be edited. Once complete, the activity appears on the schedule calendar at the algorithmically determined optimal time for all selected agents.
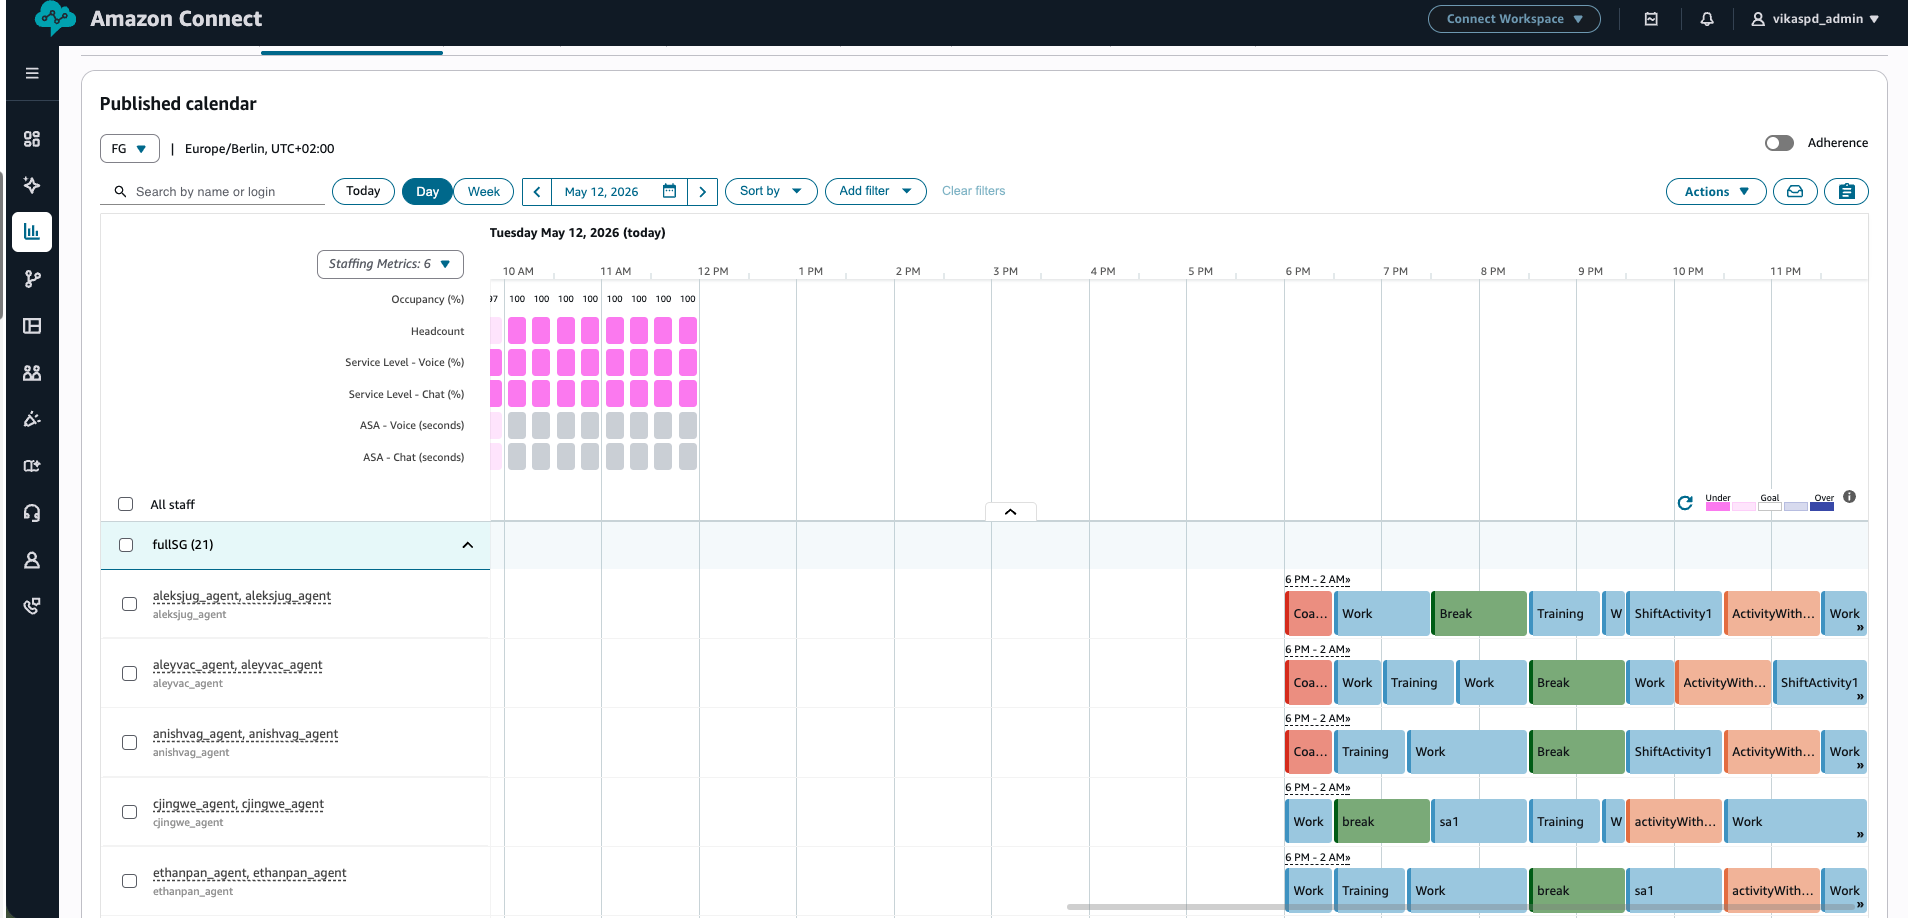
Figure 6: Shared coaching activity placed at the optimal time across all agents.
The algorithm selected this specific time because it minimizes the aggregate impact on service level goals across all intervals in the schedule. Activities placed at other times would have caused a larger service level dip.
4. Creating an individual multi-day optimized activity
Individual activities are optimized independently for each agent, making them ideal for one-on-one meetings or recurring activities that should happen on multiple days.
4.1. Step 1: Configure the activity
- Select the agents you want to schedule.
- Select Add shift activity and select the activity type (e.g., Meeting).
- Choose Individual activity. Each agent will receive their own independently optimized placement.
- Select Optimize — Any time within shift as the placement mode.
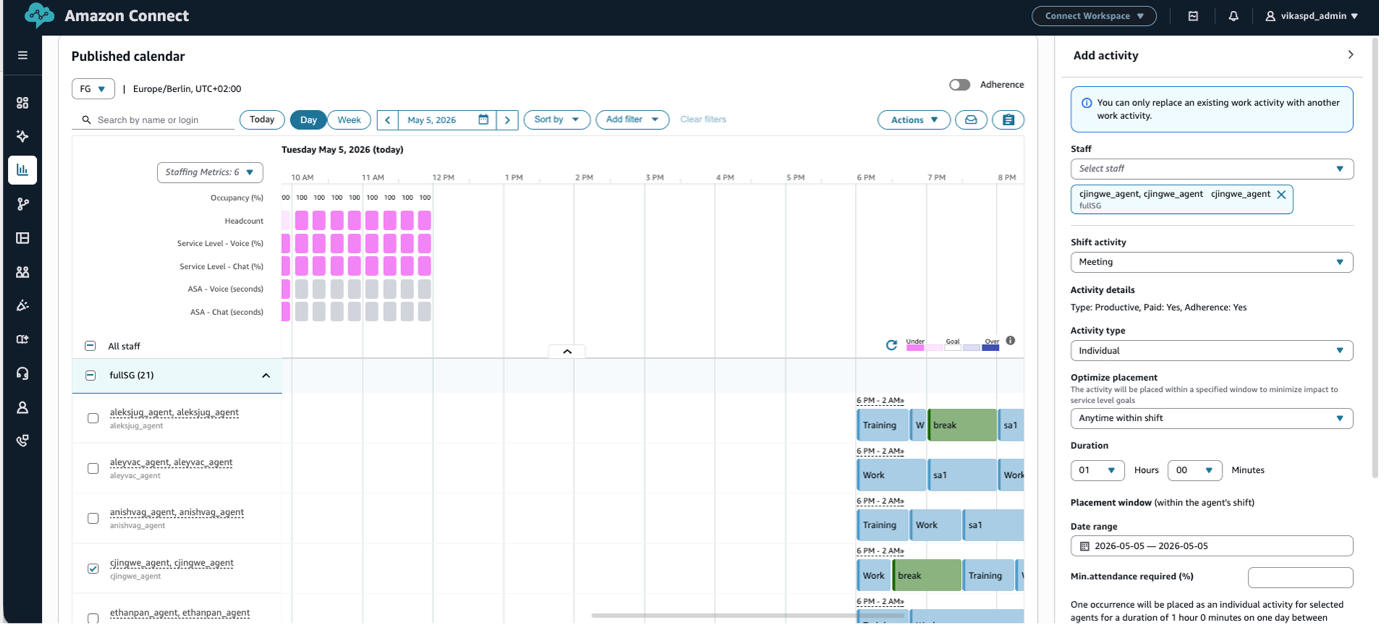
Figure 7: Configuring an individual meeting activity.
4.2. Step 2: Select multiple days
For individual activities, you can schedule across multiple days. Note that optimized activities cannot be created as a recurring series — up to 31 days. The algorithm optimizes each day independently based on that day’s demand forecast.
- In the day selection panel, choose the days you want the activity to occur (e.g., Monday to Thursday).
- Select Apply to start the optimization.
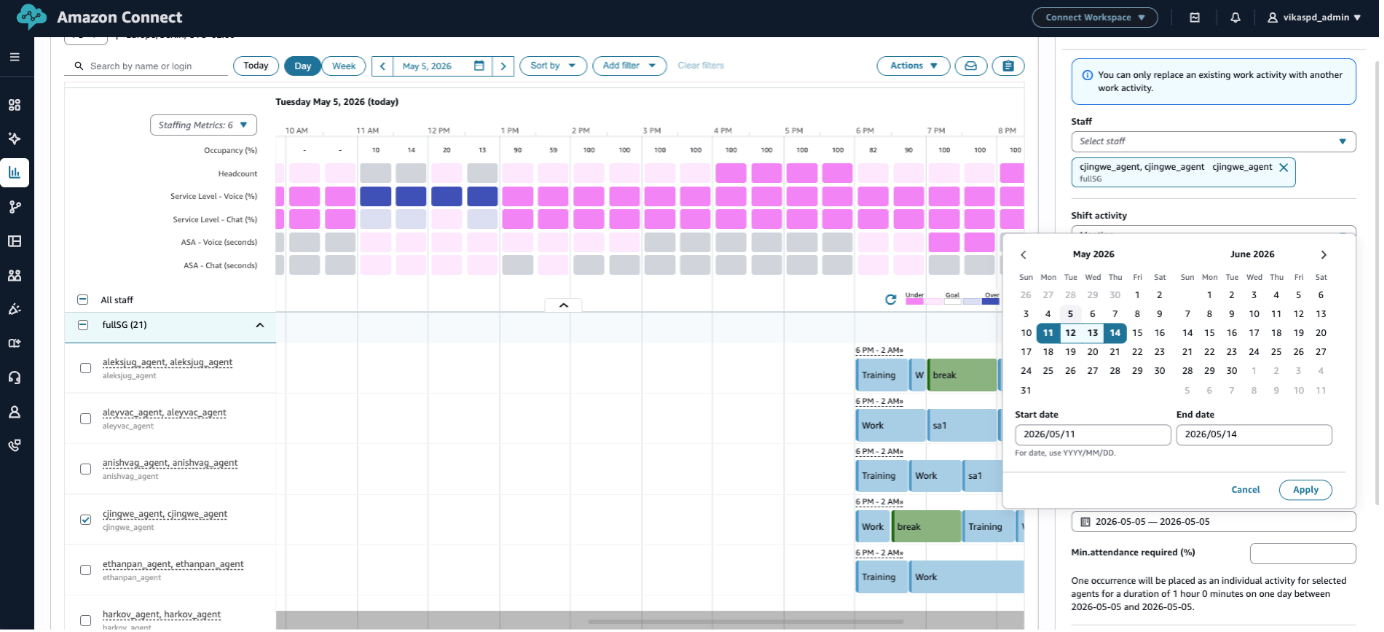
Figure 8: Selecting multiple days for individual activity optimization.
4.3. Step 3: Review multi-day placements
Once optimization completes, each agent has the activity placed at their own optimal time on each selected day. Navigate between days to verify the placements.
Because each day is optimized independently, the same agent may have the activity at different times on Monday vs. Wednesday — this is expected and reflects each day’s unique demand pattern.
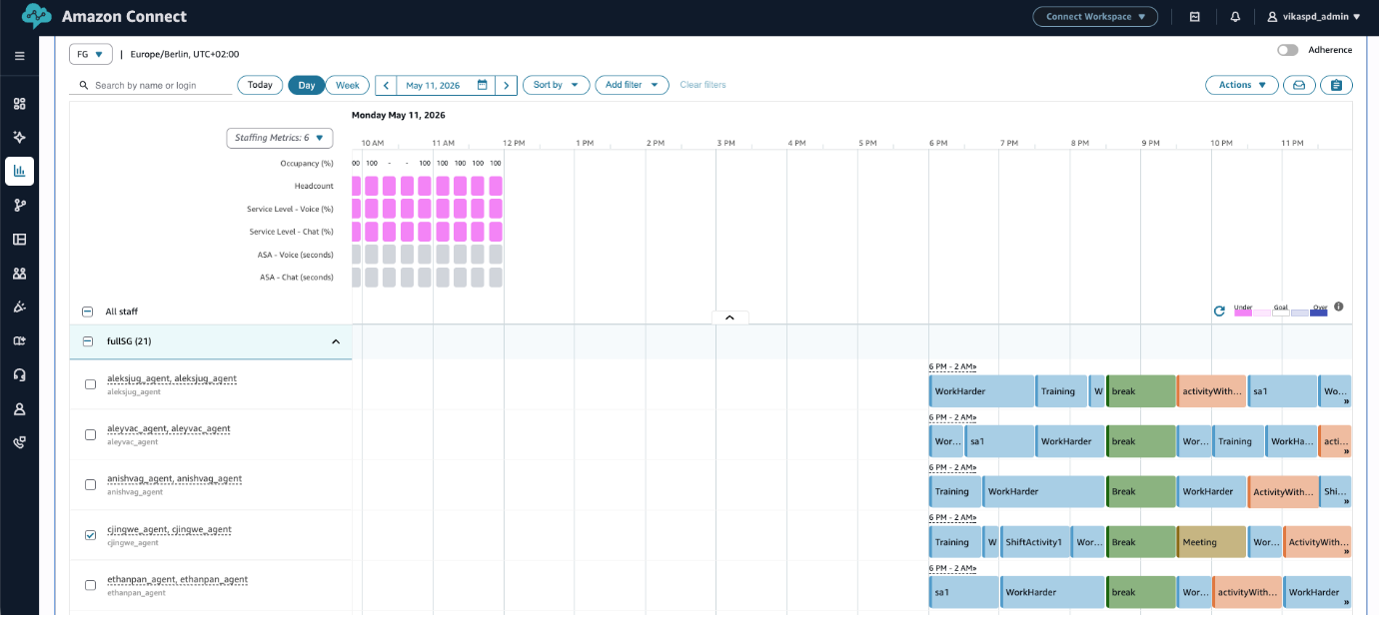
Figure 9: Individual activities placed at different optimal times across multiple days.
5. Using time window placement
Time window placement restricts the algorithm to place the activity within a user-defined time range. This is useful when external constraints limit when the activity can occur — for example, when a trainer is only available between 10 AM and 4 PM, or when a meeting room is booked for a specific window.
5.1. Configure time window
- Select agents and select Add shift activity.
- Choose the activity type and Individual or Shared.
- Under placement, select Optimize — Time window.
- Enter the start time and end time for the allowed window (e.g., 06:00 PM to 10:00 PM).
- Select Apply.
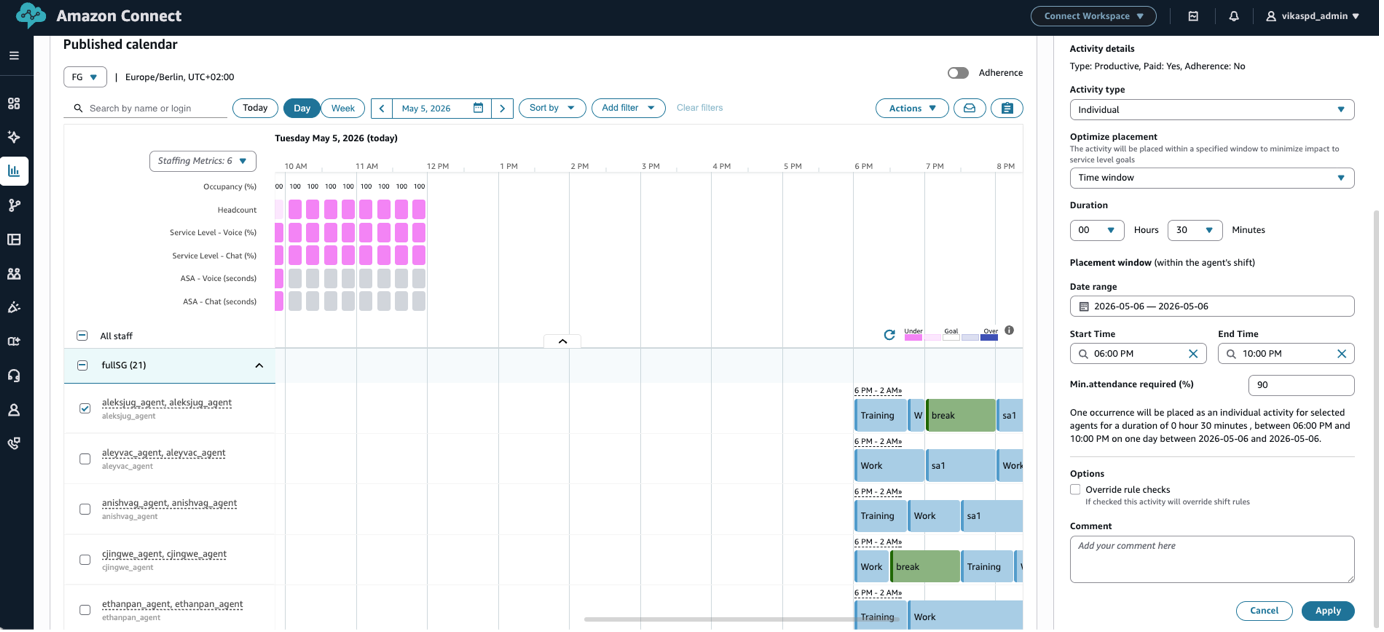
Figure 10: Configuring a time window for optimized activity placement.
The algorithm will only consider placement options within the specified window. It still optimizes for minimum service level impact, but within the constrained time range.
5.2. Review the placement
After optimization, verify that the activity falls within the specified window. The algorithm guarantees the activity starts and ends within the defined boundaries.
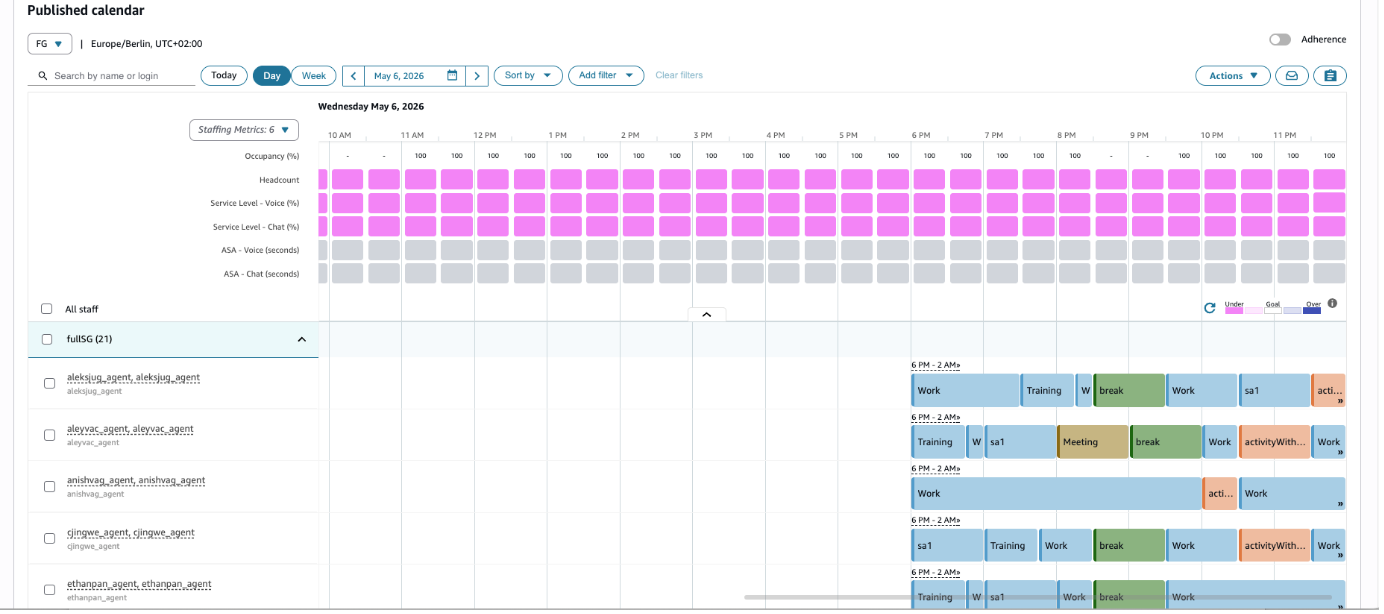
Figure 11: Activity placed within the configured time window.
6. Using relative-to-shift placement
Relative-to-shift placement constrains the activity based on the agent’s shift boundaries rather than absolute clock times. This is particularly useful when agents work different shift patterns — the constraint adapts to each agent’s individual shift start and end.
6.1. Configure relative-to-shift constraints
- Select agents and select Add shift activity.
- Choose the activity type and Individual or Shared.
- Under placement, select Optimize — Relative to shift.
- Enter the offset from shift start (e.g., 2 hours after shift start).
- Enter the offset from shift end (e.g., 3 hours before shift end).
- Select Apply.
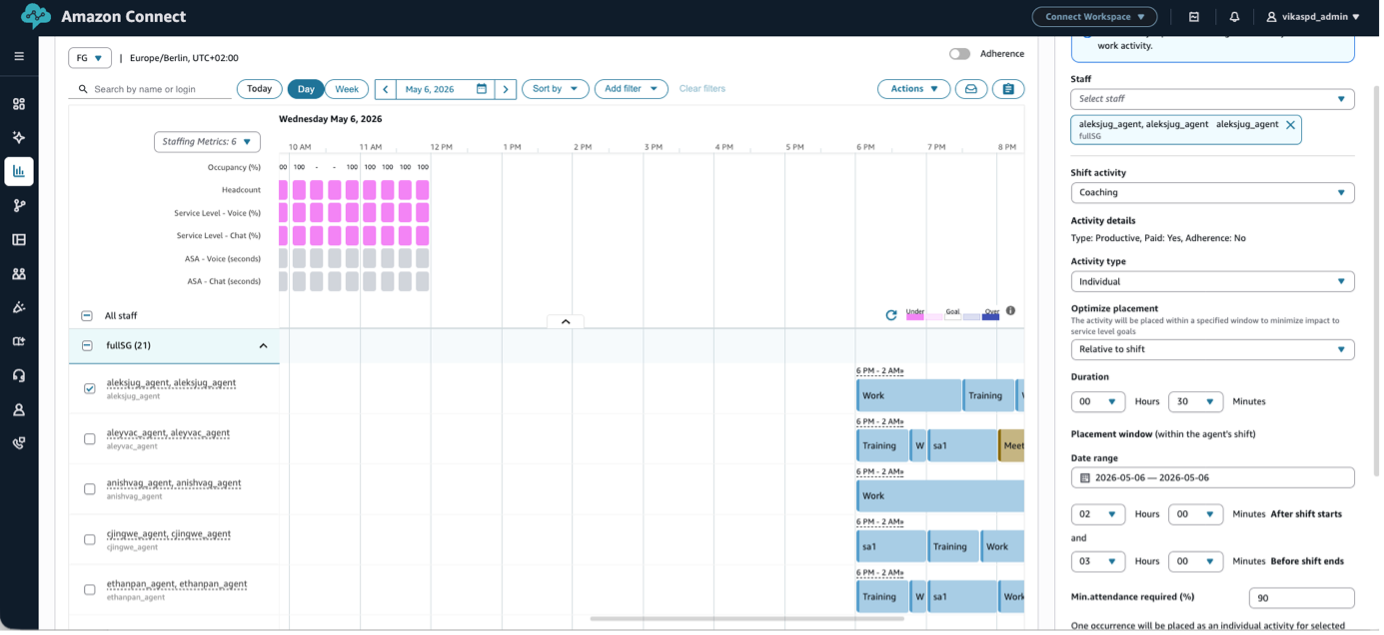
Figure 12: Configuring relative-to-shift constraints.
For an agent with a 9 AM – 5 PM shift, this configuration means the activity can only be placed between 11 AM and 4:30 PM. For an agent with a 7 AM – 3 PM shift, the window would be 9 AM – 2:30 PM. The constraint adapts automatically.
6.2. Review the placement
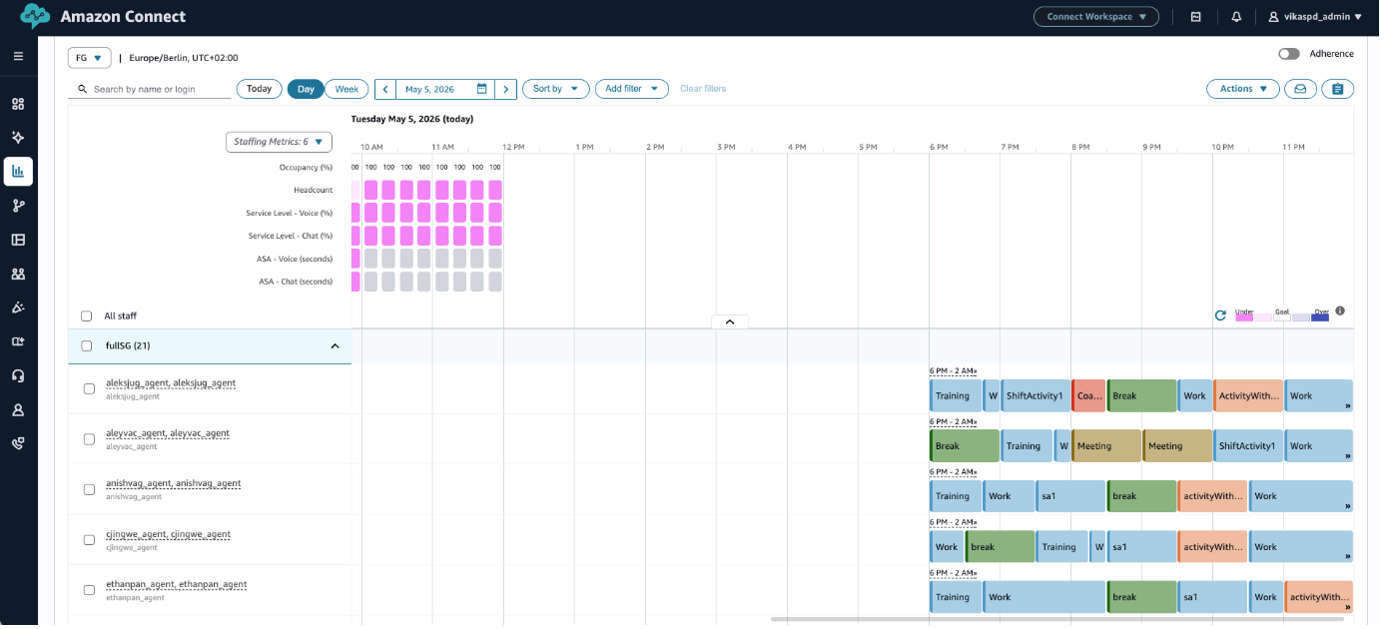
Figure 13: Activity placed within relative-to-shift constraints.
7. Tracking placements with action logs
After optimization completes, you can download a detailed CSV report of where each activity was placed. This is useful for audit trails, communicating placements to supervisors, and verifying that constraints were respected.
7.1. Download action logs
- After an optimize activity completes, navigate to the Action logs section on the scheduling page.
- Select Download CSV to export the placement details.
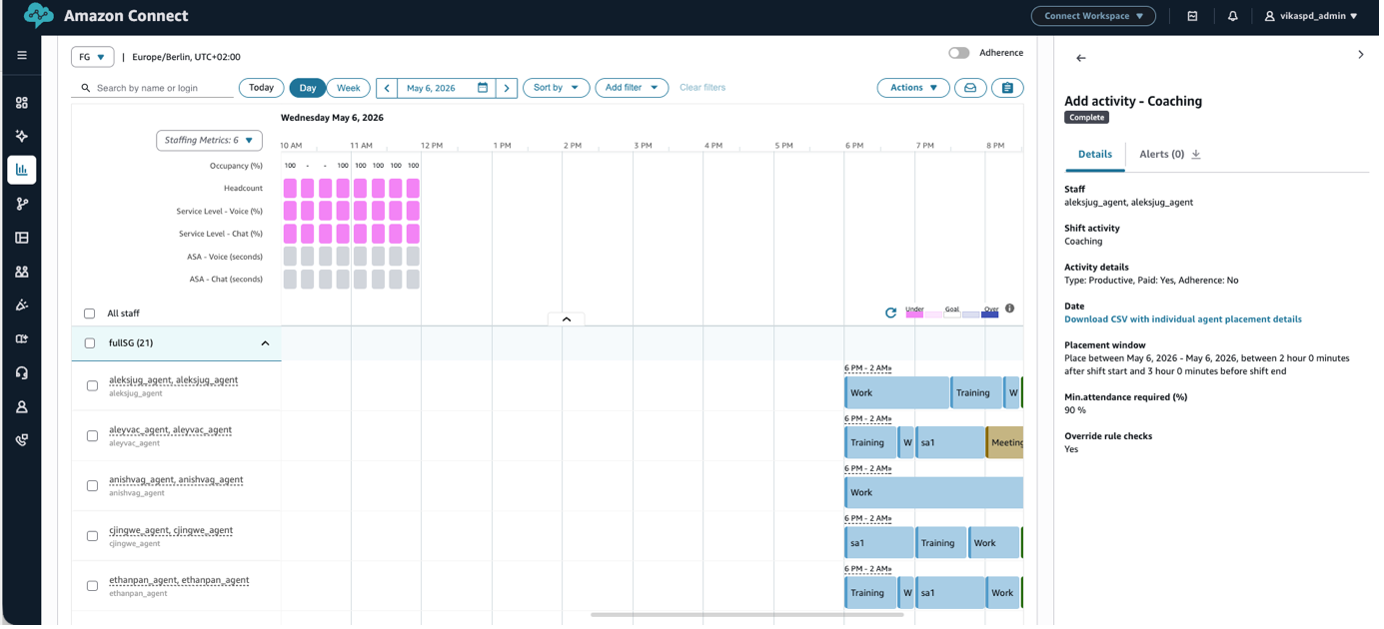
Figure 14: Downloading action logs for optimized activity placements.
7.2. CSV contents
The downloaded CSV includes the following fields for each placement:
| Field | Description | Example |
|---|---|---|
| First Name | Agent’s first name | John |
| Last Name | Agent’s last name | Smith |
| Agent Alias | Agent login / alias | jsmith |
| Activity Start Date | Date and time the activity begins (UTC) | 2026-04-21 11:00 |
| Activity End Date | Date and time the activity ends (UTC) | 2026-04-21 11:30 |
| Activity Name | Name of the shift activity | Coaching |
Figure 15: CSV action log fields for optimized activity placements.
8. Editing optimized activities after placement
An important characteristic of optimized activities: once placed, they become normal schedule activities. This means you can edit them using the same tools you use for any other schedule activity.
For example, if the algorithm placed a coaching session at 8:30 PM but the supervisor needs to move it to 8:30 PM for a specific reason, you can simply edit the activity’s start time directly on the schedule calendar.
- Select on the optimized activity in the schedule calendar.
- Modify the start time, end time, or other properties as needed.
- Select Update to save the changes.
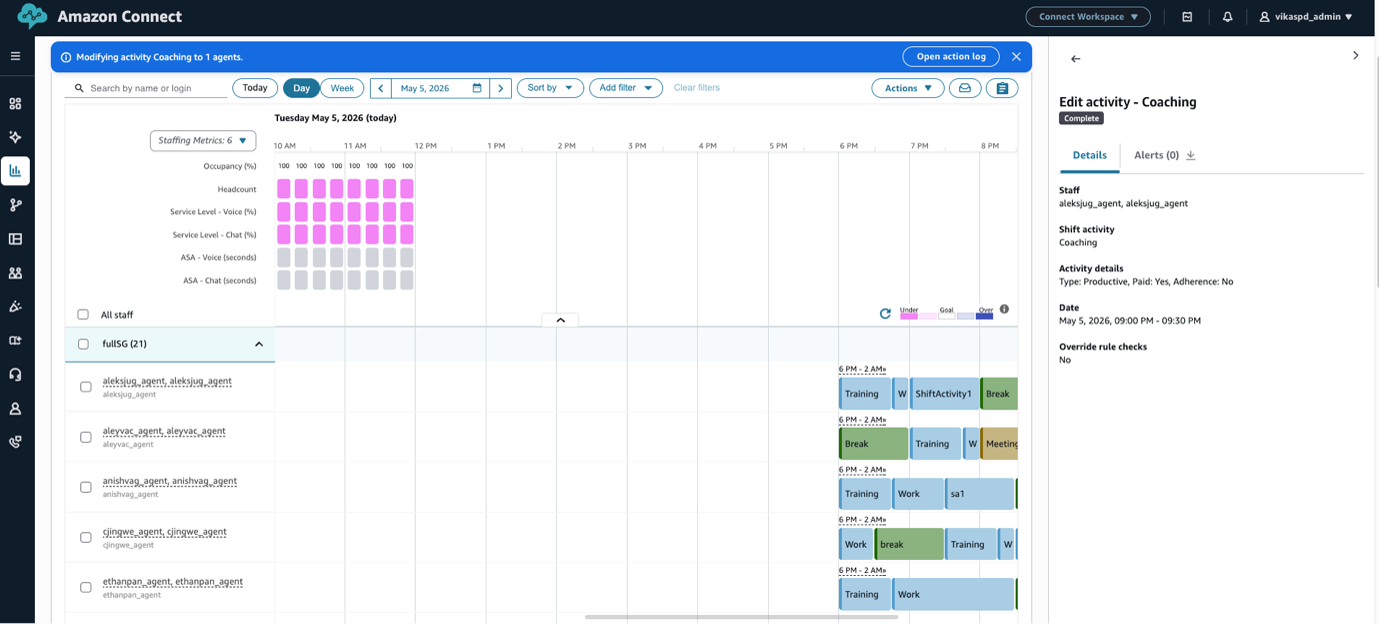
Figure 16: Editing an optimized activity after placement.
This flexibility ensures that optimization is a starting point, not a constraint. You retain full control over the final schedule.
9. Best practices
9.1. Choosing the right placement mode
| Scenario | Recommended Mode | Rationale |
|---|---|---|
| No external timing constraints | Any time within shift | Gives the algorithm maximum freedom for optimal placement |
| Trainer/facilitator availability | Time window | Constrains to when the facilitator is available |
| Post-ramp coaching for new hires | Relative to shift start | Coaching happens after agents have ramped up |
| End-of-day debrief | Relative to shift end | Activity occurs before agents finish their shift |
| Cross-timezone team meeting | Time window | Constrains to overlapping business hours |
Figure 17: Recommended placement modes by scenario.
9.2. Additional best practices
- Start with “any time within shift”: Use the least constrained mode first. Only add time window or relative-to-shift constraints when there is a genuine business requirement.
- Set realistic minimum attendance: For shared activities, a minimum attendance of 70-80% is typically practical. Setting 100% may prevent placement if any agent has a conflicting activity.
- Use multi-day for recurring activities: Instead of creating separate activities for Monday and Wednesday, use the multi-day feature to optimize both days in a single action.
- Review action logs: After optimization, download the CSV to verify placements and share with supervisors for awareness.
- Optimize early in the scheduling cycle: Run optimize activity after the initial schedule is generated but before publishing, so that service level calculations include the activity time. Note that break and meal activities cannot use optimized placement. These are placed optimally during schedule generation and may shift when you add other optimized activities.
10. Conclusion
With optimize activity, you can transform a time-consuming manual process into an automated, algorithm-driven workflow. By using the scheduling engine’s demand awareness, activities are placed at times that protect service levels while meeting operational requirements.
In this post, you learned:
- How optimize activity works and the three placement modes (any time within shift, time window, relative to shift)
- The difference between shared and individual activities and when to use each
- Step-by-step walkthroughs for creating optimized activities with each placement mode
- Multi-day scheduling for individual activities spanning up to 31 days
- Using action logs to track and audit activity placements
- Editing optimized activities after placement
- Best practices for choosing placement modes and configuring minimum attendance
Next steps
- Start by optimizing your highest-volume recurring activity (e.g., weekly coaching) using “any time within shift” to see the immediate service level benefit.
- Experiment with time window and relative-to-shift modes for activities with external constraints.
- Use multi-day scheduling to reduce repetitive setup for weekly recurring activities.
- Download action logs after each optimization to build a baseline understanding of where the algorithm places activities and why.
11. Related resources
- Amazon Connect Forecasting, Capacity Planning, and Scheduling documentation
- Configure schedule adherence thresholds in Amazon Connect to account for operational variances
- Configure scheduling notification rules in Amazon Connect
- Implementing multi-skill forecasting and scheduling in Amazon Connect
About the Authors
 |
Vikas Prasad is an Applied AI Sr Solutions Architect at Amazon Web Services, focused on Amazon Connect. He works with enterprise customers to design and implement cloud contact center solutions, with deep expertise in workforce management (Forecasting, Capacity Planning, and Scheduling). Vikas is passionate about helping organizations modernize their contact center operations using AI-powered WFM capabilities. |
 |
Prabhakar Rajasekar is an Applied AI Sr Solutions Architect for Amazon Connect at Amazon Web Services based in Aachen, Germany. Besides helping customer in their digital transformation, you will see him spending time with his kids in the garden or in the woods. |