Containers
Automated deployments with GitHub Actions for Amazon ECS Express Mode
Organizations adopt containerized applications for multiple benefits, including accelerated development cycles and faster feature delivery. Amazon Elastic Container Service (Amazon ECS) Express Mode streamlines this by managing infrastructure automatically—networking, load balancing, and capacity provisioning happen without manual configuration. However, building container images, pushing them to registries, and updating services when code changes still require manual coordination or custom scripts.
In this post, we will walk you through building an automated deployment pipeline using GitHub Actions. You will create a workflow that triggers on code changes, builds Docker images, pushes them to Amazon ECR, and deploys to Amazon ECS Express Mode using IAM roles for secure authentication. By the end, you will have a continuous integration and continuous delivery (CI/CD) workflow that automatically deploys your application when you push code.
Architecture overview
The following diagram shows how GitHub Actions integrates with Amazon ECS Express Mode to create an automated deployment pipeline:
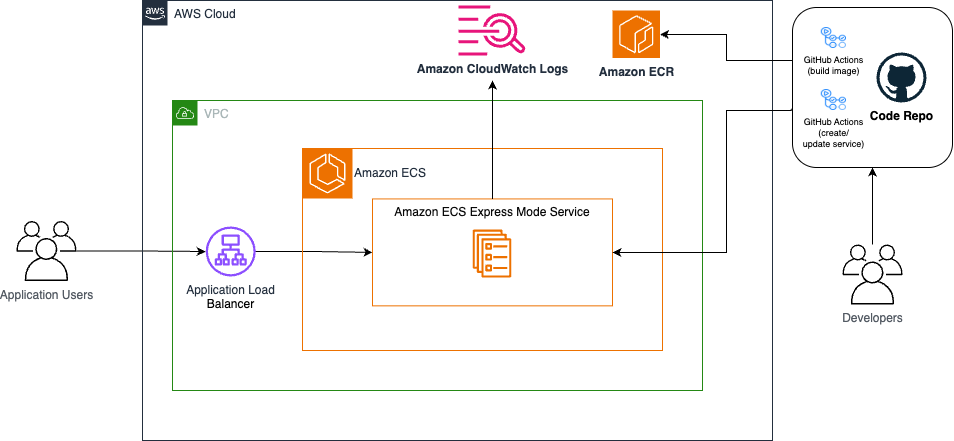
Figure 1 – CI/CD architecture diagram showing GitHub Actions workflow
When you commit code to your repository on the GitHub website, GitHub Actions automatically builds your container image and pushes it to Amazon ECR. The workflow then updates your Amazon ECS Express Mode service with the new image. An Application Load Balancer (ALB) routes user traffic to your containerized application running on Amazon ECS.
This architecture uses OpenID Connect (OIDC) to securely authenticate GitHub Actions with AWS. Because OIDC generates credentials that automatically expire after each workflow run, you don’t need to store long-lived AWS credentials in your repository to reduce your security risk exposure.
Prerequisites
Before you start, make sure that you have:
- An AWS account with permissions to create IAM roles, policies, Amazon ECR repositories, and Amazon ECS resources.
- A GitHub account.
- An AWS Command Line Interface (AWS CLI) installed and configured on your local machine.
- An Amazon ECR repository to store your container images. If you haven’t created one yet, see Creating a private repository.
- A default Amazon Virtual Private Cloud (Amazon VPC) and default subnets, otherwise, see Create a default VPC. For sensitive workloads, consider creating a custom VPC with both public and private subnets.
- Be comfortable writing Dockerfiles, understand GitHub Actions workflow syntax, and know how to navigate the AWS console.
- (Optional) A domain name if you want to use a custom domain with your application.
Estimated time: 20–30 minutes
Estimated cost: Costs vary based on usage. You will incur charges for Amazon ECS tasks, Amazon ECR storage, and data transfer. GitHub Actions usage has no charge for public repositories. Remember to clean up resources after testing.
Walkthrough
Fork and clone the source code repository on GitHub: sample-amazon-ecs-express-github-actions using the following command:
Note: If you forked this repository, GitHub Actions workflows are disabled by default. To enable them, navigate to the Actions tab in your forked repository and choose I understand my workflows, go ahead and enable them.
The repository structure looks like this:
The example Dockerfile in this repository pulls the AWS Containers Retail Sample UI application’s base image from the Amazon ECR Public Gallery. The application runs on container port 8080 and provides a functional web interface that you can use to verify that your deployment pipeline works correctly.
Set up IAM authentication for GitHub Actions
GitHub Actions requires permission to interact with your AWS account. You can use OpenID Connect (OIDC) to establish a trust relationship between GitHub and AWS. This approach improves your security posture because it generates short-lived credentials automatically.
- Create an OIDC provider
Begin by registering GitHub’s OIDC identity provider with your AWS account with the following command:
This command registers GitHub’s OIDC provider with your AWS account. AWS will now accept tokens from GitHub Actions and allow role assumption.
- Create the IAM trust policy
Create a trust policy that specifies exactly which GitHub repositories can assume your IAM role. Replace YOUR_ACCOUNT_ID, YOUR_GITHUB_USERNAME, and YOUR_REPO_NAME with your actual values:
Save this as trust-policy.json. The StringLike condition restricts the role assumption to your specific repository, preventing other GitHub repositories from using this role.
- Create the IAM role
Create an IAM role with the trust policy using the following command:
GitHub Actions will assume this role during your workflow execution.
- Create permission policies
GitHub Actions needs specific permissions to build and deploy your application. Following the principle of least privilege, define two separate policies that grant only the minimum required permissions.
The first policy grants permissions for Amazon ECS Express Mode operations. Replace YOUR_ACCOUNT_ID with your actual value and save the following as ecs-express-policy.json:
The second policy grants permissions for Amazon ECR operations. Replace region, accound-id, and my-repo with your AWS Region, Account ID, and repository name. Save the following ecr-policy.json:
These policies grant the minimum permissions required to push images to Amazon ECR and deploy to Amazon ECS Express Mode.
- Attach policies to the role
Attach both policies to your IAM role using the following command:
Create IAM roles for Amazon ECS Express Mode
Amazon ECS Express Mode requires two additional IAM roles to function: an execution role that allows Amazon ECS to pull container images and write logs (ecsTaskExecutionRole), and an infrastructure role that manages the underlying AWS resources (ecsInfrastructureRoleForExpressServices). If you haven’t created these roles yet, follow the instructions in the Amazon ECS documentation for creating IAM roles.
Configure GitHub repository variables
Your GitHub Actions workflow references your AWS account details and resource names through repository variables. These values aren’t sensitive, so you can store them as variables rather than secrets, making them easier to reference in your workflow file.Navigate to your GitHub repository on the GitHub website.
- Go to Settings, choose Secrets and variables, choose Actions, choose Variables tab.
- Add each of the following variables by selecting New repository variable:
|
Variable name |
Example value |
Description |
AWS_REGION |
us-east-1 |
AWS Region where your resources are deployed |
AWS_ACCOUNT_ID |
123456789012 | Your 12-digit AWS account ID |
ECR_REPOSITORY |
my-app |
Name of your Amazon ECR repository |
ECS_SERVICE |
my-app-service |
Name for your Amazon ECS service |
ECS_CLUSTER |
default |
Name for your Amazon ECS cluster |
Note: To specify an existing Amazon ECS cluster name other than default, you must create the cluster beforehand.
With these variables configured, you can update your deployment configuration without modifying the workflow code itself.
The GitHub Actions workflow
The workflow file defines your automated deployment pipeline, specifying what happens when you push code to your repository. This workflow triggers on every push to your main branch and on pull requests, ensuring your changes are automatically built and deployed.
In your repository, locate the .github/workflows directory to review the example deploy.yml file. The following explains how the key components work together in this workflow:
The permissions block grants id-token write access, and the workflow must request OIDC tokens for AWS authentication. Without this permission, the authentication step would fail.
The Configure AWS credentials step uses OIDC to authenticate with AWS by assuming the IAM role that you created earlier. AWS generates temporary credentials that automatically expire after the workflow completes, typically within an hour.
The Build, tag, and push step tags the container image using the first 7 characters of the commit hash. This SHA-based tagging provides precise version tracking and traceability, following AWS best practices for container image management. Each deployment references a specific, immutable image version, which helps with troubleshooting and enables reliable rollbacks if needed.
The Deploy step uses the official AWS action to deploy your Amazon ECS Express Mode service with the new container image. This step handles the complexity of task definition updates and service deployments. The action will check if the specified cluster exists (or creates it if default is specified and doesn’t exist), creates the service (or updates it, if the service already exists), and waits for the service and deployment to reach a stable state. This step provisions your complete application stack including an Amazon ECS service with tasks launched on AWS Fargate, an Application Load Balancer with target groups and health checks, auto scaling policies based on CPU utilization, security groups and networking configuration, and a custom domain with an AWS provided URL (it looks like xxxxx.ecs.region.on.aws).
Tip: This deployment step uses minimal configuration. You can customize your deployment with additional options like environment variables, health check settings, scaling policies, and custom VPC configuration. See the Complete Example with All Options for all available options.
Test your deployment pipeline
Verify that your automated deployment pipeline works correctly by making a small change to your application code. Commit your changes and push to your main branch:
Monitor the workflow execution by navigating to the Actions tab in your GitHub repository. You will see your workflow running with real-time logs for each step.
After the workflow completes successfully, verify the deployment in the Amazon ECS console. Your service will show a new deployment with the “Deployment has completed” as shown in the following image.
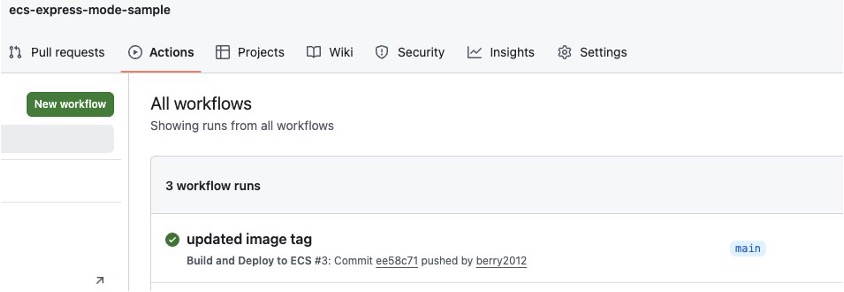
GitHub Actions workflow execution showing deployment progress
Access your application using the default URL provided in the Amazon ECS console. You can see your updated application running with the changes that you just deployed.
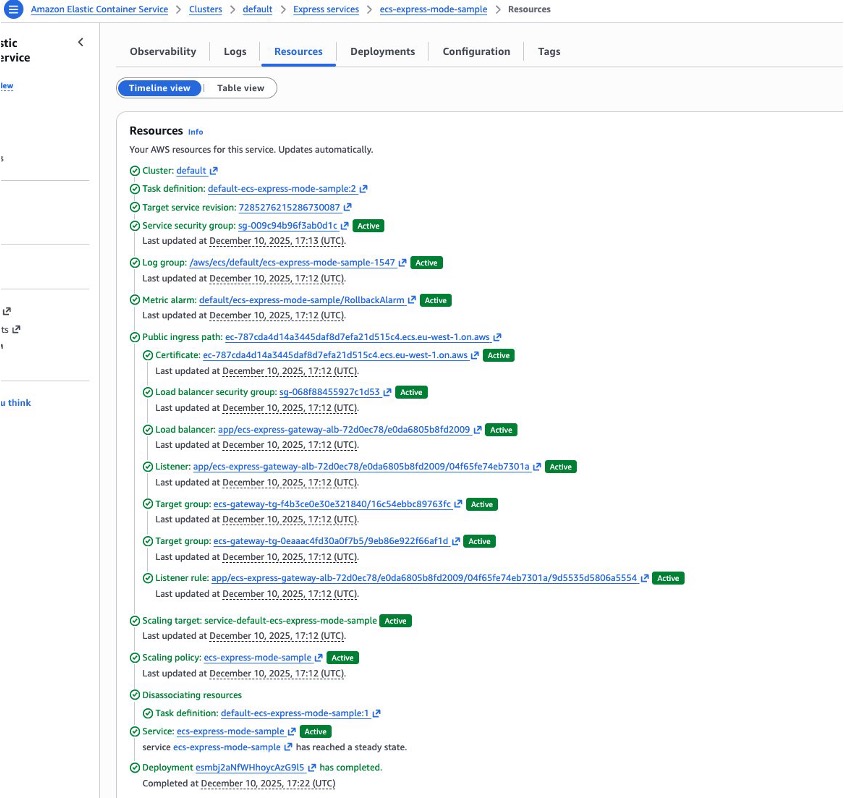
Amazon ECS console showing successful deployment
Security best practices
This implementation follows AWS security best practices to protect your deployment pipeline and running applications.
OIDC authentication generates temporary credentials that automatically expire, reducing the risk of credential exposure.
Least privilege IAM policies grant only the permissions needed for the deployment workflow. We recommend reviewing and tightening these policies based on your specific requirements. For example, you might restrict the Resource field to specific Amazon ECR repositories or Amazon ECS clusters rather than using wildcards.
You can use GitHub environments to add protection rules like required reviewers for production deployments. The workflow uses the production environment, which you can configure to require manual approval before deploying to production.
Cleaning up
To avoid incurring future charges, delete the resources that you created during this tutorial.
Delete the Amazon ECS Express Mode service:
(Optional) Delete the Amazon ECS cluster:
aws ecs delete-cluster --cluster $ECS_CLUSTER
Note: Only delete the cluster if the GitHub Actions workflow created it for you. If you’re using a pre-existing cluster with other services, skip this step to avoid disrupting those services.
Delete container images from Amazon ECR:
Remove IAM resources:
Conclusion
In this post, we walked you through implementing automated deployments for Amazon ECS Express Mode using GitHub Actions. You built a CI/CD pipeline that automatically builds and deploys your containerized applications.The pipeline uses OIDC for secure authentication with temporary credentials to automatically trigger deployments when you commit code, to track versions through commit-based image tagging, and for rollback capabilities using Amazon ECS deployment history. You can extend this foundation by adding automated tests before deployment, implementing approval workflows for production releases, or integrating security scanning tools to catch vulnerabilities before they reach production.
To learn more, see Amazon ECS Express Mode documentation, GitHub Actions for AWS, Amazon ECS Deploy Express Service GitHub Action, and Best practices for Amazon ECS Express Mode services.
| Interested in hands-on experience about ECS? Register for a guided hands-on workshop |
About the authors
 Olawale Olaleye is a Sr. GenAI/ML Specialist Solutions Architect at AWS, based in Ireland, and a certified Kubestronaut. With extensive experience architecting enterprise-scale containerized workloads, he specializes in helping organizations modernize their infrastructure across containers, AI/ML operations, and cloud security. Connect with him on LinkedIn.
 Guillaume Delacour is a Sr. Specialist Solutions Architect at AWS, based in France,
where he works with digital native customers for 3 years. His interests include application modernization, AWS Container technologies, and developer experience. You can connect with him on LinkedIn.