Containers
Build and deploy a Spring Boot application to AWS App Runner with a CI/CD pipeline using Terraform
Introduction
Spring Boot is a leading open-source framework for building Java-based web applications. It is designed to get you up and running as quickly as possible, with minimal configuration. Its opinionated take on production-ready applications makes implementing modern best practices intuitive and easy.
AWS App Runner is a fully managed container application service that makes it easy for customers without any prior containers or infrastructure experience to build, deploy, and run containerized web applications and APIs. Customers simply provide source code or a container image, and App Runner automatically builds and deploys the web application, load-balances traffic, and scales on-demand.
In this blog post, we will show how to run a Spring Boot application at scale on AWS App Runner and set up a pipeline for automatic build and deployment. The sample Spring Boot application used in this blog post is the Spring PetClinic application. The PetClinic application is chosen to demonstrate the use of Spring Boot, Spring MVC, and Spring Data in building a simple but powerful database-oriented application. The PetClinic application persists its data in Amazon Relational Database Service (Amazon RDS). The infrastructure is provisioned and managed with Terraform.
Architecture

Prerequisites
Before you build the whole infrastructure, including your CI/CD pipeline, you will need to meet the following prerequisites.
1. AWS account
Ensure you have access to an AWS account and a set of credentials with administrator permissions. Note: In a production environment, we would recommend locking permissions down to the bare minimum needed to operate the pipeline.
2. Create an AWS Cloud9 environment
Log in to the AWS Management Console and search for AWS Cloud9 services in the search bar. Select AWS Cloud9 and create an AWS Cloud9 environment in the us-east-1 region based on Amazon Linux 2.
Solution
Configure the AWS Cloud9 environment
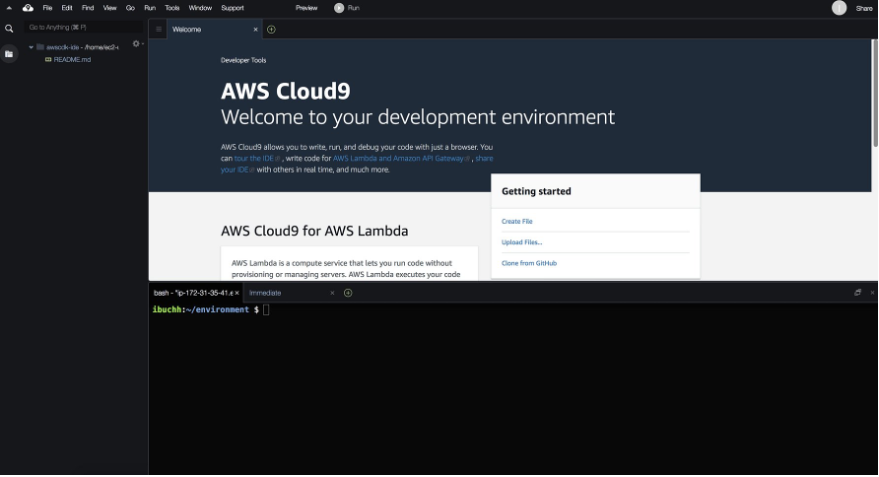
Launch the AWS Cloud9 IDE. Close the Welcome tab and open a new Terminal tab.
Create and attach an IAM role for your AWS Cloud9 instance
By default, AWS Cloud9 manages temporary IAM credentials for you. Unfortunately, these are incompatible with Terraform. To get around this, you need to disable AWS Cloud9 temporary credentials, and create and attach an IAM role for your AWS Cloud9 instance.
- Follow this deep link to create an IAM role with Administrator access.
- Confirm that AWS service and EC2 are selected, then choose Next to view permissions.
- Confirm that AdministratorAccess is checked, then choose Next: Tags to assign tags.
- Take the defaults, and choose Next: Review to review.
- Enter workshop-admin for the Name, and choose Create role.

- Follow this deep link to find your AWS Cloud9 EC2 instance.
- Select the instance, then choose Actions / Instance settings / Modify IAM role. Note: If you cannot find this menu option, look under Actions / Security / Modify IAM role

- Choose workshop-admin from the IAM role drop-down, and select Apply.

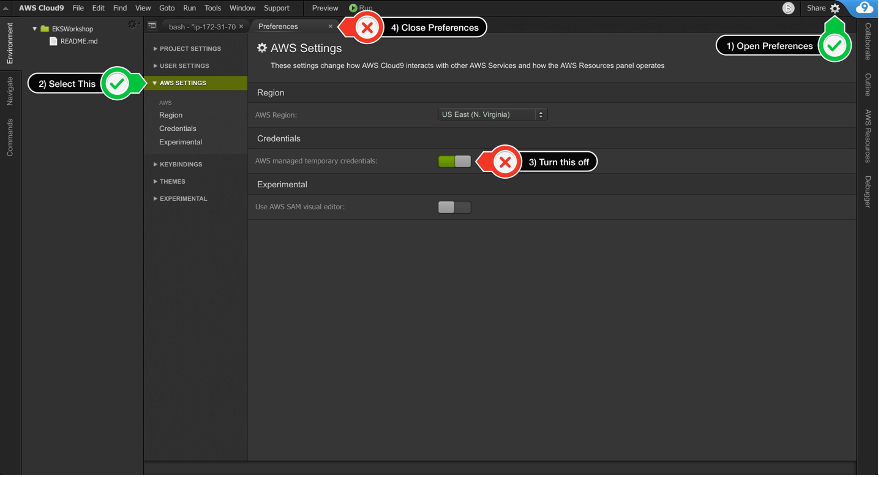
- Return to your workspace and click the gear icon (in top right corner), or click to open a new tab and choose Open preferences.
- Select AWS settings.
- Turn off AWS managed temporary credentials.
- Close the Preferences tab.
- In the AWS Cloud9 terminal pane, execute the command:
rm -vf ${HOME}/.aws/credentials - As a final check, use the GetCallerIdentity CLI command to validate that the AWS Cloud9 IDE is using the correct IAM role.
aws sts get-caller-identity --query Arn | grep workshop-admin -q && echo "IAM role valid" || echo "IAM role NOT valid"
Upgrade awscli
Ensure you are running the latest version of AWS CLI:
aws ——version
pip install awscli —upgrade —user
Run aws configure to configure your region. Leave all the other fields blank. You should have something like:
admin:~/environment $ aws configure
AWS Access Key ID [None]:
AWS Secret Access Key [None]:
Default region name [None]: us-east-1
Default output format [None]:
Install Terraform
Download and install Terraform:
sudo yum install -y yum-utils
sudo yum-config-manager --add-repo https://rpm.releases.hashicorp.com/AmazonLinux/hashicorp.repo
sudo yum -y install terraform
Verify that you can run Terraform:
terraform versionInstall Apache Maven
cd /tmp
sudo wget https://www-eu.apache.org/dist/maven/maven-3/3.8.1/binaries/apache-maven-3.8.1-bin.tar.gz
sudo tar xf /tmp/apache-maven-*.tar.gz -C /opt
sudo ln -s /opt/apache-maven-3.8.1 /opt/maven
Set up Apache Maven
sudo nano ~/.bashrcPaste the following lines at the end of the file:
export M2_HOME=/opt/maven
export MAVEN_HOME=/opt/maven
export PATH=${M2_HOME}/bin:${PATH}
Verify the Apache Maven installation:
source ~/.bashrc
mvn ——version
Clone workshop repository
Clone the source code repository:
cd ~/environment
git clone https://github.com/aws-samples/aws-apprunner-terraform.git
Package the application using Apache Maven
cd ~/environment/aws-apprunner-terraform/petclinic
mvn package -Dmaven.test.skip=true
The first time you execute this (or any other) command, Maven will need to download the plugins and related dependencies it needs to fulfill the command. From a clean installation of Maven, this can take some time (note: in the output above, it took almost five minutes). If you execute the command again, Maven will now have what it needs, so it won’t need to download anything new and will be able to execute the command quicker.
The compiled java classes were placed in spring-petclinic/target/classes, which is another standard convention employed by Maven. By using the standard conventions, the POM above is small, and you haven’t had to tell Maven explicitly where any of your sources are or where the output should go. By following the standard Maven conventions, you can do a lot with little effort.
Build and tag the Petclinic docker image
From the petclinic directory:
docker build -t petclinic .Run Petclinic application locally
Run the following inside the AWS Cloud9 terminal:
docker run -it --rm -p 8080:80 --name petclinic petclinic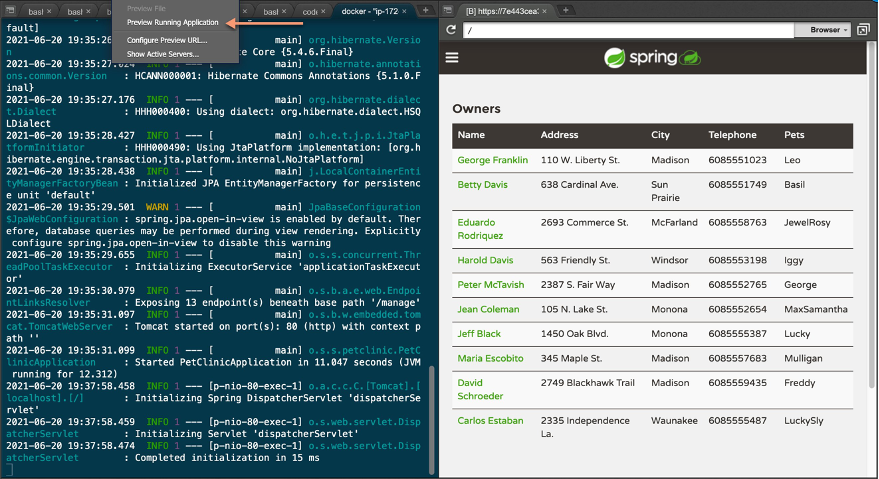
This will run the application using container port of 80 and will expose the application to host port of 8080. Choose Preview from the top menu and then choose Preview Running Application. It will open a browser displaying the Spring Petclinic application.
Push petclinic docker image to Amazon ECR
Run the following inside the AWS Cloud9 terminal:
AWS_ACCOUNT_ID=$(aws sts get-caller-identity --query 'Account' ——output text)
AWS_REGION=$(aws configure get region)

export REPOSITORY_NAME=petclinic
export IMAGE_NAME=petclinic

aws ecr create-repository \
--repository-name $REPOSITORY_NAME \
--image-scanning-configuration scanOnPush=true \
--region $AWS_REGION

aws ecr get-login-password --region $AWS_REGION | docker login --username AWS --password-stdin $AWS_ACCOUNT_ID.dkr.ecr.$AWS_REGION.amazonaws.com

docker tag $IMAGE_NAME $AWS_ACCOUNT_ID.dkr.ecr.$AWS_REGION.amazonaws.com/$IMAGE_NAME
docker push $AWS_ACCOUNT_ID.dkr.ecr.$AWS_REGION.amazonaws.com/$IMAGE_NAME
Build the infrastructure and pipeline
We shall use Terraform to build the previous architecture, including the AWS CodePipeline.
Note: This workshop will create chargeable resources in your account. When finished, please make sure you clean up resources as instructed at the end.
Set up SSM parameter for DB password
aws ssm put-parameter --name /database/password --value mysqlpassword —type SecureStringEdit Terraform variables
cd ~/environment/aws-apprunner-terraform/terraform Edit terraform.tfvars, leave the aws_profile as "default", and set aws_region to the correct value for your environment.
Build
Initialize Terraform:
terraform initBuild the infrastructure and pipeline using Terraform:
terraform applyTerraform will display an action plan. When asked whether you want to proceed with the actions, enter yes.
Wait for Terraform to complete the build before proceeding. It will take few minutes to complete “terraform apply.”
Explore the stack you have built
Once the build is complete, you can explore your environment using the AWS console:
- View the RDS database using the Amazon RDS console.
- View the Amazon ECR repo using the Amazon ECR console.
- View the AWS CodeCommit repo using the AWS CodeCommit console.
- View the AWS CodeBuild project using the AWS CodeBuild console.
- View the pipeline using the AWS CodePipeline console.
Note that your pipeline starts in a failed state. That is because there is no code to build in the CodeCommit repo! In the next step, you will push the petclinic app into the repo to trigger the pipeline.
Explore the App Runner service
The details of the App Runner service are in ~/environment/aws-apprunner-terraform/terraform/services.tf
 image_repository {
      image_configuration {
        port = var.container_port
        runtime_environment_variables = {
          "spring.datasource.username" : "${var.db_user}",
          "spring.datasource.password" : "${data.aws_ssm_parameter.dbpassword.value}",
          "spring.datasource.initialization-mode" : var.db_initialize_mode,
          "spring.profiles.active" : var.db_profile,
          "spring.datasource.url" : "jdbc:mysql://${aws_db_instance.db.address}/${var.db_name}"
        }
      }
      image_identifier      = "${data.aws_ecr_repository.image_repo.repository_url}:latest"
      image_repository_type = "ECR"
    }
Deploy petclinic application using the pipeline
You will now use git to push the petclinic application through the pipeline.
Set up a local git repo for the petclinic application
Start by switching to the petclinic directory:
cd ~/environment/aws-apprunner-terraform/petclinicSet up your git username and email address:
git config --global user.name "Your Name"
git config --global user.email you@example.com
Now create a local git repo for petclinic as follows:
git init
git add .
git commit -m "Baseline commit"
Set up the remote CodeCommit repo
An AWS CodeCommit repo was built as part of the pipeline you created. You will now set this up as a remote repo for your local petclinic repo.
For authentication purposes, you can use the AWS IAM git credential helper to generate git credentials based on your IAM role permissions. Run:
git config --global credential.helper '!aws codecommit credential-helper $@'
git config --global credential.UseHttpPath true
From the output of the Terraform build, note the Terraform output: source_repo_clone_url_http.
cd ~/environment/aws-apprunner-terraform/terraform
export tf_source_repo_clone_url_http=$(terraform output -raw source_repo_clone_url_http)
Set this up as a remote for your git repo as follows:
cd ~/environment/aws-apprunner-terraform/petclinic
git remote add origin $tf_source_repo_clone_url_http
git remote -v
You should see something like:
origin  https://git-codecommit.eu-west-2.amazonaws.com/v1/repos/petclinic (fetch)
origin  https://git-codecommit.eu-west-2.amazonaws.com/v1/repos/petclinic (push)
Trigger the pipeline
To trigger the pipeline, push the master branch to the remote as follows:
git push -u origin masterThe pipeline will pull the code, build the docker image, push it to Amazon ECR, and deploy it to your Amazon ECS cluster. This will take a few minutes. You can monitor the pipeline in the AWS CodePipeline console.

Test the application
From the output of the Terraform build, note the Terraform output apprunner_service_url.
cd ~/environment/aws-apprunner-terraform/terraform
export apprunner_service_url=$(terraform output -raw apprunner_service_url)
echo "https://$apprunner_service_url"
Use this in your browser to access the application.

Push a change through the pipeline and retest
The pipeline can now be used to deploy any changes to the application. You can try this out by changing the welcome message as follows:
cd ~/environment/aws-apprunner-terraform/petclinic
vi src/main/resources/messages/messages.properties
Change the value for the welcome string, for example, to “Hello.” Commit the change:
git add .
git commit -m "Changed welcome string"
Push the change to trigger pipeline:
git push origin masterAs before, you can use the console to observe the progression of the change through the pipeline. Once done, verify that the application is working with the modified welcome message.
Cleaning up
Tearing down the stack
Make sure that you remember to tear down the stack when finished to avoid unnecessary charges. You can free up resources as follows:
cd cd ~/environment/aws-apprunner-terraform/terraform
terraform destroy
When prompted, enter yes to allow the stack termination to proceed. Once complete, note that you will have to manually empty and delete the S3 bucket used by the pipeline.
Delete the Amazon ECR repo
aws ecr delete-repository \
    --repository-name $REPOSITORY_NAME \
    --region $AWS_REGION \
    --force
Conclusion
AWS App Runner makes it easy to run a secure web application at scale with no prior infrastructure experience required such as server configuration, networking, load balancing, autoscaling or safe deployment. Resources and infrastructure components provisioned for your web application are fully managed by AWS and benefit from our security and operational best practices, which enables you to stay completely focused on your application.
The example project used by this blog post demonstrates the set-up of running a Spring Boot application on App Runner, also providing a great stepping stone to start developing your own Spring-based web applications. Check out the AWS App Runner documentation for further information on how to use App Runner, as well as the AWS App Runner developer guide, which includes information on how to get started, best practices, and troubleshooting. You may also evaluate our roadmap and suggest new features on the AWS App Runner Roadmap hosted on GitHub.