Containers
Extending EKS with Hybrid Nodes: IAM Roles Anywhere and HashiCorp Vault
Amazon EKS Hybrid Nodes allows businesses to flexibly make use of compute resources outside of AWS by extending an Amazon Elastic Kubernetes Service (Amazon EKS) data plane beyond the AWS Cloud boundary. Use cases for EKS Hybrid Nodes include businesses who have goals or requirements focusing on data sovereignty, low latency communication, and government or industry regulations.
In this blog post, we’ll explore how to use AWS Identity and Access Management (IAM) Roles Anywhere, supported by HashiCorp Vault PKI, to facilitate joining EKS Hybrid Nodes to an Amazon EKS Cluster.
Solution overview
When a node joins an EKS cluster, it uses metadata from the cluster – such as the cluster certificate bundle – to authenticate. Permission to retrieve this metadata is granted by IAM via the eks:DescribeCluster operation, which can be attached to an IAM Role via an IAM Policy.
Since EKS Hybrid Nodes reside outside of AWS, they cannot inherit IAM Policies directly, and a different mechanism is required to retrieve the cluster certificate bundle. One recommended option is to use AWS Systems Manager (SSM) to provide nodes with temporary IAM credentials and permissions, including eks:DescribeCluster. Another option to accomplish the same outcome is to make use of an existing Public Key Infrastructure (PKI) and AWS IAM Roles Anywhere, which will be the focus of this blog post.
IAM Roles Anywhere supports temporary credential validity periods from the default value of one hour up to a maximum of twelve hours.
Prerequisites
For this solution, you should have the following prerequisites:
- An AWS account
- An Amazon EKS Cluster (prerequisites)
- One or more Linux servers that will become EKS Hybrid Nodes (compatibility)
- A HashiCorp Vault Server or Cluster
PKI architecture
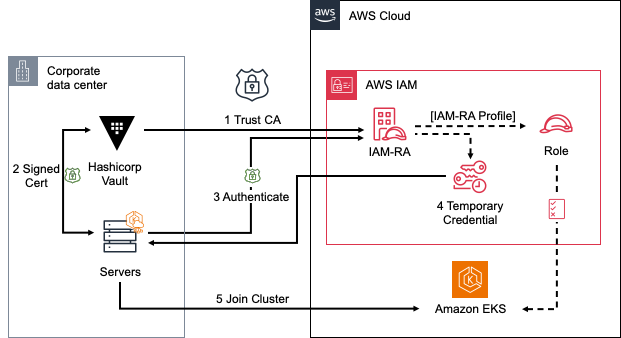
Figure 1 – Vault PKI Architecture Diagram
If you’re already using HashiCorp Vault to manage secrets and protect sensitive data, then you already have a PKI! Vault natively supports PKI as part of its secrets engine. All you must do is to enable it.
Because you’ll establish a Trust between IAM Roles Anywhere (IAM-RA) and the Vault Certificate Authority (CA), it is important to be aware that the default Time To Live (TTL) for the Vault CA is 30 days. This means that every 30 days you must refresh the Trust. The TTL can be tuned to your needs, for example to 1 year:
When establishing the CA, Vault can accept an external certificate or create a new, self-signed certificate:
IAM Roles Anywhere configuration
Normally, you would move forward to creating certificates signed by the CA. However, with IAM-RA, you need the root certificate returned by the previous command to build the trust profile.
Navigate to the IAM-RA console in your AWS account (IAM.Roles.RolesAnywhere) and create a new trust anchor (Figure 2). Provide the certificate bundle from Vault and select “Create a trust anchor”.
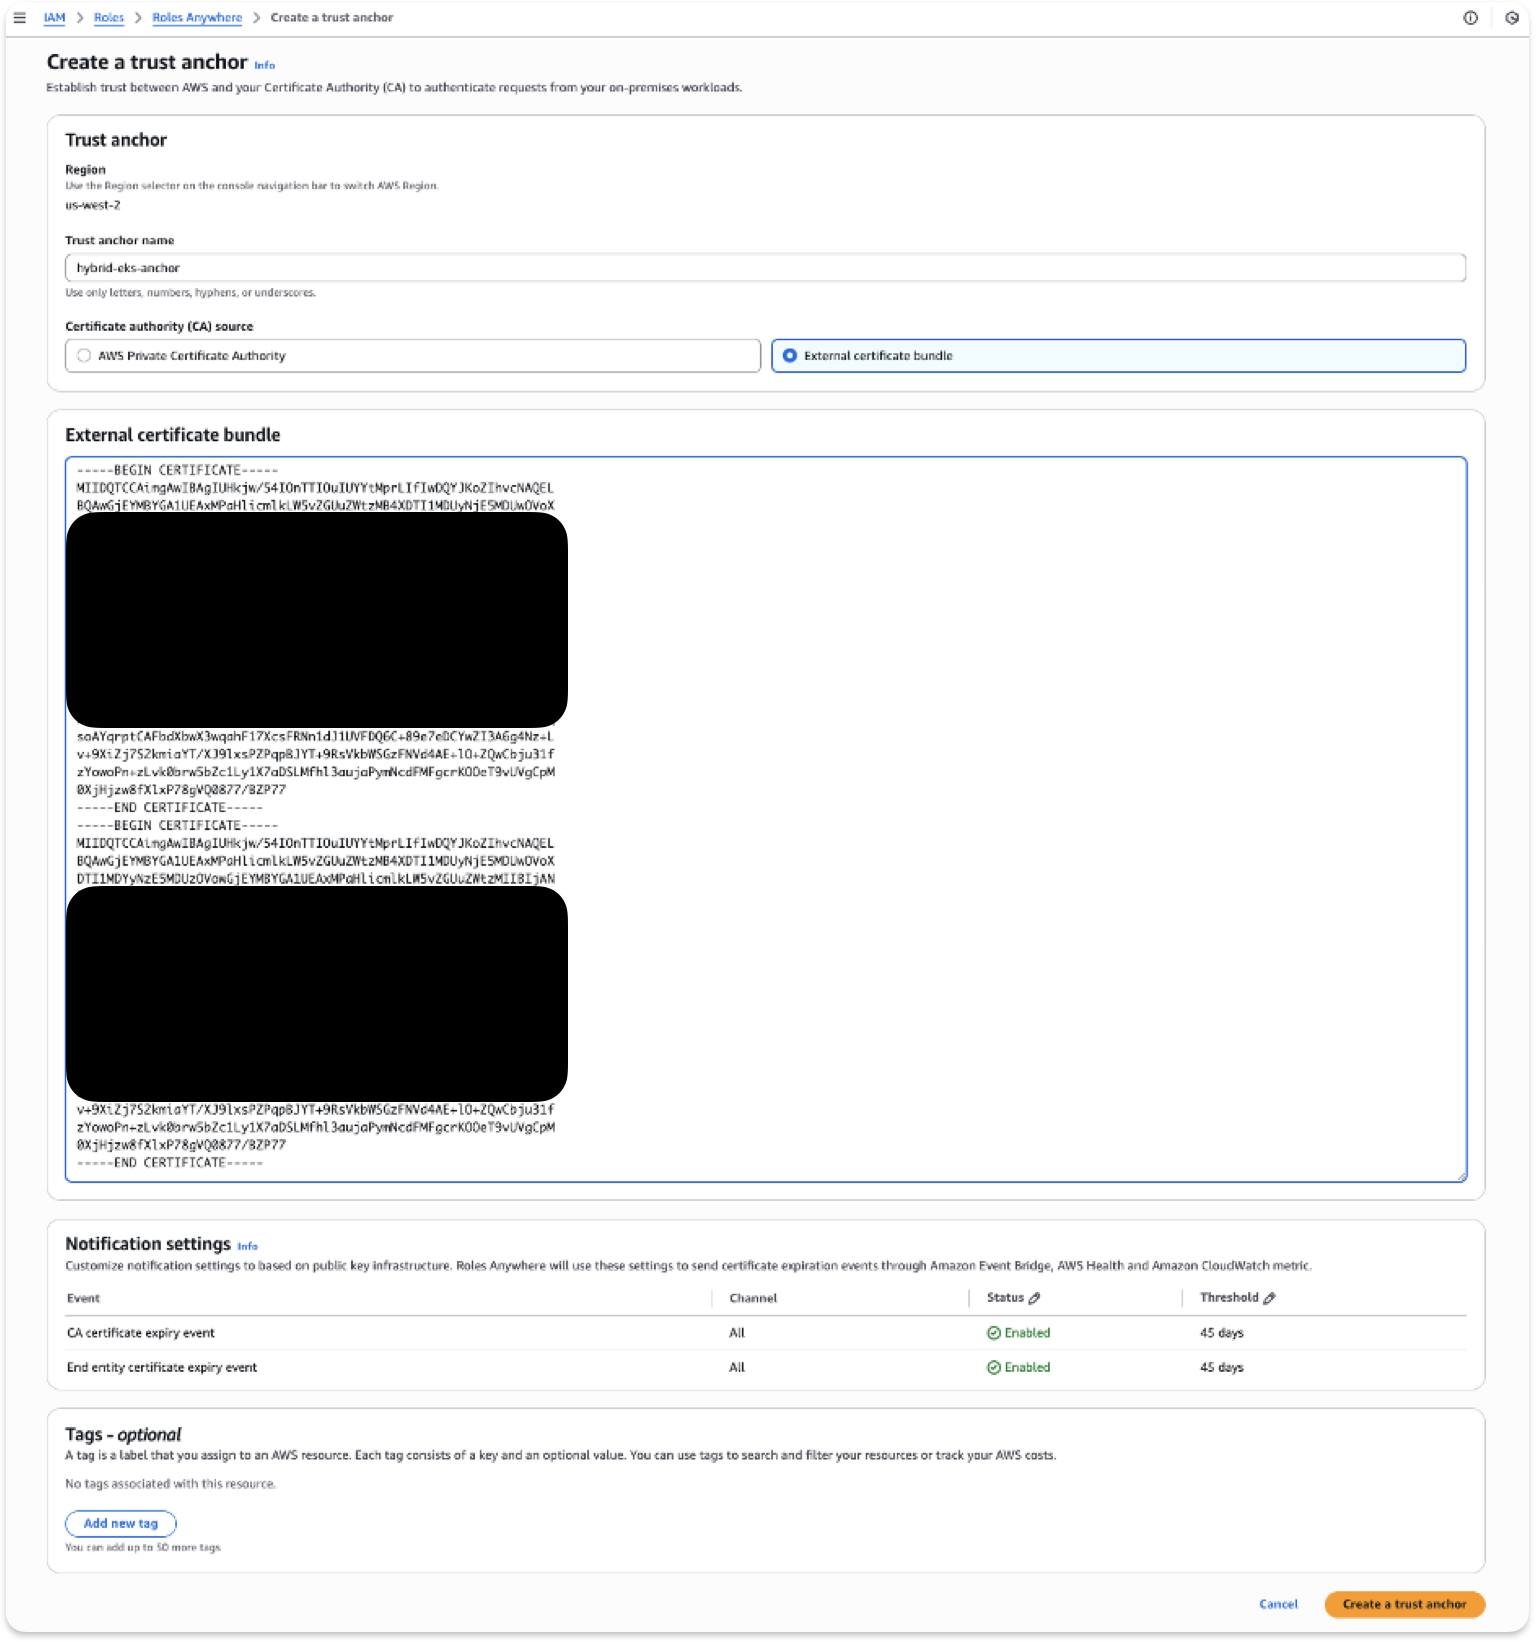
Figure 2 – IAM-RA Create Trust Anchor
Before leaving the console, you must also create a profile. A profile links together an IAM Role, a set of IAM permissions in the form of a policy, and the trust anchor created above. This chain is how IAM-RA will validate whether a request is authenticated (via the certificate), whether it is authorized (via the profile), and if both are true, then IAM-RA will deliver temporary IAM credentials corresponding to the IAM Role to the requestor.
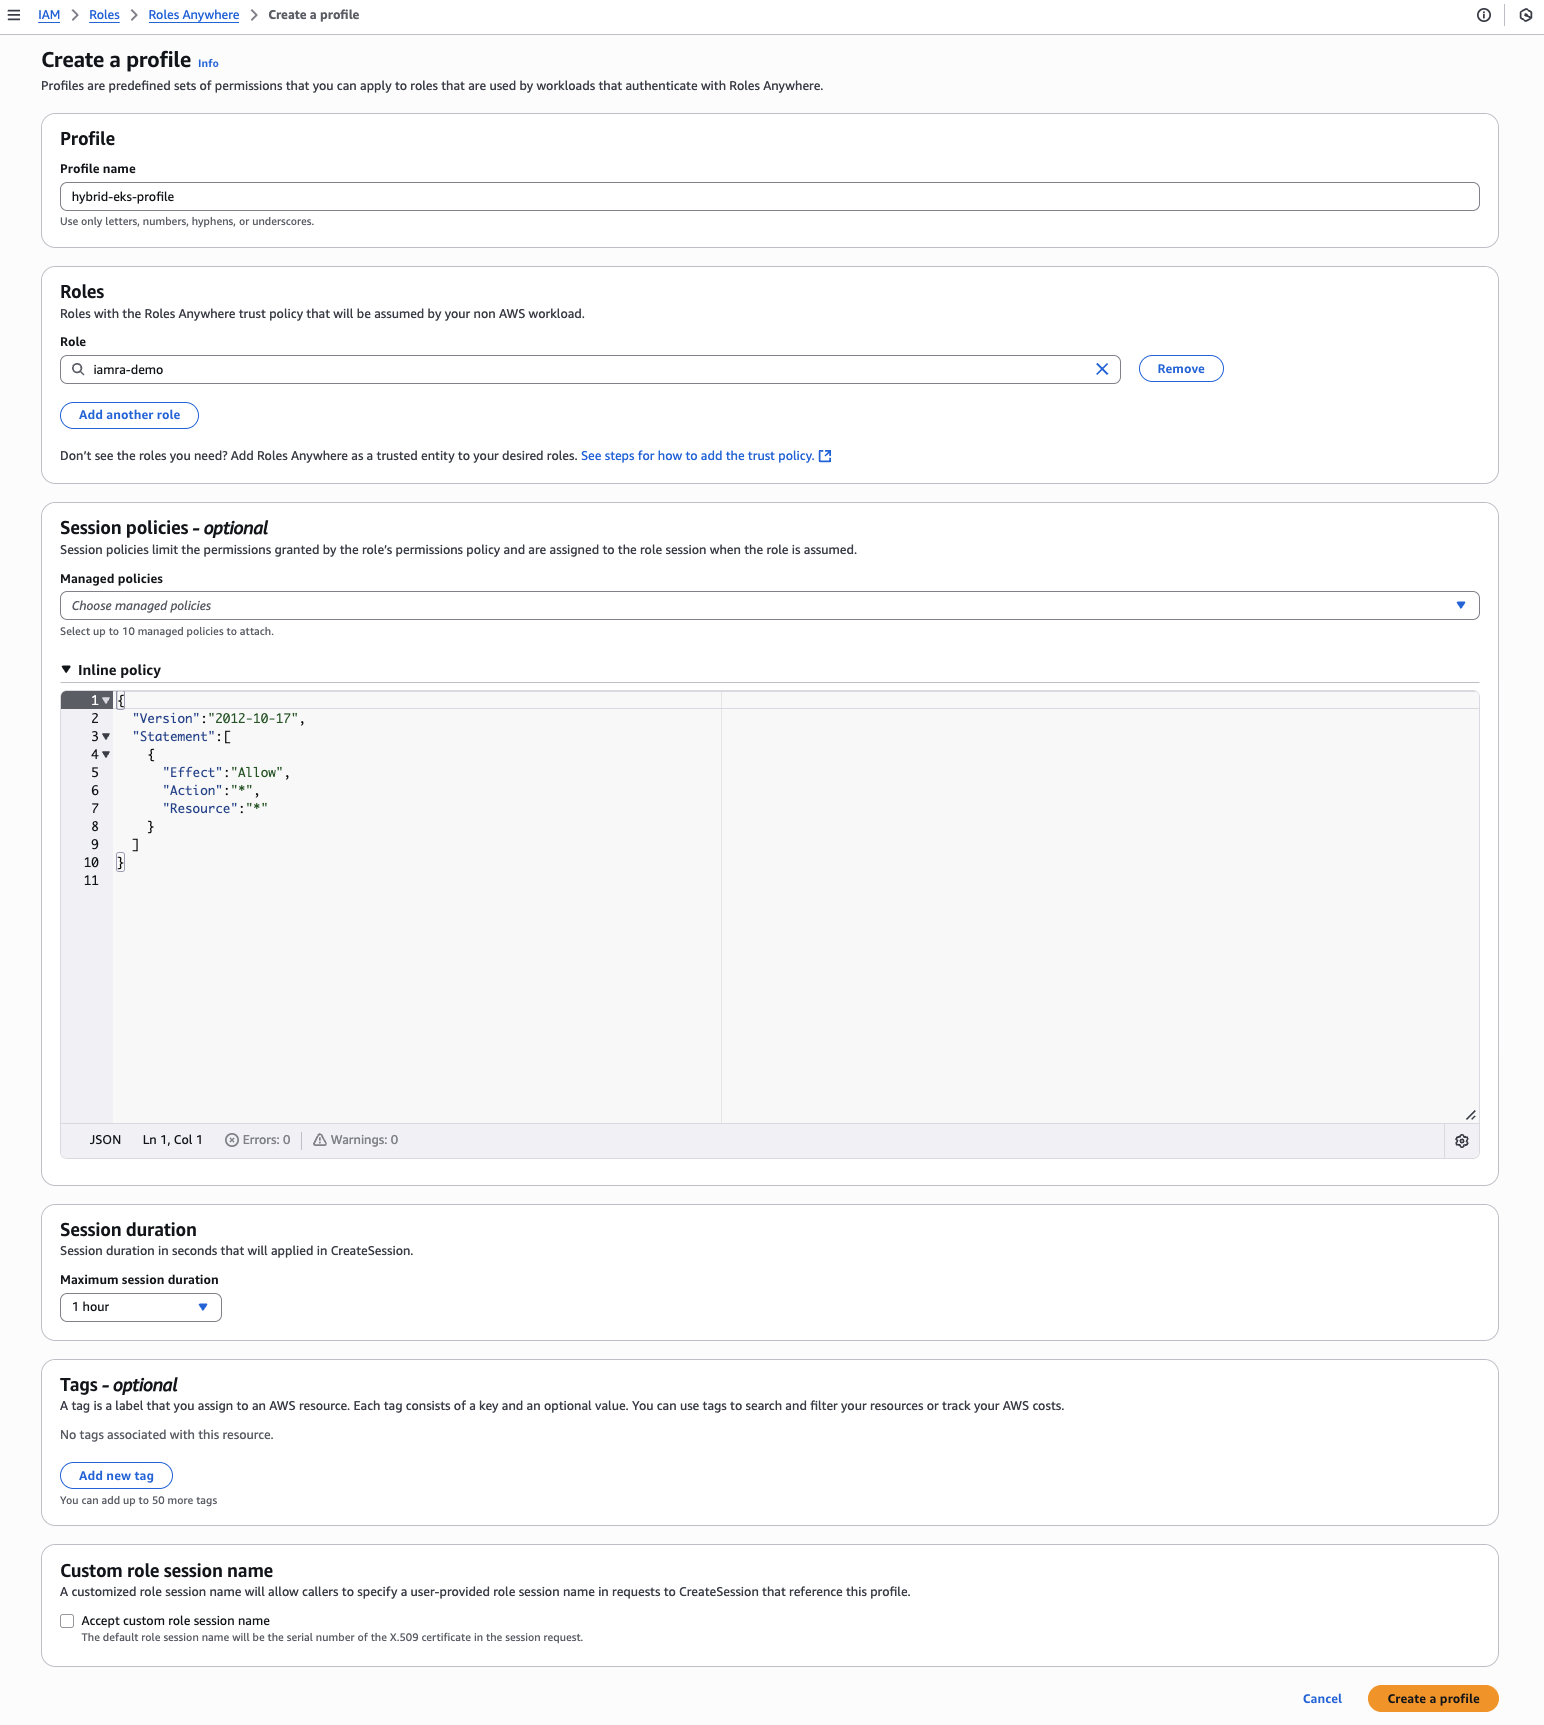
Figure 3 – IAM-RA Profile
Each IAM Role may have a unique set of permissions – or Actions – that permit corresponding activities within AWS, such as making calls to various services. In order for IAM-RA to request and retrieve the credentials that will be provided to requestors, you must establish a Trust relationship in IAM for the Role(s) referenced by the profile above. Note that the IAM Role does not require any Actions related to IAM-RA, only the Trust policy to support the credential request.
In this example, configuring the wildcard * for Action and Resource implements a configuration the fully inherits the permissions of the IAM Policy assigned to the IAM Role. We are not implementing any permission restrictions beyond what is implemented by the IAM Policy itself. However, doing so is supported by IAM-RA and should be implemented in a way that follows your organization’s security posture. More information can be found in this best practice document.
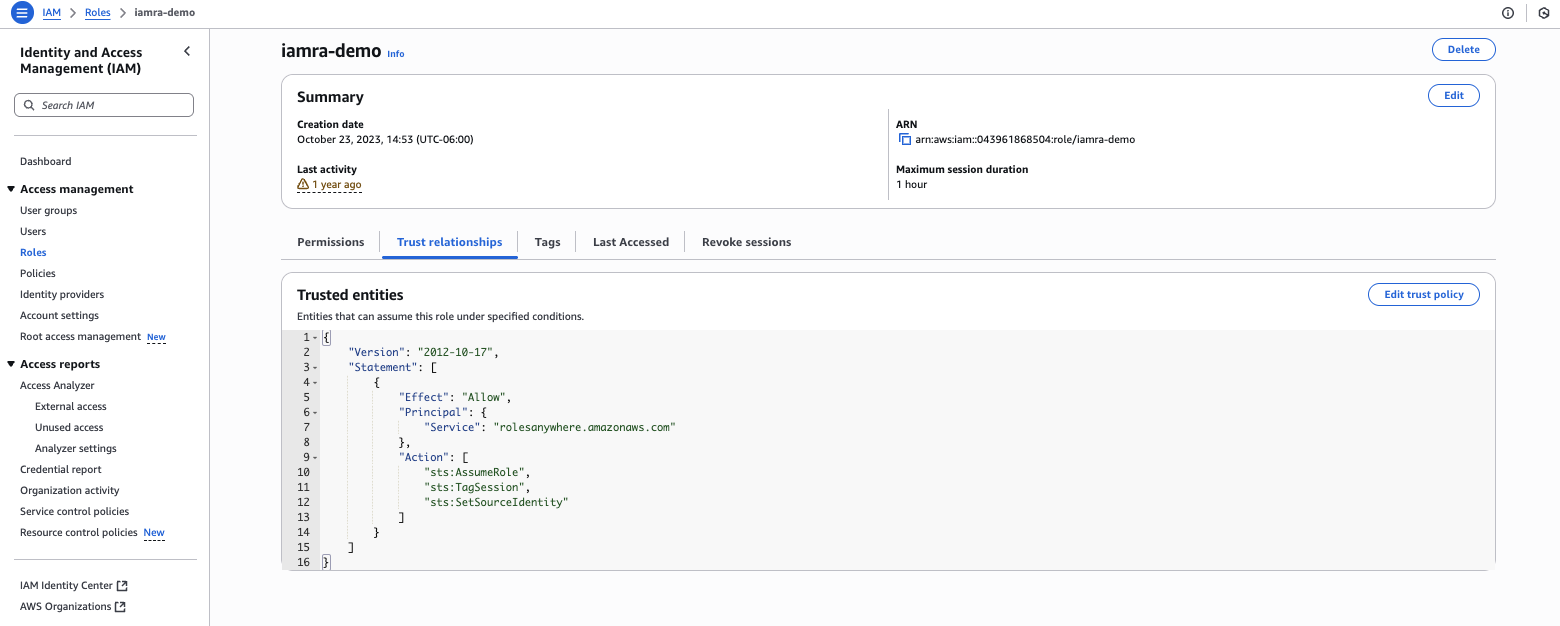
Figure 4 – IAM-RA Trust Relationship
Vault certificate management
Hybrid Nodes need to request certificates from Vault. Instead of using root credentials, create a Vault role with the necessary PKI permissions. The allowed_domains configuration provides flexibility to delegate the capability to manage certificates for one or multiple groups of Hybrid Nodes:
Request a certificate:
The certificate returned by Vault will be used to configure the Hybrid Nodes. When IAM-RA receives a request using that certificate, it will verify that the Certificate was signed by the root certificate configured earlier in the trust anchor and proceed with requesting IAM credentials.
The value provided to common_name is arbitrary but will be reflected in the way that the node identifies itself to the EKS cluster. While it is not required to be unique, we do recommend maintaining unique values for clarity.
It’s important to remember that, when configuring nodeadm for joining the node to the cluster, the order of certificate data is relevant and must follow certificate; intermediate(s); issuer. In the Vault output, the values to support this order are certificate; ca_chain; issuing_ca.
EKS Hybrid Nodes configuration
You’re now ready to start configuring a Hybrid Node to join the EKS cluster. These steps assume that no utilities have been installed and no configuration has been completed.
- Download a
nodeadmbinary for your appropriate architecture:
(x86_64)
(ARM64)
- Make the binary executable:
The nodeadm utility will perform two important functions:
- Install Kubernetes at the required version
- Connect the node to the EKS cluster
This example command installs Kubernetes version 1.33 and uses IAM-RA as the credential provider:
The last step needed before starting Kubernetes on the Hybrid Node is to write a NodeConfig file. This configuration will supply the nodeadm binary with all of the information that it needs to locate the EKS cluster and to retrieve ephemeral IAM credentials from IAM-RA in order to execute a describe-cluster to get a copy of the cluster SSL Certificate bundle for authentication. Here is an example nodeConfig.yaml file – be sure to replace variables REGION, NODE_NAME, TRUST_ANCHOR_ARN, PROFILE_ARN, and ROLE_ARN below with values from your environment:
In addition to the IAM-RA configuration, take note of the optional kubelet configuration block that extends the capability of nodeadm to add metadata to the Node that will be present when the Node has joined the cluster.
The last step is to initialize the kubelet via the nodeadm utility by running this command:
Following initialization, the node should display output like the following:
Nodes will not display the “Ready” status shown below until a Container Network Interface (CNI) is installed on the node. As of writing, Hybrid Nodes support either Cilium or Calico CNI, but be sure to check the documentation for the latest.
Results
With the CNI installed, query the Nodes attached to your EKS cluster:
Cleanup
If you’ve launched an Amazon EKS cluster and/or a HashiCorp Vault architecture to experiment with the steps provided, please feel free to delete those resources as appropriate.
Conclusion
We’ve seen that Vault PKI can be used to seamlessly support IAM Roles Anywhere, which can then be used to support joining Hybrid Nodes to an EKS cluster.
Thanks to Vault PKI, you can create trusted certificates, and use those to retrieve credentials for the cluster, however, none of this is automated. As the next step, you can create a Linux init script that makes an authenticated API call to Vault to create a signed Certificate and then make an API call to IAM-RA to retrieve credentials. Using that, a Linux host can be automatically configured to join an EKS cluster as a Hybrid Node. This is similar to configuring the user data for a node in a self-managed EC2 NodeGroup.
Make sure to check the EKS pricing page to understand the Hybrid Nodes cost model.
About the author
 Jonathan Hurley is a Sr. Technical Account Manager supporting customers across a variety of industries in the Small to Medium Business segment of AWS. In addition to his regular responsibilities, Jonathan enjoys assisting customers through his specializations in both container solutions and HashiCorp tools.