Containers
Using Dex & dex-k8s-authenticator to authenticate to Amazon EKS
This post was contributed by Márk Sági-Kazár, Jeremy Cowan, and Jimmy Ray.
Introduction
In an earlier post, Paavan Mistry introduced us to the OIDC identity provider (IdP) authentication for Amazon Elastic Kubernetes Service (Amazon EKS), a feature that allows you to use an OIDC identity provider with new or existing clusters. Before launching this feature, IAM principles and service account bearer tokens were the only authentication methods that Amazon EKS supported. If you wanted to grant a user access to an EKS cluster, you typically had to create an IAM principle, such as a user or role, and map it to a Kubernetes RBAC group. There were alternative approaches like kube-oidc-proxy, which leveraged impersonation but they were often challenging to configure. With OIDC support, customers now have the flexibility to use an OIDC compatible IdP of their choosing. This gives organizations who were reticent about creating AWS IAM user accounts/roles to their developers, an EKS-native way to grant them access to EKS clusters using an OIDC-compatible identity provider. These identities are also logged to Kubernetes audit log, giving InfoSec the ability to ascribe Kubernetes API calls to users who authenticate with an OIDC identity.
This blog describes how to use Dex with Amazon EKS, a popular OIDC provider that provides connectors for a variety of different OAuth providers. Specifically, this blog will describe how to configure Dex with GitHub as your primary IdP. Access to the Kubernetes API is governed by ClusterRoleBindings and RoleBindings.
Solution components
Dex
Dex is an OIDC provider that provides connectors for external OAuth providers to obtain an identity; in this case, a GitHub application will be used. A single instance of Dex will be deployed into the master cluster that will service all other components in all clusters including signing the OIDC tokens.
cert-manager
cert-manager is a certificate management tool used to request and automate the renewal of TLS certificates in Kubernetes, including certificates from Let’s Encrypt.
NGINX ingress controller
The NGINX ingress controller is an NGINX backed ingress controller that manages external access to HTTP/S services within the cluster.
dex-k8s-authenticator
dex-k8s-authenticator is a helper web-app that talks to one or more Dex Identity services to generate kubectlcommands for creating and modifying a kubeconfig.
Prerequisites
To follow along with this post, you’ll need a rudimentary understanding of OIDC and OAuth2.0 protocols and JSON Web Tokens (JWT). You will also need a basic understanding of Dex and DNS. To follow the instructions used to configure the OIDC integration within Amazon EKS, you’ll need to use Helm and kubectl installed locally. Finally, you’ll need appropriate access to create and manage Amazon EKS cluster and Kubernetes objects such as Ingresses, ClusterRoles, and ClusterRoleBindings.
Deployment steps
Step 1: Install the NGINX ingress controller
In our setup, the NGINX ingress controller is used to route traffic to Dex and the dex-k8s-authenticator. To install the controller, run the following command from a terminal:
kubectl apply -f https://raw.githubusercontent.com/kubernetes/ingress-nginx/controller-v0.45.0/deploy/static/provider/aws/deploy.yamlAdditional configuration options for installing the controller can be found at, https://kubernetes.github.io/ingress-nginx/deploy/#aws.
When the NGINX ingress controller service (ingress-nginx-controller) is created in Amazon EKS, an internet-facing Network Load Balancer (NLB) should also be created, and associated with the public subnets associated with the EKS cluster. This can be checked with the following kubectl command.
kubectl get svc -n ingress-nginx
NAME                                 TYPE           CLUSTER-IP       EXTERNAL-IP         PORT(S)                      AGE
ingress-nginx-controller             LoadBalancer   10.100.35.182    <NLB_DNS_ADDRESS>   80:30316/TCP,443:31132/TCP   2d15h
ingress-nginx-controller-admission   ClusterIP      10.100.207.129   <none>
The NLB DNS address will be seen in the EXTERNAL-IP column. If the EXTERNAL-IP column shows , then the NLB cannot be created. This is most likely due to the EKS cluster specific tags missing from the public subnets. Adding the following tags to the public subnet should correct this issue and the NLB will be created.
kubernetes.io/cluster/<EKS_CLUSTER_NAME>=sharedStep 2: Install cert-manager
cert-manager is used to provision TLS certificates from Let’s Encrypt. Once provisioned, these certificates are assigned to the ingress definitions for Dex and the dex-k8s-authenticator. To install cert-manager, run the following commands from a terminal:
Add the JetStack Helm repository:
helm repo add jetstack https://charts.jetstack.ioUpdate your Helm cache:
helm repo updateInstall the chart:
helm install cert-manager jetstack/cert-manager --namespace cert-manager --create-namespace --version v1.3.1 --set installCRDs=trueFor alternative installation methods, see https://cert-manager.io/docs/installation/kubernetes/.
Create a certificate issuer:
cat << 'EOF' | kubectl apply -f -
kind: ClusterIssuer
apiVersion: cert-manager.io/v1
metadata:
  name: acme
spec:
  acme:
    email: alias@yourdomain.com
    preferredChain: ''
    privateKeySecretRef:
      name: acme-account-key
    server: 'https://acme-v02.api.letsencrypt.org/directory'
    solvers:
      - http01:
          ingress:
            class: nginx
EOF
When Dex and dex-k8s-authenticator are installed (steps 5 & 6) you can verify that the Let’s Encrypt configuration is working, by confirming that the tls.crt and tls.key fields are present in the respective dex-tls and dex-k8s-authenticator-tls secrets, and that the correct annotations (seen below) are present on the secrets.
  annotations:
    cert-manager.io/alt-names: dex.yourdomain.com
    cert-manager.io/certificate-name: dex-tls
    cert-manager.io/common-name: dex.yourdomain.com
    cert-manager.io/ip-sans: ""
    cert-manager.io/issuer-group: cert-manager.io
    cert-manager.io/issuer-kind: ClusterIssuer
    cert-manager.io/issuer-name: acme
    cert-manager.io/uri-sans: ""
Step 3: Create an OAuth App in GitHub
Creating an OAuth App will allow you to use GitHub as your identity provider. During the authentication process, Dex will redirect authentications request to GitHub, which will prompt the user to login with their GitHub credentials. Once authenticated, GitHub will respond with access_token which will be used later to gain access to the EKS cluster.
Note: Make sure that the GitHub OAuth application is created within the GitHub organization that you plan to use in the GitHub connector settings in the Dex configuration. If not, the OAuth application can be transferred to the correct GitHub organization to satisfy the configuration.
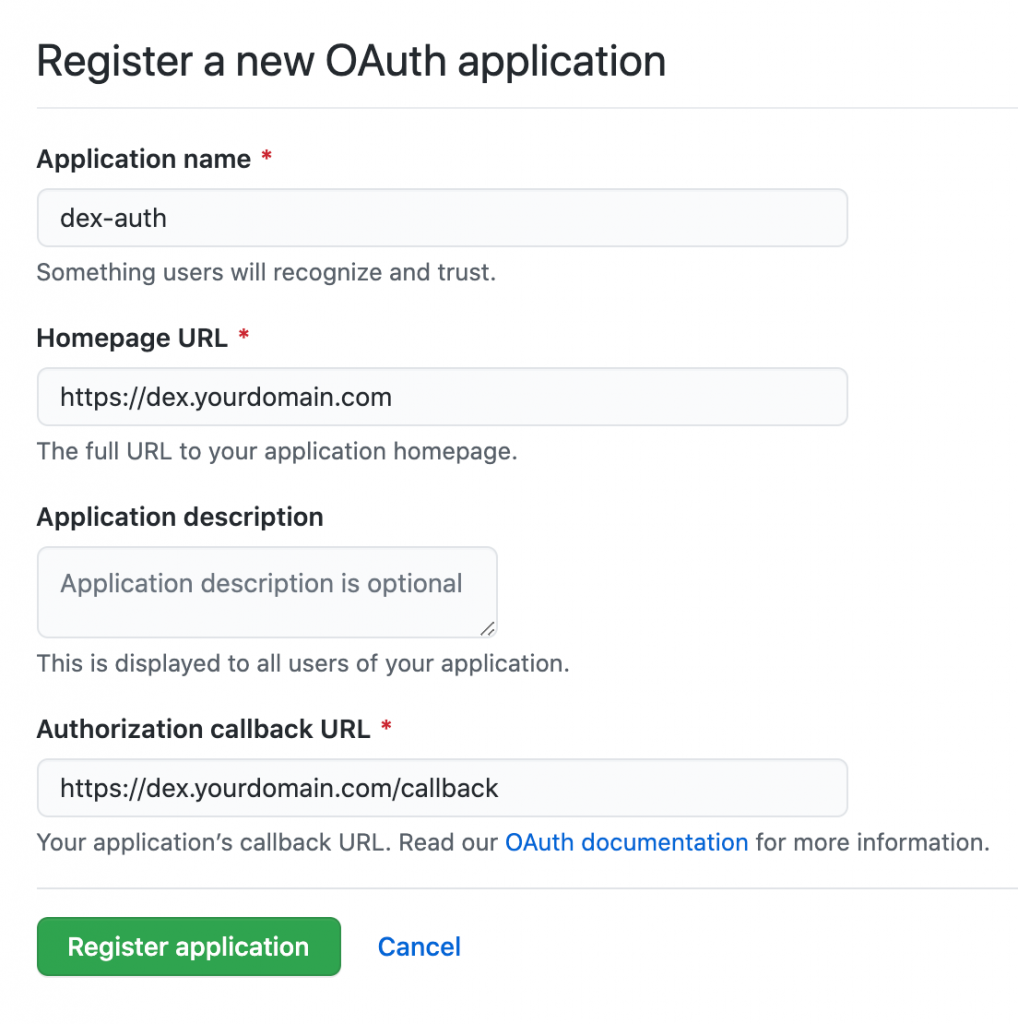
For the Homepage URL enter the url that you intend to use for the Dex web application, for example, https://dex.yourdomain.com.
For the Authorization callback URL append /callback to the url for the Dex web application, for example https://dex.yourdomain.com/callback.
Further instructions for creating a GitHub OAuth application can be found at https://docs.github.com/en/developers/apps/creating-an-oauth-app.
Step 4: Generate GitHub OAuth client secret
Dex uses the client ID and client secret to obtain an access token from GitHub. To create an access token click the Generate a new client secret button as seen below.

Copy the Client ID and Client secret as you will need these when you configure Dex.
Step 5: Install and configure Dex
Add the Dex Helm repository:
helm repo add dex https://charts.dexidp.ioUpdate your Helm cache:
helm repo updateCreate a values file for Dex. Replace the bolded text with your own values:
cat << 'EOF' > dex.yaml
ingress:
  enabled: true
  className: nginx
  annotations:
    kubernetes.io/tls-acme: "true"
    cert-manager.io/cluster-issuer: acme
  hosts:
    - host: dex.yourdomain.com
      paths:
        - path: /
          pathType: ImplementationSpecific
  tls:
    - secretName: dex-tls
      hosts:
        - dex.yourdomain.com

config:
  issuer: https://dex.yourdomain.com

  storage:
    type: kubernetes
    config:
      inCluster: true

  oauth2:
    responseTypes: ["code", "token", "id_token"]
    skipApprovalScreen: true

  connectors:
    - type: github
      id: github
      name: GitHub
      config:
        clientID: "{{ .Env.GITHUB_CLIENT_ID }}"
        clientSecret: "{{ .Env.GITHUB_CLIENT_SECRET }}"
        redirectURI: https://dex.yourdomain.com/callback
        orgs:
          - name: your-github-org-name
            teams:
              - your-github-team-name

  staticClients:
    - id: your-cluster-client-id
      secret: your-cluster-client-secret
      name: "Your EKS Cluster"
      redirectURIs:
        - https://login.yourdomain.com/callback
# Note: this will inject the environment variables directly to the pods.# In a production environment you should mount these keys from a secret using envFrom.# See https://artifacthub.io/packages/helm/dex/dex#values
env:
  GITHUB_CLIENT_ID: "your-github-client-id"
  GITHUB_CLIENT_SECRET: "your-github-client-secret"
EOF
Install the chart for Dex:
helm install dex dex/dex --namespace dex --create-namespace --version 0.2.0 --values dex.yamlStep 6: Install and configure dex-k8s-authenticator
Add the following Helm repository:
helm repo add skm https://charts.sagikazarmark.devUpdate your Helm cache:
helm repo updateFetch the client certificate data for the cluster:
aws eks describe-cluster --name <cluster-name> --query 'cluster.certificateAuthority' --region <region> --output text | base64 -dThe output will look similar to the following:
-----BEGIN CERTIFICATE-----
YOUR CLIENT CERTIFICATE DATA
-----END CERTIFICATE-----
Create a values file for the dex-k8s-authenticator:
cat << 'EOF' > dex-k8s-authenticator.yaml
config:
  clusters:
    - name: your-cluster
      short_description: "Your cluster"
      description: "Your EKS cluster"
      issuer: https://dex.yourdomain.com
      client_id: your-cluster-client-id
      client_secret: your-cluster-client-secret
      redirect_uri: https://login.yourdomain.com/callback
      k8s_master_uri: https://your-eks-cluster-endpoint-url
      k8s_ca_pem: |
        -----BEGIN CERTIFICATE-----
        YOUR CLIENT CERTIFICATE DATA
        -----END CERTIFICATE-----

ingress:
  enabled: true
  className: nginx
  annotations:
    kubernetes.io/tls-acme: "true"
    cert-manager.io/cluster-issuer: acme
  hosts:
    - host: login.yourdomain.com
      paths:
        - path: /
          pathType: ImplementationSpecific
  tls:
    - secretName: dex-k8s-authenticator-tls
      hosts:
        - login.yourdomain.com
EOF
Install the chart for the dex-k8s-authenticator:
helm install dex-k8s-authenticator skm/dex-k8s-authenticator --namespace dex --version 0.0.1 --values dex-k8s-authenticator.yamlStep 7: Configure OIDC Provider for Amazon EKS
From Amazon EKS in the AWS Management Console click on the Configuration/Authentication tab and then click the Associate Identity Provider button to create a new identity provider:

In the Issuer URL field, enter the url of the Dex web application, for example. https://dex.yourdomain.com.
In the Client ID field, enter the client ID you created for Dex. The value can be found in the ConfigMap that gets created for Dex under the staticClients section.
In the Username claim field, type email.
In the Groups claim field, type groups.
Click the Associate button when finished. The OIDC provider will take between 10-15 minutes before it becomes active.
Step 8: Create read-only ClusterRole and ClusterRoleBinding
Create a read-only cluster role:
cat << 'EOF' | kubectl apply -f -
apiVersion: rbac.authorization.k8s.io/v1
kind: ClusterRole
metadata:
  name: cluster-read-all
rules:
- apiGroups:
    - ""
    - apps
    - autoscaling
    - batch
    - extensions
    - policy
    - rbac.authorization.k8s.io
    - storage.k8s.io
  resources:
    - componentstatuses
    - configmaps
    - cronjobs
    - daemonsets
    - deployments
    - events
    - endpoints
    - horizontalpodautoscalers
    - ingress
    - ingresses
    - jobs
    - limitranges
    - namespaces
    - nodes
    - pods
    - pods/log
    - pods/exec
    - persistentvolumes
    - persistentvolumeclaims
    - resourcequotas
    - replicasets
    - replicationcontrollers
    - serviceaccounts
    - services
    - statefulsets
    - storageclasses
    - clusterroles
    - roles
  verbs:
    - get
    - watch
    - list
- nonResourceURLs: ["*"]
  verbs:
    - get
    - watch
    - list
- apiGroups: [""]
  resources: ["pods/exec"]
  verbs: ["create"]
EOF
Create a ClusterRoleBinding:
cat << 'EOF' | kubectl apply -f -
apiVersion: rbac.authorization.k8s.io/v1
kind: ClusterRoleBinding
metadata:
  name: dex-cluster-auth
roleRef:
  apiGroup: rbac.authorization.k8s.io
  kind: ClusterRole
  name: cluster-read-all
subjects:
  - kind: Group
    name: "your-github-org:your-github-team"
    apiGroup: rbac.authorization.k8s.io
EOF
Step 9: Create alias records for dex.yourdomain.com and login.yourdomain.com
Before you can access the web applications for Dex and the dex-k8s-authenticator, you’ll need to create A records for them in a Route 53 public hosted zone.
cat << 'EOF' > batch.json
{
    "Comment": "Creating Alias resource record sets in Route 53",
    "Changes": [
        {
            "Action": "CREATE",
            "ResourceRecordSet": {
                "Name": "dex.yourdomain.com",
                "Type": "A",
                "AliasTarget": {
                    "HostedZoneId": "ZXXXXXXXXXXXX",
                    "DNSName": "xxxxxxxx.us-west-2.elb.amazonaws.com",
                    "EvaluateTargetHealth": false
                }
            }
        },
        {
            "Action": "CREATE",
            "ResourceRecordSet": {
                "Name": "login.yourdomain.com",
                "Type": "A",
                "AliasTarget": {
                    "HostedZoneId": "ZXXXXXXXXXXXX",
                    "DNSName": "xxxxxxxx.us-west-2.elb.amazonaws.com",
                    "EvaluateTargetHealth": false
                }
            }
        }
    ]
}
EOF
The DNSName corresponds to the FQDN of the NLB that was provisioned when you installed the NGINX ingress controller.
Create the A records using the file you created:
aws route53 change-resource-record-sets --hosted-zone-id ZXXXXXXXXXX --change-batch file://batch.json It may take several minutes for A record changes to propagate to your DNS name servers. You can verify that the process is complete by running the following dig command:
watch dig dex.yourdomain.com +shortEvery 2 seconds, the dig command will refresh, resolving IP addresses for the A record entries. When the refresh results in the same IP address returned every time, then the DNS propagation should be complete.
Once the DNS A record propagation is complete, you can test your Dex configuration with the following URL:
https://dex.yourdomain.com/.well-known/openid-configurationThe response should resemble the output below:
{
  "issuer": "https://dex.yourdomain.com",
  "authorization_endpoint": "https://dex.yourdomain.com/auth",
  "token_endpoint": "https://dex.yourdomain.com/token",
  "jwks_uri": "https://dex.yourdomain.com/keys",
  "userinfo_endpoint": "https://dex.yourdomain.com/userinfo",
  "device_authorization_endpoint": "https://dex.yourdomain.com/device/code",
  "grant_types_supported": [
    "authorization_code",
    "refresh_token",
    "urn:ietf:params:oauth:grant-type:device_code"
  ],
  "response_types_supported": [
    "code",
    "id_token",
    "token"
  ],
  "subject_types_supported": [
    "public"
  ],
  "id_token_signing_alg_values_supported": [
    "RS256"
  ],
  "code_challenge_methods_supported": [
    "S256",
    "plain"
  ],
  "scopes_supported": [
    "openid",
    "email",
    "groups",
    "profile",
    "offline_access"
  ],
  "token_endpoint_auth_methods_supported": [
    "client_secret_basic"
  ],
  "claims_supported": [
    "aud",
    "email",
    "email_verified",
    "exp",
    "iat",
    "iss",
    "locale",
    "name",
    "sub"
  ]
}
Step 10: Log in
Open your browser and enter the URL for the dex-k8s-authenticator web application, for example, https://login.yourdomain.com.
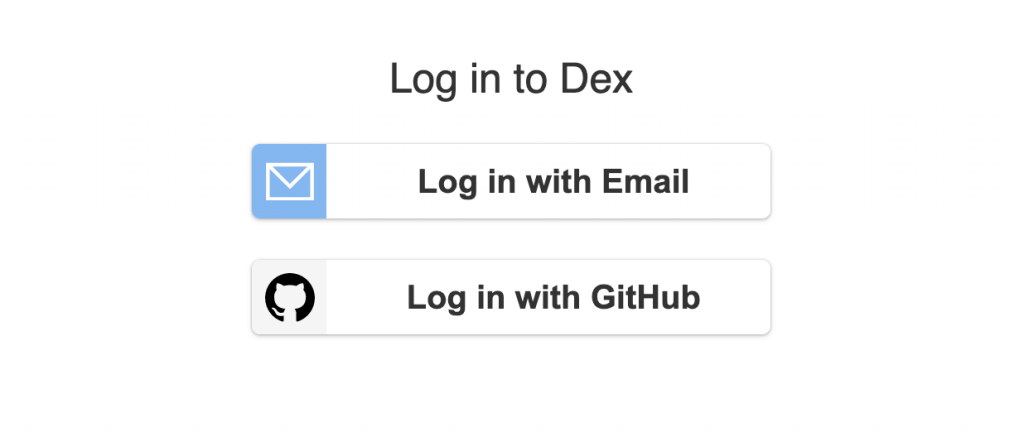
If things are working properly, you should see a page with a button to log in with GitHub. Clicking the button will reveal a page that explains how to install and set up kubectl.

Follow the steps on this page to create/update your kubeconfig file.
Summary
The addition of OpenID Connect (OIDC) Identity Provider (IdP) integration to Amazon EKS “allows customers to integrate an OIDC identity provider with a new or existing Amazon EKS cluster running Kubernetes version 1.16 or later.” Using Amazon EKS OIDC IdP integration with Dex and the dex-k8s-authenticator provides an integrated authentication layer that allows organizations to leverage their existing IdPs for AuthN purposes. In this post we demonstrated how to use GitHub Organizations and Teams with GitHub OAuth applications as the IdP.
About the authors
Márk Sági-Kazár is a Tech Lead at Cisco working on cloud native technologies (such as Dex) and everything that is open source. Chances are you will find him working on open source projects in his spare time as well. Prior to joining Cisco, Mark was an Engineering Lead at Banzai Cloud.