Containers
Introducing OIDC identity provider authentication for Amazon EKS
Today, we introduced user authentication for Amazon EKS clusters from an OpenID Connect (OIDC) Identity Provider (IDP). This feature allows customers to integrate an OIDC identity provider with a new or existing Amazon EKS cluster running Kubernetes version 1.16 or later. The OIDC IDP can be used as an alternative to, or along with AWS Identity and Access Management (IAM). With this feature, you can manage user access to your cluster by leveraging existing identity management life cycle through your OIDC identity provider.
OpenID Connect is an interoperable authentication protocol based on the OAuth 2.0 family of specifications. It adds a thin layer that sits on top of OAuth 2.0 that adds login and profile information about the identity who is logged in. You can use an existing public OIDC identity provider, or you can run your own identity provider. See OpenID Certification for a list of certified providers.
When we launched Amazon EKS in 2018, we included native support for AWS IAM users and roles as entities that can authenticate against a cluster, removing the burden from cluster administrators of having to maintain a separate identity provider to manage users. As EKS adoption has grown to include customers of all sizes and technical capabilities, we learned from your feedback that if your organization has an existing identity management system, you would prefer to use your own OIDC identity provider instead of using AWS IAM for Amazon EKS (AWS containers roadmap issue #166). Many development teams don’t have administrative access to AWS, and creating an IAM user or role for each developer can be a time consuming task that doesn’t scale well. This feature will help you use existing user management workflows in OIDC IDP to use Amazon EKS.
In this post, we’ll use Amazon Cognito as our OIDC compatible identity provider. Cognito User Pools provide a secure user directory that scales to millions of users. User Pools are easy to set up without any worries about standing up server infrastructure. You may have your existing OIDC IDP, and this blog may be useful to understand the configuration and association details below. We create Amazon Cognito OIDC IDP and populate it with a test user and group, understand the ID token to retrieve group key, associate OIDC IDP with Amazon EKS cluster, authorize secrets object resource access for users in a group through Kubernetes RBAC, and configure a user to authenticate.
Prerequisites
To follow along with this post, you’ll require a basic understanding of OIDC and OAuth2.0 protocols and in relation to this, an understanding of JSON Web Tokens (JWT). You will also need a basic understanding of Amazon Cognito and AWS CDK. To follow the instructions used to configure the OIDC integration within Amazon EKS, you’ll need to have AWS CLI, AWS CDK, and jq installed locally. Finally, you’ll need appropriate access to create and manage Amazon EKS cluster and Amazon Cognito User Pool.
Step 1: Create a Cognito OIDC IDP using AWS CDK
To help you set up an OIDC IDP, we use AWS CDK below to create and configure a Cognito User Pool in your AWS account. To initialize the AWS CDK project, create a directory and initialize AWS CDK in TypeScript language as below.
mkdir -p cognitouserpool && cd cognitouserpool && cdk init -l typescriptInstall the Amazon Cognito package from the AWS Construct Library using the command below.
npm install @aws-cdk/aws-cognitoOpen ./lib/cognitouserpool-stack.ts and replace the auto-generated code with the code below.
import * as cdk from '@aws-cdk/core';
import * as cognito from '@aws-cdk/aws-cognito';

export class CognitouserpoolStack extends cdk.Stack {
  constructor(scope: cdk.Construct, id: string, props?: cdk.StackProps) {
    super(scope, id, props);

    const pool = new cognito.UserPool(this, 'myuserpool', {
      userPoolName: 'oidc-userpool',
      passwordPolicy: {
        minLength: 8,
        requireLowercase: false,
        requireUppercase: false,
        requireDigits: false,
        requireSymbols: false,
      },
      selfSignUpEnabled: true,
      signInAliases: {
        email: true,
      },
      autoVerify: {
        email: false,
      },
      accountRecovery: cognito.AccountRecovery.NONE,
      signInCaseSensitive: false,

    });

    const client = pool.addClient('oidc-client', {
      generateSecret: false,
      authFlows: {
        adminUserPassword: true,
        userPassword: true,
      },
      oAuth: {
        flows: {
          implicitCodeGrant: true,
        }
      },
    });

    pool.addDomain("CognitoDomain", {
      cognitoDomain: {
        domainPrefix: "oidc-userpool",
      },
    });

    const region = cdk.Stack.of(this).region
    const urlsuffix = cdk.Stack.of(this).urlSuffix
    const issuerUrl = `https://cognito-idp.${region}.${urlsuffix}/${pool.userPoolId}`;
    new cdk.CfnOutput(this, 'IssuerUrl', { value: issuerUrl })
    new cdk.CfnOutput(this, 'PoolId', { value: pool.userPoolId })
    new cdk.CfnOutput(this, 'ClientId', { value: client.userPoolClientId })
  }
}

const devEnv = {
  account: process.env.CDK_DEFAULT_ACCOUNT,
  region: process.env.CDK_DEFAULT_REGION,
}

const app = new cdk.App()

new CognitouserpoolStack(app, 'oidc-demo-dev', { env: devEnv})

app.synth();
Run npm run build && cdk deploy for AWS CDK to create the Cognito User Pool and output the IssuerUrl, PoolId, and ClientId values. We will use these to configure our EKS cluster for OIDC IDP association in step 3.
✅ CognitouserpoolStack

Outputs:
CognitouserpoolStack.ClientId = 702vqsrjicklgb7c5b7b50i1gc
CognitouserpoolStack.IssuerUrl = https://cognito-idp.us-west-2.amazonaws.com/us-west-2_re1u6bpRA
CognitouserpoolStack.PoolId = us-west-2_re1u6bpRA
Let’s store these in variables for easier reference.
CLIENT_ID=702vqsrjicklgb7c5b7b50i1gc && \
ISSUER_URL=https://cognito-idp.us-west-2.amazonaws.com/us-west-2_re1u6bpRA && \
POOL_ID=us-west-2_re1u6bpRA
With the Cognito User Pool in place, and IssuerUrl, PoolId, and ClientId values generated in the User Pool, let’s create a group named secret-reader and add a new user with email test@example.com to the group within the User Pool. You may add more than one user to the group by repeating the user creation steps below. The commands for user and group creation, and passwords used are for demonstration purposes only. Your IDP will have authentication flows configured for the users, hence align with your organizational security policies as necessary.
aws cognito-idp admin-create-user --user-pool-id $POOL_ID --username test@example.com --temporary-password password

aws cognito-idp admin-set-user-password --user-pool-id $POOL_ID --username test@example.com --password Blah123$ --permanent

aws cognito-idp create-group --group-name secret-reader --user-pool-id $POOL_ID

aws cognito-idp admin-add-user-to-group --user-pool-id $POOL_ID --username test@example.com --group-name secret-reader
Step 2: Understanding the ID token to retrieve the group claim
To configure the OIDC identity provider with the correct parameters in step 3, it is important to understand the ID token contents that are returned by the IDP on successful authentication. The ID token is a security token that contains claims about the authentication of an end-user by an Authorization Server when using a client, and potentially other requested claims. The ID token is represented as a JWT.
This is relevant to help configure the group claim in step 3 to enable the Amazon EKS cluster authenticate against a group in the IDP through the ClusterRoleBinding rather than an individual user.
For Cognito User Pool, use the command below to authenticate the user against the Cognito IDP to retrieve the ID token, which is a JWT, and Base64 decode the token payload.
aws cognito-idp admin-initiate-auth --auth-flow ADMIN_USER_PASSWORD_AUTH \
--client-id $CLIENT_ID \
--auth-parameters USERNAME=test@example.com,PASSWORD=Blah123$ \
--user-pool-id $POOL_ID --query 'AuthenticationResult.IdToken' \
--output text | cut -f 2 -d. | base64 --decode | awk '{print $1"}"}' | jq
The Cognito ID token payload typically has the claims below. The payload helps determine the group key to reference in the group claim field of the association in step 3. For Amazon Cognito-issued ID token, the group key is cognito:groups as shown below. This may vary with OIDC IDP you may use, hence it is important to understand this to help you configure the cluster OIDC association appropriately in the next step.
{
  "sub": "86f7130a-5605-4c05-b402-c970b27633ce",
  "aud": "702vqsrjicklgb7c5b7b50i1gc",
  "cognito:groups": [
    "secret-reader"
  ],
  "event_id": "aa0723aa-12f3-49f1-9a21-7a7d542129bd",
  "token_use": "id",
  "auth_time": 1612760751,
  "iss": "https://cognito-idp.us-west-2.amazonaws.com/us-west-2_re1u6bpRA",
  "cognito:username": "86f7130a-5605-4c05-b402-c970b27633ce",
  "exp": 1612764351,
  "iat": 1612760751,
  "email": "test@example.com"
}
Step 3: Associate the OIDC identity provider to Amazon EKS cluster
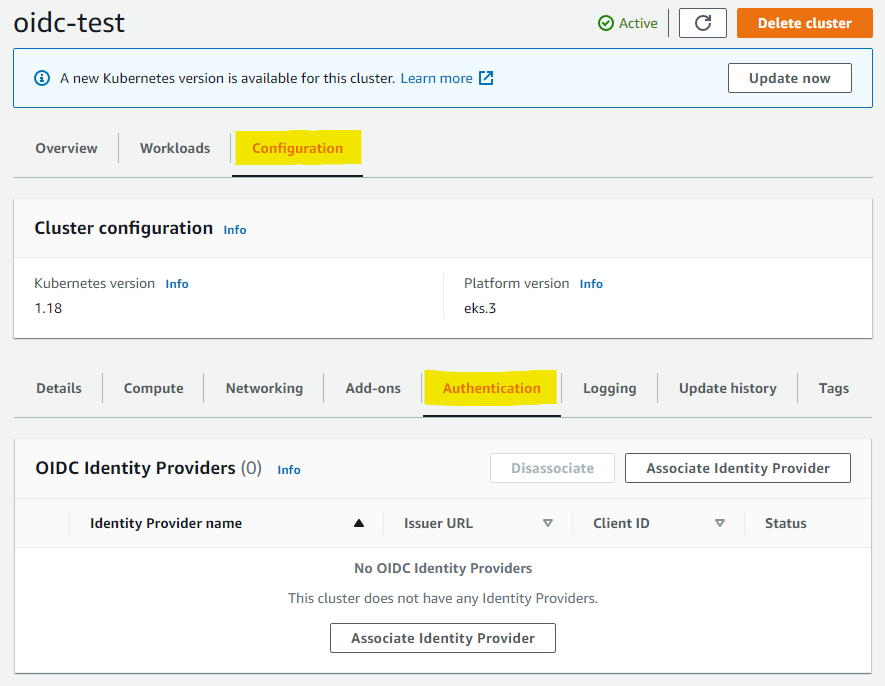
In this guide, we will use the Amazon EKS Console to create the cluster and associate the OIDC identity provider. Follow the guidance in Amazon EKS documentation to create a new EKS cluster. Once the cluster is created, click on ‘Associate Identity Provider’ button within the Configuration > Authentication tab in the cluster configuration console.
Note: For existing Amazon EKS clusters on or greater than Kubernetes v1.16, the Authentication tab, highlighted in the console screenshot below, should appear on your updated console.
The API calls related to this feature are enabled in the latest AWS CLI and eksctl versions. Instructions to create a cluster with OIDC association using eksctl can be found in Amazon EKS documentation. OIDC association for existing EKS clusters (v1.16 or greater) can also be created, described and deleted using AWS CLI. Please refer to the Amazon EKS API reference.
Click on ‘Associate Identity Provider.’ Enter the name of the Identity Provider, Issuer URL, Client ID (referred as Audience or aud key in the Step 2 JWT above), and the username, group claims, and prefixes, as preferred, and click ‘Associate’ to initiate the association of the identity provider with your cluster. This takes around 15-20 minutes to complete. Note the ‘Groups claim’ field has cognito:groups reference that we observed in the previous step for the groups key of the JWT-decoded Cognito User Pool ID token.

Once active, the OIDC Identity Provider configuration for the above values should look like below.

Step 4: Configure authorization using Kubernetes RBAC
Now that the EKS cluster is associated with the OIDC identity provider, let’s configure the users and clients to authenticate against the cluster. However, before we test authentication, we need to authorize these users to enable access to the Kubernetes resources within the cluster once the users are authenticated. We create a Kubernetes RBAC RoleBinding and ClusterRoleBinding here. To access the cluster through kubectl, update the ~/.kube/config using the command below. If you are using the IAM credentials that created the cluster, you have administrative access to the cluster.
aws eks update-kubeconfig --name oidc-testkubectl get svcThe expected output should be similar to one shown below.
NAME         TYPE        CLUSTER-IP   EXTERNAL-IP   PORT(S)   AGE
kubernetes   ClusterIP   172.20.0.1   <none>        443/TCP   9h
To create a ClusterRole named read-secrets to read secrets, create a file `clusterrole-read-secrets.yaml` with the text below and save it in a local directory.
kind: ClusterRole
apiVersion: rbac.authorization.k8s.io/v1
metadata:
  name: read-secrets
rules:
- apiGroups:
  - ""
  resources:
  - secrets
  verbs:
  - 'get'
  - 'watch'
  - 'list'
Create the ClusterRole that allows read-access to cluster secrets with the command below.
kubectl create –f clusterrole-read-secrets.yamlNow, create ClusterRoleBinding to bind the ClusterRole to the Cognito user group we created in step 1 and the group prefix gid: specified in OIDC association in step 3. Note that we allow read access to secrets to all users within this group, and note that we do not specify a subject of kind: User in this ClusterRoleBinding. ClusterRoleBinding must reflect the OIDC association configuration for any prefixes that are expected for users or group.
kind: ClusterRoleBinding
apiVersion: rbac.authorization.k8s.io/v1
metadata:
  name: read-secrets-role-binding
  namespace: default
subjects:
- kind: Group
  name: "gid:secret-reader"
  apiGroup: rbac.authorization.k8s.io
roleRef:
  kind: ClusterRole
  name: read-secrets
  apiGroup: rbac.authorization.k8s.io
Create a file `clusterrolebinding-read-secrets.yaml` with the above text and save it in a local directory. Add the ClusterRoleBinding to the cluster using the command below.
kubectl create -f clusterrolebinding-read-secrets.yamlStep 5: User login
Now that we have the authentication and authorization configured for the cluster through Step 3 and Step 4 respectively, we are ready to test access to the cluster using our OIDC user. To configure user access using kubectl, you have an option to use OIDC authenticator, which sets the id_token as a bearer token for all requests and refreshes the token once it expires. After you’ve logged into your provider, use kubectl to add your id_token, refresh_token, client_id, and client_secret to configure the plugin.
For our example above, to retrieve the id_token and refresh_token, authenticate with the Cognito authorization server using the command below.
aws cognito-idp admin-initiate-auth --auth-flow ADMIN_USER_PASSWORD_AUTH \
--client-id $CLIENT_ID \
--auth-parameters USERNAME=test@example.com,PASSWORD=Blah123$ \
--user-pool-id $POOL_ID \
--query 'AuthenticationResult.[RefreshToken, IdToken]'
To update the user kubeconfig, run the command below to update it with the OIDC authenticator settings. Replace the <refresh_token> and <id_token> values with the output from the command above.
kubectl config set-credentials cognito-user \
--auth-provider=oidc \
--auth-provider-arg=idp-issuer-url=$ISSUER_URL \
--auth-provider-arg=client-id=$CLIENT_ID \
--auth-provider-arg=refresh-token=<refresh_token> \
--auth-provider-arg=id-token=<id_token>
Add context to your kubeconfig to relate this user to the cluster and switch to this context.
kubectl config set-context oidc-secret-reader —cluster arn:aws:eks:us-west-2:<account_id>:cluster/oidc-test --user cognito-user && kubectl config use-context oidc-secret-readerTo test access, run kubectl get secrets and kubectl get nodes. The expected output for both should appear like the following:
$ kubectl get secrets
NAME                  TYPE                                  DATA   AGE
default-token-cwpl9   kubernetes.io/service-account-token   3      2d21h

$ kubectl get nodes
Error from server (Forbidden): nodes is forbidden: User "test@example.com" cannot list resource "nodes" in API group "" at the cluster scope
This output demonstrates that the OIDC user that was set up in Cognito User Pool is authenticated using OIDC cluster authentication in Amazon EKS configured in step 3, and the user has access to the secrets resources within the cluster through Kubernetes RBAC defined in step 4. The user management workflow is within Amazon Cognito and not with AWS IAM.
Alternatively, if you choose not to update the kubeconfig locally, you may test using the --token flag and provide the ID token as the parameter using kubectl as below.
kubectl --token=<IDTOKEN> get secretsHelper applications
Instead of manual configuration described in step 5 above, you may prefer to use a web-based or a CLI-based helper application that helps you authenticate with the Cognito IDP and retrieve the ID token to access the cluster. Some of the available open source examples are listed below. These are examples available from the open source community:
- Gangway
- Kubelogin
- k8s-oidc-helper (for Google IDP)
- k8s-auth-client
OIDC-authenticated user audit logging
OIDC identity provider-authenticated users are listed in the cluster’s audit log. The cluster logging must be enabled for ‘Audit’ logs to view the CloudWatch Logs or Insights. To view the logs for activity above, assuming the audit logs are enabled for your cluster, you may use the query below within CloudWatch Log Insights.
fields @timestamp, @message
| sort @timestamp desc
| filter user.username = "test@example.com"
The resulting audit log sample within CloudWatch Logs is shown below for the kubectl get secrets call to the API server.
{
    "kind": "Event",
    "apiVersion": "audit.k8s.io/v1",
    "level": "Metadata",
    "auditID": "46c1f44f-840e-45c0-ba4b-4fc82bea9084",
    "stage": "ResponseComplete",
    "requestURI": "/api?timeout=32s",
    "verb": "get",
    "user": {
        "username": "test@example.com",
        "groups": [
            "gid:secret-reader",
            "system:authenticated"
        ]
    },
    "sourceIPs": [
        "10.0.0.1"
    ],
    "userAgent": "kubectl/v1.19.3 (darwin/amd64) kubernetes/1e11e4a",
    "responseStatus": {
        "metadata": {},
        "code": 200
    },
    "requestReceivedTimestamp": "2021-02-08T20:58:56.894015Z",
    "stageTimestamp": "2021-02-08T20:58:56.894186Z",
    "annotations": {
        "authorization.k8s.io/decision": "allow",
        "authorization.k8s.io/reason": "RBAC: allowed by ClusterRoleBinding \"system:discovery\" of ClusterRole \"system:discovery\" to Group \"system:authenticated\""
    }
}
Access control
AWS account managers can restrict the OIDC authentication feature to Amazon EKS cluster administrators in a couple of ways through IAM policies.
To limit an administrator to a specific OIDC identity provider and application client, the following policy can be attached to the cluster administrator role. This is possible using IAM context keys `eks: issuerUrl` and `eks:clientId`.
{
    "Version": "2012-10-17",
    "Statement": [
        {
            "Sid": "AllowCognitoOnly",
            "Effect": "Deny",
            "Action": "eks:AssociateIdentityProviderConfig",
            "Resource": "arn:aws:eks:<us-west-2>:<111122223333>:cluster/test-instance-refresh",
            "Condition": {
                "StringNotLikeIfExists": {
                    "eks:issuerUrl": "https://cognito-idp.us-west-2.amazonaws.com/*"
                }
            }
        },
        {
            "Sid": "DenyOtherClients",
            "Effect": "Deny",
            "Action": "eks:AssociateIdentityProviderConfig",
            "Resource": "arn:aws:eks:<us-west-2>:<111122223333>:cluster/test-instance-refresh",
            "Condition": {
                "StringNotEquals": {
                    "eks:clientId": "2bsfr5vpp50ooaffgpf8kd8eeh"
                }
            }
        },
        {
            "Sid": "AllowOthers",
            "Effect": "Allow",
            "Action": "eks:*",
            "Resource": "*"
        }
    ]
}
Similarly, you may prevent an OIDC identity provider from being associated with a cluster using the following IAM policy to the cluster administrator role.
{
    "Version": "2012-10-17",
    "Statement": [
        {
            "Sid": "denyOIDC",
            "Effect": "Deny",
            "Action": [
                "eks:AssociateIdentityProviderConfig"
            ],
            "Resource": "arn:aws:eks:<us-west-2>:<111122223333>:cluster/*"
        },
        {
            "Sid": "eksAdmin",
            "Effect": "Allow",
            "Action": [
                "eks:*"
            ],
            "Resource": "*"
        }
    ]
}
OIDC provider URL and OIDC authentication in Amazon EKS cluster configuration
Within your cluster, you may notice another OIDC reference in the configuration details for OpenID Connect provider URL as shown in the console screenshot below. This shouldn’t be confused with OIDC authentication feature discussed in this blog.
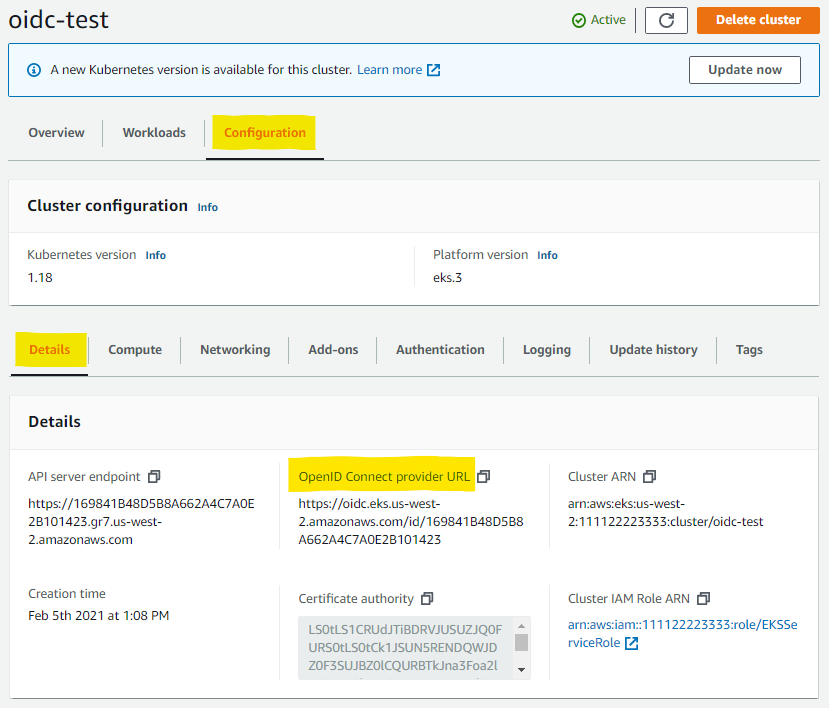
Whilst OIDC authentication enables your cluster API server to authenticate using JWTs issued from an external (non-IAM) OIDC IDP to Kubernetes API server, Open ID Connect provider URL enables federation of Kubernetes service account tokens (also JWTs) issued from Kubernetes API server (Identity Provider) to AWS IAM (Relying Party). Open ID Connect provider URL is used for IAM roles for service accounts launched in September 2019.
The OpenID Connect provider URL is used by AWS IAM to establish trust between an OIDC-compatible IDP, in this case the cluster’s Kubernetes API server for service account identities, and your AWS account. Through Service Account Issuer Discovery, the Kubernetes API server passes the token issued from OpenID Connect provider URL to the AWS STS AssumeRoleWithWebIdentity API operation and receives IAM temporary role credentials from AWS STS that are used by the pod to interact with AWS service defined in the IAM role associated with the pod service account. To further understand this, please refer to the Kubernetes, EKS, and IAM documentation in relation to this feature.
Cleanup
To clean up the resources created in this blog, follow the instructions below.
1. Delete ClusterRole and ClusterRoleBinding
kubectl delete clusterrole read-secrets && kubectl delete clusterrolebinding read-secrets-role-binding2. Delete the OIDC association using AWS CLI.
aws eks disassociate-identity-provider-config --cluster-name oidc-test --identity-provider-config '{"name": "oidc-config", "type": "oidc"}'3. Delete the Cognito User Pool using AWS CDK.
cdk destroy4. Delete the AWS CDK code directory.
cd .. && rm -rf cognitouserpoolConclusion
In this post, we have introduced and explained how you can integrate an existing or new OIDC IDP with Amazon EKS to support your identity management workflows. We have included OIDC and Amazon EKS document references relating to this launch below that may be useful for you:
- Kubernetes Authentication
- OpenID Connect Specification
- JSON Web Token Overview
- Amazon EKS Identity and Access Management
- Amazon EKS OIDC Authentication
You can start using OIDC authentication feature today in Amazon EKS. We are eager for you to try it out and tell us what you think about it, and how this is making it easier for you to integrate OIDC IDP authentication with Amazon EKS! We welcome your feedback through our AWS containers roadmap.