AWS Open Source Blog
Introducing fine-grained IAM roles for service accounts
Here at AWS we focus first and foremost on customer needs. In the context of access control in Amazon EKS, you asked in issue #23 of our public container roadmap for fine-grained IAM roles in EKS. To address this need, the community came up with a number of open source solutions, such as kube2iam, kiam, and Zalando’s IAM controller – which is a great development, allowing everyone to better understand the requirements and also the limitations of different approaches.
Now it’s time for an integrated, end-to-end solution that is flexible and easy to use. Our primary goal was to provide fine-grained roles at the pod level rather than the node level. The solution we came up with is also open source, so you can use it with Amazon EKS when provisioning a cluster with eksctl, where we are taking care of the setup, or you can use it with other Kubernetes DIY approaches, such as the popular kops setup.
Access control: IAM and RBAC
In Kubernetes on AWS, there are two complementary access control regimes at work. AWS Identity and Access Management (IAM) allows you to assign permissions to AWS services: for example, an app can access an S3 bucket. In the context of Kubernetes, the complementary system to define permissions towards Kubernetes resources is Kubernetes Role-based Access Control (RBAC). A complete end-to-end example might look as follows (we covered this in a previous post on Centralized Container Logging with Fluent Bit, where we introduced Fluent Bit output plugins):

NOTE If you want to brush up your knowledge, check out the IAM and RBAC terminology resource page we put together for this purpose.
Through the Kubernetes RBAC settings in the pod-log-reader role, the Fluent Bit plugin has permission to read the logs of the NGINX pods. Because it is running on an EC2 instance with the AWS IAM role eksctl-fluent-bit-demo-nodegroup-ng-2fb6f1a-NodeInstanceRole-P6QXJ5EYS6, which has an inline policy attached, it is also allowed to write the log entries to a Kinesis Data Firehose delivery stream.
As you can tell from above figure, the problem now is that all pods running on the Kubernetes node share the same set of permissions – the above setup violates the least privilege principle and provides attackers with a much larger attack surface than necessary.
Can we do better? Yes, we can. The community developed tooling such as kiam and kube2iam to address this issue. Our approach, IAM Roles for Service Accounts (IRSA), however, is different: we made pods first class citizens in IAM. Rather than intercepting the requests to the EC2 metadata API to perform a call to the STS API to retrieve temporary credentials, we made changes in the AWS identity APIs to recognize Kubernetes pods. By combining an OpenID Connect (OIDC) identity provider and Kubernetes service account annotations, you can now use IAM roles at the pod level.
Drilling further down into our solution: OIDC federation access allows you to assume IAM roles via the Secure Token Service (STS), enabling authentication with an OIDC provider, receiving a JSON Web Token (JWT), which in turn can be used to assume an IAM role. Kubernetes, on the other hand, can issue so-called projected service account tokens, which happen to be valid OIDC JWTs for pods. Our setup equips each pod with a cryptographically-signed token that can be verified by STS against the OIDC provider of your choice to establish the pod’s identity. Additionally, we’ve updated AWS SDKs with a new credential provider that calls sts:AssumeRoleWithWebIdentity, exchanging the Kubernetes-issued OIDC token for AWS role credentials.
The resulting solution is now available in EKS, where we manage the control plane and run the webhook responsible for injecting the necessary environment variables and projected volume. The solution is also available in a DIY Kubernetes setup on AWS; more on that option can be found below.
To benefit from the new IRSA feature the necessary steps, on a high level, are:
- Create a cluster with
eksctland OIDC provider setup enabled. This feature works with EKS clusters 1.13 and above. - Create an IAM role defining access to the target AWS services, for example S3, and annotate a service account with said IAM role.
- Finally, configure your pods by using the service account created in the previous step and assume the IAM role.
Let’s now have a closer look at how exactly these steps look in the context of EKS. Here, we’ve taken care of all the heavy lifting, such as enabling IRSA or injecting the necessary token into the pod.
Setup with Amazon EKS and eksctl
So how do you use IAM Roles for Service Accounts (IRSA) in EKS? We tried to make it as simple as possible, so you can follow along in this generic walk-through. Further down, we provide a concrete end-to-end walk-through using an app that writes to S3.
1. Cluster and OIDC ID provider creation
First, create a new v1.13 EKS cluster using the following command:
$ eksctl create cluster irptest
[ℹ]  using region us-west-2
...
Now let’s set up the OIDC ID provider (IdP) in AWS:
Note: Make to sure to use an eksctl version >= 0.5.0
$ eksctl utils associate-iam-oidc-provider \
               --name irptest \
               --approve
[ℹ]  using region us-west-2
[ℹ]  will create IAM Open ID Connect provider for cluster "irptest" in "us-west-2"
[✔]  created IAM Open ID Connect provider for cluster "irptest" in "us-west-2"
If you’re using eksctl, then you’re done and no further steps are required here. You can proceed directly to step 2.
Alternatively, for example when using CloudFormation for EKS cluster provisioning, you’ll have to create the OIDC IdP yourself. Some systems, such as Terraform, provide first-class support for this and otherwise you’ll have to manually create the IdP as follows:
First, get the cluster’s identity issuer URL by executing:
$ ISSUER_URL=$(aws eks describe-cluster \
                       --name irptest \
                       --query cluster.identity.oidc.issuer \
                       --output text)
We capture above URL in an environment variable called ISSUER_URL since we will need it in the next step. Now, create the OIDC provider (shown later on for our (AWS) OIDC ID provider), but you can also use your own as shown here:
$ aws iam create-open-id-connect-provider \
          --url $ISSUER_URL \
          --thumbprint-list $ROOT_CA_FINGERPRINT \
          --client-id-list sts.amazonaws.com
NOTE How you obtain the
ROOT_CA_FINGERPRINTis up to the OIDC provider; for AWS, see Obtaining the Root CA Thumbprint for an OpenID Connect Identity Provider in the docs.
2. Kubernetes service account and IAM role setup
Next, we create a Kubernetes service account and set up the IAM role that defines the access to the targeted services, such as S3 or DynamoDB. For this, implicitly, we also need to have an IAM trust policy in place, allowing the specified Kubernetes service account to assume the IAM role. The following command does all these steps conveniently at once:
$ eksctl create iamserviceaccount \
                --name my-serviceaccount \
                --namespace default \
                --cluster irptest \
                --attach-policy-arn arn:aws:iam::aws:policy/AmazonS3ReadOnlyAccess \
                --approve
[ℹ]  1 task: { 2 sequential sub-tasks: { create addon stack "eksctl-irptest-addon-iamsa-default-my-serviceaccount", create ServiceAccount:default/my-serviceaccount } }
[ℹ]  deploying stack "eksctl-irptest-addon-iamsa-default-my-serviceaccount"
[✔]  create all roles and service account
Under the hood, the above command carries out two things:
-
- It creates an IAM role, something of the form
eksctl-irptest-addon-iamsa-default-my-serviceaccount-Role1-U1Y90I1RCZWBand attaches the specified policy to it, in our casearn:aws:iam::aws:policy/AmazonS3ReadOnlyAccess. - It creates a Kubernetes service account,
my-serviceaccounthere, and annotates the service account with said IAM role.
- It creates an IAM role, something of the form
The following CLI command sequence is equivalent to the steps the eksctl create iamserviceaccount takes care of, for you:
# STEP 1: create IAM role and attach the target policy:
$ ISSUER_HOSTPATH=$(echo $ISSUER_URL | cut -f 3- -d'/')
$ ACCOUNT_ID=$(aws sts get-caller-identity --query Account --output text)
$ PROVIDER_ARN="arn:aws:iam::$ACCOUNT_ID:oidc-provider/$ISSUER_HOSTPATH"
$ cat > irp-trust-policy.json << EOF
{
  "Version": "2012-10-17",
  "Statement": [
    {
      "Effect": "Allow",
      "Principal": {
        "Federated": "$PROVIDER_ARN"
      },
      "Action": "sts:AssumeRoleWithWebIdentity",
      "Condition": {
        "StringEquals": {
          "${ISSUER_HOSTPATH}:sub": "system:serviceaccount:default:my-serviceaccount"
        }
      }
    }
  ]
}
EOF
$ ROLE_NAME=s3-reader
$ aws iam create-role \
          --role-name $ROLE_NAME
          --assume-role-policy-document file://irp-trust-policy.json
$ aws iam update-assume-role-policy \
          --role-name $ROLE_NAME \
          --policy-document file://irp-trust-policy.json
$ aws iam attach-role-policy \
          --role-name $ROLE_NAME \
          --policy-arn arn:aws:iam::aws:policy/AmazonS3ReadOnlyAccess
$ S3_ROLE_ARN=$(aws iam get-role \
                        --role-name $ROLE_NAME \
                        --query Role.Arn --output text)

# STEP 2: create Kubernetes service account and annotate it with the IAM role:
$ kubectl create sa my-serviceaccount
$ kubectl annotate sa my-serviceaccount eks.amazonaws.com/role-arn=$S3_ROLE_ARN
Now that we have the identity side of things covered, and have set up the service account and the IAM role, we can move on to using this setup in the context of a pod.
3. Pod setup
Remember that the service account is the identity of your app towards the Kubernetes API server, and the pod that hosts your app uses said service account.
In the previous step, we created a service account called my-serviceaccount, so let’s use that in a pod spec. The service account should look as follows (edited for readability):
$ kubectl get sa my-serviceaccount -o yaml
apiVersion: v1
kind: ServiceAccount
metadata:
  annotations:
    eks.amazonaws.com/role-arn: arn:aws:iam::123456789012:role/eksctl-irptest-addon-iamsa-default-my-serviceaccount-Role1-UCGG6NDYZ3UE
  name: my-serviceaccount
  namespace: default
secrets:
- name: my-serviceaccount-token-m5msn
Using serviceAccountName: my-serviceaccount in the deployment manifest, we can now, make the pods it is supervising use the service account we defined above. Looking at the deployment you should find something like the following (edited for readability):
apiVersion: apps/v1
kind: Deployment
metadata:
  labels:
    run: myapp
  name: myapp
spec:
  ...
  template:
    ...
    spec:
      serviceAccountName: my-serviceaccount
      containers:
      - image: myapp:1.2
        name: myapp
        ...
Now we can finally create the deployment with kubectl apply, and the resulting pods should look something like the following (again, edited for readability):
apiVersion: apps/v1
kind: Pod
metadata:
  name: myapp
spec:
  serviceAccountName: my-serviceaccount
  containers:
  - name: myapp
    image: myapp:1.2
    env:
    - name: AWS_ROLE_ARN
      value: arn:aws:iam::123456789012:role/eksctl-irptest-addon-iamsa-default-my-serviceaccount-Role1-UCGG6NDYZ3UE
    - name: AWS_WEB_IDENTITY_TOKEN_FILE
      value: /var/run/secrets/eks.amazonaws.com/serviceaccount/token
    volumeMounts:
    - mountPath: /var/run/secrets/eks.amazonaws.com/serviceaccount
        name: aws-iam-token
        readOnly: true
  volumes:
  - name: aws-iam-token
    projected:
      defaultMode: 420
      sources:
      - serviceAccountToken:
          audience: sts.amazonaws.com
          expirationSeconds: 86400
          path: token
In the above you can see that the mutating admission controller we run in EKS (via a webhook) automatically injected the environment variables AWS_ROLE_ARN and AWS_WEB_IDENTITY_TOKEN_FILE as well as the aws-iam-token volume. All you had to do was to annotate the service account my-serviceaccount. Further, you can see that the temporary credentials from STS are by default valid for 86,400 seconds (i.e., 24h).
If you do not want to the admission controller to modify your pods, you can manually add the environment variables AWS_WEB_IDENTITY_TOKEN_FILE and AWS_ROLE_ARN with the values of a projected service account token location and the role to assume. In addition, you will also need to add a volume and volumeMounts parameter to the pod with a projected service account token, see the Kubernetes docs for reference.
The final step necessary is that the pod, via its service account, assumes the IAM role. This works as follows: OIDC federation allows the user to assume IAM roles with the Secure Token Service (STS), effectively receiving a JSON Web Token (JWT) via an OAuth2 flow that can be used to assume an IAM role with an OIDC provider. In Kubernetes we then use projected service account tokens, which are valid OIDC JWTs, giving each pod a cryptographically-signed token which can be verified by STS against the OIDC provider for establishing identity. The AWS SDKs have been updated with a new credential provider that calls sts:AssumeRoleWithWebIdentity, exchanging the Kubernetes-issued OIDC token for AWS role credentials. For this feature to work correctly, you’ll need to use an SDK version greater than or equal to the values listed below:
- Java 1.11.623
- Java2 2.7.36
- Go 1.23.13
- Python 1.9.220
- Node 2.521.0
- Ruby 3.65.0
- PHP 3.110.7
- .NET 3.3.580.0
In case you’re not (yet) using one of the above SDK versions or not (yet) in the position to migrate, you can make app IRSA-aware (in the pod) using the following recipe. As a prerequisite you need the AWS CLI and jq installed, for example like so:
$ JQ=/usr/bin/jq && curl https://stedolan.github.io/jq/download/linux64/jq > $JQ && chmod +x $JQ
$ curl https://bootstrap.pypa.io/get-pip.py -o get-pip.py && python get-pip.py
$ pip install awscli --upgrade
Now you can do the sts:AssumeRoleWithWebIdentity call manually:
$ aws sts assume-role-with-web-identity \
 --role-arn $AWS_ROLE_ARN \
 --role-session-name mh9test \
 --web-identity-token file://$AWS_WEB_IDENTITY_TOKEN_FILE \
 --duration-seconds 1000 > /tmp/irp-cred.txt
$ export AWS_ACCESS_KEY_ID="$(cat /tmp/irp-cred.txt | jq -r ".Credentials.AccessKeyId")"
$ export AWS_SECRET_ACCESS_KEY="$(cat /tmp/irp-cred.txt | jq -r ".Credentials.SecretAccessKey")"
$ export AWS_SESSION_TOKEN="$(cat /tmp/irp-cred.txt | jq -r ".Credentials.SessionToken")"
$ rm /tmp/irp-cred.txt
NOTE In the above case, the temporary STS credentials are valid for 1000 seconds, specified via
--duration-seconds, and you’ll need to refresh them yourself. Also, note that the session name is arbitrary and each session is stateless and independent; that is: the token contains all the relevant data.
With the generic setup out of the way, let’s now have a look at a concrete end-to-end example, showing IRSA in action.
Example usage walkthrough
In this walkthrough we show you, end-to-end, how to use IRSA (IAM Roles for Service Accounts) for an app that takes input from stdin and writes the data to an S3 bucket, keyed by creation time.
To make the S3 Echoer demo app work on EKS, in a nutshell, we have to set up an IRSA-enabled cluster, create the S3 bucket and enable IRSA for the pod the app is running in, and then can launch a pod that writes to the S3 bucket.
Let’s start with cloning the demo app repo into a local directory:
$ git clone https://github.com/mhausenblas/s3-echoer.git && cd s3-echoerNext, we create the EKS cluster and enable IRSA in it:
$ eksctl create cluster --approve

$ eksctl utils associate-iam-oidc-provider --name s3echotest --approve
Now we define the necessary permissions for the app by creating an IAM role and annotating the service account the pod will be using, with it:
$ eksctl create iamserviceaccount \
                --name s3-echoer \
                --cluster s3echotest \
                --attach-policy-arn arn:aws:iam::aws:policy/AmazonS3FullAccess
                --approve
At this point we have all the pieces in place: now we create the target bucket we want to write to and launch the S3 Echoer app as a one-off Kubernetes job like so:
$ TARGET_BUCKET=irp-test-2019

$ aws s3api create-bucket \
            --bucket $TARGET_BUCKET \
            --create-bucket-configuration LocationConstraint=$(aws configure get region) \
            --region $(aws configure get region)

$ sed -e "s/TARGET_BUCKET/${TARGET_BUCKET}/g" s3-echoer-job.yaml.template > s3-echoer-job.yaml

$ kubectl apply -f s3-echoer-job.yaml
NOTE Make sure that you use a different value for
$TARGET_BUCKETthan shown here, since S3 bucket names must be globally unique.
Finally, to verify if the write to the bucket was successful, do the following:
$ aws s3api list-objects \
            --bucket $TARGET_BUCKET \
            --query 'Contents[].{Key: Key, Size: Size}'
[
    {
        "Key": "s3echoer-1565024447",
        "Size": 27
    }
]
Here’s how the different pieces from AWS IAM and Kubernetes all play together to realize IRSA in EKS (dotted lines are actions, solid ones are properties or relations):
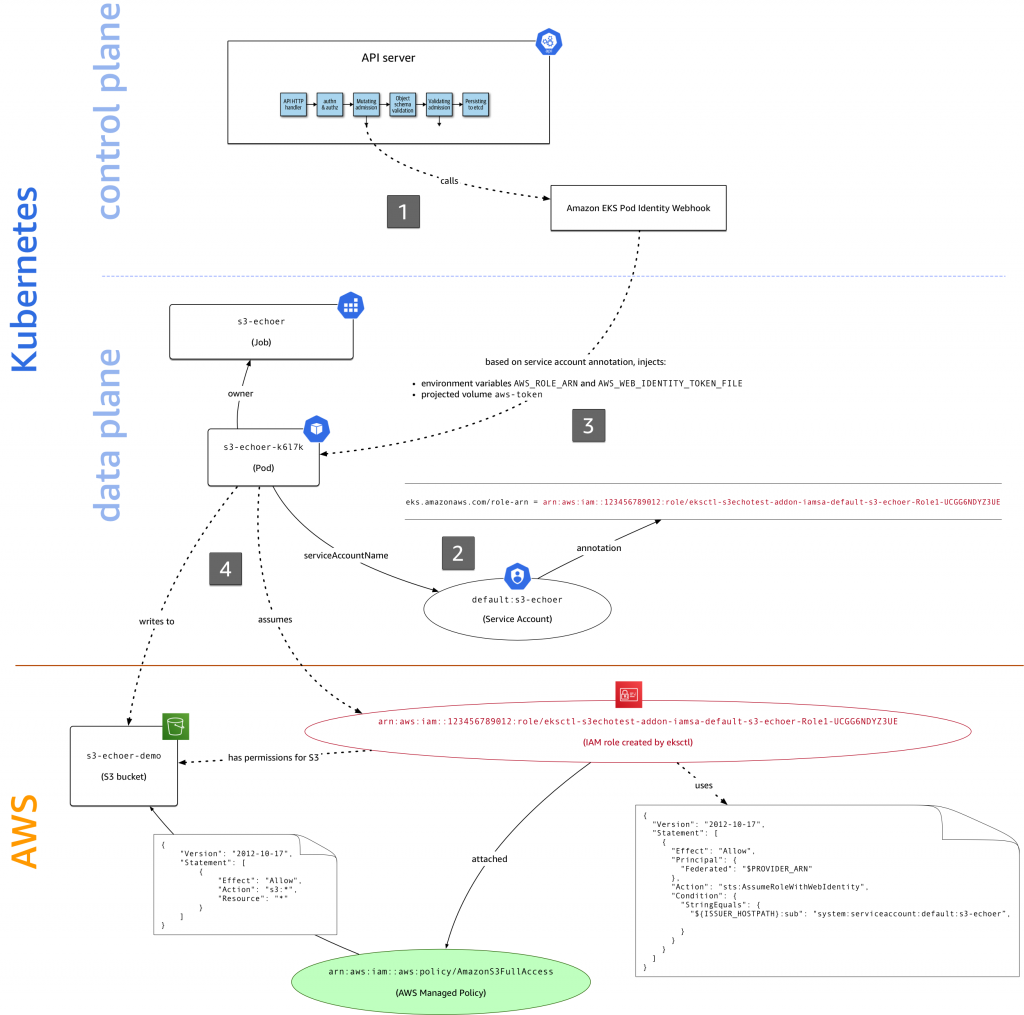
There’s a lot going on in the figure above, let’s take it step by step:
- When you launch the S3 Echoer app with
kubectl apply -f s3-echoer-job.yaml, the YAML manifest is submitted to the API server with the Amazon EKS Pod Identity webhook configured, which is called in the mutating admission step. - The Kubernetes job uses the service account
s3-echoer, set viaserviceAccountName. - Because the service account has an
eks.amazonaws.com/role-arnannotation, the webhook injects the necessary environment variables (AWS_ROLE_ARNandAWS_WEB_IDENTITY_TOKEN_FILE) and sets up theaws-iam-tokenprojected volume in the pod that the job supervises. - When the S3 Echoer app calls out to S3, attempting to write data into a bucket, the IRSA-enabled Go SDK we use here performs an
sts:assume-role-with-web-identitycall to assume the IAM role that has thearn:aws:iam::aws:policy/AmazonS3FullAccessmanaged policy attached. It receives temporary credentials that it uses to complete the S3 write operation.
If you want to explore the access control space yourself, learning how IAM roles, service accounts etc. are connected, you can use rbIAM, a tool we’ve written specifically for exploring the IAM/RBAC space in a unified manner. For example, for the S3 Echoer demo, an excerpt of rbIAM in action looks as follows:

That’s it! With the S3 Echoer app we’ve demonstrated how to use IRSA in EKS, and shown how the different entities in IAM and Kubernetes work together to realize IRSA. Don’t forget to clean up using kubectl delete job/s3-echoer.
Open source for the win: use with DIY Kubernetes on AWS
Now that you know how to use IRSA in EKS, you might be wondering if you can use it for a DIY Kubernetes on AWS, for example, if you’re managing your Kubernetes clusters with kops. We’ve open sourced our solution so you can, in addition to the managed solution with EKS, use it in your own setup: check out aws/amazon-eks-pod-identity-webhook, the Amazon EKS Pod Identity webhook, called by the API server in the mutating admission phase.
From the GitHub repo, you can learn how to set it up and configure it in your own environment:

To start benefiting from IRSA in your own Kubernetes setup, follow the instructions in the Amazon EKS Pod Identity Webhook GitHub repo to set up the webhook and let us know via issues there how it goes.
Next steps
Given the demand and due to the fact that we’ve open sourced the necessary components, we’re naturally excited to share this with you and let you take it for a spin on your own clusters. We will continue to improve IRSA, addressing common asks from the community, including (but not limited to) support for cross-account roles, supporting multiple profiles, and using tokens to talk to other systems, that is, non-AWS service, for example if you want to access Jenkins or Vault running in EKS.
Please do let us know if something doesn’t work the way you expect, and also leave any feedback here, comment, or open an issue on the AWS Containers Roadmap on GitHub.