.NET on AWS Blog
Empowering .NET Developers: C# in Amazon SageMaker Jupyter Notebooks using Amazon Bedrock
Razvan Pat contributed to this article.
Introduction
As .NET developers, we often find ourselves at a crossroads when venturing into the world of machine learning and AI. While Python dominates this space, what if you could leverage your C# skills in a powerful machine learning (ML) environment? That’s exactly what we’re exploring today: how to use C# in Amazon SageMaker Jupyter Notebooks, paired with the latest capabilities of Amazon Bedrock.
This post focuses on customizing the Amazon SageMaker Notebooks environments to support C# so .NET developers can get started with SageMaker Notebooks and explore a Generative AI example on AWS. To provide support for C# in our SageMaker Jupyter Notebook environment, we use the .NET interactive tool, which is an evolution of the Try .NET global tool. An installation script is provided for you, which automatically downloads and installs these components. Note that the components are distributed under a proprietary license from Microsoft.
After we set up the environment, we walk through an end-to-end example of building and invoking an Amazon Bedrock LLM.
Amazon SageMaker is a fully managed service that provides developers and data scientists with the ability to build, train, and deploy ML models quickly. SageMaker removes the heavy lifting from each step of the machine learning process to make it easier to develop high-quality models.
Amazon SageMaker Notebooks are one-click Jupyter Notebooks with elastic compute that can be spun up quickly. Notebooks contain everything necessary to run or recreate a machine learning workflow. Notebooks in SageMaker come pre-loaded with essential tools for machine learning development. This includes CUDA and cuDNN drivers, which enable efficient GPU computing for deep learning tasks (NVIDIA developer resources). Anaconda packages provide a comprehensive collection of data science libraries and tools. Additionally, popular machine learning framework libraries like TensorFlow and PyTorch are pre-installed. This pre-configuration saves developers significant setup time, allowing them to focus immediately on model development and training rather than environment setup. However, there is a small amount of work required to support C# code in the Notebooks.
What You’ll Learn
In this post, we’ll walk you through:
- Customizing SageMaker Notebooks to support C# .NET
- Setting up and using Amazon Bedrock for Generative AI tasks
- Building an end-to-end example using C# .NET APIs
Services Used:
- Amazon SageMaker
- Amazon Bedrock
Solution Overview
We’ll add C# capability to Amazon SageMaker Jupyter Notebooks using a custom lifecycle configuration. The process involves creating a bash script that downloads and installs the latest .NET Core SDK and .NET Interactive upon notebook startup. Once implemented, users can access new kernels for C#, F#, and PowerShell within their Jupyter environment. We will focus primarily on C# usage examples in SageMaker notebooks. We’ll then use this environment to interact with Amazon Bedrock, demonstrating how to generate images, interpret them, and even create recipes based on the ingredients.
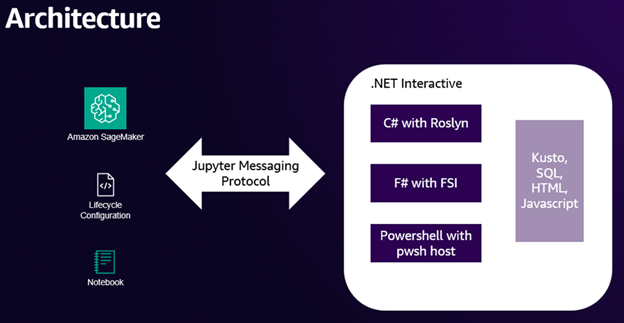
Figure 1: Architecture
Prerequisites
Before we begin, make sure you have:
- An AWS account
- Basic familiarity with AWS services, particularly SageMaker and Bedrock
- C# and .NET development experience
Walkthrough
Step 1. Customize SageMaker Jupyter Notebook with Lifecycle Configurations
Amazon SageMaker Notebooks can be customized through lifecycle configurations. Lifecycle configurations provide shell scripts that run when a notebook instance is created, or when it is started. We will use this feature to install the .NET runtime. Amazon SageMaker Notebook instances use Amazon Linux as an operating system, therefore, the lifecycle configuration script must be written in Bash.
This section will walk you through how to create a lifecycle configuration and will provide you with a bash script that installs the latest version of .NET Core SDK and .NET interactive, then will explain how the script works so that you can make changes if needed.
To create a SageMaker notebook instance lifecycle configuration, open Amazon SageMaker in the AWS Console and select Lifecycle configurations from the menu on the left, then select the Notebook instance tab.

Figure 2: Lifecycle configurations
Choose Create configuration, enter a descriptive name, paste the script below in the Start notebook text field, then choose Create configuration.
This bash script installs and configures .NET and .NET Interactive for use with Jupyter notebooks on an EC2 instance. The script does the following:
1. Starts a block that will be executed as the user ec2-user.
2. Runs with the correct permissions.
3. Downloads the dotnet-install script, makes it executable, and runs it to install the latest version of .NET.
4. Sets environment variables for DOTNET_ROOT and updates the PATH to include .NET directories.
5. Installs the microsoft.dotnet-interactive tool globally and then installs it for Jupyter.
6. Appends the .NET environment variables to the ec2-user profile for persistence across sessions.
7. Restarts the Jupyter server to apply the changes.
This script effectively sets up a .NET development environment and integrates it with Jupyter on an EC2 instance, allowing for .NET development in Jupyter notebooks.
#!/bin/bash

sudo -u ec2-user -i <<'EOF'
unset SUDO_UID

wget https://dot.net/v1/dotnet-install.sh -O dotnet-install.sh
chmod +x ./dotnet-install.sh
export HOME=/home/ec2-user
./dotnet-install.sh --version latest
export DOTNET_ROOT=$HOME/.dotnet
export PATH=$PATH:$DOTNET_ROOT:$DOTNET_ROOT/tools
dotnet tool install --global Microsoft.dotnet-interactive
dotnet interactive jupyter install

echo "export DOTNET_ROOT=/home/ec2-user/.dotnet" >> /home/ec2-user/.profile
echo "export PATH=\$PATH:/home/ec2-user/.dotnet:/home/ec2-user/.dotnet/tools" >> /home/ec2-user/.profile
EOF

systemctl restart jupyter-server.service
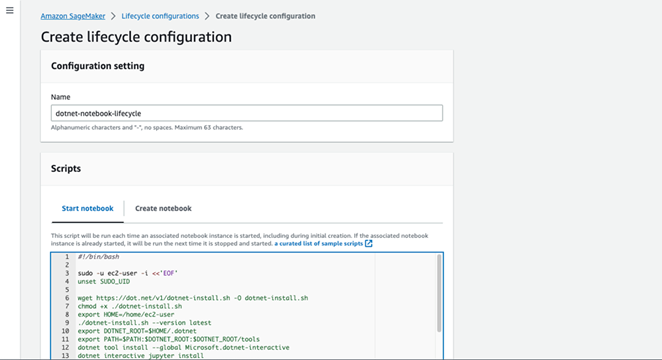
Figure 3: Create lifecycle configuration
The lifecycle configuration is now ready to be used.
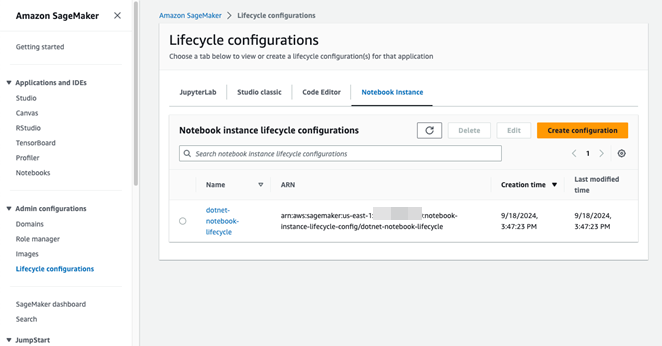
Figure 4: Created lifecycle configuration
Step 2. Launch a Jupyter Notebook
The next step is to create a new Amazon SageMaker Notebook instance that uses this lifecycle configuration.
1. Navigate to the Notebooks page from the left menu and choose Create notebook instance.
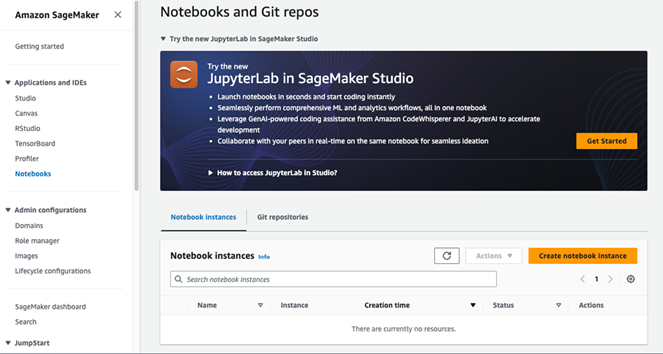
Figure 5: Notebook instances
2. Next, enter a Notebook instance name, select a Notebook instance type, then choose Additional configuration and fill in Lifecycle configuration with the one you previously created.
3. Choose Create notebook instance. The notebook instance will be created now, which could take a few minutes. The status of the Notebook will change to InService when ready.
Step 3. Setup Model Access in Amazon Bedrock
Ensure you have the necessary permissions to access the models in Amazon Bedrock.
1. In the AWS management console, navigate to Amazon Bedrock.
2. From the Amazon Bedrock home page, choose Get started.
3. From the left side navigation, scroll all the way to the end of the page and select Model access from the left panel.

Figure 6: Model access
4. From the Model access screen, select Enable specific models.
5. From the list of Base models, select Amazon Titan Image Generator G1 v2 and Claude 3 Haiku. Choose Next at the bottom of the screen.
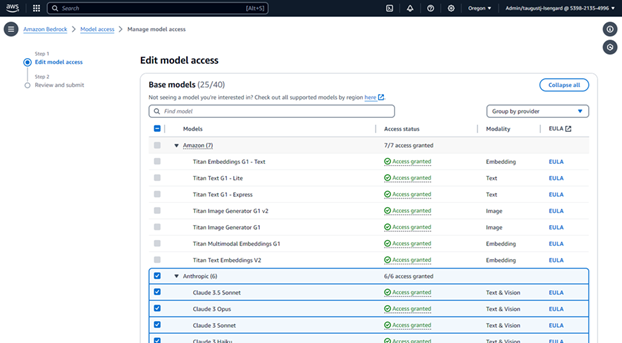
Figure 7: Select models
6. On the Review and submit screen, review your selections and choose Submit.
Now, you should see a Model access updates submitted banner at the top. Model access might take a minute or two to complete.
7. Once the model access is granted, the access status for those models will show Access granted.
Step 4. Generate an Image with Amazon Titan Image Generator
Let’s start with generating an image of food ingredients:
Create a new Amazon SageMaker Notebook instance by following this tutorial. Copy and paste the following script to get started.
#r "nuget:AWSSDK.Core"
#r "nuget:AWSSDK.Bedrock"
#r "nuget:AWSSDK.BedrockRuntime"
#r "nuget:System.Text.Json"
#r "nuget:System.Memory.Data"

using System;
using System.IO;
using System.Net.Http;
using System.Net.Http.Headers;
using System.Text;
using System.Text.Json;
using System.Text.Json.Serialization;
using System.Text.Json.Nodes;
using System.Threading.Tasks;
using Amazon.Util;
using Amazon.BedrockRuntime;
using Amazon.BedrockRuntime.Model;

public class AmazonTitanTextToImageResponse
{
    [JsonPropertyName("images")]
    public IReadOnlyList Images { get; set; } = new List();
}

public static class AmazonTitanImage
{
    public static JsonObject CreateBodyJson(string prompt)
    {
        var bodyJson = new JsonObject
        {
            ["taskType"] = "TEXT_IMAGE",
            ["textToImageParams"] = new JsonObject
            {
                ["text"] = prompt
            },
            ["imageGenerationConfig"] = new JsonObject
            {
                ["quality"] = "standard",
                ["width"] = 1024,
                ["height"] = 1024,
                ["cfgScale"] = 8.0,
                ["seed"] = new Random().Next(),
                ["numberOfImages"] = 1,
            }
        };
        return bodyJson;
    }
}

public static class AnthropicClaude3
{
    #nullable enable
    public static JsonObject CreateBodyJson(
        string? prompt,
        BinaryData? image = null)
    {
        var bodyJson = new JsonObject
        {
            ["anthropic_version"] = "bedrock-2023-05-31",
            ["max_tokens"] = 8000,
            ["messages"] = new JsonArray
            {
                new JsonObject
                {
                    ["role"] = "user",
                    ["content"] = new JsonArray
                    {
                        new JsonObject
                        {
                            ["type"] = "text",
                            ["text"] = prompt,
                        }
                    }
                }
            }
        };

        if (image != null)
        {
            var base64 = Convert.ToBase64String(image.ToArray());
            var jsonImage = new JsonObject
            {
                ["type"] = "image",
                ["source"] = new JsonObject
                {
                    ["type"] = "base64",
                    ["media_type"] = "image/jpeg",
                    ["data"] = base64
                }
            };

            var content = (JsonArray)bodyJson["messages"]?[0]?["content"]!;
            content.Add(jsonImage);
        }

        return bodyJson;
    }
}

private readonly AmazonBedrockRuntimeClient _bedrockClient = new();
private string _generatedImage = "";
private string _ingredients = "";
const string ClaudeModelId = "anthropic.claude-3-5-sonnet-20240620-v1:0";
const string AmazonImageModelId = "amazon.titan-image-generator-v2:0";

private async Task GenerateImageOfIngredients()
{
    var prompt = @"i need you to prepare a meal. show me an image of realistic food ingredients. include poultry and/or fish";

    var bodyJson = AmazonTitanImage.CreateBodyJson(prompt);
    var requestBody = JsonSerializer.Serialize(bodyJson);

    var request = new InvokeModelRequest
    {
        ModelId = AmazonImageModelId,
        ContentType = "application/json",
        Accept = "application/json",
        Body = new MemoryStream(Encoding.UTF8.GetBytes(requestBody))
    };

    try
    {
        var response = await _bedrockRuntimeClient.InvokeModelAsync(request);

        using var streamReader = new StreamReader(response.Body);
        var responseBody = await streamReader.ReadToEndAsync();
        var titanResponse = JsonSerializer.Deserialize<AmazonTitanTextToImageResponse>(responseBody);

        var images = titanResponse?.Images.Select(x => Convert.FromBase64String(x ?? string.Empty)).ToList() ?? [];
        _generatedImage = Convert.ToBase64String(images.First());
        var src = $"data:image/jpeg;base64,{_generatedImage}";

        display(HTML($"<img src=\"{src}\"></img>"));
    }
    catch (Exception ex)
    {
        Console.WriteLine($"Error generating image: {ex.Message}");
        throw;
    }
}
Choose Run, and you’ll see an image generated similar to Figure 8.

Figure 8: Realistic food ingredients
Step 5. Interpret the Generated Image
Now, let’s use Claude to interpret the image. Copy and paste the following method at the end of the existing script.
private async Task InterpretIngredients()
{
    var prompt = @"you are a world renowned chef.  in detail, name and describe the foods in this image.";

    var bytes = Convert.FromBase64String(_generatedImage);
    var image = BinaryData.FromBytes(bytes);
    var bodyJson = AnthropicClaude3.CreateBodyJson(prompt, image);
    var requestBody = JsonSerializer.Serialize(bodyJson);

    var request = new InvokeModelRequest
    {
        ModelId = ClaudeModelId,
        ContentType = "application/json",
        Accept = "application/json",
        Body = new MemoryStream(Encoding.UTF8.GetBytes(requestBody))
    };

    try
    {
        var response = await _bedrockRuntimeClient.InvokeModelAsync(request);
        var modelResponse = await JsonNode.ParseAsync(response.Body);
        var responseText = modelResponse["content"]?[0]?["text"] ?? "";
        _ingredients = responseText.ToString();

        Console.WriteLine(responseText);
    }
    catch (AmazonBedrockRuntimeException e)
    {
        Console.WriteLine($"ERROR: Can't invoke '{ClaudeModelId}'. Reason: {e.Message}");
        throw;
    }
}
Choose Run, and you’ll see generated text similar to Figure 9.
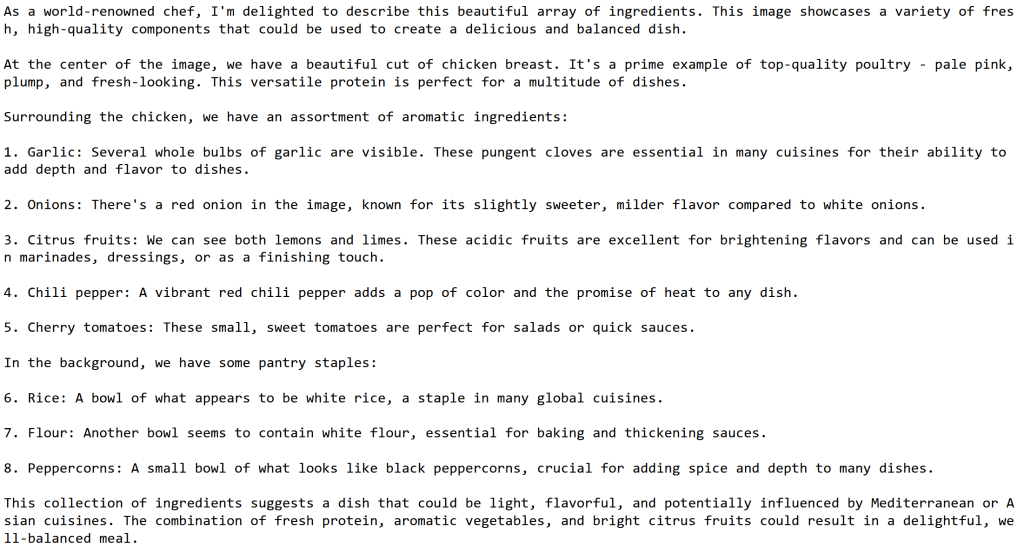
Figure 9: Interpret the image
Step 6. Generate a Recipe
Finally, let’s use Claude to create a recipe based on the ingredients. Copy and paste the following method at the end of the existing script.
private async Task CreateRecipe()
{
    var prompt = String.Format(@"
        \n\nHuman:
Here are the provided ingredients: {0}

You are a extremely knowledgeable nutritionist, bodybuilder and chef who also knows
everything one needs to know about the best quick, healthy recipes.
You know all there is to know about healthy foods, healthy recipes that keep
people lean and help them build muscles, and lose stubborn fat.

You've also trained many top performers athletes in body building, and in extremely
amazing physique.

You understand how to help people who don't have much time and or
ingredients to make meals fast depending on what they can find in the kitchen.
Your job is to assist users with questions related to finding the best recipes and
cooking instructions depending on the following variables:
 {0}

When finding the best recipes and instructions to cook,
you'll answer with confidence and to the point.
Keep in mind the time constraint of 5-10 minutes when coming up
with recipes and instructions as well as the recipe.

If the {0} are less than 3, feel free to add a few more
as long as they will compliment the healthy meal.

Make sure to format your answer as follows:
- The name of the meal as bold title (new line)
- Best for recipe category (bold)

- Preparation Time (header)

- Difficulty (bold):
    Easy
- Ingredients (bold)
    List all ingredients and quantity
- Kitchen tools needed (bold)
    List kitchen tools needed
- Instructions (bold)
    List all instructions to put the meal together
- Macros (bold):
    Total calories
    List each ingredient calories
    List all macros

    Please make sure to be brief and to the point.
    Make the instructions easy to follow and step-by-step.
\n\nAssistant:", _ingredients);

    var result = _chatLlm.GenerateAsync(prompt);
    Console.WriteLine(result.Result);

    var bodyJson = AnthropicClaude3.CreateBodyJson(prompt);
    var requestBody = JsonSerializer.Serialize(bodyJson);

    var request = new InvokeModelRequest
    {
        ModelId = ClaudeModelId,
        ContentType = "application/json",
        Accept = "application/json",
        Body = new MemoryStream(Encoding.UTF8.GetBytes(requestBody))
    };

    try
    {
        var response = await _bedrockRuntimeClient.InvokeModelAsync(request);
        var modelResponse = await JsonNode.ParseAsync(response.Body);
        var responseText = modelResponse["content"]?[0]?["text"] ?? "";
        _ingredients = responseText.ToString();

        Console.WriteLine(responseText);
    }
    catch (AmazonBedrockRuntimeException e)
    {
        Console.WriteLine($"ERROR: Can't invoke '{ClaudeModelId}'. Reason: {e.Message}");
        throw;
    }
}
Choose Run, and you’ll see a generated text similar to Figure 10.
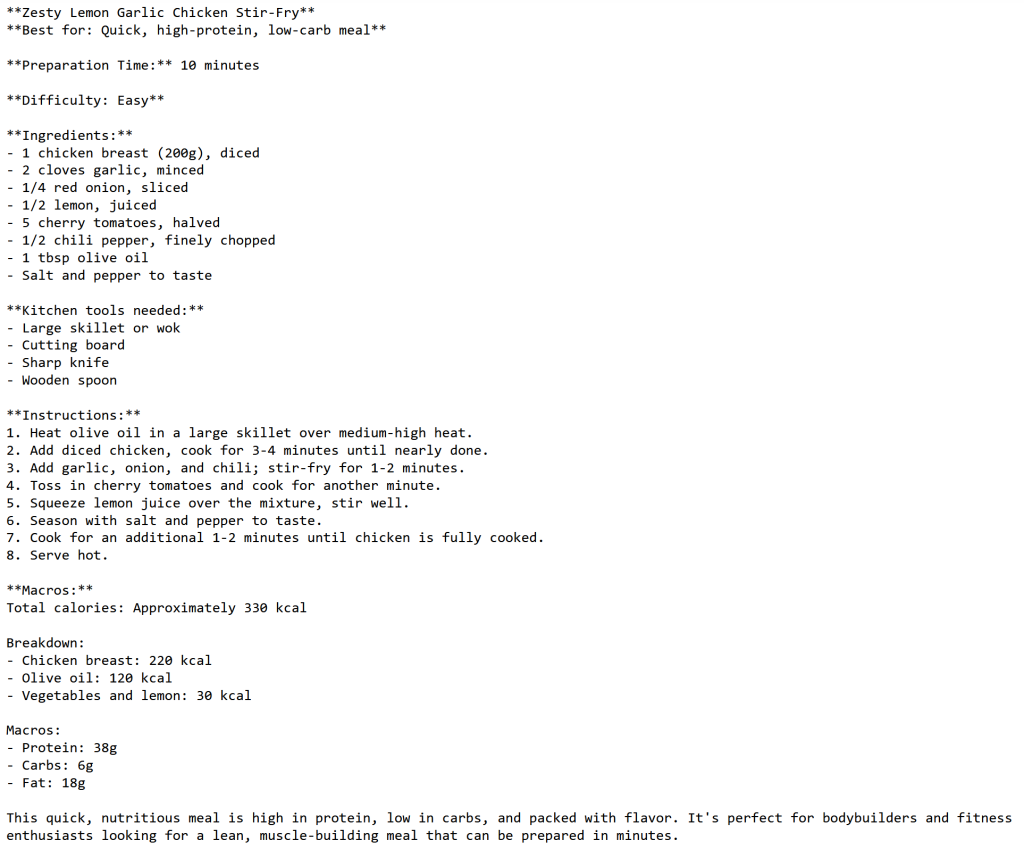
Figure 10: Recipe based on the interpreted text
Cleanup
After experimenting, don’t forget to stop and delete the SageMaker Notebook instance to avoid unnecessary cost.
Conclusion
We’ve just scratched the surface of what’s possible with C# in SageMaker Notebooks and Amazon Bedrock. This approach opens up a world of possibilities for .NET developers in the AI and ML space. By combining the power of C# with AWS’s machine learning infrastructure, you can build sophisticated AI applications while leveraging your existing skills and knowledge.
Remember, this is just the beginning. There’s so much more to explore, from fine-tuning models to building complex AI workflows. So, dive in, experiment, and push the boundaries of what’s possible with C# in the world of AI and ML! Get started using Amazon SageMaker like in this guide.
Happy coding!