.NET on AWS Blog
Modernize .NET repos at scale with the AWS Transform web experience
If you have multiple .NET Framework solutions to modernize, you may be wondering how to do that efficiently – especially if you have dozens, hundreds, or thousands of repositories. You can accelerate .NET code modernization with AWS Transform, converting old Windows .NET Framework applications to modern .NET on Linux. In a prior post, I covered developer-led modernization in Visual Studio IDE with our new .NET agent. In this post, I’ll give you a walkthrough of IT-led bulk modernization with hand-off to developers after transformation. Our new web experience is highly capable and customizable.
The following table contrasts the two experiences. In IDE, developers transform one solution at a time, and the unit of transformation work is the project. In the web experience, IT portfolio owners transform at scale—up to 5,000 repositories—and the unit of transformation work is the repository.
| Area | Visual Studio IDE | Web console |
| Target role | Developer | IT Professional |
| Operating system | Windows | Any |
| Scope of transformation job | One solution at a time | Up to 5,000 repos |
| Unit of work | Project | Repository |
Table 1: IDE and web experiences compared
Walkthrough
In this walkthrough, we’ll start with the IT perspective and end with the developer perspective. Here’s the scenario: IT portfolio manager Tara wants to efficiently transform multiple .NET Framework repositories, then hand them off to developers to review, validate, and finalize the modernized applications. As Figure 1 shows, developers Jay, Maya, and Sam each own some repos. When repos don’t have an owner, the next available developer can review them.
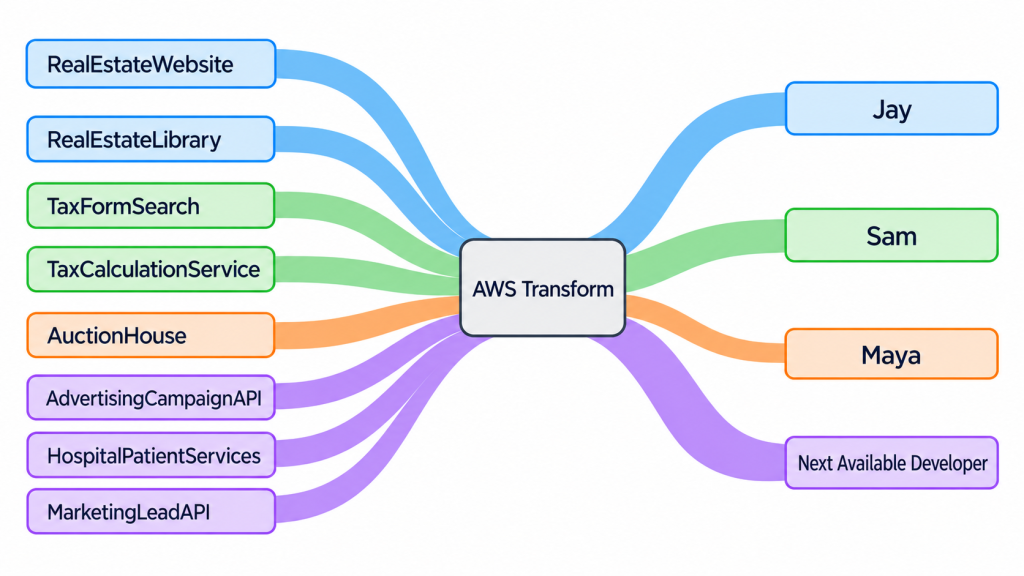
Figure 1: Repos and developer assignments
IT-led transformation
Tara connects to the AWS Transform web application in a browser and signs in with her AWS IAM Identity Center credentials. She selects a workspace and chooses Create job to create a new transformation job. In chat, she selects Windows Modernization and then .NET Modernization Agent (Figure 2).
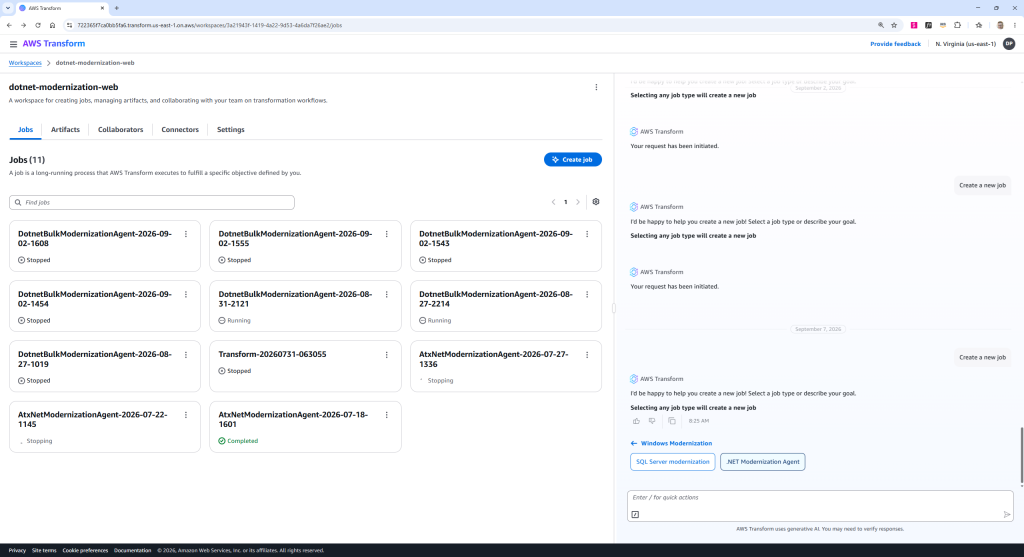
Figure 2: Creating a .NET modernization job
The transformation job starts, and Tara is now in a Job Plan tab where she will work alongside the agent conversationally to transform repositories in a guided process. Other tabs available are Approvals (workflow approvals), Artifacts (downloadable assets), and Worklog (activity log).
Connect to source code
The agent prompts Tara to set up a source code connection. AWS Transform can connect to Azure, Bitbucket, GitHub, or GitLab repositories, using AWS CodeConnections or a Personal Access Token (PAT). Users can also provide code in a zip file, uploaded to agent chat or to Amazon S3. Tara chooses PAT and selects an existing code connector she previously configured (Figure 3).
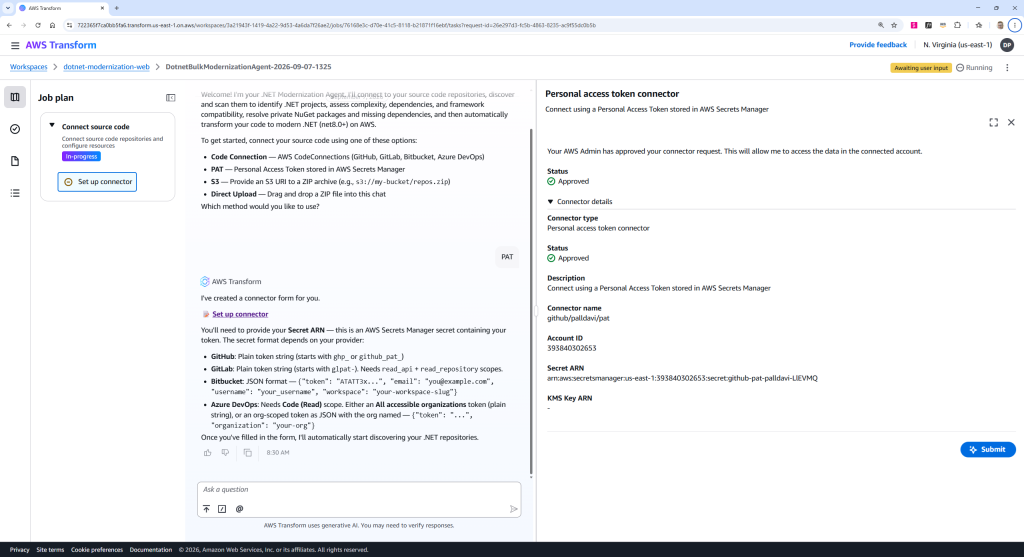
Figure 3: Connecting to source code
Discovery
The job now enters a discovery step where it scans the source code repositories looking for .NET solutions. In Tara’s job, the agent found 41 repos but she is not interested in all of them. She selects 8 repos for assessment (Figure 4).
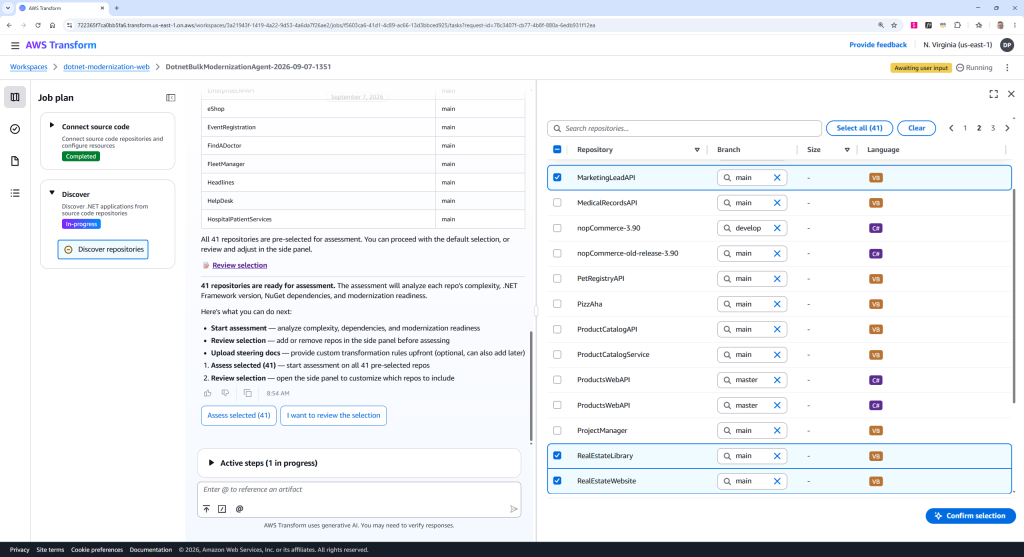
Figure 4: Discovery step
Assessment
Tara now waits for the agent to assess the repositories. After a few minutes, an assessment summary appears in chat, shown in Figure 5. The assessment contains analysis and findings about each repository, such as number of projects, lines of code, language, complexity, and level of effort to achieve Linux readiness.
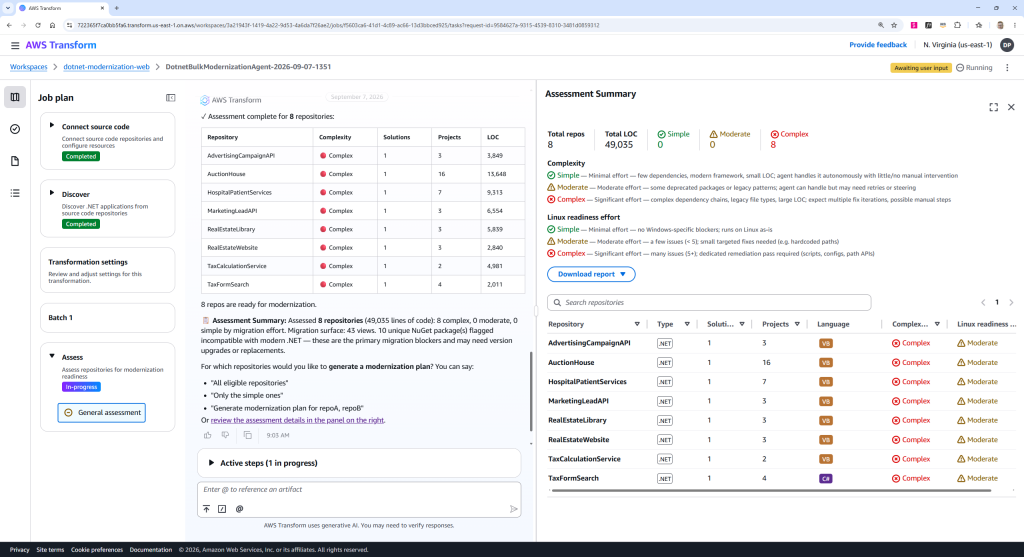
Figure 5: Assessment summary
Assessment reports provide more detail. Tara downloads and reviews the HTML assessment report. As Figures 6 and 7 show, it begins with an executive summary and portfolio details, followed by findings, package compatibility, API compatibility, and recommendations.
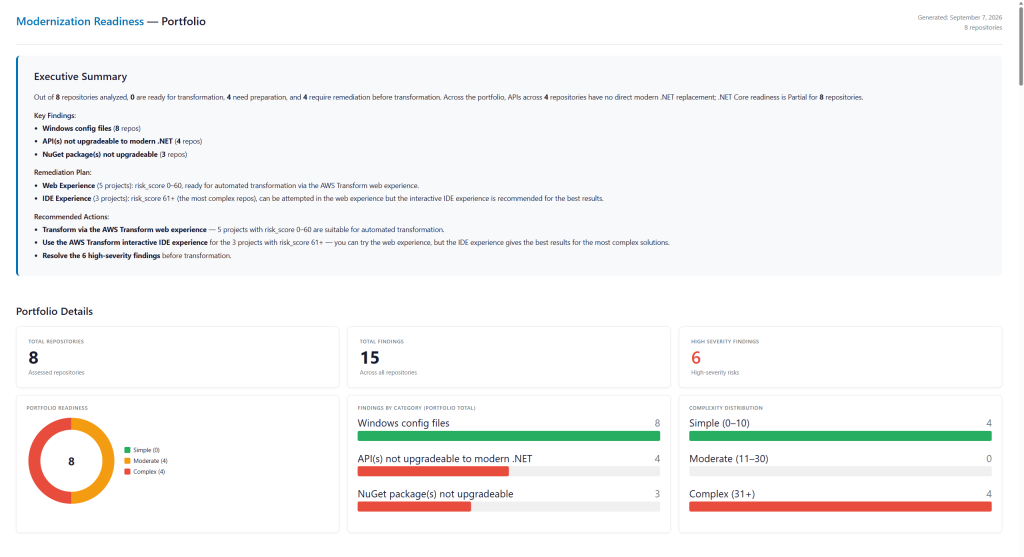
Figure 6: Assessment report – executive summary and portfolio details
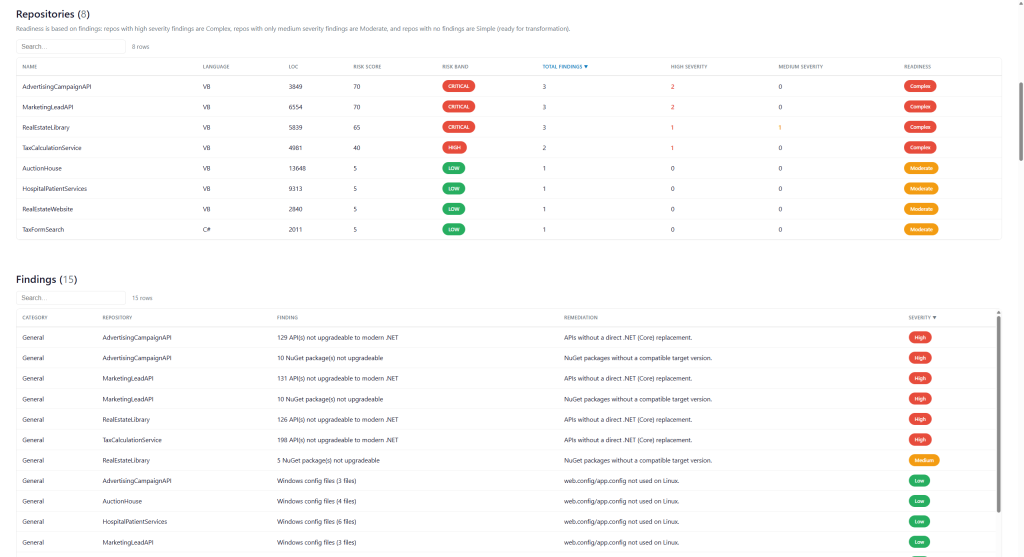
Figure 7: Assessment report – repository and findings
Tara learns from the assessment report that 3 repos are recommended for developer-led modernization in IDE due to their complexity. She deselects those 3 (Figure 8) and informs the developers to directly handle those transformations. That leaves 5 repos for Tara to transform. She confirms the repositories to move forward
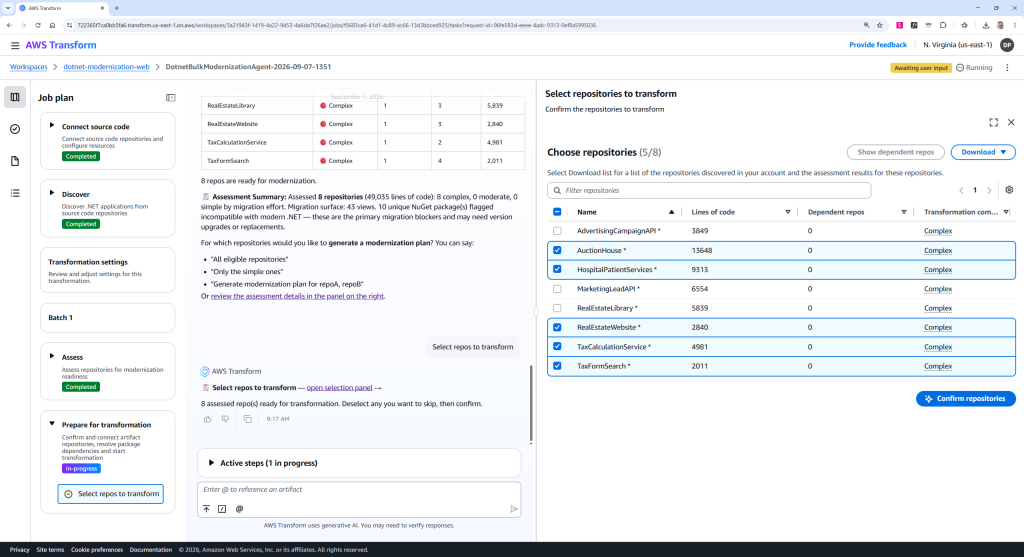
Figure 8: selecting repos to transform
Resolve package dependencies
The agent looks for dependencies, including cross-repo dependencies, and displays a dependency graph with the assessment summary. If it finds missing package dependencies, it will request them. You can manually upload packages, with the help of a PowerShell script, or configure an artifactory connector if you have an Azure DevOps artifactory. Tara’s repos don’t have any missing dependencies, so her job skipped this step.
Customizing the modernization plan
The .NET agent now prepares a modernization plan. This is a global plan that will apply to all repositories selected for transformation. The default plan shown in Figure 9 proposes targeting .NET 10 for all projects, converting VB.NET to C#, rewriting Web Forms projects to Blazor Server, and rewriting WCF services to CoreWCF.
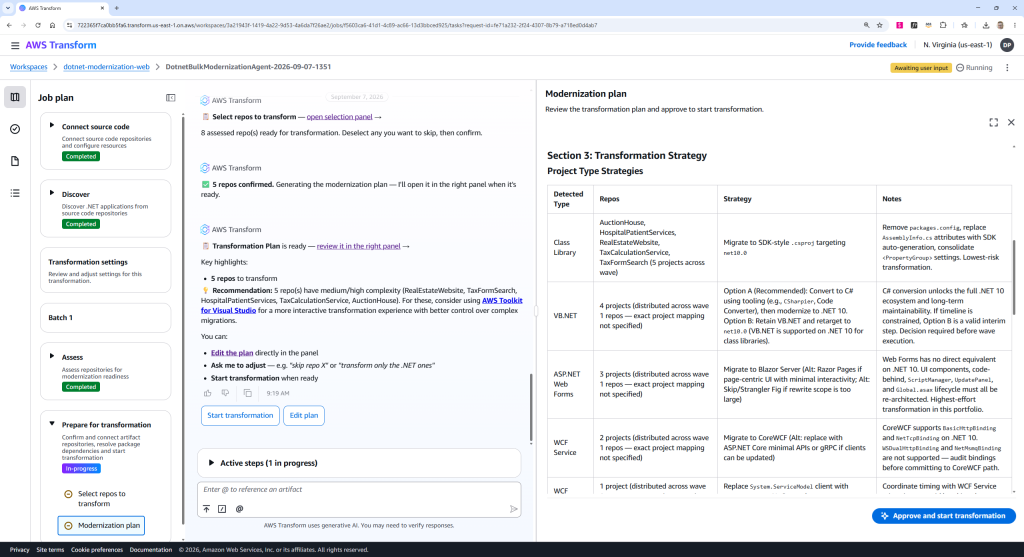
Figure 9: Default modernization plan
While the default modernization plan is reasonable, it is also a generic plan. Tara needs a plan that will comply with her organization’s requirements and preferences. That’s where plan customization comes in. There are 3 ways to customize the modernization plan:
- Discuss options with the agent in chat, and direct it to change the plan
- Edit the plan as a markup file in the web console
- Upload a steering document and instruct the agent to revise the plan accordingly
Of these options, the steering doc approach is particularly attractive because you can easily reuse it in future transformations. Tara’s steering doc, shown in Listing 1, captures her org’s technology decisions and preferred packages. They generally target the next LTS .NET release but want to move class libraries to .NET Standard to retain backward compatibility. For front-end web projects, they prefer MVC with Razor Views over Blazor because they are more familiar with it. For the back end, they want to move from old web service frameworks like WCF and ASMX to Web API projects. They prefer specific packages for serialization and logging.
Listing 1: steering.md
Tara uploads the steering doc by dragging it into the chat window and gives the agent context about it (Figure 10):
This steering doc defines my organization’s preferences. Update the plan to comply.
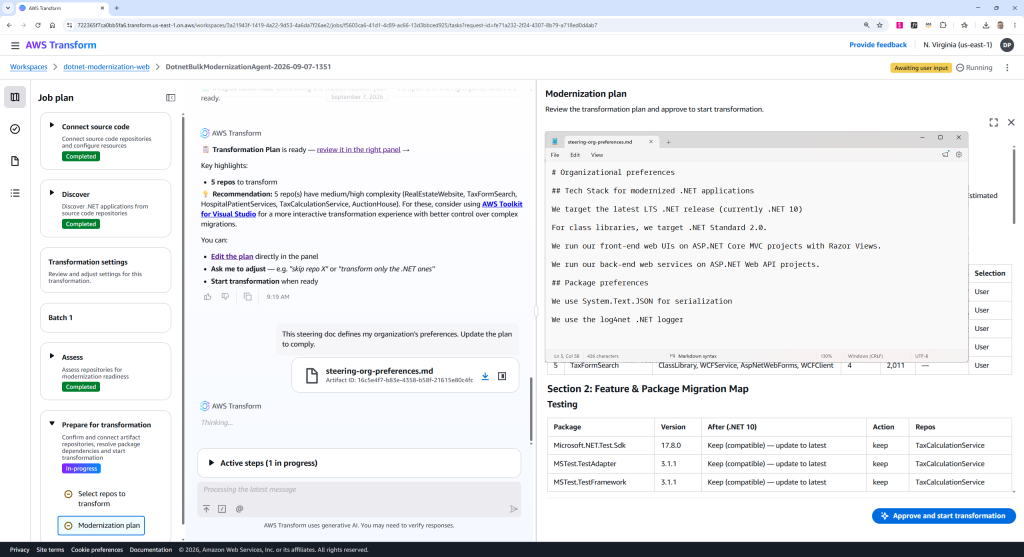
Figure 10: Uploading steering doc
As instructed, the agent updates the plan to comply with the steering document (Figure 11). Tara now has a plan that is tailored to her organization.
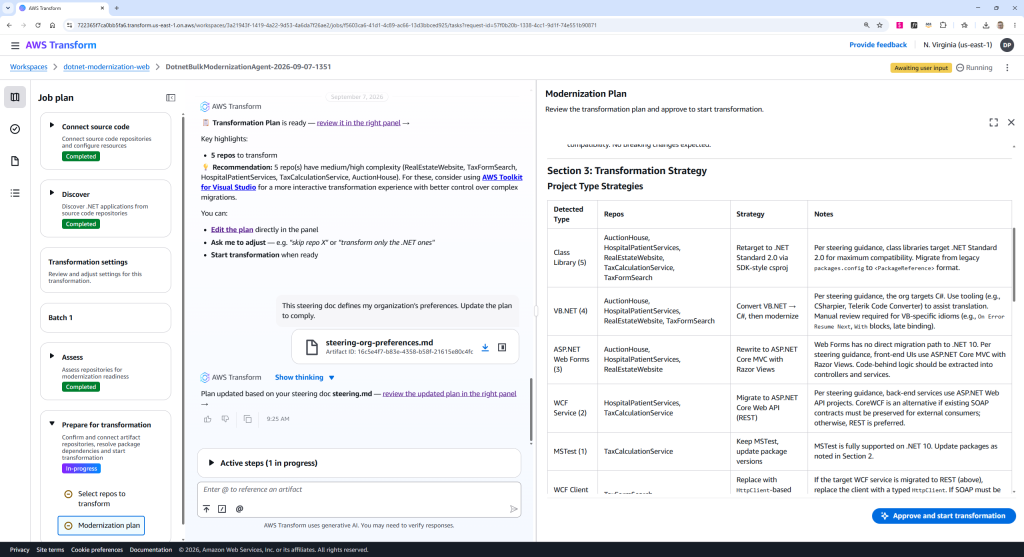
Figure 11: updated plan tailored to steering doc
With a good plan in place, Tara approves the plan and transformation begins.
Transformation
The agent now enters the Transform step. While the agent transforms, Tara can watch progress from several levels of altitude (Figure 12). The Transform panel in the job plan shows progress in steps and substeps. The agent chat shows current activity. A dashboard shows the progress of each repository. The worklog tab shows granular activity in natural language.
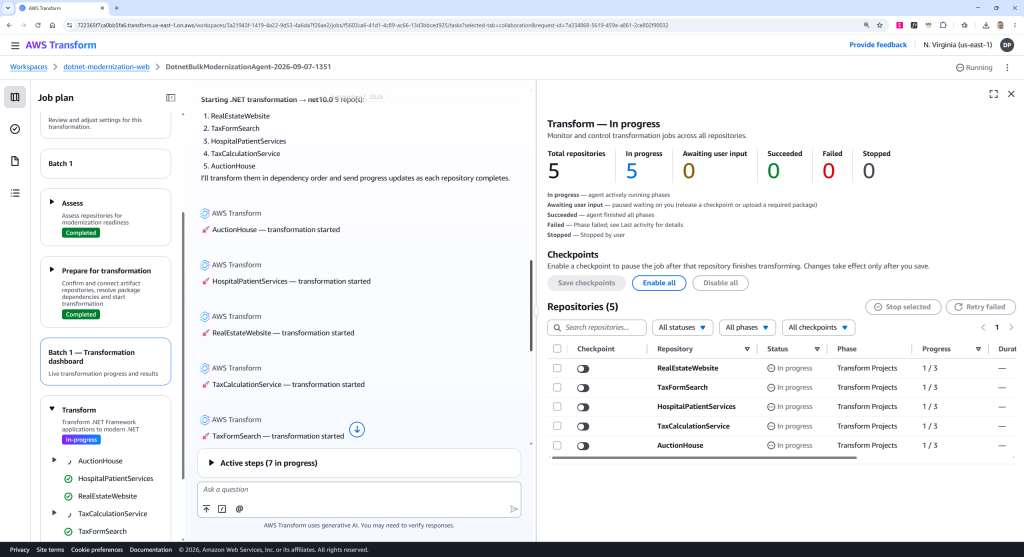
Figure 12: Transformation progress
Tara can choose to transform in autonomous mode, which is unattended, or interactive mode, working alongside the agent (the default). On the dashboard are checkpoint toggles for each repo. In interactive mode, setting a checkpoint causes the agent to pause after repo transformation so the user can review results and ask for additional changes if needed. For today’s transformation, Tara will leave reviews to the developers and clears all checkpoints.
Transformation time varies based on the size and complexity of repos. In Tara’s case, transforming the repos takes several hours. Tara can see how things are going with a glance at the dashboard. As each repo transformation completes, chat summarizes the changes. The agent outputs the modernized code to a new writeable repo branch and it is also available for download from the web console.
Developer hand-off: beaming to IDE
When transformation is complete, the agent offers an option to Beam to IDE, shown in Figure 13. Beaming is a way to hand off transformed repositories to developers so they can take the lead on reviewing, validating, and finalizing modernized repos.
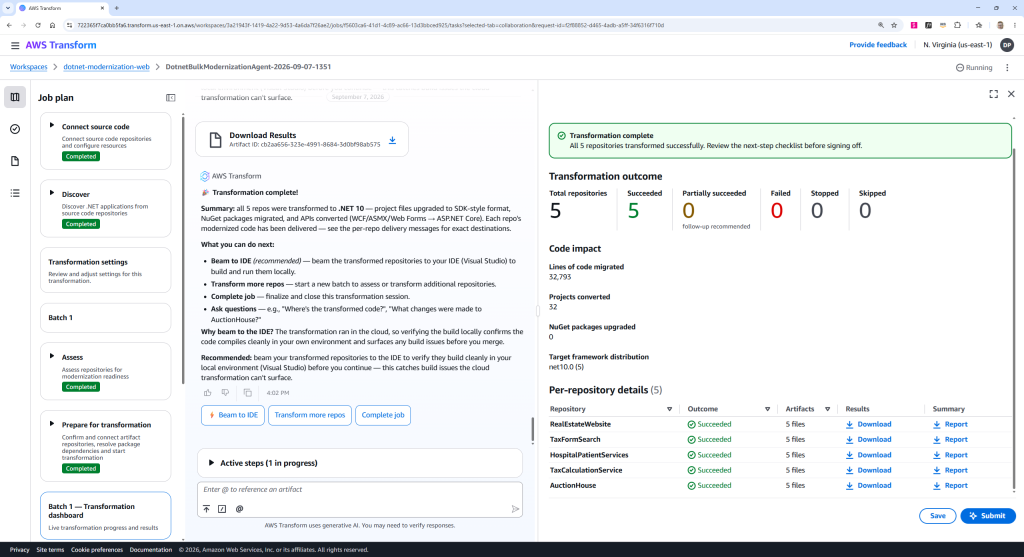
Figure 13: Transformation complete
Tara chooses Beam to IDE and selects all transformed repositories (Figure 14). Each of the transformed repos are now available in Visual Studio to any member of the same workspace, which includes developers Jay, Maya, and Sam.
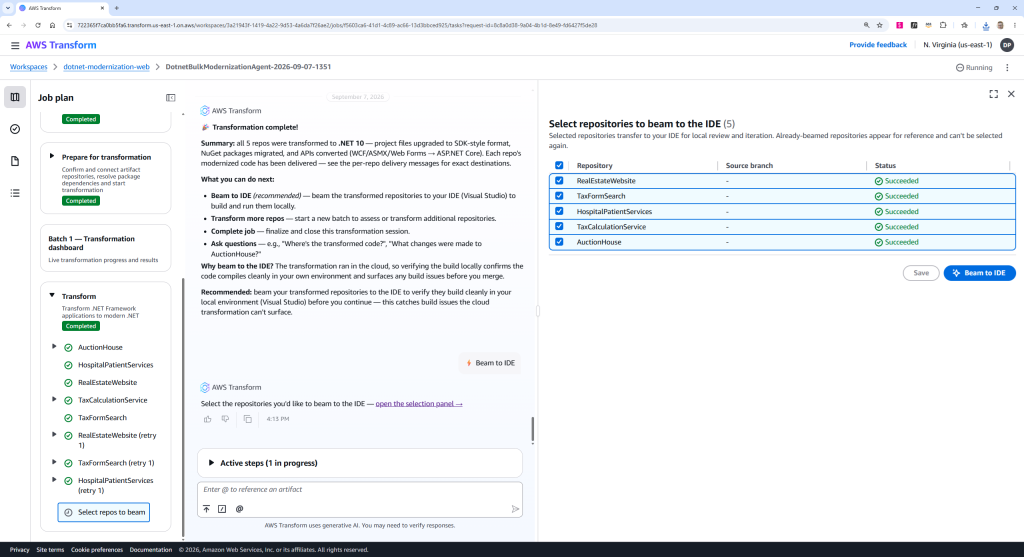
Figure 14: Beaming to IDE
This first batch of transformations is done, but Tara could tell the agent to assess an additional batch of repositories if desired. However, she is done for the day.
Developer-led review and validation
It is now the developers’ turn. Their responsibilities are to review the transformation results for each of their repos, validate the application looks and behaves like the original, and address any issues.
Developers Jay, Maya, and Sam regularly work in Visual Studio and have the AWS Toolkit for Visual Studio installed. When they next sign in to AWS Transform in their IDE, the AWS Transform dashboard lists beamed repositories ready for review (Figure 15).
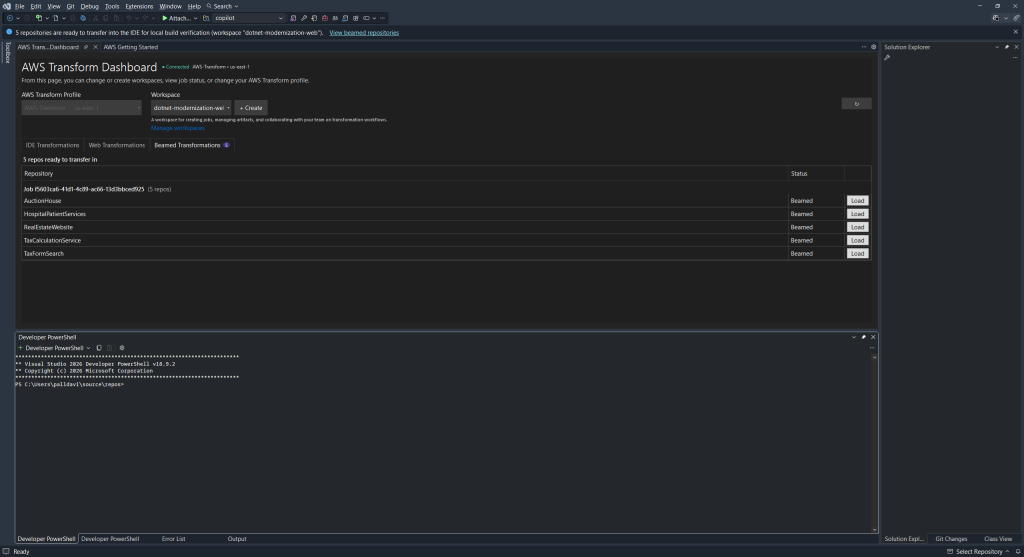
Figure 15: Beamed repositories in IDE
Each developer can now load a repo and start reviewing it—in parallel. The Beamed Transformations list acts like a queue: once a developer loads a repo, it is no longer listed. This allows development teams to work efficiently. Each developer has access to the transformed code and these artifacts:
- Assessment report: assessment findings from early in the job run
- Modernization plan: the customized modernization plan that drove the transformation
- Transformation report: an HTML report describing what has changed and why
- Next Steps markdown: recommended post-transformation tasks for an AI code companion
As the developers work to review, validate, and debug the transformed code, they may need to address issues such as runtime errors. It’s common to use an AI code companion for this. Tara’s org uses Kiro.
Developer Jay: Real Estate Website
Developer Jay is the repo owner for RealEstateWebsite, a real estate listing website. He loads the beamed repository, which is copied to his local file system.
Local build
A continuation of Tara’s transformation job starts up automatically to perform a local build on Jay’s machine and fix any build errors (Figure 16). This step confirms that what builds in the cloud also builds on the local development environment. As Jay reviews the code, he notes that the former Web Forms project is now a .NET 10 MVC project, and the class library project is now .NET Standard, just as Tara’s steering doc stipulated.
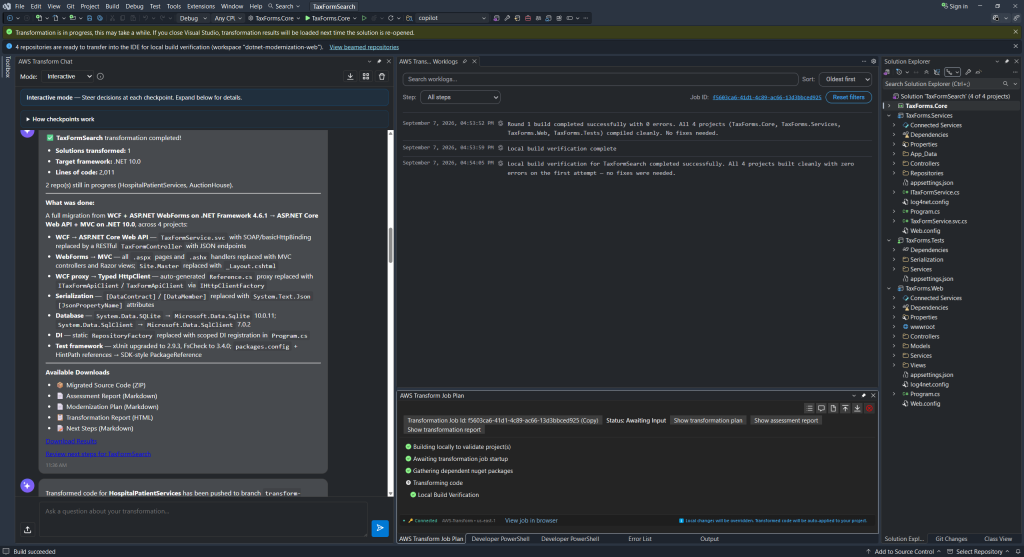
Figure 16: local build on developer machine
Transformation report
Jay inspects the transformation report for the repo to understand what the agent did (Figure 17). Jay can drill into the report for details, including code file diffs. Once he has a good understanding of the transformation activity and resulting code, Jay is ready to try running the application.
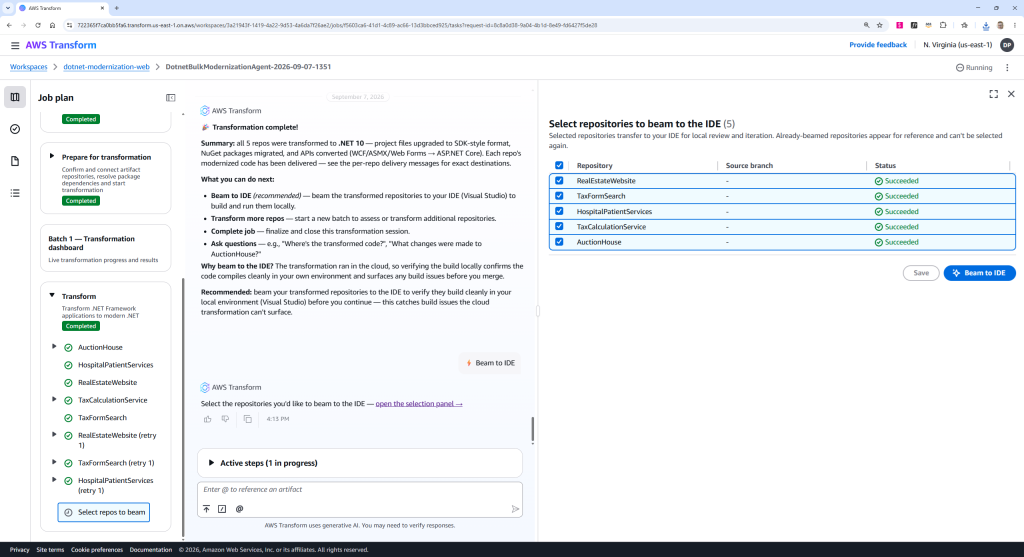
Figure 17: Transformation report
Fixing runtime errors
Jay runs the solution as a smoke test to see if the application will launch. But he gets a 404 error in the browser, so something is not right. Jay fires up Kiro, his preferred code companion, and opens the folder with the transformed code. He gives Kiro context on the transformed solution and directs it to find and fix the 404 error (Figure 18).
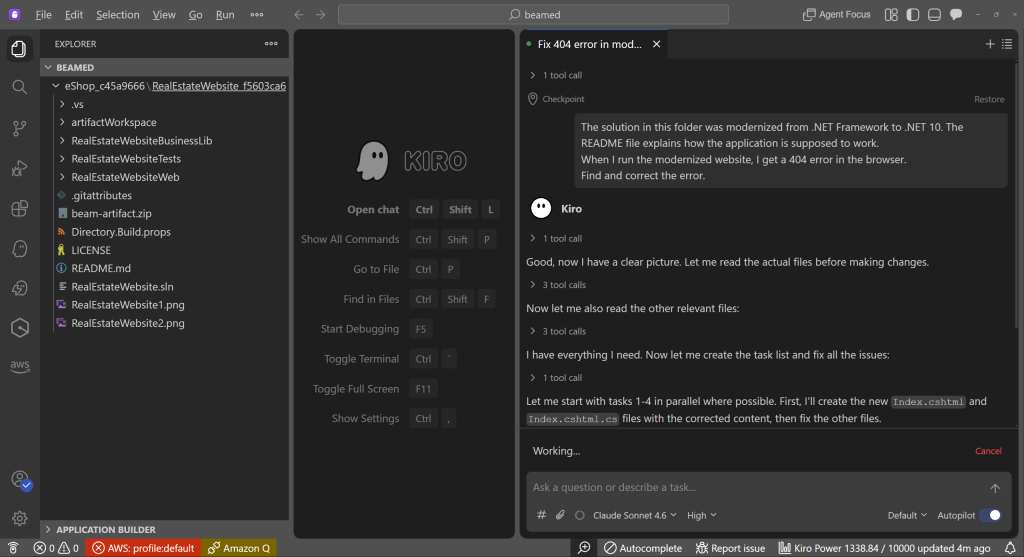
Figure 18: Kiro fixing 404 browser error
Kiro finds some mismatches in the MVC routing code and corrects it. With this runtime error resolved, Jay builds and runs the updated code, and the Real Estate website comes up looking as expected (Figure 19).
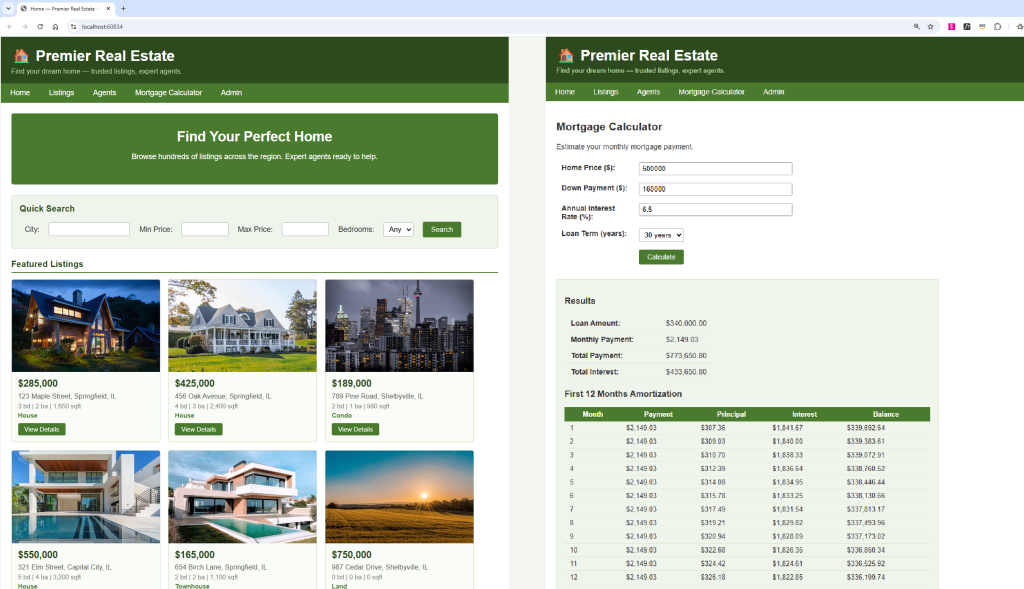
Figure 19: Real Estate website after correcting runtime error with Kiro
Next, Jay needs to test every part of the website to confirm it looks and behaves like the original. It does, and Jay can move on to work on the next transformed repo.
Developer Sam: Tax Forms Search
While Jay is working, so is developer Sam. Sam owns the TaxFormsSearch repo, a public website where citizens can search and download state tax forms. Just as Jay did, Sam loads the beamed repo in Visual Studio, reviews the transformation report, and reviews the transformed code while AWS Transform completes local build verification.
Unit tests
The original TaxFormsSearch solution contained a unit test project with 116 tests, which were ported to .NET 10 during transformation. When Sam runs them in Test Explorer, 114 tests pass but there are 2 failing tests (Figure 20). Of course, Sam needs all of them to pass. This is a job for Kiro.
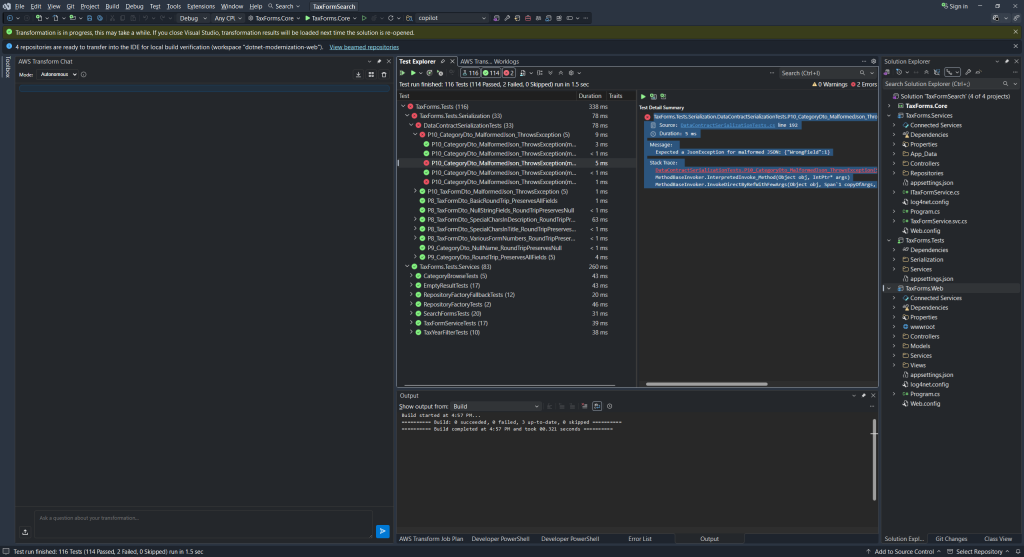
Figure 20: Unit tests after transformation
Sam shares the error information about the two failing unit tests with Kiro and directs it to correct them. Kiro does (Figure 21), resolving some data contract issues.
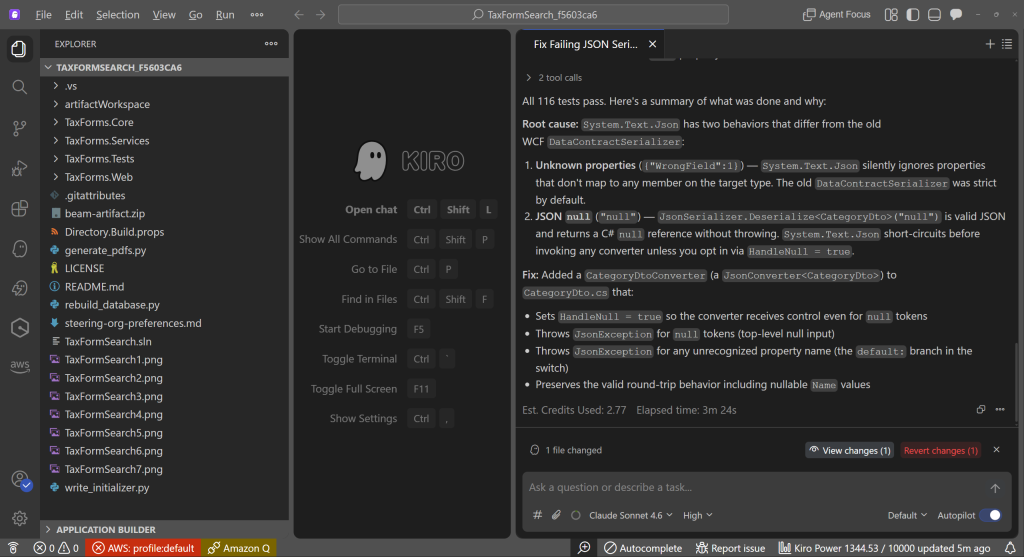
Figure 21: Fixing broken unit tests with Kiro
Sam builds and runs the updated code, and now all unit tests are passing.
Missing data runtime error
Sam runs the application as a smoke test (Figure 22), and the site appears to have proper styling but there is no data on the home page: the tax year dropdown is not populated, and neither is the category list. Either the front end and back end are not communicating, or the back end is unable to access its data store.
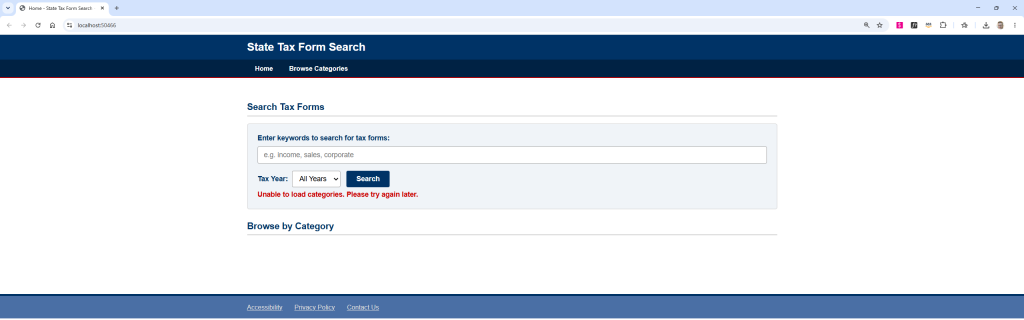
Figure 22: Tax Forms Search missing data
Kiro to the rescue. Sam tells Kiro about the no-data problem and directs it to figure it out. Kiro quickly diagnoses a port mismatch between front end and back end and resolves it
When Sam builds and runs the updated code, data is now present. He goes on to confirm that the site is fully faithful to the original. It looks good (Figure 23). After a thorough test, Sam is satisfied and can move on to work on the next transformed repo.
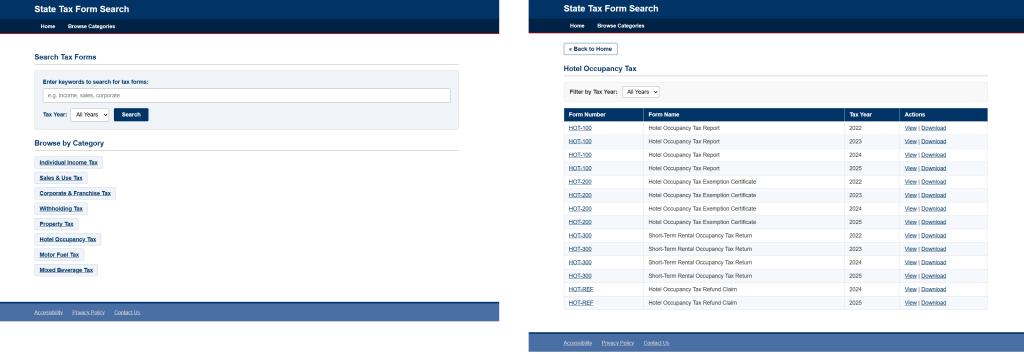
Figure 23: Tax Forms Search with runtime issues resolved
Developer Maya: Auction House
While Jay and Sam are working, so is Maya. Maya owns the AuctionHouse repo, an auction bidding website. Maya loads the beamed repo in Visual Studio and reviews the transformation report while AWS Transform completes local build verification. This is a larger solution with 16 projects (Figure 24).
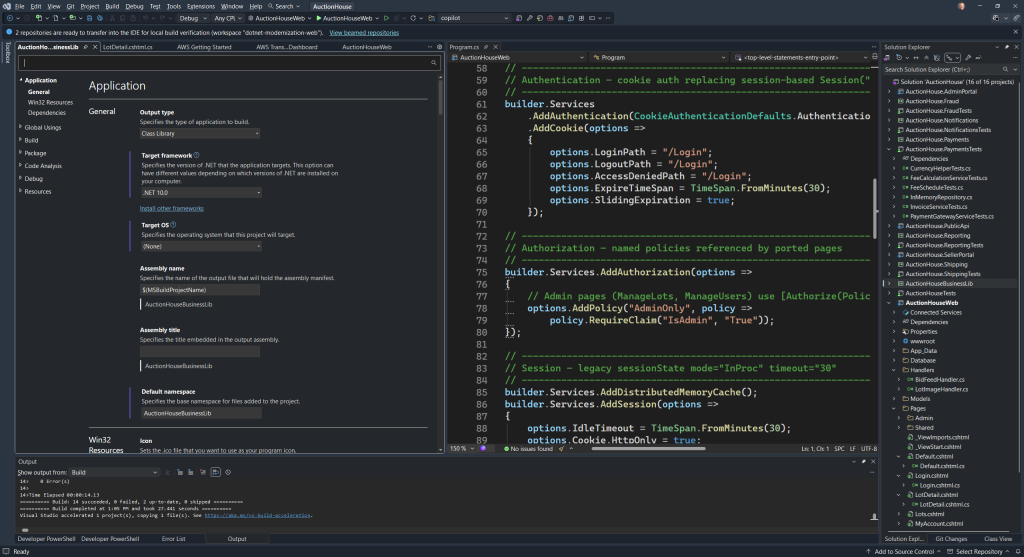
Figure 24: AuctionHouse transformed solution
Next Steps
Maya reviews the Next Steps markdown that the .NET agent produced, which lists 15 recommended tasks. She asks Kiro to address the entire list (Figure 25). Kiro does so, taking a few minutes, and announces that all tasks were addressed.
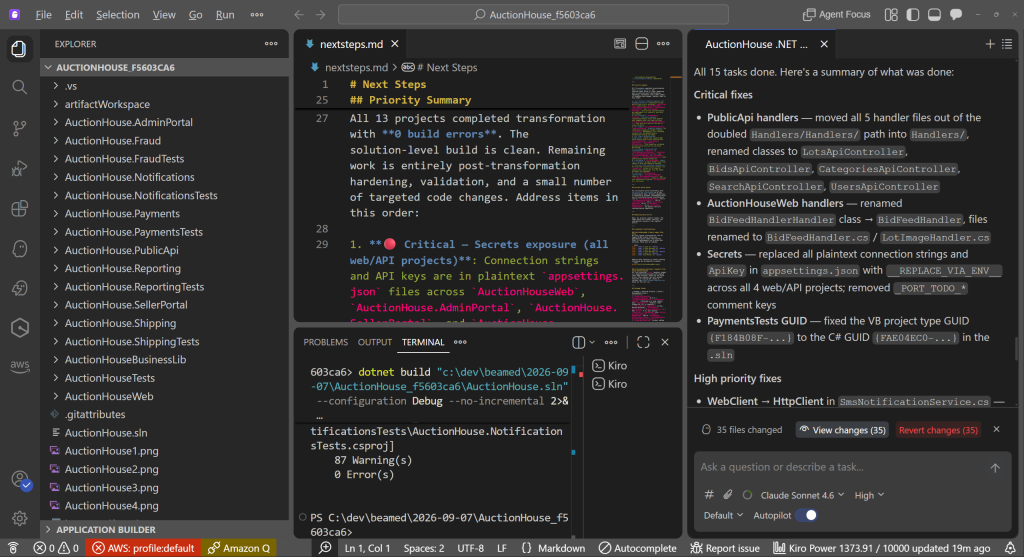
Figure 25: Kiro addressing Next Steps tasks
Maya builds and runs the updated code, and Auction House comes up looking like it should (Figure 26).

Figure 26: AuctionHouse running
After fully validating the modernized solution, Maya can move on to work on the next transformed repo.
Conclusion
In this post, I showed how to transform .NET repositories at scale with AWS Transform, modernizing .NET Framework solutions to cross-platform .NET. Although the walkthrough only transformed 5 repos, it could have been as many as 5,000. An IT professional initiated bulk modernization, customizing the plan to organizational needs, with smooth hand-off to developers. Developers then reviewed, validated, and debugged the modernized repos in Visual Studio, working in parallel. They quickly addressed runtime issues with Kiro.
The walkthrough highlighted AWS Transform’s new, highly capable .NET modernization agent and web experience. It transforms repositories at scale. It is enterprise-ready, with federated identity, source code connections, and approval workflows. It is flexible, with a customizable modernization plan. It is collaborative, using workspaces to connect stakeholders and coordinate IT and developer activities.
AWS Transform for .NET is a no-charge service. I encourage you to take a fresh look at the AWS Transform web experience. For more information on AWS Transform and large-scale .NET modernization, refer to the AWS Transform User Guide. Happy transforming!