AWS for Games Blog
Rapid game server iteration on Amazon GameLift Servers
Amazon GameLift Servers provides fully managed global game server hosting. It’s trusted by games like Apex Legends to provide reliable hosting at global scale. In this blog post, I present a new solution that you can use to iterate quickly on new game server versions and host multiple different versions on a single Amazon GameLift Servers fleet.
Deployments on Amazon GameLift Servers by default are immutable, which helps ensure that game servers across the fleet behave in a consistent and predictable manner. In most production environments, this immutability provides the consistency you want. But in development and testing phases, having the flexibility to host multiple game server versions and swapping them as needed can be beneficial for rapid iteration. You can use the multi-build solution for Amazon GameLift Servers to do that. It’s a solution that configures an Amazon GameLift Servers containers fleet that automatically synchronizes multiple game server build versions from an Amazon Simple Storage Service (Amazon S3) bucket in real time and runs them inside a pre-created game server container. You can also run any existing Linux game server binary without Amazon GameLift Servers SDK integration. The solution is well-suited for development, testing, and alpha and beta test phases.
Overview
The solution comes with a deployment pipeline that packages a game server wrapper script and a game server build synchronizer in separate container images, uploads them to Amazon Elastic Container Registry (Amazon ECR), and sets up an Amazon GameLift Servers fleet for hosting. By using the deployment pipeline, you can configure the port and game server binary path and start using the solution without any significant modifications specific to your game.
After the fleet is deployed, you can use the provided command line tools to upload new game server versions or update and delete existing ones. The instances hosting your game servers in all your fleet locations will automatically synchronize all builds you have uploaded, and game sessions can be requested by passing the build version with Amazon GameLift Servers APIs.
Architecture
The solution uses two different containers:
- Game server container: Runs an Amazon GameLift Servers SDK wrapper (Go application) and the game server process. Game server builds are accessed through a shared volume on the instance. Amazon GameLift Servers will run as many copies of the game server container as it can fit on the instance based on your vCPU and memory configuration
- Amazon S3 sync container (per-instance): Continuously synchronizes game builds from Amazon S3 to a shared volume. To avoid extensive amounts of unneeded API calls, full sync is only done when the
.builds_updatedfile has changed in S3.
Both containers share a volume mounted at /shared/builds where game server binaries are stored and accessed.
Figure 1 shows the overall architecture of the solution.
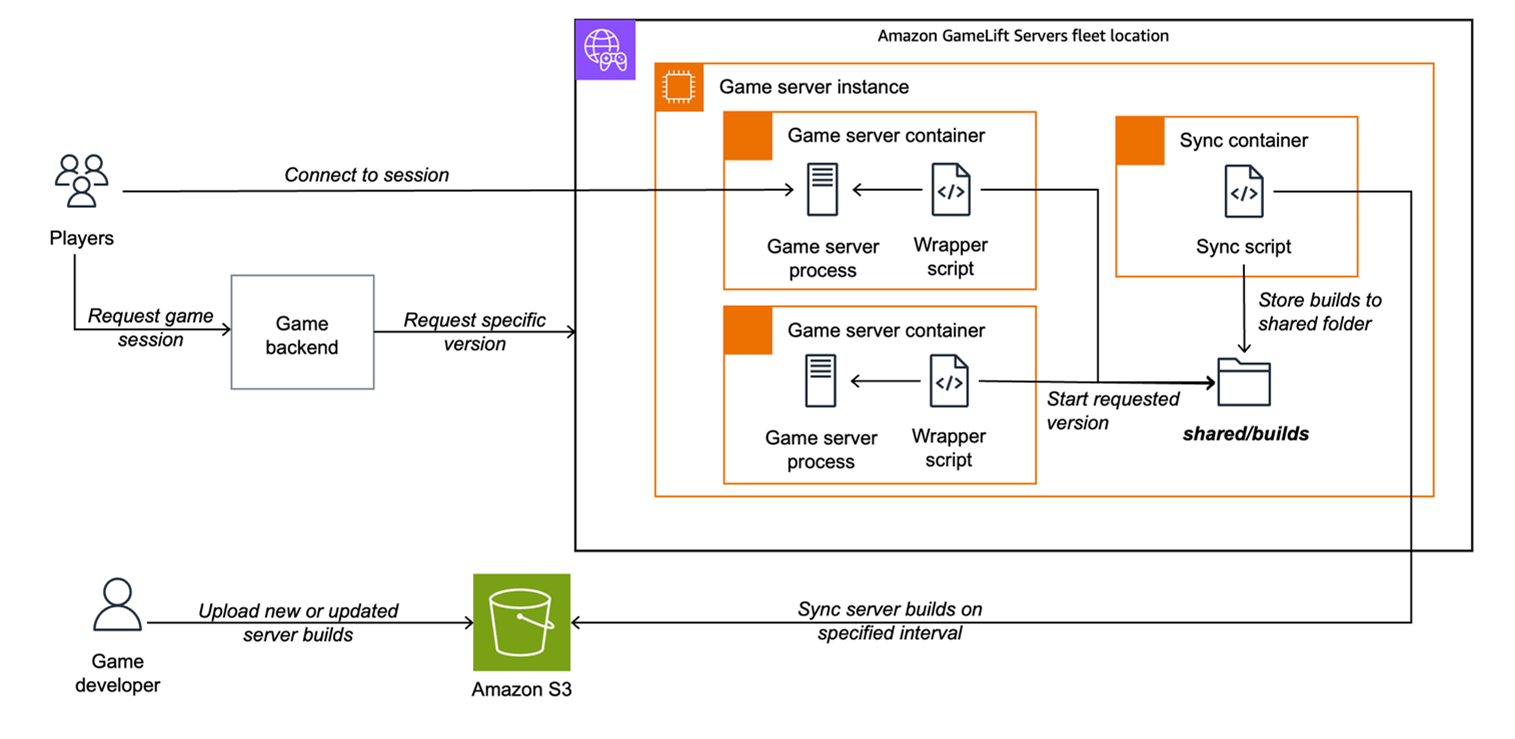
Figure 1 – Overall architecture
Each game server instance on the fleet hosts one sync container, and one or more game server containers. In the default configuration, I use a C6i.xlarge instance to host three game server processes. The sync container polls Amazon S3 for any changes in the .builds_updated file. If there’s an update, it will synchronize all new builds and delete all old builds locally. It will then mark the builds locally with a .download_completed marker file if the build already has an .upload_completed marker file. These three configuration files help ensure that no builds that are still uploading are executed on the game server instances, no builds that are still downloading locally are executed, and files are only synchronized if something changes.
The shared/builds folder on each instance is mounted on all the containers, allowing the game server containers to use the builds synchronized by the sync container.
As a game developer, you use the provided CLI tool to upload, delete and modify game server builds. These builds are then synchronized to Amazon S3, allowing the sync container in each game server instance of the fleet across all its locations to synchronize the build to the local system.
Game server container flow
The entry point for a game server container is the wrapper.sh script. The flow of a single game server container consists of the following steps:
- Container standby: Game server container starts and waits indefinitely for game session allocation.
- Session request: Game session request arrives with build version defined in
GameProperties["BuildVersion"] - Version extraction: Go Server SDK process extracts the build version from
GamePropertiesand writes it to/tmp/build_version.txtlocally on the container. - Build availability check: The wrapper script reads the build version and checks if the build is available in
/shared/builds/<version>/ - Wait for sync: If the build isn’t available, the wrapper waits up to 30 seconds for the Amazon S3 sync container to download it. If the download fails, the placement will time out.
- Integrity verification: The wrapper waits up to 30 seconds for the
.download_completemarker to ensure the build is fully synced. Again, in case of failure the placement will time out - Server start: The wrapper starts the game server binary from the versioned directory in the background.
- Activation delay: The wrapper verifies the server process is running by waiting two seconds and checking the status.
- Session activation: The wrapper signals the Go SDK process to activate the game session using
/tmp/activate_session.txt - Game session: The game server runs and handles the session (GameSessionData is available for the game logic over a localhost endpoint if needed).
- Cleanup: On termination, the wrapper signals the Go process to call
ProcessEnding()and cleans up temp files. This will trigger the creation of a new game server container.
Deployment
In this section, you go through the basic steps to deploy the solution and host your game server binaries on the fleet. If you want more details on how to customize the deployment, see the deployment steps in the repository.
1. Set up prerequisites
To get started with the deployment, you need access to an AWS account and to meet the following prerequisites in your local system:
- AWS Command Line Interface (AWS CLI) configured with appropriate credentials
- The default AWS Region set to a Region that’s supported as a home Region for a fleet
- AWS Identity and Access Management (IAM) permissions to create the resources in the following list
- A game server Linux build available
Your AWS user or role needs IAM permissions to create the following resources:
- AWS CloudFormation stacks
- Amazon GameLift Servers fleets and container groups
- Amazon ECR repositories
- Amazon S3 buckets
- AWS CodeBuild projects
- AWS IAM roles and policies
- Amazon CloudWatch log groups
2. Clone the repository
a. Clone the Amazon GameLift Servers Toolkit repository and navigate to the solution folder:
git clone https://github.com/aws/amazon-gamelift-toolkit.git
cd amazon-gamelift-toolkit/multi-build-solution/
b. Open the multi-build-solution folder in your favorite integrated development environment (IDE) or editor.
3. Configure the game server path
Before deploying, you need to configure the path to your game server binary in wrapper.sh. This path must be consistent across all build versions.
Edit wrapper.sh and set the SERVER_BINARY_RELATIVE_PATH="gameserver" to match your game server path. To use the sample placeholder server that comes with the solution, use “gameserver” as the value.
Examples:
Simple binary at root (default test server included that is just a blocking shell script):
game-builds/v1.0.0/
└── gameserver
Path: "gameserver"
Unreal Engine:
game-builds/v1.0.0/
└── MyGame/
└── Binaries/
└── Linux/
└── MyGameServer
Path: "MyGame/Binaries/Linux/MyGameServer"
Unity:
game-builds/v1.0.0/
├── MyGame.x86_64
└── MyGame_Data/
Path: "MyGame.x86_64"
4. Deploy infrastructure
Run the setup script to deploy the infrastructure.
Linux/macOS:
./setup-fleet.sh MultiBuildTest
Windows (PowerShell):
.\setup-fleet.ps1 MultiBuildTest
The script will prompt you for the ServerBinaryRelativePath (the path to your game server binary within build folders). You can press Enter to use what you configured previously.
This script will:
a. Deploy the CloudFormation stack with default settings (port 7777/UDP, C6i.xlarge instance, three game sessions per instance). The stack includes an Amazon GameLift Servers fleet with one location, the CodeBuild project, an Amazon S3 bucket for files, and other supporting resources.
b. Create and upload a ZIP file with the game server wrapper and sync scripts
c. Trigger CodeBuild to build and deploy containers to the fleet
d. Provide information on checking the status of the deployment
The deployment takes about 10–15 minutes. You can use the CLI commands provided on your terminal to check the progress of the CodeBuild Project and the fleet. You can also check the outputs from the CloudFormation console to view the CodeBuild project logs in real time. When deployment is complete, open the AWS Management Console for Amazon GameLift Servers to view the fleet deployment.
5. Upload your game server build
Use the interactive CLI tool to manage builds:
Linux/macOS:
./manage-builds.sh MyStackName
Windows (PowerShell):
.\manage-builds.ps1 MyStackName
From the menu:
a. Select 2) Upload a new build.
b. Enter your build directory path (./game-builds/v1.0.0 for the test binary).
c. Enter a version identifier (for example, v1.0.0).
d. Confirm the upload.
The tool automatically:
a. Fetches the S3 bucket from your CloudFormation stack
b. Uploads your build to Amazon S3
c. Creates completion markers for integrity verification
d. Updates the marker that indicates builds have been updated
e. Shows you the command to create a game session
The build must meet the following requirements:
- The build must contain the game server binary at the path specified in
ServerBinaryRelativePath - The binary must be executable (
chmod +x) - The build must include all dependencies needed to run the binary
Testing
Now that you have the fleet deployed and a game server build uploaded, the build should be synchronizing to all the instances in the fleet. By default, you have only one instance in the home Region, but you can modify the fleet for more locations and automatic scaling based on demand. As mentioned before, we don’t recommend this solution for large-scale production use cases, but you might want to expand to more Regions for playtesting and alpha and beta phases.
To test the game server, create a game session on the fleet. By default, sessions are created in the home Region of the fleet, but you can add --location to define another location when you expand your fleet.
Linux/macOS:
Windows (PowerShell):
You will receive the IP and port to connect with your game client. You should check the Game Sessions tab in the Amazon GameLift Servers console for your fleet to make sure the session is activated correctly. If you don’t see it, check the Amazon CloudWatch Logs for your fleet to see the game server wrapper log output for individual containers.
You can then connect to the game server with the IP and port like you would connect to any server from your game client. If you deployed the sample game server binary, it doesn’t have any actual netcode, it only shows how the end-to-end process works.
Figure 2 shows how multiple build versions are hosted in the same fleet. You define the build version in the session request, and the wrapper script will start the correct game server version.
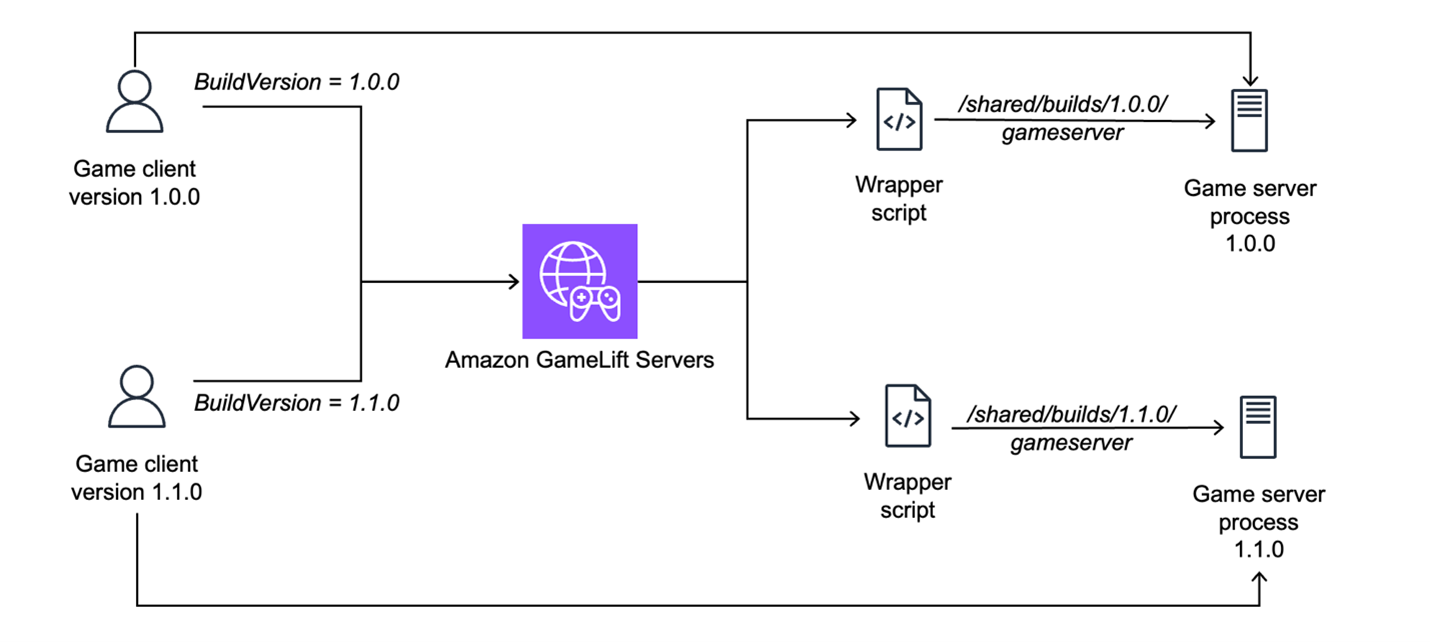
Figure 2 – Multiple build versions in a single fleet
Conclusion
In game development, iteration speed is critical for testing ideas and developing features. In this post, I covered the multi-build solution for Amazon GameLift Servers that you can use to host multiple game server versions on a single fleet and supports switching builds on the fly without updating the fleet. This allows rapid iteration and supports hosting multiple versions of the game, useful especially in development and testing phases.
Contact an AWS Representative to find out how we can help accelerate your game development.