AWS for Industries
Connect to automotive or manufacturing plant displays using VNC and AWS IoT Secure Tunneling
In the rapidly evolving automotive industry, remote access to vehicle displays has become a game-changer for maintenance, development, and support. By using VNC technology and AWS IoT Secure Tunneling, automotive professionals can now connect to remote vehicle displays for a wide array of applications. This capability enables remote diagnostics and troubleshooting, allowing technicians to securely access infotainment systems or instrument cluster displays of vehicles in the field, while engineers can remotely view and interact with advanced driver assistance system (ADAS) displays to help determine the need for debugging and tuning. During over-the-air (OTA) updates, engineers can monitor the progress and status screens remotely to confirm successful deployment. Fleet managers can use this technology to view driver information displays or telematics screens of multiple vehicles to help monitor performance, fuel efficiency, and improve driver behavior. In automotive manufacturing, quality control personnel can benefit from the ability to remotely access and inspect digital displays on vehicles moving through assembly lines. For vehicle testing and development, test engineers can remotely access prototype vehicle displays during road tests or simulations to help enhance safety and efficiency in testing procedures. Beyond these applications, the technology opens up possibilities for various other maintenance and support use cases, including onboard troubleshooting and guided co-browsing experiences, revolutionizing the way automotive professionals interact with and support vehicles in the field.
Overview of solution
This secure connectivity solution makes use of IoT Secure Tunneling to establish bidirectional communication to remote devices over a secure connection that is managed by AWS IoT. The solution uses a client machine with VNC Viewer installed, an intermediary server that acts as a secure local proxy, and an automotive display that you are connecting to.
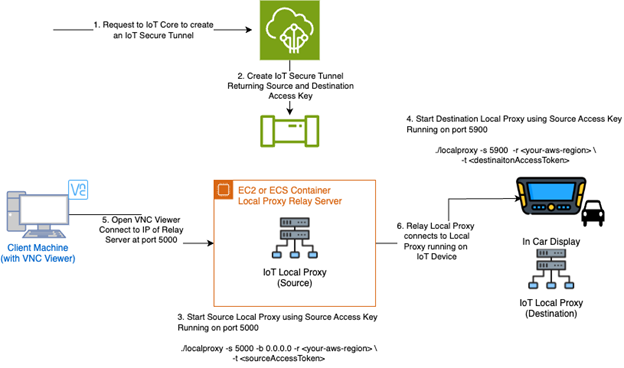 Figure 1: Architecture IoT Secure Tunneling components and messages
Prerequisites
For this walkthrough, you should have the following prerequisites:
- An AWS account
- A VPC with a private subnet
- Basic familiarity with Linux commands and AWS IoT services
- A device to act as your IoT thing (destination)
- Recommend using a Raspberry Pi 4
- VNC server installed and enabled
- AWS CLI installed and configured
- AWS IoT secure tunneling local proxy binary
- A server to act as a proxy relay (source)
- This can be an EC2 instance or ECS/EKS container
- AWS CLI installed and configured
- AWS IoT Secure Tunneling local proxy binary or container
- A client machine
- Recommend using either a Windows Bastion host in AWS or a personal computer
- VNC viewer installed
- Network connectivity to your proxy relay (source)
Walkthrough
Setup your Raspberry Pi:
The first step is to install and enable the VNC server, configure your Raspberry Pi as an IoT thing, and install or build the IoT Secure Tunneling local proxy.
Note if the Pi does not recognize that it has a display to share, connect it to a monitor.
- Install VNC server:
- Enable VNC server through raspi-config:
- Set VNC password:
Configure your Raspberry Pi as an IoT thing:
- Register your Raspberry Pi as an AWS IoT thing:
aws iot create-thing --thing-name
- Create required IoT policies and certificates (see detailed steps in setup instructions)
- Follow the AWS IoT documentation to create and download certificates (here)
- Attach the policy to the certificate
- Install and configure the local proxy (instructions can be found AWS IoT Secure Tunneling Local Proxy or in the Setup Local Proxy sections below)
Create an IoT secure tunnel:
- From the command line, issue the following AWS CLI command to your account and region where you are deploying your resources
aws iotsecuretunneling open-tunnel \
- The command will return a JSON payload that contains the sourceAccessToken and destinationAccessToken (see documentation here). Note these down for later use. Best practice is to place the source and destination tokens into their own .txt files for easy use.
Setup the local proxy using a binary file:
Within the private subnet, create an EC2 Ubuntu instance and follow the steps from AWS IoT Secure Tunneling Local Proxy to build the local proxy binary. Ensure that you can communicate from the Windows bastion host (described below) or personal device to the EC2 Ubuntu instance over TCP port 5000, and the instance has an IAM Role allowing Systems Manager access.
- Connect into the EC2 Ubuntu instance via AWS Session Manager or SSH.
- Run the following command from the command line from the directory that the
- On your Raspberry Pi, run the following command from the command to start the local proxy binary.
./localproxy -d 5000 -b 0.0.0.0 -r <your-aws-region> -t <destinationAccessToken>Setup the local proxy using a container:
Reference the Docker documentation to install docker before proceeding. The local proxy container can run on Amazon Elastic Kubernetes Service (EKS) and Amazon Elastic Container Service (ECS), if desired.
To download the container image and run on your EC2 instance, run the following command from the folder where your source token is stored sourceToken.txt. Replace <distro> with the appropriate distribution option for your machine from the list here.
For raspberry Pi, run the following command where your destinationToken is stored destinationToken.txt. Replace <distro> with the appropriate distribution option for your machine from the list here.
Setup the Windows bastion host with VNC Viewer:
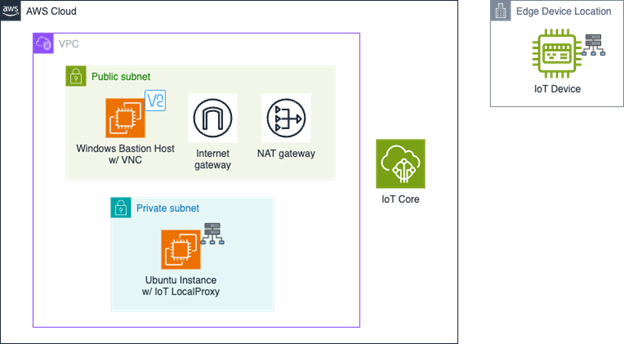 Figure 2: VPC with bastion and Ubuntu local proxy
In order to experiment with IoT Secure Tunnel and the IoT LocalProxy, create a VPC with a public subnet containing a Windows bastion host, Internet Gateway, and NAT Gateway.
If you are going to use a personal device as the client machine, place your Ubuntu EC2 instance with LocalProxy in this public subnet instead.
Setup the client machine:
On your client machine (either Windows Bastion host or personal computer), you will need to install a VNC viewer application. Follow the instructions here. If you are using a personal device, please ensure your EC2 proxy is in a public subnet.
- Get the IP address of the EC2 Ubuntu instance. If using your personal device, make sure this is the public IP address.
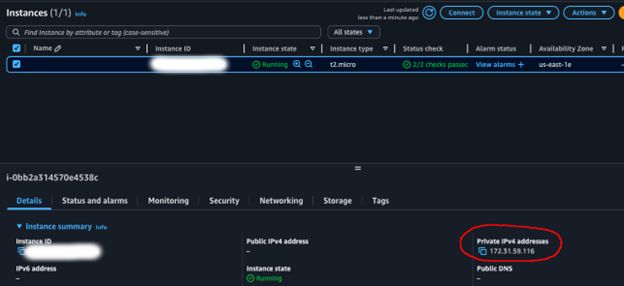
- Open the VNC Viewer application. Create a new connection. For the connection address, use the IP Address of the Ubuntu server and specify the port as 5000 (i.e. 172.31.59.116:5000)
If you are using a personal computer, you will need to make sure your Ubuntu server has a public IP and is in a public subnet
- When prompted, enter the authentication information (i.e. username and password you setup on the Raspberry Pi for VNC)
Cleaning up
To help avoid incurring unnecessary future charges, stop using resources that are no longer needed:
- Delete the AWS IoT thing, certificates, and policies you created
- Close and delete any open tunnels using the AWS IoT console or CLI
- Stop the VNC server if no longer needed
- Terminate and delete any EC2 instances or ECS containers created
- Delete your VPC and VPC resources you created
Conclusion
In this post, we demonstrated how to establish secure user interface access to an IoT thing using AWS IoT Secure Tunneling and VNC. This solution can be adapted for various automotive, manufacturing, and industrial IoT scenarios where secure direct screen sharing access is crucial. Examples include remote diagnostics of vehicle infotainment systems and real-time monitoring of manufacturing equipment displays. We also shared details on leveraging built-in IoT messaging to automate the setup and teardown of the IoT secure tunnel and local proxy. Furthermore, this blog presented an architecture showcasing how to expand IoT secure tunnel automation with an AWS serverless architecture. This approach helps efficiently manage the creation and termination of IoT secure tunnels across a fleet of IoT things, whether they’re connected to vehicle or other displays. By implementing these solutions, automotive manufacturers and industrial operators can help significantly enhance their remote monitoring, troubleshooting, and maintenance capabilities, creating the potential for improved efficiency and reduced downtime.
To learn more, check out the AWS IoT Secure Tunneling documentation or explore other AWS IoT solutions.