Migration & Modernization
Decoupling the compute and data layers with AWS MGN, AWS DataSync and Amazon FSx
As more organizations take their first steps in the cloud migration journey, we’re seeing them facing a common on-premises challenge: applications that are tightly coupled with their datasets. This means that while their applications (running on physical or virtual machines) are ready to be migrated to the cloud using the rehost (“lift-and-shift”) strategy, there may be massive, multi-terabyte block storage volumes attached to them that create migration bottlenecks. This traditional “lift-and-shift” of both compute and storage at once can be slow, risky, and complex.
This challenge is especially acute in data-intensive industries. Consider a financial services firm that is running an on-premises data analytics application on a powerful server. Imagine a case where the C: drive hosts the operating system, database engine (e.g. SQL Server) or an application, while the business-critical data is spread across several large volumes: a 4TB D: drive holds active financial transaction data, a 6TB E: drive archives historical records, and an 8TB F: drive contains shared data marts for business intelligence reporting. While functional, this setup creates significant challenges for scaling capacity, collaboration, or ensuring business continuity—all because the data is locally stored on that single on-premises server.
To overcome this, in this blog post we’ll share with you our recommended strategy for decoupling these layers by first migrating your on-premises data volumes, those large D:, E:, and F: drives, to a fully managed shared storage service in the cloud, such as Amazon FSx for NetApp ONTAP, using AWS DataSync. AWS DataSync is an online data transfer service that simplifies data migration and helps you quickly, easily, and securely, transfer your file or object data to, from, and between AWS storage services.
This strategy preserves file permissions and metadata while transforming your rigid, hardware-dependent storage into a flexible, enterprise-grade managed service. Additionally, by relocating your data to a managed file system, you gain access to features such as automated backups and disaster recovery, all with minimal disruption to the running application.
In this blog post, we’ll walk you through executing this strategy in the form of a scenario, providing you with a practical blueprint for accelerating your own cloud journey.
We’ll demonstrate how to prepare the on-premises server for data migration, configure a DataSync task, and perform the cutover from using the local storage drives to a remote mounted file system. We’ll also show you how to streamline the compute migration by using AWS Application Migration Service (AWS MGN), and selectively replicating only the OS and application volumes. By following this decoupling strategy, when you’re ready to complete the server migration using AWS MGN, your new Amazon EC2 instance can mount the exact same cloud-based shared file system that stores your decoupled datasets.
Prerequisites
While familiarity with these AWS services and concepts is beneficial, this post focuses on the strategic approach and best practices for a successful migration, rather than detailed technical setup. Before proceeding, ensure you have the following prerequisites in place:
- An AWS account with the necessary AWS Identity and Access Management permissions required for accessing these services
- AWS MGN initialized in your target AWS Region.
- An Amazon FSx file system (e.g. for Windows File Server or for NetApp ONTAP) provisioned in your target VPC. This will serve as the destination for your data.
- Established network connectivity between your on-premises environment and your AWS VPC, and firewall rules in place to allow connectivity with AWS services
Important Note: This migration pattern is designed for file-level access scenarios only. If your application requires block-level disk access (such as for Windows Server Failover Clustering Quorum), this decoupling strategy is not suitable, and you should maintain the traditional approach of migrating compute and storage together.
Walkthrough: The Decoupling process
Step 1: Expose On-Premises Data Volumes as Shares
Now that we understand the big picture, let’s look at the first critical step on-premises: making the data available for migration. Remember those massive D:, E:, and F: drives that are attached directly to your single server? The beauty of this storage-first approach is that we don’t need to physically move them. Instead, we’ll simply “liberate” the data from the local server’s direct control by exposing it to the network.

Figure 1: List the physical volumes attached to your on-premises server.
Think of it this way: the data is already stored in a file system, just like a standard network drive. By enabling simple Windows File Sharing, you can turn those local volumes into network shares. It’s a quick process—you’ll create a share for each volume (e.g. \your-server\data-D, \your-server\data-E, \your-server\data-F) and grant a specific service account read-only permissions. This read-only access is a best practice that ensures the migration tool can’t accidentally modify your source data.
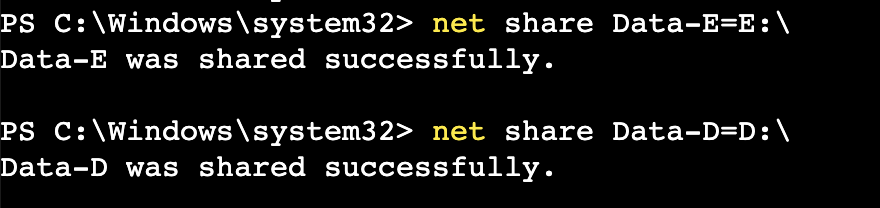

Figure 2: Create SMB shares for the non-bootable drives.
Once those shares are active, they become the “source” for your migration. The DataSync agent, which we’ll cover in the next section, can now connect to these shares and begin its work, treating them just like any other network-accessible file system. With this one simple step, you’ve taken the first stride toward decoupling your storage and compute, opening the door for a smooth, non-disruptive migration.
Step 2: Provision your cloud storage with Amazon FSx
With your on-premises data now exposed and ready to be migrated, the next step is to create its new home in the cloud. This is where Amazon FSx for NetApp ONTAP comes in. You’ll create a file system that is not only highly available and durable, but also fully managed. This new storage will have all the enterprise-grade features you’re accustomed to, like data deduplication and compression to save costs, and snapshots for quick, point-in-time restores. Most importantly, it will provide the same familiar user experience you’re used to on-premises. You will create a new SMB share (e.g. \fsx-ontap-endpoint\app-A) that will be the destination for our application’s on-premises volumes. FSx for NetApp ONTAP seamlessly integrates with your existing Microsoft Active Directory infrastructure, allowing you to maintain security for your data at the file and folder levels. The beauty of this step is that you’re not just replicating data; you’re modernizing your entire storage layer. This new cloud-native storage is fully decoupled from any single compute instance, which means it can be accessed by your existing on-premises team during the migration and will be ready for your new cloud-based Amazon EC2 instances when you’re ready for the cutover.
Step 3: Deploy the AWS DataSync Agent
With our data now accessible via SMB shares, the next step is to introduce the key player in our migration: the AWS DataSync agent.
Think of the DataSync agent as a smart, automated delivery driver. The agent connects to your on-premises shares, grabs the data, and securely and efficiently delivers it to its new home in the cloud. It’s the essential bridge between your legacy on-premises environment and your new AWS infrastructure.
Make sure you architect and plan accordingly, so that the agent is deployed to a network that has connectivity to the servers where data is located, as well as the DataSync backend service. DataSync agents may be deployed as a Virtual Machine on supported platforms, as well as an Amazon EC2 Instance.
Step 4: Create and Run the DataSync Task
With all the pieces in place—your on-premises data exposed as network shares and your new FSx for NetApp ONTAP file system ready in the cloud—the final step is to orchestrate the migration itself. In the AWS console, you’ll configure the transfer locations – source SMB (or NFS, if you choose to follow this strategy with a Linux server) and target FSx for ONTAP, then create a DataSync task. This task is a data transfer job that brings the source and destination locations together and sets task options for moving file or object data between AWS storage services and on-premises systems, or other cloud providers. DataSync can be tuned to meet your needs by offering a number of powerful options here, including scheduling the task for a convenient time, filtering which files and folders to include, and configuring how it handles things like symbolic links and user permissions.

Figure 3: Monitoring the DataSync data copy task
When you run the task for the first time, DataSync performs a full initial transfer of all your data. After that, you can schedule the task to run on a regular basis for periodic incremental loads. DataSync will identify and transfer only the files that have changed since the last run, ensuring your cloud storage stays up to date with minimal bandwidth usage. DataSync handles the heavy lifting, ensuring a fast, secure, and reliable migration with minimal impact on your running application.
Step 5: Prepare for Cutover
Before the final cutover, it’s crucial to prepare your on-premises environment. Start by running a final incremental DataSync task to ensure all the latest changes have been synced to your FSx file system. Once that’s complete, you’ll schedule a maintenance window to take the on-premises application or database offline and unmount the original D:, E:, and F: drives from your local server. With those local volumes disconnected, the final step is to remount the new cloud file system. You’ll now mount your Amazon FSx share at the same mount location or drive letter, so the data is available for your on-premises server the same way it was with a local drive. This seamless transition allows your application to start using the cloud-based storage without any changes to its configuration or file paths.
Step 6: Validate and Resume the Application
Once the file system is remounted, the final steps are to validate and resume the application. First, perform a quick check to ensure the application can correctly read and write data to the newly mounted cloud volumes. Once you validate and confirm everything is working as expected, you can bring the application back online, pointing it to the new, cloud-based storage.
Step 7: Migrate or Modernize?
After a successful data migration, the next logical step is to address the compute layer. Now that the data is decoupled and residing on a cloud-native service like Amazon FSx, you can follow an efficient approach for migrating your application server. AWS MGN is the ideal service for this. When installing the MGN replication agent on your on-premises server, you can choose to selectively replicate only the OS and application volumes. With the large data volumes that were previously attached locally already migrated, this is a crucial step—you’ll use a flag in the command-line installer to configure the agent to only migrate local volumes that contain the operating system and the application. In the below screenshot, the –drives command instructs MGN to only replicate the C: drive, significantly reducing the time it takes for replicating your server’s data to AWS.

Figure 4: Use the –drives flag on Windows or –devices on Linux to specify the bootable drive for replication by MGN
This storage-first approach gives you a powerful opportunity to modernize your compute architecture. By decoupling your application from its on-premises storage, you’ve paved the way to paths beyond a simple lift-and-shift migration to an EC2 instance, opening the door to explore modern, containerized platforms. For example, you can start working on modernizing your Windows-based application using AWS Transform for .NET workloads and deploy your application on Amazon EKS (Elastic Kubernetes Service), leveraging the persistent storage with native support for containerized workloads provided by FSx for ONTAP. This allows you to scale and manage your application with far greater flexibility than a traditional server.
Conclusion
In this post, we walked you through a strategic pattern that takes you beyond a simple lift-and-shift migration and helps you take your first step in modernizing your monolithic applications. By using AWS DataSync and AWS Application Migration Service together, you can decouple large data volumes from your application servers during a rehost migration.
Consider adapting this approach to meet your migration timelines while simultaneously unlocking the benefits of cloud: improved agility, independent scalability, and enhanced resilience for your architecture.