Front-End Web & Mobile
Building a serverless real-time chat application with AWS AppSync
June 27, 2024: This blog post covers Amplify Gen 1. For new Amplify apps, we recommend using Amplify Gen 2. You can learn more about Gen 2 in our launch blog post.
Update: We recommend checking the new revamped chat app solution with more features, modern client libraries, and simplified implementation.
Today, most digital media usage originates from mobile devices. People interact with their apps using multiple devices, over a variety of connections (3G, LTE, Wi-Fi, and so on), as well as offline. It’s important to offer a consistent user experience across different connection types. At the same time, there’s been a rise in the number of social media apps and apps that incorporate social elements to enable activities like collaboration, messaging, and commenting. These activities require a real-time capability to automatically present updated information to users.
AWS AppSync, introduced at re:Invent 2017, is a fully managed GraphQL service. It makes it easy to build collaborative mobile and web applications that deliver responsive user experiences, and provide offline and real-time capabilities. You can find more information about GraphQL in the AWS AppSync Developer Guide.
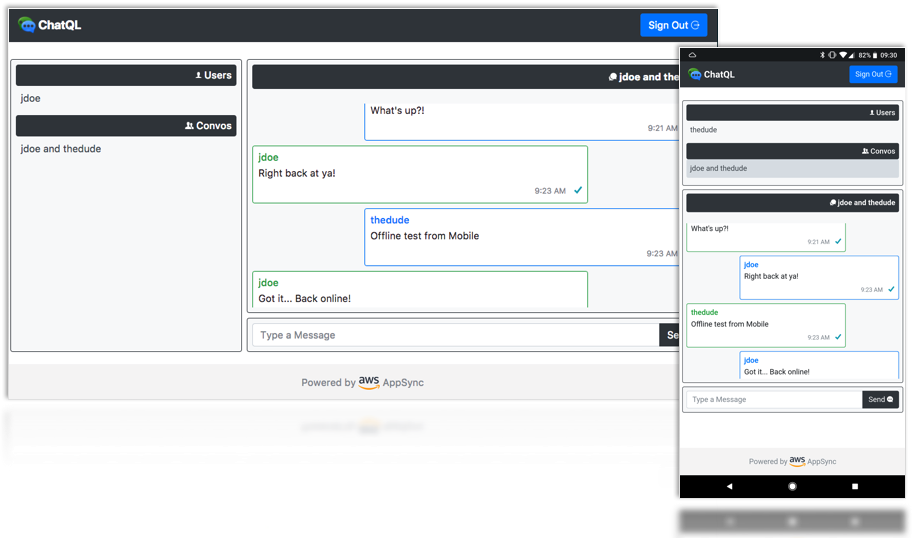
Today, we’re introducing ChatQL, which is a new Angular Progressive Web App (PWA) starter application. Built with AWS AppSync, it showcases how to create a real-time chat application. In this blog post, we present an overview of the application, and dive into AWS AppSync and the front-end implementation.
Deploying the application
You can clone, install, test, build, and deploy ChatQL by following the instructions on the GitHub respository. You can automatically configure and deploy the User Sign-In, Analytics, and Hosting backend and related AWS services by using a few AWS Mobile Command Line Interface (CLI) commands.
Architecture overview

The application uses AWS AppSync to interact with the backend data sources, and uses the AWS AppSync SDK for JavaScript. The AWS AppSync API is defined by a GraphQL schema where types and operations (queries or mutations) are associated with resolvers. These resolvers use request and response mapping templates to read data from and write to specific data sources. The application uses four Amazon DynamoDB tables:
- User table – stores users names and internal identifiers
- Message table – messages correlating users, conversations and timings
- Conversation table – stores conversations names and internal identifiers
- User Conversations table – associates users with conversations
The following graph is a high-level representation of our data model. It’s composed of nodes and edges. Along the edges, cardinality information for each connected set of nodes is presented. The nodes represent the data that we’re storing, and the edges represent associations between the data. The graph view helps us understand how the data relates to itself and how it should be stored. Note that we’re storing the data in DynamoDB. A GraphQL application doesn’t require using a graph database.

Users can see a list of all other users, and can start conversations with any of them. However, they can only see conversations that they initiated or are invited to. In order to make it all work, we take advantage of specific GraphQL operations:
- Queries — fetch the list of users, related conversations, and messages
- Mutations — create users, messages, conversations, and relations between users and conversations
- Subscriptions — automatically retrieve new messages in a conversation as soon as they’re received in the backend
The chat application consists of a “chat-app” feature module that’s composed of several components. Each component interacts with the module’s simple Angular service that provides access to the AWS AppSync client.

Authentication
Users must authenticate to use ChatQL. AWS AppSync allows you to secure and protect your data by using API keys, AWS IAM or Amazon Cognito user pools. The ChatQL application uses Amazon Cognito user pools, and allows users to register their account and sign in. After successful authentication, Amazon Cognito returns a JWT token to the application that’s used to identify the user and authorize access to the AWS AppSync GraphQL API.
ChatQL uses the AWS Amplify library to easily implement authentication. AWS Amplify is a declarative library that makes it easy to implement common tasks (such as authentication) in front-end and mobile applications. A thin stand-alone feature module implements the onboarding pages for the app — calling Amplify Auth for sign-up, sign-in, password confirmation and sign-out. You make this module available in the application by adding it to imports in app.module.ts.
  import { AuthModule } from './auth/auth.module';
  ...
  imports: [
    ...
    AuthModule.forRoot({signInPath: '/chat'}),
    ...
  ],
Interacting with data
Querying and receiving messages
You fetch messages using the loadMessages function in chat-message-view.component.ts by calling the AWS AppSync client’s watchQuery with the allMessageConnection query:
query getConversationMessages($conversationId: ID!, $after: String, $first: Int) {
  allMessageConnection(conversationId: $conversationId, after: $after, first: $first) {
    __typename
    nextToken,
    messages {
      __typename
      id
      conversationId
      content
      createdAt
      sender
      isSent
    }
  }
}
The query returns a MessageConnection type, which is a GraphQL connection. A connection is a term that describes paginated data. It allows us to efficiently query for a subset of messages. A connection is typically composed of an array of data (the paginated field) and a token/cursor that points to where the next query should start from.
type MessageConnection {
  messages: [Message]
  nextToken: String
}
In the allMessageConnection query, we pass a mandatory conversationId argument. We can also pass a token to the optional after argument that indicates from which item we should start querying for data. Optionally, we can also specify how many items to retrieve with the first argument. The following is the response template for the query:
{
    "version" : "2017-02-28",
    "operation" : "Query",
    "query" : {
        "expression": "conversationId = :conversationId",
        "expressionValues" : {
            ":conversationId" : {
                "S" : "${context.arguments.conversationId}"
            }
        }
    },
    "scanIndexForward": false,
    "limit": #if(${context.arguments.first}) ${context.arguments.first} #else 20 #end,
    "nextToken": #if(${context.arguments.after}) "${context.arguments.after}" #else null #end
}
We use a “cache-and-network” fetch policy in watchQuery to retrieve the messages. This way, simultaneous requests are made to the client cache and to the backend for messages. This allows a quick response to the user if a list of messages is already in the cache. The cache is then updated by any new messages that are returned from the network. We subscribe to the observable object that watchQuery returns to update our message list, and store the returned nextToken.
Fetching more messages and paginating
When it opens an existing conversation, the application only loads the last 10 messages. A conversation can hold any amount of messages. We don’t want to retrieve all of them at once because this would impact the application’s responsiveness. The application uses the allMessageConnection query with the first argument to manage how messages are fetched in batches. The nextToken saved from the previous query execution is used to specify where message retrieval should start from.
const result = this.observedQuery.fetchMore({
  variables : { after: this.nextToken },
  updateQuery: (prev, {fetchMoreResult} ) => {
    if (!fetchMoreResult) { return prev; }
    const _res = pushMessages(prev as MessagesQuery,
      fetchMoreResult.allMessageConnection.messages,
      fetchMoreResult.allMessageConnection.nextToken);
    this.completedFetching = false;
    this.fetchingMore = true;
    return _res;
  }
});
Additional messages are loaded by scrolling up in the message view. The scroll action triggers an event that calls loadMoreMessages in chat-message-view.component.ts. We call fetchMore on the original observable object with nextToken, and append the new set of returned messages to our existing list. This allows a seamless infinite scrolling experience for the end user.
Subscribing to and handling new messages
During a conversation, the application pushes new messages in real time to the chat. AWS AppSync provides this functionality with subscriptions. We subscribe to new messages in the current conversation, and a subscription is invoked any time a message is created. To do this, we call the subscribeToMore function on the observable object that’s returned by the watchQuery function.
this.subscription = observable.subscribeToMore({
    document: subscribeToNewMessages,
    variables: { 'conversationId': this._conversation.id },
    updateQuery: (prev: MessagesQuery, {subscriptionData: {data: {subscribeToNewMessage: message }}}) => {
      return unshiftMessage(prev, message);
    }
});
We pass the ID of the current conversation to the subscription and add newly received messages to the front of our existing message list when a message is pushed to our chat app.
Sending a message and optimistic responses
To update our backend with GraphQL, we use mutations. The app uses a createMessage mutation to add a message to a conversation. However, GraphQL operations aren’t possible when the backend can’t be reached. This limits the effectiveness of a typical app.
The AWS AppSync SDK for JavaScript provides offline capabilities with support for optimistic UIs. These capabilities inside our PWA app allow users to interact with the app even when it’s offline or experiencing network connectivity issues. Our app allows users to “send” messages at any time — even when they’re offline. When a user sends a message, it’s immediately displayed in the message view, without waiting for a server response. The associated mutation is also saved. If the mutation can’t be executed, it’s resent to the backend when the app comes back online.
To send a message, first we construct a message object. We define the ID of the message on the client side. We do this so that we can properly roll back the optimistic data when the response is received from the backend with the same ID. Because we fetch our messages in reverse chronological order (oldest to newest) on the backend, we use the current date as part of our ID (which is used as a key in our DynamoDB table). We add UUIDv4 to the ID to ensure uniqueness.
const date = Date.now();
const message: Message = {
  ...
  isSent: false,
  id : `${date}-${uuid()}`
};
Our mutation defines what fields are returned when the mutation is successfully executed.
mutation createMessage($id: ID!, $content: String, $conversationId: ID!, $createdAt: String!) {
  createMessage(id: $id, content: $content, conversationId: $conversationId, createdAt: $createdAt){
    __typename
    conversationId
    createdAt
    id
    sender
    content
    isSent
  }
}
To take advantage of the offline capability, we provide an optimistic response in our mutation that represents what the response from the server should look like. In our case, this is just a response object with the message.
client.mutate({
mutation: createMessage,
variables: message,
optimisticResponse: () => ({
createMessage: {
...message,
__typename: 'Message'
}
}),
...
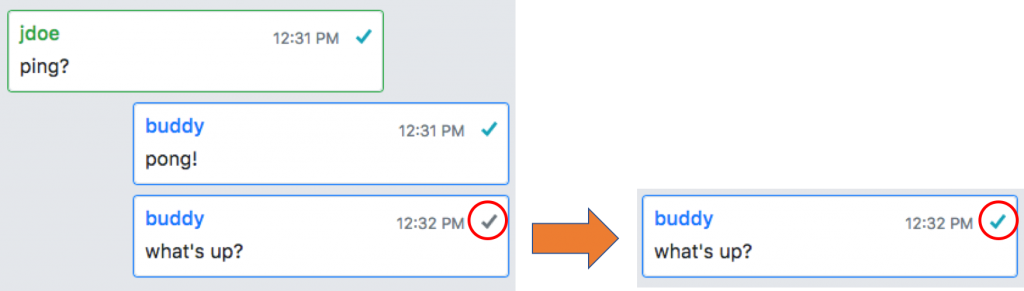
});The app provides visual cues to let the user know if a message still needs to be sent, or if it’s been received by the backend. The message object that’s sent in the mutation has an isSent flag set to false. The flag controls the color of a check mark that’s shown for each message.
When our mutation is handled successfully on the backend, a matching message object is returned with the flag set to true. This change in value automatically switches the check mark color from gray to green.
Collecting analytics
ChatQL collects user session metrics. It also tracks the number of conversations that were created and messages that were sent in Amazon Pinpoint. You can do this by using AWS Amplify, which is also being used to implement authentication. We configure AWS Amplify once in app.module.ts, and call Analytics.record any time a message is sent after a conversation is created.
app.module.ts
import Amplify from 'aws-amplify';
import aws_exports from '../aws-exports';

Amplify.configure(aws_exports);
chat-input.component.ts
import { Analytics } from 'aws-amplify';
...
Analytics.record('Chat MSG Sent');
You can see the aggregated metrics in the Amazon Pinpoint console.

Conclusion
In this blog post, we went over the new ChatQL Angular PWA starter application that’s built using AWS AppSync and the AWS AppSync SDK for JavaScript. AWS AppSync makes it simple for our app to interact with backend data sources and to implement real-time and offline capabilities.
We described how our app interacts with messages (querying, fetching, creating, subscribing to), and how we used optimistic responses to provide a seamless, improved experience to the user. There are also other parts of the app that interact with other parts of our backend data sources with AWS AppSync. We encourage you to dive in as well by getting started with the code, the documentation, and the AWS resources that are configured and deployed in the backend.
We hope that this starter application helps you get started with AWS AppSync. You can find the code and information about how to publish the app in the GitHub repo.
This post was contributed by Ed Lima and Brice Pelle. Ed is a Solutions Architect passionate about Serverless, Mobile, IoT as well as helping well architect AWS customers journey in the cloud. Brice is a Enterprise Support Lead and mobile support specialist. Brice also likes to tinker with app development in his spare time.