Front-End Web & Mobile
NEW: Build React forms for any API in minutes with AWS Amplify Studio (no AWS Account required)
June 27, 2024: This blog post covers Amplify Gen 1. For new Amplify apps, we recommend using Amplify Gen 2. You can learn more about Gen 2 in our launch blog post.
Today, AWS Amplify announces Amplify Studio form builder, the new way to build React form components for any API. Amplify Studio is a visual interface that helps customers build full-stack web and mobile apps faster. Developers can now generate cloud-connected React forms based on their app’s GraphQL data model or REST APIs in one click and extend them with custom validations rules and stylings.
Amplify Studio is the new way to build React forms by making it easier in three key ways:
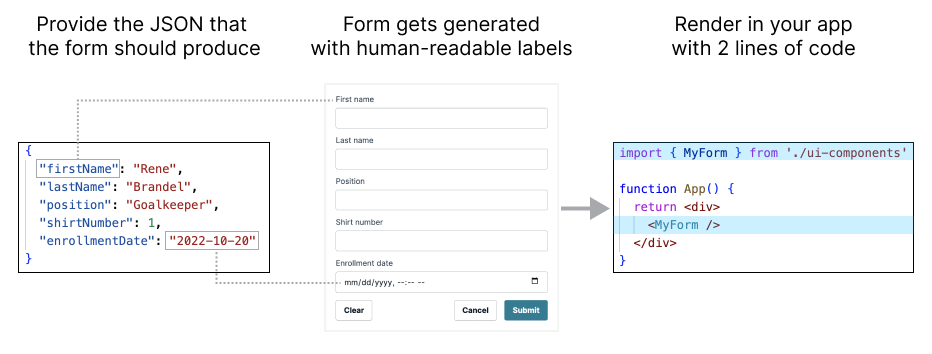
- API-driven form generation: Provide the JSON object you want your form to produce or have a form connect to your existing data model in Amplify Studio. The generated form inputs have human-readable labels and auto-inferred input types for string, number, dates, and more. When linked to an Amplify data model, the generated form stays in sync with data model updates.
- Visual form customization: Drag and drop to rearrange form inputs. Visually configure common validation rules such as enforcing emails or URL formats.
- Extensible via code: Enhance your validation rules in code, including asynchronous validations against external services and APIs. Style the forms using an Amplify UI theme to match your brand or toggle between light and dark mode.
1. Create new React form based on JSON it should produce
In this demo, we’ll build a new football player submission form ⚽️. (Yes, it’s football; not “soccer”).
If you don’t have an AWS account, go to the Amplify Studio sandbox to use the form builder even without an AWS account.
If you have an AWS account, we recommend you to go to the Amplify console > select Build a new app > open “UI Library” in Amplify Studio > select “New form“.
Choose to start from “JSON object” and paste in the JSON that you want the from to produce. Let’s assume we want the form to produce the following JSON object:
{
   "firstName": "Rene",
   "lastName": "Brandel",
   "position": "Goalkeeper",
   "shirtNumber": 1,
   "enrollmentDate": "2022-10-20"
}
Now, you’ve successfully generated a React form! You can play with it when you click on “View as end user”.

Note: Amplify Studio will intelligently infer the form input types (see NumberField for “shirtNumber” and DateTimeField for “enrollmentDate”. Studio will also reformat the labels from “camelCase”, “PascalCase”, or “snake_case” to “Sentence case” for more human-readability.
Next, you can optionally customize the input types, input layout, and validation logic. If you’re good with the form as is, you can skip to section “3. Render React form“.
2. Visually customize input layout, types, validation rules
Customize input layout and types
Use “drag and drop” to rearrange form elements including the ability to put elements side-by-side. For example, let’s move the “Last name“ input next to the “First name” input.
You can also change the NumberField to a StepperField for the “Shirt number”. This gives your end users some nicer controls for this use case.

Provide prepopulated options for SelectFields
In addition, you can also change the “position” input to use a “Select Field” to provide a fixed set of options. For your convenience, below are the common football (again; not “soccer”) positions that you can paste in:
Goalkeeper
Right Full-back (or Wingback)
Left Full-back (or Wingback)
Center-back
Center back (or sweeper)
Defensive Midfielder
Right Midfielder (or Winger)
Center Midfielder
Center Forward (or Striker)
Attacking Midfielder (or Center Forward)
Left Midfielder (or Winger)
Visually configure common validation rules
Lastly, you can also visually configure validation rules for the form inputs. Looking to code custom validation rules? Don’t worry, we’ll cover that in the section “Bonus 2: Extend validation logic in code”.
Let’s assume for the sake of this demo that all football players’ names must start with “René“ (I know… weird example). To add a validation rule, select a form input > select ”Add rule“ under validation rules:

3. Render forms in React
Setup React project and setup Amplify UI library
To render the React form, you’ll need to create a React project and get the form code. These instructions are also available in the Amplify Studio sandbox when you select “Setup React project“.
First, create your React project by running the following command in your Terminal:
npx create-react-app my-amplify-project
cd my-amplify-project
Then, install the Amplify JavaScript and UI Library dependencies to properly render the React form:
npm install @aws-amplify/ui-react aws-amplifyNext, configure edit your index.js file and import the dependencies required for the Theming system for Amplify UI:
import "@aws-amplify/ui-react/styles.css";
import { ThemeProvider } from "@aws-amplify/ui-react";
Lastly, in the same index.js file, wrap your index.js file with the ThemeProvider to propagate all theming changes:
<ThemeProvider>
  <App />
</ThemeProvider>
Get form code and display form
If you used the Amplify Studio sandbox, click on “Add form to app” to download the generated React form code. Unzip ui-components.zip and move the ui-components/ folder to your React project’s source folder my-amplify-project/src/ui-components/.

If you generated the form in an existing Amplify Studio project, authenticated with an AWS Account, run the amplify pull command in your Terminal to get your form component code.
To render the form, go to your App.js file and replace it with the following contents. Effectively, you only need 1 line of code to import the form and 1 line of code to render it.
import { MyForm } from './ui-components' // imports the form

function App() {
  // Render the form
  return <MyForm onSubmit={fields => console.log(fields)} />
}

export default App
Go back to your Terminal and start your local development server for React by running:
npm run startSuccess! Your form should now be fully functional! Open the developer console in your browser to see the JSON payload onSubmit. Notice how the shape matches exactly what the original JSON object we used to create this form?

Bonus 1: Style form elements to match your brand
The generated forms are built on top of the Amplify UI library which has an entire theming system to make the Amplify UI components match your brand with design tokens such as colors, spaces, fonts, border radii, and more.
To extend the default theme, go to your index.js file, import the createTheme function and create a new theme object. In our example, we’ll modify the brand color and have the font color reference the new brand color:
import { createTheme, ThemeProvider } from "@aws-amplify/ui-react";

const myTheme = createTheme({
  tokens: {
    colors: {
      brand: {
        primary: {
          "80": {
            value: "#B71C1C"
          }
        }
      },
      font: {
        primary: {
          value: "{colors.brand.primary.80.value}"
        },
      }
    }
  }
})
Last but not least, you need to set the new theme in the ThemeProvider to propagate the new theming changes to the components in your app:
<ThemeProvider theme={myTheme}>Now if you go back to your browser, you’ll see the changes reflected. To learn more about the theming capabilities of Amplify UI, review Theming on the Amplify UI documentation.

Bonus 2: Extend validation logic in code
Amplify Studio provides you lifecycle hooks to record user inputs, add custom validation logic, or handle call-to-action button events. For example, you already used the onSubmit event handler to log the user input upon clicking “Submit“.

Let’s use the onValidate event handler to hook in some custom validation logic. Let’s say we want to restrict the shirtNumber to be between 1 and 99:
<MyForm
  onValidate = {{
    shirtNumber: (value, validationResponse) => {
      // value: current user input's value (e.g. "-1")
      // validationResponse: existing response from any visually configured validation rules
      if (value < 1 || value > 99) {
        return {
          hasError: true,
          errorMessage: "Shirt number must be between 1 and 99. Sorry!"
        }
      }
      // Always return the existing validation repsonse as default return
      return validationResponse
    }
  }}
  onSubmit = { fields => console.log(fields) }
/>
Your form will now run the custom validation rule as you input values into the form.

Note: Not covered in this example but these generated forms also support asynchronous validation rules. For example, when you need to call an external API for validation. To run an async validation rule, return a promise with the validation response.
The new way to build React forms
I hope this blog post gives you a glimpse on how we’re envisioning forms to be built from now on. Amplify Studio generates a form by working backwards from the expected data it should produce. There’s so much more to Amplify Studio forms that we didn’t get to cover in this blog post:
- Amplify Studio’s forms are also cloud-connected and can auto-submit to an Amplify-generated backend
- Hide the built-in action buttons (Submit, Clear, Cancel) and use onChange hook to get user input data
- Add sectional elements such as headings, text, dividers
- Dismiss the form when the user clicks the Cancel action button
- Dynamically modify specific input properties in code
As always, feel free to reach out to the Amplify team via GitHub or join our Discord community. Follow @AWSAmplify on Twitter to get the latest updates on feature launches, DX enhancements, and other announcements.