Microsoft Workloads on AWS
Automate Active Directory domain join activities at scale with AWS Systems Manager
In a previous blog post, I showed how you can use AWS Systems Manager Automation to dynamically automate domain join and unjoin activities with Microsoft Active Directory Domain Services (AD DS) for your Windows instances on Amazon Elastic Compute Cloud (Amazon EC2). The previous solution showed you how to manually domain join/unjoin activities against single or multiple EC2 instances to an Active Directory (AD) environment. However, I have worked with customers who were looking to support dynamic AD workloads and looking for ways to add automation to further simplify this process. In addition to this, they were looking to meet compliance with AWS tag policies and Service control policies (SCP) within AWS Organizations.
In this blog post, I will show you how State Manager, a capability of AWS Systems Manager, automates the domain join or unjoin process of a fleet of Windows EC2 instances while complying with policies put forth by your security teams.
Solution Overview
In this blog post, I will show how State Manager associations can be configured to define the appropriate state for the Windows EC2 instances. The configuration defines the state your Windows EC2 instances need to be, either domain joined to an AD domain or unjoined from the AD domain. This process scales with your Windows workloads, allowing you to maintain the appropriate domain join/unjoin state for one Windows EC2 instance or a fleet of Windows EC2 instances.
The solution components include:
- An AWS CloudFormation template to deploy the associations and associated IAM roles
- Two State Manager associations
- One association to join Windows EC2 instances to an AD domain
- One association to unjoin Windows EC2 instances from an AD domain
- Two Identity and Access Management (IAM) roles for each aforementioned association
- The Systems Manager Automation runbook from the previous blog post
- For this demo, I will use SSM-Automation-AD-Join.
- EC2 tags
- Tags can categorize your EC2 instances resources in different ways, for example, by purpose, owner, or environment. I will show how specific tags determine an entire fleet of EC2 instances’ AD domain activity.
To deploy the runbook and parameters automatically, download and save the AWS CloudFormation template from Github locally to your computer to create a new CloudFormation stack. Creating a new stack will simplify the deployment of the State Manager associations and IAM roles to automate the AD join and unjoin activities automatically. Review What is AWS CloudFormation? to learn more.
A CloudFormation stack, presented In Figure 1, is created with the name SSM-Association-Demo. The first input parameter in the stack requires you to enter a name for an existing Automation runbook. For this demo, I will use SSM-Automation-AD-Join, though you can enter any name you like as long as it meets the requirements referenced on the stack creation screen. The remaining two input parameters in the stack create Systems Manager association names, one for AD domain join and one for AD domain unjoin activities. I will name these values SSM-Association-AD-Join and SSM-Association-AD-Unjoin, respectively.

Figure 1: Example screenshot of AWS CloudFormation stack creation.
In Figure 2, you see both of the associations that were created by the CloudFormation stack.

Figure 2: Example screenshot of State Manager associations for AD domain join and domain unjoin.
I can view details, edit, or delete either association by selecting the radio button next to each association. If I want either association to run immediately, I can choose Apply association now and the association will run and set the desired state of each Windows EC2 instance. Each association will run against all of the Windows EC2 instances that are tagged based on a specific key/value pair. I will go into more detail about the EC2 tags below.
Understanding associations
Associations in State Manager define the state you want to apply to a set of targets. The provided CloudFormation template creates the association for you. However, it helps to understand how an association works; in particular, the main components:
- Automation runbook that will enforce the desired state
- Defining how to run the association against a fleet of EC2 instances
- EC2 instance(s) as the target AWS resource
- Input parameters for the select Automation runbook
- A schedule that will run each association
Review Working with associations in Systems Manager to learn more.
Now let’s look at each component in more detail.
Document
An association requires you to select a single SSM document or Automation runbook to run and enforce for your desired state. As shown in Figure 3, the document list is vast, as it includes AWS-provided documents and runbooks. You can easily filter this list by type and the owner of the runbooks. For this demo, I will select the Automation runbook that I created based on the previous blog post called SSM-Automation-AD-Join.
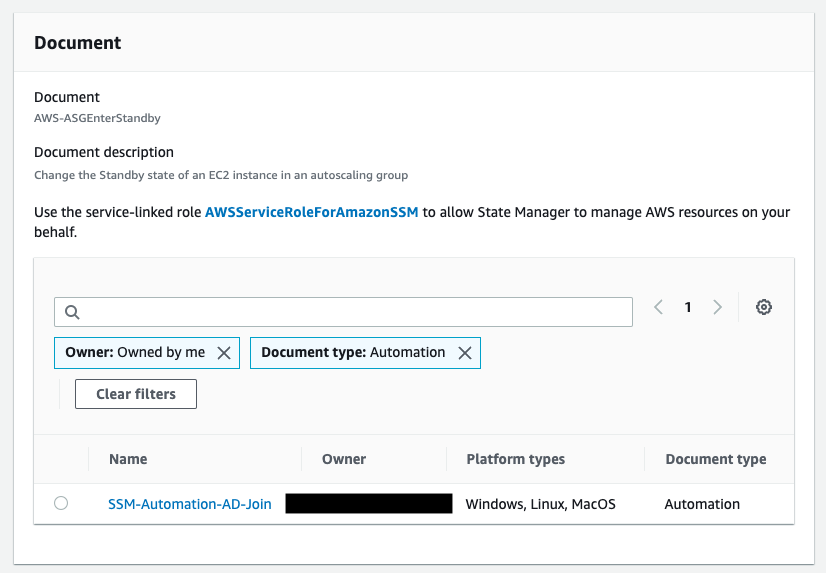
Figure 3: Select the custom Automation runbook.
Execution and Targets
Before defining your target EC2 instances, you need to define how to run the association: Simple execution or Rate control. Choosing Simple execution allows you to select a single EC2 instance or multiple EC2 instances, whereas Rate control allows you to safely run the association against a fleet of EC2 instances. I want to configure these associations to run on Windows EC2 instances based on their tags, so I will select Rate control.
Now that I have selected Rate control, I need to configure the Targets section by selecting InstanceId as the Parameter and the Tags as the Targets. This allows me to enter a specific EC2 tag based on its key/value pair that can be applied to a fleet of Windows EC2 instances, thus allowing your workloads to automatically perform the correct AD domain activity. You can see in Figure 4 and Figure 5 that I have configured the Tag key as ADJoined; however, the Tag value is different depending on the AD domain activity. To domain join, the Tag value is set to ADD while the domain unjoin is set to REMOVE.
(NOTE: both the Tag key and Tag value are cAsE-SeNsItIvE).

Figure 4: Execution and Targets configuration to domain join Windows EC2 instances.

Figure 5: Execution and Targets configuration to domain unjoin Windows EC2 instances.
Input parameters
Most SSM Documents and Automation runbooks include input parameters. As shown in Figure 6 and Figure 7, the parameters that can be configured are AutomationAssumeRole and DomainJoinActivity, both of which should be familiar to you if you manually ran the Automation runbook. Configuring the DomainJoinActivity field is required with either Join or Unjoin, both of which determine a specific AD domain activity that will take place.
To allow State Manager to call AWS services specified in the runbook and run Automation associations on your behalf, specify the role ARN created from the CloudFormation template in the AutomationAssumeRole field. Figure 8 shows the custom IAM policy that allows State Manager permissions to describe, stop, and reboot EC2 instances, as well as create and describe EC2 tags. It also allows Systems Manager to describe EC2 instances, list associations, and run commands directly on the EC2 instances. Review Method 2: Use IAM to configure roles for Automation to learn more.

Figure 6: Input parameters configured to allow domain join.

Figure 7: Input parameters configured to allow domain unjoin.
{
    "Version": "2012-10-17",
    "Statement": [
        {
            "Sid": "EC2TagConditions",
            "Effect": "Allow",
            "Action": [
                "ec2:RebootInstances",
                "ec2:StopInstances"
            ],
            "Resource": "*",
            "Condition": {
                "StringLike": {
                    "aws:RequestTag/ADJoined": [
                        "ADD",
                        "REMOVE"
                    ]
                }
            }
        },
        {
            "Sid": "EC2SSMDescribe",
            "Effect": "Allow",
            "Action": [
                "ec2:CreateTags",
                "ec2:DescribeInstances",
                "ec2:DescribeTags",
                "ssm:DescribeInstanceInformation",
                "ssm:List*",
                "ssm:SendCommand"
            ],
            "Resource": "*"
        }
    ]
}
Figure 8: Custom IAM policy that allows State Manager associations permissions to call Amazon EC2 and AWS Systems Manager services.
Schedule
Finally, you will define the schedule for when the association is run. When configuring associations, you can choose either On Schedule or No Schedule. For this example, I have configured both associations to run once every hour. And since both associations are looking for a specific EC2 tag, Systems Manager will only process those Windows EC2 instances that are waiting for a specific AD domain join or unjoin activity to take place. For the domain unjoin process in particular, this allows you to maintain a clean AD environment, ensuring that your Windows EC2 instances are removed from AD. Had I selected No Schedule, the association would run one time.
When configuring a schedule, you have the option to configure a CRON or rate builder. I chose to configure this schedule with a CRON expression, though, this can be customized to meet your environment and maintain compliance. Review Reference: Cron and rate expressions for Systems Manager to learn more.
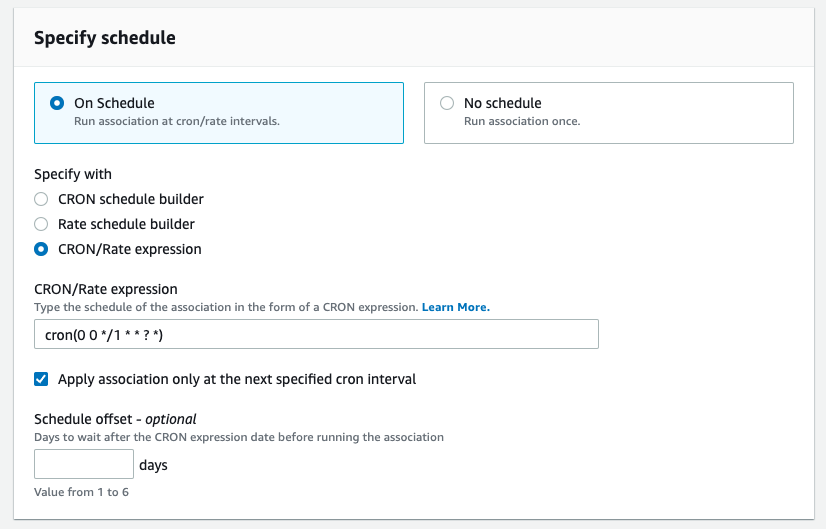
Figure 9: Example schedule specified with a CRON expression to run every hour.
Prepare your Windows EC2 instances
Now that both of the AD domain join and domain unjoin associations are created, I will walk through how to prepare EC2 instances to domain join and domain unjoin. In both cases, the EC2 tag value determines which association will run.
Domain join
- Open the Amazon EC2 console at https://console.aws.amazon.com/ec2/.
- In the navigation pane, select Instances.
- Select the EC2 instance from the Instances list and choose the Tags
- Choose Manage tags.
- In the Manage tags screen, click Add new tag.
- Enter ADJoined for the key and ADD for the value of the tag.
- When you are finished adding the tag, choose Save. (Figure 10)

Figure 10: Example screenshot of an EC2 instance’s tags configured to start the domain join process.
Domain unjoin
- Open the Amazon EC2 console at https://console.aws.amazon.com/ec2/.
- In the navigation pane, select Instances.
- Select the EC2 instance from the Instances list and choose the Tags
- Choose Manage tags.
- In the Manage tags screen, click Add new tag.
- Enter ADJoined for the key and REMOVE for the value of the tag.
- When you are finished adding the tag, choose Save. (Figure 11)

Figure 11: Example screenshot of an EC2 instance’s tags configured to start the domain unjoin process.
Let Systems Manager do the work
With the associations configured and the Windows EC2 instances tagged, Systems Manager will handle the heavy lifting. To see an example of this, I can view the details of an Association Id by clicking on the Id or by selecting the radio button next to each association and choosing View details. Selecting 636953d4-3c27-4782-8712-42e4f76d4c1e, for example, shows me the details of the association. Selecting the Resources tab will show all the resources that this association will run against as seen in Figure 12. I can go check to see the status of any Automation runbook by navigating to Automations in the Systems Manager console.
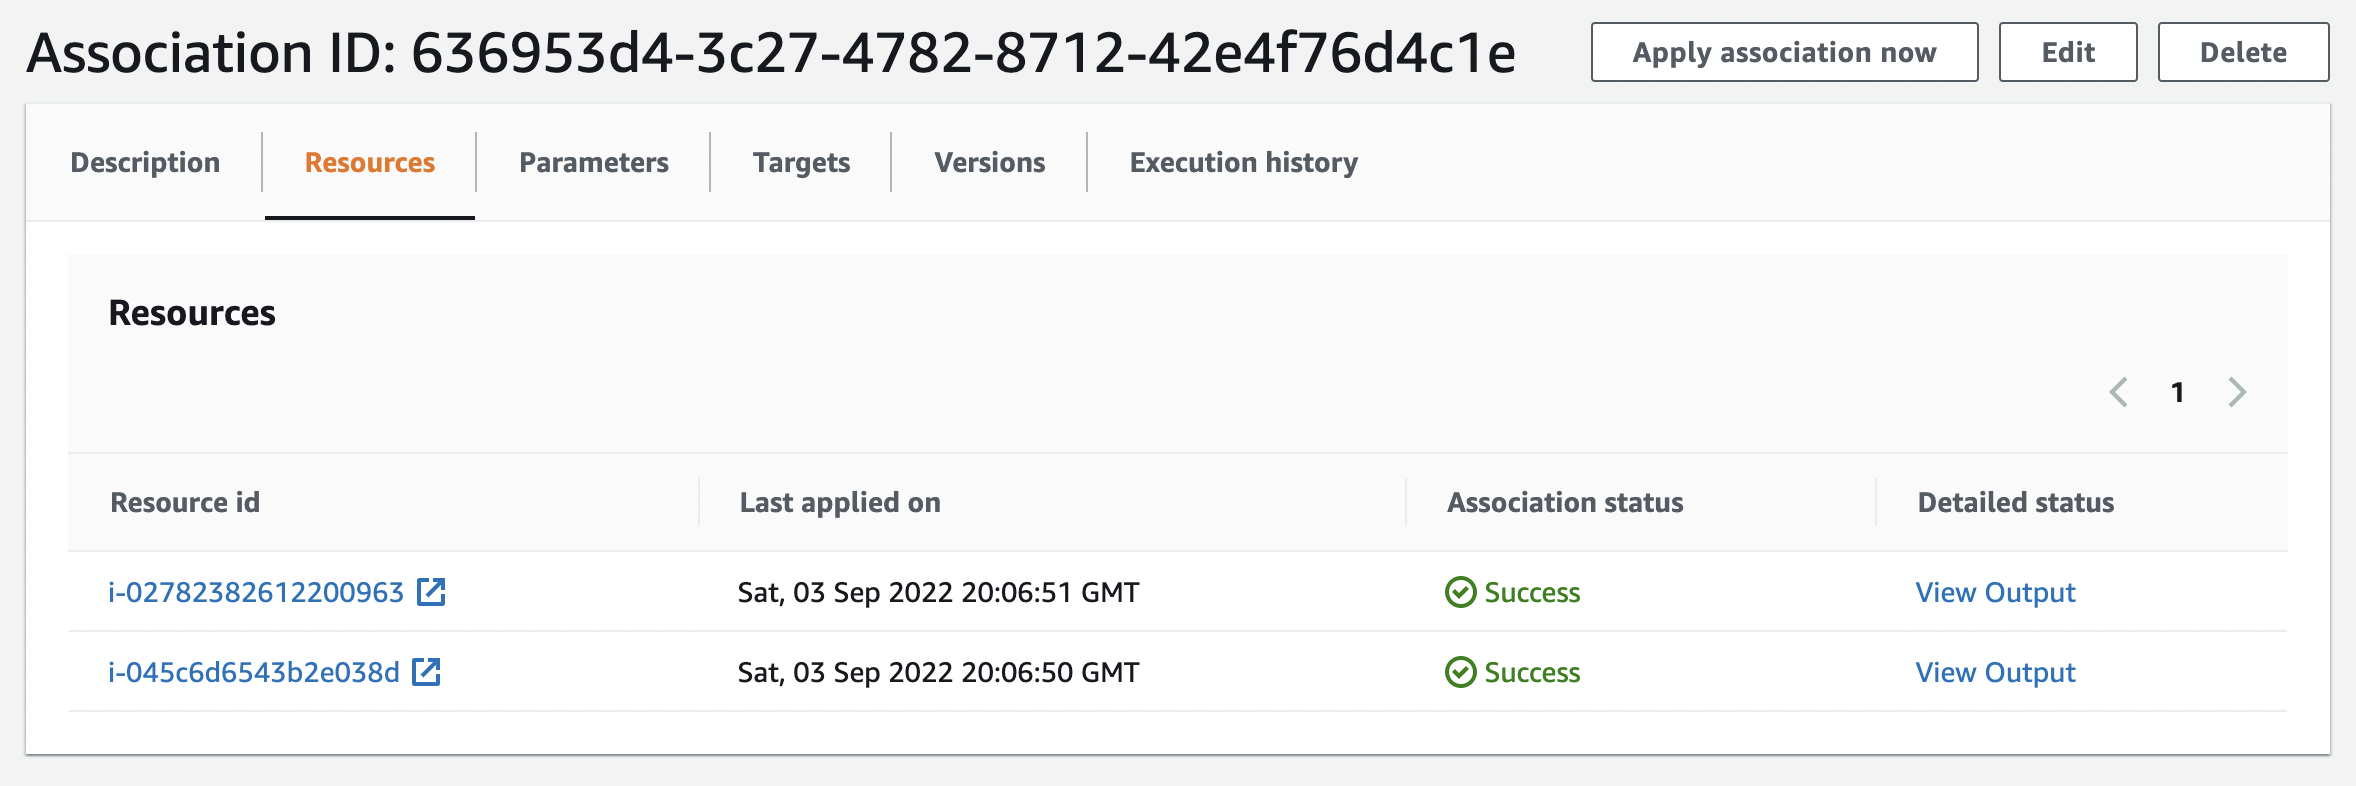
Figure 12: Example screenshot of the domain join association and it’s Resources tab.
Figure 13 shows a screenshot of the Automation execution screen, which will be familiar to anyone who read the previous blog post. The main difference here is that State Manager will show an additional Execution ID, the details of which show the fleet of Windows EC2 instances that were identified as resources according to the association. For example, the details of 181efaf7-54c2-4167-8f45-d0adc0e0b895 show me all of the EC2 instances that the association found as resources and ran the SSM-Automation-AD-Join runbook against. From the details screen, I can click on any of the individual Execution IDs of each Automation execution to see the specific details of the runbook, as shown in Figure 14.

Figure 13: Example screenshot of the Automation executions.
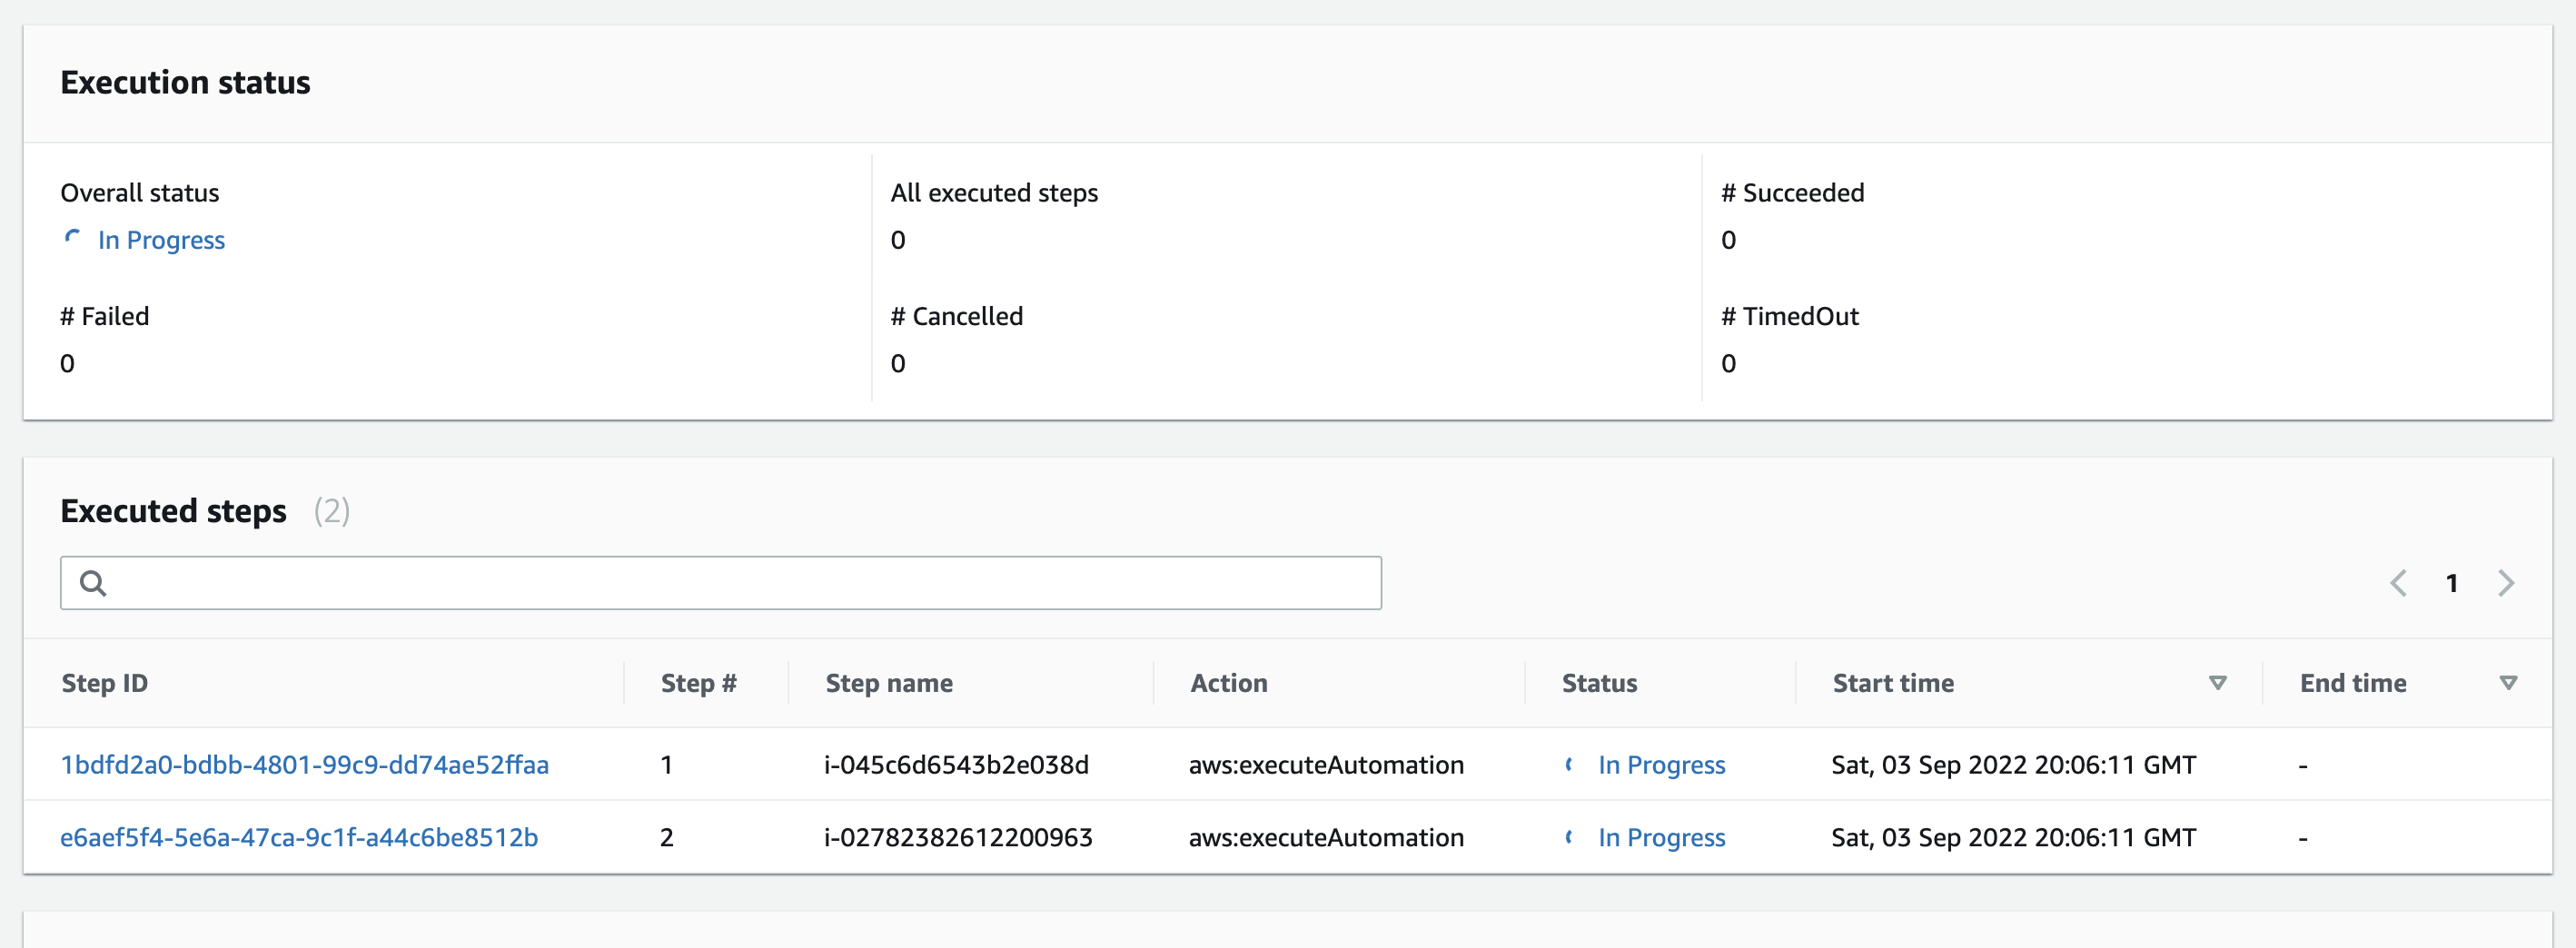
Figure 14: Example screenshot of the Automation executions status details page and steps that have run.
Cleanup
To delete the resources created by the CloudFormation template, go to the AWS CloudFormation console in the management account. Choose the stack you created, and then choose Delete.
Summary
There you have it! You can use the existing Systems Manager Automation runbook to ensure your Windows EC2 instances domain join and unjoin with Systems Manager State Manager associations.
AWS can help you assess how your company can get the most out of cloud. Join the millions of AWS customers that trust us to migrate and modernize their most important applications in the cloud. To learn more on modernizing Windows Server or SQL Server, visit Windows on AWS. Contact us to start your modernization journey today.