Microsoft Workloads on AWS
Containerize SQL Server workloads with Amazon EKS and DxOperator for Kubernetes
In this blog post, we will demonstrate a simple and effective way to deploy Microsoft SQL Server Always On Availability Group (AG) containers in Amazon Elastic Kubernetes Service (Amazon EKS) with DxOperator – SQL Server Operator for Kubernetes.
Deploying database workloads in Kubernetes (K8s) is a growing trend. The Cloud Native Foundation’s 2022 Survey showed a 48% increase in K8s database workload deployments from 2021 to 2022. This growth is being fueled by organizations looking for significant enhancements in scalability, speed to deployment, and overall management experience of their containerized applications.
Containerizing SQL Server workloads enables high density and allows many internal enterprise workloads to share a common resource pool (memory, CPU, and storage). It therefore reduces unused capacity and improves the efficiency of your infrastructure use and reduces license costs migrating from Windows Server OS to Linux.
Business-critical workloads running on SQL Server requires high availability with fast failovers. DH2i’s DxOperator – SQL Server Operator for Kubernetes enhances the value of K8s by adding fast application layer failover coupled with deployment ease and flexibility. DxOperator gives SQL Server containers running in K8s less than 15 second automatic failovers, the same performance of SQL Server running in a virtual machine environment. DxOperator is a cross-platform, high availability clustering solution providing fast installation and fully automatic hybrid multicloud failover. With DxEnterprise(DxE) you can combine containers and virtual machines running SQL Server in the same availability group making migration from Windows Server OS to Amazon EKS as simple and fast as a failover.
Prerequisites
- An AWS account with the appropriate AWS Identity and Access Management (IAM) permissions.
- A deployed Amazon EKS cluster with three worker nodes with Amazon EBS CSI driver and AWS Load Balancer Controller installed.
- The worker nodes should have a minimum of 4 vCPUs each to follow Microsoft’s minimum recommended configuration for SQL Server. If needed, refer to the user guide, Getting Started with Amazon EKS.
- A client machine to run the kubectl commands, manage object creation, and facilitate the administration of the cluster.
- DH2i’s DxAdmin and Microsoft SQL Server Management Studio (SSMS) installed on your client machine.
- A license is required to use DH2i’s DxOperator, DxOperator Free Trial License.
- A license is required to use Microsoft SQL Server. For this non-production demonstration, we will use a free SQL Server development license.
Solution overview
Figure 1 shows the high-level architecture for the SQL Server Operator on Kubernetes – DxOperator on an Amazon EKS cluster. DxOperator uses DH2i’s DxEnterprise Smart High Availability Clustering software. The cluster consists of three Amazon EKS worker nodes, each running in its own AWS Availability Zone (AZ). Each worker node has one pod with SQL Server and DxEnterprise containers deployed in the sidecar configuration.
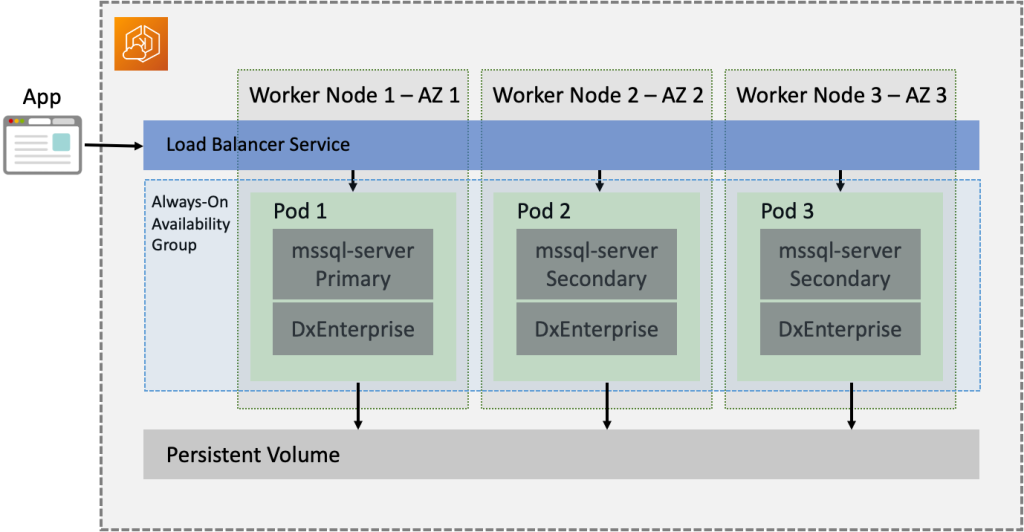
Figure 1 – DxEnterprise SQL Server EKS cluster high-level architecture
Using DH2i’s DxEnterprise Smart High Availability Clustering software and DxOperator, we will create an availability group (AG), consisting of three pods (Figure 2) in Amazon EKS that spans three AWS Availability Zones (AZs). The deployed AG will use synchronous replication between AZs for the AG primary and two replicas.
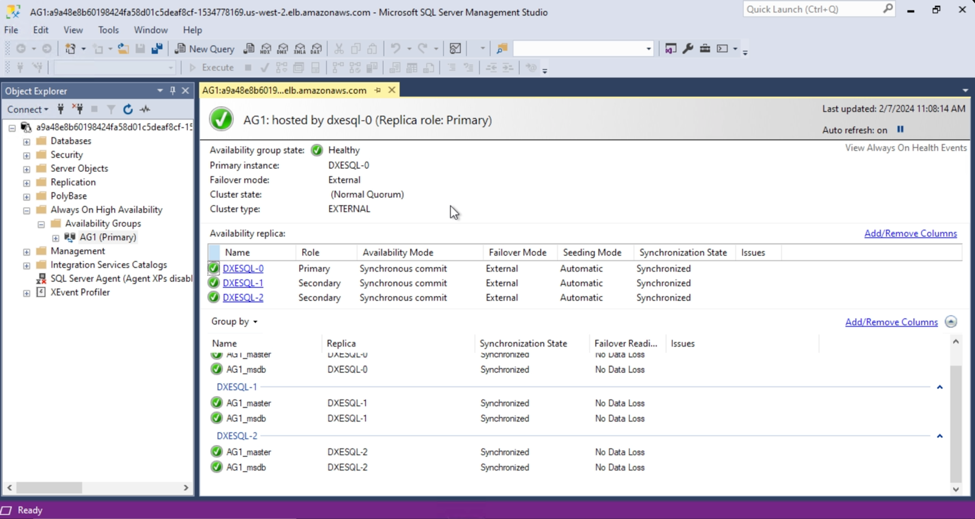
Figure 2 – SQL Server Always On availability group running in Amazon EKS
SQL Server is installed when DxOperator is deployed. DxOperator allows you to build a SQL Server AG in less than 90 seconds using only five commands. DH2i’s technology not only streamlines deployment and configuration of your SQL Server AG in Kubernetes, but DxEnterprise (DxE) also allows you to achieve near zero downtime for SQL Server Kubernetes deployments.
DxE provides minimum downtime with fully automatic database-level failover for SQL Server AGs in Kubernetes. No matter if a worker node or pod fails, DxE’s patented clustering technology reduces your failover window to seconds, readying your organization to take even the most critical SQL Server workloads to Amazon EKS.
DH2i’s DxEnterprise high availability (HA) clustering software is smart with its integrated software defined perimeter feature set. A software-defined perimeter (SDP) is a way to hide internet-connected infrastructure (servers, routers, etc.) so that external parties and attackers cannot see it, whether it is hosted on-premises or in the cloud or both. DxE uses this capability to automatically create application level Zero Trust Network Access (ZTNA) encrypted tunnels between your AG replicas, eliminating the need for additional network encryption mechanisms. DH2i’s security software is differentiated in the SDP market through significant qualities and features:
- DH2i’s SDP does not see your data because the technology stays out of the data path entirely.
- Replication throughput is boosted by up to 40% with proprietary data transport technology.
- SDP ZTNA tunnels are highly available in the case of an outage.
Deployment steps
Let’s start by reviewing the cluster we created for this blog post. There are three worker nodes in our Amazon EKS cluster (Figure 2). The nodes are created in three different AZs. There is also a Windows client.

Figure 3 – List of Amazon EKS worker nodes on Amazon EC2
We can also use the kubectl command get nodes, to view the nodes of your Amazon EKS cluster (Figure 4).

Figure 4 – List of Amazon EKS nodes using kubectl commands
Step 1 – Install DxOperator – SQL Server operator for Kubernetes
Start by installing DxOperator on the Amazon EKS cluster. DxOperator is installed by applying a YAML configuration file acquired from DH2i. This file can be downloaded using the command.
curl -o dxoperator.yaml https://dxoperator.dh2i.com/dxesqlag/files/v1.yaml
Note: Making changes to this complex file is an advanced topic beyond the scope of this blog post. Reach out to DH2i to learn more about the content of dxoperator.yaml.
After downloading the installation YAML, it can be applied to your Amazon EKS cluster using the following command (Figure 5).
kubectl apply -f dxoperator.yaml
You can use the following command to get status on the DxOperator installation.
kubectl get -n dxoperator-system pods -w

Figure 5 – Install DxOperator using kubectl command
Step 2 – Edit the configuration of DxOperator
Once DxOperator has finished installing, download the custom configuration file from D2Hi. Create a file named dxesqlag.yaml and copy the content of the custom configuration file into it. An edited configuration file with settings and other parameters for this DxE and SQL Server deployment.
apiVersion: dh2i.com/v1
kind: DxEnterpriseSqlAg
metadata:
  name: dxesqlag
spec:
  synchronousReplicas: 3
  asynchronousReplicas: 0
  # ConfigurationOnlyReplicas are only allowed with availabilityGroupClusterType set to EXTERNAL
  configurationOnlyReplicas: 0
  availabilityGroupName: AG1
  # For a contained availability group, add the option CONTAINED
  availabilityGroupOptions: CONTAINED
  # Valid options are EXTERNAL (automatic failover) and NONE (no automatic failover)
  availabilityGroupClusterType: EXTERNAL
  createLoadBalancers: false
  template:
    spec:
      dxEnterpriseContainer:
        image: "docker.io/dh2i/dxe:latest"
        imagePullPolicy: Always
        acceptEula: true
        clusterSecret: dxe
        vhostName: VHOST1
        # Configuration options for the required persistent volume claim for DxEnterprise
        volumeClaimConfiguration:
          storageClassName: null
          resources:
            requests:
              storage: 1Gi
      mssqlServerContainer:
        image: "mcr.microsoft.com/mssql/server:latest"
        imagePullPolicy: Always
        mssqlSecret: mssql
        acceptEula: true
        mssqlPID: Developer
        mssqlConfigMap: null
        # Configuration options for the required persistent volume claim for SQL Server
        volumeClaimConfiguration:
          storageClassName: null
          resources:
            requests:
              storage: 4Gi
      topologySpreadConstraints:
      - topologyKey: topology.kubernetes.io/zone
        maxSkew: 1
        whenUnsatisfiable: DoNotSchedule
        labelSelector:
          matchLabels:
            dh2i.com/entity: dxesqlag
---
apiVersion: v1
kind: Service
metadata:
  name: dxesqlag-0-lb
  annotations:
    service.beta.kubernetes.io/aws-load-balancer-internal: "true"
spec:
  type: LoadBalancer
  selector:
    dh2i.com/name: dxesqlag-0
  ports:
  - name: dxl
    port: 7979
  - name: sql
    port: 1433
---
apiVersion: v1
kind: Service
metadata:
  name: dxesqlag-1-lb
  annotations:
    service.beta.kubernetes.io/aws-load-balancer-internal: "true"
spec:
  type: LoadBalancer
  selector:
    dh2i.com/name: dxesqlag-1
  ports:
  - name: dxl
    port: 7979
  - name: sql
    port: 1433
---
apiVersion: v1
kind: Service
metadata:
  name: dxesqlag-2-lb
  annotations:
    service.beta.kubernetes.io/aws-load-balancer-internal: "true"
spec:
  type: LoadBalancer
  selector:
    dh2i.com/name: dxesqlag-2
  ports:
  - name: dxl
    port: 7979
  - name: sql
    port: 1433
Reference the DxOperator QuickStart Guide for the configuration settings utilized in this cluster. In this example, we changed the values of several parameters. These are the parameters that DxOperator users will want to customize the most often when working through their own SQL Server AG Kubernetes projects.
dxEnterpriseContainer:
synchronousReplicas: 3
asynchronousReplicas: 0
availabilityGroupOptions: “CONTAINED”
mssqlServerContainer:
mssqlPID: “Developer”
storageClassName: io2
storage: 4Gi
For this demo we used the io2 storage class, which is recommended for SQL Server production environments.
topologySpreadConstraints:
– topologyKey: topology.kubernetes.io/zone
maxSkew: 1
whenUnsatisfiable: DoNotSchedule
Refer to, Configure topology spreading of DxEnterpriseSqlAg pods for more details on how to spread pods across different worker nodes, AZs or AWS Regions.
apiVersion: v1
kind: Service
metadata:
name: dxesqlag-0-lb
annotations:
service.beta.kubernetes.io/aws-load-balancer-scheme: internal
service.beta.kubernetes.io/aws-load-balancer-nlb-target-type: ip
spec:
type: LoadBalancer
selector:
dh2i.com/name: dxesqlag-0
ports:
– name: dxl
port: 7979
– name: sql
port: 1433
For this demo we used the AWS cloud provider load balancer controller to create AWS Network Load Balancers for each pod. The scheme is set to internal so that its only accessible inside the VPC network. We open two ports, one for the DxEnterprise management, 7979 and one for SQL Server, 1433. See Network load balancing on Amazon EKS for more information about EKS Service Load Balancing Types.
We need to define the storage class within Amazon EKS, that maps to the EBS io2 type. That storage class can then be referenced in PVCs to describe which type of storage they should be created.
Create a configuration file named io2.yaml and copy the following content into it.
apiVersion: storage.k8s.io/v1
kind: StorageClass
metadata:
  annotations:
    storageclass.kubernetes.io/is-default-class: "false"
  name: io2
parameters:
  fsType: ext4
  type: io2
  iops: "4000"
provisioner: ebs.csi.aws.com
reclaimPolicy: Delete
volumeBindingMode: WaitForFirstConsumer
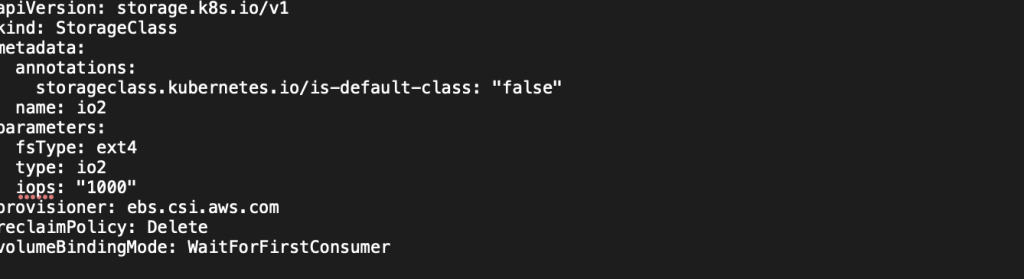
Figure 6 – Configuration file for io2 storage class
Step 3 – Create Kubernetes secrets
This step involves applying sensitive information including passwords, in the form of Kubernetes secrets. Prior to taking this step, we advise following the AWS best practices for securing Kubernetes secrets in Amazon EKS, including the use of envelope encryption with AWS Key Management Service (AWS KMS).
Create a cluster secret for DxE using your passkey and license code with the following command.
kubectl create secret generic dxe –from-literal=DX_PASSKEY=<pass> –from-literal=DX_LICENSE=<license_key>
This command will create a new secret resource in Kubernetes called dxe. It will contain two named values, both of which are required to set up DxE:
- The cluster passkey used to log in with DxAdmin: DX_PASSKEY=<passkey>
- The license key used to activate DxE: DX_LICENSE=<license_key>
Create the mssql secret with following command prompt (Figure 7).
kubectl create secret generic mssql –from-literal=MSSQL_SA_PASSWORD=<pass>
This command will create a new secret resource in Kubernetes: mssql. It will contain a single named value required to set up SQL Server.
MSSQL_SA_PASSWORD=<password>
This sets the initial system administrator (sa) password for the SQL Server instances.

Figure 7 – Kubectl creating a secret for SQL Server password
Step 4 – Deploy SQL Server containers in pods
We can now deploy DxE and SQL Server containers in the pods with the following commands:
kubectl apply -f io2.yaml
kubectl apply -f dxesqlag.yaml
kubectl get pod -w
These commands apply the custom resource to Kubernetes, instructing the operator to go ahead and create the cluster as described so far and get checks on the deployment status.
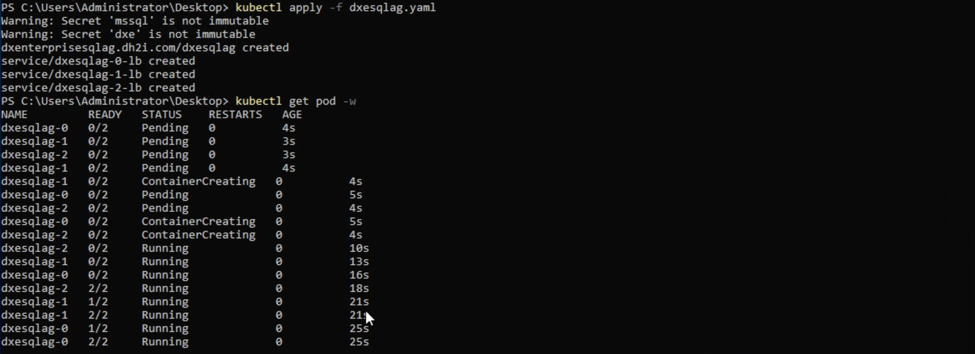
Figure 8 – DxOperator deploying SQL Server Availability Group in Amazon EKS
After waiting a short while, we use the command kubectl get pod -w to view the cluster status again. It only took 90 seconds (Figure 10) to deploy a SQL Server Availability Group in Amazon EKS.

Figure 9 – Status of SQL Server Availability Group in Amazon EKS
Step 5 – Verify connectivity to the cluster
We use the command kubectl get service to view the IP addresses of the load balancers. We will copy the External-IP of the DXESQLAG-0 load balancer as highlighted (Figure 10).
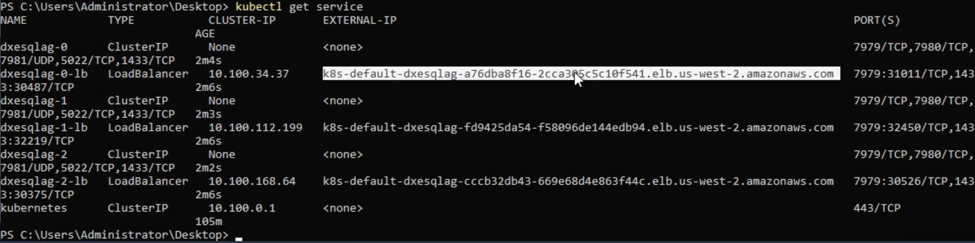
Figure 10 – External IP of DXESQLAG-0 load balancer
Connect to the AG using SQL Server Management Studio (SSMS) (Figure 11).
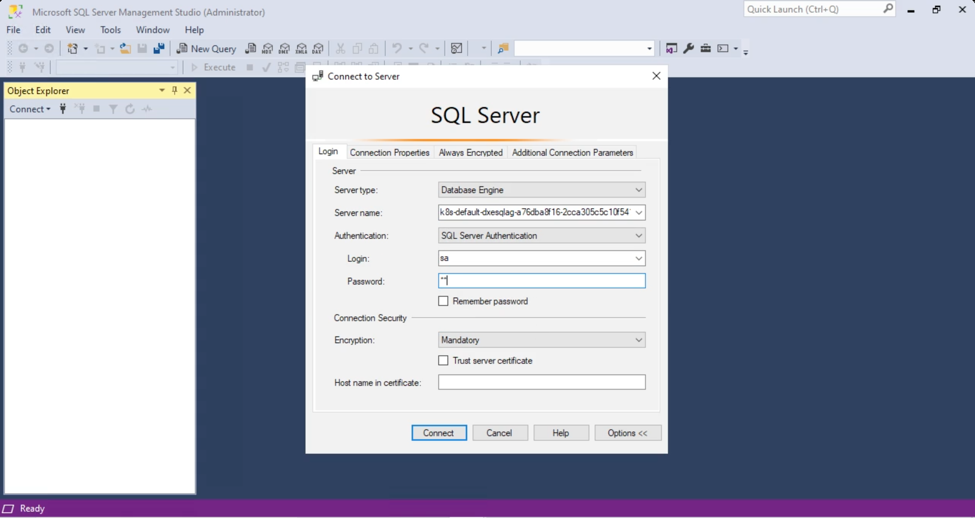
Figure 11 – Login to cluster on SQL Server Management Studio using load balancer external IP from a deployed pod
Once the databases have synced, you have officially created your highly available SQL Server AG in Amazon EKS. In this example, we created a three-pod, highly available AG in Amazon EKS that spans three different AWS AZs (Figure 12).

Figure 12 – SQL Server Always On availability group dashboard
You can also connect to the cluster using DH2i’s DxAdmin, an equivalent management tool that provides the same level of visibility and control over your cluster as SSMS.
Step 6 – Manual failover validation
We will test the resilience of the SQL Server AG running Amazon EKS by performing a manual failover test. To do that, create a shell on DXESQLAG-0 and run a dxcli command, which is installed as part of DxE, to manually failover from DXESQLAG-0 to DXESQLAG-1. The DxAdmin administration console shows DXESQLAG-0 as active and primary in the availability group (Figure 13).
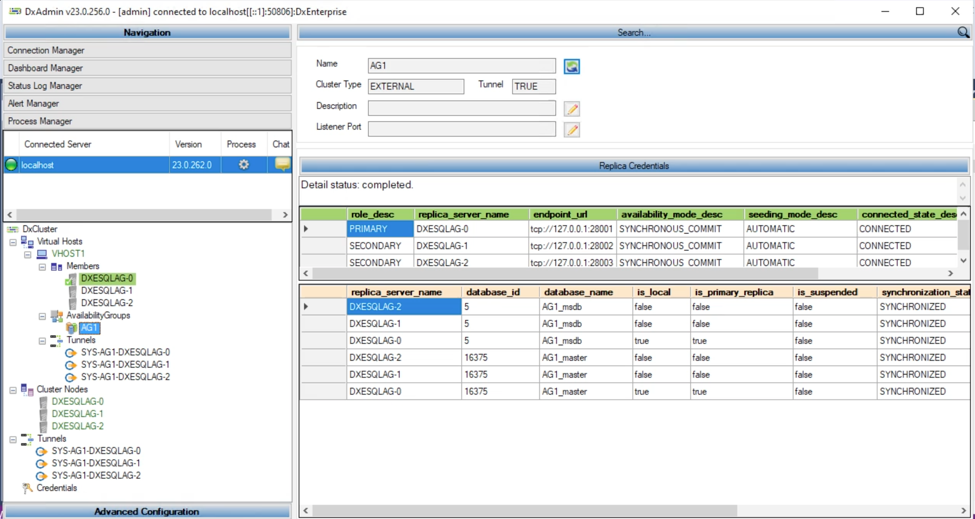
Figure 13 –View of the AG in the DxAdmin administration console shows it active on DXESQLAG-0
Create a command shell on DXESQL-0.
kubectl exec -it -c dxe dxesql-0 — bash
Instruct DxE to do a manual failover and make DXESQLAG-1 the new primary (Figure 14).
dxcli vhost-start-node VHOST1 DXESQLAG-1

Figure 14 – Initiating a manual failover from DXESQLAG-0 to DXESQLAG-1
To verify the failover, we use the load balancer External-IP of DXESQLAG-1 and connect SSMS and verify DXESQLAG-1 is the new primary (Figure 15).
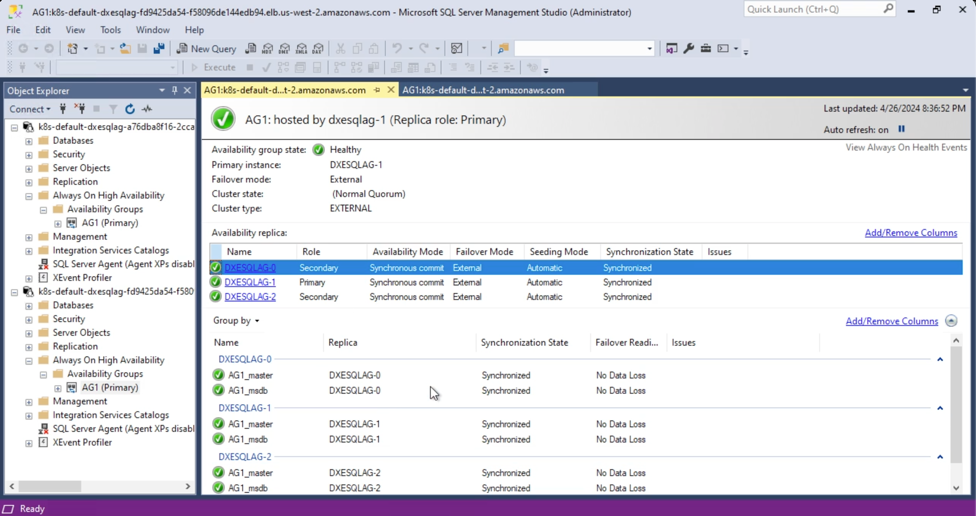
Figure 15 – SQL Server Always On availability group dashboard
Now that you have your Availability Group up and running, you may want to copy data into one of the pods. For more information, see this guide, Copy data to and from a DxEnterpriseSqlAg container. It will go through methods of copying data files to and from a SQL Server container of a DxOperator deployment.
Cleanup
To avoid incurring future charges, delete any resources you created as part of this blog post:
- Amazon EKS cluster with three worker nodes.
- Any client machine created in AWS.
Conclusion
In this blog post, we demonstrated how to run SQL Server on Amazon EKS with DxOperator – SQL Server Operator for Kubernetes, culminating in a cross-platform, high availability solution that provides fast installation, fully automatic failover, and reduced costs. DxOperator offers:
- The exclusive capability of fully automatic failover for SQL Server AGs in Kubernetes.
- Sidecar container deployment for application-clusterware isolation.
- The ability to securely cluster any mix of cloud, virtual, or physical infrastructure.
Want to give Amazon EKS or DxOperator, a try? Amazon EKS and other AWS services are available for trial on the AWS Free Tier. A free trial of DxOperator is available from DxOperator Free Trial License.
Interested in checking out additional demo and blog post content? See these SQL Server AG Kubernetes deployment posts:
- Deploy availability groups with DH2i DxEnterprise on Kubernetes
- Configure SQL Server Always On availability group on Windows and Linux (cross-platform)
- SQL Server Availability Groups with Mixed Operating Systems
- Install DxE + SQL Server Helm Chart
- Install DxE + SQL Server Helm Chart Using Rancher
- Always on Availability Groups for SQL Server containers on Kubernetes – The DH2i’s DxOperator way!!
AWS has significantly more services, and more features within those services, than any other cloud provider, making it faster, easier, and more cost effective to move your existing applications to the cloud and build nearly anything you can imagine. Give your Microsoft applications the infrastructure they need to drive the business outcomes you want. Visit our .NET on AWS and AWS Database blogs for additional guidance and options for your Microsoft workloads. Contact us to start your migration and modernization journey today.