AWS Cloud Operations Blog
Tag Editor moves to AWS Resource Explorer: bulk-tag resources across Regions
Starting today, you can manage resource tags in bulk in the AWS Resource Explorer console, and requests to Tag Editor console will redirect to Resource Explorer automatically. This post shows how each Tag Editor task works in Resource Explorer and where the steps differ.
Benefits of tagging resources in Resource Explorer.
Finding resources and tagging them was split across two tools. Resource Explorer already handled the finding: search across Regions, a query language a query language that combines resource type, Region, and tag filters in one search, with no 20-resource-type limit, and the ability to filter resources directly in the search results. Bringing tag management to Resource Explorer means one console and one search experience for the full workflow: search, select, tag. Resource Explorer covers wider resource types and regions as compared to Tag Editor.
Prerequisites:
Before you start, check the following:
- Cross-Region search (one-time, skip if already done). Resource Explorer turns on search automatically in each Region you use. To search and tag across Regions in one selection, as you did in Tag Editor, your account needs an aggregator index. If your account doesn’t have one yet, open the Resource Explorer console. In the Complete setup and enable cross-Region search banner, choose a Region, then choose Enable cross-Region search in all Regions. Aggregating resources can take up to a couple of hours. You can use Systems Manager Quick Setup for multi account setup.
- Permissions:
To search: the AWSResourceExplorerReadOnlyAccess managed policy, or resource-explorer-2:GetView, Search, and ListResources on the view you use.
To tag:tag:GetTagKeys,tag:GetTagValues,tag:TagResources,tag:UntagResources, plus the tagging permissions for each service you tag, for example grant permission to tag Amazon EC2 resources during creation and managing resources in the Resource Explorer console.
To run the one-time setup: the AWSResourceExplorerFullAccess managed policy.
Finding the resources you want to tag
This step looks the most different, so I start here. In Tag Editor, you built a query by choosing up to 20 resource types (or All supported resource types) and one or more Regions from drop downs. In Resource Explorer, you type what you are looking for into the search box instead. The query language lets you combine resource types, Regions, and tag filters in a single search. There is no cap at 20 resource types.
For example, to find Amazon EC2 instances missing cost allocation tags across Regions, you search like this:
resourcetype:ec2:instance -tag.key:costcenter
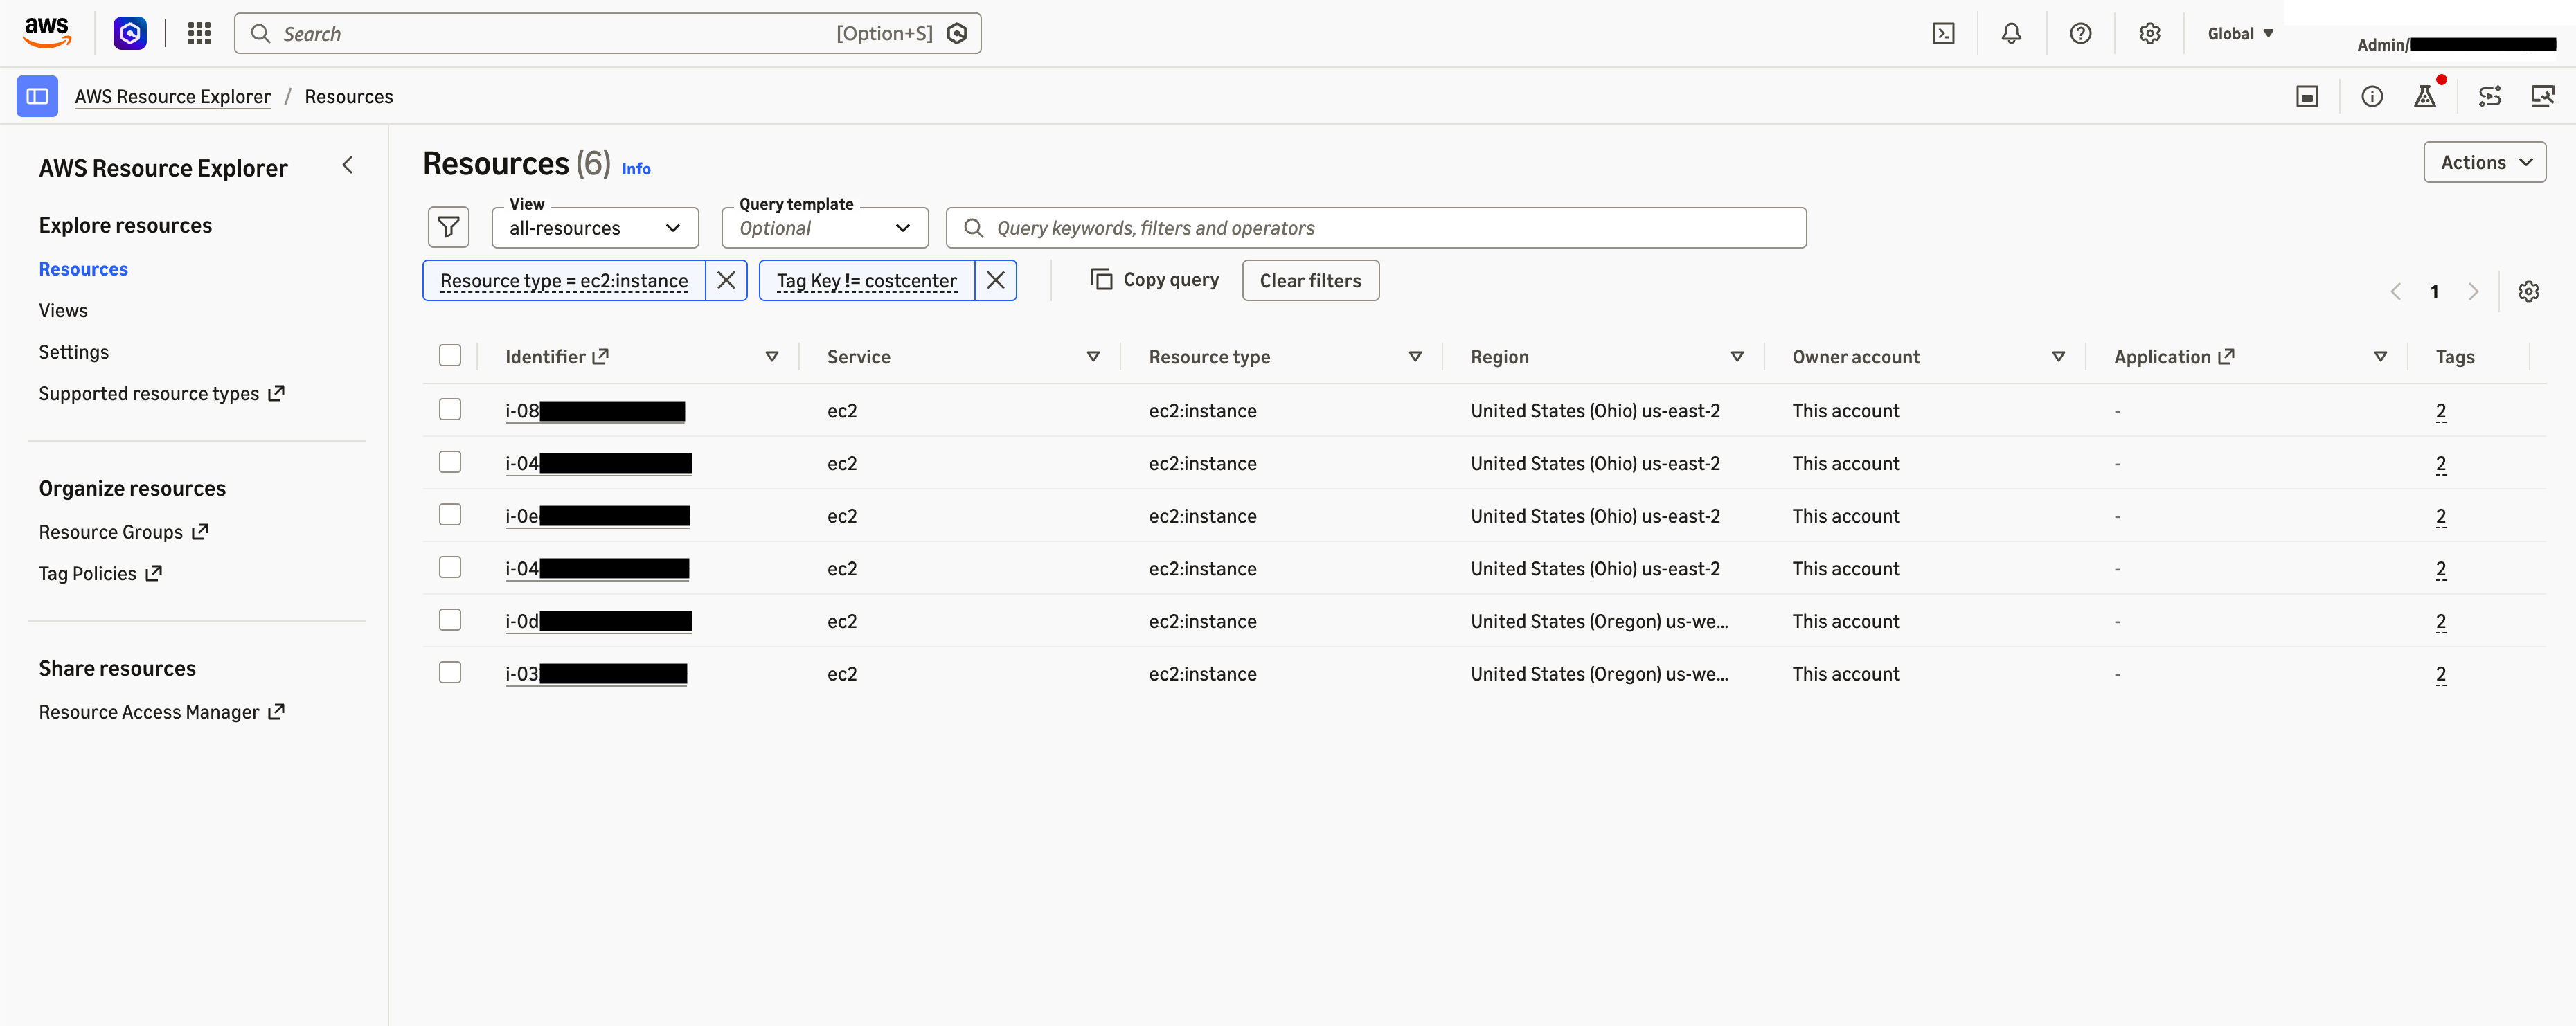
Figure 1: The Resource Explorer search box with the sample query entered and matching resources in the results table. A single search query takes the place of the resource-type and Region menus.
Adding, editing, and removing tags:
After you have your results, tagging works as it does in Tag Editor. You select the resources and apply the change to the whole selection at once. Here is the flow:
- On the Resources page, choose the view that you want to use. Resource Explorer preselects the default view.
- (Optional) Enter a search query to narrow the list to the resources you want.
- In the results, select up to 400 resources.
- Choose Actions, then Manage tags.
- Select an existing tag or create a new tag to apply to everything you selected. To change a value, provide a new value for an existing tag key, and Resource Explorer applies that key value pair to all selected resources, including those that did not have the key.
- Choose Apply.
Here is an example where I select all matching ec2:instance resources, across both us-east-2 and us-west-2 regions, and add a costcenter tag that will be applied to all selected resources, regardless of region.
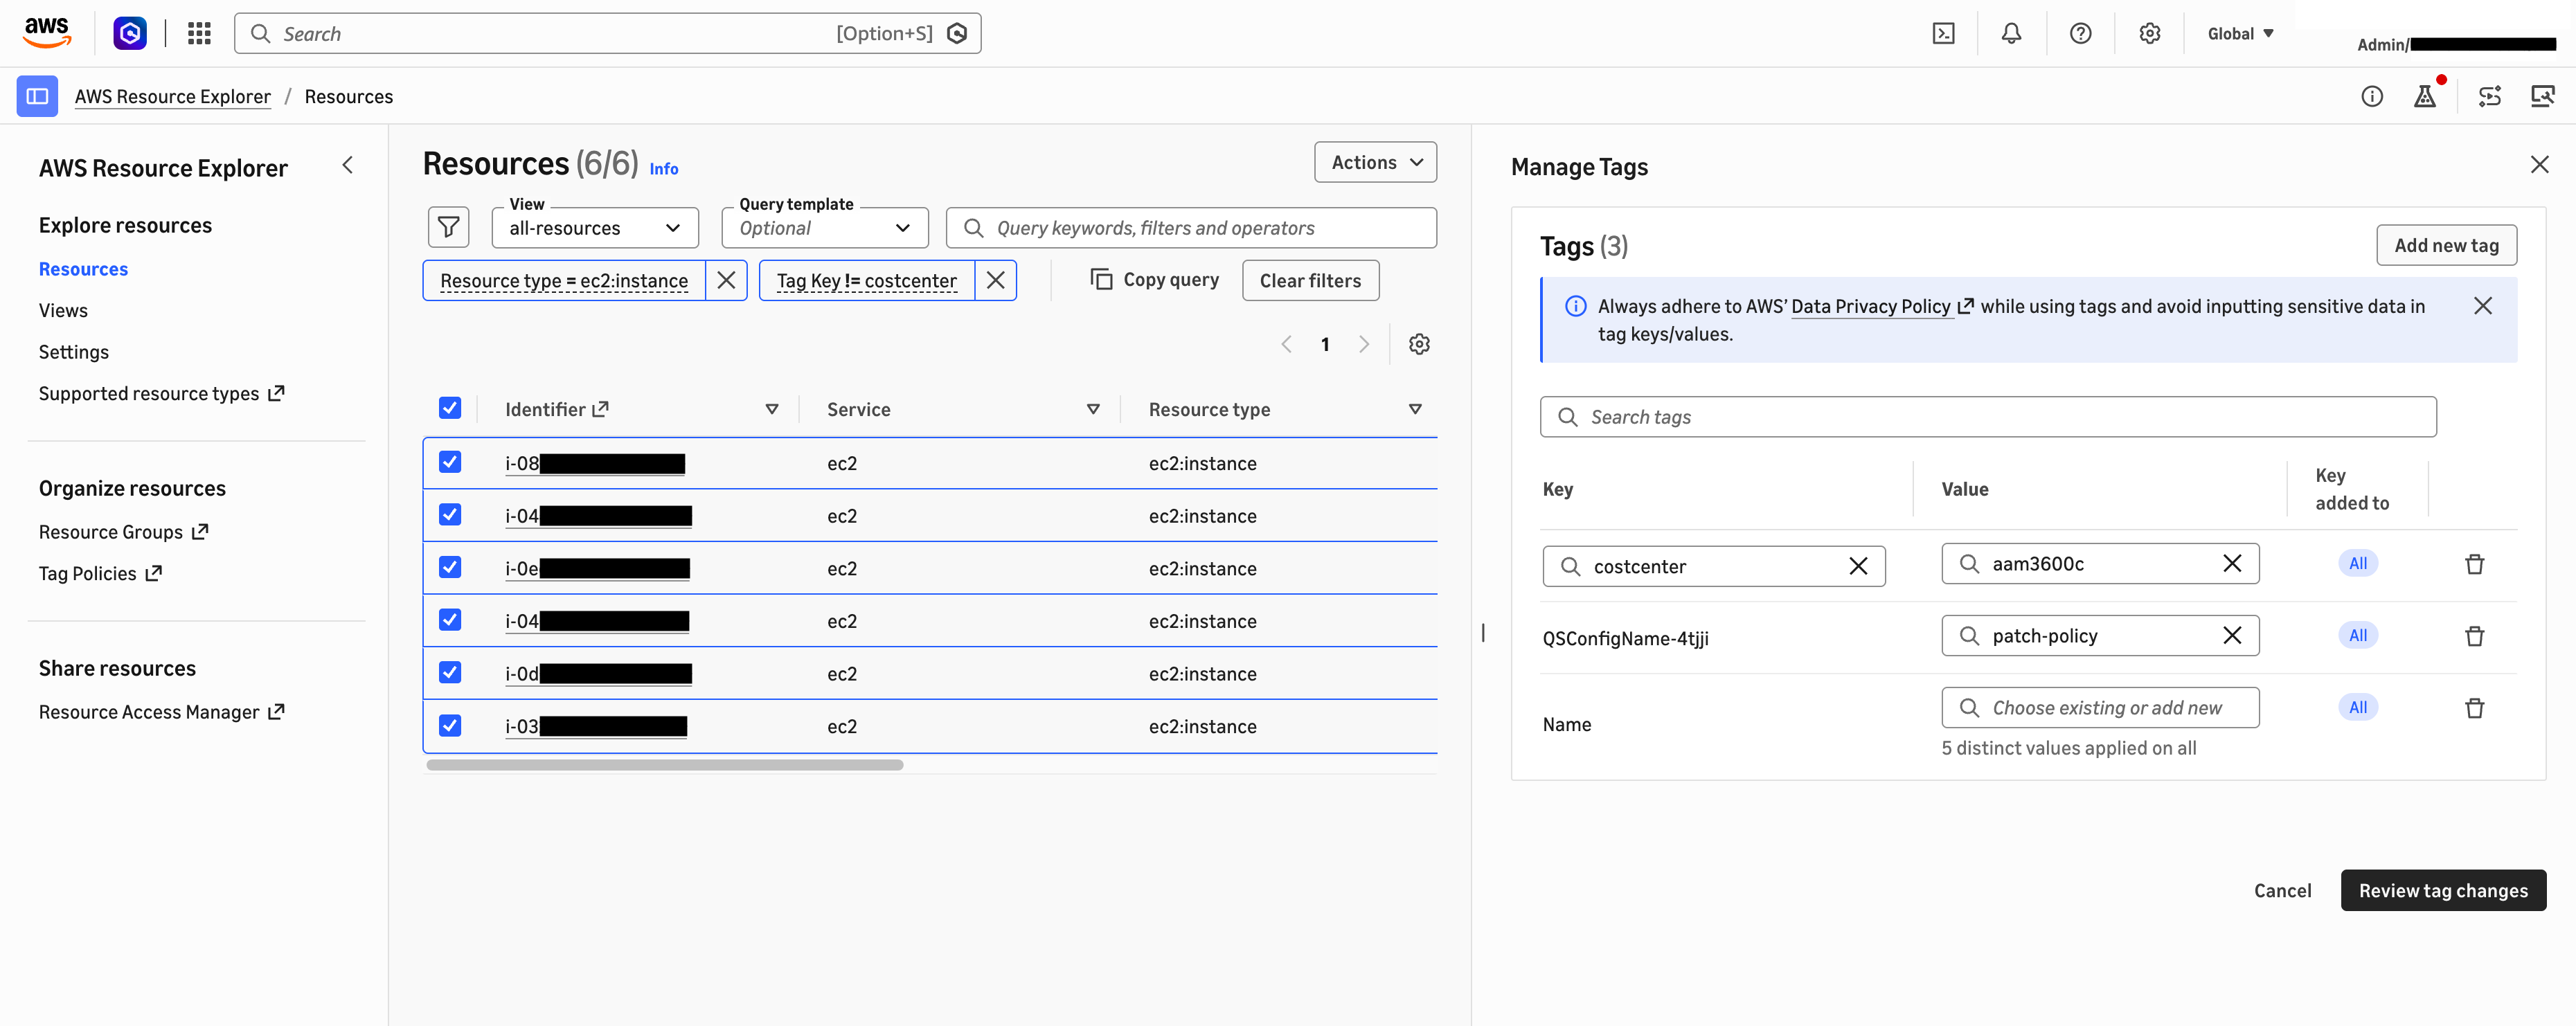
[Figure 2: The Manage tags dialog with a tag key and value entered against a multi-resource selection. Add, create, edit, or remove tags across the whole selection from one dialog.]
Tag Editor and Resource Explorer quick reference:
The following table maps each Tag Editor task to its Resource Explorer equivalent.
| What are you doing | In Tag Editor | In Resource Explorer |
|---|---|---|
| Finding resources | Choose resource types (or All supported resource types) and Regions from dropdowns | Type a search query; combine resource types, Regions, and tag filters |
| Setting scope across Regions | Select Regions in the query builder | Search runs against a view; one selection can span Regions, or can be scoped to a single region based on view or query |
| Selecting resources to tag | Select up to 500 from the results table | Select up to 400 resources from the results table |
| Adding, editing, removing tags | Add, edit, or delete across the selection | Choose Actions, Manage tags, then apply across the selection |
| Filtering results | Filter box on the results | Filter box on the results (unchanged) |
| Seeing changes take effect | Reflected in the results | A new search may take up to 30 seconds to reflect bulk changes |
| Exporting a resource list | Export resources and tags to CSV | Export Resources and Tags to CSV |
Things to know:
Keep in mind as you move your tagging work to Resource Explorer:
- CloudFormation stacks. Don’t include AWS CloudFormation stacks in your selection manage stack tags through CloudFormation instead.
- Redirect from Tag Editor. If you haven’t set up Resource Explorer yet, see Prerequisites. Requests to the Tag Editor page redirect to Resource Explorer automatically. Update saved bookmarks and runbooks so they open Resource Explorer directly.
- Permissions. To manage tags, you need the tagging permissions for each service whose resources you are tagging (for example, the Amazon EC2 tagging actions to tag EC2 instances), plus these tag actions:
tag:GetTagKeys,tag:GetTagValues,tag:TagResources, andtag:UntagResources. If you see a permissions error when managing tags, check these first. - Propagation. Bulk tag changes will not appear in resource tag counts immediately. Allow up to about 30 seconds before new searches show the updated tags.
Available now. Bulk tag management is available in all Regions where Resource Explorer is available. There is no additional charge. .With tag management in Resource Explorer, you can find and tag up to 400 resources across Regions from a single search. To learn more about writing searches, see the Resource Explorer search reference. For the tagging workflow, see Managing resources in the Resource Explorer console.