Networking & Content Delivery
Collecting AWS networking information in large multi-account environments
Many organizations need to review or audit networking information within AWS environments that contain multiple AWS accounts. At scale, questions such as “which accounts have Internet access enabled?”, “which account owns the Elastic IP 198.51.100.101?” and, “what are the IP addresses of my NAT gateways?” can be challenging to answer.
Traditionally, within an individual account, you run AWS Config or API calls to extract networking information. AWS Config is a service that records your AWS resource configurations and allows you to review changes in configurations and relationships between AWS resources. Additionally, the AWS Command Line Interface (CLI) can make API calls to get details about resources. For example, the AWS CLI command aws ec2 describe-internet-gateways provide a list of Internet Gateways configured for the specified AWS Region, and details such as what VPCs they are attached to. Logging into every account and running AWS Config or API calls to get networking information is not scalable in multi-account environments, especially when enterprises may have hundreds of accounts.
In this blog post, we will share three scalable options to help you collect details about networking resources in your multi-account AWS environment.
Option 1: Monitor and audit IP addresses at-scale with Amazon VPC IP Address Manager (IPAM)
Amazon VPC IP Address Manager (IPAM) is a VPC feature that makes it easier for you to plan, track, and monitor IP addresses for your AWS workloads. From a centralized dashboard, you can monitor IP address space that’s in use and use the IP historical data to search for the status change of IP addresses or CIDRs for the following types of resources:
- VPC CIDR Addresses
- VPC Subnet CIDR Addresses
- Public Elastic IPs (EIP)
- EC2 instances
- Elastic Network Interfaces (ENI)
You can integrate IPAM with AWS organizations to activate the Amazon VPC IPAM service to manage and monitor networking resources created by all AWS organizations member accounts.
Prerequisites
IPAM is not enabled by default. This section will help you create an IPAM instance for your AWS organization.
Step 1: Integrate IPAM with AWS organizations. You must delegate an AWS organizations member account as an IPAM administrator account, otherwise IPAM will only monitor resources in the AWS account you used to create the IPAM.
- Browse to the Amazon VPC IP Address Manager console in your organization.
- Click on “Settings” and then “Edit”.

Figure 1: Navigating the IPAM settings page to delegate administrator control to an AWS Organization member account.
- Enter the account ID of account to be delegated as the IPAM administrator for your organization. Click “Save changes”.
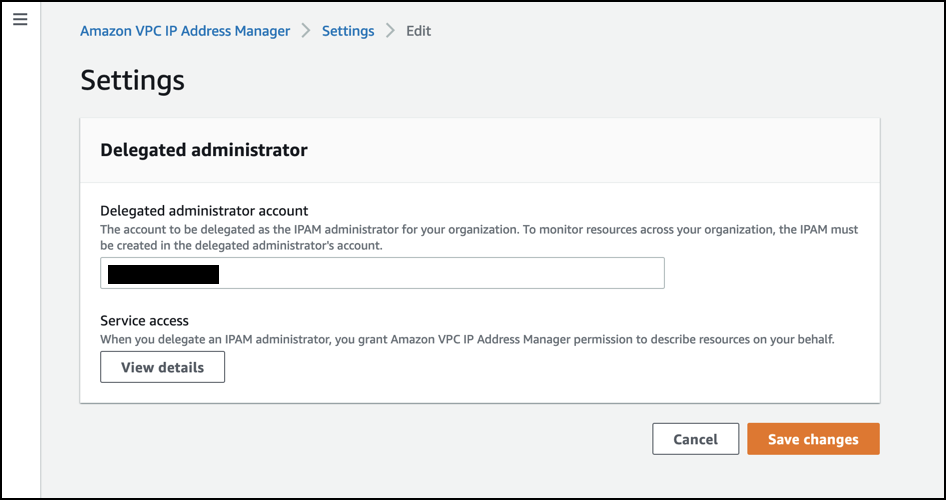
Figure 2: Entering the delegated administrator account in IPAM settings.
When you delegate an organization’s member account as an IPAM administrator account, IPAM automatically creates a service-linked IAM role in all member accounts in your organization. For more information, please refer to the Integrate IPAM with AWS Organizations section in the Amazon VPC IP Address Manager user guide.
Step 2: Create an IPAM instance.
- Browse to the Amazon VPC IP Address manager console in your delegated IPAM administrator account.
- Click on “IPAMs”, and “Create IPAM”.
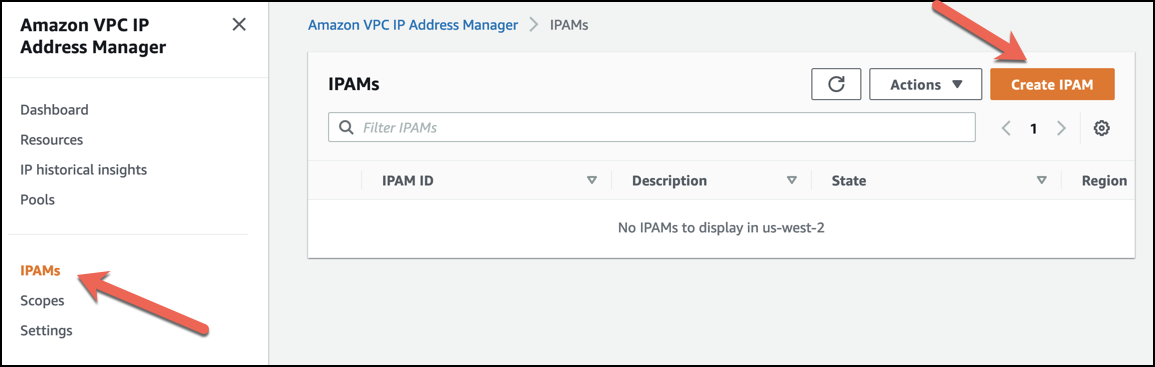
Figure 3: Navigating the IPAMs page to create a new IPAM.
- Fill in:
- Select “Allow Amazon VPC IP Address Manager to replicate data from the member account(s) into the Amazon VPC IP Address Manager delegate account.”.
- Enter a name tag, e.g. “My Organizations IPAM”.
- Select your operating Regions, e.g. “us-west-2” and “us-east-1”.
- Click “Create IPAM”.
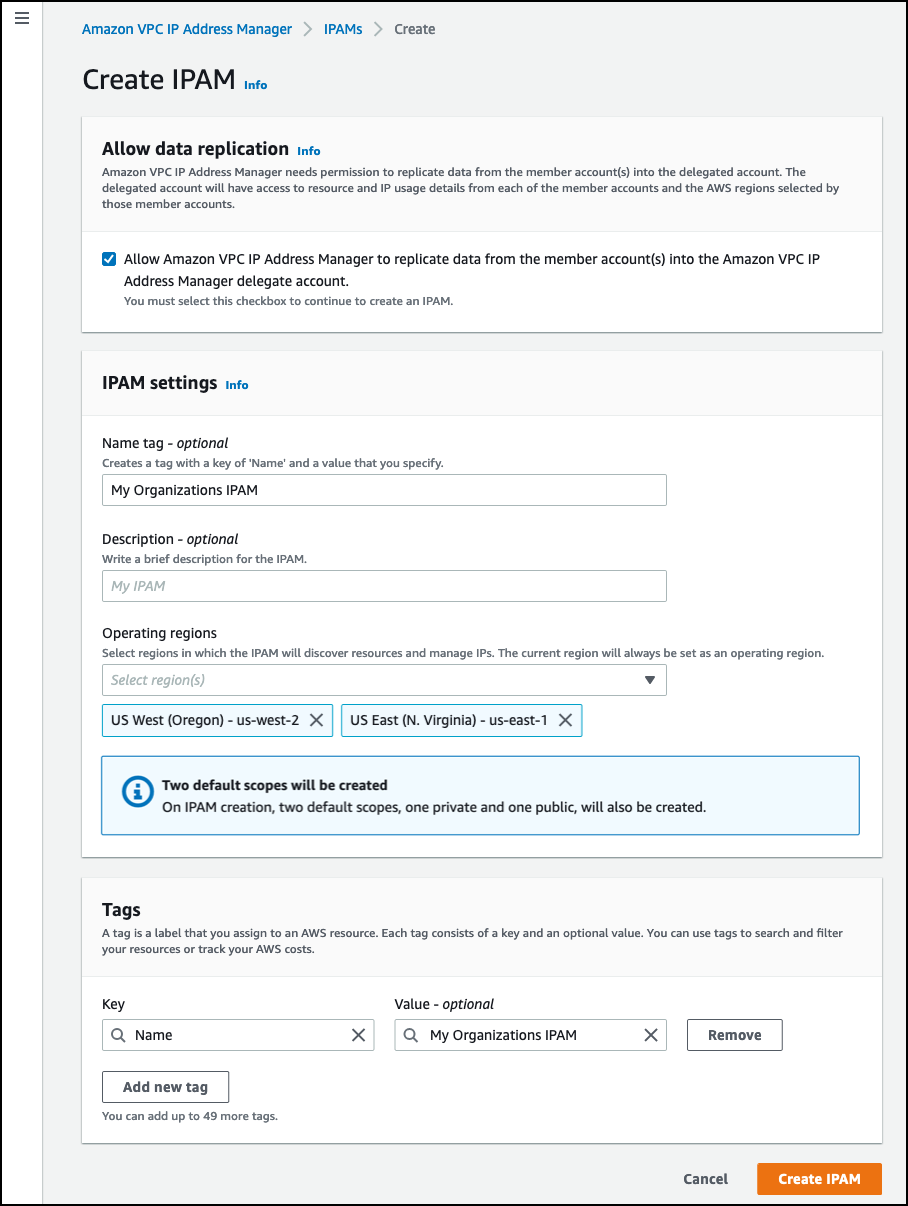
Figure 4: Entering the required information to create a new IPAM.
Let’s run through a sample scenario where you need to answer the question “which account owns the Elastic IP 198.51.100.101?” This is one example of how IPAM is used.
AWS Management Console
IPAM allows you to view VPC CIDR, subnet CIDR, and EIP resources and search for historical IP information using the Amazon VPC IP Address manager console.
- Browse to the Amazon VPC IP Address manager console in your delegated IPAM administrator account.
- Click on “Resources”. On this page, you can monitor IP usage within VPCs, subnets, and EIPs.
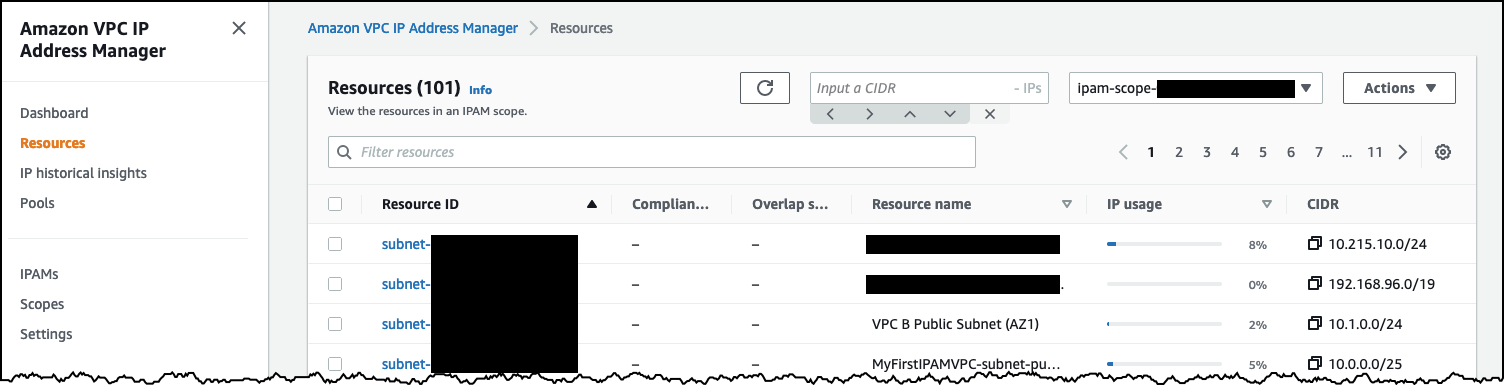
Figure 5: The IPAM resources page allows you to monitor CIDR usage within VPCs, subnets, and EIPs.
- Click on “IP historical insights”. Click on the “IPAM scope ID” dropdown and select your Public scope. To answer the question “which account owns the Elastic IP 198.51.100.101?” enter the IP address in the CIDR field and click “Search”.
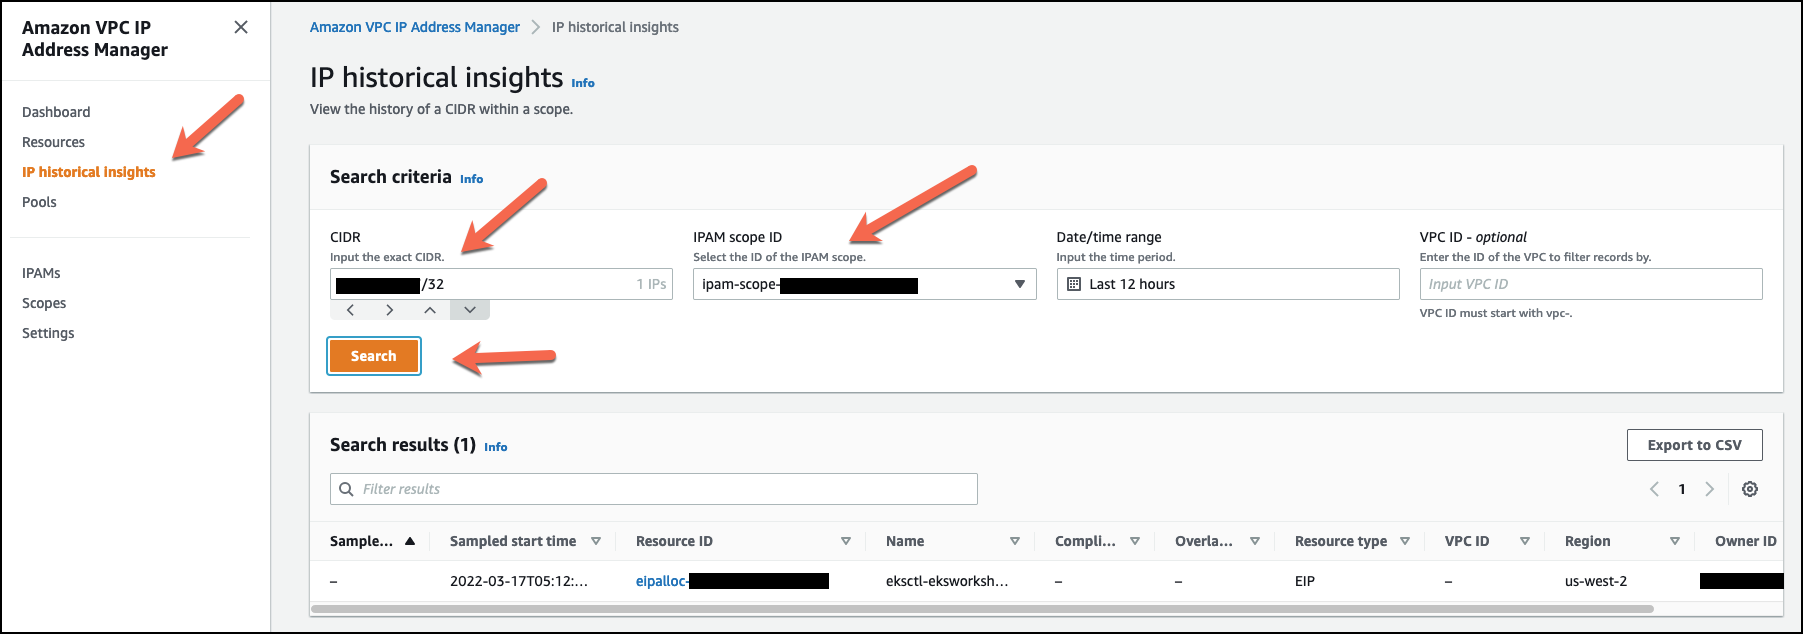
Figure 6: Navigating the IPAM IP historical insights page to search for a CIDR in your multi-account environment.
AWS CLI
The AWS CLI command get-ipam-resource-cidrs returns a list of VPC CIDR, subnet CIDR, and EIP resources and the command get-ipam-address-history retrieves historical information about an IP/CIDR within an IPAM scope. The following steps will show you how to determine which account owns the Elastic IP 198.51.100.101 in your multi-account environment.
- Run the following CLI to get a list of IPAM scopes configured.
shell$ aws ec2 describe-ipam-scopesYour result should look similar to the following output.
{
    "IpamScopes": [
        {
            "OwnerId": "XXXXXXXX9854",
            "IpamScopeId": "ipam-scope-XXXXXXXXXXXX2fe9a",
            "IpamScopeArn": "arn:aws:ec2::XXXXXXXX9854:ipam-scope/ipam-scope- XXXXXXXXXXXX2fe9a",
            "IpamArn": "arn:aws:ec2::XXXXXXXX9854:ipam/ipam-XXXXXXXXXXXX1e9f4",
            "IpamRegion": "us-west-2",
            "IpamScopeType": "private",
            "IsDefault": true,
            "PoolCount": 1,
            "State": "create-complete",
            "Tags": []
        },
        {
            "OwnerId": "XXXXXXXX9854",
            "IpamScopeId": "ipam-scope-XXXXXXXXXXXX7fa2c",
            "IpamScopeArn": "arn:aws:ec2::XXXXXXXX9854:ipam-scope/ipam-scope- XXXXXXXXXXXX7fa2c",
            "IpamArn": "arn:aws:ec2::XXXXXXXX9854:ipam/ipam-XXXXXXXXXXXX1e9f4",
            "IpamRegion": "us-west-2",
            "IpamScopeType": "public",
            "IsDefault": true,
            "PoolCount": 0,
            "State": "create-complete",
            "Tags": []
        }
    ]
}- Run the following CLI command. Update the
ipam-scope-idusing the previous output, and the CIDR you are searching for.
shell$ aws ec2 get-ipam-address-history --ipam-scope-id ipam-scope-id --cidr 198.51.100.10.1/32Your result will show the resource that is using the CIDR you specified:
{
    "HistoryRecords": [
        {
            "ResourceOwnerId": " XXXXXXXX6656",
            "ResourceRegion": "us-west-2",
            "ResourceType": "eip",
            "ResourceId": "eipalloc-XXXXXXXXXXXX9cb8d",
            "ResourceCidr": "198.51.100.10.1/32",
            "SampledStartTime": "2022-03-17T05:12:02.079000+00:00"
        }
    ]
}
Cleanup
When finished, delete the IPAM instance.
Option 2: Automating multi-account network information capture with AWS Config aggregator
AWS Config records your AWS resource configurations and allows you to review changes in configurations and relationships between AWS resources. The following list is an example of networking resource types collected by AWS Config:
- Internet Gateway (IGW) – AWS::EC2::InternetGateway
- NAT Gateway (NATGW) – AWS::EC2::NatGateway
- Load Balancer (NLB/ALB) – AWS::ElasticLoadBalancingV2::LoadBalancer
- VPC CIDR Addresses – AWS::EC2::VPC
- VPC Subnet CIDR Addresses – AWS::EC2::Subnet
- Public Elastic IPs (EIP) – AWS::EC2::EIP
- Elastic Network Interfaces (ENI) – AWS::EC2::NetworkInterface
You can aggregate AWS Config data from multiple accounts and AWS Regions into a single account using multi-account, multi-Region data aggregation, as shown in Figure 7. Let’s explore this is more detail.
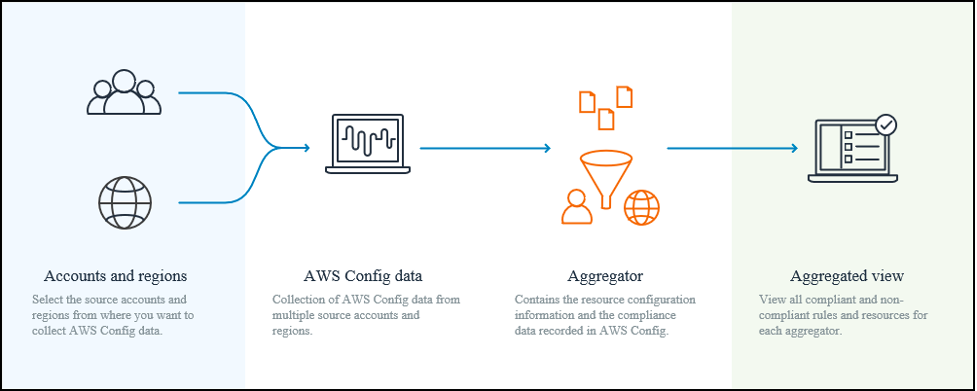
Figure 7: An overview of AWS Config multi-account, multi-Region data aggregation.
Prerequisites
AWS Config is not enabled by default, this section will help you set up AWS Config and multi-account, multi-Region data aggregation.
Note: If you are using AWS Control Tower, you don’t have to set this up manually and you may skip this prerequisites section. AWS Control Tower automatically configures AWS Config and aggregates resource configurations from member accounts to the audit account. I recommend you read the Extend AWS Control Tower governance using AWS Config Conformance Packs blog post for more information.
There are three steps to setting up AWS Config with multi-account, multi-Region data aggregation.
Step 1: Setting Up AWS Config. In this step, you can use the 1-click setup feature to activate AWS Config based on AWS best practices, or go through the setup yourself. You do this for each Region you want to activate AWS Config in. You can use AWS CloudFormation StackSets to activate AWS Config in multiple accounts and Regions using this sample CloudFormation template.
Step 2 Setting Up an Aggregator. In this step you create an aggregator, select the source accounts (you may add individual account IDs, or add your organization), and select the Regions that you want to aggregate data for. It asks you to allow data replication, giving permission to AWS Config to replicate data from the source accounts into an aggregator account.
Step 3 Authorizing Aggregator Accounts. This step is only required if you select the source accounts using individual account IDs in the aggregator. If you added your organization to the aggregator source account, you may skip this step. In this step, you will log into each individual account that you added to the aggregator manually and authorize the pending request for the aggregator account. It displays a message to confirm that you are granting permission to an aggregator account and Region for collecting AWS Config data.
You have now configured multi-account multi-Region data aggregation in AWS Config and can view your AWS resource configurations in the aggregator account.
Let’s run through a sample scenario where you must answer the question, “what are the IP addresses of my NAT gateways?” This is one example of how AWS Config aggregation is used. You follow similar steps for other supported resource types.
AWS Management Console
AWS Config allows you to view the configuration, relationships, and number of changes made to a resource using the AWS Config console.
- Browse to the AWS Config console.
- Click on “Resources” under “Aggregators”.
- The aggregator you configured should already be selected. In the “filter by” field, enter “natgateway” and select “AWS Resource type: AWS::EC2::NatGateway” from the list. The Resources table will be filtered to show all NAT Gateway resources in AWS accounts that have been configured to send resource configurations to the Aggregator.
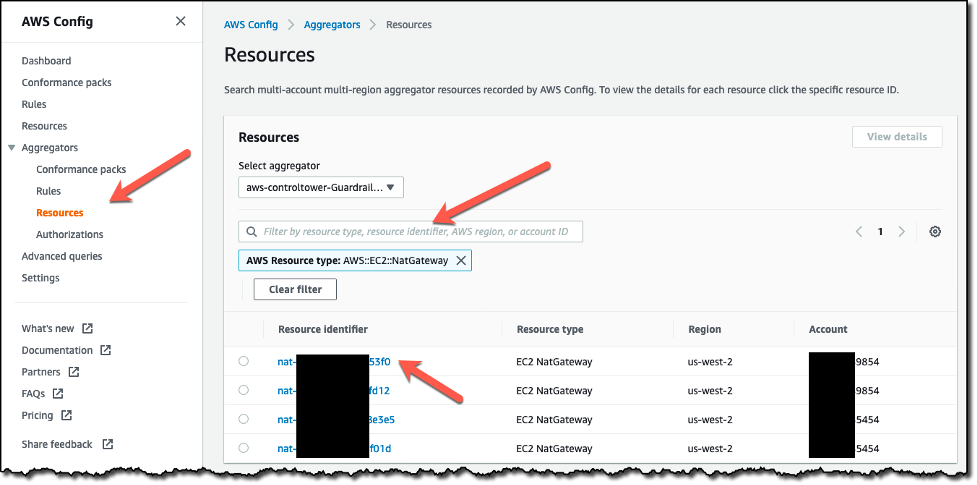
Figure 8: Navigating the AWS Config Resources page to search for NAT Gateways in your multi-account environment.
- Click on a resource ID. Under “View Configuration Item” you will see details such as
privateIpandpublicIp.
AWS CLI
The AWS CLI command configservice list-aggregate-discovered-resources returns a list of resource identifiers based on a resource type for a given configuration aggregator. A resource identifier includes the resource type, ID, (if available) the custom resource name, source account, and source Region. The following steps will show you how to retrieve the IP addresses for a NAT gateway in your multi-account environment.
- Access the AWS account that is aggregating AWS Config data in your environment. If you are using AWS Control Tower, please refer to the Audit Account using the AWS CLI blog post.
- Run the following CLI command. Update the
configuration-aggregator-namebased on your configuration, andresource-typefor the one you are interested in.
shell$ aws configservice list-aggregate-discovered-resources --configuration-aggregator-name aws-controltower-GuardrailsComplianceAggregator --resource-type AWS::EC2:: NatGatewayYour result should look similar to the following output.
{
    "ResourceIdentifiers": [
        {
            "SourceAccountId": "XXXXXXXX9854",
            "SourceRegion": "us-west-2",
            "ResourceId": "nat-XXXXXXXXXXXXX53f0",
            "ResourceType": "AWS::EC2::NatGateway"
        },
        {
            "SourceAccountId": " XXXXXXXX9854",
            "SourceRegion": "us-west-2",
            "ResourceId": "nat-XXXXXXXXXXXXXfd12",
            "ResourceType": "AWS::EC2::NatGateway"
        },
        {
            "SourceAccountId": " XXXXXXXX5454",
            "SourceRegion": "us-west-2",
            "ResourceId": "nat-XXXXXXXXXXXXX8e3e5",
            "ResourceType": "AWS::EC2::NatGateway"
        },
        {
            "SourceAccountId": " XXXXXXXX5454",
            "SourceRegion": "us-west-2",
            "ResourceId": "nat-XXXXXXXXXXXXXf01d",
            "ResourceType": "AWS::EC2::NatGateway"
        }
    ]
}- The
configservice get-aggregate-resource-configcommand returns configuration item information based on a resource identifier. The configuration item will contain fields such as create time, network interface ID, IP addresses, subnet IDs, and VPC IDs
Run the following CLI command to get more information on a specific “ResourceIdentifier” from the list above. Update the configuration-aggregator-name based on your configuration, and SourceAccountId, SourceRegion, ResourceId, and ResourceType.
shell$ aws configservice get-aggregate-resource-config --configuration-aggregator-name aws-controltower-GuardrailsComplianceAggregator --resource-identifier SourceAccountId=XXXXXXXX9854,SourceRegion=us-west-2,ResourceId=nat-XXXXXXXXXXXXX53f0,ResourceType=AWS::EC2::NatGatewayThe output of the command should contain the fields privateIp and publicIp.
Cleanup
When finished, turn off AWS Config. For non-Control Tower environments, follow these steps:
- In the aggregator account, delete the aggregator under “Aggregators”.
- In all accounts, stop the recorder to turn off the AWS Config configuration recorder.
- AWS Config configuration item data will be retained for 7 years by default. Change the retention period to 30 days to delete the data earlier.
Option 3: Automatically generating a multi-account network resources report using aws-sts-network-query-tool
A script that uses AWS CLI (or an SDK such as boto3 if you writing in Python) can by created to solve this challenge at scale. For example, a script in the aws-samples repo on GitHub called aws-sts-network-query-tool uses cross account roles to collect networking related information for multiple accounts, and outputs the information in a CSV. Let’s explore the script in more detail.
The script supports the following resource queries:
- Internet Gateway (IGW)
- NAT Gateway (NATGW)
- Load Balancer (NLB/ALB)
- VPC CIDR Addresses
- VPC Subnets
- Public Elastic IPs (EIP)
- Elastic Network Interfaces (ENI)
Please review the Getting Started section of the script’s README before proceeding. You need to ensure it created the proper cross account roles for each account. Environmental variables must be set, or ~/.aws/config must be configured, for your AWS organization management account, or delegated administrator account. If you do not want to use an AWS organization management account or delegated administrator, you may specify a list of member accounts to scan by using the --accounts-csv option.
You can run the following CLI command to query all networking resources supported by the script.
shell$ aws_network_query --allWhen the script completes, it will print out a summary of resources that it found. See an example below.
FINISHED. Results summary:
A total of 20 Internet Gateways were found. Writing details to output-igw.csv
A total of 2 NAT Gateways were found. Writing details to output-natgw.csv
A total of 6 Load Balancers were found. Writing details to output-elb.csv
A total of 24 VPC CIDRs were found. Writing details to output-cidr.csv
A total of 72 VPC Subnets were found. Writing details to output-subnets.csv
A total of 2 Elastic IP Addresses were found. Writing details to output-addresses.csv
A total of 59 Elastic Network Interfaces were found. Writing details to output-eni.csv
You can analyze the details of your network resources by opening the output-*.csv files. For example, the following table is the list of ENIs from output-addresses.csv which contains two Elastic IP Addresses based on the script output above (the second to last line). This helps you answer the question “which account owns the Elastic IP 198.51.100.101?”.
Figure 9: List of ENIs from output-addresses.csv
Cleanup
- Delete the CloudFormation stack used to deploy the cross-account IAM role in member accounts.
- Remove the Python script from your local machine by running the following command.
shell$ pip3 uninstall aws-sts-network-query-toolChoosing an option
If you want to see a list of VPC CIDRs, subnets, ENIs, and EIPs, and IP usage within CIDRs, go with Option 1. Option 2 and 3 expand on this by allowing you to see a list of IGWs, NATGWs, and load balancers within your accounts, and see what resources EIPs are attached to. Additionally, if your accounts are not within an AWS organization, go with Option 3.
Conclusion
It is not scalable for organizations to review or audit networking information within their multi-account AWS environment by manually logging into each account individually. This blog post explored three scalable options. First, we used IPAM integrated with AWS organizations to view the IP usage within VPCs, subnets, and EIPs and searched for historical IP information. Second, we used AWS Config with multi-account, multi-Region data aggregation to view the current configuration of a resource and its configuration history. Finally, we built an automated solution programmatically using the AWS CLI (or SDK such as boto3). An example of this is aws-sts-network-query-tool, that outputs details about Internet Gateways, NAT Gateways, Load Balancers, VPC CIDR Addresses, VPC Subnets, Elastic IP Addresses, and Elastic Network Interfaces into a CSV.
To learn more, check out these blog posts
- Network Address Management and Auditing at Scale with Amazon VPC IP Address Manager
- AWS Config best practices
- A simpler way to assess the network exposure of EC2 instances: AWS releases new network reachability assessments in Amazon Inspector