Networking & Content Delivery
Trust goes both ways: Amazon CloudFront now supports viewer mTLS
Starting today, Amazon CloudFront supports viewer mTLS authentication from end users to CloudFront, enhancing security for highly distributed and sensitive applications. In modern architectures, securing client-server communication necessitates more than standard TLS, and mTLS extends this model by enforcing bidirectional authentication. This makes sure that both the client and the server verify each other’s identity before any data is exchanged. Furthermore, this new capability enforces granular access control and identity verification at the protocol level while streamlining auditing and compliance for regulated environments.
mTLS benefits for CloudFront-powered applications
mTLS adds an extra layer of security by requiring both parties to present and verify digital certificates, creating two-way authentication. As a result, mTLS is now widely adopted across industries where identity assurance, encrypted communication, and regulatory compliance are foundational to business trust. It provides cryptographic proof of identity, prevents credential-based attacks, and enforces zero-trust principles across distributed systems. Key industry use cases include:
Financial services: Mandated by frameworks such as PCI DSS and PSD2 to secure API transactions between banks, payment gateways, and trusted third-party (TTP) providers. For example, trading platforms use mTLS to authenticate brokers or partner institutions before allowing access to market data or trade execution endpoints.
IoT and connected devices: Authenticates devices—such as gaming consoles, connected vehicles, or sensors—before they send telemetry to the cloud, protecting against spoofed devices or data injection.
Enterprise applications: Enforces authentication and encryption across internal microservices or between corporate systems and software as a service (SaaS) platforms, such as HR, payroll, and analytics, thus reducing the risk of lateral movement or unauthorized data access.
Healthcare: Protects Protected Health Information (PHI) in compliance with HIPAA by authenticating EHR systems, medical devices, and APIs exchanging sensitive patient data.
Telecommunications and media: Secures control and content distribution channels between edge nodes and origin servers, making sure that only trusted infrastructure components can exchange live or on-demand media traffic.
To meet these diverse and stringent security needs, CloudFront now supports viewer mTLS. Organizations can use this to authenticate clients, such as applications, devices, or services, directly at the edge before any request reaches the origin. This capability extends mTLS protection from service-to-service traffic into user-facing scenarios, so that enterprises can enforce client certificate validation globally with minimal latency. Viewer mTLS integrates seamlessly with CloudFront Trust Store so that customers can use Amazon Web Services (AWS) Private Certificate Authority or bring their own CA to implement fine-grained authentication policies, automate certificate provisioning, and achieve compliance without adding operational complexity.
Getting started
To implement mTLS authentication for a CloudFront distribution, first set up a private certificate authority and create client certificates. The configuration involves collecting the public key certificates of the root certificate authority and any intermediate certificate authorities in PEM file format. Then, these certificate files need to be uploaded to an Amazon S3bucket, which serves as the source for the trust store used in the authentication process.
In this example, we demonstrate using OpenSSL to create the private certificate authority and client certificates. Alternatively, this process can be streamlined using AWS Certificate Manager Private CA, which is a fully managed service. Check out the AWS Private CA documentation for more details.
First, create a new certificate authority with OpenSSL by following these steps:
1. Generate the private CA private key and certificate:
a. During the certificate creation process, you are prompted to provide information for the certificate’s distinguished name (DN) fields.
b. Optionally, you can create intermediate certificate authorities signed by your root CA. CloudFront supports certificate chains up to 4 depth, such as root certificate for mTLS authentication. You must combine your root CA and intermediate CA certificates into a single PEM bundle (CA bundle). Use the cat command to build the CA bundle file:
2. After establishing the CA hierarchy, generate the client certificate private key and certificate signing request (CSR):
a. Enter the client’s subject name, locality, organization, and organizational unit properties of the client certificate. Keep the optional password challenge empty.
3. Sign the client certificate using the previously created root CA:
4. After completing these steps, the following files should be in your directory:

Setting up the trust store
The following section outlines how to set the trust store.
Prerequisites
You must have a Root CA certificate or CA bundle (PEM file) from your certificate authority uploaded to an S3 bucket. If you completed the previous section, then you should have already created the Root_CA.pem file that needs to be uploaded to your S3 bucket.
1. In the CloudFront console, choose Trust Store under Security on the left menu. Choose Create trust store.

Trust Stores in Amazon CloudFront
2. Specify the S3 bucket location on this page. Choose Create trust store. The CA bundle is read once and stored on CloudFront.
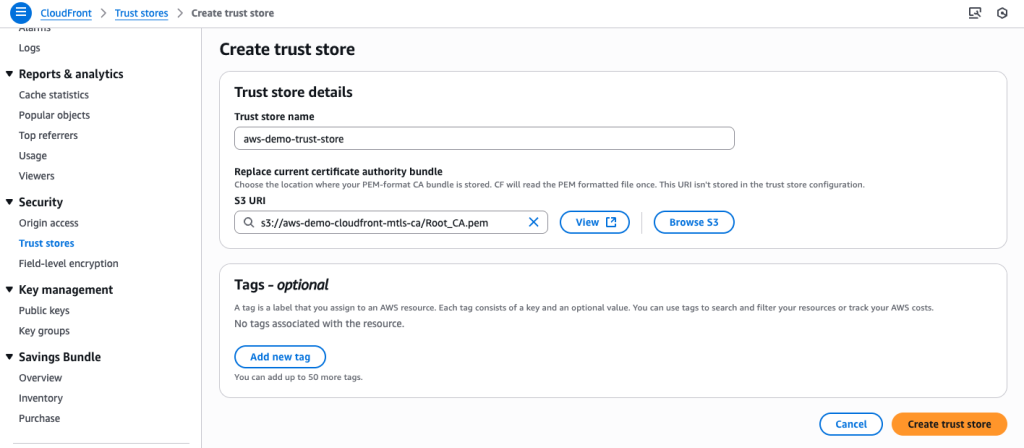
Create Trust Store in Amazon CloudFront
3. When the trust store has been created, the console takes you to the trust store details page. From this page you can associate the trust store to a distribution by choosing the Associate to distribution button.
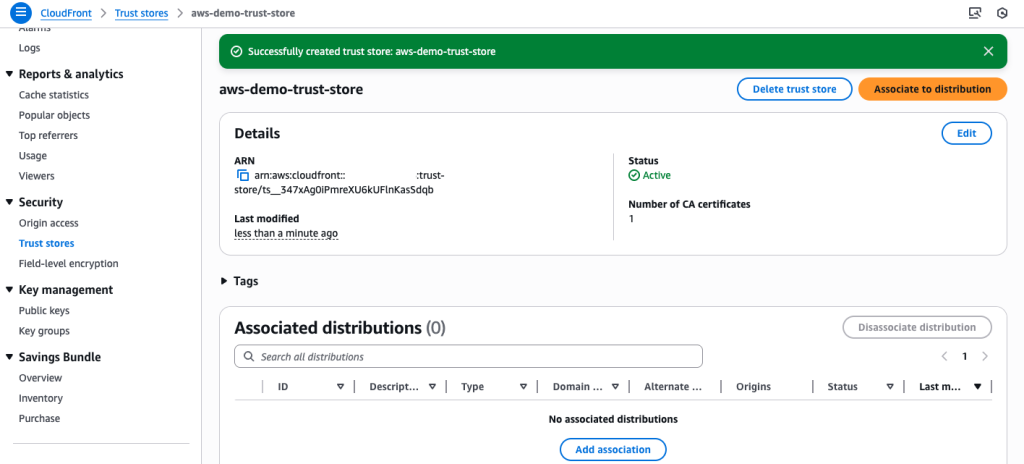
Successful creation of Trust Store in an Amazon CloudFront distribution
4. On this page you can choose the distribution to which you want to associate the trust store.

Associating Trust Store to an Amazon CloudFront distribution
Alternatively, you can associate the trust store through the distribution settings.
Setting up distribution
Prerequisites
You must have an existing CloudFront distribution with HTTPS only viewer protocol enabled.
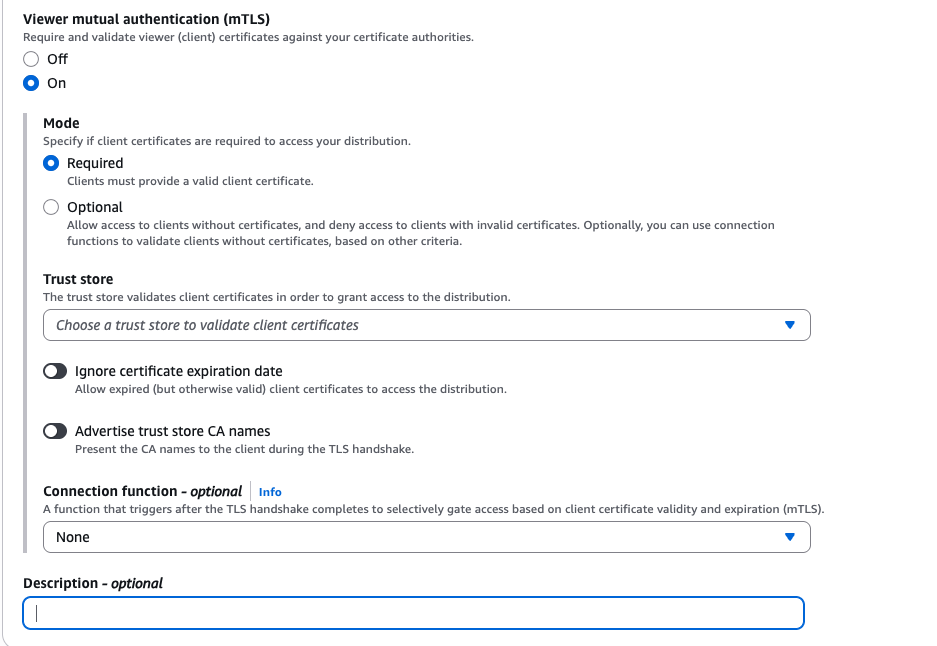
1. To enable mTLS authentication for viewers, navigate to Distribution Settings and toggle the Viewer mutual authentication (mTLS) setting to On.
Enable mTLS in CloudFront distribution
2. Choose the appropriate mTLS parameters for your use case.
Mode
CloudFront’s mTLS offers both Required mode, where all clients must present valid certificates, and Optional mode, which allows mixed authentication by accepting both mTLS and non-mTLS clients on the same distribution while still rejecting invalid certificates.
Trust store
After enabling viewer mTLS authentication, choose your previously created trust store to associate it with the distribution.
There are two optional parameters, and both default to false:
Ignore certificate expiration date: If this is true, then CloudFront accepts connections from viewers even if one or more of the certificates in the client certificate chain does not pass X509 time validation (the current time is before NotBefore or after NotAfter). Other X509 certificate validations are still applied. The client certificates must be signed in a chain going up to one of the trusted certificates in the CA bundle.
Advertise trust store CA names: If this is true, then CloudFront advertises to viewers the list of certificate authority names that the distribution accepts. This is the list of certificate distinguished names (DNs) that are in the trust store.
Connection function (optional):
Connection functions are an optional enhancement to viewer mTLS. They enable you to execute custom validations as part of the mTLS handshake process, so that you can allow, deny, or log information about the connection. In a later section, we demonstrate an example of how to use connection functions within your CloudFront distribution.
CloudFront Viewer Certificate headers
CloudFront can extract information from the client certificate and add it to viewer requests as HTTP headers. Then, you can use these headers as part of your cache key and/or forward them to your origin server. You can also read these headers while processing a viewer request in CloudFront Functions or AWS Lambda@Edge.
CloudFront Viewer Certificate headers are:
· CloudFront-Viewer-Cert-Serial-Number
· CloudFront-Viewer-Cert-Issuer
· CloudFront-Viewer-Cert-Subject
· CloudFront-Viewer-Cert-Validity
· CloudFront-Viewer-Cert-PEM
· CloudFront-Viewer-Cert-Present
· CloudFront-Viewer-Cert-SHA256
For more details, refer to the CloudFront documentation.
Testing mTLS authentication
To test your mTLS configuration, use curl with your client certificate. The following are examples of successful and denied scenarios:
· –key: Specifies your client’s private key file.
· –cert: Specifies your client’s certificate file.
· Replace dxxxxxxxxxxxxx.cloudfront.net with your actual CloudFront distribution domain name that has mTLS enabled.
1. Successful authentication example (with valid client certificate):
2. Denied authentication example (with invalid or missing certificate):
The following steps walk through the overall process of mTLS authentication in CloudFront, as shown in the following diagram.

mTLS authentication in Amazon CloudFront
1. Upload your CA bundle to an S3 bucket.
2. Create the Trust Store and provide the Amazon S3 path to the CA certificate bundle.
3. Client initiates a TLS session with CloudFront. During the TLS handshake, the client presents the TLS certificate.
4. CloudFront validates the client certificate, and mTLS session is established.
4a. Optionally, you can run connection-functions by hooking during TLS handshake. You can extract information from the client certificate and deny connections from clients with invalid certs based on custom logic.
5. Optionally, a viewer request edge function can be triggered to perform CloudFront functions. You can extract information from the client certificate through cloudfront-viewer-cert* headers.
6. If you enable cloudfront-viewer-cert* headers in your origin request policy, then CloudFront forwards client certificate information to your origin server. The headers are sent according to your configured origin request policies.
CloudFront enables custom authentication and security controls through both connection functions (executed during TLS handshake) and viewer-request edge functions (run after handshake completion) for implementing certificate-based validations. For more details, refer to the CloudFront documentation.
Monitoring with connection logs
CloudFront generates detailed connection logs that capture key information about TLS handshakes.
You can use connection logs to do the following:
· Monitor and troubleshoot mTLS-enabled distributions
· Track successful mTLS connections and client certificates
· Gain visibility into failed TLS handshakes
Furthermore, connection functions allow you to add custom log data to your connection logs. To add custom data, use the logCustomData helper method available on the connection object of the connection function. You can log any valid UTF-8 string of up to 800 bytes to the connectionLogCustomData field.
Like Access logs, CloudFront delivers connection logs through CloudWatch vended logs, offering the following features:
· Send connection logs to CloudWatch Logs, Amazon Data Firehose, and Amazon S3.
· Choose other output log file formats such as JSON, w3c, and Parquet (Amazon S3 only).
Each mTLS connection generates a unique identifier connectionId that is recorded across CloudFront log types: Connection logs, Standard logs, and Real-time logs. You can use this unified identifier to investigate and correlate access patterns across connection logs and access logs. For example, you can use the connectionId to trace a specific request, which makes troubleshooting and analysis more efficient. For more details, refer to the CloudFront documentation.
Certificate revocation validation using connection Functions and CloudFront KeyValueStore
In mTLS authentication, certificates may be revoked due to theft or compromise even if they are within their validity period. You can combine CloudFront connection functions with CloudFront KeyValueStore to implement real-time certificate revocation checking.
Preparing CloudFront KeyValueStore
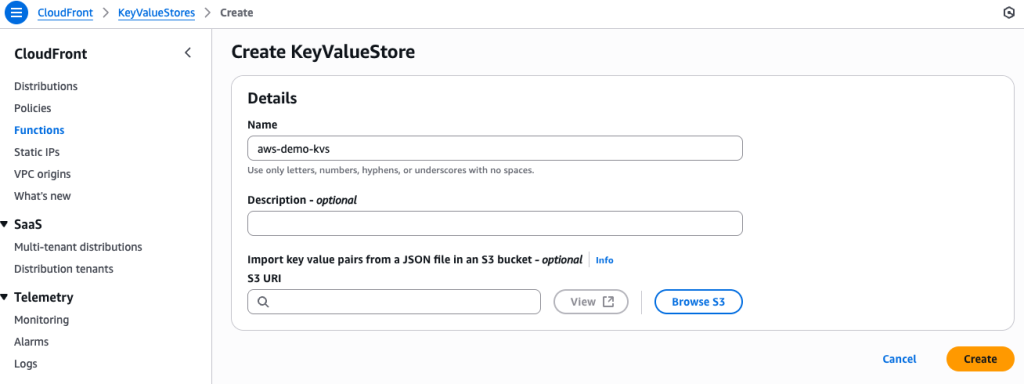
First, create a KeyValueStore to store the serial numbers of revoked certificates.
1. In the CloudFront console, choose Functions under the left menu. Then, open the KeyValueStores tab at the top and choose Create KeyValueStore.

Create KeyValueStore
2. Provide a name for your KeyValueStore and choose Create. You can also import data from Amazon S3 if needed.
3. Choose the created KeyValueStore, then choose Edit under Key value pairs to enter the serial numbers of revoked certificates.

4. Choose Save changes to save your entries.
Creating a connection function
Create a connection function to check certificate serial numbers:
1. In the CloudFront console, choose Functions under the left menu. Then, choose the Connection functions tab at the top and choose Create connection function.
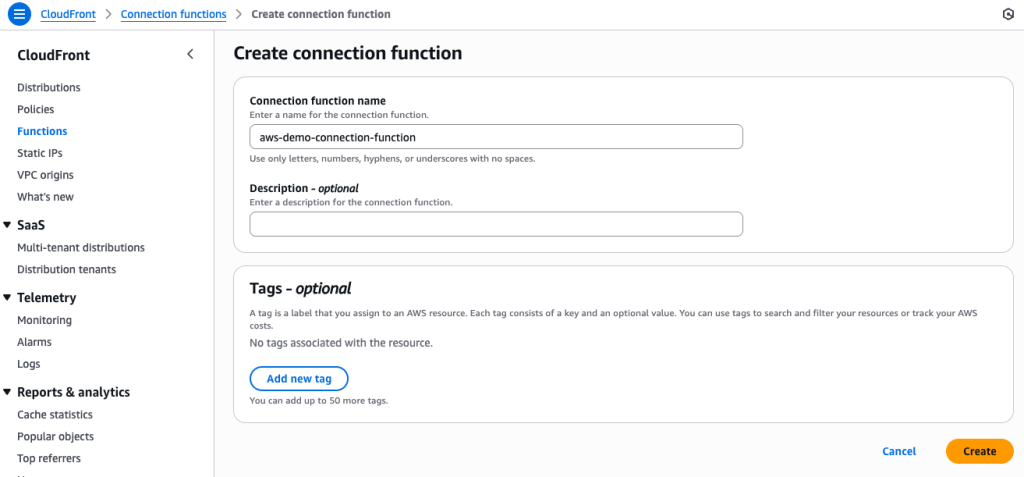
Create connection function
2. Provide a name for your function and choose Create.
Create KeyValueStore
3. Under Associated KeyValueStore, choose Associate existing KeyValueStore and associate the KeyValueStore created earlier.

4. Paste the following code into Function Code and choose the Save Change button.
5. Provide a name for your function and choose Create.
6. Under Associated KeyValueStore, choose Associate existing KeyValueStore and associate the KeyValueStore that you created earlier.
import cf from 'cloudfront';
async function connectionHandler(connection) {
const kvsHandle = cf.kvs();
// Get certificate serial number
const serialNumber = connection.clientCertificate.certificates.leaf.serialNumber.replace(/:/g, "");
// Check revocation status in KVS
const isRevoked = await kvsHandle.exists(serialNumber);
if (isRevoked) {
// Deny connection for revoked certificates
connection.logCustomData(`Revoked certificate: ${serialNumber}`);
console.log(`Denying connection for revoked certificate: ${serialNumber}`);
return connection.deny();
}
// Allow connection for valid certificates
connection.logCustomData(`Valid certificate: ${serialNumber}`);
console.log(`Allowing connection for valid certificate: ${serialNumber}`);
return connection.allow();
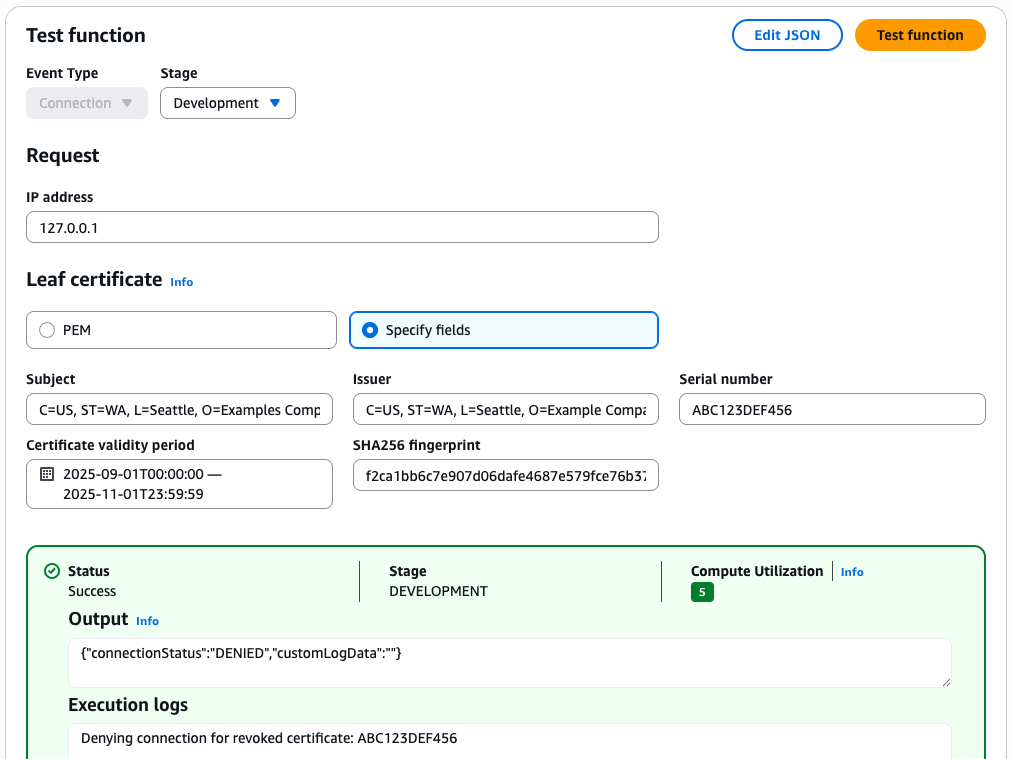
}7. In the Test tab, you can test the function. Enter the certificate information and the Serial number you added to the KeyValueStore, as shown in the following figure. Then, choose Test function to confirm that the certificate is properly revoked.
Test function
8. In the Publish tab, choose Publish connection function.
9. Under Associated distributions, choose Add association, choose the distribution with which to associate the function, and choose Associate.
Testing and verification
Test with a revoked certificate to confirm that the connection is denied:
# Test with revoked certificate (connection should be denied)

 # Note: Replace with your actual CloudFront distribution domain

 curl --key revoked_client.key \

 --cert revoked_client.pem \


         https://dxxxxxxxxxxxxx.cloudfront.net

 # Test with valid certificate (connection should be allowed)

 curl --key valid_client.key \

 --cert valid_client.pem \

 https://dxxxxxxxxxxxxx.cloudfront.net
Conclusion
Security on the internet has always been about trust. With mTLS, identities are verified on both sides of every connection.Now you can use viewer mTLS through Amazon CloudFront to deploy and operate at a global scale. You decide exactly who or what gets to communicate with your applications, without slowing anything down.
Turn on viewer mTLS in your CloudFront distribution today or check out the AWS documentation to discover how to bring mutual authentication to your edge.

Sagar Desarda
Sagar Desarda is the Head of the Technical Account Manager (TAM) and Business Development (BD) organizations for Data, Analytics, and Gen AI ISVs. Sagar’s teams partner with customers to optimize their AWS architecture, ensure seamless operation of their business-critical applications, accelerate adoption, and drive go-to-market success across North America. Additionally, Sagar serves as the AMER leader for the Edge Networking Services Specialist team, where he drives new business growth, fosters technical engagements, and authors customer-facing publications.

Tomoya Kudo
Tomoya Kudo is a Prototyping Engineer based in Tokyo. His main focus is helping customers succeed by proposing solutions based on best practices and developing prototypes to ensure project success.

Yutaka Oka
Yutaka Oka is a Senior Edge Specialist Solutions Architect based in Tokyo. His main focus is helping customers optimize and secure content delivery using AWS Edge Services.