AWS Open Source Blog
Add Single Sign-On to Open Distro for Elasticsearch Kibana Using SAML and ADFS
Open Distro for Elasticsearch Security (Open Distro Security) comes with authentication and access control out of the box. Prior posts have discussed LDAP integration with Open Distro for Elasticsearch and JSON Web Token authentication with Open Distro for Elasticsearch.
Security Assertion Markup Language 2.0 (SAML) is an open standard for exchanging identity and security information with applications and service providers. Open Distro Security implements the web browser Single Sign On (SSO) profile of the SAML 2.0 protocol. This enables you to configure federated access with any SAML 2.0-compliant identity provider (IdP) – e.g. Microsoft Active Directory Federation Services (ADFS), Okta, Auth0, and AWS SSO. This integration is meant for use with web browsers only; it is not a general-purpose method of authenticating users. Its primary use case is to support Kibana single sign-on. In this post, we’ll talk about setting up SAML-based SSO using Microsoft ADFS.
Prerequisites
- Install and configure Open Distro for Elasticsearch.
- Install and configure Kibana. Make note of your Kibana server FQDN as
kibana_base_urlandkibana_port(default is 5601). - Enable SSL on Elasticsearch and Kibana (this is a requirement for most Identity Providers).
- Active Directory with ADFS already set up.
- Create users and assign to groups in your IdP. For this post, I’ve created three users –
esuser1,esuser2, andesuser3– and two groups –ESAdminsandESUsersGroup memberships as shown here:
| User | Active Directory Group |
Open Distro Security role |
| esuser1 | ESAdmins | all_access |
| esuser2 | ESUsers | readall |
| esuser3 | N/A | N/A |
Active Directory Federation Services (ADFS) configuration
ADFS federation occurs with the participation of two parties: the identity or claims provider (Active Directory in our case) and the relying party (Kibana in our case). SAML federation works by issuing and transforming claims between claims providers and relying parties. A claim is information about a user from a trusted source: the trusted source is asserting that the information is true, and that the source has authenticated the user in some manner. The claims provider is the source of the claim. The relying party (Kibana) is the destination for the claims.
Relying party
Configure Kibana as a relying party in ADFS:
1. From the ADFS Management Console, right-click ADFS and select Add Relying Party Trust.

2. In the Add Relying Party Trust Wizard, select ‘Claims aware’ and click Start.

3. Next select the option – “Enter data about the relying party manually” and click Next.

4. Add an appropriate display name and click Next.

5. In the URL configuration screen, tick the box to “Enable support for SAML 2.0 WebSSO protocol and enter this Kibana url as the Service URL:
https://<kibana_base_url>:<kibana_port>/_opendistro/_security/saml/acsMake sure to replace the kibana_base_url and kibana_port with your actual kibana configuration as noted in the prerequisites. In my setup this is : https://new-kibana.ad.example.com:5601/
Click Next.

6. Add a string for the Relying party trust identifier. You can choose any name here; for this demo, use kibana-saml. You will use this name in the Open Distro Security SAML config as the SP-entity-id.

7. In the access control policy, you can permit everyone to access Kibana, or restrict to select groups. Note: this is only providing access for the users to authenticate into Kibana. We have not yet set up Open Distro Security roles and permission. The mapping from the user’s AD groups to Elasticsearch backend roles is below.

8. In the next screen, review all the settings and click Finish to Add Kibana as a Relying Party Trust.

Claim rules
Subjects (i.e., usernames) are usually stored in the NameId element of a SAML response. We’ll create two claim rules, one for NameId (usernames) and another for Roles (group mappings).
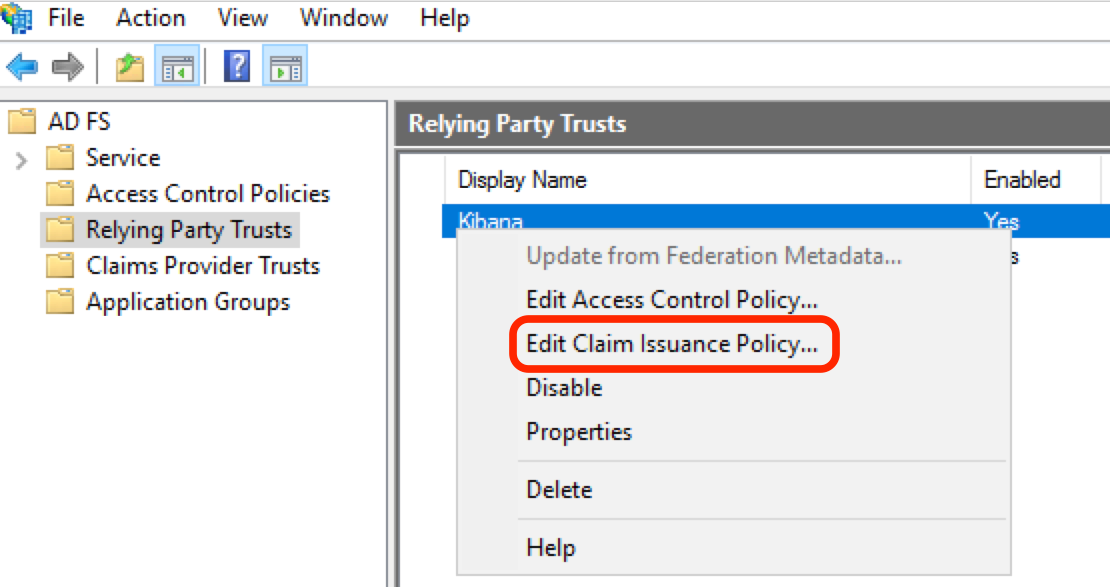
Right Click Kibana from the Relying Party Trusts and select Edit Claim Issuance Policy…
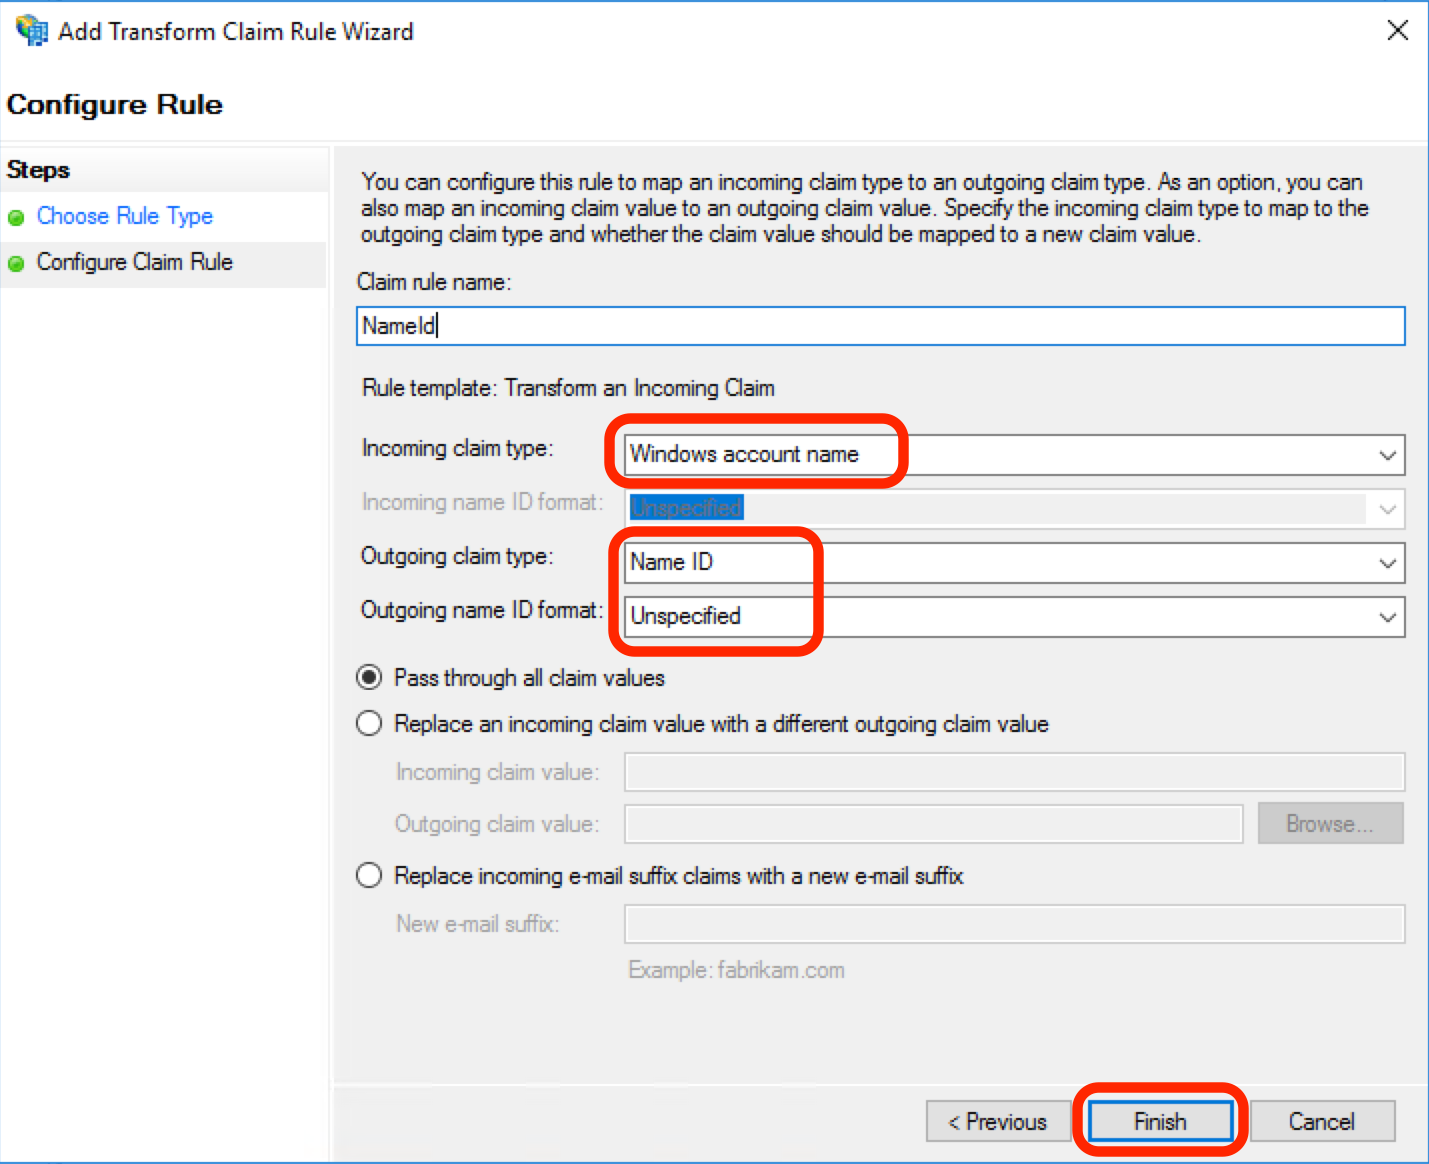
1. NameId
In the Edit Claim Issuance Policy dialog box, click Add Rule…
Select Transform an Incoming Claim as rule type and then click Next.
In the next screen, use the following settings:
- Claim rule name: NameId
- Incoming claim type: Windows Account Name
- Outgoing claim type: Name ID
- Outgoing name ID format: Unspecified
- Pass through all claim values: checked
Click Finish.
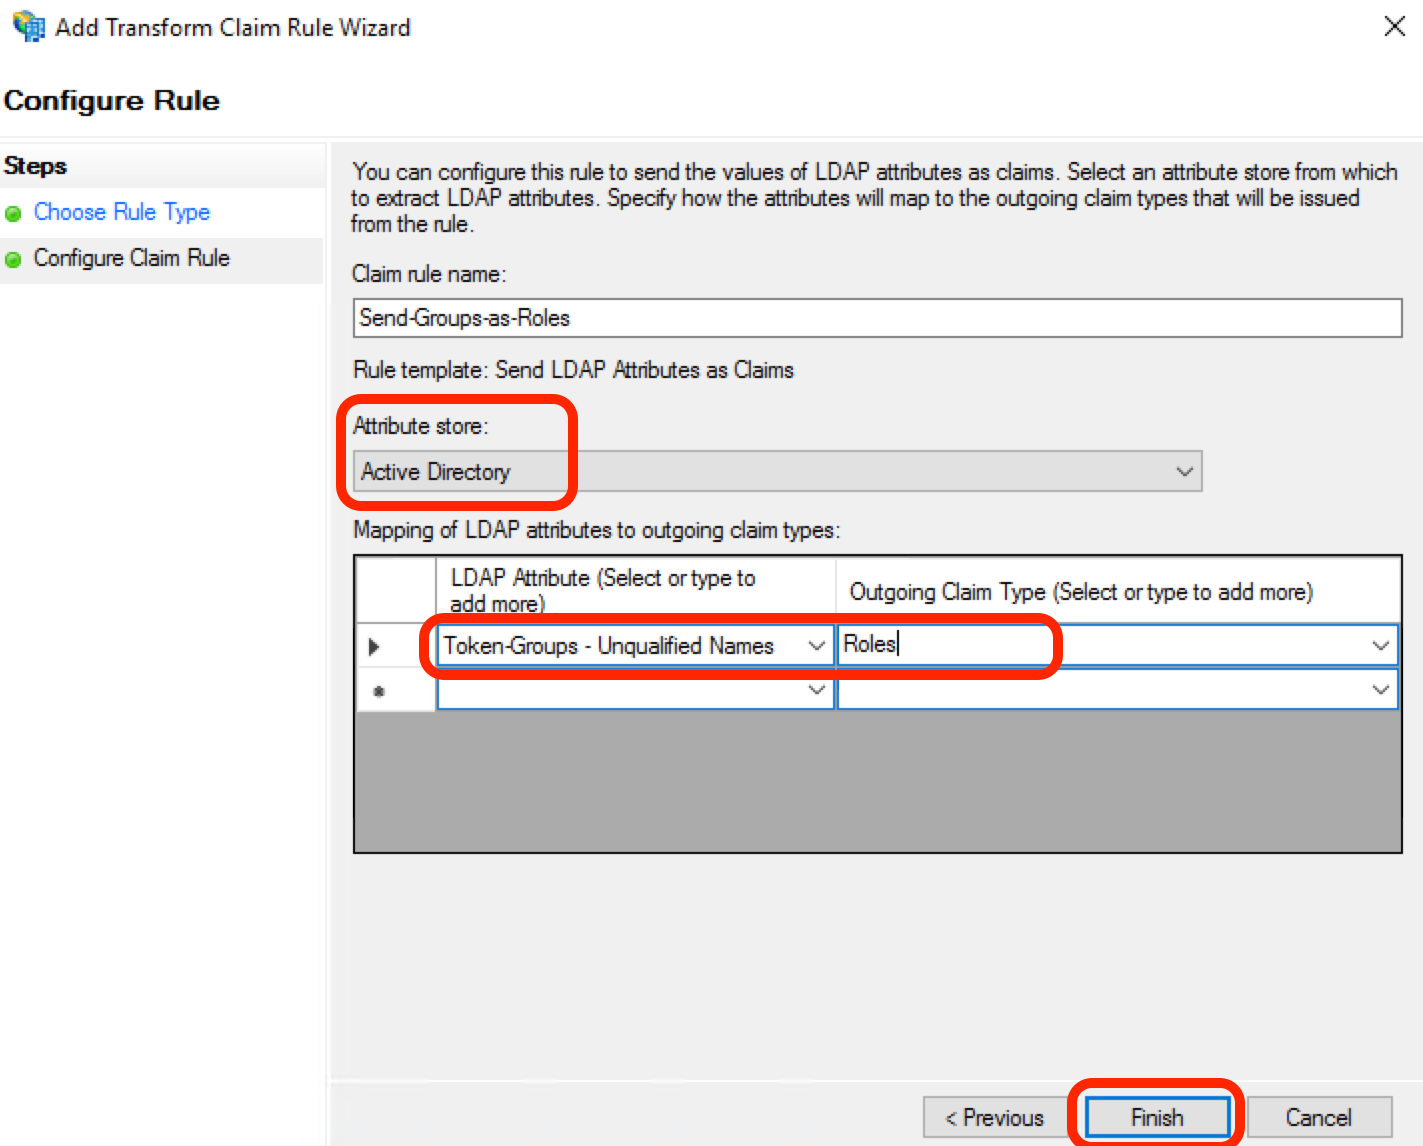
2. Roles
In the Edit Claims issuance policy dialog box, click Add Rule…
Select Send LDAP Attributes as Claims as rule type and click Next.
In the next screen, use the following settings:
- Claim rule name: Send-Group-as-Roles
- Attribute Store: Active Directory
- LDAP Attribute: Token-Groups – Unqualified Names (to select the group name)
- Outgoing Claim Type: Roles. (This should match the “roles_key” defined in Open Distro Security’s config.)
Click Finish.
Finally, download the SAML Metadata file from ADFS and copy to the Elasticsearch config directory. The ADFS metadata file can be accessed from https://<ADFS FQDN>/FederationMetadata/2007-06/FederationMetadata.xml
Configuring SAML in Open Distro Security
For a new setup, you can use plugins/opendistro_security/securityconfig/config.yml to update the SAML configuration details. In an established setup, make sure you retrieve the current Open Distro Security configuration from a running cluster and use those files to avoid losing any changes. For additional details on how to use securityadmin.sh, refer to the Open Distro for Elasticsearch documentation.
To use SAML for authentication, you need to configure an authentication domain in the authc section of config.yml. Since SAML works solely on the HTTP layer, you do not need any authentication_backend and can set it to noop. I recommend adding at least one other authentication domain, such as LDAP or the internal user database, to support API access to Elasticsearch without SAML. For Kibana and the internal Kibana server user, you also need to add another authentication domain that supports basic authentication. This authentication domain should be placed first in the chain, and the challenge flag must be set to false. Configuring multiple authentication mechanisms ensures that a single failure will not lock you out of the system.
My config is as below:
    authc:
      basic_internal_auth_domain:
        http_enabled: true
        transport_enabled: true
        order: 0
        http_authenticator:
          type: "basic"
          challenge: false
        authentication_backend:
          type: "intern"
      saml_auth_domain:
        http_enabled: true
        transport_enabled: false
        order: 1
        http_authenticator:
          type: saml
          challenge: true
          config:
 idp: metadata_file: adfs.xml entity_id: http://sts.ad.example.com/adfs/services/trust sp: entity_id: kibana-saml kibana_url: https://new-kibana.ad.example.com:5601/ roles_key: Roles exchange_key: 'AbCDefg123......'
        authentication_backend:
          type: noop
idp.metadata_file : The path to the SAML 2.0 metadata file of your IdP. Place the metadata file in the config directory of Open Distro for Elasticsearch. The path has to be specified relative to the config directory (you can also specify metadata_url instead of file).
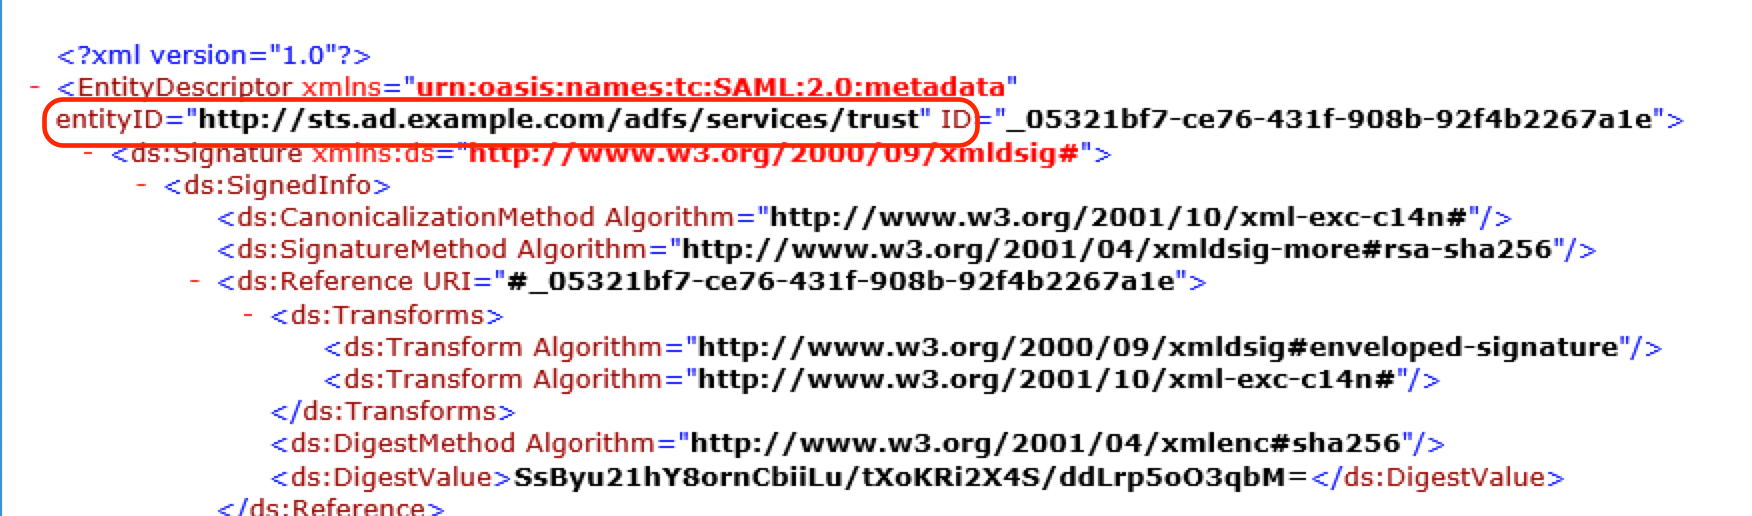
idp.entity_id : This is the unique ID of your identity provider. You can find this ID in the SAML metadata:
sp.entity_id: This should match the “Relying Party identifier” in ADFS configuration.
kibana_url : The base URL of your Kibana installation that receives HTTP requests.
roles_key: The attribute in the SAML response where the roles are stored. You called your Claim type “Roles” in ADFS.
exchange_key: SAML, unlike other protocols, is not meant to be used for exchanging user credentials with each request. Open Distro Security trades the SAML response for a lightweight JSON web token that stores the validated user attributes. This token is signed by an exchange key that you can choose freely. The algorithm is HMAC256, so it should have at least 32 characters. Note that when you change this key all tokens signed with it will immediately become invalid.
Update Open Distro Security’s config
Now run securityadmin.sh to update the Open Distro Security’s config as shown below:
$ /usr/share/elasticsearch/plugins/opendistro_security/tools/securityadmin.sh \
    -cacert /etc/elasticsearch/root-ca.pem \
    -cert /etc/elasticsearch/kirk.pem \
    -key /etc/elasticsearch/kirk-key.pem \
    -h <Cluster-IP-or-FQDN> \
    -f <Path-to-config>/config.yml -t config
Here I’m specifying the paths for the Root CA certificate (-cacert), Admin Certificate (-cert), and Admin Private Key (-key) files. The distinguished name (DN) of the Admin certificate needs to be configured in the elasticsearch.yml file under opendistro_security.authcz.admin_dn . I’m restricting this update to the config file by explicitly specifying the config file location.
Role mapping
You can map Open Distro Security roles to usernames, backend roles, and/or hosts. Backend roles are determined as part of the authentication and authorization process, and in our case this is the “Roles” Attribute values of the SAML response. My prior post on setting up LDAP integration for Open Distro for Elasticsear details how to configure the security roles and role mappings. I mapped my AD Group ESAdmins to Security role all_access and AD Group ESUsers to readall

Kibana configuration
Since most of the SAML specific configuration is done in Open Distro Security, you can simply activate SAML in your kibana.yml by adding:
In addition, you must whitelist the Kibana endpoint for validating the SAML assertions and the logout endpoint:
In order to test your configuration, you must restart Kibana.
sudo systemctl restart kibana.service
Test logging in as different users
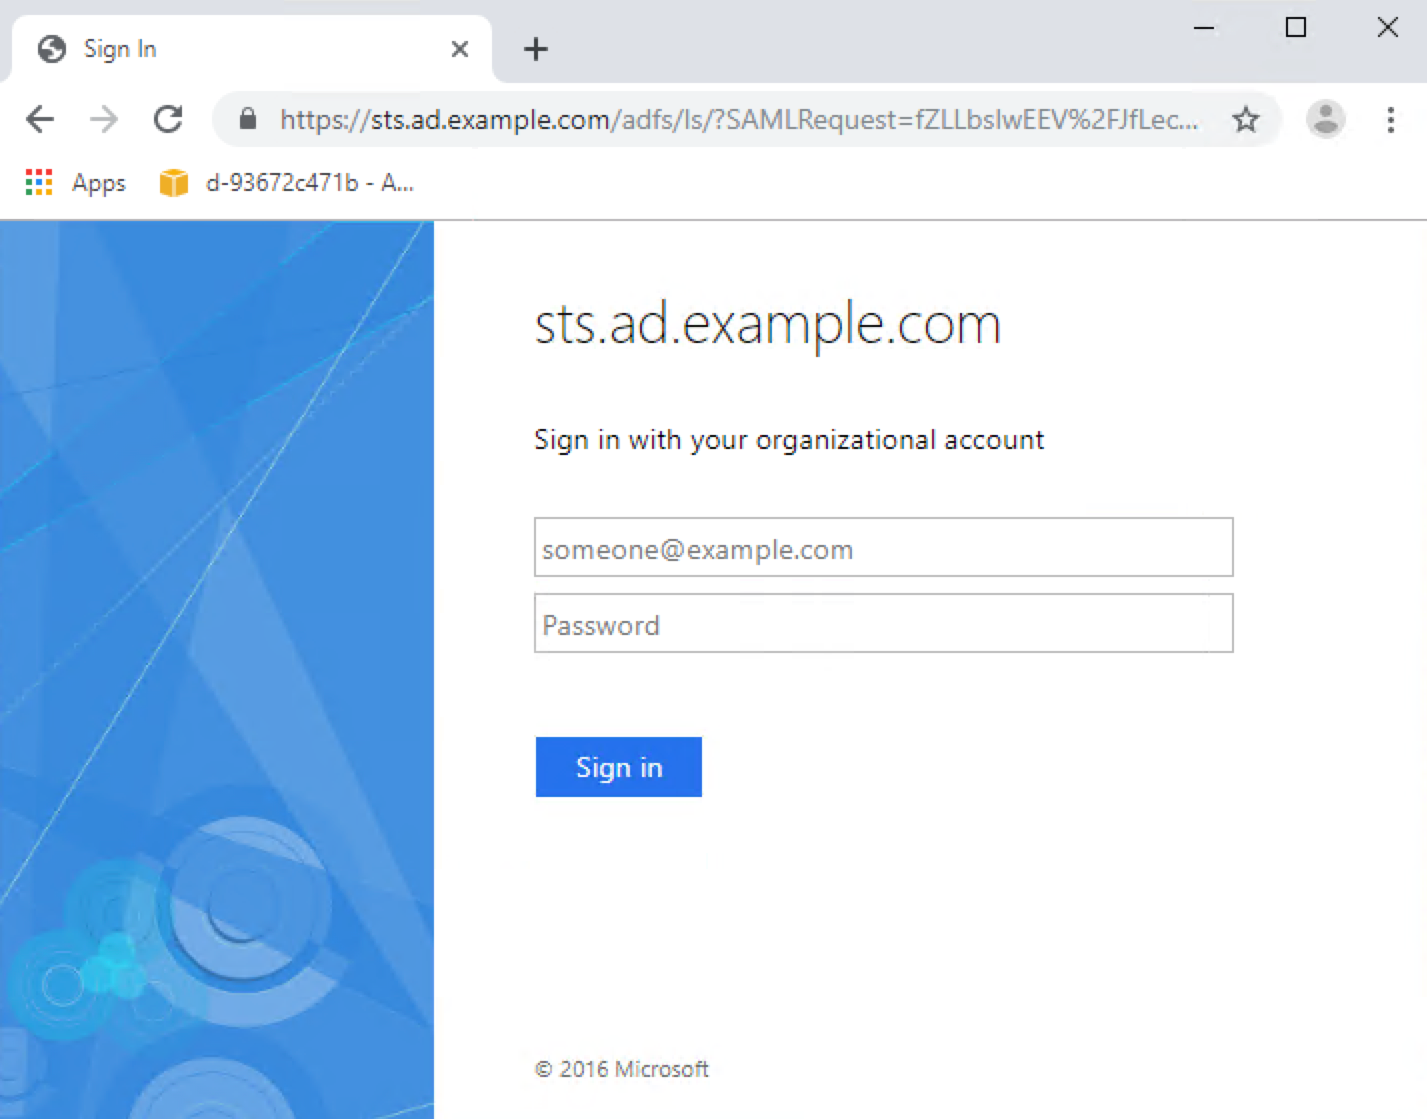
Navigate to https://<<kibana url>>:5601. You will be redirected to the ADFS login page:
As a read-write user esuser1
User esuser1 is part of the ESAdmins AD group and is mapped to the security role all_access. This user is allowed to perform read and write operations.
Add a document (succeeds as expected):

Run a search query (succeeds as expected):

As read-only user esuser2
User esuser2 is part of the ESUsers AD group and is mapped to the security role readall. This user is allowed to perform only read operations.
Create a document (fails as expected; esuser2 is not a member of a group that allows writing):

Run a search query (succeeds, as expected):

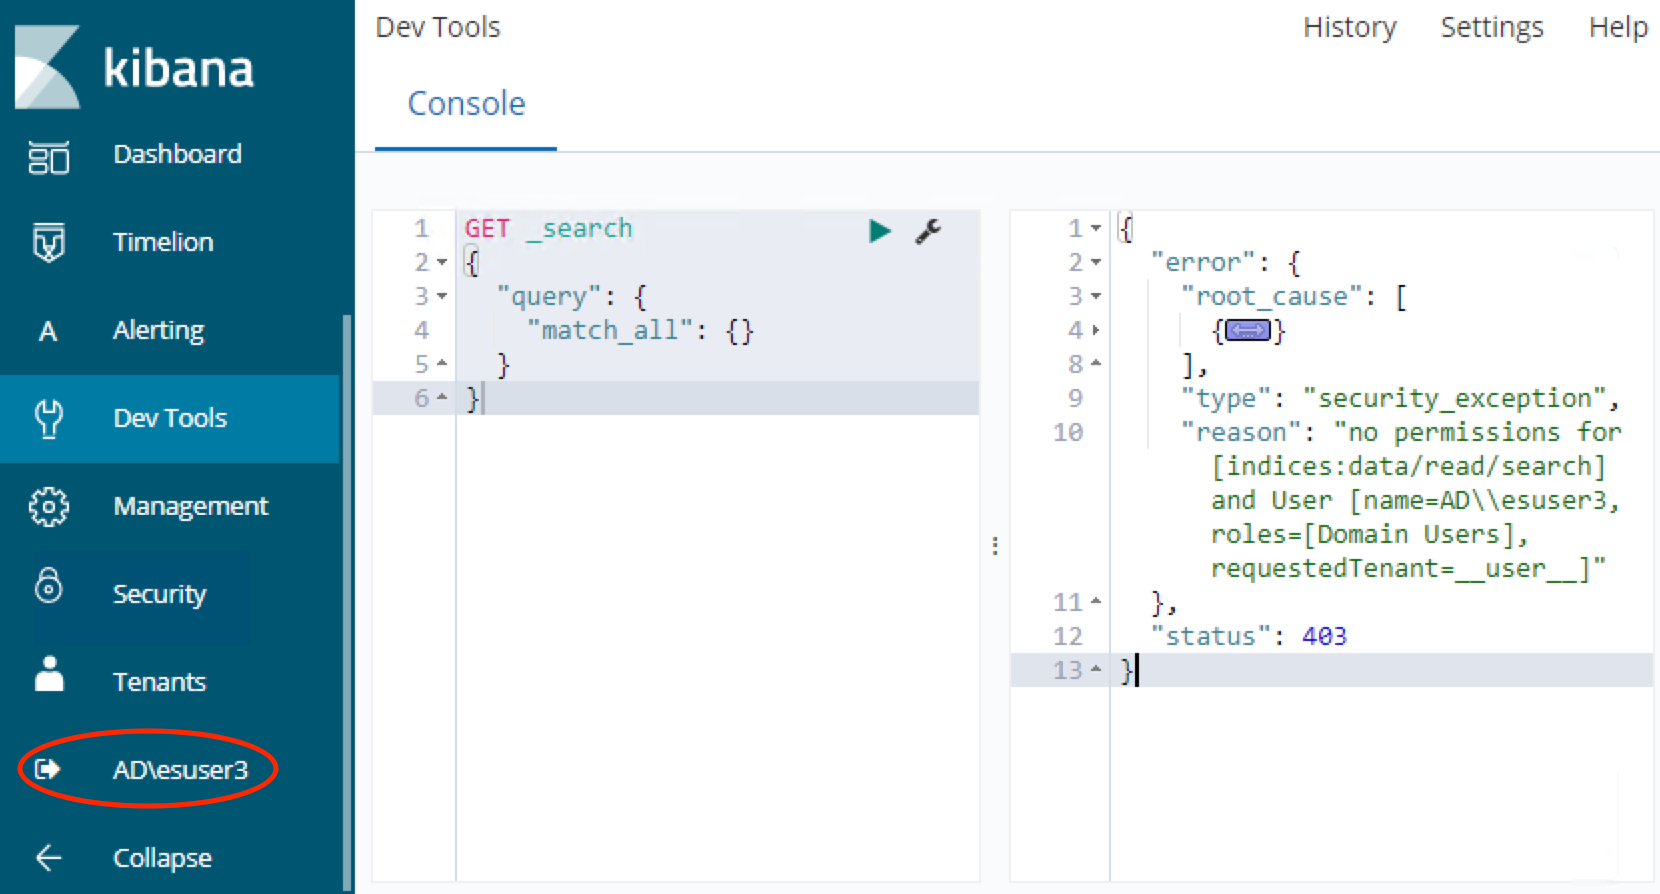
As user esuser3 – not in any groups
User esuser3 is not part of any AD groups and is not mapped to any security roles. This user is not allowed to perform any operations.
Run a search query (fails, as expected; esuser3 is not a member of any group):
Conclusion
In this post, I covered SAML authentication for Kibana single sign on with ADFS. Please refer to the Open Distro for Elasticsearch documentation for additional configuration options for Open Distro Security configuration with SAML
Have an issue or question? Want to contribute? You can get help and discuss Open Distro for Elasticsearch on our forums. You can file issues here.