AWS Storage Blog
Cross-account disaster recovery setup using AWS Elastic Disaster Recovery in secured networks (Part 2: Failover and failback implementation)
This post is the second in a two-part series to provide you with a step-by-step guide on cross-account failover and failback with AWS Elastic Disaster Recovery service.
The security of cloud infrastructure is an essential concern for organizations operating in regulated industries or with sensitive workloads. Many users require environments where direct internet access is restricted or completely prohibited, creating challenges for implementing DR solutions such as Elastic Disaster Recovery.
In the previous post, we covered the architecture and network setup needed to build a secure cross-account disaster recovery (DR) solution. We detailed how to create VPC endpoints, establish VPC peering connections, and configure Amazon Route 53 private hosted zones to maintain network isolation and security controls.
In this second part, we focus on implementing the failover and failback processes using the network infrastructure we established. We walk through installing the AWS replication agent, performing recovery drills, initiating reverse replication, and completing the failback to the production environment.
Walkthrough
These are the high-level steps covered in this post:
- Install AWS replication agent on production servers
- Perform recovery drill in recovery Region.
- Initiate reverse replication to production Region.
- Launch failback instances in production Region.
- Protect failback instances by starting reverse replication back to recovery Region
- Cleaning up
Detailed steps
The following steps walk you through this solution.
Step 1: Installing AWS replication agent on production servers
Now that connectivity to Regional API endpoints is confirmed in both accounts, you can proceed with installing the Elastic Disaster Recovery replication agent on production servers. The installation necessitates downloading the agent installer from the eu-west-2 Region, although installers from other AWS Regions would technically work as well.
To download the replication installer and install the AWS replication agent, you need access to Amazon S3, Elastic Disaster Recovery, and AWS Security Token Service (AWS STS) endpoints.
To download the installer through Amazon S3 VPC endpoint, modify the Amazon S3 URL https://aws-elastic-disaster-recovery-eu-west-2.s3.eu-west-2.amazonaws.com/latest/linux/aws-replication-installer-init by:
- replacing
.s3.eu-west-2.amazonaws.comwith your Amazon S3 endpoint-specific DNS name. In this example, we use the following DNS name:vpce-04e9a422afdd2378c-gwfu83tk.s3.eu-west-2.vpce.amazonaws.com - including the word
bucketin the URL path
The resulting installer URL becomes: https://aws-elastic-disaster-recovery-eu-west-2.bucket.vpce-04e9a422afdd2378c-gwfu83tk.s3.eu-west-2.vpce.amazonaws.com/latest/linux/aws-replication-installer-init
You also need to use the Elastic Disaster Recovery VPC endpoint DNS with --endpoint switch to route traffic to Elastic Disaster Recovery through this endpoint.
This is demonstrated in the commands shown in the following Example 1.
[user]# export RECOVERY_REGION="eu-west-2"
[user]# export S3_INT_ENDPOINT_ID_RECOVERY_ACC="vpce-0cfcc5c15c1f23e67-12bk9m17.s3.eu-west-2.vpce.amazonaws.com"
[user]# export DRS_INT_ENDPOINT_ID_RECOVERY_ACC="vpce-00aeea736ecca4909-zbxjeg8c.drs.eu-west-2.vpce.amazonaws.com"
[user]# wget -O ./aws-replication-installer-init https://aws-elastic-disaster-recovery-eu-west-2.bucket."${S3_INT_ENDPOINT_ID_RECOVERY_ACC=}"/latest/linux/aws-replication-installer-init
--2025-06-18 16:30:47--  https://aws-elastic-disaster-recovery-eu-west-2.bucket.vpce-0cfcc5c15c1f23e67-12bk9m17.s3.eu-west-2.vpce.amazonaws.com/latest/linux/aws-replication-installer-init
Resolving aws-elastic-disaster-recovery-eu-west-2.bucket.vpce-0cfcc5c15c1f23e67-12bk9m17.s3.eu-west-2.vpce.amazonaws.com (aws-elastic-disaster-recovery-eu-west-2.bucket.vpce-0cfcc5c15c1f23e67-12bk9m17.s3.eu-west-2.vpce.amazonaws.com)... 192.168.0.134, 192.168.0.46, 192.168.0.120
Connecting to aws-elastic-disaster-recovery-eu-west-2.bucket.vpce-0cfcc5c15c1f23e67-12bk9m17.s3.eu-west-2.vpce.amazonaws.com (aws-elastic-disaster-recovery-eu-west-2.bucket.vpce-0cfcc5c15c1f23e67-12bk9m17.s3.eu-west-2.vpce.amazonaws.com)|192.168.0.134|:443... connected.
HTTP request sent, awaiting response... 200 OK
Length: 11596288 (11M) [binary/octet-stream]
Saving to: ‘./aws-replication-installer-init’
./aws-replication-installer-init                     100%[=====================================================================================================================>]  11.06M  59.8MB/s    in 0.2s
2025-06-18 16:30:47 (59.8 MB/s) - ‘./aws-replication-installer-init’ saved [11596288/11596288]
Example 1: Downloading AWS replication agent using VPC endpoints
Now the installer is downloaded, install the AWS replication agent by specifying three critical parameters:
- The AWS account ID of Recovery Account using the
--account-idparameter - The Elastic Disaster Recovery VPC endpoint using the
--endpointparameter - The Amazon S3 VPC endpoint using the
--s3-endpointparameter
These parameters make sure that the agent communicates through your configured VPC endpoints rather than attempting direct internet access, and the installer uses AWS Identity and Access Management (IAM) role credentials for agent installation. This is demonstrated in the commands shown in the following Example 2.
[user]# chmod +x aws-replication-installer-init
[user]# ./aws-replication-installer-init --account-id xxxxxxxx2903 --region "${RECOVERY_REGION=}" --endpoint "${DRS_INT_ENDPOINT_ID_RECOVERY_ACC}" --s3-endpoint "${S3_INT_ENDPOINT_ID_RECOVERY_ACC=}" --no-prompt
The installation of the AWS Replication Agent has started.
Identifying volumes for replication.
Identified volume for replication: /dev/xvda of size 8 GiB
All volumes for replication were successfully identified.
Downloading the AWS Replication Agent onto the source server...
Finished.
Installing the AWS Replication Agent onto the source server...
Finished.
Syncing the source server with the Elastic Disaster Recovery Console...
Finished.
The following is the source server ID: s-a90469c0b82913552.
The AWS Replication Agent was successfully installed.
Example 2: Installing AWS replication agent with VPC endpoints
With the successful installation of the AWS replication agent, the S3 interface endpoint has served its purpose for this server. However, keep this endpoint active because it’s necessary for agent installations on any other source servers that you may add in the future. Furthermore, all Amazon S3 operations in the staging area use the Amazon S3 gateway endpoint, particularly for downloading replication software. This gateway endpoint remains a permanent requirement for the replication subnet’s operations.
At this stage, the source server is added to the Elastic Disaster Recovery console in the DR account in the eu-west-2 Region.
However, one crucial configuration remains for the agent to function properly. By default, the agent processes attempt to communicate with the global AWS STS endpoint (sts.amazonaws.com) to obtain temporary IAM role credentials for DRS API interactions. The source server operates in an air-gapped environment without internet access, thus we must redirect these requests to the Regional eu-west-2 AWS STS endpoint.
This redirection necessitates modifying the agent’s environment variables file located at /var/lib/aws-replication-agent/aws-replication-prepare.template. Add the following configuration by running the following command:
[user]# cd /var/lib/aws-replication-agent/
[user]# echo "AWS_STS_REGIONAL_ENDPOINTS=regional" >> /var/lib/aws-replication-agent/aws-replication-prepare.template
For Windows servers, there is no environment variable file such as Linux, thus you can set the persistent environment variable with the following command:
setx AWS_STS_REGIONAL_ENDPOINTS regional /MAfter adding this configuration, verify the modification of the environment variable files before and after the restart of the AWS replication agent:
[user]# cat aws-replication-prepare.template | grep AWS_STS_REGIONAL_ENDPOINTS
AWS_STS_REGIONAL_ENDPOINTS=regional
[user]# ./stopAgent.sh
[user]# ./runAgent.sh
[user]# cat aws-replication-prepare.env | grep AWS_STS_REGIONAL_ENDPOINTS
AWS_STS_REGIONAL_ENDPOINTS=regional
With this final configuration in place, the replication initiation process begins. When all initiation steps complete successfully, data replication commences automatically. After the data replication finishes, the source server’s data replication status is healthy, as shown in the following figure 1.
 Figure 1. Elastic Disaster Recovery source server in the AWS console
Step 2: Perform recovery drill in recovery Region
When the source server’s data replication status has reached Healthy, a recovery drill can be performed. One of the primary objectives is to preserve the IP address of the production servers during failover. To achieve that, Copy private IP must be set to Yes in the Launch Settings of the source server, as shown in the following figure 2.
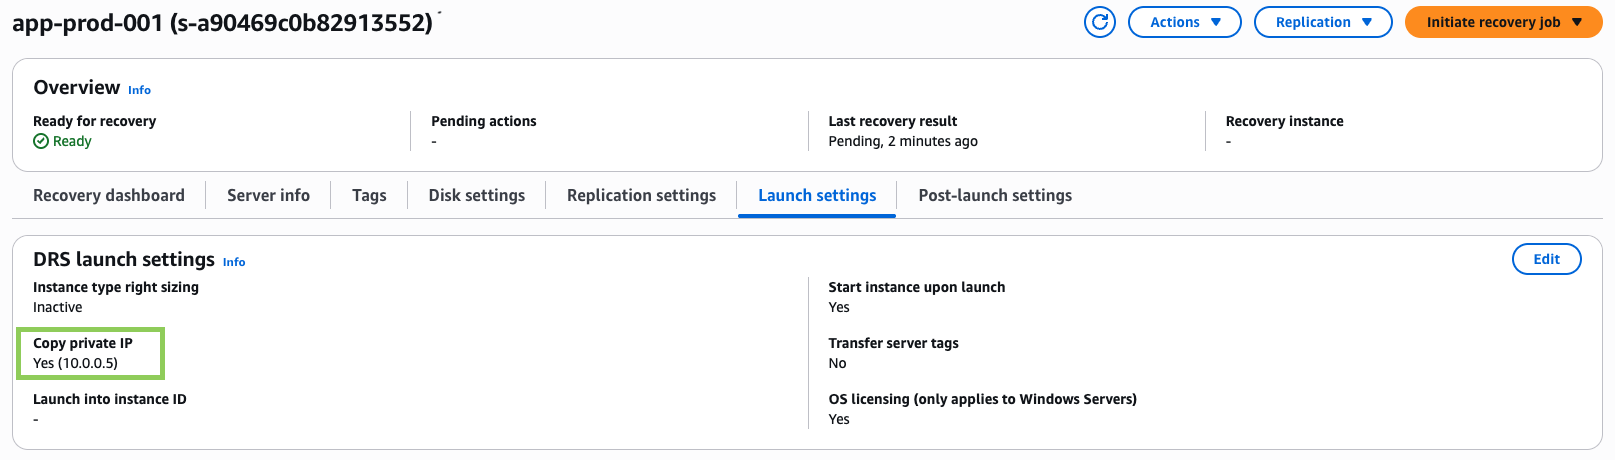 Figure 2. Copy private IP
Performing a recovery drill
- Navigate to the Elastic Disaster Recovery console. In the left navigation pane, choose Source Servers.
- Choose one or more source servers, then choose Initiate Recovery Job.
- Choose Initiate recovery drill.
- Choose a Point in Time to recover to:
- Choose Use most recent data to attempt to create a sub-second RPO snapshot from the source server(s).
- Choose a specific time to use snapshots created at that timestamp, or slightly before if a snapshot was unavailable for a particular source server(s).
- Choose Initiate drill as shown in the following figure 3.
 Figure 3. Performing a recovery drill
After the drill completes successfully, the recovery instance is launched and is visible under Recovery instances in the Elastic Disaster Recovery console. The instance is launched with the same IP address associated with the production server satisfying the requirement of IP address preservation during failover. This is demonstrated in the following figure 4.
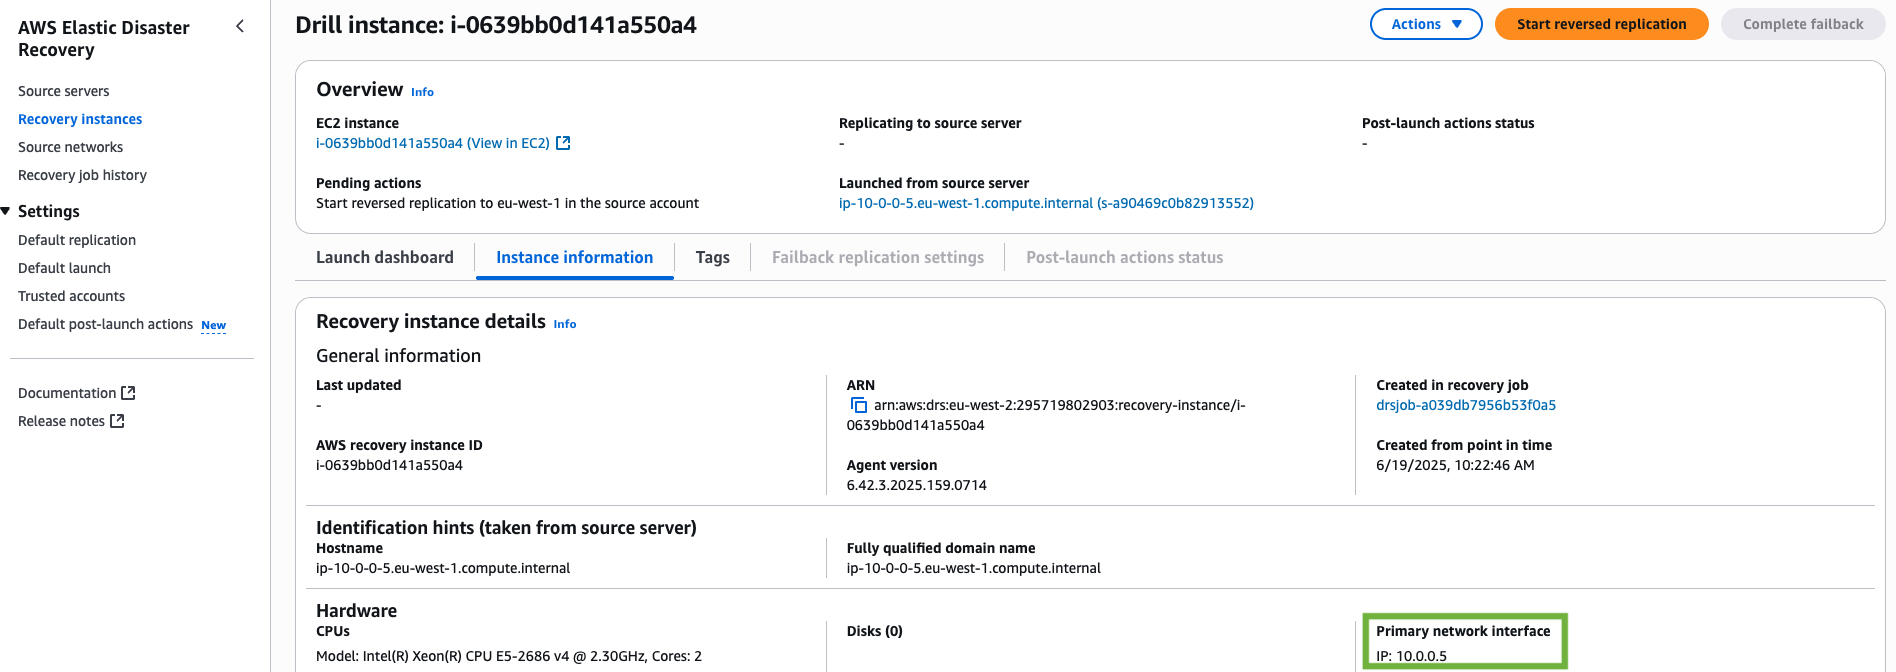 Figure 4. Recovery instance launched
Step 3: Initiate reverse replication back to production Region
Before, starting reverse replication to your source Region, make sure that the recovery servers can connect to Elastic Disaster Recovery service of both the source Region and recovery Regions. Remember, while installing the AWS replication agent, we provide the VPC endpoint DNS of Elastic Disaster Recovery of staging VPC. The recovery servers cannot access staging VPC resources, thus the Elastic Disaster Recovery endpoint in AWS replication agent configuration file— agent.config—needs to be changed to DNS of Elastic Disaster Recovery of recovery VPC. After this change, the recovery servers can access the Elastic Disaster Recovery service of the recovery Region.
To do this, stop the AWS replication agent and update the endpoint DNS in the configuration file as shown in the following commands:
# Change the directory and stop the AWS Replication Agent
cd /var/lib/aws-replication-agent
./stopAgent.sh

# Make sure no AWS Replication Agent process runs
ps -u aws-replication

# Export the DNS of Elastic Disaster Recovery endpoint and update the agent.config file
DRS_INT_ENDPOINT_DNS_RECOVERY_ACC="vpce-0443827e131e35797-vqhgf22f.drs.eu-west-2.vpce.amazonaws.com"
sed -i 's/"serviceEndpoint": "https:\/\/[^"]*"/"serviceEndpoint": "https:\/\/'"$DRS_INT_ENDPOINT_DNS_RECOVERY_ACC"'"/' agent.config

# Verify the change
cat agent.config

# Start the AWS Replication Agent
./runAgent.sh & (sleep 0.5; while true; do pkill -9 -f prepare-agent-config.sh 2>/dev/null; sleep 0.1; done) &
After doing the changes, start the reverse replication in the Elastic Disaster Recovery console. Follow the below steps to start reverse replication:
- Open the Elastic Disaster Recovery console in recovery Account and choose the recovery Region.
- Navigate to the Recovery instances page.
- Choose the servers that you want to protect and choose Start reversed replication as shown in the following figure 5.
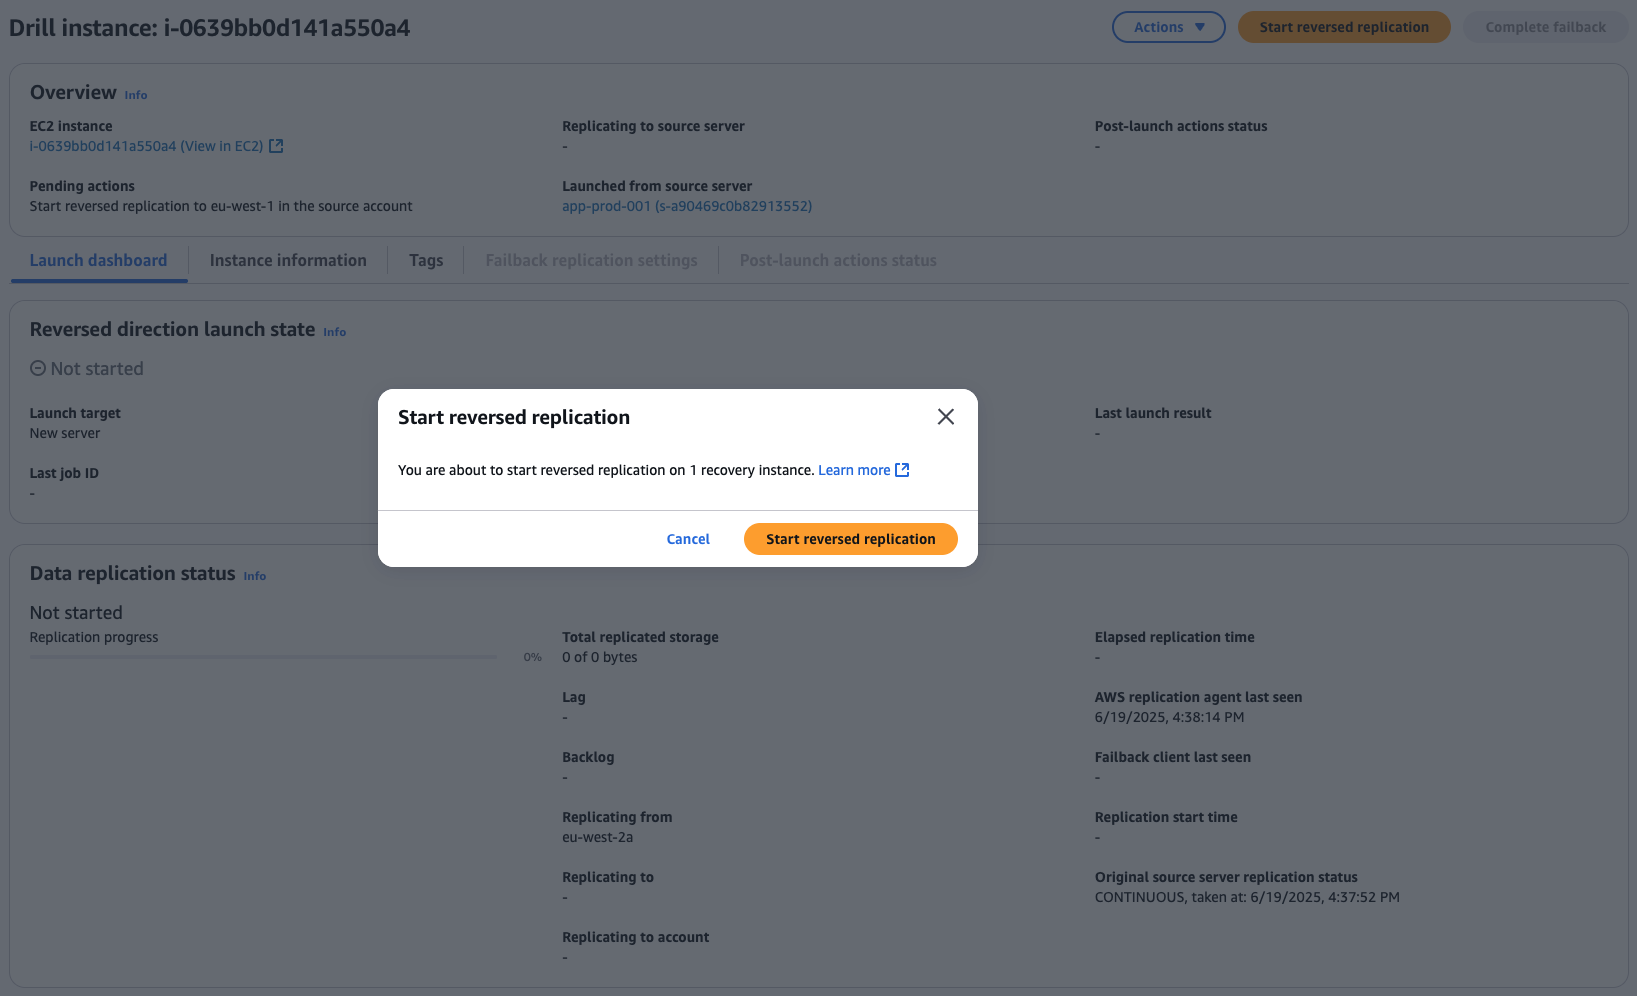 Figure 5. Start reverse replication
A source server is created in the production Account in the source Region, as shown in the following figure 6.
 Figure 6. Source server created in production account
After the reverse replication is started in the Elastic Disaster Recovery console, the recovery servers do not need the connectivity to the Elastic Disaster Recovery endpoint of recovery Region. They need the connectivity to the Elastic Disaster Recovery endpoint and AWS STS endpoints of the source Region. Therefore, the service endpoint in the agent.config must again be modified with the DNS of the VPC endpoint of the Elastic Disaster Recovery endpoint of the source Region.
Before doing this, make sure that the recovery servers can resolve and connect Elastic Disaster Recovery endpoint and AWS STS endpoints. To update the configuration file, stop the AWS replication agent and update the endpoint DNS as demonstrated in the following commands:
# Change the directory and stop the AWS Replication Agent
cd /var/lib/aws-replication-agent
./stopAgent.sh

# Make sure no AWS Replication Agent process runs
ps -u aws-replication

# Export the DNS of Elastic Disaster Recovery endpoint and update the agent.config file
DRS_INT_ENDPOINT_DNS_PROD_ACC="vpce-052a5bc114d91ebf9-jezwmkn2.drs.eu-west-1.vpce.amazonaws.com"
sed -i 's/"serviceEndpoint": "https:\/\/[^"]*"/"serviceEndpoint":"https:\/\/'"$DRS_INT_ENDPOINT_DNS_PROD_ACC"'"/' agent.config

# Verify the change
cat agent.config

# Start the AWS Replication Agent
./runAgent.sh & (sleep 0.5; while true; do pkill -9 -f prepare-agent-config.sh 2>/dev/null; sleep 0.1; done) &
After updating the configuration file and starting the AWS replication agent, the replication process begins. You can monitor the replication initiation in the Elastic Disaster Recovery console across both accounts. In the recovery Account, monitor progress on the Recovery instances page, while in production account, monitor progress on the Source servers page as shown in the following figure 7.
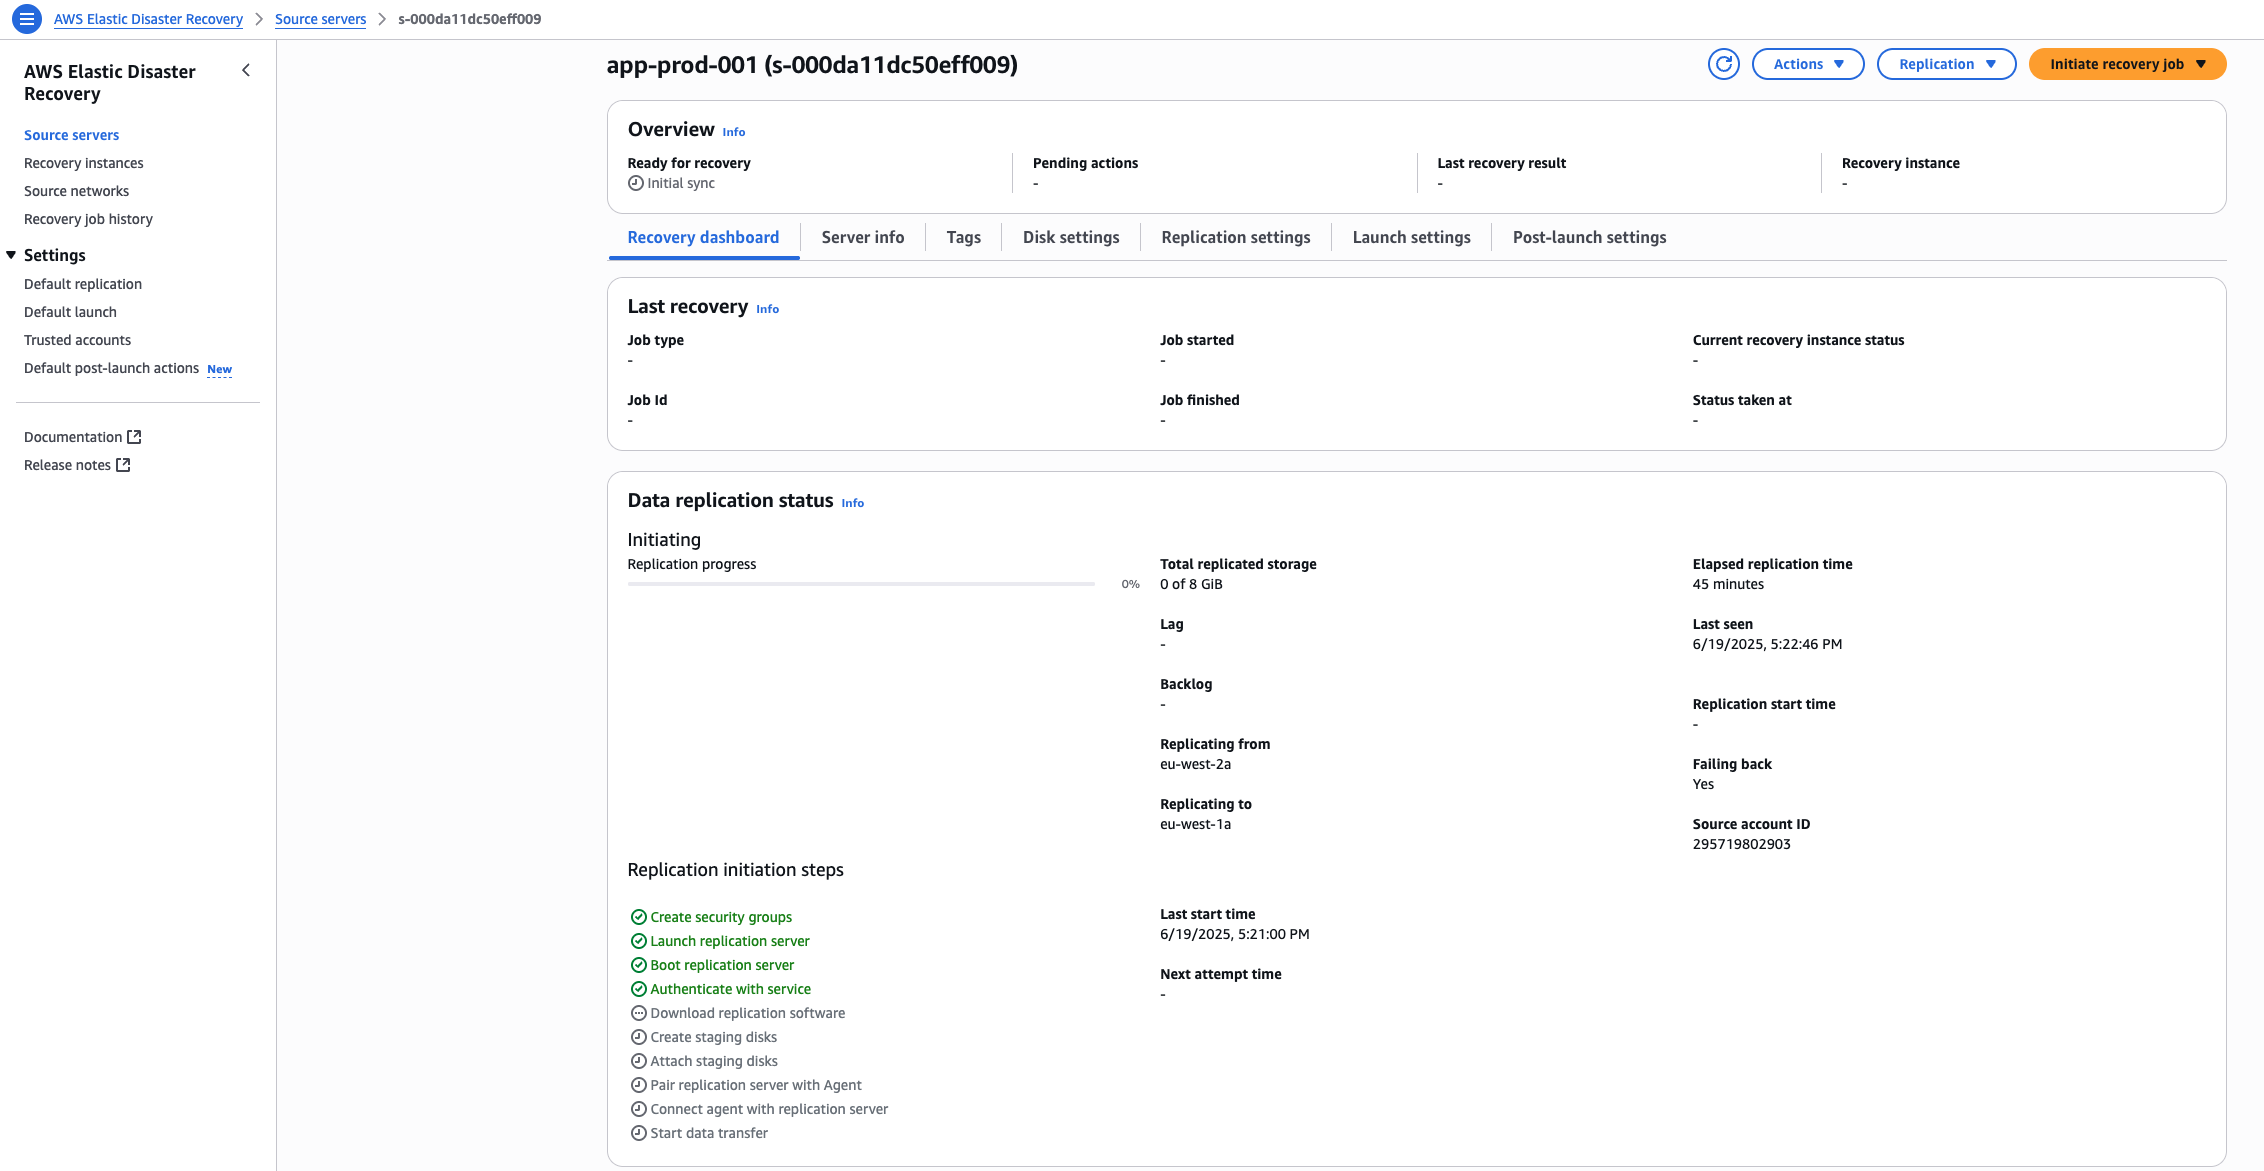 Figure 7. Monitoring replication process in source account
Step 4: Launch failback instances in production Region
After the reverse data replication finishes, and the Ready for recovery status is marked as Ready, failback can be completed. This is demonstrated in the following figure 8.
 Figure 8. Recovery status is ready
However, before launching the new production server, the old production server needs a cleanup because it holds the private IP address needed by the new production server. To clean up the old production server, terminate the server. To retain the IP address, make sure that the Copy private IP is set to Yes in the Launch Settings of the source server in Elastic Disaster Recovery console.
After terminating the old production server and making sure that the Copy private IP setting is in place, take these steps to complete the failback:
- Choose the source server in production account and Region
- Choose Launch for failback under Initiate recovery job
A recovery job is launched, and after the job finishes the new production server is launched and is shown as a recovery instance under the Recovery instances page in the Elastic Disaster Recovery console as shown in the following figure 9.
 Figure 9. New production server shown under recovery instances
In the Amazon Elastic Compute Cloud (Amazon EC2) console, the new production server is launched while the old production server stands terminated, as demonstrated in the following figure 10.
 Figure 10: New and old production servers
Step 5: Start reverse replication back to recovery Region to protect new failback instances
The newly launched failed-back production instances are running but not protected because the old production server is still associated with the source server in recovery Region in the recovery account. To protect the new production server, reverse replication must be started to recovery Region.
Before, starting reverse replication to your recovery Region, make sure that the new production servers can connect to Elastic Disaster Recovery service of both the source Region and recovery Regions. To enable the new production servers to connect to the Elastic Disaster Recovery service of the source Region, the DNS of the Elastic Disaster Recovery VPC endpoint must be replaced with the DNS of the Elastic Disaster Recovery VPC endpoint created in production VPC in the agent.config file. After this change, the new production servers can access the Elastic Disaster Recovery service of the source Region.
To do this, stop the AWS replication agent and update the endpoint DNS in the configuration file as demonstrated in the following commands:
# Change the directory and stop the AWS Replication Agent
cd /var/lib/aws-replication-agent
./stopAgent.sh

# Make sure no AWS Replication Agent process runs
ps -u aws-replication

# Export the DNS of Elastic Disaster Recovery endpoint and update the agent.config file
DRS_INT_ENDPOINT_DNS_PROD_ACC="vpce-0cec3e0059353f47c-u4wawa45.drs.eu-west-1.vpce.amazonaws.com"
sed -i 's/"serviceEndpoint":"https:\/\/[^"]*"/"serviceEndpoint":"https:\/\/'"$DRS_INT_ENDPOINT_DNS_PROD_ACC"'"/' agent.config

# Verify the change
cat agent.config

# Start the AWS Replication Agent
./runAgent.sh & (sleep 0.5; while true; do pkill -9 -f prepare-agent-config.sh 2>/dev/null; sleep 0.1; done) &
After doing the changes, start the reverse replication in the Elastic Disaster Recovery console. Follow these steps to start reverse replication:
- Navigate to the Recovery instance in the production account and Region.
- Choose the recovery instance and choose Start reversed replication as shown in the following figure 11. This step replaces the old production server associated with the Elastic Disaster Recovery source server in recovery account.
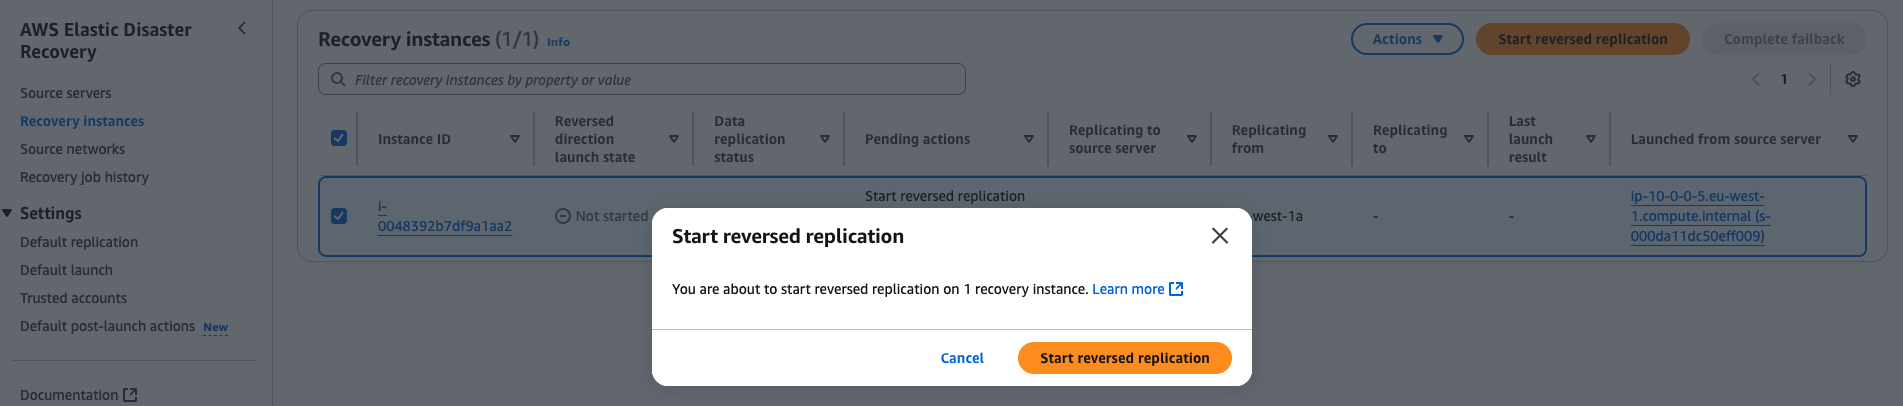 Figure 11: Protecting new production server
After the reverse replication is started in the Elastic Disaster Recovery console, the recovery servers do not need the connectivity to the Elastic Disaster Recovery endpoint of the source Region. They need the connectivity to the Elastic Disaster Recovery endpoint and AWS STS endpoints of recovery Region. Therefore, the service endpoint in the agent.config must again be modified with the DNS of the VPC endpoint of Elastic Disaster Recovery endpoint recovery Region.
Before doing this, make sure that the recovery servers can resolve and connect the Elastic Disaster Recovery endpoint and AWS STS endpoints. To update the configuration file, stop the AWS replication agent and update the endpoint DNS, as shown in the following commands:
# Change the directory and stop the AWS Replication Agent
cd /var/lib/aws-replication-agent
./stopAgent.sh

# Make sure no AWS Replication Agent process runs
ps -u aws-replication

# Export the DNS of Elastic Disaster Recovery endpoint and update the agent.config file
export DRS_INT_ENDPOINT_ID_RECOVERY_ACC="vpce-00aeea736ecca4909-zbxjeg8c.drs.eu-west-2.vpce.amazonaws.com"
sed -i 's/"serviceEndpoint":"https:\/\/[^"]*"/"serviceEndpoint":"https:\/\/'"$DRS_INT_ENDPOINT_ID_RECOVERY_ACC"'"/' agent.config

# Verify the change
cat agent.config

# Start the AWS Replication Agent
./runAgent.sh & (sleep 0.5; while true; do pkill -9 -f prepare-agent-config.sh 2>/dev/null; sleep 0.1; done) &
After updating the configuration file and starting the AWS replication agent, the replication process begins. You can monitor the replication initiation in the Elastic Disaster Recovery console across both accounts. In the recovery account, monitor progress on the Source servers page, and while in the production account, monitor progress on the Recovery servers page.
The new production server has replaced the old production server in the Elastic Disaster Recovery console after the reverse replication is started, as demonstrated in the following figure 12.
 Figure 12. New production server as the source server
The failback is complete as the new production server is now protected. Therefore, the recovery instance in the recovery Region can be terminated to save costs and not maintain these resources. To do so, follow these steps:
- Navigate to the Source servers page in the production account in the source Region, and choose the source server for which you want to stop replication and choose Replication. Choose Stop replication. This is demonstrated in the following figure 13.
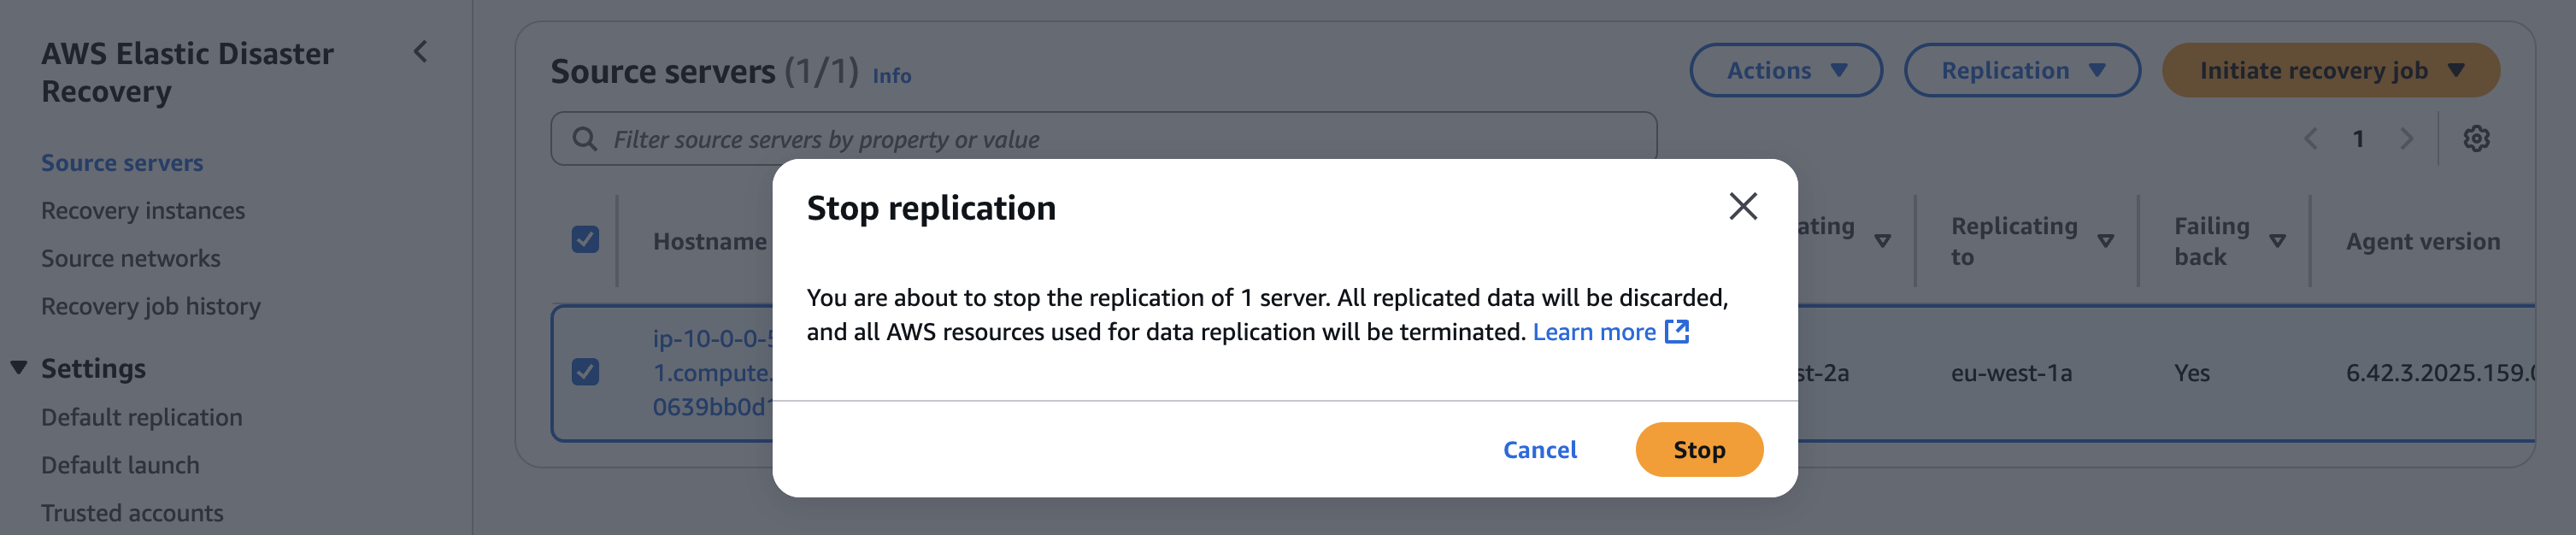 Figure 13. Stop replication of source servers in production account
- Navigate to the Elastic Disaster Recovery console in your recovery account in recovery Region, choose the recovery instances you want to terminate. Choose Actions and choose Terminate recovery instances, as demonstrated in the following figure 14.
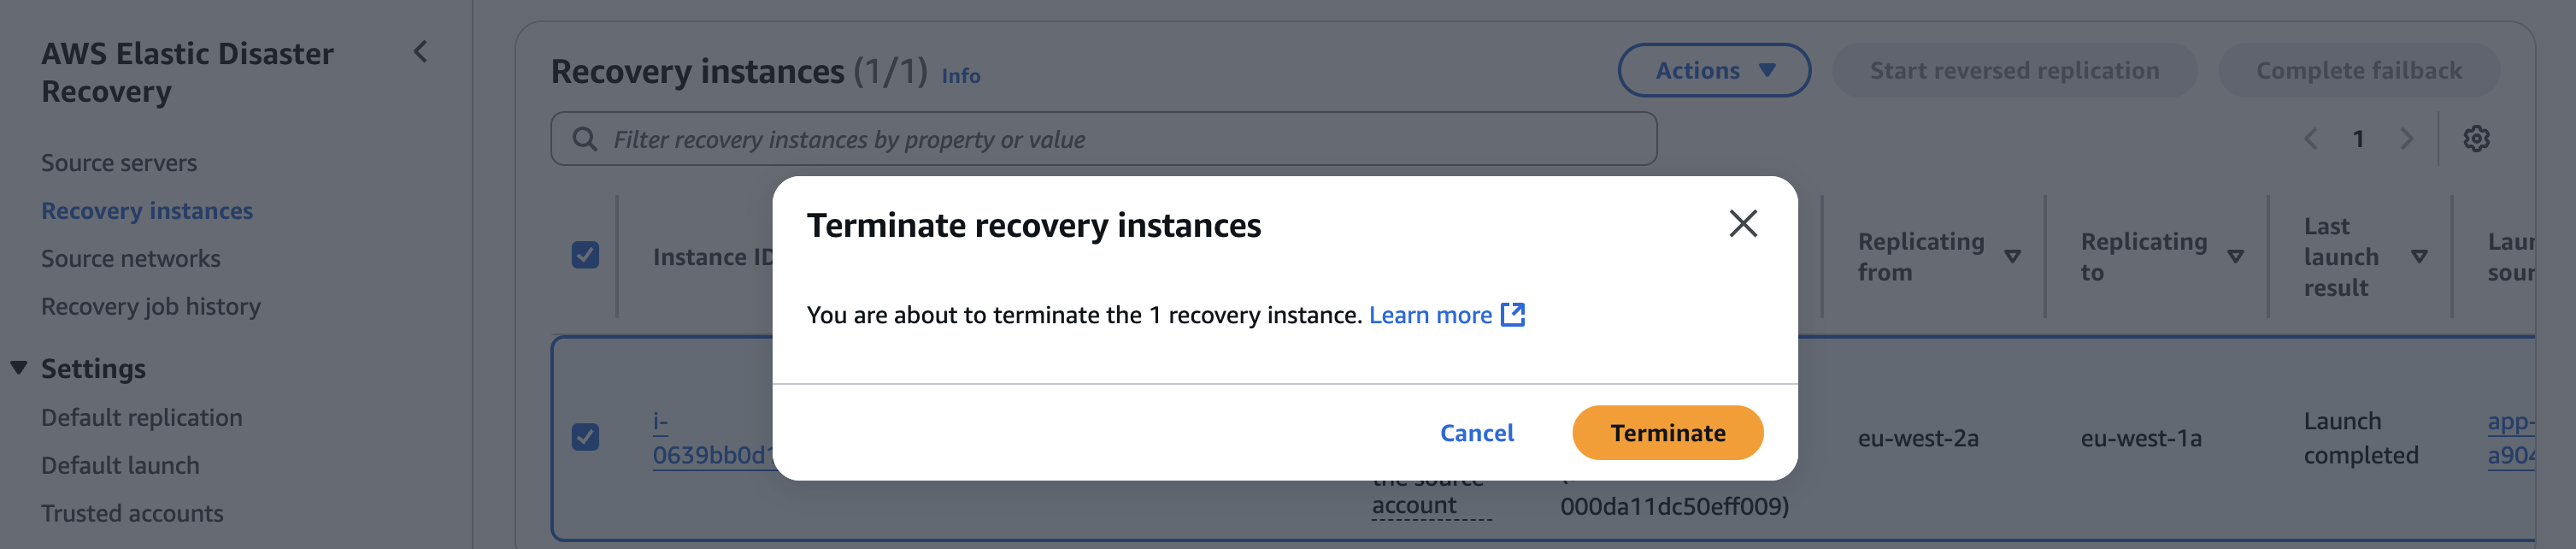 Figure 14. Terminate recovery instances in recovery account
After termination, the recovery instances no longer appear in the Recovery instances page on the Elastic Disaster Recovery console. This is shown in the following figure 15.
 Figure 15. Recovery instances terminated
Cleaning up
To minimize unnecessary AWS costs, delete any resources you’ve created, including EC2 instances, Elastic Disaster Recovery source servers, and recovery servers. Leaving these resources running can result in unexpected charges on your AWS bill, even if they’re not in use. Make sure to review all provisioned resources and terminate any that are no longer needed.
Conclusion
In this two-part series, we’ve guided you through implementing a secure cross-account disaster recovery solution using AWS Elastic Disaster Recovery in highly secured networks. This architecture addresses critical requirements for organizations operating in regulated environments where direct internet access is restricted or prohibited.
Using AWS PrivateLink with VPC endpoints, VPC peering connections, and Amazon Route 53 private hosted zones allows you to maintain strict security controls throughout the DR process while preserving private IP addressing during failover events. This preservation of IP addresses is crucial for applications with dependencies on specific network configurations or existing DNS configurations.
Our solution spans two AWS accounts and two AWS Regions, creating a comprehensive DR framework that operates entirely within the AWS private network infrastructure without compromising security posture. The architecture enables bidirectional replication between production and recovery environments, supporting both failover and failback scenarios while maintaining network isolation.
The implementation of this architecture provides several key benefits:
- Enhanced security: Eliminating the need for internet gateways and public endpoints means that this solution maintains the isolation and security controls needed by highly regulated environments.
- Business continuity: The preservation of private IP addresses during failover events makes sure that applications with strict networking requirements continue to function properly after recovery.
- Operational resilience: The bidirectional replication capability supports complete recovery lifecycle management, such as testing, failover, and failback operations.
- Regulatory compliance: The solution helps organizations meet stringent compliance requirements by maintaining security controls throughout the DR process.
Although implementing this architecture necessitates careful planning and configuration, the benefits of maintaining both security and business continuity make it a valuable approach for organizations with strict security requirements. Following the detailed steps outlined in this post enable you to enhance your organization’s resilience while maintaining the security controls needed for your most sensitive workloads.
We hope that you find this solution useful for your DR planning and invite your feedback on implementing Elastic Disaster Recovery in your secured environments.
Blog series
Direct links to each of the posts in this series are as follows: