AWS Storage Blog
From hours to minutes: Rethinking Oracle database operations with Amazon FSx for OpenZFS
When customers choose to run self-managed Oracle databases in the cloud, one of the fundamental decisions they make is where to store their data. Although many deployments use locally attached block storage, there’s a compelling alternative: running Oracle on a network file system such as Amazon FSx for OpenZFS. Shifting database storage from local disks to a dedicated fully managed file system service unlocks practical capabilities that make database management considerably simpler — freeing teams from routine storage management tasks so they can focus on work that directly benefits the business. For an introduction to deploying Oracle on FSx for OpenZFS, see Getting started with self-managed Oracle in AWS using Amazon FSx for OpenZFS.
The shift to a file system-based approach improves three common database operations: taking snapshots, creating clones, and managing storage efficiency through compression. These aren’t exotic features—they’re tasks that database administrators deal with regularly, whether for backups, creating test environments, or trying to keep storage costs under control. With locally attached storage, these operations often require more tooling, scripting, and time. FSx for OpenZFS handles them as part of the file system itself. The business value of having snapshots, clones, and compression built into the file system is clear: organizations save time and reduce complexity. Instead of waiting hours to copy a multi-terabyte database for testing or development, teams can create a clone in minutes. Snapshots that might have required careful orchestration and storage planning become direct, point-in-time operations that can be taken as frequently as needed. Compression happens transparently, reducing the storage footprint without requiring modifications to databases or applications. These capabilities mean that teams spend less time on storage management tasks and more time on work that directly benefits the business, while gaining more flexibility to support development cycles, testing scenarios, and recovery operations that would otherwise be too time-consuming or expensive to implement.
In this post, we examine the FSx for OpenZFS snapshot, clone, and compression features and show how to configure and use them for self-managed Oracle database workloads on Amazon Elastic Compute Cloud (Amazon EC2).
Solution architecture
Figure 1 shows the solution architecture.
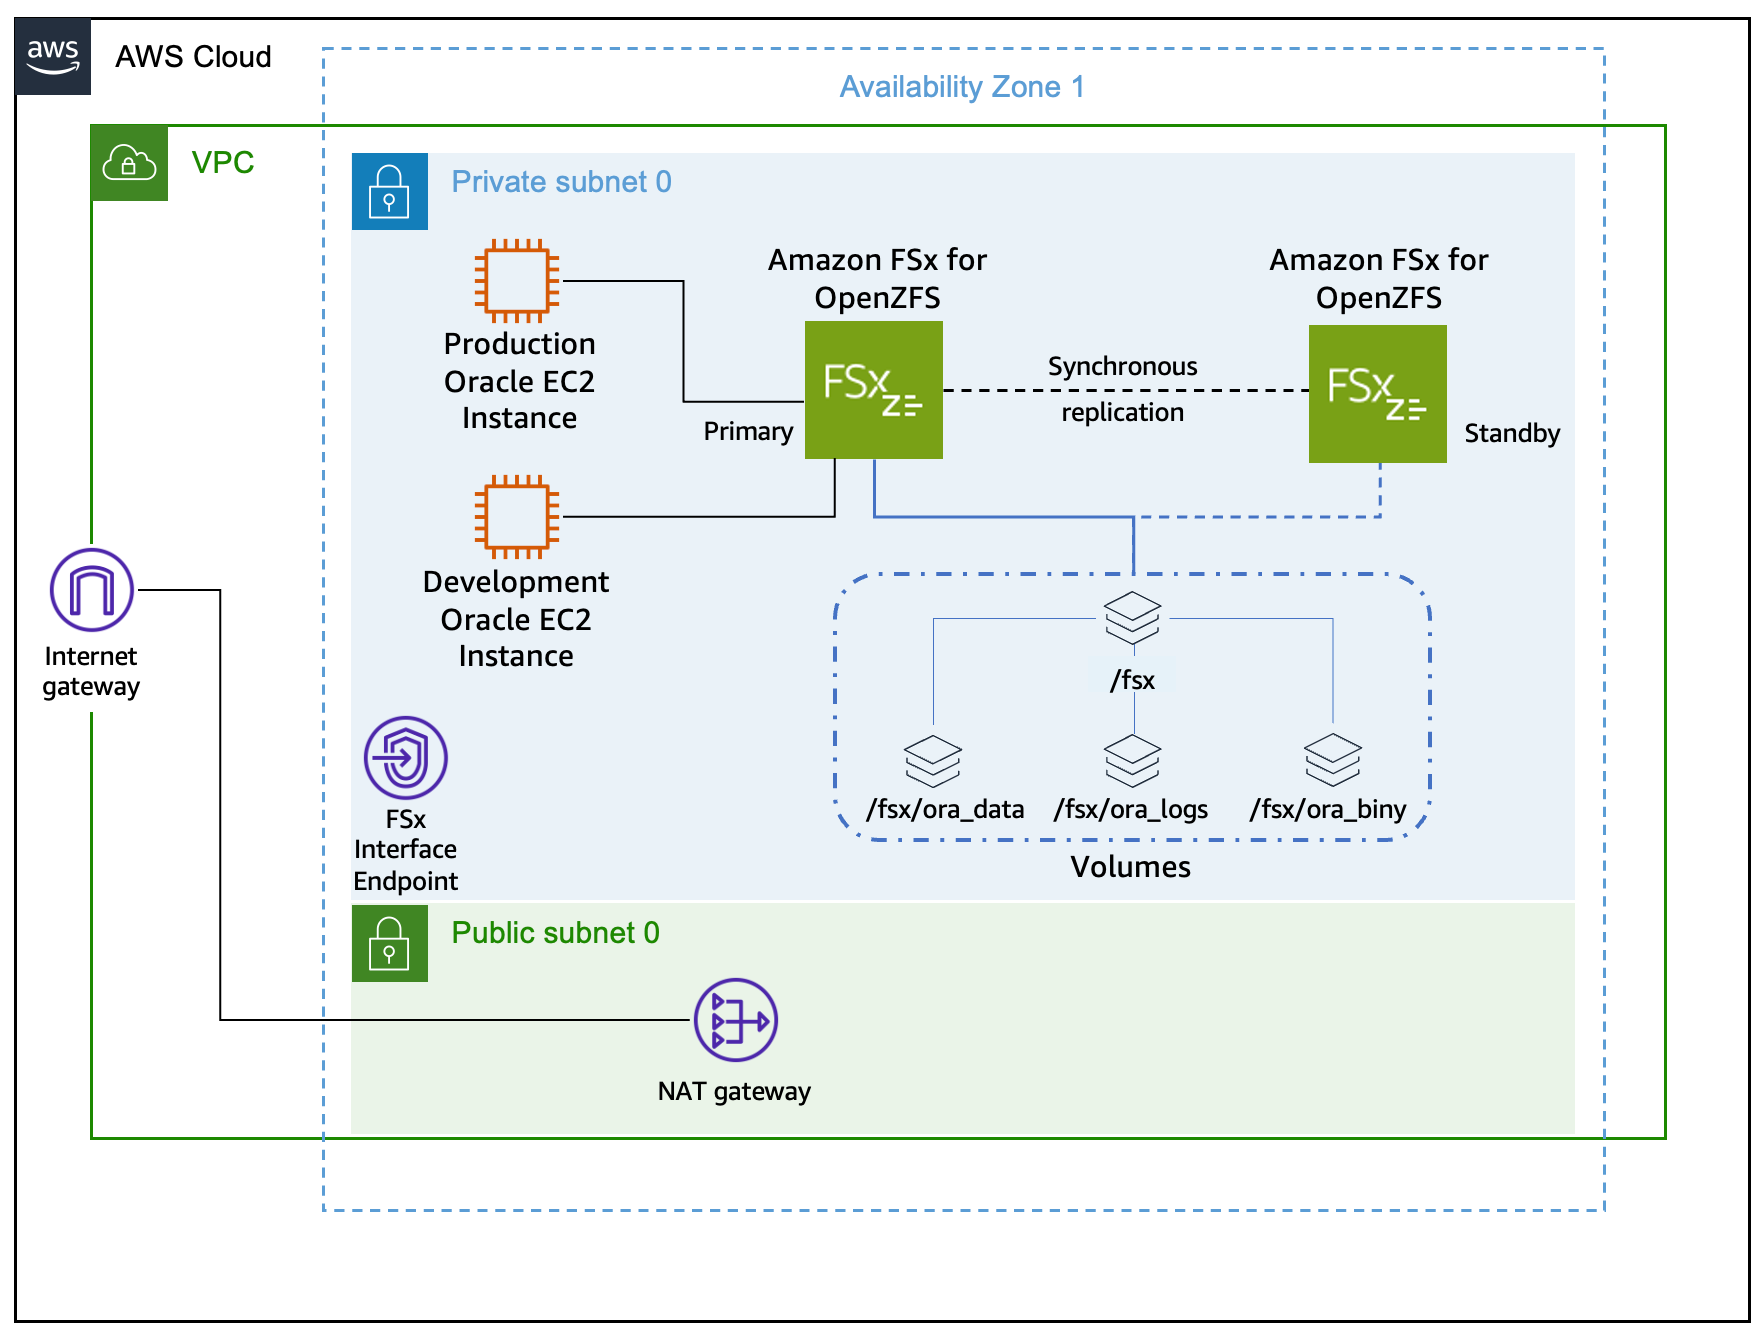
Figure 1: Production Oracle database running on an EC2 instance mounting the FSx for OpenZFS file system with a development EC2 instance in the same subnet.
Prerequisites
The following prerequisites are needed to implement this solution:
- Experience operating and managing Oracle databases on Linux.
- Intermediate Linux skills as an administrator.
- A self-managed Oracle 19c database running on Amazon EC2 using FSx for OpenZFS as the persistent storage layer following Oracle Optimal Flexible Architecture (OFA) best practices.
- An added EC2 instance to be used as the development Oracle database instance in the same VPC and subnet as the production self-managed Oracle database.
- The necessary Linux environment variables configured for database commands.
- A configured and operating Amazon Web Services (AWS) Command Line Interface (AWS CLI) and jq package.
Walkthrough
This section guides you through the deployment steps. The solution uses directory naming conventions as outlined in the prerequisites section. Therefore, if your environment follows different naming standards, you must modify the commands accordingly. Throughout this guide, you set multiple environment variables to streamline the deployment process. To avoid losing these variables if your terminal session disconnects, consider saving them to your shell startup script.
Part 1: Confirm database details
This step wouldn’t be necessary to operationalize the creation of snapshots and clones of the production Oracle database running on an FSx for OpenZFS file system. These steps are being provided for demonstration purposes and to help show the configuration of the environment.
- SSH to the Linux machine hosting the production Oracle database.
- Connect to the Oracle database using sqlplus.
sqlplus / as sysdba- Confirm that the database is running in ARCHIVELOG mode, which is required for two key reasons. First, it enables hot backups, allowing backups to be taken while the database is still running and eliminating the need for downtime. Second, it enables Oracle to recover the database to a consistent state from an FSx snapshot taken without shutting down the database, using archived redo logs to roll forward any transactions that were in-flight at the time the snapshot was captured.
SELECT log_mode FROM v$database;- Check which mount point contains the database files on the database server. You use this information in later steps to confirm the database resides on the FSx for OpenZFS file system.
SET LINESIZE 120
SET PAGESIZE 50
COLUMN file_name FORMAT A80
COLUMN tablespace_name FORMAT A20
COLUMN size_mb FORMAT 999,999.99

SELECT file_name, tablespace_name, bytes/1024/1024 as size_mb
 FROM dba_data_files
ORDER BY tablespace_name;- Exit the sqlplus utility and disconnect from the Oracle database.
exit;- Confirm the database mount points for u01, u02, and u03 reside on your FSx for OpenZFS file system. Note the target for these mount points. If your environment doesn’t follow OFA, or your database files reside on a different mount point, then use the naming convention used in your environment.
df -h | grep u0- Set the FSx for OpenZFS file system ID to an environment variable for use in later commands. This command uses the file system name “FSxZ-OracleDB” as described in the prerequisites section.
export FILE_SYSTEM_ID=$(aws fsx describe-file-systems --output json | jq -r '.FileSystems[] | select(.Tags[] | select(.Key=="Name" and .Value=="FSxZ-OracleDB")).FileSystemId')
echo $FILE_SYSTEM_ID- Cross-reference the database mount points found previously with the FSx for OpenZFS volumes and review the FSx for OpenZFS compression settings on the volumes.
aws fsx describe-volumes \
--filters Name=file-system-id,Values=$FILE_SYSTEM_ID \
--query "Volumes[*].{
  VolumeId:VolumeId,
  Name:Name,
  SizeInMegabytes:OpenZFSConfiguration.StorageCapacityQuotaGiB,
  ParentVolumeId:OpenZFSConfiguration.ParentVolumeId,
  VolumePath:OpenZFSConfiguration.VolumePath,
  DataCompression:OpenZFSConfiguration.DataCompressionType
}" \
--output table
Part 2: Creating test data for snapshot restore
To demonstrate the snapshot restore process, this section creates a sample table with 100 rows distributed across multiple status values. After creating the data, we simulate a user error (an incorrect UPDATE statement) that requires restoring the FSx for OpenZFS snapshot to recover the original data.This is an example scenario. You can substitute your own test data or use an existing table before taking the snapshot.
- Connect to the Oracle database using sqlplus.
sqlplus / as sysdba- Create the demo table called orders.
CREATE TABLE orders (
  order_id   NUMBER PRIMARY KEY,
  customer_name VARCHAR2(100),
  order_date  DATE,
  amount    NUMBER(10,2),
  status    VARCHAR2(20)
);- Insert 100 rows with various statuses into the orders table.
BEGIN
  FOR i IN 1..100 LOOP
    INSERT INTO orders VALUES (
      i,
      'Customer_' || i,
      SYSDATE - DBMS_RANDOM.VALUE(1, 365),
      ROUND(DBMS_RANDOM.VALUE(10, 1000), 2),
      CASE MOD(i, 5)
        WHEN 0 THEN 'PENDING'
        WHEN 1 THEN 'SHIPPED'
        WHEN 2 THEN 'DELIVERED'
        WHEN 3 THEN 'CANCELLED'
        ELSE 'PROCESSING'
      END
    );
  END LOOP;
  COMMIT;
END;
/- Show the count by status prior to taking the storage snapshot.
SELECT status,
    COUNT(*) AS count
FROM orders
GROUP BY status
ORDER BY status;- Exit the sqlplus connection to the Oracle database.
exit;- Using the following command, note the current used capacity of the FSx for OpenZFS file system, because it is needed for comparison in a later step.
aws cloudwatch get-metric-statistics \
--namespace AWS/FSx --metric-name UsedStorageCapacity --dimensions Name=FileSystemId,Value=$FILE_SYSTEM_ID \
--start-time $(date -d "10 minutes ago" -u +%Y-%m-%dT%H:%M:%SZ) --end-time $(date -u +%Y-%m-%dT%H:%M:%SZ) \
--period 600 --statistics Maximum --query 'Datapoints[0].Maximum' --output text \
| awk 'BEGIN{print ""} {printf "File system used capacity: %.2f MiB\n", $1/1048576}'
Part 3: Create storage snapshots
- Create a timestamp environment variable that is used to name the snapshots of your binary, data, and log volumes.
export TIMESTAMP=$(date +%Y%m%d-%H%M%S)
echo $TIMESTAMP- Obtain the volume ID’s of the Oracle database volumes and set them to corresponding environment variables. If your volume naming convention doesn’t match the OFA naming, then replace the volume names in these examples with your own naming convention. You should see an output for each volume in the format of fsvol-0123456789abcdefg.
export ORA_BINY_VOL_ID=$(aws fsx describe-volumes \
 --filters Name=file-system-id,Values=$FILE_SYSTEM_ID \
 --query "Volumes[?Name=='ora_biny'].VolumeId" \
 --output text)

export ORA_DATA_VOL_ID=$(aws fsx describe-volumes \
 --filters Name=file-system-id,Values=$FILE_SYSTEM_ID \
 --query "Volumes[?Name=='ora_data'].VolumeId" \
 --output text)

export ORA_LOGS_VOL_ID=$(aws fsx describe-volumes \
 --filters Name=file-system-id,Values=$FILE_SYSTEM_ID \
 --query "Volumes[?Name=='ora_logs'].VolumeId" \
 --output text)
echo $ORA_BINY_VOL_ID
echo $ORA_DATA_VOL_ID
echo $ORA_LOGS_VOL_ID- Place the Oracle database in hot backup mode to ensure datafile consistency during the snapshot. This mode allows the database to remain online and operational while marking a checkpoint that enables recovery using archived redo logs after the snapshot is restored. Connect to the Oracle database using sqlplus, run the commands, and record the SCN.
sqlplus / as sysdba
set echo on
ALTER SYSTEM SWITCH LOGFILE;
ALTER DATABASE BEGIN BACKUP;
SELECT CURRENT_SCN FROM V$DATABASE;
exit; - Create an FSx for OpenZFS zero-copy snapshot of the database volumes, setting the snapshot ID to an environment variable.
export ORA_BINY_SNAPSHOT_ID=$(aws fsx create-snapshot \
--volume-id "$ORA_BINY_VOL_ID" \
--name "ora_biny-snapshot-${TIMESTAMP}" \
--tags Key=AutomatedBackup,Value=True \
--query 'Snapshot.SnapshotId' \
--output text)
export ORA_DATA_SNAPSHOT_ID=$(aws fsx create-snapshot \
--volume-id "$ORA_DATA_VOL_ID" \
--name "ora_data-snapshot-${TIMESTAMP}" \
--tags Key=AutomatedBackup,Value=True \
--query 'Snapshot.SnapshotId' \
--output text)
export ORA_LOGS_SNAPSHOT_ID=$(aws fsx create-snapshot \
--volume-id "$ORA_LOGS_VOL_ID" \
--name "ora_logs-snapshot-${TIMESTAMP}" \
--tags Key=AutomatedBackup,Value=True \
--query 'Snapshot.SnapshotId' \
--output text)echo $ORA_BINY_SNAPSHOT_ID
echo $ORA_DATA_SNAPSHOT_ID
echo $ORA_LOGS_SNAPSHOT_ID- Run the following commands to monitor the snapshot creation progress. Wait until all snapshots show an “Available” status before proceeding to the next step.
aws fsx describe-snapshots \
--snapshot-ids "$ORA_BINY_SNAPSHOT_ID" \
--query 'Snapshots[0].Lifecycle' \
--output text
aws fsx describe-snapshots \
--snapshot-ids "$ORA_DATA_SNAPSHOT_ID" \
--query 'Snapshots[0].Lifecycle' \
--output text
aws fsx describe-snapshots \
--snapshot-ids "$ORA_LOGS_SNAPSHOT_ID" \
--query 'Snapshots[0].Lifecycle' \
--output text- With the snapshots successfully created, take the Oracle database out of backup mode.
sqlplus / as sysdba
ALTER DATABASE END BACKUP;
exit;- You can now list the snapshots of the Oracle database volumes on the FSx for OpenZFS file system.
aws fsx describe-snapshots \
--query "Snapshots[?contains(Name, 'snapshot-$TIMESTAMP')].{
SnapshotId:SnapshotId,
Name:Name,
VolumeId:VolumeId,
CreationTime:CreationTime,
Lifecycle:Lifecycle
}" \
--output tableAlthough this guide walks through each step manually, you could automate the entire preceding process by placing the database in backup mode, creating storage snapshots, removing the database from backup mode, and listing the snapshots. Although automation is outside the scope of this post, the steps provided here serve as the foundation for building your own automated solution.
- Re-run the FSx API command to check the consumed capacity of the FSx for OpenZFS file system and compare the output to your previous result. You should observe that only the snapshot metadata consumes more storage capacity on the file system—no other storage capacity is needed. If the capacity hasn’t increased, wait ten minutes and re-run the command below.
aws cloudwatch get-metric-statistics \
--namespace AWS/FSx --metric-name UsedStorageCapacity --dimensions Name=FileSystemId,Value=$FILE_SYSTEM_ID \
--start-time $(date -d "10 minutes ago" -u +%Y-%m-%dT%H:%M:%SZ) --end-time $(date -u +%Y-%m-%dT%H:%M:%SZ) \
--period 600 --statistics Maximum --query 'Datapoints[0].Maximum' --output text \
| awk 'BEGIN{print ""} {printf "File system used capacity: %.2f MiB\n", $1/1048576}'Part 4: Restore from snapshot
Don’t perform this part on a production database. This section is for testing and demonstration purposes to show how to recover a database to a previously created FSx for OpenZFS snapshot. This section uses the demo table “orders” that was created in Part 2. In this section we simulate a user error (an incorrect UPDATE statement) that requires restoring the FSx for OpenZFS snapshot to recover the original data.
Intentional error
- Connect to the database using sqlplus.
sqlplus / as sysdba- Show the current count by status.
SELECT status, COUNT(*) as count
FROM orders
GROUP BY status
ORDER BY status;- Commit a malformed update that sets all rows to the same status.
UPDATE orders SET status = 'CANCELLED';
/
COMMIT;- Verify that the erroneous changes were committed to the database.
SELECT status, COUNT(*) as count
FROM orders
GROUP BY status
ORDER BY status;- Shut down the database so that it can be rolled back to the point in time when the FSx for OpenZFS zero-copy snapshot was created.
shutdown immediate;- Exit the sqlplus connection to the Oracle database.
exit;Restoring the database
- You can now restore the Oracle database to the point in time when the zero-copy snapshot was created. This example doesn’t restore the binaries (/u01) volume. However, you may want to include it during a database upgrade. The restore reverts the demo table “orders” to its original state, along with all other database changes made after the snapshot was created.
aws fsx restore-volume-from-snapshot \
--volume-id $ORA_DATA_VOL_ID --snapshot-id $ORA_DATA_SNAPSHOT_ID
aws fsx restore-volume-from-snapshot \
--volume-id $ORA_LOGS_VOL_ID --snapshot-id $ORA_LOGS_SNAPSHOT_ID- Run the following commands to monitor the snapshot restore progress and wait until all volumes show a “Completed” status for the restore before proceeding to the next step.
aws fsx describe-volumes \
--volume-ids "$ORA_DATA_VOL_ID" \
--query 'Volumes[0].AdministrativeActions[0].{Status:Status, ActionType:AdministrativeActionType, RequestTime:RequestTime, Snapshot:TargetVolumeValues.OpenZFSConfiguration.RestoreToSnapshot}' \
--output table
aws fsx describe-volumes \
--volume-ids "$ORA_LOGS_VOL_ID" \
--query 'Volumes[0].AdministrativeActions[0].{Status:Status, ActionType:AdministrativeActionType, RequestTime:RequestTime, Snapshot:TargetVolumeValues.OpenZFSConfiguration.RestoreToSnapshot}' \
--output table- The database volumes have been successfully restored to the point in time when the snapshots were created. You can reconnect to the database using sqlplus.
sqlplus / as sysdba- Start the database by running the following command.
startup;You are expected to receive an error message stating “ORA-10873: file 1 needs to be either taken out of backup mode or media” when attempting to start the database. This occurs because the snapshot captured the database while it was in backup mode. The restored volume reflects the exact point-in-time state of the snapshot, thus the database still believes it’s in backup mode. You must: option 1—end the hot backup mode, or option 2—perform database recovery. When this has been run, the database can start successfully. For this example, we use option 2 by performing database recovery.
- Run the following commands to recover the database and take it out of backup mode.
recover database;
alter database open;Verify the restore
- Now that the database has started, confirm that the demo table “orders” has been restored to its original state at the time when the snapshot was created, with the erroneous changes removed:
SELECT status, COUNT(*) as count
FROM orders
GROUP BY status
ORDER BY status;- You should see the original count by status.
You can also perform single file restores by accessing the hidden .zfs directory
FSx for OpenZFS provides instant access to snapshot data through the hidden .zfs directory, allowing single-file restores. From any client with the volume mounted, navigate to the snapshot directory to browse and recover individual files:
cd /u01/.zfs/snapshot
ls -lahEach snapshot appears as a subdirectory containing data that is no longer consistent with the active file system. You can directly copy directories or files from these snapshots back to your active filesystem as needed.
Part 5: Create storage clones and development database
In this section, we simulate cloning a source database to a secondary server for use as a development or test environment. Unlike a traditional clone, these lower environments consume storage capacity only for metadata, which means that no additional capacity is required for the data itself. The result is a fully functional copy of the database without any added storage consumption. Furthermore, the data volume is using the LZ4 compression algorithm, thus storage capacity is further reduced on both the primary and clone volumes, which results in even greater overall storage savings.
- SSH to the Linux machine, which is used to run the development Oracle database.
- Set the FSx for OpenZFS file system ID to an environment variable for use in later commands. This command uses the file system name FSxZ-OracleDB as described in the prerequisite section. Confirm the file system ID value from the echo output.
export FILE_SYSTEM_ID=$(aws fsx describe-file-systems --output json | jq -r '.FileSystems[] | select(.Tags[] | select(.Key=="Name" and .Value=="FSxZ-OracleDB")).FileSystemId')
echo $FILE_SYSTEM_ID- Set the root volume ID of the FSx for OpenZFS file system to an environment variable for use in creating a zero-copy clone in subsequent steps.
export ROOT_VOLUME_ID=$(aws fsx describe-file-systems \
--file-system-ids "$FILE_SYSTEM_ID" \
--query 'FileSystems[0].OpenZFSConfiguration.RootVolumeId' \
--output text)
echo $ROOT_VOLUME_ID- Set an environment variable with the ID of the Oracle volumes on the FSx for OpenZFS file system to be used in future steps.
export ORA_BINY_VOL_ID=$(aws fsx describe-volumes \
--filters Name=file-system-id,Values=$FILE_SYSTEM_ID \
--query "Volumes[?Name=='ora_biny'].VolumeId" \
--output text)
export ORA_DATA_VOL_ID=$(aws fsx describe-volumes \
--filters Name=file-system-id,Values=$FILE_SYSTEM_ID \
--query "Volumes[?Name=='ora_data'].VolumeId" \
--output text)
export ORA_LOGS_VOL_ID=$(aws fsx describe-volumes \
--filters Name=file-system-id,Values=$FILE_SYSTEM_ID \
--query "Volumes[?Name=='ora_logs'].VolumeId" \
--output text)
echo $ORA_BINY_VOL_ID
echo $ORA_DATA_VOL_ID
echo $ORA_LOGS_VOL_ID- Set the snapshot Amazon Resource Name (ARN) environment variables required to create the zero-copy clone volumes.
export ORA_BINY_SNAPSHOT_ARN=$(aws fsx describe-snapshots \
--filters Name=volume-id,Values=$ORA_BINY_VOL_ID \
--query "sort_by(Snapshots, &CreationTime)[-1].ResourceARN" \
--output text)
export ORA_DATA_SNAPSHOT_ARN=$(aws fsx describe-snapshots \
--filters Name=volume-id,Values=$ORA_DATA_VOL_ID \
--query "sort_by(Snapshots, &CreationTime)[-1].ResourceARN" \
--output text)
export ORA_LOGS_SNAPSHOT_ARN=$(aws fsx describe-snapshots \
--filters Name=volume-id,Values=$ORA_LOGS_VOL_ID \
--query "sort_by(Snapshots, &CreationTime)[-1].ResourceARN" \
--output text)echo $ORA_BINY_SNAPSHOT_ARN
echo $ORA_DATA_SNAPSHOT_ARN
echo $ORA_LOGS_SNAPSHOT_ARN- Create zero-copy clone volumes from the snapshots created in the snapshot creation section and set their IDs to an environment variable. These are the volumes from which the development Oracle database is run.
export ORA_BINY_CLONE_ID=$(aws fsx create-volume \
--volume-type OPENZFS \
--name "ora_biny-clone-dev1" \
--open-zfs-configuration "{
\"ParentVolumeId\": \"$ROOT_VOLUME_ID\",
\"OriginSnapshot\": {
\"SnapshotARN\": \"$ORA_BINY_SNAPSHOT_ARN\",
\"CopyStrategy\": \"CLONE\"
},
\"CopyTagsToSnapshots\": true,
\"DataCompressionType\": \"LZ4\",
\"StorageCapacityQuotaGiB\": -1,
\"StorageCapacityReservationGiB\": -1
}" \
--tags Key=Purpose,Value=Clone \
--query "Volume.VolumeId" \
--output text)
export ORA_DATA_CLONE_ID=$(aws fsx create-volume \
--volume-type OPENZFS \
--name "ora_data-clone-dev1" \
--open-zfs-configuration "{
\"ParentVolumeId\": \"$ROOT_VOLUME_ID\",
\"OriginSnapshot\": {
\"SnapshotARN\": \"$ORA_DATA_SNAPSHOT_ARN\",
\"CopyStrategy\": \"CLONE\"
},
\"CopyTagsToSnapshots\": true,
\"DataCompressionType\": \"LZ4\",
\"StorageCapacityQuotaGiB\": -1,
\"StorageCapacityReservationGiB\": -1
}" \
--tags Key=Purpose,Value=Clone \
--query "Volume.VolumeId" \
--output text)
export ORA_LOGS_CLONE_ID=$(aws fsx create-volume \
--volume-type OPENZFS \
--name "ora_logs-clone-dev1" \
--open-zfs-configuration "{
\"ParentVolumeId\": \"$ROOT_VOLUME_ID\",
\"OriginSnapshot\": {
\"SnapshotARN\": \"$ORA_LOGS_SNAPSHOT_ARN\",
\"CopyStrategy\": \"CLONE\"
},
\"CopyTagsToSnapshots\": true,
\"DataCompressionType\": \"NONE\",
\"StorageCapacityQuotaGiB\": -1,
\"StorageCapacityReservationGiB\": -1
}" \
--tags Key=Purpose,Value=Clone \
--query "Volume.VolumeId" \
--output text)echo $ORA_BINY_CLONE_ID
echo $ORA_DATA_CLONE_ID
echo $ORA_LOGS_CLONE_ID- Run the following commands to monitor the clone creation progress, and wait until all volumes show an “Available” status before proceeding to the next step.
aws fsx describe-volumes \
--volume-ids "$ORA_BINY_CLONE_ID" \
--query 'Volumes[0].Lifecycle' \
--output text
aws fsx describe-volumes \
--volume-ids "$ORA_DATA_CLONE_ID" \
--query 'Volumes[0].Lifecycle' \
--output text
aws fsx describe-volumes \
--volume-ids "$ORA_LOGS_CLONE_ID" \
--query 'Volumes[0].Lifecycle' \
--output text- Identify the fully qualified domain name of the FSx for OpenZFS file system and set it to the FILE_SYSTEM_FQDN environment variable for use in mounting the zero-copy clone.
export FILE_SYSTEM_FQDN=$(aws fsx describe-file-systems \
--query "FileSystems[?Tags[?Key=='Name' && Value=='FSxZ-OracleDB']].DNSName | [0]" \
--output text)
echo $FILE_SYSTEM_FQDN- Mount the clone volumes on the development Oracle database server.
sudo mount -t nfs -o \
noatime,nfsvers=4.2,nconnect=16,rsize=1048576,wsize=1048576,timeo=600 \
$FILE_SYSTEM_FQDN:/fsx/ora_biny-clone-dev1 /u01
sudo mount -t nfs -o \
noatime,nfsvers=4.2,nconnect=16,rsize=1048576,wsize=1048576,timeo=600 \
$FILE_SYSTEM_FQDN:/fsx/ora_data-clone-dev1 /u02
sudo mount -t nfs -o \
noatime,nfsvers=4.2,nconnect=16,rsize=1048576,wsize=1048576,timeo=600 \
$FILE_SYSTEM_FQDN:/fsx/ora_logs-clone-dev1 /u03- Confirm that the clone volumes have been successuflly mounted on the development Oracle database server.
df -h | grep u0- Connect to the Oracle database using the sqlplus tool on the development server.
sqlplus / as sysdba- Startup the Oracle database on the development server.
startup;- You should receive an error message stating “ORA-10873: file 1 needs to be either taken out of backup mode or media” when attempting to start the database. This occurs because the snapshot captured the database while it was in backup mode. The restored clone reflects the exact point-in-time state of the snapshot, thus the database still believes it’s in backup mode. You must perform database recovery to exit backup mode before the database can start successfully.
recover database;
alter database open;- The Oracle database on the development server has been recovered. Run a query against the orders table. Note that the table exists, and all of the status and counts are identical to the production database at the time when the snapshot was created.
SELECT status, COUNT(*) as count
FROM orders
GROUP BY status
ORDER BY status;- Exit the sqlplus connection to the Oracle database.
exit;- Retrieve the current used capacity of the FSx for OpenZFS file system and compare it to the capacity before creating the clone. Despite having a complete duplicate of the production database, the file system’s used capacity has increased by only a small amount to store the clone volume’s metadata. This is because the zero-copy clone references the original data rather than duplicating it.
aws cloudwatch get-metric-statistics \
--namespace AWS/FSx --metric-name UsedStorageCapacity --dimensions Name=FileSystemId,Value=$FILE_SYSTEM_ID \
--start-time $(date -d "10 minutes ago" -u +%Y-%m-%dT%H:%M:%SZ) --end-time $(date -u +%Y-%m-%dT%H:%M:%SZ) \
--period 600 --statistics Maximum --query 'Datapoints[0].Maximum' --output text \
| awk 'BEGIN{print ""} {printf "File system used capacity: %.2f MiB\n", $1/1048576}'Cleaning up
- Connect to the development server and shut down the Oracle database if it’s running.
sqlplus / as sysdba
shutdown immediate;
exit;- Unmount the clone volumes from the development server.
sudo umount /u03
sudo umount /u02
sudo umount /u01- Verify that the volumes are unmounted.
df -h | grep u0- Delete the clone volumes from the FSx for OpenZFS file system. Any data written to the clone volumes is lost and deleted through this process.
aws fsx delete-volume --volume-id $ORA_LOGS_CLONE_ID
aws fsx delete-volume --volume-id $ORA_DATA_CLONE_ID
aws fsx delete-volume --volume-id $ORA_BINY_CLONE_ID- Run the following commands to monitor the clone volume deletion and wait until all volumes have been removed before proceeding to the next step. When the volume has been deleted, these commands return the VolumeNotFound error.
aws fsx describe-volumes --volume-ids $ORA_BINY_CLONE_ID --query 'Volumes[0].Lifecycle' --output text
aws fsx describe-volumes --volume-ids $ORA_DATA_CLONE_ID --query 'Volumes[0].Lifecycle' --output text
aws fsx describe-volumes --volume-ids $ORA_LOGS_CLONE_ID --query 'Volumes[0].Lifecycle' --output text- Delete the snapshots created of the production Oracle volumes on the FSx for OpenZFS file system. When these are deleted you can no longer recover the volume to the point in time when the snapshot was created.
aws fsx delete-snapshot --snapshot-id $ORA_BINY_SNAPSHOT_ID
aws fsx delete-snapshot --snapshot-id $ORA_DATA_SNAPSHOT_ID
aws fsx delete-snapshot --snapshot-id $ORA_LOGS_SNAPSHOT_ID- Confirm the snapshots have been successfully deleted from the file system. This command responds with the SnapshotNotFound error when the snapshots have been deleted, because they no longer exist.
aws fsx describe-snapshots --snapshot-ids $ORA_BINY_SNAPSHOT_ID
aws fsx describe-snapshots --snapshot-ids $ORA_DATA_SNAPSHOT_ID
aws fsx describe-snapshots --snapshot-ids $ORA_LOGS_SNAPSHOT_ID
Conclusion
The capabilities demonstrated in this post—instant snapshots, space-efficient clones, and transparent compression—represent more than technical features. They fundamentally change the economics and practicality of how you can operate Oracle databases. Development teams can spin up full production-scale environments in minutes rather than waiting hours or days for database copies. Testing against production-like data becomes routine rather than exceptional. Recovery point objectives that were previously constrained by backup windows and storage costs become flexible enough to support aggressive business requirements.
Perhaps most significantly, these capabilities shift database operations from resource constraints to policy decisions. The question is no longer whether you can afford to create another test environment or take more frequent snapshots—the storage overhead is negligible and the time investment minimal. Instead, you can focus on how these capabilities support your development velocity, testing rigor, and data protection requirements. When your storage layer handles snapshots, clones, and compression natively and efficiently, your database operations align more naturally with business needs rather than working around infrastructure limitations. Start transforming your Oracle database operations today by migrating to Amazon FSx for OpenZFS and experience the efficiency gains of snapshot, clone, and compression capabilities that can reduce hours of work to just minutes.