AWS Storage Blog
How to configure user storage quotas for the AWS Transfer Family on Amazon FSx for NetApp ONTAP
Managing storage efficiently in a multi-user environment is a critical yet often overlooked aspect of cloud infrastructure design. When you combine AWS Transfer Family with Amazon FSx for NetApp ONTAP, you unlock a robust, enterprise-grade file transfer solution. However, without effective quota controls, a single user or process can consume disproportionate storage, leading to performance degradation, unexpected costs, and operational challenges.
In this blog post, we walk you through how to configure user storage quotas on FSx for ONTAP when used alongside the AWS Transfer Family. This post is primarily intended for storage administrators managing Windows and Active Directory-based environments; however, the same quota enforcement principles can be applied to Linux/Unix environments as well. User quotas give you fine-grained control over per-user storage consumption—helping you prevent runaway storage costs, enforce fair and proportionate resource allocation across workloads, and maintain predictable capacity planning. Whether you manage an SFTP-based data ingestion pipeline or a large-scale file-sharing environment, quotas are a straightforward way to build a more cost-efficient and resilient architecture.
Solution overview
This solution uses AWS Transfer Family for secure file transfer, AWS Directory Service for identity management, and FSx for ONTAP for storage with native quota enforcement. Figure 1 illustrates how authentication, authorization, and quota enforcement work together.
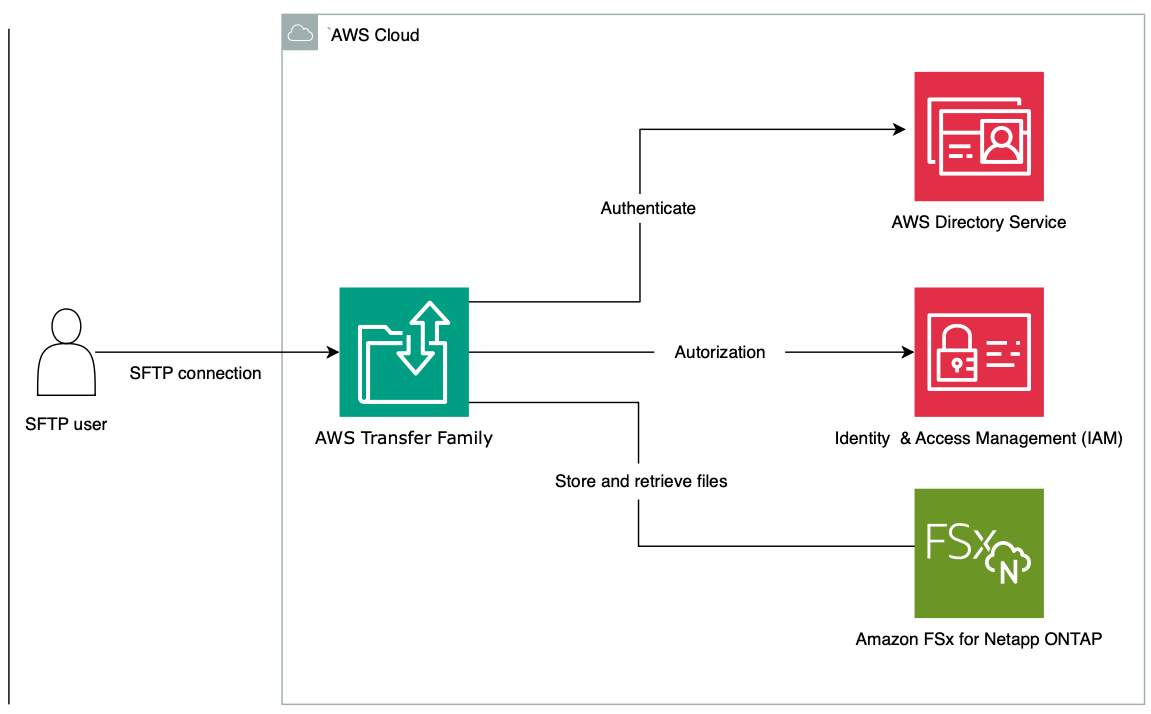
Figure 1: Architecture diagram showing Transfer Family with Directory Service as an identity provider, IAM authorization, and FSx for ONTAP as storage with quota enforcement.
The workflow consists of the following steps:
- Authentication verifies who the user is. When an SFTP user initiates a connection to Transfer Family, the service forwards the authentication request to AWS Directory Service, which can be AWS Directory Service for Microsoft Active Directory or AD Connector. Directory Service validates the user’s credentials, confirming their identity before any session is established. Only successfully authenticated users are permitted to proceed.
- Authorization determines what the user can do. After the user is authenticated, Transfer Family applies authorization controls through AWS Identity and Access Management (IAM) roles and logical directory mappings. This step governs which resources on the FSx for ONTAP file system the user can access, which home directory they are mapped to, and what operations (read, write, or delete) they are permitted to perform. Applying the principle of least privilege ensures that users interact only with their designated storage areas.
- Quota enforcement governs how much the user can store. As file operations are performed against FSx for ONTAP, the file system’s native quota engine enforces per-user storage limits in real time. If a user attempts to exceed their allocated quota, the write operation is denied, preventing storage overconsumption and maintaining fair resource allocation across all connected users.
Prerequisites
To follow along with this walkthrough, you will need the following:
- An AWS account to deploy the solution.
- A Transfer Family server configured with Directory Service as the identity provider.
- An FSx for ONTAP file system joined to the same Active Directory domain that your Transfer Family users are configured in. For instructions on joining an FSx for ONTAP file system to a domain, see Joining FSx for ONTAP to an Active Directory.
- An FSx for ONTAP volume with the security style parameter set to NTFS.
Solution walkthrough
With the prerequisites in place, you can begin the walkthrough by creating a user storage quota.
Create a user storage quota
You configure user storage quotas through the NetApp ONTAP CLI, not the AWS Management Console. To access the ONTAP CLI, establish an SSH connection to your file system’s management endpoint and log in with the fsxadmin username and password. Before you configure quotas, review the following FSx for ONTAP concepts:
- Volume — A logical storage container within an FSx for ONTAP storage virtual machine (SVM). Volumes hold your data and are where quota enforcement takes effect.
- Quota policy — A named collection of quota rules that you attach to a volume. Each volume can have one active quota policy at a time. Policies let you group and manage multiple quota rules together.
- Quota rule — A specific storage limit (such as 10 MB) applied to a user, group, or qtree within a volume.
Step 1: Connect to the FSx for ONTAP CLI
- On the Amazon FSx console, choose File systems in the navigation pane.
- Choose your File system ID and select the Administration tab.
- Note the Management endpoint – IP address and the FSx for ONTAP administrator username. If you have not configured the FSx for ONTAP administrator password, choose Update to set the credentials.
- Open a terminal and connect via SSH:
ssh fsxadmin@<management-endpoint-ip>
Step 2: Configure the user storage quota
After you connect to the FSx for ONTAP CLI, complete the following steps to create a quota policy, define a quota rule, and activate enforcement.
a. Create a quota policy
Create a new quota policy to organize your quota rules (or use the existing default policy). Replace <ServerName> with your SVM name and <PolicyName> with a descriptive policy name.
volume quota policy create -vserver <ServerName> -policy-name <PolicyName>
b. Create a quota rule
Create a 10 MB storage quota for a specific domain user. Replace <VolumeName> with your volume name and DOMAIN\username with the target domain user.
volume quota policy rule create -vserver <ServerName> -policy-name <PolicyName> -volume <VolumeName> -type user -target "DOMAIN\username" -qtree "" -disk-limit 10MB
c. Apply the policy to the SVM
vserver modify -vserver <ServerName> -quota-policy <PolicyName>
d. Activate the quota on the volume
volume quota on -vserver <ServerName> -volume <VolumeName>
e. Verify the quota report
As in Figure 2, the quota report displays the configured limits for each user. Verify that domain user has a 10 MB quota with 0 B of current usage.
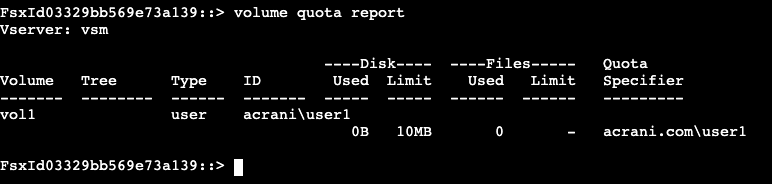
Figure 2: FSx for ONTAP volume quota report showing a 10 MB limit for domain user, User1.
f. Create a CIFS share for the volume
To make the volume accessible to Windows clients for testing, create a CIFS share:
cifs share create -vserver <ServerName> -share-name <ShareName> -path /vol1
Validate the user storage quota settings
Next, validate that the quota correctly enforces the storage limit by testing with a domain user on a Windows workstation.
- Sign in as the domain user to a Windows server or workstation that has access to the FSx for ONTAP share.
- Create a 5 MB file on the share (as in Figure 3). This operation should succeed because the user is within the 10 MB quota.
- Create a 6 MB file on the same share. This write operation should be denied because it would exceed the user’s 10 MB quota, confirming that quota enforcement is working correctly.
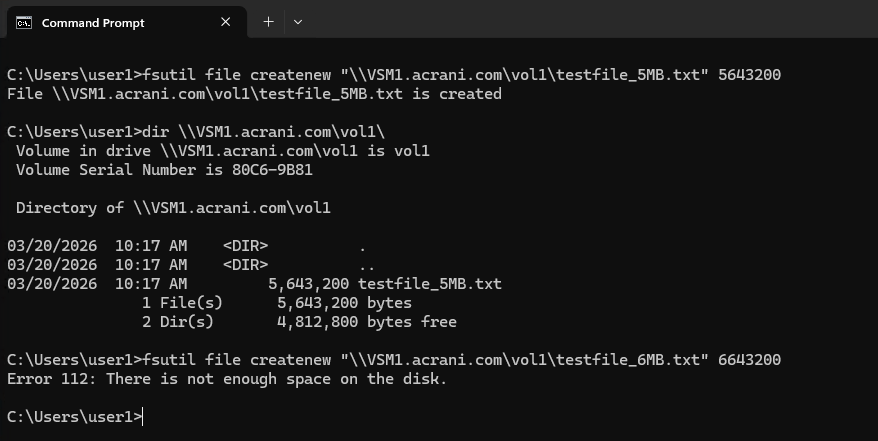
Figure 3: Windows Explorer showing the 5 MB file created successfully and the 6 MB file write denied due to quota enforcement.
Note: You can run this same test using the command net use [drive letter]:\\server\share to map the drive, or access the FSx share directly via UNC path.
Provision SFTP user home directories
Before you configure Transfer Family access, you must create home directories for your SFTP users. For FSx for ONTAP S3 access points, create these directories exclusively through the S3 API rather than NFS or SMB protocols. The following section explains why.
Why use the S3 API for directory creation?
In Amazon S3, directory structures are represented as zero-byte objects with a trailing slash in their key names. When you create a directory using the S3 API (aws s3api put-object), it generates this zero-byte object, which persists even when the directory is empty—preserving the directory hierarchy.Directories created through NFS or SMB exist only as native file system directories without the associated zero-byte S3 object. If an SFTP client removes all contents from such a directory, the FSx for ONTAP S3 access point removes the empty directory from the S3 namespace because no zero-byte placeholder exists. This causes SFTP authentication failures because the home directory mapping points to a location that no longer exists in the S3 access point namespace.Creating directories through the S3 API establishes the zero-byte placeholder object that keeps the directory visible in the S3 namespace regardless of content, ensuring stable SFTP connectivity.
Create a directory for Transfer Family users using the AWS CLI:
aws s3api put-object --bucket <S3_access_point_alias> --key <folder_name>/
Set permissions via SMB share (after creating the directory via S3 API):
icacls "D:\vol1\<folder_name>" /grant "Domain\username:(OI)(CI)M" /T
In the preceding commands, replace <S3_access_point_alias> with your S3 access point alias, <folder_name> with the desired directory name, and Domain\username with the domain user identity.
Configure user access and permissions in the AWS Transfer Family
Tha AWS Transfer Family does not access FSx for ONTAP storage directly. Instead, it connects through an S3 access point that provides an S3-compatible interface to your FSx for ONTAP volume. The following steps walk you through creating the access point, configuring IAM permissions, and setting up Transfer Family user access.
Create an S3 access point
- Open the Amazon FSx console.
- In the navigation pane, choose File systems.
- Select your FSx for ONTAP file system.
- Choose the Volumes tab.
- Select the volume that you want to attach.
- For Actions, select Create S3 access point.
- For Access point name, enter a descriptive name (for example, transfer-family-ap).
- For File system user identity type, select Windows identity and enter the user domain name (the same user used to configure the quota on FSx for ONTAP).
- (Optional) Configure an Access point policy as needed. For more information, see S3 access points on FSx for ONTAP.
- Choose Create.
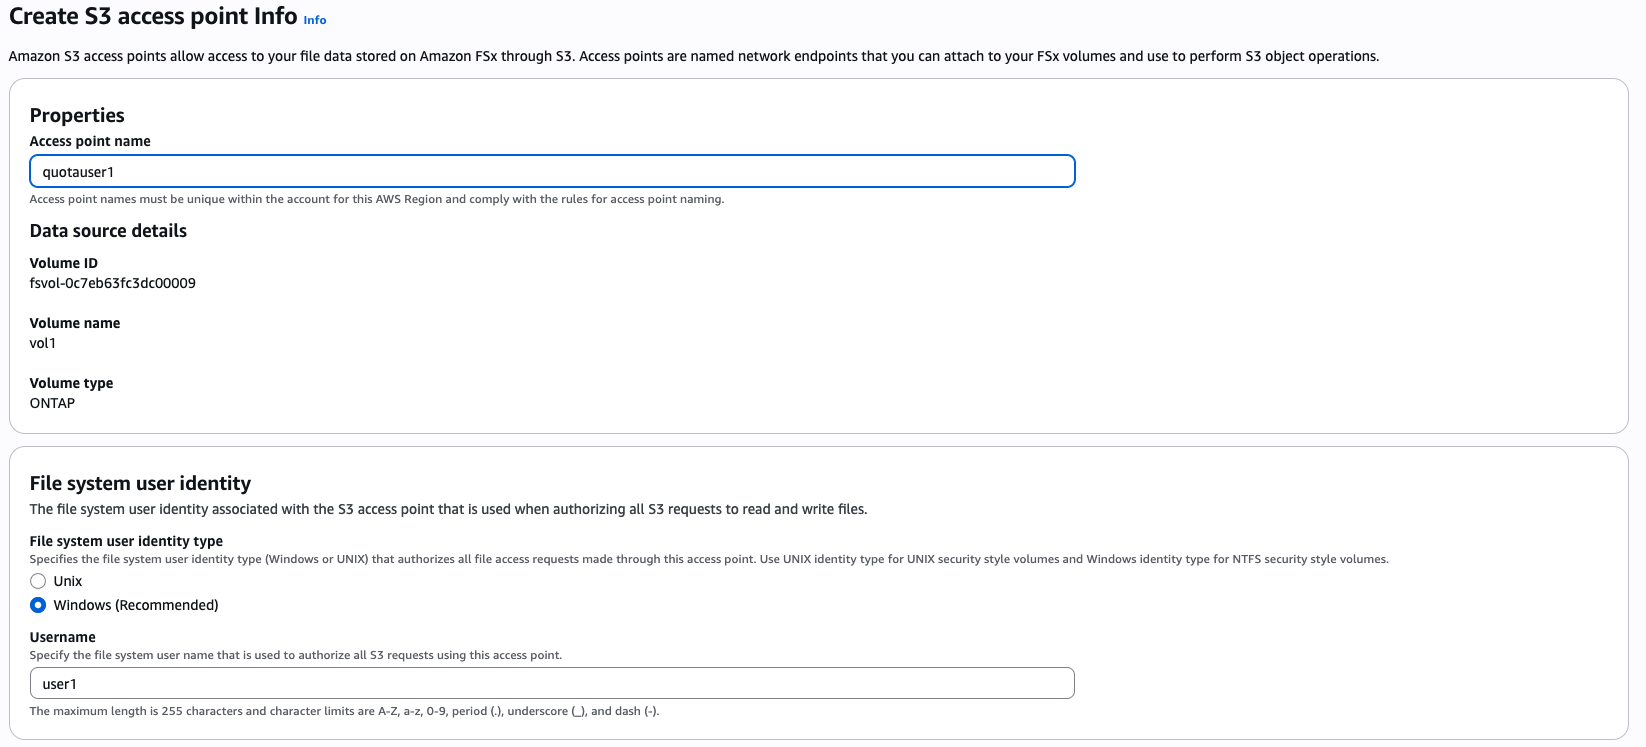
Figure 4: Creating an S3 access point through the FSx for ONTAP console.
After creation, note the access point alias for use in Transfer Family configuration as shown in Figure 5.

Figure 5: S3 access point alias displayed in the console.
Create an IAM role for Transfer Family
Create an IAM role that grants Transfer Family permission to access the S3 access point on behalf of your users.
- Open the IAM console.
- In the navigation pane, choose Roles, then choose Create role.
- For Trusted entity type, select AWS service.
- For Use case, select Transfer.
Note: The trust policy allows the Transfer Family service to assume this role. Without this trust relationship, Transfer Family cannot access the S3 access point on behalf of your users.
- Choose Next.
- Choose Create policy and enter the following policy (replace the placeholders with your AWS Region, account ID, and access point name):
    {
      "Version": "2012-10-17",
      "Statement": [
        {
           "Sid": "AllowFileOperations",
           "Effect": "Allow",
           "Action": ["s3:GetObject","s3:PutObject","s3:DeleteObject","s3:GetObjectTagging","s3:PutObjectTagging"],
           "Resource": "arn:aws:s3:<Region>:<AccountID>:accesspoint/<AccessPointName>/*"
        },
        {
           "Sid": "AllowDirectoryOperations",
           "Effect": "Allow",
           "Action": ["s3:ListBucket","s3:GetBucketLocation"],
           "Resource": "arn:aws:s3:<Region>:<AccountID>:accesspoint/<AccessPointName>"
        }
      ]
    }
- Attach the policy to the role and choose Create role.
Create Transfer Family user access
You must configure user access for FSx for ONTAP S3 access points through the AWS CLI because the Transfer Family console displays only S3 buckets, not S3 access points.First, retrieve the security identifier (SID) for the Active Directory group that contains your domain user. Run the following Windows PowerShell command, replacing YourGroupName with the name of the group:
Get-ADGroup -Filter {samAccountName -like "YourGroupName*"} -Properties * | Select SamAccountName,ObjectSid
Next, create the Transfer Family access using the AWS CLI. Replace the placeholders in angle brackets with your environment-specific values:
aws transfer create-access \ --server-id <Server-ID> \ --external-id <SID_Group> \ --role arn:aws:iam::<AccountID>:role/<RoleName> \ --home-directory-type LOGICAL \ --region <Region> \ --home-directory-mappings '[{"Entry": "/", "Target": "/<S3_Access_Point_Alias>"}]'
A successful response returns the ServerID and ExternalID confirming the access was created as in Figure 6.
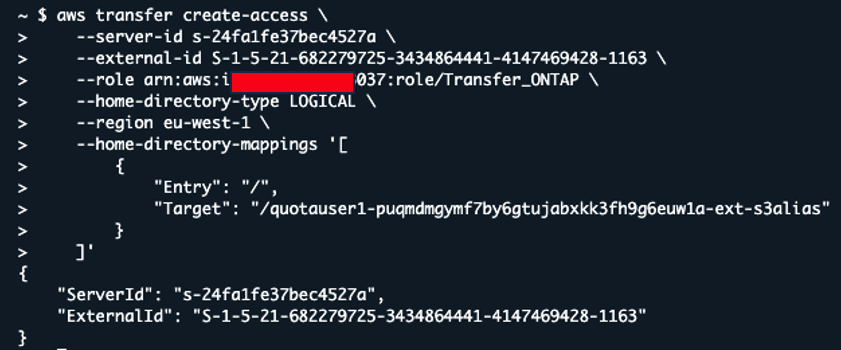
Figure 6: AWS CLI output confirming Transfer Family access creation.
Validate the quota through Transfer Family
Now connect to the SFTP server with domain user (who has a 10 MB storage quota) and attempt to transfer a file that exceeds the quota to verify enforcement.At the prompt, enter the following command to connect via SFTP:
sftp sftp_user@service_endpoint
In the preceding command, sftp_user is the username and service_endpoint is the Transfer Family server endpoint shown in the AWS Transfer Family console.Attempt to upload a 14 MB file. The transfer should fail because the file exceeds the user’s 10 MB quota (Figure 7).
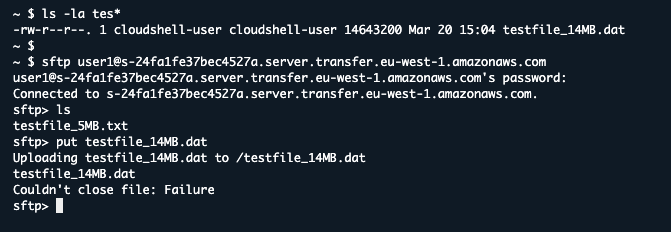
Figure 7: File transfer failed, confirming that the quota was applied.
Note: When a transfer is denied due to quota enforcement, the user receives a generic OpenSSH error message rather than a specific quota-exceeded message. This error can also occur due to full disk space, insufficient write permissions, or a process moving the file before it is fully closed. The error is not a failure of the Transfer Family service itself.
Cleaning up
To avoid incurring future charges, delete the resources that you created as part of this walkthrough:
- Delete the S3 access point: In the Amazon FSx console, select your volume, select the S3 access point, and delete it.
- (Optional) Delete the user storage quota rule: If you created a new FSx for ONTAP file system or volume for testing, delete it in the Amazon FSx console. If you created a quota rule on an existing volume, run the following command:
volume quota policy rule delete -vserver <ServerName> -policy-name <PolicyName> -volume <VolumeName> -type user -target <Domain\Username>
- (Optional) Delete the domain user: If you created a new AWS Managed Microsoft AD or AD Connector for testing, delete it in the Directory Service console.
- (Optional) Delete Transfer Family access: If you created a new access for testing, select the access that you created and delete it.
- (Optional) Delete the Transfer Family server: If you created a new server for testing, delete it using the Transfer Family console.
- Delete the IAM role and policy: In the IAM console, delete the role and policy created for testing.
Conclusion
Configuring user storage quotas for AWS Transfer Family on FSx for ONTAP helps organizations balance accessibility with control. Quotas protect against storage overages, ensure fair resource distribution, and provide the governance framework necessary for enterprise file transfer operations. By implementing quota management, you can maximize the value of your Transfer Family deployment while maintaining operational efficiency and cost predictability.