AWS Storage Blog
Manage storage consumption at scale using quotas on Amazon FSx for NetApp ONTAP
Organizations that consolidate multiple application workloads onto shared file storage often lack a mechanism to prevent one workload from consuming capacity allocated to another. An extract, transform, and load (ETL) pipeline that fails to rotate staging files, a logging service that spikes during an incident, or a backup job that retains more data than expected can exhaust the shared storage and cause write failures across dependent applications. Traditional approaches to managing this problem, including monitoring disk usage with custom scripts or relying on application-level controls, are reactive and error-prone. By the time an administrator discovers that one workload has consumed all available capacity, the impact has already spread to other workloads that share the same storage.
Amazon FSx for NetApp ONTAP provides fully managed, enterprise-grade file storage built on NetApp’s popular ONTAP file system. To address the challenge of uncontrolled capacity consumption on shared volumes, FSx for ONTAP includes quota management capabilities that enforce per-workload capacity boundaries at the storage layer. By using ONTAP qtrees and tree quota policy rules, you can subdivide a single volume into logical workload boundaries, assign hard limits to each, and configure soft limits and thresholds that generate alerts before enforcement occurs. These quotas are enforced at the storage layer regardless of whether applications connect over NFS or SMB, providing consistent capacity governance across all client protocols.
In this post, we demonstrate how to configure ONTAP tree quotas on FSx for ONTAP to enforce per-workload capacity boundaries within a shared volume. We show how to create qtrees to represent distinct workloads, define tree quota policy rules with hard limits, soft limits, and thresholds, activate quota enforcement, and monitor per-workload consumption using native quota reports. This approach prevents a single workload from exhausting shared capacity, provides proactive alerting before limits are reached, and alleviates the need for custom monitoring scripts.
The following sections walk you through the complete implementation, from creating qtrees to validating quota enforcement. For our code, we provide both the syntax and a specific example, along with sample output.
Understanding FSx for ONTAP quota types
ONTAP provides four types of quotas, each designed for a different level of capacity governance:
- Tree quotas – Enforce a capacity boundary on an entire qtree, regardless of which user or group writes the data. Tree quotas are ideal when each application or workload has its own dedicated directory.
- User quotas – Restrict how much disk space an individual user can consume within a volume or qtree. User quotas are useful in shared home directory environments where you need to prevent one user from using too much space.
- Group quotas – Control the collective disk space consumed by all members of an Active Directory or UNIX group within a volume or qtree. Group quotas are suited for environments where teams or departments share storage and need a combined limit.
- Default quotas – Apply a baseline limit to every user or qtree that doesn’t have its own explicit rule. For example, instead of creating individual user quota rules for 500 users, you can set a single default user quota of 10 GB that applies to all of them.
All four quota types support hard limits, soft limits, and thresholds, and they are enforced at the storage layer regardless of client protocol. This storage-layer enforcement maintains capacity boundaries consistently, preventing the uncontrolled consumption described earlier. The following walkthrough focuses on tree quotas because they align directly with the common pattern of dedicating directories to specific application workloads.
Solution overview
The solution uses the following four core ONTAP components working together to enforce per-workload capacity boundaries. Each tree quota rule supports three levels of capacity governance: a hard disk limit that rejects write operations when exceeded, a soft disk limit that generates a warning event while allowing writes to continue, and a threshold that generates an additional alert event at a level between the soft and hard limits.
- Qtrees – Logical subdivisions within a volume, each representing a distinct workload. ONTAP tracks each qtree as a separate storage object with independent usage accounting.
- Tree quota policy rules – Capacity limits assigned to each qtree, defining the hard disk limit, soft disk limit, and threshold for that workload.
- Quota activation – Initialization of quota enforcement on the volume. ONTAP scans existing consumption and begins enforcing the defined rules.
- Quota reports – Per-qtree usage visibility showing current consumption against defined limits.
Figure 1 illustrates the end-to-end workflow for implementing tree quotas on FSx for ONTAP.
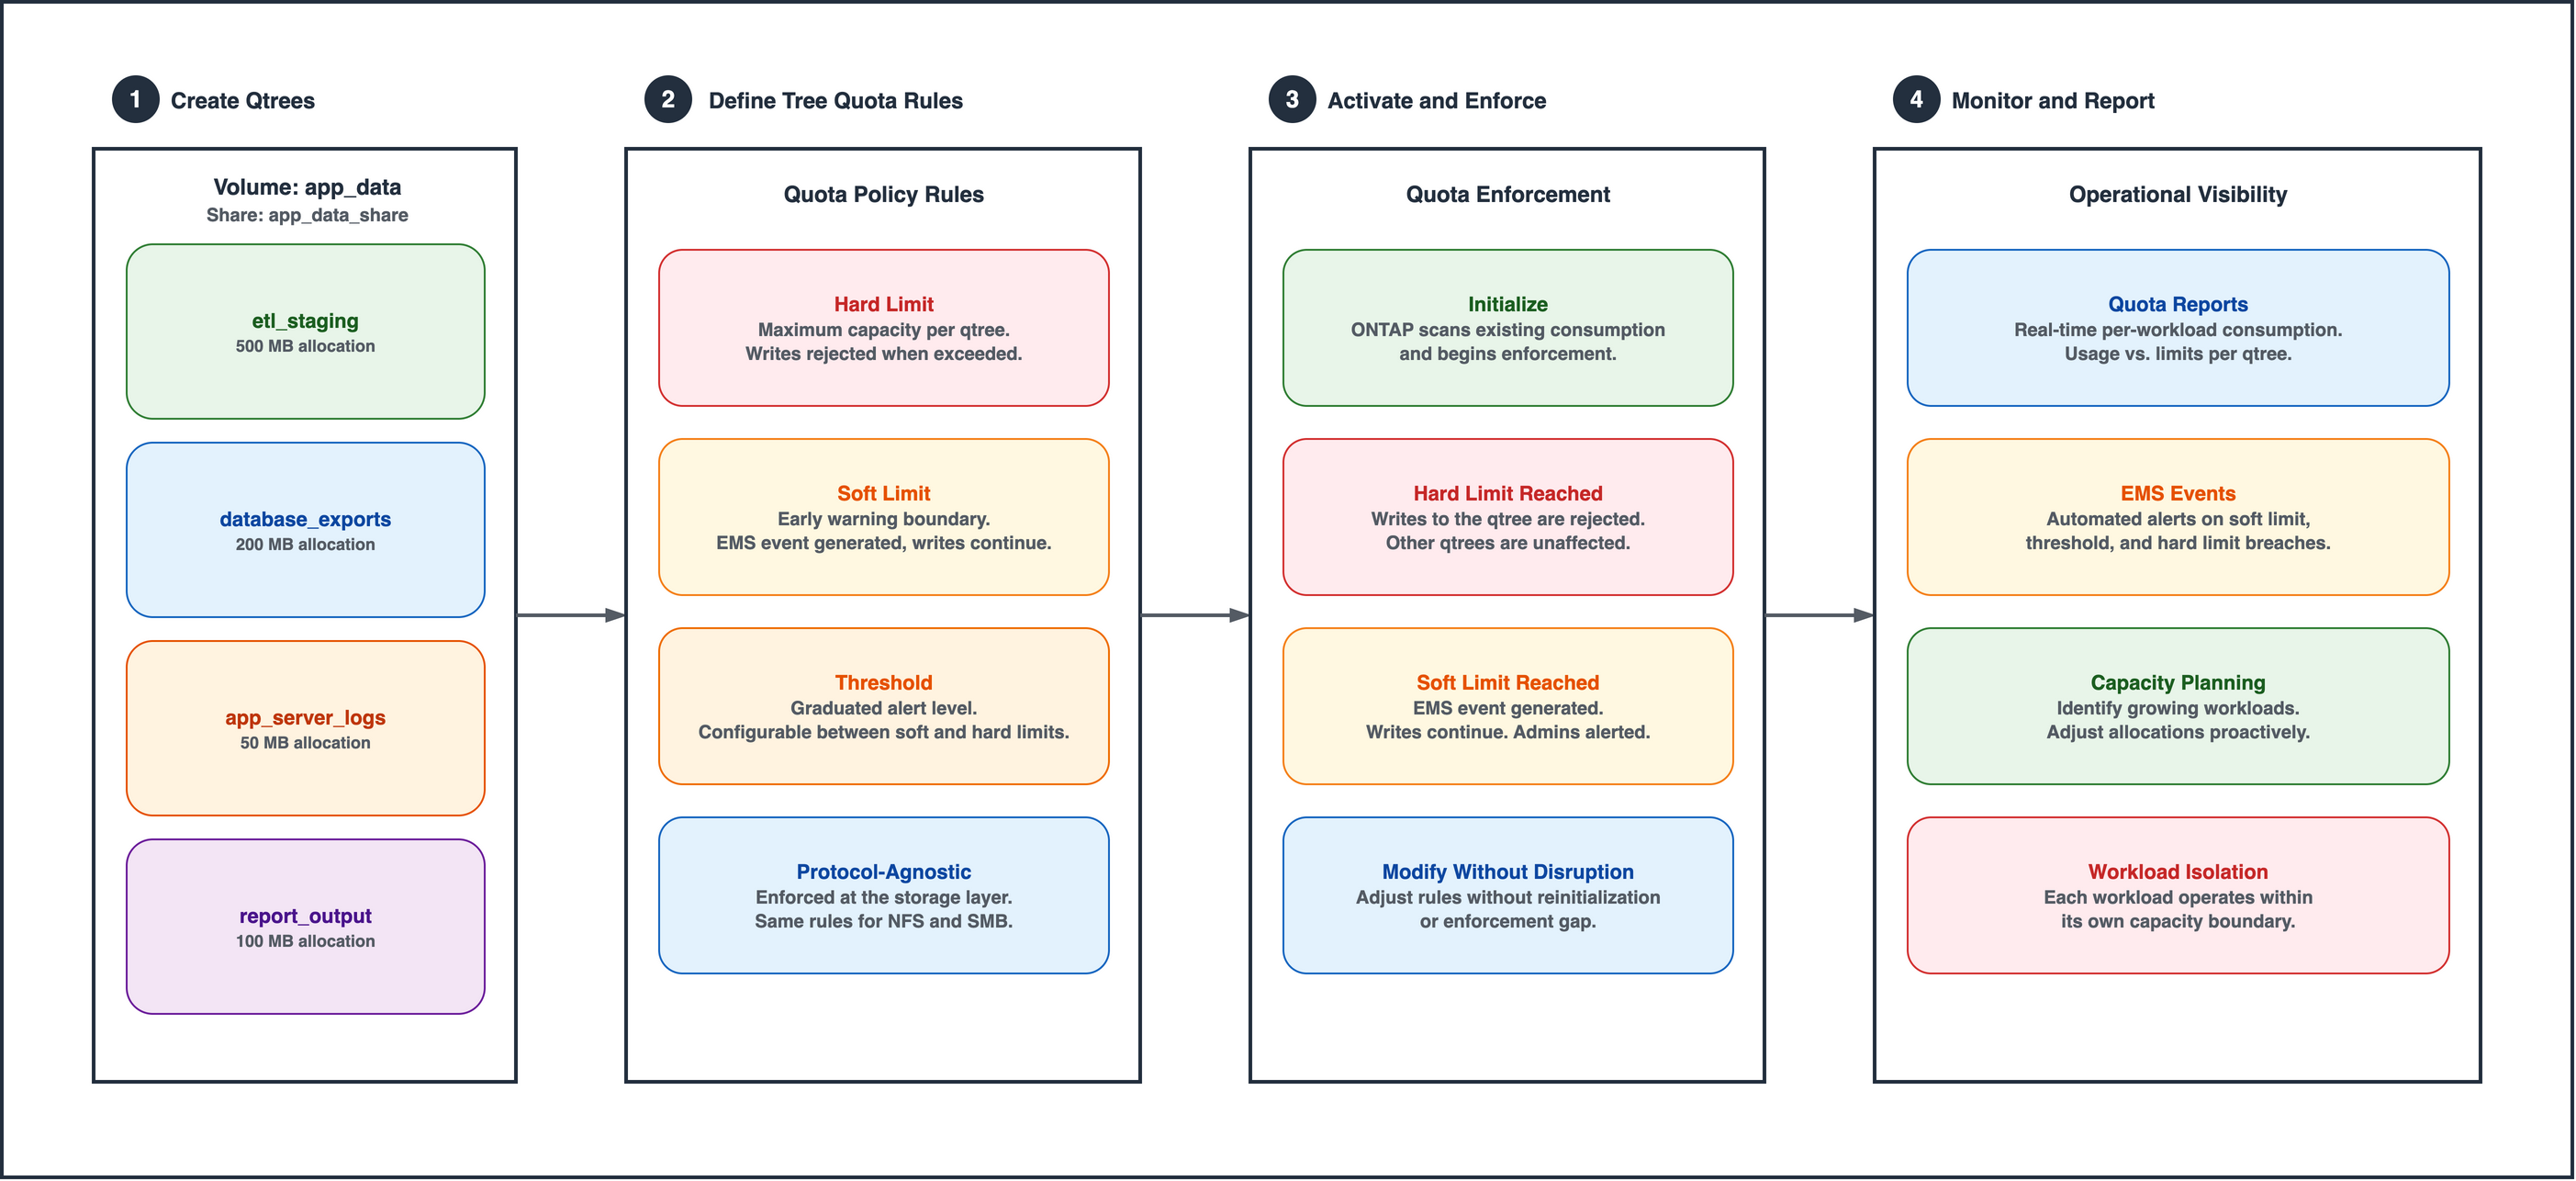
Figure 1: FSx for ONTAP tree quota implementation workflow
For our example use case, an organization operates four application workloads on a shared FSx for ONTAP volume. Each workload writes to a dedicated directory, but without enforcement, any single workload can consume the entire volume. The following capacity allocations need to be enforced:
- etl_staging (500 MB) – Pipeline staging files processed and rotated daily.
- database_exports (200 MB) – Scheduled database dumps for reporting and disaster recovery.
- app_server_logs (50 MB) – Centralized application logs aggregated from multiple compute instances.
- report_output (100 MB) – Generated reports and analytics artifacts.
Each workload is represented by a qtree within the volume. Tree quotas enforce the capacity allocation for each qtree independently, so one workload reaching its limit doesn’t affect the others.
Prerequisites
Before you begin, ensure you have the following:
- An FSx for ONTAP file system with at least one storage virtual machine (SVM).
- A volume with sufficient capacity for the workloads being managed.
- SSH access to the FSx for ONTAP management endpoint within the virtual private cloud (VPC) using fsxadmin credentials.
- A Common Internet File System (CIFS) share configured on the volume for enforcement testing.
To verify your prerequisites, connect to the ONTAP CLI within your VPC and confirm your SVM and volume configuration:
For example:
Once connected, verify the SVM and volume:
For example:
We get the following output:
Create qtrees within the volume
Each workload in the scenario is represented by a qtree. Qtrees appear as directories to clients but ONTAP tracks them as separate storage objects, which allows independent quota rules, security styles, and usage reporting per qtree.
From the ONTAP CLI, create four qtrees, one for each workload:
For example:
The -security-style ntfs parameter configures the qtree to use NTFS permissions. Use -security-style unix for NFS-only environments or -security-style mixed for multiprotocol access. The security style doesn’t affect quota enforcement. Quotas apply regardless of the security style configured on the qtree.
Verify qtree creation
Confirm that all four qtrees were created successfully:
For example:
We get the following output:
Verify that all four qtrees are listed with the correct security style and a status of "normal". The first entry with "" is the default qtree for the volume root.
Create tree quota policy rules with hard disk limits
Next, define a tree quota rule for each qtree. The hard disk limit (-disk-limit) specifies the maximum capacity the qtree can consume. When a workload reaches its hard limit, ONTAP rejects subsequent write operations to that qtree while other qtrees on the same volume remain unaffected.
Define the tree quota rule with the following command:
For example:
The command uses the following parameters:
- -policy-name default – The default quota policy associated with the volume. Each volume has one active quota policy.
- -type tree – Specifies a tree quota, which applies to the entire qtree rather than individual users or groups.
- -target – The name of the qtree to which the rule applies.
- -disk-limit – The maximum disk space the qtree can consume. Write operations are rejected when this limit is reached.
Configure soft limits and thresholds for proactive alerting
Soft limits and thresholds generate Event Management System (EMS) events when consumption reaches the specified levels. You can view these events through the ONTAP CLI using the event log show command, as demonstrated later in this post. Unlike hard limits, soft limits and thresholds don’t block write operations. Instead, soft limits and thresholds provide early visibility into consumption growth, allowing corrective action before hard limits are reached.
Configure soft limits and thresholds with the following code:
For example:
The three levels work together as follows:
- Soft disk limit – An EMS event is generated but writes continue. This serves as an early warning that the workload is approaching its capacity allocation.
- Threshold – An EMS event is generated but writes continue. This serves as an escalation indicating the workload is nearing enforcement.
- Hard disk limit – Write operations are rejected. The workload has consumed its full capacity allocation.
Verify that all rules are configured correctly with the following command:
For example:
We get the following output:
Activate quotas on the volume
Quota rules aren’t enforced until quotas are activated on the volume. The activation process scans existing consumption across all qtrees and begins enforcement.
Activate quotas on the volume with the following code:
For example:
We get the following output:
The -foreground parameter runs the activation synchronously so you can confirm completion before proceeding. For volumes with large amounts of existing data, the initial scan might take several minutes.
Verify quota status
Confirm that quotas are active on the volume:
For example:
We get the following output:
The Quota State should show "on" and the Scan Status should show "-", indicating that the initial scan is complete and enforcement is active.
Review the quota report
The quota report provides real-time per-qtree consumption data, showing current usage against the defined limits. Review the quota report with the following command:
For example:
We get the following output:
The Files Used column shows 1 for each qtree because ONTAP counts the qtree directory itself as a file. Disk Used shows 0B because no data has been written yet. The Limit column confirms the hard disk limits defined earlier.
Validate enforcement
To validate that quotas are enforced correctly, write data to a qtree until it exceeds the hard limit. The following two options demonstrate how to test enforcement from a Windows client within your VPC that has network access to the CIFS share configured in the prerequisites.
To use File Explorer, complete the following steps:
- From a Windows instance within your VPC, open File Explorer.
- In the address bar, enter
\\<svm-dns-name>\app_data_share\app_server_logsand press Enter. - If prompted, enter your domain credentials to authenticate.
- Transfer files into the directory until the cumulative size exceeds the 50 MB hard disk limit configured on the qtree.
Windows displays an error indicating insufficient disk space when the hard limit is reached.
To use the command line, from a Windows client, map the share and create test files:
The fsutil file createnew command is a built-in Windows utility that creates a file of a specified size in bytes. The first file (approximately 30 MB) succeeds. The second file (another 30 MB, totaling approximately 60 MB) fails because the combined size exceeds the 50 MB hard limit on the app_server_logs qtree.
After testing, review the quota report to confirm enforcement:
The app_server_logs qtree should show approximately 30 MB used with a 50 MB limit, while other qtrees remain at 0 bytes. This confirms that one qtree reaching its limit doesn’t affect the others. Each workload operates within its own capacity boundary.
Modifying quotas without disruption
As workload requirements evolve, you can adjust quota limits without disrupting active operations. The volume quota resize command applies rule changes without requiring a full reinitialization of quota enforcement.
For example, the app_server_logs workload requires additional capacity. The following commands increase the hard limit from 50 MB to 75 MB and adjust the soft limit and threshold accordingly:
For example:
Apply the change without reinitialization:
For example:
We get the following output:
Verify the updated limits:
For example:
We get the following output:
The app_server_logs qtree now shows the updated 75 MB limit (changed from 50 MB) in the Limit column. No disruption occurs to other qtrees during the resize operation.
When full re-initialization is required
The volume quota resize command applies changes to existing rules. However, adding a new quota rule, for example a rule for a newly created qtree, requires a full reinitialization:
For example:
During reinitialization, quota enforcement is temporarily suspended. Plan this operation during a maintenance window if strict enforcement is required at all times.
Monitoring and operational visibility
Amazon FSx for NetApp ONTAP provides two native mechanisms for monitoring quota consumption. Quota reports show real-time per-workload usage against defined limits, and Event Management System (EMS) events generate alerts when soft limits or thresholds are exceeded.
Quota reports for capacity planning
The quota report is the primary tool for monitoring per-workload consumption. View the report using the following command:
For example:
Use the report to identify workloads approaching their limits, plan allocation adjustments, and track consumption trends over time.
EMS events for proactive alerting
When a workload exceeds its soft limit or threshold, ONTAP generates EMS events that can be used for alerting and automated response. To view recent quota-related events, use the following command:
For example:
We get the following output (when a soft limit is exceeded):
ONTAP generates the following EMS events at each quota level:
- quota.softlimit.exceeded – Triggered when consumption exceeds the soft disk limit or threshold
- wafl.quota.qtree.exceeded – Triggered when consumption reaches the hard disk limit and write operations are rejected
Clean up
If you provisioned any resources while following this walkthrough, we recommend deleting the resources that you are no longer using so you don’t incur unintended charges. You can deactivate quotas, remove the quota policy rules, and delete the CIFS share from the ONTAP CLI. Complete the following steps:
- Deactivate quotas:
For example:
- Delete quota policy rules:
For example:
- To delete the qtrees, first remove all files within each qtree. FSx for ONTAP doesn’t delete qtrees that contain data unless the files are removed first. When a qtree is empty, delete it:
For example:
- Remove the CIFS share:
For example:
- If you created a test FSx for ONTAP file system specifically for this walkthrough, you can delete it using the Amazon FSx console to stop incurring storage charges.
Conclusion
In this post, we demonstrated how to use ONTAP tree quotas on FSx for ONTAP to enforce per-workload capacity boundaries within a shared volume. By creating qtrees to represent distinct workloads and defining tree quota policy rules with hard limits, soft limits, and thresholds, you can prevent a single workload from exhausting shared capacity while receiving proactive alerts before enforcement occurs.
The implementation walkthrough covered creating qtrees, defining quota rules, activating enforcement, validating hard limit behavior, modifying quotas without disruption, and monitoring consumption through quota reports and EMS events. This storage layer approach provides consistent enforcement regardless of client protocol and alleviates the need for custom monitoring scripts.
To learn more about FSx for ONTAP, see the Amazon FSx for NetApp ONTAP User Guide. For related content on managing access controls on FSx for ONTAP, see Restrict access to your Amazon FSx for NetApp ONTAP volumes using export policies. If you have questions or comments about this post, please leave them in the comments section.