AWS Storage Blog
Secure shared storage with CIFS share-level access controls on Amazon FSx for NetApp ONTAP
Organizations that consolidate multiple teams onto shared file storage encounter a common challenge. Every new Common Internet File System (CIFS) share grants authenticated domain users unrestricted access by default. Without share-level restrictions, any user who can authenticate to the domain can connect to any CIFS share on the FSx volume, regardless of whether they have a legitimate business need to access that data. Sensitive data is exposed to users outside the intended audience, unauthorized users can access every share, and compliance audits that require demonstrable access segregation between departments fail before they begin.
Amazon FSx for NetApp ONTAP provides fully managed, enterprise-grade file storage built on NetApp’s popular ONTAP file system. To address the challenge of unrestricted share access on shared volumes, FSx for ONTAP includes CIFS share-level access control lists (ACLs) that restrict which Active Directory (AD) users or groups can connect to a specific share. By creating dedicated qtrees for each team, mapping each qtree to a separate CIFS share, and configuring share ACLs to restrict access to specific AD groups, you can enforce per-team access boundaries within a shared volume. Share ACLs operate as the middle layer in a layered security model, complementing network-level export policies and file-level NTFS permissions so no single misconfiguration exposes data.
In this post, we demonstrate how to use CIFS share-level access controls with qtrees on FSx for ONTAP to enforce per-team access boundaries. You will learn how to create qtrees and map them to dedicated CIFS shares, remove the default Everyone: Full Control entry, assign per-team AD groups with appropriate permission levels, explicitly deny access to individual users using No_access, and configure access-based enumeration so users only see the shares they are authorized to access. This approach prevents unauthorized share access, simplifies access management through AD group membership, and provides a consistent security layer that is enforced before file-level permissions are evaluated.
The following sections walk you through restricting each CIFS share to specific AD users or groups, from creating qtrees to validating access from Windows clients. By default, every new CIFS share grants Everyone full control, which allows any authenticated domain user to read, write, and modify data on the share. After completing these steps, only designated AD groups or users can access each share, with permissions scoped to what the workload requires. For our code, we provide both the syntax and a specific example, along with sample output.
Solution overview
The solution uses three core components in FSx for ONTAP that work together to enforce per-team access boundaries within a shared volume:
- Qtrees – Logical subdivisions within a volume, each representing a distinct team or workload. Each qtree is mapped to a dedicated CIFS share, providing independent access control boundaries.
- CIFS shares – Network endpoints that Windows clients connect to using Universal Naming Convention (UNC) paths (for example,
\\svm-dns-name\share_name). Each share is mapped to a specific qtree path. - Share ACLs – Permission entries on each share that define which AD users or groups can connect and at what permission level:
Full_Control,Change,Read, orNo_access.
Share ACLs control which users can connect to a share. NTFS permissions control what users can do with files and folders after connecting. Share ACLs are evaluated first, and the effective permission a user receives is the most restrictive combination of the share ACL and the NTFS permission. For example, if a user has Change access at the share level but only Read access at the NTFS level, the effective permission is Read. This post focuses on the share ACL layer.
Consider the following use cases for share ACLs compared to NTFS permissions:
- Use share ACLs to control which teams can connect to a share and to grant different permission levels per team, such as
Full_Controlfor administrators,Changefor operators, andReadfor consumers. - Use NTFS permissions to control what users can do with specific files and folders within a share, configure inheritance for new files and subfolders, or apply different permissions to subdirectories within the same share.
Share ACLs apply to any CIFS share regardless of whether the share maps to a qtree, a volume root, or a regular directory. This walkthrough uses qtrees because they provide independent storage boundaries for each team.
Figure 1 illustrates the complete workflow for implementing CIFS share-level access controls on FSx for ONTAP.
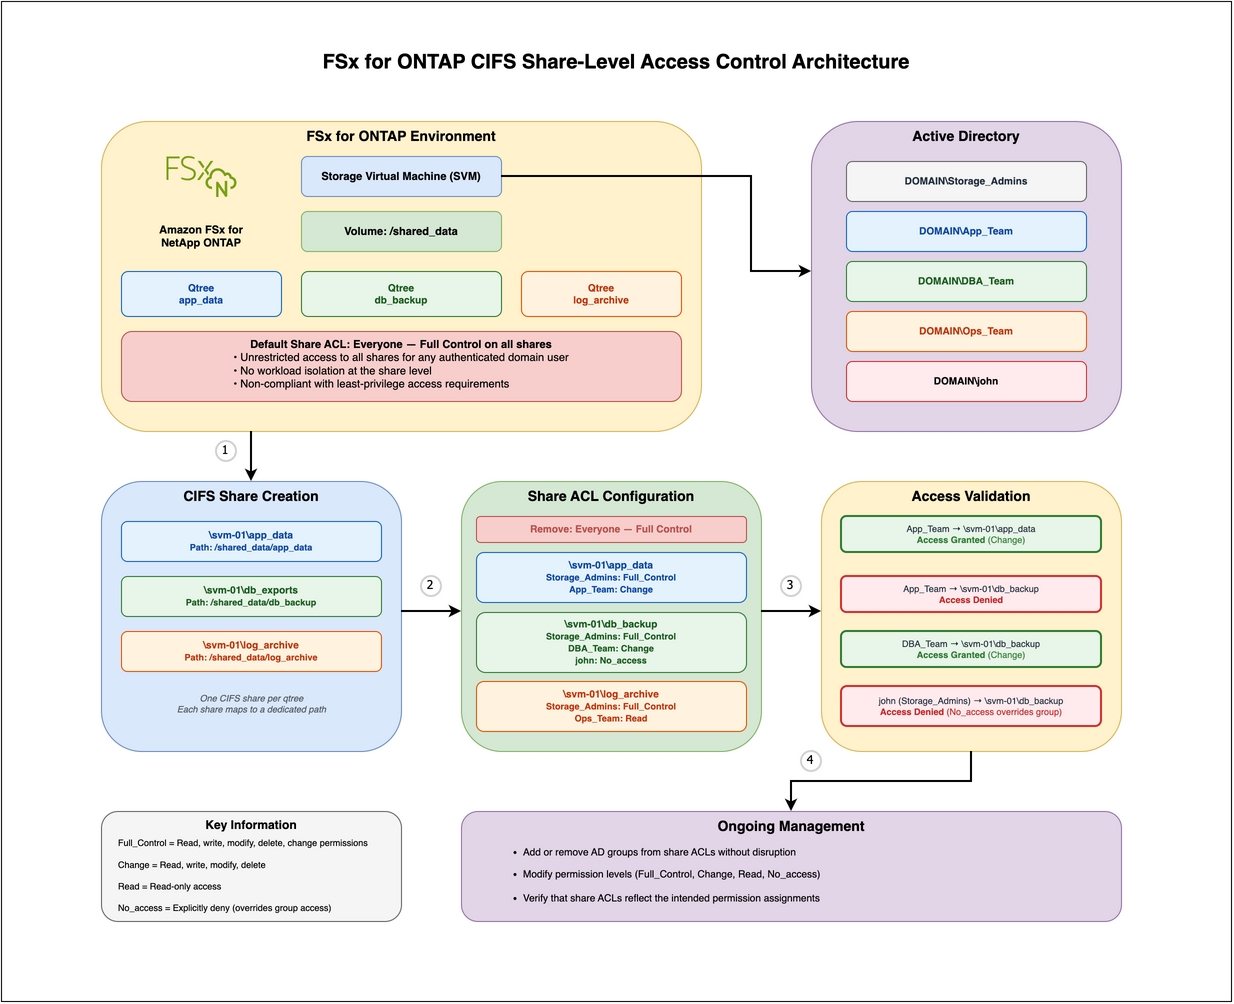
Figure 1: FSx for ONTAP CIFS share-level access control workflow
For our example use case, an organization operates three workloads on a shared FSx for ONTAP volume. Each workload writes to a dedicated directory, but without share-level access controls, any authenticated user can connect to any share. The following access boundaries need to be enforced:
- app_data – Application data files. Storage administrators require
Full_Controlfor share management. The application team requiresChangeaccess for read and write operations. - db_backup – Scheduled database backups. Database administrators require
Changeaccess to write and manage backup files. An individual administrator who is transitioning roles must be explicitly denied access usingNo_access - log_archive – Centralized log files aggregated from multiple compute instances. The operations team requires
Readaccess for log review and analysis.
Each workload is represented by a qtree within the volume. Share ACLs enforce the access boundaries for each share independently, so users from one team can’t connect to shares belonging to another team.
Prerequisites
Before you begin, ensure you have the following:
- An FSx for ONTAP file system with at least one storage virtual machine (SVM).
- A volume configured with NTFS security style.
- AD integration configured for the SVM with a CIFS server joined to the domain.
- SSH access to the FSx for ONTAP management endpoint within the virtual private cloud (VPC) using
fsxadmincredentials. - AD security groups created for each team (for example,
Storage_Admins,App_Team,DBA_Team,Ops_Team) - A Windows client joined to the same AD domain for access validation.
To verify your prerequisites, connect to the ONTAP CLI within your VPC and confirm your SVM and CIFS server configuration:
Create qtrees within the volume
Each team in the scenario is represented by a qtree. Qtrees are logical subdivisions within a volume that ONTAP tracks as separate storage objects. Each qtree can be mapped to a dedicated CIFS share with its own access controls.
From the ONTAP CLI, create a qtree for each workload:
For example:
The -security-style ntfs parameter configures the qtree to use NTFS permissions, which is required for CIFS share access with AD-based authentication.
Verify qtree creation and security style
Confirm that all three qtrees were created successfully with the correct security style:
For example:
We get the following output:
Verify that all three qtrees are listed with the NTFS security style and a status of "normal". The first entry with "" is the default qtree for the volume root.
Create CIFS shares mapped to each qtree
Create a dedicated CIFS share for each qtree using the following command. Each share maps to the qtree path within the volume’s junction path, providing a separate network endpoint for each team.
For example:
The -path parameter specifies the full path to the qtree within the volume. Windows clients connect to these shares using UNC paths such as \\<svm-dns-name>\app_data.
Verify share creation and default properties
Confirm that all three shares were created and review their default configuration:
For example:
We get the following output:
Notice that every new share defaults to Everyone / Full Control in the ACL column. This means any authenticated domain user can connect to any of these shares with full access. The output also includes c$ and ipc$, which are default administrative shares that FSx for ONTAP creates automatically on the SVM root path (/) for remote management. These are not related to the shares you created.
To examine the access control entries in detail, use the access-control show command:
For example:
We get the following output:
The following steps replace this default with per-team access controls.
Remove the default Everyone entry from each share
Remove the Everyone: Full_Control entry from all three shares to eliminate unrestricted access:
For example:
After removing the default entries, no users can connect to these shares until you add specific AD group entries in the following steps.
Verify that the Everyone entries have been removed:
We get the following output:
Only the default c$ administrative share remains. FSx for ONTAP automatically creates c$ for remote administrative access to the SVM root and ipc$ for inter-process communication used by Windows for share browsing and remote management. The ipc$ share doesn’t appear in this output because it has no ACL entries.
Add Storage_Admins with Full_Control to all shares
Grant the storage administration team Full_Control on all three shares using the following command. This way, administrators can manage files across all shares regardless of workload ownership.
For example:
Replace DOMAIN with your AD domain name. The -permission parameter accepts four values:
- Full_Control – Read, write, modify, delete, and change permissions on the share.
- Change – Read, write, modify, and delete files within the share.
- Read – Read-only access to files within the share.
- No_access – Explicitly deny access, overriding any group-level allow entries.
No_accesstakes precedence over all other permissions, includingFull_Controlgranted through group membership.
Verify that Storage_Admins has been added to all three shares:
We get the following output:
Add workload-specific AD groups per share
Grant each team the minimum permission level required for their role on their respective share:
Use the app_data share for the Application team with Change access:
Use the db_backup share with the DBA team with Change access and an individual user denied:
The No_access entry for DOMAIN\jsmith explicitly denies this user access to the db_backup share, even if they are a member of DBA_Team or Storage_Admins. No_access always takes precedence over allow entries. This is useful when an individual is transitioning roles and should no longer access specific shares while their AD group memberships are being updated.
Use the log_archive share for the Operations team with Read access:
Verify share ACL configuration
Confirm that all share ACLs are configured correctly:
For example:
We get the following output:
Verify that each share has the correct AD groups with the intended permission levels, the Everyone entry has been removed from all shares, and the No_access entry for DOMAIN\jsmith is present on the db_backup share.
Compare this output to the default state from the earlier step. Each share now grants access only to specific AD groups or users with the necessary permissions, replacing the default Everyone full control.
Configure access-based enumeration
Access-based enumeration (ABE) hides files and folders that a user doesn’t have permission to access. Without ABE, users can see the names of all files and folders in a share even if they can’t open them. Enabling ABE reduces confusion and prevents users from discovering the existence of files they are not authorized to access. ABE filters the directory listing based on NTFS permissions on individual files and folders within the share, not based on share ACLs.
Enable ABE with the following command:
For example:
Verify that ABE is enabled:
For example:
We get the following output:
The access-based-enumeration property should appear in the list of share properties.
On shares with a large number of files, ABE can increase directory listing latency because the server evaluates NTFS permissions for each item before returning results. The impact is most noticeable on shares where directories contain many files or subdirectories with distinct ACLs, accessed by many concurrent users. For shares with millions of files, evaluate whether the added latency is acceptable for your workload after enabling ABE.
Validate access from Windows clients
Connect to the shares from a Windows client within your VPC to confirm that access controls are enforced correctly:
- From a Windows instance within your VPC, open File Explorer.
- In the address bar, enter
\\<svm-dns-name>\app_dataand press Enter. - If prompted, enter your domain credentials to authenticate.
- Log in as a member of
App_Team.
You should be able to read and write files in the app_data share.
- Attempt to access
\\<svm-dns-name>\db_backupas the sameApp_Teamuser.
Windows should display an “Access Denied” error because App_Team has no entry on the db_backup share ACL.
- Log in as
DOMAIN\jsmithand attempt to access\\<svm-dns-name>\db_backup.
Access should be denied even though jsmith might be a member of DBA_Team, because the No_access entry overrides group-level permissions.
- Log in as a member of
Ops_Teamand access\\<svm-dns-name>\log_archive.
You should be able to read files but not create, modify, or delete them.
These tests confirm that share ACLs are enforced before file-level permissions are evaluated, and that No_access entries override group-level allow entries.
Managing share ACLs for evolving requirements
As teams change and access requirements evolve, you can modify share ACLs without disrupting users who are currently connected to other shares.
Add a new team to an existing share
For example, a reporting team needs Read access to the db_backup share to generate reports from database exports:
This adds the new entry without affecting existing ACL entries on the share. Members of DBA_Team retain their Change access, and the No_access entry for jsmith remains in effect.
Modify permission levels for an existing group
For example, the operations team now needs Change access instead of Read on the log_archive share to rotate log files:
Revoke access for a team
For example, a contractor team that previously had access to the app_data share no longer requires it:
Explicitly deny access for a group
For example, an entire team must be blocked from a share during an audit:
All share ACL changes take effect immediately for new connections. Users who are already connected to a share are not disconnected, but their permissions are evaluated against the updated ACL on their next access attempt.
Clean up
If you provisioned any resources while following this walkthrough, we recommend deleting the resources that you are no longer using so you don’t incur unintended charges. Complete the following steps:
- Remove the share ACL entries, delete the CIFS shares, and delete the
qtreesfrom the ONTAP CLI:
- To delete the qtrees, first remove all files within each
qtree. FSx for ONTAP doesn’t deleteqtreesthat contain data unless the files are removed first. After aqtreeis empty, delete it:
- If you created a test FSx for ONTAP file system specifically for this walkthrough, you can delete it using the Amazon FSx console to stop incurring storage charges.
Conclusion
In this post, we demonstrated how to use CIFS share-level access controls with qtrees on FSx for ONTAP to enforce per-team access boundaries within a shared volume. With these controls in place, compliance audits become straightforward because each share’s ACL provides a clear record of who can access what. Onboarding and offboarding reduces to AD group membership changes, with no need to reconfigure share permissions. If a user account is compromised, the area of impact is limited to only the shares that account is authorized to access. As new workloads are added, the same pattern of creating a qtree, mapping a share, and configuring the ACL scales without re-architecting your storage.
To learn more about FSx for ONTAP, see the Amazon FSx for NetApp ONTAP User Guide. For related content on managing access controls on FSx for ONTAP, see Managing NTFS permissions at scale on Amazon FSx for NetApp ONTAP and Restrict access to your Amazon FSx for NetApp ONTAP volumes using export policies. If you have questions or comments about this post, please leave them in the comments section.