背景概述:
随着最近几年,越来越多的公司使用“微服务”来构建他们的系统或应用架构。在微服务架构中服务治理是一个重要的问题,在没有服务治理的分布式集群中,各个服务之间通过手工或者配置的方式进行服务关系管理,遇到服务关系变化或者增加服务的时候,手动配置极其麻烦且容易出错,在容器化技术以及kubernetes成为主流前,行业内使用Eureka\Zookeeper\consul 方案来处理这一问题。
本文的背景中客户就是使用consul基于EC2来构建自己的微服务架构,随着kubernetes技术的成熟及容器在成本,效率上的优势,客户计划对现有架构进行容器化改造,使用EKS实现服务间的治理。基于业务稳定性,连续性的考量,客户要求构建混合的微服务架构,服务可以在现有consul架构及未来EKS中共存,后期小批量平滑的进行迁移。(从EC2迁移到容器)
在本文中,我们将向您介绍如何帮助客户解决这些方面的挑战,通过AWS Cloud Map 服务来构建混合的微服务架构。
方案概述:

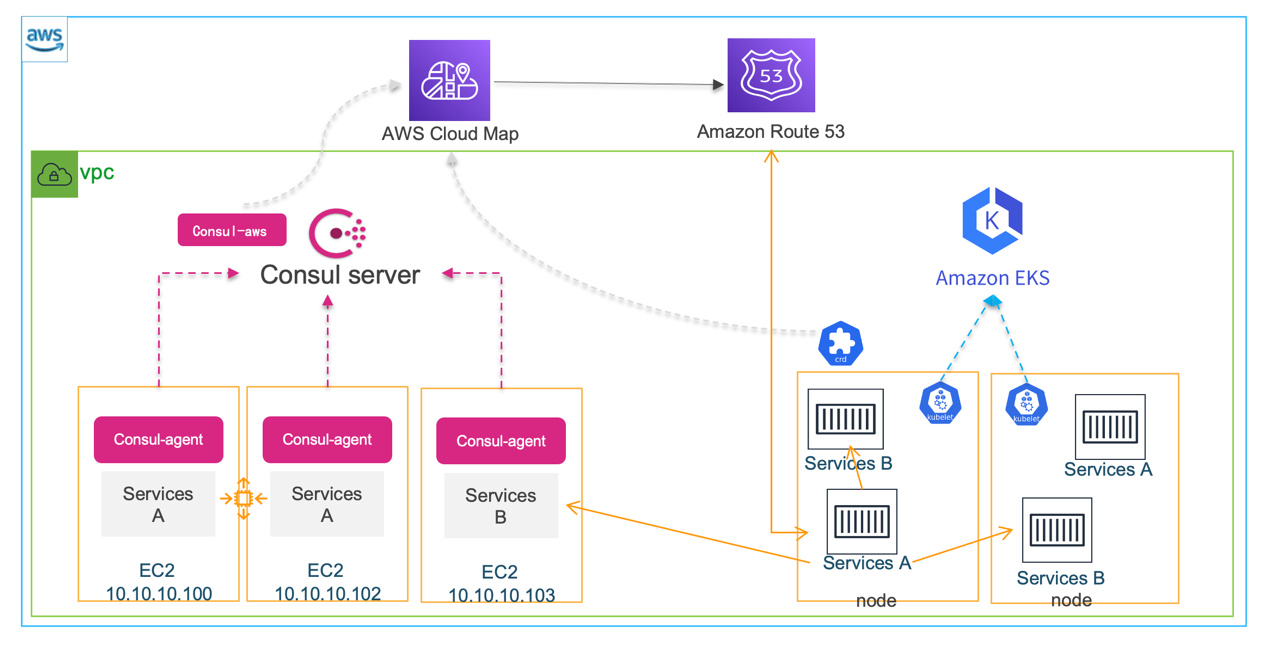
如上图,在本示例中在位于同一VPC内的有Consul和EKS两个集群,我们可以通过AWS Cloud Map 实现混合基础设施间的服务发现。
流程如下:
- 构建consul集群,模拟服务注册到consul-server
- 通过consul-aws client 同步consul-server中的服务到AWS Cloud Map
- 在EKS 集群中构建测试服务,通过appmesh-controller 自动同步服务到AWS Cloud Map
另外也可以使用AWS Cloud Map MCS Controller for K8s 同步信息到Cloud Map,具体请查考https://github.com/aws/aws-cloud-map-mcs-controller-for-k8s
- 服务通过DNS 实现混合架构间的通信
环境部署:
注:本示例的整个流程选择在us-east-2区域进行,使用EC2 Iam role 获取相应权限
- Consul 环境设置
#consul install
yum install -y yum-utils
yum-config-manager --add-repo https://rpm.releases.hashicorp.com/AmazonLinux/hashicorp.repo
yum -y install consul
nohup consul agent -server -bootstrap-expect 1 -config-dir /etc/consul.d/ -data-dir /var/opt/consul -client=0.0.0.0 -ui >> /var/opt/consul/consul.log 2>&1  &

#nginx services install
sudo amazon-linux-extras install nginx1
echo >/usr/share/nginx/html/index.html
echo 'Welcome to Nginx I am run in ec2-server' > /usr/share/nginx/html/index.html
systemctl start nginx

#test nginx  running
private_ip=`curl -s http://169.254.169.254/latest/meta-data/local-ipv4`
[root@*]# curl http://${private_ip}/index.html
Welcome to Nginx I am run in ec2-server

# register services to consul
curl -X PUT -d '{"id": "'app-${private_ip}'","name": "nginx","address": "'${private_ip}'","port": 80,"tags":["service nginx"],"checks": [{"http": "'http://${private_ip}:80/index.html'","interval": "5s"}]}' http://127.0.0.1:8500/v1/agent/service/register
通过consul ui 确认服务已注册到consul server 中

#consul-aws client install
wget https://releases.hashicorp.com/consul-aws/0.1.2/consul-aws_0.1.2_linux_amd64.zip
unzip consul-aws_0.1.2_linux_amd64.zip
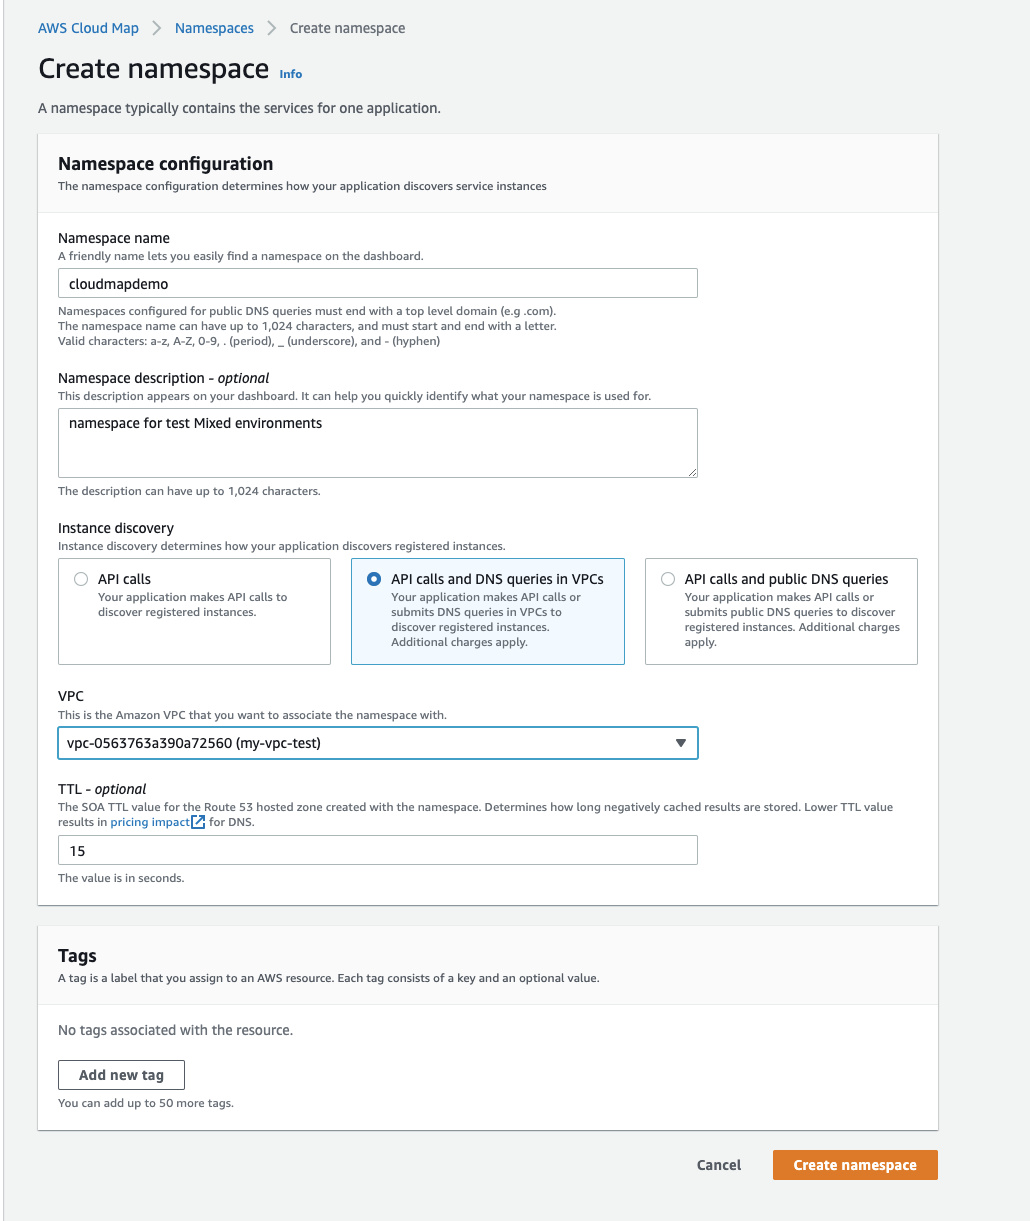
- AWS Cloud Map 设置

创建完成后,会自动创建相对应的Route 53 Hosted zones

   #sync consul services to aws cloudmap
export AWS_REGION=us-west-2
通过控制台获取aws cloud map Namespace ID
[root@*]# ./consul-aws sync-catalog -aws-namespace-id ns-glubffqpz3pke27s -to-aws
2022-01-17T07:20:32.656Z [INFO]  aws: created: count=2
2022-01-17T07:20:42.626Z [INFO]  aws: service already exists: name=Nginx
2022-01-17T07:20:42.668Z [INFO]  aws: service already exists: name=consul
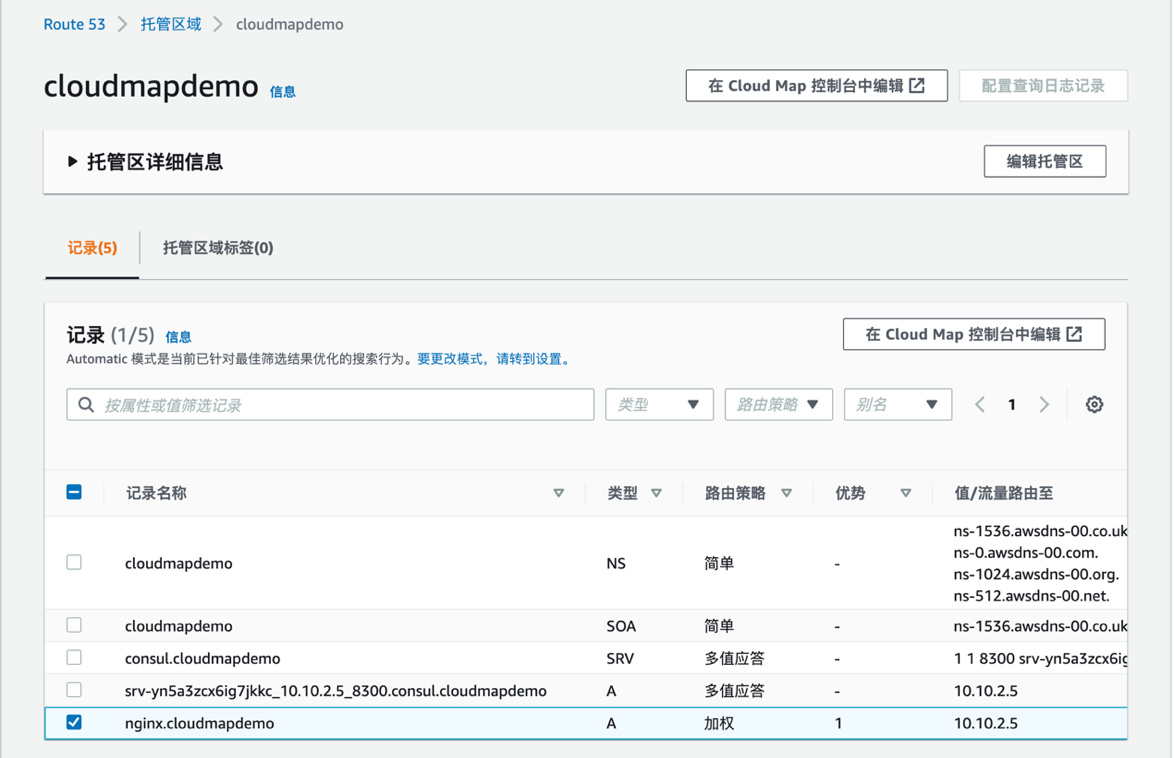
控制台查看Nginx 服务已同步到 aws cloud map 中,并且在 Route 53 Hosted zones 增加了一条对应的A记录


#curl test
[root@*]# curl http://nginx.cloudmapdemo/index.html
Welcome to Nginx I am run in ec2-server
- EKS 资源设置
EKS 集群的创建请参考官方文档
#helm install
curl https://raw.githubusercontent.com/helm/helm/master/scripts/get-helm-3 > get_helm.sh
chmod 700 get_helm.sh
./get_helm.sh
kubectl apply -k "https://github.com/aws/eks-charts/stable/appmesh-controller/crds?ref=master"
# create kubernetes namespaces
kubectl create ns appmesh-system
#create OpenID Connect
export CLUSTER_NAME=ops-cluster
export AWS_REGION=us-west-2
eksctl utils associate-iam-oidc-provider \
    --region=$AWS_REGION \
    --cluster $CLUSTER_NAME \
    --approve
eksctl create iamserviceaccount \
    --cluster $CLUSTER_NAME \
    --namespace appmesh-system \
    --name appmesh-controller \
    --attach-policy-arn  arn:aws:iam::aws:policy/AWSCloudMapFullAccess,arn:aws:iam::aws:policy/AWSAppMeshFullAccess \
    --override-existing-serviceaccounts \
    --approve
kubectl get serviceaccount -n appmesh-system
NAME                 SECRETS   AGE
appmesh-controller   1         11m
default              1         16m
#Deploy the App Mesh controller
helm upgrade -i appmesh-controller eks/appmesh-controller \
    --namespace appmesh-system \
    --set region=$AWS_REGION \
    --set serviceAccount.create=false \
    --set serviceAccount.name=appmesh-controller
#deploy App Mesh resources,new namespaces
apiVersion: v1
kind: Namespace
metadata:
  name: my-apps
  labels:
    mesh: my-mesh
    appmesh.k8s.aws/sidecarInjectorWebhook: disabled
注意:本方案只需要通过app mesh controller 把pod IP 自动同步到cloudmap 上,mesh功能本方案并不需要,要disabled掉envoy的注入。
# create mesh
apiVersion: appmesh.k8s.aws/v1beta2
kind: Mesh
metadata:
  name: my-mesh
spec:
  namespaceSelector:
    matchLabels:
      mesh: my-mesh

kubectl apply -f mesh.yaml
[root@*]# aws appmesh describe-mesh --mesh-name my-mesh --region us-west-2
{
    "mesh": {
        "status": {
            "status": "ACTIVE"
        },
        "meshName": "my-mesh",
        "spec": {},
        "metadata": {
            "uid": "b033b95d-178a-4abe-a317-ab887f4f893a",
            "lastUpdatedAt": 1642734368.342,
            "arn": "arn:aws:appmesh:us-west-2:386709100178:mesh/my-mesh",
            "version": 1,
            "resourceOwner": "386709100178",
            "createdAt": 1642734368.342,
            "meshOwner": "386709100178"
        }
    }
}

#create Virtualnode
apiVersion: appmesh.k8s.aws/v1beta2
kind: VirtualNode
metadata:
  name: app-services
  namespace: my-apps
spec:
  podSelector:
    matchLabels:
      app: nginx       #  pod label
  listeners:
    - portMapping:
        port: 80
        protocol: http
  serviceDiscovery:
    awsCloudMap:
      namespaceName: cloudmapdemo # cloud map namespaces
      serviceName: nginx   # cloudmap serices name

[root@*]# kubectl apply -f VirtualNode.ymal
virtualnode.appmesh.k8s.aws/app-services created
# create nginx deployment
kind: Deployment
metadata:
  labels:
    app: nginx        # label 要与virturalnode 里一致
  name: nginx-deployment
  namespace: my-apps
spec:
  replicas: 1
  selector:
    matchLabels:
      app: nginx
  template:
    metadata:
      labels:
        app: nginx
    spec:
      containers:
      - image: nginx
        name: nginx
        ports:
        - containerPort: 80
通过控制台查看Virtual nodes 已成功创建

Cloud Map cloudmapdemo nignx 服务里也获取到pod 的相应信息

Route 53 Hosted zones 增加了一条对应的A记录

- 测试验证
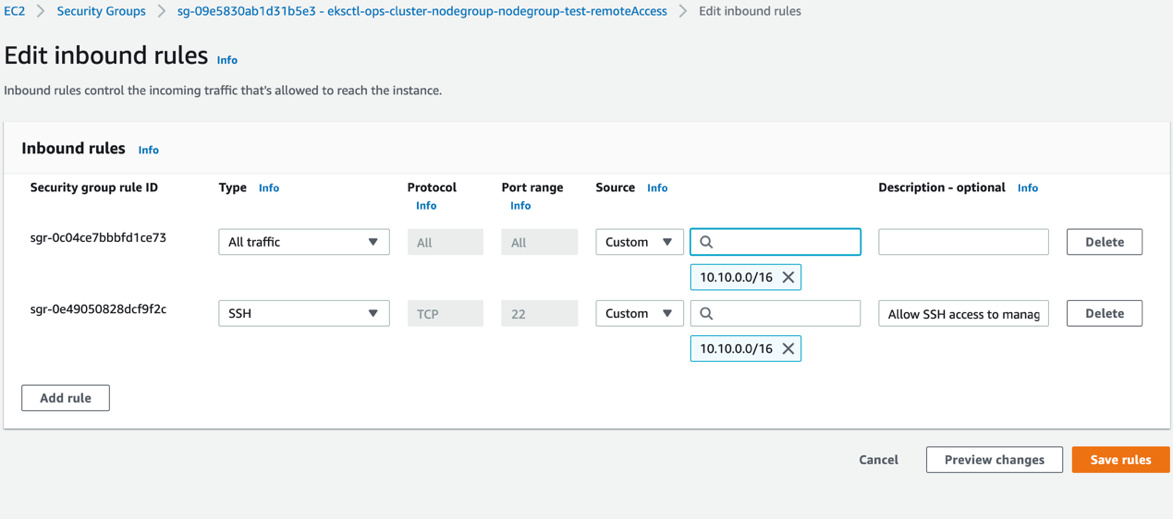
#edit eks nodegroup sg inbound rules允许VPC 10.10.0.0/16 的所有流量

# 多次 ping 或dig 查看返回结果的IP 变化
[root@*]# ping nginx.cloudmapdemo
PING nginx.cloudmapdemo (10.10.2.5) 56(84) bytes of data.
64 bytes from ip-10-10-2-5.us-west-2.compute.internal (10.10.2.5): icmp_seq=1 ttl=255 time=0.390 ms
64 bytes from ip-10-10-2-5.us-west-2.compute.internal (10.10.2.5): icmp_seq=2 ttl=255 time=0.381 ms
64 bytes from ip-10-10-2-5.us-west-2.compute.internal (10.10.2.5): icmp_seq=3 ttl=255 time=0.488 ms
^C
--- nginx.cloudmapdemo ping statistics ---
3 packets transmitted, 3 received, 0% packet loss, time 2030ms
rtt min/avg/max/mdev = 0.381/0.419/0.488/0.053 ms
[root@*]# ping nginx.cloudmapdemo
PING nginx.cloudmapdemo (10.10.3.168) 56(84) bytes of data.
64 bytes from ip-10-10-3-168.us-west-2.compute.internal (10.10.3.168): icmp_seq=1 ttl=254 time=0.709 ms
64 bytes from ip-10-10-3-168.us-west-2.compute.internal (10.10.3.168): icmp_seq=2 ttl=254 time=0.718 ms
64 bytes from ip-10-10-3-168.us-west-2.compute.internal (10.10.3.168): icmp_seq=3 ttl=254 time=0.770 ms
#使用CURL 测试,两次curl的结果也不同,一次请求到pod 上,一次请求到ec2 上
[root@*]# curl nginx.cloudmapdemo
<!DOCTYPE html>
<html>
<head>
<title>Welcome to nginx!</title>
<style>
html { color-scheme: light dark; }
body { width: 35em; margin: 0 auto;
font-family: Tahoma, Verdana, Arial, sans-serif; }
</style>
</head>
<body>
<h1>Welcome to nginx!</h1>
<p>If you see this page, the nginx web server is successfully installed and
working. Further configuration is required.</p>
<p>For online documentation and support please refer to
<a href="http://nginx.org/">nginx.org</a>.<br/>
Commercial support is available at
<a href="http://nginx.com/">nginx.com</a>.</p>
<p><em>Thank you for using nginx.</em></p>
</body>
</html>
[root@ip-10-10-2-136 leiwork]# curl nginx.cloudmapdemo
Welcome to Nginx I am run in ec2-server
注意: cloud map nginx dns 记录的ttl 要设为0 ,减少cache 对测试的影响
总结:
在本方案中,我们在VPC内创建了consul和EKS集群,在两种不同的基础设施上创建不同的服务,并使用AWS Cloud Map的发现服务建立起通信。利用 AWS Cloud Map能够找到服依赖的所有基础设施资源的位置,而不需要关心底层的资源运行在那里,比如ECS、EKS、Fargate以及EC2实例等。本方案可以给大家一个启示,大家可以进一步扩展实现更多的混合基础设施场景。
参考:
https://www.consul.io/
https://aws.amazon.com/cn/blogs/china/cross-amazon-eks-cluster-app-mesh-using-aws-cloud-map/
https://www.hashicorp.com/blog/enabling-service-discovery-consul-cloud-map
https://github.com/aws/eks-charts/blob/master/stable/appmesh-controller/README.md#upgrade
本篇作者