1、前言
Amazon Quick Suite这是一个新的代理式团队成员,可以快速回答您在工作中遇到的问题,并将这些洞察转化为操作。
Amazon Kiro是一款革命性的 AI 驱动整合开发环境(Agentic IDE)。它是一个完全独立的平台,能通过与您对话,将您的想法直接转化为一个真实、可访问的网站。
Amazon Bedrock AgentCore是一套企业级AI代理平台,旨在帮助开发者安全、大规模地构建、部署和运行有效的AI智能体,无需管理底层基础设施。它提供了运行时 (Runtime)、内存 (Memory)、网关 (Gateway)、身份管理 (Identity)、可观测性 (Observability)、浏览器工具和代码解释器等核心组件,支持与各种开源框架和基础模型(FM)集成,将AI智能体从概念验证快速推向生产环境。
随着跨境电商业务的快速增长,海外仓库每周需要处理大量的物流报价查询请求。对部门运营效率提出挑战,目前的工作方式是以传统的Excel表格查询方式,时效和准确度都难以保障。希望能够借由AI提升效率和准确度,同时又自主快速迭代。
2、业务背景与客户痛点
2.1 客户场景介绍
客户是国内领先的办公用品供应商,其国际事业部负责海外仓储和跨境物流业务。随着跨境电商业务的快速增长,海外仓库每周需要处理大量的物流报价查询请求。同时客户目前采用是Excel方式维护一个复杂的报价总表,涵盖多个物流渠道:USPS费用明细(美国邮政服务)、FEDEX-HFG费用明细(联邦快递重货渠道)、FEDEX-QFG费用明细(联邦快递轻货渠道)、FEDEX-JFG费用明细(联邦快递经济渠道)、GOFO PARCEL费用明细(GOFO包裹服务)、GOFO GROUND费用明细(GOFO陆运服务)、UNIUNI费用明细(UNIUNI物流渠道)。每个渠道报价规则基于如下维度:1、物品尺寸:长、宽、高、重量等;2、配送区域:Zone 1-8不同区域价格差异显著;3、时效性:报价生效日期范围,过期报价不可用;4、燃油附加费;5、偏远附加费等其他多因素考虑。
2.2 核心痛点分析
通过和客户相关人员的深度访谈和场景调研,我们识别出以下核心痛点:
1、人工查表效率低下
- 业务人员每周需要处理报价查询所花费时间按天计
- 每次查询需要在7个不同的Excel Sheet中逐一对比
- 单次查询平均耗时按小时计
- 容易出现人为错误,导致报价不准确
2、报价时效性难以保证
- 不同渠道的报价生效日期不同
- 人工难以快速判断当前时间是否在有效期内
- 使用过期报价导致客户投诉和成本损失
3、最优渠道选择复杂性
- 需要综合考虑价格、时效、区域、类型等多个因素,人工对比容易遗漏
4、报告生成繁杂
5、IT资源受限
- IT部门属于独立资源线,需要走流程申请资源,但是业务部门希望能够自主快速迭代。
2.3 技术方案选型
基于客户的实际情况和业务诉求,我们选择了Amazon Kiro + Amazon Bedrock AgentCore + Amazon Quick Suite的Serverless架方案。
2.3.1 SaaS服务化交付模式
业务部门更倾向于SaaS服务化方式将AI融入业务流程,而非传统的软件部署模式。Amazon Quick Suite完全托管的AI助手服务,无需安装部署,客户可以通过自然语言方式直接交互设计。Amazon Bedrock AgentCore直接可以将我们相关的mcp做到生产级的托管。Amazon Kiro AI驱动的开发工具,快速帮我们生成所需要的MCP代码,并且完成Amazon Bedrock AgentCore托管部署。最终业务人员只需要通过Web界面和API访问,可直接使用。相比于传统方案,更加简单和快速。
2.3.2 最小化IT研发介入
IT部门资源紧张,希望方案实施尽可能不依赖IT研发团队。Amazon Kiro通过AI辅助生成MCP工具代码,减少99%的手工编码,Amazon Quick Suite通过拖拽方式设计业务流程,Bedrock AgentCore提供开箱即用的AI托管容器。业务人员可以自行调整报价规则和流程逻辑。相比于传统开发模式,Serverless AI方案整体周期可以控制在3-5个工作日内。
2.3.3 聚焦效率提升场景
AI的核心价值在于提升业务效率和解决重复劳动,而非复杂的算法创新。智能查询:通过自然语言对话完成报价查询,无需记忆复杂规则;自动对比:AI自动遍历所有渠道,找出最优方案;时效校验:自动过滤过期报价,确保数据准确性。报告生成:一键生成标准化Excel报告,节省人工整理时间。整体人效大幅度提升。
2.3.4 可控的前期投入和运维可持续性
客户前期预算有限,无法承担大规模前期投资。Serverless AI方案无需购买服务器、存储等硬件设备,无需专职运维人员,根据实际使用量计费,业务低峰期成本接近零。最终快速ROI,1-2周即可上线,快速产生业务价值。同时对于客户长期运维来说,AWS托管服务自动进行安全补丁和功能更新,无需自建容灾,持续获得AWS最新AI能力,无需重构系统。
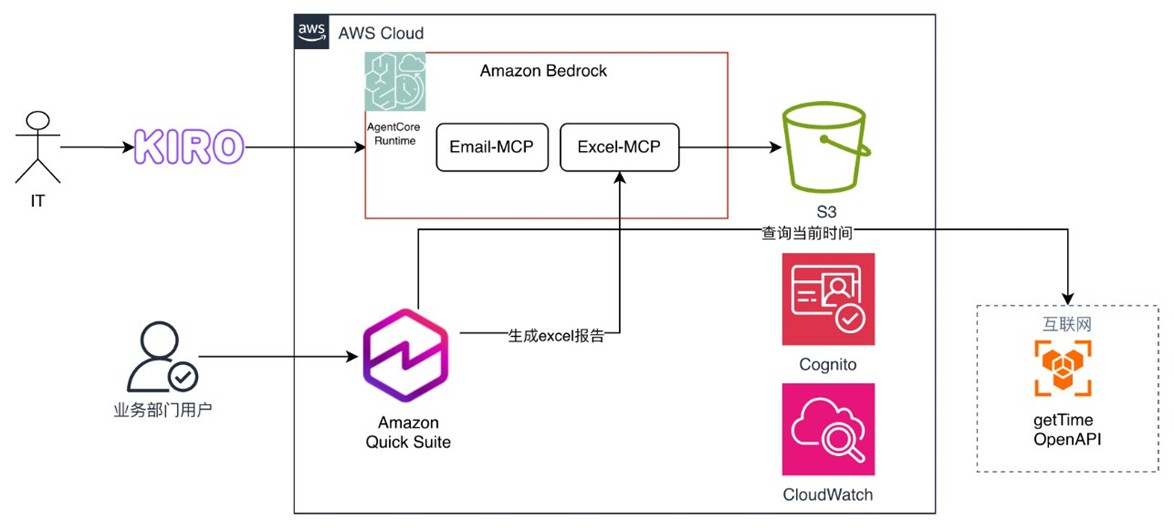
3、系统架构详细设计
系统整体架构如下图所示:
整体包括以下三个部分。第一部分是:使用kiro完成我们所需要的mcp的开发和生产级部署;第二部分是:利用Amazon Quick Suite的flows功能完成海外报价助手设计和开发;第三部分是:用户根据设计完成的flows通过chat方式完成最新物品报价报告生成。
3.1 基于kiro的mcp了开发和部署
传统开发方式需要手写大量代码,包括S3连接、excel数据解析、业务逻辑、错误处理等,通常需要几天时间。使用Amazon Kiro的AI驱动开发:1、通过自然语言描述需求;2、Kiro自动生成生产级代码(包含错误处理、日志、性能优化);3、Kiro自动生成完整的单元测试;4、一键部署到生产环境。最终整体上线时间缩短到几个小时。
MCP是一种标准化协议,用于连接AI模型与外部工具和数据源。在我们的场景中,MCP工具负责:1、根据模版生成结构化的Excel报告;2、将Excel报告写入到S3并返回给用户。
3.1.1 基于kiro spec开发
初始化提示词,选择spec开发模式。
##prompt
那我现在需要将uvx excel-mcp-server streamable-http(https://pypi.org/project/excel-mcp-server/)
通过agentcore configure 和 agentcore launch 两条命令,
即可通过 CodeBuild 在 AWS 托管环境构建容器镜像,
配置基于 Amazon Cognito 的身份认证机制,
将构建完成的 MCP 服务器镜像部署到 Amazon Bedrock AgentCore Runtime,
并创建一个访问端点。已认证的客户端可通过托管的端点,使用 Streamable HTTP 传输方式访问 MCP 服务器。
我们提供基于 Jupyter Notebook 的快速使用指导,帮助您快速上手 Amazon Bedrock AgentCore Runtime。
通过kiro完成requirements.md生成,如下所示:
# Requirements Document
## Introduction
本文档定义了将 Excel MCP 服务器通过 Amazon Bedrock AgentCore Runtime 部署为托管服务的需求。该系统允许用户使用两条简单的命令(agentcore configure 和 agentcore launch)完成从容器镜像构建、身份认证配置到服务部署的全流程,并通过 Streamable HTTP 传输方式提供 MCP 服务访问能力。
## Glossary
- **MCP Server**: Model Context Protocol 服务器,提供标准化的上下文协议服务
- **Excel MCP Server**: 基于 Excel 操作的 MCP 服务器实现
- **AgentCore CLI**: Amazon Bedrock AgentCore 的命令行工具
- **CodeBuild**: AWS 的持续集成服务,用于构建容器镜像
- **Amazon Cognito**: AWS 的身份认证和用户管理服务
- **Bedrock AgentCore Runtime**: Amazon Bedrock 的代理核心运行时环境
- **Streamable HTTP**: 支持流式传输的 HTTP 通信协议
- **Container Image**: 容器镜像,包含应用程序及其依赖的打包格式
- **Access Endpoint**: 访问端点,客户端用于连接服务的 URL
- **Authenticated Client**: 已通过身份验证的客户端应用
## Requirements
### Requirement 1
**User Story:** 作为开发者,我希望能够通过简单的配置命令设置部署参数,以便快速准备 MCP 服务器的部署环境。
#### Acceptance Criteria
1. WHEN 用户执行 agentcore configure 命令 THEN the AgentCore CLI SHALL 收集并验证所有必需的部署配置参数
2. WHEN 配置参数包含 MCP 服务器源信息 THEN the AgentCore CLI SHALL 验证源路径的有效性并记录配置
3. WHEN 配置参数包含 AWS 区域信息 THEN the AgentCore CLI SHALL 验证区域的可用性并保存配置
4. WHEN 配置完成 THEN the AgentCore CLI SHALL 将配置持久化到本地配置文件
5. WHEN 配置参数缺失或无效 THEN the AgentCore CLI SHALL 提供清晰的错误信息并拒绝保存配置
### Requirement 2
**User Story:** 作为开发者,我希望系统能够自动构建容器镜像,以便将 MCP 服务器打包为可部署的格式。
#### Acceptance Criteria
1. WHEN 用户执行 agentcore launch 命令 THEN the AgentCore CLI SHALL 触发 CodeBuild 项目开始构建流程
2. WHEN CodeBuild 构建容器镜像 THEN the CodeBuild Service SHALL 使用配置的 MCP 服务器源代码创建容器镜像
3. WHEN 容器镜像构建成功 THEN the CodeBuild Service SHALL 将镜像推送到 Amazon ECR 容器注册表
4. WHEN 容器镜像构建失败 THEN the AgentCore CLI SHALL 显示构建日志并返回错误状态
5. WHILE 构建过程进行中 THEN the AgentCore CLI SHALL 显示实时构建进度信息
### Requirement 3
**User Story:** 作为系统管理员,我希望系统能够自动配置身份认证机制,以便保护 MCP 服务器的访问安全。
#### Acceptance Criteria
1. WHEN 部署流程启动 THEN the AgentCore CLI SHALL 创建或配置 Amazon Cognito 用户池
2. WHEN Cognito 用户池创建完成 THEN the AgentCore CLI SHALL 配置应用客户端和身份验证流程
3. WHEN 身份认证配置完成 THEN the AgentCore CLI SHALL 将认证信息关联到 MCP 服务器部署
4. WHEN 客户端请求访问 THEN the Bedrock AgentCore Runtime SHALL 验证客户端的 Cognito 身份令牌
5. IF 客户端未提供有效令牌 THEN the Bedrock AgentCore Runtime SHALL 拒绝访问并返回 401 未授权错误
### Requirement 4
**User Story:** 作为开发者,我希望系统能够自动将 MCP 服务器部署到托管环境,以便无需管理底层基础设施。
#### Acceptance Criteria
1. WHEN 容器镜像构建完成且认证配置就绪 THEN the AgentCore CLI SHALL 将 MCP 服务器部署到 Bedrock AgentCore Runtime
2. WHEN 部署到运行时环境 THEN the Bedrock AgentCore Runtime SHALL 启动容器实例并验证服务健康状态
3. WHEN 服务健康检查通过 THEN the Bedrock AgentCore Runtime SHALL 创建可访问的服务端点
4. WHEN 部署完成 THEN the AgentCore CLI SHALL 返回访问端点 URL 和认证信息
5. WHEN 部署失败 THEN the AgentCore CLI SHALL 显示详细错误信息并回滚部署
### Requirement 5
**User Story:** 作为客户端开发者,我希望能够通过 Streamable HTTP 协议访问 MCP 服务器,以便实现高效的流式数据传输。
#### Acceptance Criteria
1. WHEN 已认证客户端向端点发送请求 THEN the Bedrock AgentCore Runtime SHALL 通过 Streamable HTTP 协议转发请求到 MCP 服务器
2. WHEN MCP 服务器返回响应 THEN the Bedrock AgentCore Runtime SHALL 通过 Streamable HTTP 协议流式传输响应到客户端
3. WHEN 客户端建立连接 THEN the Bedrock AgentCore Runtime SHALL 保持连接以支持双向流式通信
4. WHEN 传输过程中发生错误 THEN the Bedrock AgentCore Runtime SHALL 向客户端返回明确的错误信息
5. WHILE 流式传输进行中 THEN the Bedrock AgentCore Runtime SHALL 维护连接状态并处理背压
### Requirement 6
**User Story:** 作为新用户,我希望获得基于 Jupyter Notebook 的快速入门指导,以便快速学会如何使用部署的 MCP 服务器。
#### Acceptance Criteria
1. WHEN 用户访问快速入门文档 THEN the System SHALL 提供包含完整示例的 Jupyter Notebook 文件
2. WHEN Notebook 执行身份认证步骤 THEN the Notebook SHALL 演示如何获取和使用 Cognito 身份令牌
3. WHEN Notebook 执行连接步骤 THEN the Notebook SHALL 演示如何连接到托管的 MCP 服务器端点
4. WHEN Notebook 执行操作示例 THEN the Notebook SHALL 演示如何通过 Streamable HTTP 发送请求和接收响应
5. WHEN Notebook 包含代码示例 THEN the Notebook SHALL 提供可直接运行的 Python 代码片段
### Requirement 7
**User Story:** 作为开发者,我希望命令行工具提供清晰的反馈和日志,以便了解部署过程的每个阶段状态。
#### Acceptance Criteria
1. WHEN 任何命令执行 THEN the AgentCore CLI SHALL 显示当前操作的进度指示器
2. WHEN 关键步骤完成 THEN the AgentCore CLI SHALL 输出成功消息和相关资源信息
3. WHEN 错误发生 THEN the AgentCore CLI SHALL 输出包含错误原因和建议解决方案的消息
4. WHERE 用户启用详细日志模式 THEN the AgentCore CLI SHALL 输出详细的调试信息
5. WHEN 部署完成 THEN the AgentCore CLI SHALL 输出摘要信息包括端点 URL 和后续步骤指引
### Requirement 8
**User Story:** 作为开发者,我希望系统能够处理 uvx 命令格式的 MCP 服务器定义,以便支持标准的 MCP 服务器启动方式。
#### Acceptance Criteria
1. WHEN 配置接收 uvx 命令格式 THEN the AgentCore CLI SHALL 解析命令参数提取服务器包名和版本
2. WHEN 构建容器镜像 THEN the CodeBuild Service SHALL 在容器中安装 uvx 和指定的 MCP 服务器包
3. WHEN 容器启动 THEN the Bedrock AgentCore Runtime SHALL 使用 uvx 命令启动 MCP 服务器进程
4. WHEN MCP 服务器包含环境变量配置 THEN the AgentCore CLI SHALL 将环境变量传递到容器运行时
5. WHEN 服务器包版本更新 THEN the System SHALL 支持重新部署以使用新版本
基于上面的需求,我们完成了design.md设计。
# Design Document
## Overview
本设计文档描述了一个完整的 MCP 服务器部署系统,该系统通过Amazon Bedrock AgentCore Runtime 将 Excel MCP 服务器部署为托管服务。系统由三个主要组件构成:
1. **AgentCore CLI** - 命令行工具,提供 configure 和 launch 命令
2. **构建和部署管道** - 使用 AWS CodeBuild 和 ECR 构建容器镜像
3. **运行时环境** - Bedrock AgentCore Runtime 托管 MCP 服务器并提供 Streamable HTTP 访问
系统设计遵循基础设施即代码(IaC)原则,自动化所有部署步骤,并集成 Amazon Cognito 提供企业级身份认证。
## Architecture
### 系统架构图
```mermaid
graph TB
    User[开发者] -->|agentcore configure| CLI[AgentCore CLI]
    User -->|agentcore launch| CLI

    CLI -->|创建/更新| Config[配置文件]
    CLI -->|触发构建| CodeBuild[AWS CodeBuild]
    CLI -->|创建/配置| Cognito[Amazon Cognito]
    CLI -->|部署服务| Runtime[Bedrock AgentCore Runtime]

    CodeBuild -->|构建镜像| Docker[容器镜像]
    Docker -->|推送| ECR[Amazon ECR]

    Runtime -->|拉取镜像| ECR
    Runtime -->|验证令牌| Cognito
    Runtime -->|运行| MCP[MCP Server Container]

    Client[客户端应用] -->|Streamable HTTP + Token| Endpoint[访问端点]
    Endpoint -->|验证| Cognito
    Endpoint -->|转发请求| MCP
    MCP -->|流式响应| Endpoint
    Endpoint -->|流式响应| Client

    Notebook[Jupyter Notebook] -.->|示例代码| Client
```
### 部署流程
```mermaid
sequenceDiagram
    participant User as 开发者
    participant CLI as AgentCore CLI
    participant CB as CodeBuild
    participant ECR as Amazon ECR
    participant Cog as Cognito
    participant RT as AgentCore Runtime

    User->>CLI: agentcore configure
    CLI->>CLI: 验证参数
    CLI->>User: 保存配置成功

    User->>CLI: agentcore launch
    CLI->>CB: 触发构建项目
    CB->>CB: 构建容器镜像
    CB->>ECR: 推送镜像
    CB->>CLI: 构建完成

    CLI->>Cog: 创建/配置用户池
    Cog->>CLI: 返回认证配置

    CLI->>RT: 部署 MCP 服务器
    RT->>ECR: 拉取镜像
    RT->>RT: 启动容器
    RT->>RT: 健康检查
    RT->>CLI: 返回端点 URL

    CLI->>User: 部署成功 + 端点信息
```
## Components and Interfaces
### 1. AgentCore CLI
命令行工具是用户与系统交互的主要接口。
#### 命令接口
**configure 命令**
```bash
agentcore configure \
  --server "uvx excel-mcp-server" \
  --transport "streamable-http" \
  --region "us-east-1" \
  --project-name "my-excel-mcp"
```
参数说明:
- `--server`: MCP 服务器启动命令(支持 uvx 格式)
- `--transport`: 传输协议(streamable-http)
- `--region`: AWS 区域
- `--project-name`: 项目名称(用于资源命名)
**launch 命令**
```bash
agentcore launch \
  --config-file "./agentcore-config.json" \
  --verbose
```
参数说明:
- `--config-file`: 配置文件路径(可选,默认使用上次 configure 的配置)
- `--verbose`: 启用详细日志输出
#### 配置文件格式
```json
{
  "version": "1.0",
  "project": {
    "name": "my-excel-mcp",
    "region": "us-east-1"
  },
  "server": {
    "command": "uvx",
    "args": ["excel-mcp-server"],
    "transport": "streamable-http",
    "environment": {}
  },
  "build": {
    "codebuildProject": "agentcore-mcp-builder",
    "ecrRepository": "agentcore/excel-mcp-server"
  },
  "auth": {
    "cognitoUserPoolId": "",
    "cognitoClientId": ""
  }
}
```
#### CLI 核心模块
```typescript
interface AgentCoreCLI {
  // 配置管理
  configure(options: ConfigureOptions): Promise<ConfigResult>
  validateConfig(config: Config): ValidationResult
  saveConfig(config: Config, path: string): Promise<void>

  // 部署流程
  launch(options: LaunchOptions): Promise<DeploymentResult>

  // 内部方法
  triggerBuild(config: Config): Promise<BuildResult>
  setupAuth(config: Config): Promise<AuthConfig>
  deployToRuntime(config: Config, imageUri: string, authConfig: AuthConfig): Promise<Endpoint>

  // 日志和反馈
  logger: Logger
  progressReporter: ProgressReporter
}
```
### 2. 构建管道组件
#### CodeBuild 项目配置
CodeBuild 项目使用以下 buildspec.yml:
```yaml
version: 0.2
phases:
  pre_build:
    commands:
      - echo Logging in to Amazon ECR...
      - aws ecr get-login-password --region $AWS_REGION | docker login --username AWS --password-stdin $ECR_REGISTRY

  build:
    commands:
      - echo Building MCP Server container...
      - docker build -t $IMAGE_NAME:$IMAGE_TAG .
      - docker tag $IMAGE_NAME:$IMAGE_TAG $ECR_REGISTRY/$IMAGE_NAME:$IMAGE_TAG

  post_build:
    commands:
      - echo Pushing image to ECR...
      - docker push $ECR_REGISTRY/$IMAGE_NAME:$IMAGE_TAG
      - echo Build completed on `date`
artifacts:
  files:
    - imageDetail.json
```
#### Dockerfile 模板
```dockerfile
FROM python:3.11-slim
# 安装 uv 和 uvx
RUN pip install uv
# 设置工作目录
WORKDIR /app
# 安装 MCP 服务器
ARG MCP_SERVER_PACKAGE
RUN uvx install ${MCP_SERVER_PACKAGE}
# 暴露端口
EXPOSE 8080
# 启动命令
CMD ["uvx", "excel-mcp-server", "--transport", "streamable-http", "--port", "8080"]
```
### 3. 身份认证组件
#### Cognito 配置
```typescript
interface CognitoConfig {
  userPool: {
    poolName: string
    policies: PasswordPolicy
    mfaConfiguration: 'OFF' | 'OPTIONAL' | 'ON'
  }

  appClient: {
    clientName: string
    generateSecret: boolean
    authFlows: string[]
    tokenValidity: {
      accessToken: number  // 小时
      idToken: number
      refreshToken: number  // 天
    }
  }
}
```
#### 认证流程
客户端获取令牌的流程:
```python
import boto3
# 初始化 Cognito 客户端
cognito = boto3.client('cognito-idp', region_name='us-east-1')
# 用户认证
response = cognito.initiate_auth(
    ClientId='your-client-id',
    AuthFlow='USER_PASSWORD_AUTH',
    AuthParameters={
        'USERNAME': 'user@example.com',
        'PASSWORD': 'password'
    }
)
# 获取访问令牌
access_token = response['AuthenticationResult']['AccessToken']
```
### 4. Bedrock AgentCore Runtime
#### 运行时接口
```typescript
interface AgentCoreRuntime {
  // 部署管理
  deployServer(config: DeploymentConfig): Promise<Deployment>
  updateServer(deploymentId: string, config: DeploymentConfig): Promise<Deployment>
  deleteServer(deploymentId: string): Promise<void>

  // 健康检查
  healthCheck(deploymentId: string): Promise<HealthStatus>

  // 端点管理
  createEndpoint(deploymentId: string): Promise<Endpoint>
  getEndpoint(deploymentId: string): Promise<Endpoint>
}
interface Deployment {
  id: string
  status: 'CREATING' | 'ACTIVE' | 'FAILED' | 'UPDATING'
  imageUri: string
  authConfig: AuthConfig
  endpoint?: Endpoint
  createdAt: Date
  updatedAt: Date
}
interface Endpoint {
  url: string
  protocol: 'streamable-http'
  authRequired: boolean
}
```
#### Streamable HTTP 处理
运行时实现 Streamable HTTP 协议的请求转发:
```typescript
class StreamableHttpHandler {
  async handleRequest(
    request: IncomingRequest,
    mcpServerUrl: string
  ): Promise<StreamableResponse> {
    // 验证认证令牌
    const token = this.extractToken(request)
    await this.validateToken(token)

    // 建立到 MCP 服务器的连接
    const mcpConnection = await this.connectToMCPServer(mcpServerUrl)

    // 转发请求并流式传输响应
    return this.streamResponse(request, mcpConnection)
  }

  private async streamResponse(
    request: IncomingRequest,
    connection: MCPConnection
  ): Promise<StreamableResponse> {
    const stream = new TransformStream()

    // 异步处理流式数据
    this.pipeData(request, connection, stream)

    return {
      status: 200,
      headers: {
        'Content-Type': 'application/json',
        'Transfer-Encoding': 'chunked'
      },
      body: stream.readable
    }
  }
}
```
### 5. 客户端 SDK
#### Python 客户端示例
```python
class MCPClient:
    def __init__(self, endpoint_url: str, access_token: str):
        self.endpoint_url = endpoint_url
        self.access_token = access_token
        self.session = requests.Session()
        self.session.headers.update({
            'Authorization': f'Bearer {access_token}',
            'Content-Type': 'application/json'
        })

    def send_request(self, method: str, params: dict) -> Iterator[dict]:
        """发送请求并流式接收响应"""
        payload = {
            'jsonrpc': '2.0',
            'method': method,
            'params': params,
            'id': str(uuid.uuid4())
        }

        response = self.session.post(
            self.endpoint_url,
            json=payload,
            stream=True
        )

        response.raise_for_status()

        # 流式解析响应
        for line in response.iter_lines():
            if line:
                yield json.loads(line)
```
## Data Models
### 配置数据模型
```typescript
interface Config {
  version: string
  project: ProjectConfig
  server: ServerConfig
  build: BuildConfig
  auth: AuthConfig
}
interface ProjectConfig {
  name: string
  region: string
  tags?: Record<string, string>
}
interface ServerConfig {
  command: string  // 'uvx'
  args: string[]   // ['excel-mcp-server']
  transport: 'streamable-http'
  environment: Record<string, string>
  port?: number
}
interface BuildConfig {
  codebuildProject: string
  ecrRepository: string
  imageTag?: string
  buildTimeout?: number  // 分钟
}
interface AuthConfig {
  cognitoUserPoolId?: string
  cognitoClientId?: string
  cognitoRegion?: string
}
```
### 部署状态模型
```typescript
interface DeploymentState {
  phase: DeploymentPhase
  status: DeploymentStatus
  progress: number  // 0-100
  message: string
  startTime: Date
  endTime?: Date
  error?: DeploymentError
}
enum DeploymentPhase {
  CONFIGURING = 'configuring',
  BUILDING = 'building',
  AUTHENTICATING = 'authenticating',
  DEPLOYING = 'deploying',
  VERIFYING = 'verifying',
  COMPLETED = 'completed'
}
enum DeploymentStatus {
  IN_PROGRESS = 'in_progress',
  SUCCESS = 'success',
  FAILED = 'failed',
  ROLLED_BACK = 'rolled_back'
}
interface DeploymentError {
  code: string
  message: string
  phase: DeploymentPhase
  suggestion?: string
}
```
### MCP 协议数据模型
```typescript
interface MCPRequest {
  jsonrpc: '2.0'
  method: string
  params?: any
  id: string | number
}
interface MCPResponse {
  jsonrpc: '2.0'
  result?: any
  error?: MCPError
  id: string | number
}
interface MCPError {
  code: number
  message: string
  data?: any
}
interface StreamChunk {
  type: 'data' | 'error' | 'end'
  payload: any
  timestamp: Date
}
```
## Corr
ectness Properties
*A property is a characteristic or behavior that should hold true across all valid executions of a system-essentially, a formal statement about what the system should do. Properties serve as the bridge between human-readable specifications and machine-verifiable correctness guarantees.*
基于需求分析,我们识别出以下核心正确性属性。这些属性将通过属性测试来验证系统行为的正确性。
### 配置管理属性
**Property 1: 配置参数验证完整性**
*For any* 配置参数集合,当执行 configure 命令时,CLI 应该验证所有必需参数的存在性和有效性,并且只有当所有参数都有效时才保存配置
**Validates: Requirements 1.1, 1.5**
**Property 2: 配置持久化往返一致性**
*For any* 有效的配置对象,保存到文件后再读取应该得到等价的配置对象
**Validates: Requirements 1.4**
**Property 3: 源路径验证正确性**
*For any* MCP 服务器源路径,CLI 应该正确识别有效路径(存在且可访问)和无效路径(不存在或不可访问)
**Validates: Requirements 1.2**
**Property 4: AWS 区域验证正确性**
*For any* AWS 区域字符串,CLI 应该正确识别有效区域(在 AWS 支持的区域列表中)和无效区域
**Validates: Requirements 1.3**
### 构建和部署属性
**Property 5: Launch 命令触发构建**
*For any* 有效配置,执行 launch 命令应该触发 CodeBuild 项目,并且可以通过 CodeBuild API 查询到构建任务
**Validates: Requirements 2.1**
**Property 6: 构建镜像包含正确内容**
*For any* 成功构建的容器镜像,镜像应该包含配置中指定的 MCP 服务器包和 uvx 工具
**Validates: Requirements 2.2, 8.2**
**Property 7: 成功构建推送到 ECR**
*For any* 成功的构建,构建的镜像应该出现在配置的 ECR 仓库中,并且可以通过 ECR API 查询到
**Validates: Requirements 2.3**
**Property 8: 构建进度信息输出**
*For any* 构建过程,CLI 的输出应该包含进度相关的信息(如百分比、阶段名称等)
**Validates: Requirements 2.5**
### 身份认证属性
**Property 9: 部署创建 Cognito 资源**
*For any* 部署流程,应该创建或配置 Cognito 用户池和应用客户端,并且可以通过 Cognito API 查询到这些资源
**Validates: Requirements 3.1, 3.2**
**Property 10: 认证信息关联到部署**
*For any* 完成的部署,部署配置应该包含 Cognito 用户池 ID 和客户端 ID
**Validates: Requirements 3.3**
**Property 11: 令牌验证拒绝无效请求**
*For any* 不包含有效 Cognito 令牌的请求,运行时应该拒绝访问并返回 401 状态码
**Validates: Requirements 3.5**
**Property 12: 令牌验证接受有效请求**
*For any* 包含有效 Cognito 令牌的请求,运行时应该验证通过并转发请求到 MCP 服务器
**Validates: Requirements 3.4**
### 部署和端点属性
**Property 13: 前置条件满足触发部署**
*For any* 配置,当容器镜像构建完成且认证配置就绪时,CLI 应该触发部署到 AgentCore Runtime
**Validates: Requirements 4.1**
**Property 14: 部署执行健康检查**
*For any* 部署,运行时应该执行健康检查,并且只有健康检查通过后才创建端点
**Validates: Requirements 4.2, 4.3**
**Property 15: 成功部署返回端点信息**
*For any* 成功的部署,CLI 应该返回包含端点 URL 和认证信息的结果
**Validates: Requirements 4.4**
### Streamable HTTP 传输属性
**Property 16: 认证请求正确转发**
*For any* 带有有效令牌的客户端请求,运行时应该通过 Streamable HTTP 协议转发请求到 MCP 服务器
**Validates: Requirements 5.1**
**Property 17: 响应流式传输**
*For any* MCP 服务器响应,运行时应该以流式方式(chunked transfer)传输响应到客户端
**Validates: Requirements 5.2**
**Property 18: 连接保持支持双向通信**
*For any* 建立的客户端连接,运行时应该保持连接活跃,支持多个请求/响应往返
**Validates: Requirements 5.3**
**Property 19: 传输错误返回明确信息**
*For any* 传输过程中的错误,运行时应该返回包含错误代码和描述的响应
**Validates: Requirements 5.4**
### 日志和反馈属性
**Property 20: 命令执行显示进度**
*For any* CLI 命令执行,输出应该包含进度指示器(如进度条、百分比或阶段信息)
**Validates: Requirements 7.1**
**Property 21: 成功步骤输出资源信息**
*For any* 成功完成的关键步骤,CLI 输出应该包含相关资源的标识信息(如 ID、ARN 或 URL)
**Validates: Requirements 7.2**
**Property 22: 错误输出包含原因和建议**
*For any* 错误情况,CLI 输出应该包含错误原因和至少一条解决建议
**Validates: Requirements 7.3**
**Property 23: 详细模式输出调试信息**
*For any* 启用详细日志模式的命令执行,输出应该包含比正常模式更多的调试信息
**Validates: Requirements 7.4**
**Property 24: 部署完成输出摘要**
*For any* 完成的部署,CLI 输出应该包含端点 URL 和后续步骤指引
**Validates: Requirements 7.5**
### uvx 命令处理属性
**Property 25: uvx 命令解析正确性**
*For any* uvx 格式的命令字符串,CLI 应该正确提取包名、版本和参数
**Validates: Requirements 8.1**
**Property 26: 容器包含 uvx 和 MCP 包**
*For any* 构建的容器镜像,镜像应该包含 uvx 工具和配置中指定的 MCP 服务器包
**Validates: Requirements 8.2**
**Property 27: 容器使用 uvx 启动服务器**
*For any* 启动的容器,容器进程应该使用 uvx 命令启动 MCP 服务器
**Validates: Requirements 8.3**
**Property 28: 环境变量正确传递**
*For any* 配置中的环境变量,这些变量应该在容器运行时环境中可用
**Validates: Requirements 8.4**
**Property 29: 版本更新支持重新部署**
*For any* MCP 服务器包的版本更新,系统应该支持使用新版本重新部署,并且新部署使用更新后的版本
**Validates: Requirements 8.5**
## Error Handling
### 错误分类
系统定义以下错误类别:
1. **配置错误** (CONFIG_ERROR)
   - 缺失必需参数
   - 参数格式无效
   - 路径不存在
   - 区域不支持
2. **构建错误** (BUILD_ERROR)
   - CodeBuild 项目不存在
   - 构建超时
   - 镜像推送失败
   - Dockerfile 语法错误
3. **认证错误** (AUTH_ERROR)
   - Cognito 用户池创建失败
   - 令牌无效或过期
   - 权限不足
4. **部署错误** (DEPLOYMENT_ERROR)
   - 运行时环境不可用
   - 健康检查失败
   - 端点创建失败
   - 资源配额超限
5. **运行时错误** (RUNTIME_ERROR)
   - MCP 服务器崩溃
   - 连接超时
   - 流式传输中断
   - 背压处理失败
### 错误处理策略
```typescript
interface ErrorHandler {
  // 错误分类
  classifyError(error: Error): ErrorCategory

  // 错误恢复
  attemptRecovery(error: CategorizedError): Promise<RecoveryResult>

  // 回滚机制
  rollback(deploymentState: DeploymentState): Promise<void>

  // 用户通知
  formatErrorMessage(error: CategorizedError): UserMessage
}
interface RecoveryStrategy {
  // 配置错误:提示用户修正
  CONFIG_ERROR: () => PromptUserCorrection

  // 构建错误:重试或清理缓存
  BUILD_ERROR: () => RetryWithCleanCache

  // 认证错误:刷新令牌或重新认证
  AUTH_ERROR: () => RefreshOrReauthenticate

  // 部署错误:回滚到上一个稳定版本
  DEPLOYMENT_ERROR: () => RollbackToPrevious

  // 运行时错误:重启服务或降级
  RUNTIME_ERROR: () => RestartOrDegrade
}
```
### 回滚机制
部署失败时的回滚流程:
```mermaid
graph TD
    A[检测到部署失败] --> B{是否有上一个版本?}
    B -->|是| C[停止当前部署]
    B -->|否| D[清理资源]
    C --> E[恢复上一个镜像]
    E --> F[重新部署上一个版本]
    F --> G[验证健康状态]
    G -->|成功| H[回滚完成]
    G -->|失败| D
    D --> I[通知用户手动介入]
```
### 错误消息格式
```typescript
interface UserMessage {
  level: 'error' | 'warning' | 'info'
  code: string
  message: string
  details?: string
  suggestions: string[]
  documentation?: string
}
// 示例
const configErrorMessage: UserMessage = {
  level: 'error',
  code: 'CONFIG_001',
  message: '配置参数验证失败',
  details: 'AWS 区域 "us-invalid-1" 不是有效的区域代码',
  suggestions: [
    '请使用有效的 AWS 区域代码,如 us-east-1, us-west-2',
    '运行 "aws ec2 describe-regions" 查看可用区域列表'
  ],
  documentation: 'https://docs.aws.amazon.com/general/latest/gr/rande.html'
}
```
## Testing Strategy
本项目采用双重测试策略,结合单元测试和基于属性的测试(Property-Based Testing, PBT)来确保系统的正确性和健壮性。
### 测试框架选择
- **单元测试框架**: Jest (TypeScript/JavaScript)
- **属性测试框架**: fast-check (TypeScript/JavaScript)
- **集成测试**: AWS SDK Mocks + Testcontainers
### 单元测试策略
单元测试专注于验证特定的示例、边界情况和集成点:
1. **配置解析测试**
   - 测试标准配置格式的解析
   - 测试边界情况(空配置、最小配置、最大配置)
   - 测试错误配置的拒绝
2. **命令行接口测试**
   - 测试命令参数解析
   - 测试帮助信息显示
   - 测试错误消息格式
3. **AWS 服务集成测试**
   - 使用 AWS SDK Mocks 模拟服务调用
   - 测试 API 调用的正确参数
   - 测试错误响应的处理
4. **Streamable HTTP 处理测试**
   - 测试流式数据的正确传输
   - 测试连接中断的处理
   - 测试背压机制
### 属性测试策略
属性测试验证系统在各种输入下的通用行为:
**配置要求**:
- 每个属性测试至少运行 100 次迭代
- 使用 fast-check 库生成随机测试数据
- 每个测试必须标注对应的设计文档属性编号
**测试标注格式**:
```typescript
// **Feature: excel-mcp-agentcore-deployment, Property 2: 配置持久化往返一致性**
test('config round-trip consistency', () => {
  fc.assert(
    fc.property(configArbitrary, (config) => {
      const saved = saveConfig(config)
      const loaded = loadConfig(saved)
      expect(loaded).toEqual(config)
    }),
    { numRuns: 100 }
  )
})
```
**属性测试覆盖**:
1. **Property 1-4: 配置管理**
   - 生成随机配置对象
   - 验证验证逻辑的正确性
   - 测试往返一致性
2. **Property 5-8: 构建流程**
   - 生成随机构建配置
   - 验证构建触发和状态跟踪
   - 测试镜像内容验证
3. **Property 9-12: 身份认证**
   - 生成随机令牌(有效和无效)
   - 验证认证逻辑
   - 测试访问控制
4. **Property 13-15: 部署流程**
   - 生成随机部署配置
   - 验证部署条件和状态转换
   - 测试端点创建
5. **Property 16-19: Streamable HTTP**
   - 生成随机请求和响应
   - 验证流式传输行为
   - 测试错误处理
6. **Property 20-24: 日志反馈**
   - 验证输出格式
   - 测试日志级别
   - 验证信息完整性
7. **Property 25-29: uvx 命令处理**
   - 生成随机 uvx 命令字符串
   - 验证解析正确性
   - 测试环境变量传递
### 测试数据生成器
使用 fast-check 定义自定义生成器:
```typescript
// 配置生成器
const configArbitrary = fc.record({
  version: fc.constant('1.0'),
  project: fc.record({
    name: fc.stringOf(fc.char(), { minLength: 1, maxLength: 50 }),
    region: fc.oneof(
      fc.constant('us-east-1'),
      fc.constant('us-west-2'),
      fc.constant('eu-west-1'),
      fc.string() // 包含无效区域
    )
  }),
  server: fc.record({
    command: fc.constant('uvx'),
    args: fc.array(fc.string(), { minLength: 1, maxLength: 5 }),
    transport: fc.constant('streamable-http'),
    environment: fc.dictionary(fc.string(), fc.string())
  })
})
// uvx 命令生成器
const uvxCommandArbitrary = fc.tuple(
  fc.constant('uvx'),
  fc.stringOf(fc.char(), { minLength: 1 }), // 包名
  fc.option(fc.stringOf(fc.char()), { nil: undefined }) // 可选版本
).map(([cmd, pkg, version]) =>
  version ? `${cmd} ${pkg}@${version}` : `${cmd} ${pkg}`
)
// Cognito 令牌生成器
const tokenArbitrary = fc.oneof(
  fc.string().map(s => `Bearer ${s}`), // 随机令牌
  fc.constant(''), // 空令牌
  fc.constant('InvalidFormat'), // 无效格式
  validTokenArbitrary // 有效令牌
)
```
### 集成测试
使用 Testcontainers 进行端到端测试:
```typescript
describe('End-to-End Deployment', () => {
  let localstackContainer: StartedTestContainer

  beforeAll(async () => {
    // 启动 LocalStack 容器模拟 AWS 服务
    localstackContainer = await new GenericContainer('localstack/localstack')
      .withExposedPorts(4566)
      .start()
  })

  test('complete deployment workflow', async () => {
    // 1. 配置
    const config = await cli.configure({
      server: 'uvx excel-mcp-server',
      region: 'us-east-1'
    })

    // 2. 启动部署
    const deployment = await cli.launch(config)

    // 3. 验证端点
    expect(deployment.endpoint).toBeDefined()

    // 4. 测试访问
    const client = new MCPClient(deployment.endpoint, deployment.token)
    const response = await client.sendRequest('test', {})
    expect(response).toBeDefined()
  })
})
```
### 测试覆盖率目标
- 代码覆盖率: ≥ 80%
- 属性测试覆盖: 所有 29 个属性
- 集成测试: 覆盖主要用户流程
- 错误场景测试: 覆盖所有错误类别
### 持续集成
测试在 CI/CD 管道中自动运行:
```yaml
# .github/workflows/test.yml
name: Test
on: [push, pull_request]
jobs:
  test:
    runs-on: ubuntu-latest
    steps:
      - uses: actions/checkout@v2
      - uses: actions/setup-node@v2
      - run: npm install
      - run: npm run test:unit
      - run: npm run test:property
      - run: npm run test:integration
      - run: npm run coverage
```
## Implementation Notes
### 技术栈
- **CLI 工具**: TypeScript + Commander.js
- **AWS SDK**: AWS SDK for JavaScript v3
- **容器化**: Docker + Docker Compose
- **测试**: Jest + fast-check + Testcontainers
- **文档**: Jupyter Notebook + Markdown
### 依赖项
```json
{
  "dependencies": {
    "@aws-sdk/client-codebuild": "^3.0.0",
    "@aws-sdk/client-ecr": "^3.0.0",
    "@aws-sdk/client-cognito-identity-provider": "^3.0.0",
    "@aws-sdk/client-bedrock-agent-runtime": "^3.0.0",
    "commander": "^11.0.0",
    "chalk": "^5.0.0",
    "ora": "^6.0.0"
  },
  "devDependencies": {
    "@types/jest": "^29.0.0",
    "jest": "^29.0.0",
    "fast-check": "^3.0.0",
    "testcontainers": "^10.0.0",
    "typescript": "^5.0.0"
  }
}
```
### 部署架构决策
1. **使用 CodeBuild 而非本地构建**
   - 理由: 提供一致的构建环境,避免本地环境差异
   - 权衡: 增加构建时间,但提高可靠性
2. **使用 Cognito 而非自定义认证**
   - 理由: 企业级安全性,支持多种认证流程
   - 权衡: 增加 AWS 服务依赖,但减少安全风险
3. **使用 Streamable HTTP 而非 WebSocket**
   - 理由: 更好的 HTTP 基础设施兼容性
   - 权衡: 可能不如 WebSocket 高效,但更易部署
4. **使用 uvx 而非直接 pip install**
   - 理由: 隔离依赖,避免版本冲突
   - 权衡: 增加启动时间,但提高稳定性
### 性能考虑
- **构建缓存**: 使用 Docker 层缓存加速构建
- **连接池**: 复用 AWS SDK 客户端连接
- **流式传输**: 使用 chunked transfer 减少内存占用
- **健康检查**: 使用轻量级探针减少开销
### 安全考虑
- **最小权限原则**: IAM 角色仅授予必需权限
- **令牌过期**: Cognito 令牌设置合理的过期时间
- **HTTPS 强制**: 所有端点强制使用 HTTPS
- **日志脱敏**: 避免在日志中记录敏感信息
最终形成了我们的任务执行文档如下:
# Implementation Plan
- [x] 1. 设置项目结构和核心接口
  - 创建 TypeScript 项目结构(src/, tests/, types/)
  - 配置 TypeScript、Jest 和 fast-check
  - 定义核心数据模型接口(Config, DeploymentState, Endpoint 等)
  - 设置 AWS SDK 客户端配置
  - _Requirements: 1.1, 1.2, 1.3, 1.4_
- [x] 2. 实现配置管理模块
  - [x] 2.1 实现配置验证逻辑
    - 编写参数验证函数(validateConfig)
    - 实现 AWS 区域验证
    - 实现源路径验证
    - 实现 uvx 命令解析
    - _Requirements: 1.1, 1.2, 1.3, 8.1_

  - [ ]* 2.2 编写配置验证属性测试
    - **Property 1: 配置参数验证完整性**
    - **Validates: Requirements 1.1, 1.5**

  - [ ]* 2.3 编写源路径验证属性测试
    - **Property 3: 源路径验证正确性**
    - **Validates: Requirements 1.2**

  - [ ]* 2.4 编写 AWS 区域验证属性测试
    - **Property 4: AWS 区域验证正确性**
    - **Validates: Requirements 1.3**

  - [ ]* 2.5 编写 uvx 命令解析属性测试
    - **Property 25: uvx 命令解析正确性**
    - **Validates: Requirements 8.1**

  - [x] 2.6 实现配置持久化
    - 编写 saveConfig 函数(保存到 JSON 文件)
    - 编写 loadConfig 函数(从 JSON 文件读取)
    - 实现配置文件路径管理
    - _Requirements: 1.4_

  - [ ]* 2.7 编写配置持久化属性测试
    - **Property 2: 配置持久化往返一致性**
    - **Validates: Requirements 1.4**
- [x] 3. 实现 CLI 命令接口
  - [x] 3.1 实现 configure 命令
    - 使用 Commander.js 定义命令参数
    - 实现参数收集和验证流程
    - 集成配置验证和保存逻辑
    - 实现错误处理和用户反馈
    - _Requirements: 1.1, 1.2, 1.3, 1.4, 1.5_

  - [x] 3.2 实现进度报告器
    - 使用 ora 实现进度指示器
    - 实现不同日志级别(info, error, success)
    - 实现详细模式支持
    - _Requirements: 7.1, 7.4_

  - [ ]* 3.3 编写进度输出属性测试
    - **Property 20: 命令执行显示进度**
    - **Validates: Requirements 7.1**

  - [ ]* 3.4 编写详细模式属性测试
    - **Property 23: 详细模式输出调试信息**
    - **Validates: Requirements 7.4**

  - [x] 3.5 实现错误消息格式化
    - 定义 UserMessage 接口实现
    - 实现错误分类逻辑
    - 实现建议生成逻辑
    - _Requirements: 7.3_

  - [ ]* 3.6 编写错误消息属性测试
    - **Property 22: 错误输出包含原因和建议**
    - **Validates: Requirements 7.3**
- [x] 4. 实现 CodeBuild 集成
  - [x] 4.1 实现构建触发逻辑
    - 使用 AWS SDK 创建/获取 CodeBuild 项目
    - 实现构建任务触发
    - 实现构建状态轮询
    - _Requirements: 2.1_

  - [ ]* 4.2 编写构建触发属性测试
    - **Property 5: Launch 命令触发构建**
    - **Validates: Requirements 2.1**

  - [x] 4.3 实现 Dockerfile 和 buildspec 生成
    - 根据配置生成 Dockerfile
    - 生成 buildspec.yml
    - 处理 uvx 和 MCP 服务器包安装
    - 处理环境变量注入
    - _Requirements: 2.2, 8.2, 8.4_

  - [ ]* 4.4 编写容器内容验证属性测试
    - **Property 6: 构建镜像包含正确内容**
    - **Validates: Requirements 2.2, 8.2**

  - [ ]* 4.5 编写环境变量传递属性测试
    - **Property 28: 环境变量正确传递**
    - **Validates: Requirements 8.4**

  - [x] 4.6 实现 ECR 集成
    - 创建/获取 ECR 仓库
    - 验证镜像推送成功
    - _Requirements: 2.3_

  - [ ]* 4.7 编写 ECR 推送属性测试
    - **Property 7: 成功构建推送到 ECR**
    - **Validates: Requirements 2.3**

  - [x] 4.8 实现构建进度监控
    - 实时获取构建日志
    - 显示构建阶段和进度
    - 处理构建失败情况
    - _Requirements: 2.4, 2.5_

  - [ ]* 4.9 编写构建进度属性测试
    - **Property 8: 构建进度信息输出**
    - **Validates: Requirements 2.5**
- [x] 5. 实现 Cognito 身份认证集成
  - [x] 5.1 实现 Cognito 资源创建
    - 创建或获取 Cognito 用户池
    - 配置应用客户端
    - 配置令牌有效期
    - _Requirements: 3.1, 3.2_

  - [ ]* 5.2 编写 Cognito 资源创建属性测试
    - **Property 9: 部署创建 Cognito 资源**
    - **Validates: Requirements 3.1, 3.2**

  - [x] 5.3 实现认证信息关联
    - 将 Cognito 配置保存到部署配置
    - 生成客户端认证示例代码
    - _Requirements: 3.3_

  - [ ]* 5.4 编写认证信息关联属性测试
    - **Property 10: 认证信息关联到部署**
    - **Validates: Requirements 3.3**
- [x] 6. 实现 Bedrock AgentCore Runtime 集成
  - [x] 6.1 实现部署触发逻辑
    - 检查前置条件(镜像和认证就绪)
    - 调用 AgentCore Runtime API 部署服务
    - _Requirements: 4.1_

  - [ ]* 6.2 编写部署触发属性测试
    - **Property 13: 前置条件满足触发部署**
    - **Validates: Requirements 4.1**

  - [x] 6.3 实现健康检查和端点创建
    - 执行服务健康检查
    - 创建访问端点
    - 验证端点可访问性
    - _Requirements: 4.2, 4.3_

  - [ ]* 6.4 编写健康检查属性测试
    - **Property 14: 部署执行健康检查**
    - **Validates: Requirements 4.2, 4.3**

  - [x] 6.5 实现部署结果返回
    - 返回端点 URL 和认证信息
    - 生成部署摘要
    - 提供后续步骤指引
    - _Requirements: 4.4, 7.5_

  - [ ]* 6.6 编写部署结果属性测试
    - **Property 15: 成功部署返回端点信息**
    - **Validates: Requirements 4.4**

  - [ ]* 6.7 编写部署摘要属性测试
    - **Property 24: 部署完成输出摘要**
    - **Validates: Requirements 7.5**

  - [x] 6.8 实现部署失败回滚
    - 检测部署失败
    - 执行资源清理
    - 恢复到上一个稳定版本(如果存在)
    - _Requirements: 4.5_
- [x] 7. 实现 Streamable HTTP 运行时处理器
  - [x] 7.1 实现令牌验证中间件
    - 提取 Authorization header
    - 验证 Cognito 令牌
    - 处理无效令牌(返回 401)
    - _Requirements: 3.4, 3.5_

  - [ ]* 7.2 编写令牌验证属性测试(拒绝)
    - **Property 11: 令牌验证拒绝无效请求**
    - **Validates: Requirements 3.5**

  - [ ]* 7.3 编写令牌验证属性测试(接受)
    - **Property 12: 令牌验证接受有效请求**
    - **Validates: Requirements 3.4**

  - [x] 7.4 实现请求转发逻辑
    - 建立到 MCP 服务器的连接
    - 转发客户端请求
    - _Requirements: 5.1_

  - [ ]* 7.5 编写请求转发属性测试
    - **Property 16: 认证请求正确转发**
    - **Validates: Requirements 5.1**

  - [x] 7.6 实现流式响应处理
    - 使用 chunked transfer encoding
    - 实现流式数据传输
    - 保持连接支持多次往返
    - _Requirements: 5.2, 5.3_

  - [ ]* 7.7 编写流式传输属性测试
    - **Property 17: 响应流式传输**
    - **Validates: Requirements 5.2**

  - [ ]* 7.8 编写连接保持属性测试
    - **Property 18: 连接保持支持双向通信**
    - **Validates: Requirements 5.3**

  - [x] 7.9 实现传输错误处理
    - 捕获传输错误
    - 返回明确的错误信息
    - _Requirements: 5.4_

  - [ ]* 7.10 编写传输错误属性测试
    - **Property 19: 传输错误返回明确信息**
    - **Validates: Requirements 5.4**
- [x] 8. 实现 launch 命令
  - [x] 8.1 实现完整部署流程编排
    - 加载配置
    - 触发构建
    - 设置认证
    - 部署到运行时
    - 返回结果
    - _Requirements: 2.1, 3.1, 4.1_

  - [x] 8.2 实现资源信息输出
    - 输出构建 ID
    - 输出 ECR 镜像 URI
    - 输出 Cognito 资源 ID
    - 输出端点 URL
    - _Requirements: 7.2_

  - [ ]* 8.3 编写资源信息输出属性测试
    - **Property 21: 成功步骤输出资源信息**
    - **Validates: Requirements 7.2**

  - [x] 8.4 实现容器启动命令配置
    - 使用 uvx 命令启动 MCP 服务器
    - 传递 transport 和 port 参数
    - _Requirements: 8.3_

  - [ ]* 8.5 编写容器启动命令属性测试
    - **Property 27: 容器使用 uvx 启动服务器**
    - **Validates: Requirements 8.3**
最终通过多次对话交互和测试后,生成的工程如下所示:
该MCP具备如下功能:1、完整的 Excel 操作(创建、读写、格式化、图表、公式等);2、S3 集成,自动上传并返回预签名下载链接;3、OAuth 2.0 认证(Cognito);4、一键部署到Amazon Bedrock AgentCore。
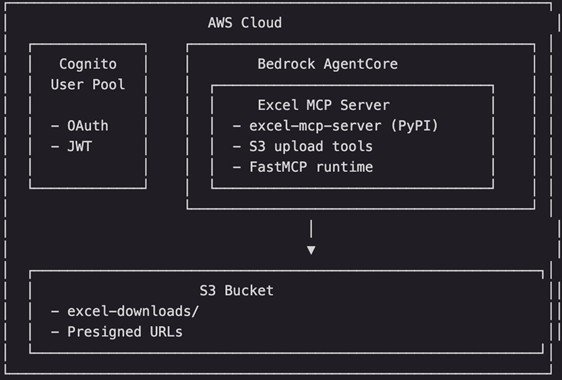
3.1.2 EXCEL-MCP架构设计
本方案采用 Amazon Bedrock AgentCore 作为 MCP Server 的托管运行时,结合 Amazon Cognito 实现 OAuth 2.0 认证,通过 S3 预签名URL 解决文件下载问题。整体架构设计如下图所示:
AgentCore Runtime 使用 microVM
整个架构由以下核心组件构成:
1、Amazon Quick Suite:企业级AI助手界面,用户通过自然语言与系统交互
2、Amazon Cognito:提供OAuth 2.0 认证,使用Client Credentials Grant 模式生成 JWT Token
3、Amazon Bedrock AgentCore:无服务器运行时,托管MCP Server,自动处理扩缩容
4、Excel MCP Server:基于excel-mcp-server封装,新增S3 上传和预签名 URL 功能
5、Amazon S3:存储生成的Excel 文件,通过预签名 URL 提供安全下载
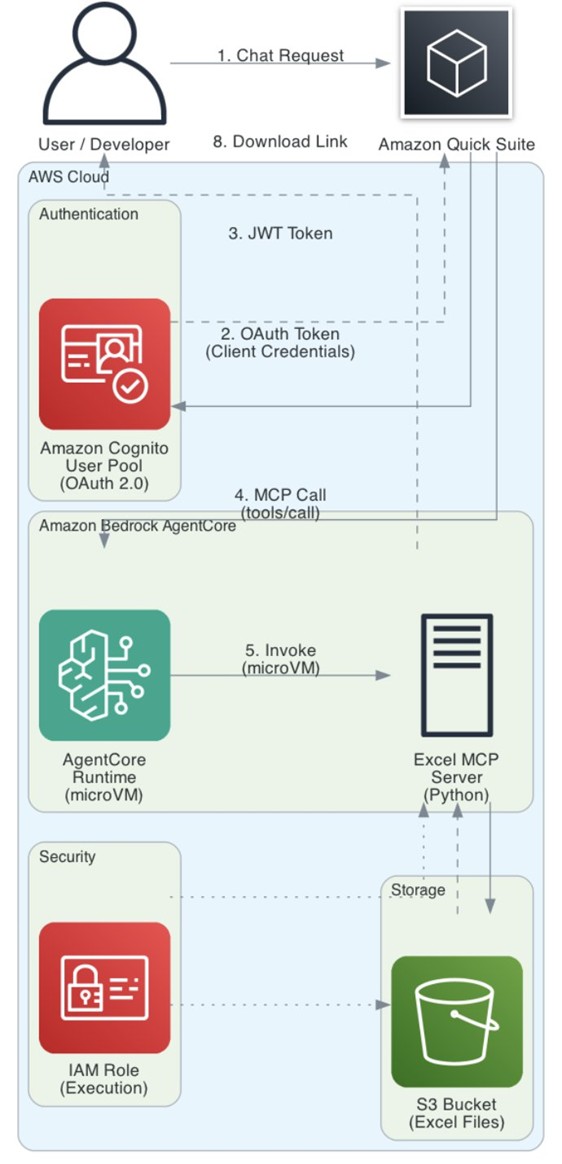
当用户发起一个 Excel 生成请求时,系统按以下流程处理:
1、用户在Amazon Quick Suite中输入自然语言请求,例如:”尺寸(cm) 长 宽 高 46.5 53 65 实重(KG)22.8″。
2、Amazon Quick Suite向Amazon Cognito发起OAuth 2.0 Token请求(Client Credentials Grant)Amazon Cognito验证客户端凭证后返回JWT Access Token。
3、Amazon Cognate验证客户端凭证后返回JWT Access Token。
4、Amazon Quick Suite携带Token调用Amazon Bedrock AgentCore的MCP端点(/invocations)。
5、Amazon Bedrock AgentCore验证Token后调用Excel MCP Server的create_workbook_and_upload工具。
6、MCP Server使用openpyxl创建Excel文件,并上传到 Amazon S3。
7、Amazon S3 返回预签名下载URL(有效期1小时)。
8、用户获得下载链接,点击即可下载Excel文件。
mcp_server.py代码如下所示:
# mcp_server.py
# Excel MCP Server wrapper for Amazon Bedrock AgentCore deployment
# https://pypi.org/project/excel-mcp-server/
#
# AgentCore Requirements:
# - Host: 0.0.0.0, Port: 8000, Path: /mcp
# - stateless_http=True for session management
#
# Workarounds:
# 1. excel-mcp-server writes logs to /var/excel-mcp.log (not writable in AgentCore)
#    Solution: Patch logging.FileHandler to redirect to /tmp/

import os
import sys
import logging

# ============================================================
# STEP 1: Patch logging.FileHandler BEFORE importing excel_mcp
# ============================================================
_original_file_handler_init = logging.FileHandler.__init__


def _patched_file_handler_init(
    self, filename, mode="a", encoding=None, delay=False, errors=None
):
    """Redirect any /var/* log files to /tmp/"""
    if filename.startswith("/var/"):
        filename = "/tmp/" + os.path.basename(filename)
        print(f"[PATCH] Redirecting log file to: {filename}", flush=True)
    _original_file_handler_init(self, filename, mode, encoding, delay, errors)


logging.FileHandler.__init__ = _patched_file_handler_init

# ============================================================
# STEP 2: Set environment variables
# ============================================================
os.environ["EXCEL_FILES_PATH"] = "/tmp/excel_files"
os.makedirs("/tmp/excel_files", exist_ok=True)

# S3 configuration for file downloads
# Option 1: Set via environment variable EXCEL_S3_BUCKET
# Option 2: Hardcode your bucket name below
S3_BUCKET = os.environ.get("EXCEL_S3_BUCKET", [bucketName])
S3_PREFIX = os.environ.get("EXCEL_S3_PREFIX", "excel-downloads/")  # S3 key prefix
PRESIGNED_URL_EXPIRY = int(os.environ.get("PRESIGNED_URL_EXPIRY", "3600"))  # 1 hour default

print("Starting Excel MCP Server for AgentCore...", flush=True)
print(f"EXCEL_FILES_PATH: {os.environ['EXCEL_FILES_PATH']}", flush=True)
print(f"Python version: {sys.version}", flush=True)

# ============================================================
# STEP 3: Create FastMCP server with AgentCore settings
# ============================================================
from mcp.server.fastmcp import FastMCP

# Create FastMCP with AgentCore-required settings
mcp = FastMCP(
    name="excel-mcp",
    host="0.0.0.0",
    port=8000,
    stateless_http=True,  # Required for AgentCore!
)

# Import excel_mcp tools and register them
print("Loading excel_mcp tools...", flush=True)

try:
    from excel_mcp import server as excel_server

    original_mcp = excel_server.mcp

    # Copy all tools from excel_mcp to our mcp instance
    if hasattr(original_mcp, "_tool_manager") and hasattr(
        original_mcp._tool_manager, "_tools"
    ):
        for tool_name, tool_func in original_mcp._tool_manager._tools.items():
            print(f"  Registering tool: {tool_name}", flush=True)
            mcp._tool_manager._tools[tool_name] = tool_func

    print("Excel MCP tools loaded successfully", flush=True)

except Exception as e:
    print(f"Error loading excel_mcp tools: {e}", flush=True)
    import traceback

    traceback.print_exc()

    # Fallback: create a simple test tool
    @mcp.tool()
    def test_tool(message: str) -> str:
        """A simple test tool"""
        return f"Test response: {message}"

    print("Fallback: registered test_tool", flush=True)

# ============================================================
# STEP 4: Add S3 download tool
# ============================================================
import boto3
from botocore.exceptions import ClientError
from datetime import datetime


@mcp.tool()
def upload_to_s3_and_get_download_url(filepath: str, custom_filename: str = "") -> str:
    """
    Upload Excel file to S3 and return a presigned download URL.

    Args:
        filepath: Path to the Excel file (relative to EXCEL_FILES_PATH or absolute)
        custom_filename: Optional custom filename for the download (default: original filename)

    Returns:
        JSON string with download URL or error message
    """
    import json

    if not S3_BUCKET:
        return json.dumps({
            "success": False,
            "error": "S3_BUCKET not configured. Set EXCEL_S3_BUCKET environment variable."
        })

    # Resolve file path
    excel_files_path = os.environ.get("EXCEL_FILES_PATH", "/tmp/excel_files")
    if not os.path.isabs(filepath):
        full_path = os.path.join(excel_files_path, filepath)
    else:
        full_path = filepath

    # Check if file exists
    if not os.path.exists(full_path):
        return json.dumps({
            "success": False,
            "error": f"File not found: {filepath}"
        })

    try:
        from urllib.parse import quote

        s3_client = boto3.client("s3")

        # Generate S3 key
        filename = custom_filename if custom_filename else os.path.basename(filepath)
        timestamp = datetime.now().strftime("%Y%m%d_%H%M%S")
        s3_key = f"{S3_PREFIX}{timestamp}_{filename}"

        # URL encode filename for Content-Disposition header (RFC 5987)
        encoded_filename = quote(filename, safe='')
        content_disposition = f"attachment; filename*=UTF-8''{encoded_filename}"

        # Upload to S3
        s3_client.upload_file(
            full_path,
            S3_BUCKET,
            s3_key,
            ExtraArgs={
                "ContentType": "application/vnd.openxmlformats-officedocument.spreadsheetml.sheet",
                "ContentDisposition": content_disposition
            }
        )

        # Generate presigned URL
        download_url = s3_client.generate_presigned_url(
            "get_object",
            Params={
                "Bucket": S3_BUCKET,
                "Key": s3_key,
                "ResponseContentDisposition": content_disposition
            },
            ExpiresIn=PRESIGNED_URL_EXPIRY
        )

        print(f"[S3] Uploaded {filepath} to s3://{S3_BUCKET}/{s3_key}", flush=True)

        return json.dumps({
            "success": True,
            "download_url": download_url,
            "filename": filename,
            "s3_bucket": S3_BUCKET,
            "s3_key": s3_key,
            "expires_in_seconds": PRESIGNED_URL_EXPIRY,
            "message": f"文件已上传,点击链接下载: {download_url}"
        })

    except ClientError as e:
        return json.dumps({
            "success": False,
            "error": f"S3 error: {str(e)}"
        })
    except Exception as e:
        return json.dumps({
            "success": False,
            "error": f"Unexpected error: {str(e)}"
        })


@mcp.tool()
def list_excel_files() -> str:
    """
    List all Excel files in the working directory.

    Returns:
        JSON string with list of available Excel files
    """
    import json

    excel_files_path = os.environ.get("EXCEL_FILES_PATH", "/tmp/excel_files")

    try:
        files = []
        if os.path.exists(excel_files_path):
            for f in os.listdir(excel_files_path):
                if f.endswith((".xlsx", ".xls")):
                    full_path = os.path.join(excel_files_path, f)
                    files.append({
                        "filename": f,
                        "size_bytes": os.path.getsize(full_path),
                        "modified": datetime.fromtimestamp(
                            os.path.getmtime(full_path)
                        ).isoformat()
                    })

        return json.dumps({
            "success": True,
            "files": files,
            "count": len(files),
            "directory": excel_files_path
        })
    except Exception as e:
        return json.dumps({
            "success": False,
            "error": str(e)
        })


@mcp.tool()
def create_workbook_and_upload(filename: str, data: list = None, sheet_name: str = "Sheet1") -> str:
    """
    Create a new Excel workbook, optionally write data, and upload to S3 for download.
    This is a convenience tool that combines create_workbook, write_data_to_excel, and upload_to_s3_and_get_download_url.

    Args:
        filename: Name of the Excel file (e.g., "报价查询.xlsx")
        data: Optional list of lists containing data to write (e.g., [["Name", "Price"], ["Item1", 100]])
        sheet_name: Name of the worksheet (default: "Sheet1")

    Returns:
        JSON string with download URL or error message
    """
    import json
    from openpyxl import Workbook

    excel_files_path = os.environ.get("EXCEL_FILES_PATH", "/tmp/excel_files")
    os.makedirs(excel_files_path, exist_ok=True)

    # Ensure filename ends with .xlsx
    if not filename.endswith(".xlsx"):
        filename = filename + ".xlsx"

    filepath = os.path.join(excel_files_path, filename)

    try:
        # Create workbook
        wb = Workbook()
        ws = wb.active
        ws.title = sheet_name

        # Write data if provided
        if data:
            for row_idx, row_data in enumerate(data, start=1):
                for col_idx, value in enumerate(row_data, start=1):
                    ws.cell(row=row_idx, column=col_idx, value=value)

        # Save workbook
        wb.save(filepath)
        print(f"[CREATE] Created workbook: {filepath}", flush=True)

        # Upload to S3
        if not S3_BUCKET:
            return json.dumps({
                "success": False,
                "error": "S3_BUCKET not configured"
            })

        from urllib.parse import quote

        s3_client = boto3.client("s3")
        timestamp = datetime.now().strftime("%Y%m%d_%H%M%S")
        s3_key = f"{S3_PREFIX}{timestamp}_{filename}"

        # URL encode filename for Content-Disposition header (RFC 5987)
        encoded_filename = quote(filename, safe='')
        content_disposition = f"attachment; filename*=UTF-8''{encoded_filename}"

        s3_client.upload_file(
            filepath,
            S3_BUCKET,
            s3_key,
            ExtraArgs={
                "ContentType": "application/vnd.openxmlformats-officedocument.spreadsheetml.sheet",
                "ContentDisposition": content_disposition
            }
        )

        download_url = s3_client.generate_presigned_url(
            "get_object",
            Params={
                "Bucket": S3_BUCKET,
                "Key": s3_key,
                "ResponseContentDisposition": content_disposition
            },
            ExpiresIn=PRESIGNED_URL_EXPIRY
        )

        print(f"[S3] Uploaded to s3://{S3_BUCKET}/{s3_key}", flush=True)

        return json.dumps({
            "success": True,
            "download_url": download_url,
            "filename": filename,
            "s3_bucket": S3_BUCKET,
            "s3_key": s3_key,
            "expires_in_seconds": PRESIGNED_URL_EXPIRY,
            "message": f"Excel文件已创建并上传,点击链接下载: {download_url}"
        })

    except Exception as e:
        return json.dumps({
            "success": False,
            "error": f"Error: {str(e)}"
        })


print(f"S3 download tool registered (bucket: {S3_BUCKET or 'NOT SET'})", flush=True)

# ============================================================
# STEP 5: Run the server
# ============================================================
if __name__ == "__main__":
    print("Starting MCP server on 0.0.0.0:8000/mcp (stateless_http=True)...", flush=True)
    mcp.run(transport="streamable-http")
3.1.3 Amazon Bedrock AgentCore部署MCP
我们通过kiro帮我们生成部署MCP到Amazon Bedrock AgentCore的yaml文件如下所示:
default_agent: excel_mcp_oauth
agents:
  excel_mcp_oauth:
    name: excel_mcp_oauth
    entrypoint: mcp_server.py
    deployment_type: direct_code_deploy
    runtime_type: PYTHON_3_11
    platform: linux/arm64
    container_runtime: null
    source_path: /Users/***/excel-mcp/mcp-server
    aws:
      execution_role: 【arn:aws:iam::***:role/AmazonBedrockAgentCoreSDKRuntime-***】
      execution_role_auto_create: false
      account: 【"account"】
      region: [region]
      ecr_repository: null
      ecr_auto_create: false
      s3_path: s3://bedrock-agentcore-codebuild-***
      s3_auto_create: false
      network_configuration:
        network_mode: PUBLIC
        network_mode_config: null
      protocol_configuration:
        server_protocol: MCP
      observability:
        enabled: true
      lifecycle_configuration:
        idle_runtime_session_timeout: null
        max_lifetime: null
    bedrock_agentcore:
      agent_id: excel_mcp_oauth-H2LQqD8kpU
      agent_arn: [arn]
      agent_session_id: null
    codebuild:
      project_name: null
      execution_role: null
      source_bucket: null
    memory:
      mode: NO_MEMORY
      memory_id: null
      memory_arn: null
      memory_name: null
      event_expiry_days: 30
      first_invoke_memory_check_done: false
      was_created_by_toolkit: false
    identity:
      credential_providers: []
      workload: null
    authorizer_configuration:
      customJWTAuthorizer:
        discoveryUrl: [https://.cognito-idpURL]
        allowedClients:
        - [****]
    request_header_configuration: null
    oauth_configuration: null
    api_key_env_var_name: null
    api_key_credential_provider_name: nul
    is_generated_by_agentcore_create: false
最终我们只需要通过chatbox对话方式就可以快速帮我们部署上线开发完成的MCP。
3.1.4 Amazon Quick Suite Integrations中OpenAPI设计
我们需要在Amazon Quick Suite Integrations菜单中选择Actions创建OpenAPI Specification。API对应的schema如下所示:
{
  "openapi": "3.0.0",
  "info": {
    "title": "Time API",
    "description": "Get current time by coordinates",
    "version": "1.0.0"
  },
  "servers": [
    {
      "url": "https://www.timeapi.io/api",
      "description": "Production server"
    }
  ],
  "paths": {
    "/Time/current/coordinate": {
      "get": {
        "summary": "Get current time by coordinates",
        "operationId": "getCurrentTimeByCoordinate",
        "parameters": [
          {
            "name": "latitude",
            "in": "query",
            "required": true,
            "schema": {
              "type": "number",
              "default": 31.2304
            },
            "description": "Latitude (e.g., 31.2304 for Shanghai)"
          },
          {
            "name": "longitude",
            "in": "query",
            "required": true,
            "schema": {
              "type": "number",
              "default": 121.4737
            },
            "description": "Longitude (e.g., 121.4737 for Shanghai)"
          }
        ],
        "responses": {
          "200": {
            "description": "Successful response",
            "content": {
              "application/json": {
                "schema": {
                  "$ref": "#/components/schemas/TimeResponse"
                }
              }
            }
          }
        }
      }
    }
  },
  "components": {
    "schemas": {
      "TimeResponse": {
        "type": "object",
        "properties": {
          "year": {
            "type": "integer",
            "description": "Year"
          },
          "month": {
            "type": "integer",
            "description": "Month (1-12)"
          },
          "day": {
            "type": "integer",
            "description": "Day of month"
          },
          "hour": {
            "type": "integer",
            "description": "Hour (0-23)"
          },
          "minute": {
            "type": "integer",
            "description": "Minute"
          },
          "seconds": {
            "type": "integer",
            "description": "Seconds"
          },
          "dateTime": {
            "type": "string",
            "description": "Full datetime string"
          },
          "date": {
            "type": "string",
            "description": "Date string (MM/DD/YYYY)"
          },
          "time": {
            "type": "string",
            "description": "Time string (HH:MM)"
          },
          "timeZone": {
            "type": "string",
            "description": "Timezone name"
          },
          "dayOfWeek": {
            "type": "string",
            "description": "Day of week"
          },
          "dstActive": {
            "type": "boolean",
            "description": "Daylight saving time active"
          }
        }
      }
    },
    "securitySchemes": {}
  },
  "security": []
}
该API主要是获取当前日期,最终通过actions方式为flows提供实时服务。
3.2 基于Amazon Quick Suite的flows设计
首轮prompt如下所示:
***海外仓库有一个报价总表,里面包括渠道分类包括:USPS费用明细、FEDEX-HFG费用明细、FEDEX-QFG费用明细、FEDEX-JFG费用明细、GOFO PARCEL费用明细、GOFO GROUND费用明细、UNIUNI费用明细等多个渠道。同时物品发往不同的区域Zone价格不一样。同时上述的不同渠道报价明细表中对于报价生效日期也是有要求的,需要确定查询时间是否在报价表生效日期范围内。
第一步先根据物品的长、宽、高去上面的渠道分类的sheet里面对比,找到单价最优惠的渠道和单价费用;
上面的flows的step需要你根据实际情况一步步确认调整和测试验证。最终流程执行完毕后,客户可以根据自己要求从下载链接下载报告。
3.3 经验总结
在将 MCP Server 部署到 Amazon Bedrock AgentCore 的过程中,我们遇到了一些典型问题。本节将这些经验整理成最佳实践,帮助开发者少走弯路。
3.3 .1 基于AgentCore部署MCP Server的经验实践
问题1:AgentCore运行时环境中,大部分目录是只读的。许多第三方库(如excel-mcp-server)默认将日志写入 /var/ 目录,导致启动失败。
解决方案:在导入第三方库之前,patch logging.FileHandler,将日志重定向到 /tmp/ 目录:
import logging

_original_file_handler_init = logging.FileHandler.__init__

def _patched_file_handler_init(self, filename, mode="a", encoding=None, delay=False, errors=None):
    if filename.startswith("/var/"):
        filename = "/tmp/" + os.path.basename(filename)
    _original_file_handler_init(self, filename, mode, encoding, delay, errors)

logging.FileHandler.__init__ = _patched_file_handler_init

# 然后再导入第三方库
from excel_mcp import server as excel_server
问题2:AgentCore 运行时是无状态的,每次请求可能在不同的实例上执行。生成的文件无法在后续请求中访问。
解决方案:将文件操作和上传合并为原子操作。我们设计了 create_workbook_and_upload 工具,在单次请求中完成创建、写入、上传、返回链接的全流程:
@mcp.tool()
def create_workbook_and_upload(filename: str, data: list = None, sheet_name: str = "Sheet1") -> str:
    # 1. 创建 Excel
    # 2. 写入数据
    # 3. 上传到 S3
    # 4. 返回预签名 URL
问题3:AgentCore要求MCP Server以无状态模式运行。
解决方案:创建FastMCP实例时设置 stateless_http=True。
问题4:agentcore invoke CLI 无法调用OAuth认证的Agent。
原因:当 AgentCore Runtime配置了JWT Bearer Token 认证(如 Cognito OAuth)时,AWS SDK/CLI 不支持传递自定义 Bearer Token,只能使用 IAM SigV4 签名,存在限制。
解决方案:使用 curl 或其他 HTTP 客户端直接调用 API,手动设置 Authorization header。
3.3 .2 OAuth 2.0 认证配置
问题1:Cognito Discovery URL格式,AgentCore的JWT验证需要OIDC Discovery URL,但Cognito的URL格式容易写错。常见错误:使用Cognito Domain而非User Pool ID;缺少 .well-known/openid-configuration后缀。
正确示例:
https://cognito-idp.{region}.amazonaws.com/{user-pool-id}/.well-known/openid-configuration
问题:Cognito的Client Credentials Grant生成的Token不包含aud (audience) claim,导致AgentCore的 allowedAudience 验证失败。
解决方案:在 .bedrock_agentcore.yaml 中使用 allowedClients 替代 allowedAudience:
authorizer_configuration:
  customJWTAuthorizer:
    discoveryUrl: https://cognito-idp.us-east-1.amazonaws.com/{user-pool-id}/.well-known/openid-configuration
    allowedClients:
      - {your-client-id}  # 使用 allowedClients 而非 allowedAudience
其他
AgentCore 执行角色默认没有 S3 访问权限。
S3 的 Content-Disposition header 不支持非 ASCII 字符,中文文件名会导致下载失败或乱码。
部署新版本MCP Server后,Quick Suite 的 Enabled Actions 列表不更新,看不到新增的工具,Quick Suite 在创建 MCP 插件时会缓存工具列表,后续不会自动刷新。
Quick Suite Flows节点如果是客户上传文件需要注意文件大小限制。
Quick Suite Flows节点中Action Connector中目前版本是不支持REST API,建议采用OpenAPI方式。
4、成本分析
|
A |
B |
C |
D |
| 1 |
费用类别 |
订阅月费用 |
备注 |
|
| 2 |
Amazon Quick Suite 基础设施 |
$250 |
新用户前3个月免费 |
|
| 3 |
Amazon Quick Suite 订阅 (Pro/ES) |
$20.00/$40.00 |
单个用户订阅费用 |
|
| 4 |
Amazon Bedrock AgentCore Runtime |
约 $0.0008/次交互 |
按实际CPU/内存消耗计费 |
|
| 5 |
Amazon Cognito M2M |
$0.00225/请求 |
Token 请求 |
|
| 6 |
Amazon S3 存储/传输 |
$0.023/GB/月 |
前 100GB 免费 |
|
举例说明:
每月订阅10个用户,MCP Server完成90次请求,价格为:Quick Suite (基础设施费用$250 + 订阅费用$20*10)+AgentCore Runtime $0.11+Cognito M2M $0.2。
5、结论
本文着重介绍通过Amazon Kiro的AI驱动编码能力,结合Amazon Bedrock AgentCore的智能代理服务,实现跨境物流报价场景的快速构建与智能化升级实践。文章涵盖了MCP工具开发、Amazon Quick Suite Flows流程设计、多渠道报价数据整合、时效性校验和AI对话式查询等核心环节,展示了如何基于Serverless架构从传统人工查表模式转变为智能化自动报价的完整实现过程。同时强调了无服务器SaaS方案在敏捷开发、弹性扩展和成本优化方面的显著优势,确保企业能够以最小的基础设施投入实现业务创新。同时强调了在跨境物流场景中建立多渠道报价动态管理机制的重要性,确保报价数据的准确性和时效性。
核心贡献
- 方法论创新:建立了AI驱动的智能化应用快速构建方法论,验证了Serverless架构在制造行业数字化出海场景中的最佳实践。
- 架构优势:充分展现了Serverless SaaS方案的核心价值——零基础设施运维、按需付费、自动弹性伸缩,大幅降低了企业的技术门槛和运营成本。
- 业务价值:实现了报价查询效率的显著提升和人工成本的大幅降低,同时避免了传统架构中的服务器采购、运维和容量规划等复杂工作。
实践价值
希望当您面临日常工作中重复劳动、查询效率低和人工成本居高不下的挑战时,本文的智能化方法论和Serverless架构实践能够为您提供有价值的参考。通过采用无服务器SaaS方案,企业可以:
- 快速上线:无需采购和配置服务器,从需求到上线仅需数天时间
- 零运维负担:无需关注补丁更新、容量规划、高可用配置等基础设施管理
- 成本可控:按实际使用量付费,避免资源闲置浪费,实现真正的降本增效
- 弹性扩展:自动应对业务高峰,无需提前规划容量或担心性能瓶颈
随着制造业数字化转型的深入推进和业务场景的日益复杂化,基于Serverless架构的AI驱动智能业务系统将成为企业提升运营效率的重要支撑。我们相信通过持续的技术创新和实践探索,能够为更多制造企业提供高效、精准、免运维的智能化解决方案,让复杂的业务流程管理变得简单可控,让数据查询和决策支持更加便捷高效,让企业真正聚焦于业务创新而非基础设施管理。
参考文档
1、https://pypi.org/project/excel-mcp-server/
2、https://modelcontextprotocol.io
3、https://github.com/jlowin/fastmcp
4、https://docs.aws.amazon.com/bedrock/latest/userguide/agentcore.html
5、https://docs.aws.amazon.com/cognito/latest/developerguide/cognito-user-pools.html
6、https://github.com/tianpeijun/excel-mcp
7、https://docs.aws.amazon.com/quicksuite/latest/userguide/action-connector-apis-supported-types.html
8、https://aws.amazon.com/cn/blogs/china/reimagine-the-way-you-work-with-ai-agents-in-amazon-quick-suite/
*前述特定亚马逊云科技生成式人工智能相关的服务目前在亚马逊云科技海外区域可用。亚马逊云科技中国区域相关云服务由西云数据和光环新网运营,具体信息以中国区域官网为准。
本篇作者
AWS 架构师中心: 云端创新的引领者
探索 AWS 架构师中心,获取经实战验证的最佳实践与架构指南,助您高效构建安全、可靠的云上应用

|
 |