Migrate from RDS MySQL to Aurora MySQL in near zero downtime
Introduction
Implementation
Setup web application
1. Download the CloudFormation template
The CloudFormation.yaml Template on the GitHub page will launch an Amazon EC2 instance of type t2.micro with latest Amazon Linux 2 OS, bootstrap Apache/PHP, and install a simple address book web application. The template will also create an Amazon RDS MySQL database instance in free tier, i.e. of type db.t2.micro and with no Multi-AZ setup or read replicas. The WebTier Security Group will allow only SSH and HTTP connections to the web server (EC2 instance), and the DBTier Security Group will only allow the WebTier Security Group to initiate database connections to the RDS DB instance over the TCP port 3306.
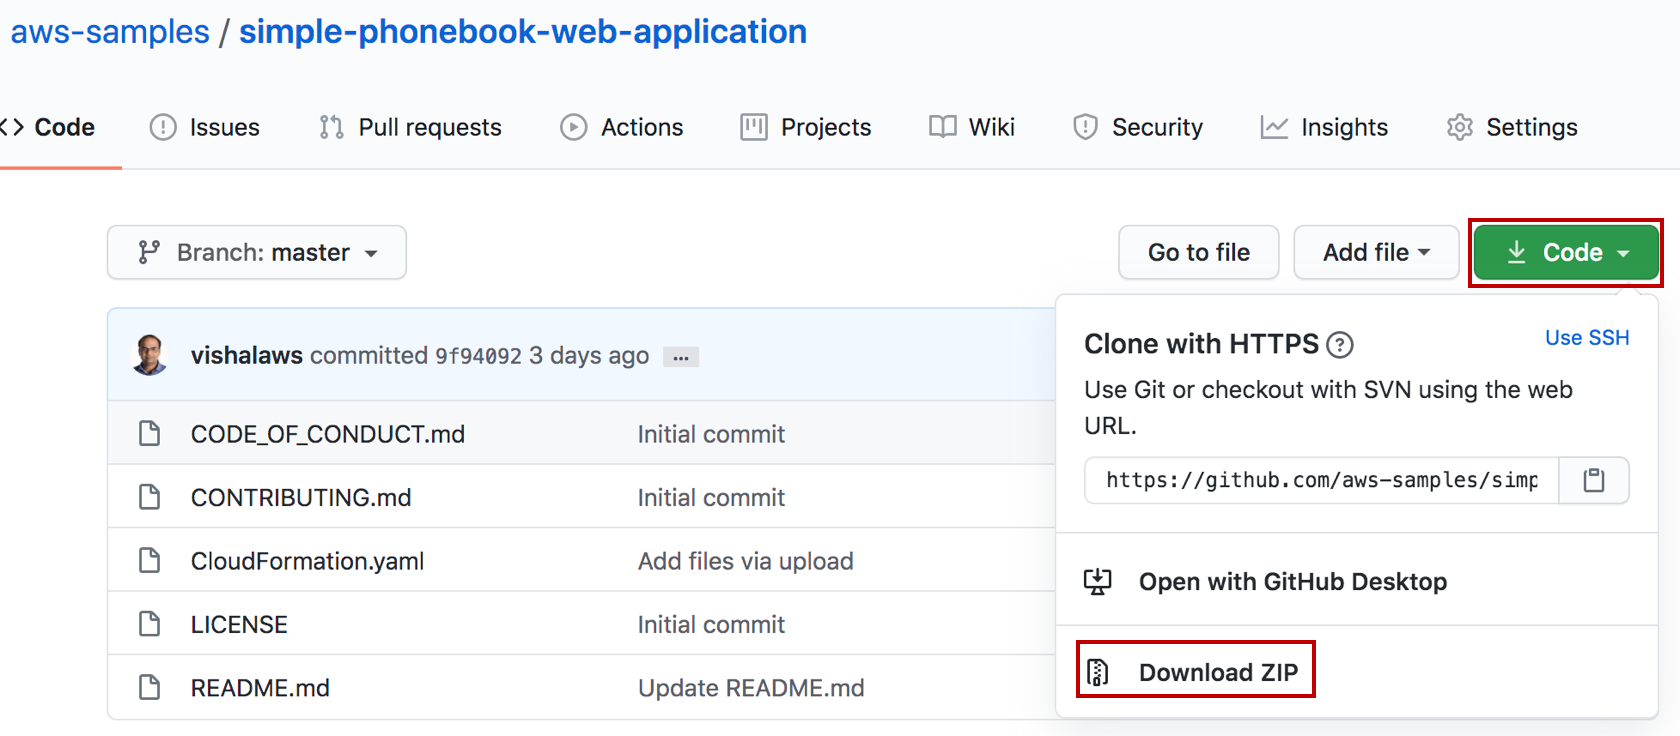
Go to the Github link and download the files as shown.
Click the Code option and then click on Download ZIP. The zip folder will be downloaded by your browser.
Go to the downloaded folder location on your machine and then unzip the folder. You will have all files as shown above.
2. Open CloudFormation
Open the AWS CloudFormation console and sign in with your AWS account credentials. Choose the Region drop-down and select the appropriate AWS Region. This tutorial uses the US West (Oregon) Region. Click on Create stack.

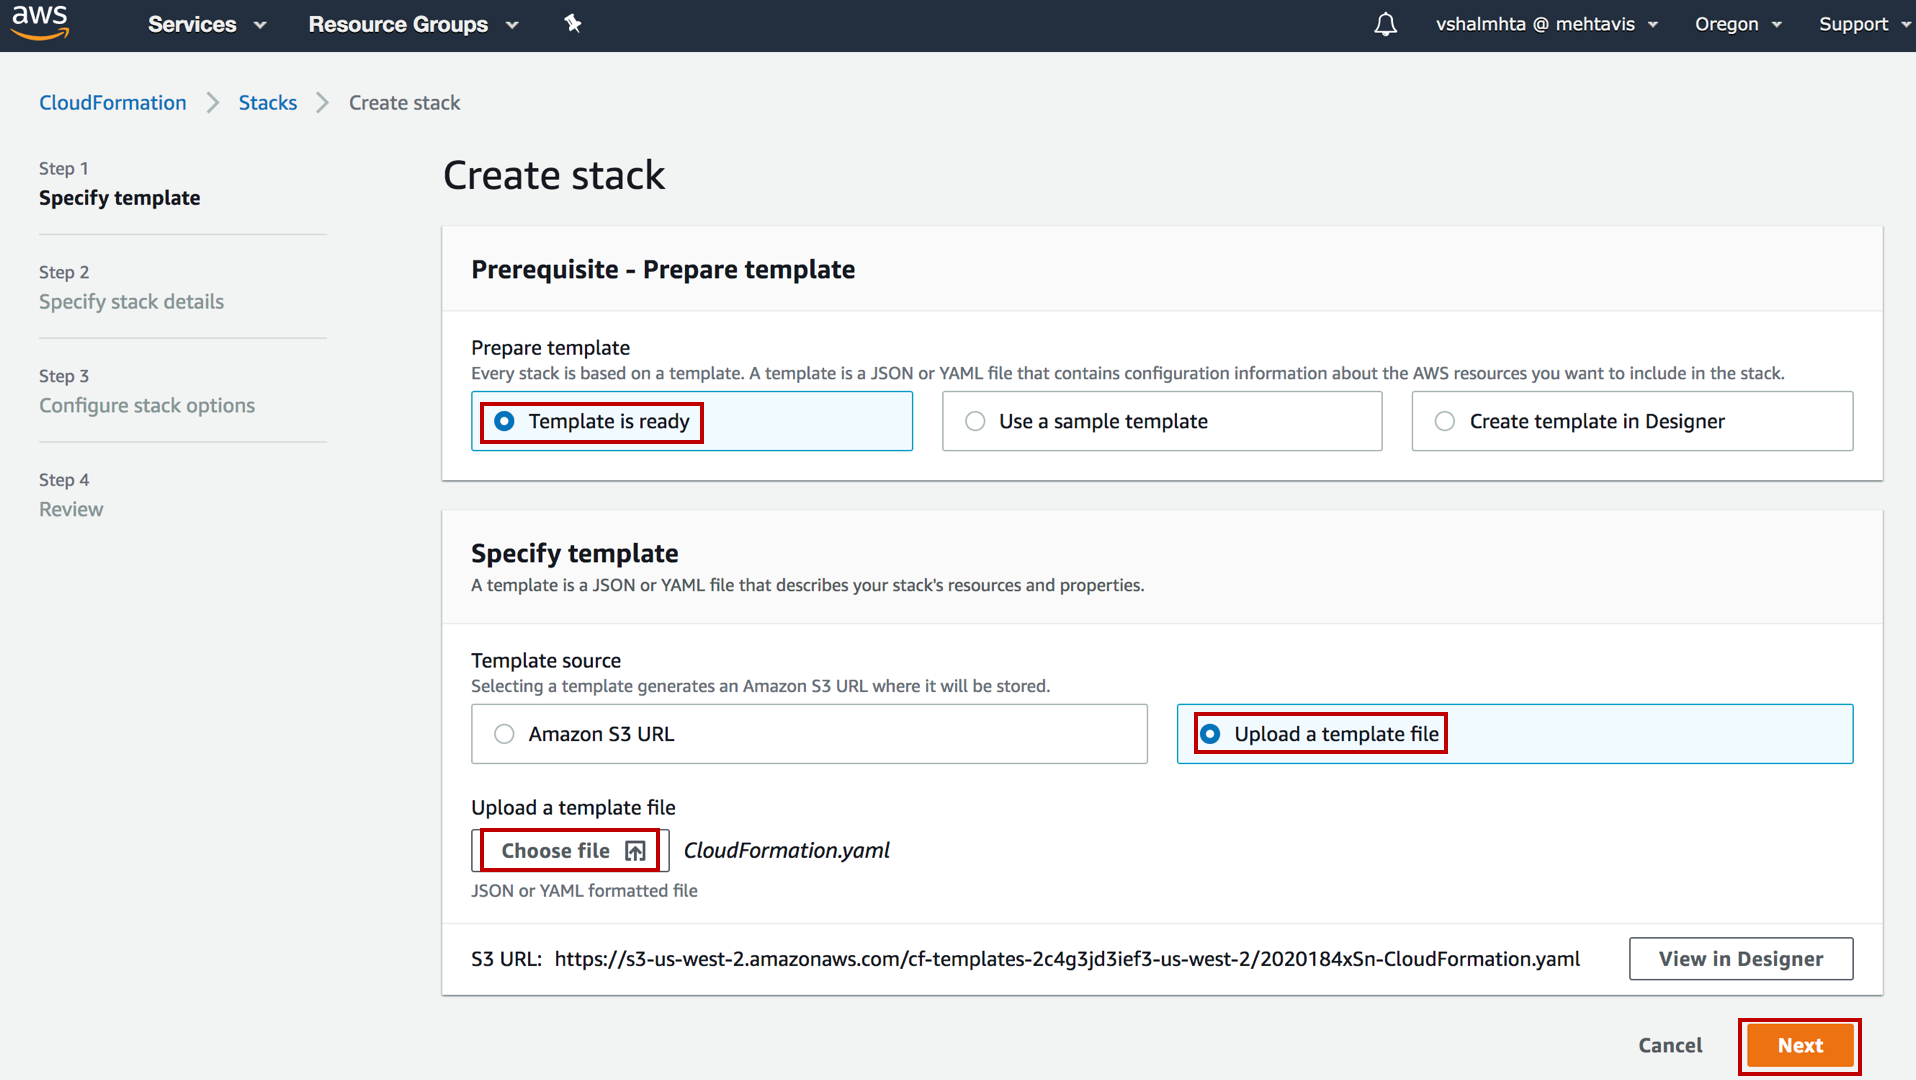
3. Create stack
Select Template is ready, and choose Upload a template file as the source template. Then, click on Choose file and upload the CloudFormation.yaml (downloaded in previous step). Click Next.
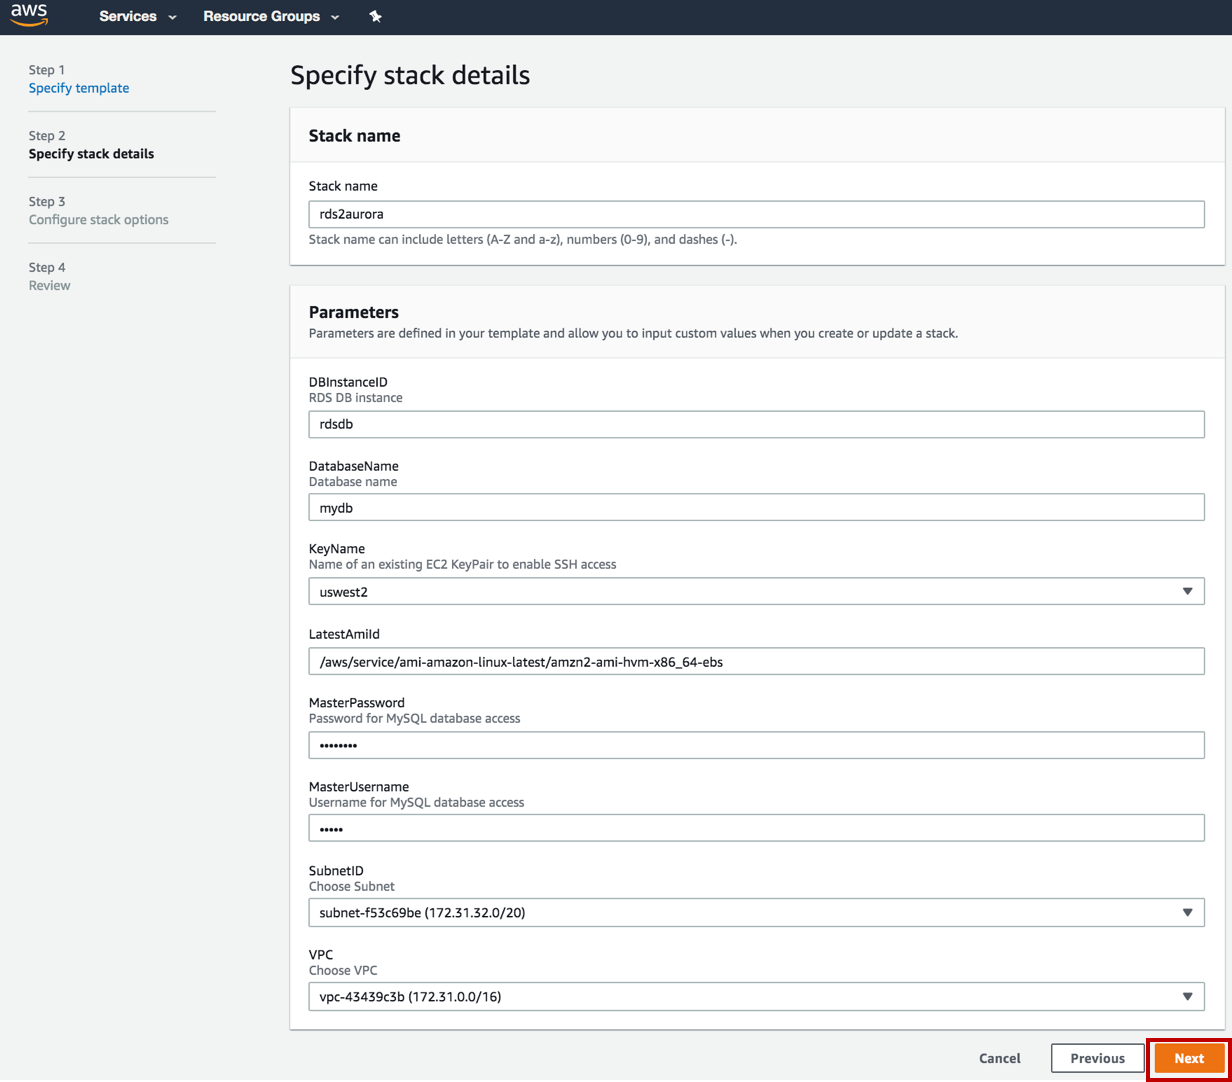
4. Review stack details and create stack
Populate the form as with the values specified below, and then click Next:
Stack Name: A unique identifier without spaces
DBInstanceID: RDS DB instance identifier. It defaults to rdsdb
DatabaseName: Database name. It defaults to mydb
KeyName: The existing key pair in this account and region
LatestAmild: Don't change this parameter, it will install the latest Amazon Linux 2 OS AMI
MasterUsername: Choose subnet to deploy the instances
MasterPassword: Password for MySQL database access
SubnetID: Choose subnet to deploy the instances
VPC: Choose VPC (Above subnet should be of this VPC)
Note: The resources that are created here will be prefixed with whatever value you specify in the Stack Name. Please specify a value that is unique to your account.
Once you click Next, on the Stack Options page, accept all of the defaults and click Next.
On the Review page, click Create stack.
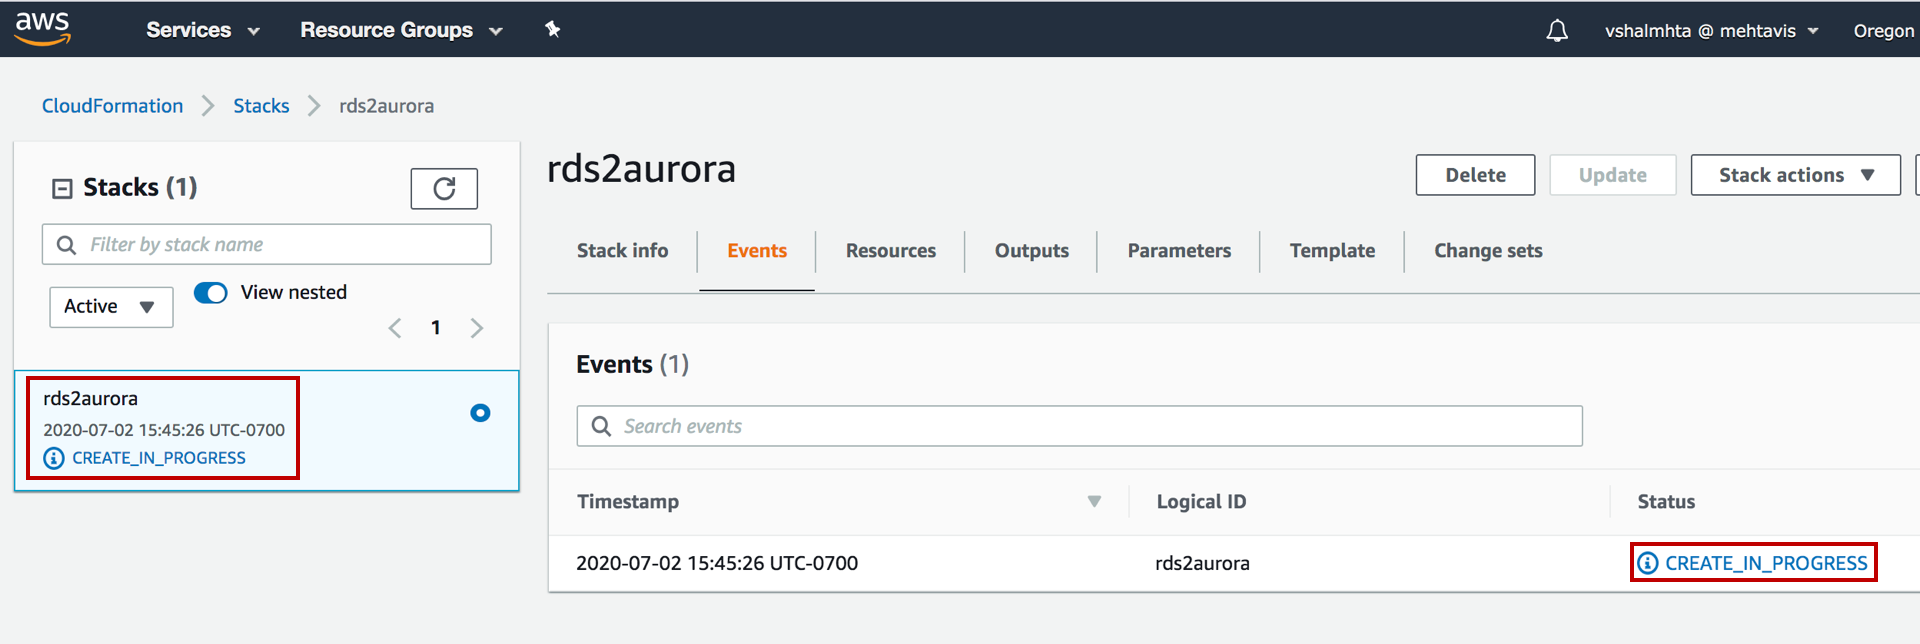
5. Wait for stack creation
At this point, you will be directed back to the CloudFormation console and will see a status of CREATE_IN_PROGRESS. Please wait here until the status changes to COMPLETE.
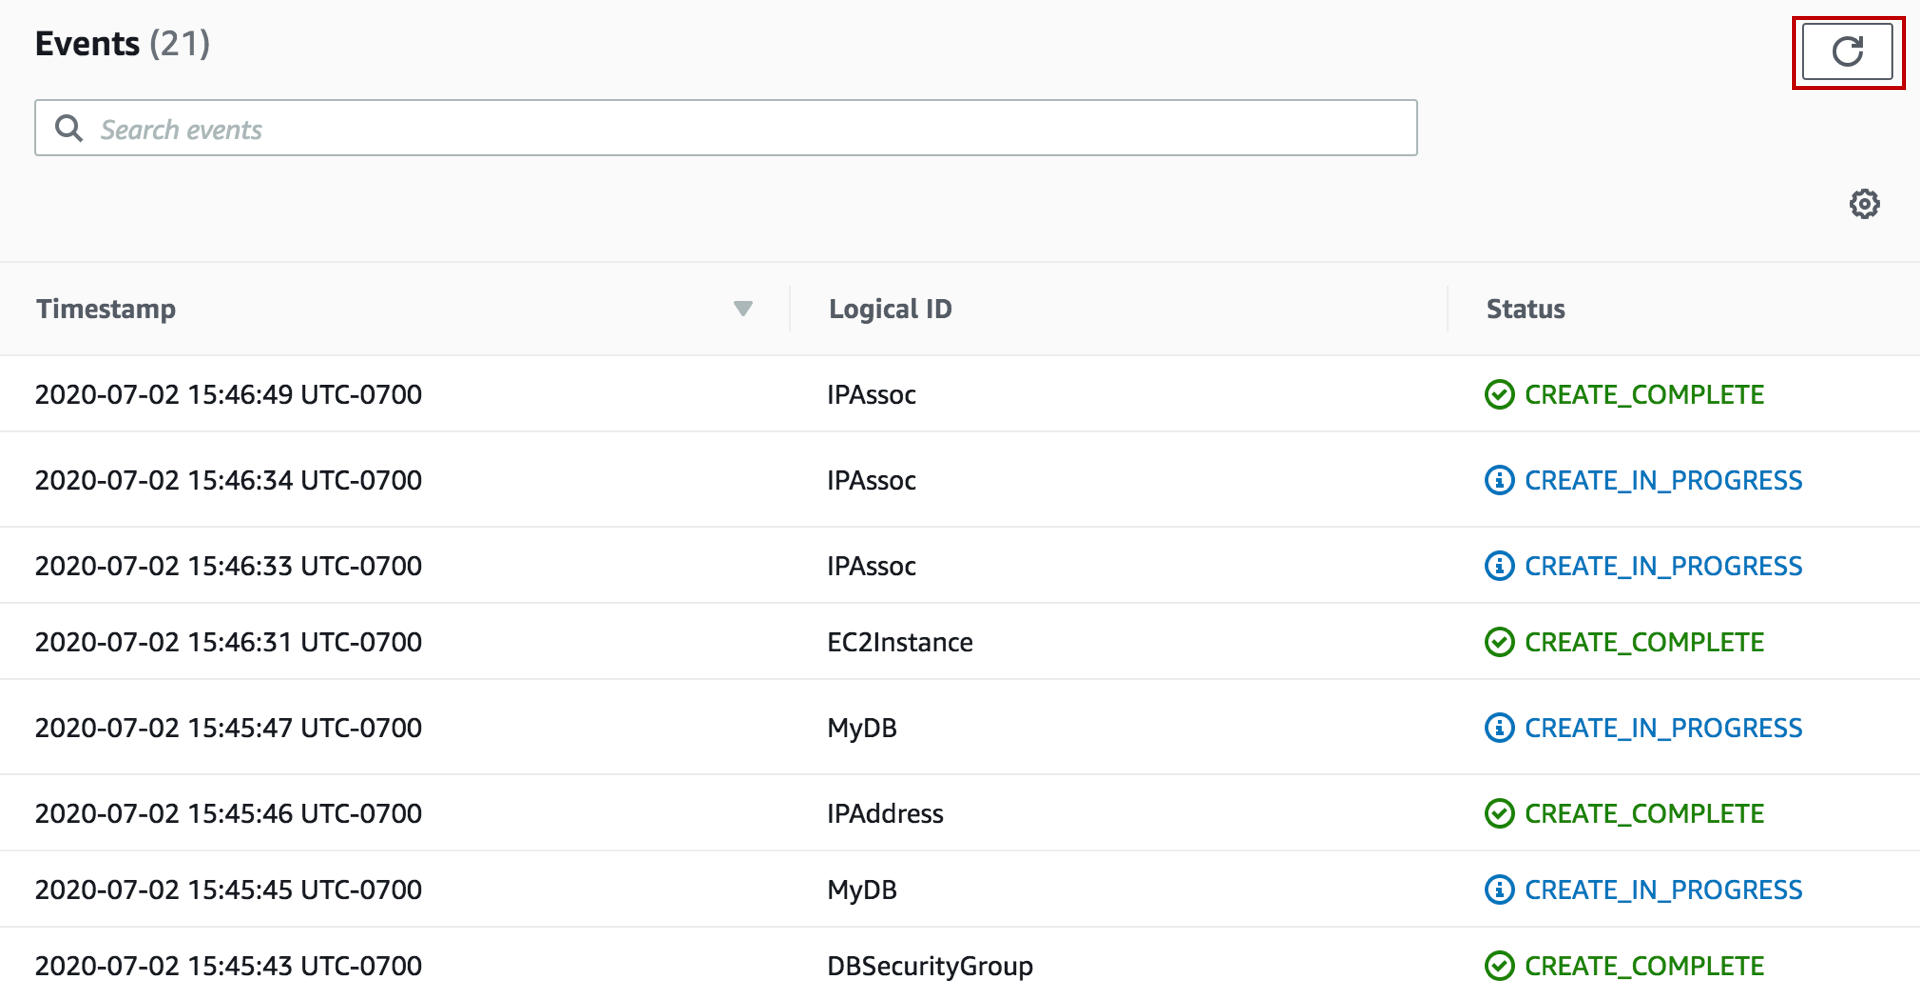
6. (Optional) Refresh status
You can click on the refresh icon to see the progress of resources creation.
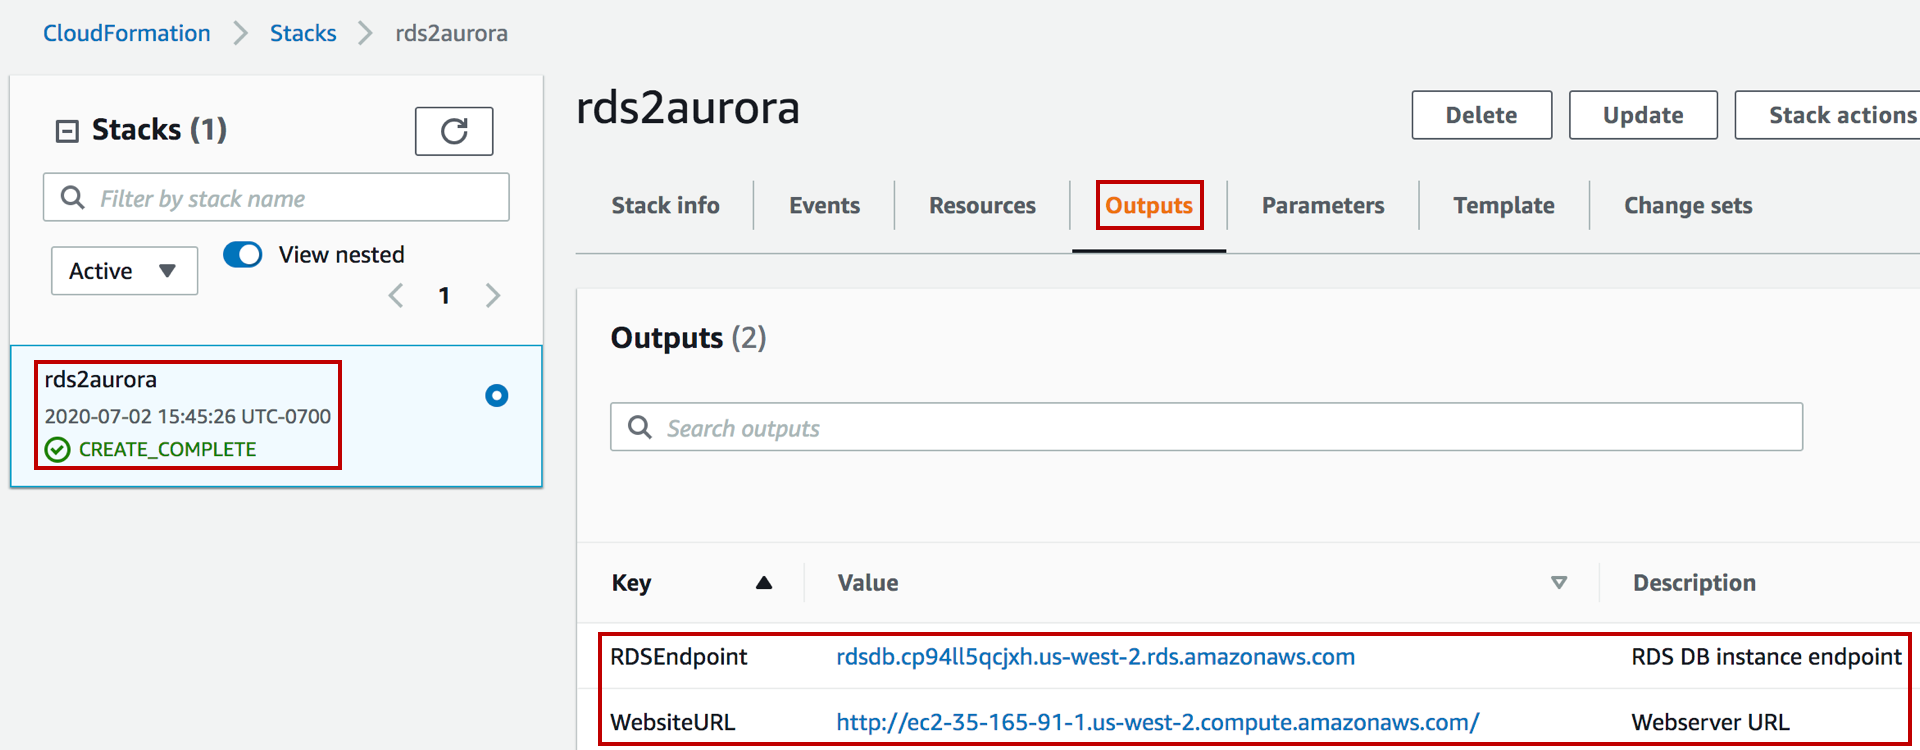
7. View stack outputs
Once CloudFormation status changes to CREATE_COMPLETE, go to the Outputs section.
Make a note of the Output values from the CloudFormation environment that you have launched, as you will need them for the remainder of the lab.
For this tutorial setup, the values are:
RDS DB instance endpoint - rdsdb.cp94ll5qcjxh.us-west-2.rds.amazonaws.com
This is the DNS name of your database instance, and you will need it to connect to the database.
Webserver URL - http://ec2-35-165-91-1.us-west-2.compute.amazonaws.com/
This is the Public DNS name of the Amazon EC2 instance.
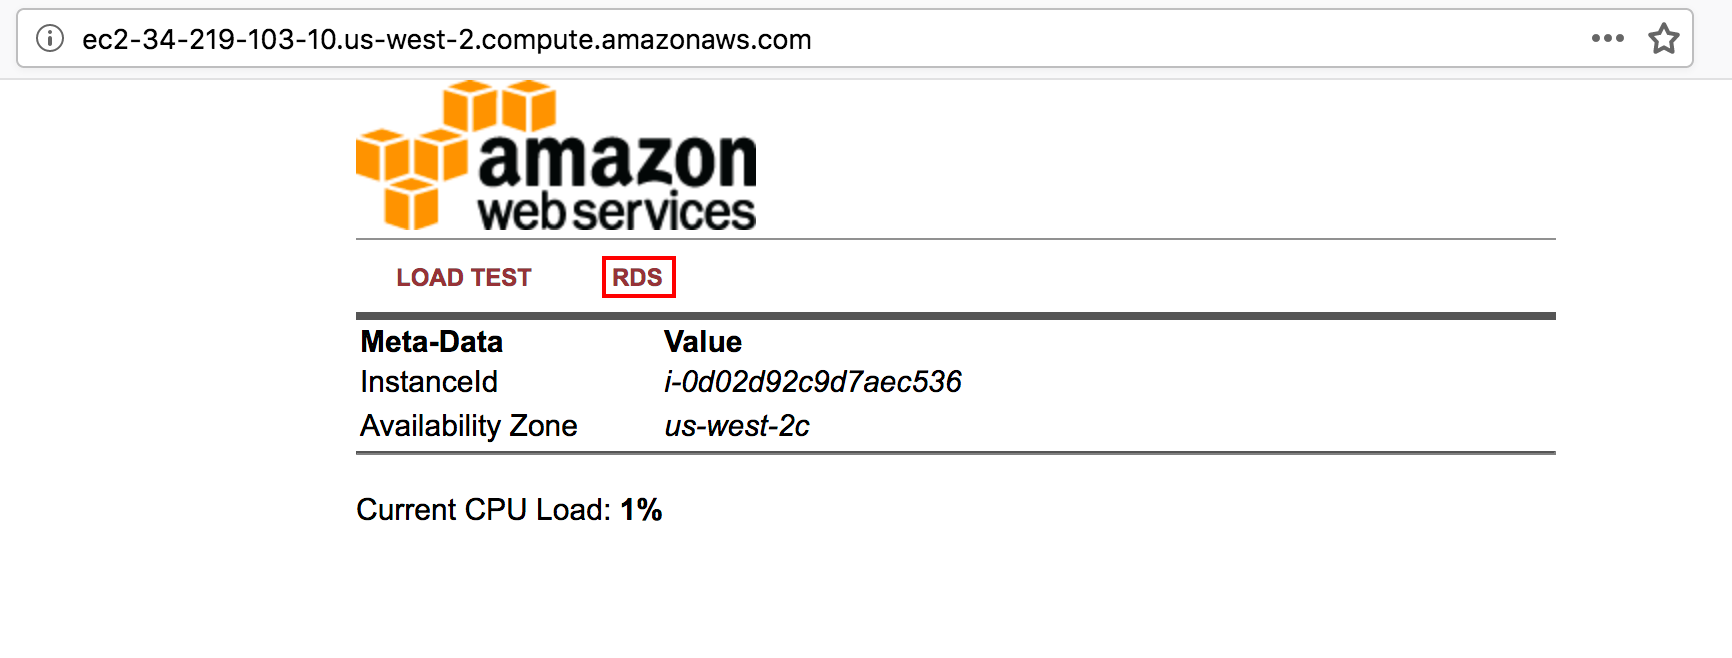
8. Open web application and choose RDS
Open a new browser tab and navigate to the web server interface by entering the EC2 instance’s Public DNS name (from preceding step) into the browser. You should see a website that looks like the example.
Click on the RDS tab.
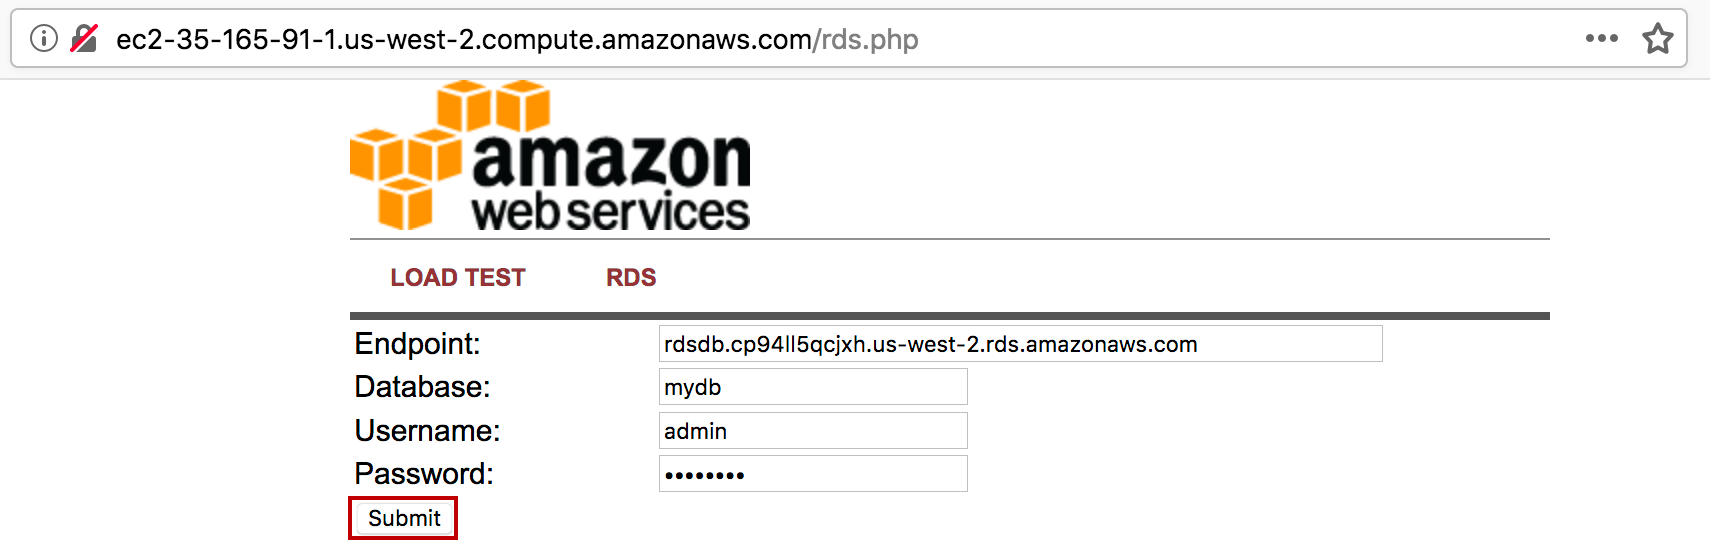
9. Enter database details
Enter the credentials and database name as shown. The RDS Endpoint name was noted in previous step Click the Submit button.
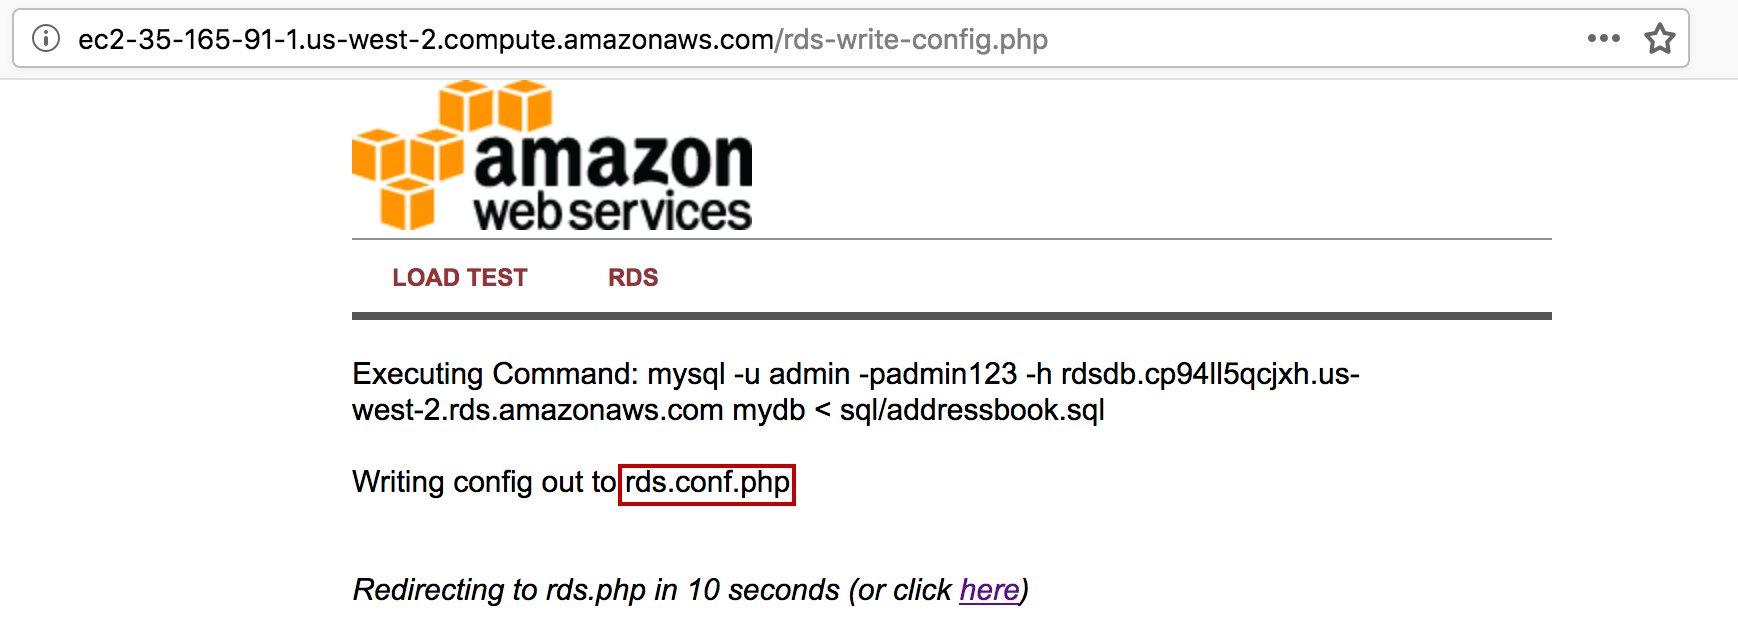
10. Verify connection and view configuration file
You will see a brief message of a connection attempt by the application to connect to the database on the RDS DB instance, as shown.
You will review the contents of file rds.conf.php
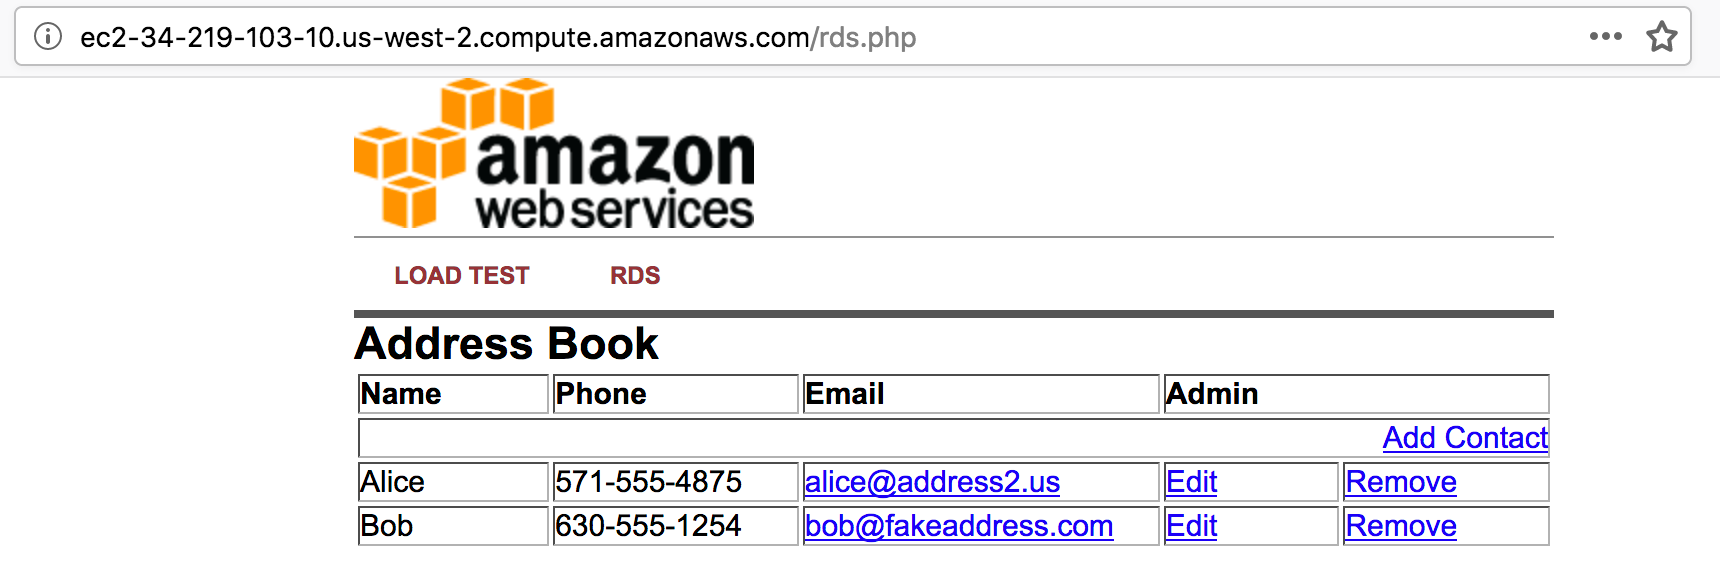
11. View address book
Upon successful connection completion, you will be redirected to a simple address book application displaying all of the information from the database.
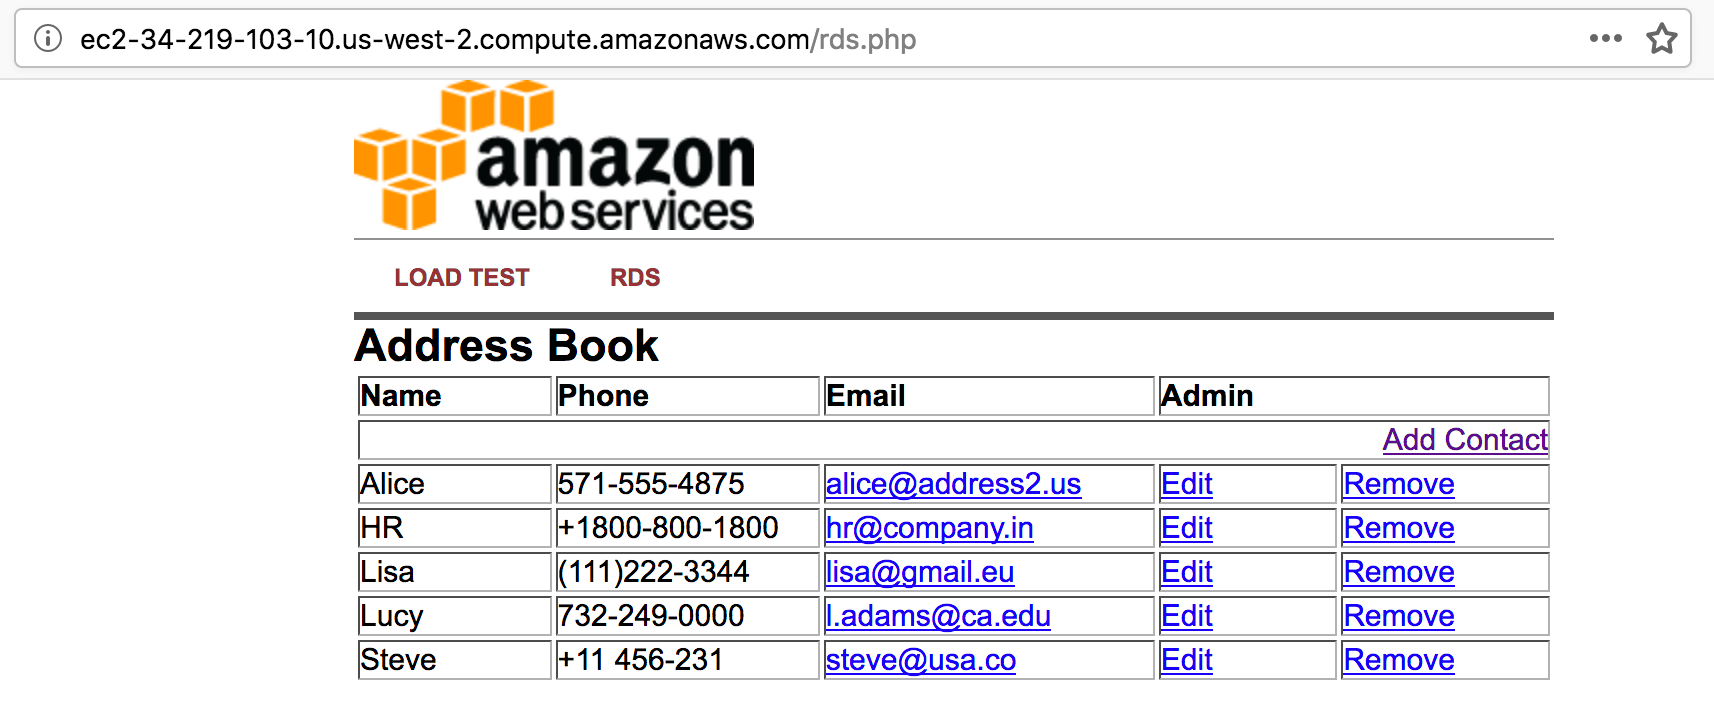
12. (Optional) Test database operations
Feel free to play around with the address book and add/edit/remove content from your RDS database by using the Add Contact, Edit, and Remove links in the Address Book. The changes made to the address book in this tutorial are shown.
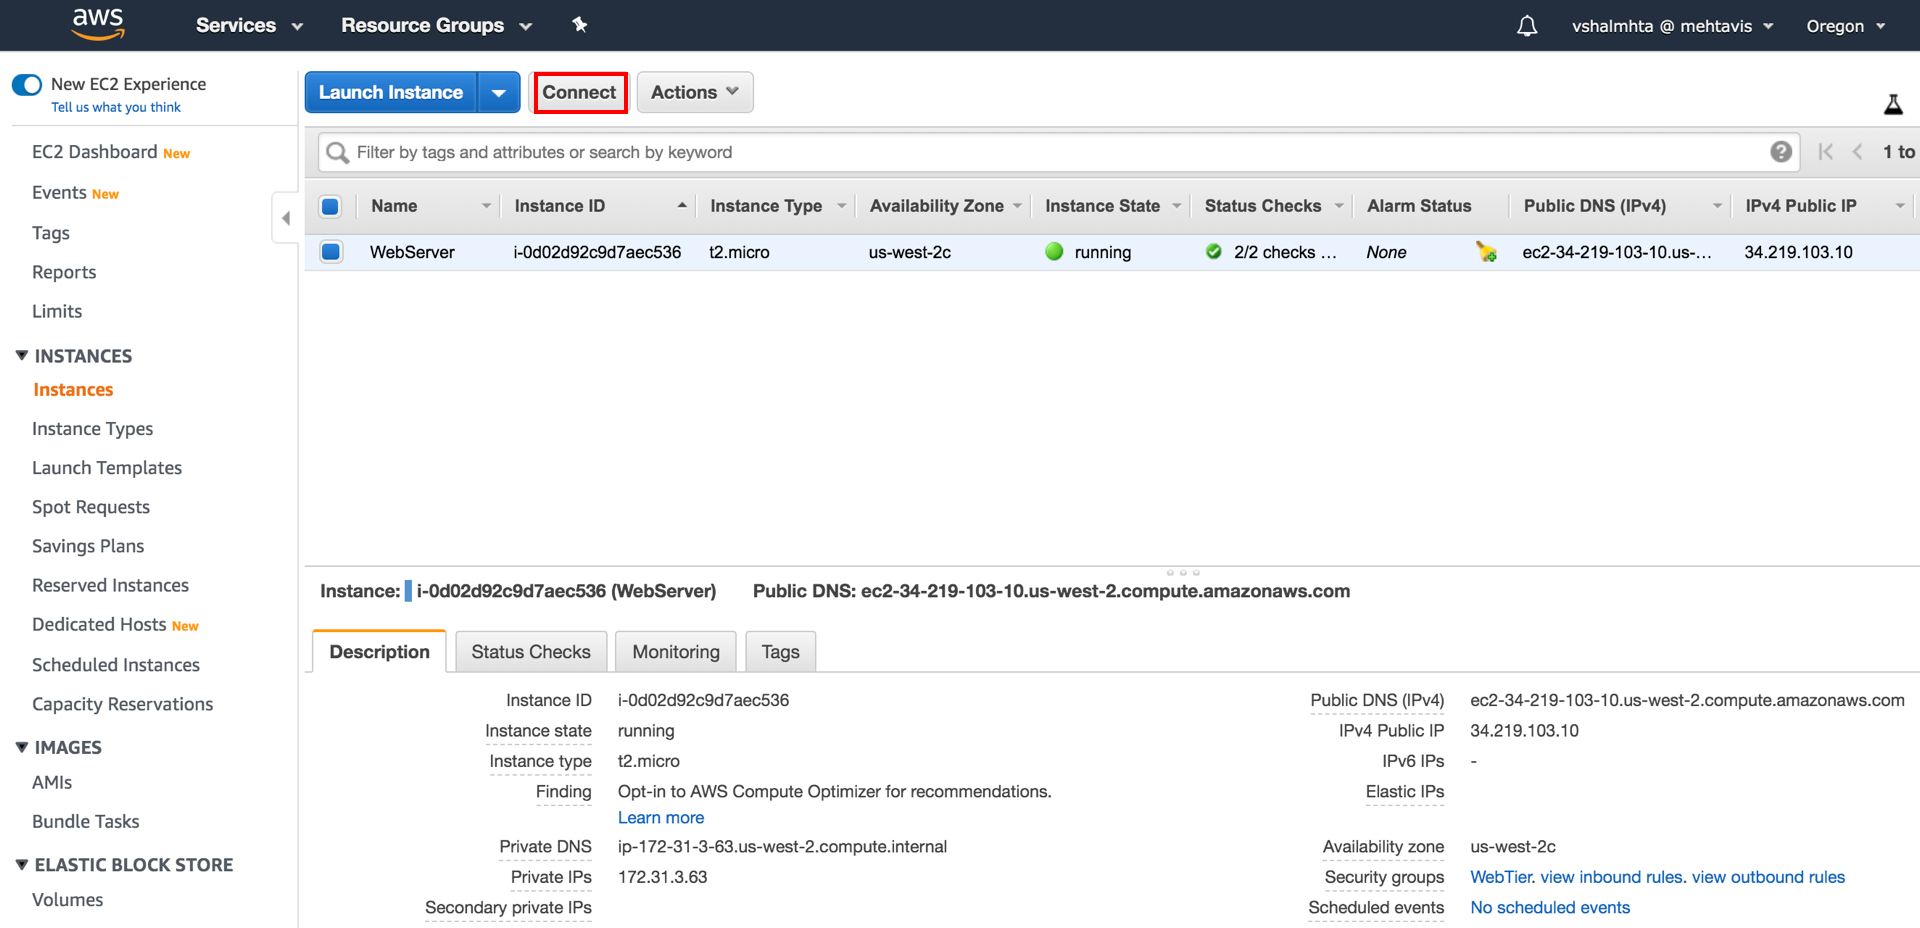
13. Connect to Instance
Navigate to the EC2 console, choose the EC2 instance (Webserver) and choose Connect.
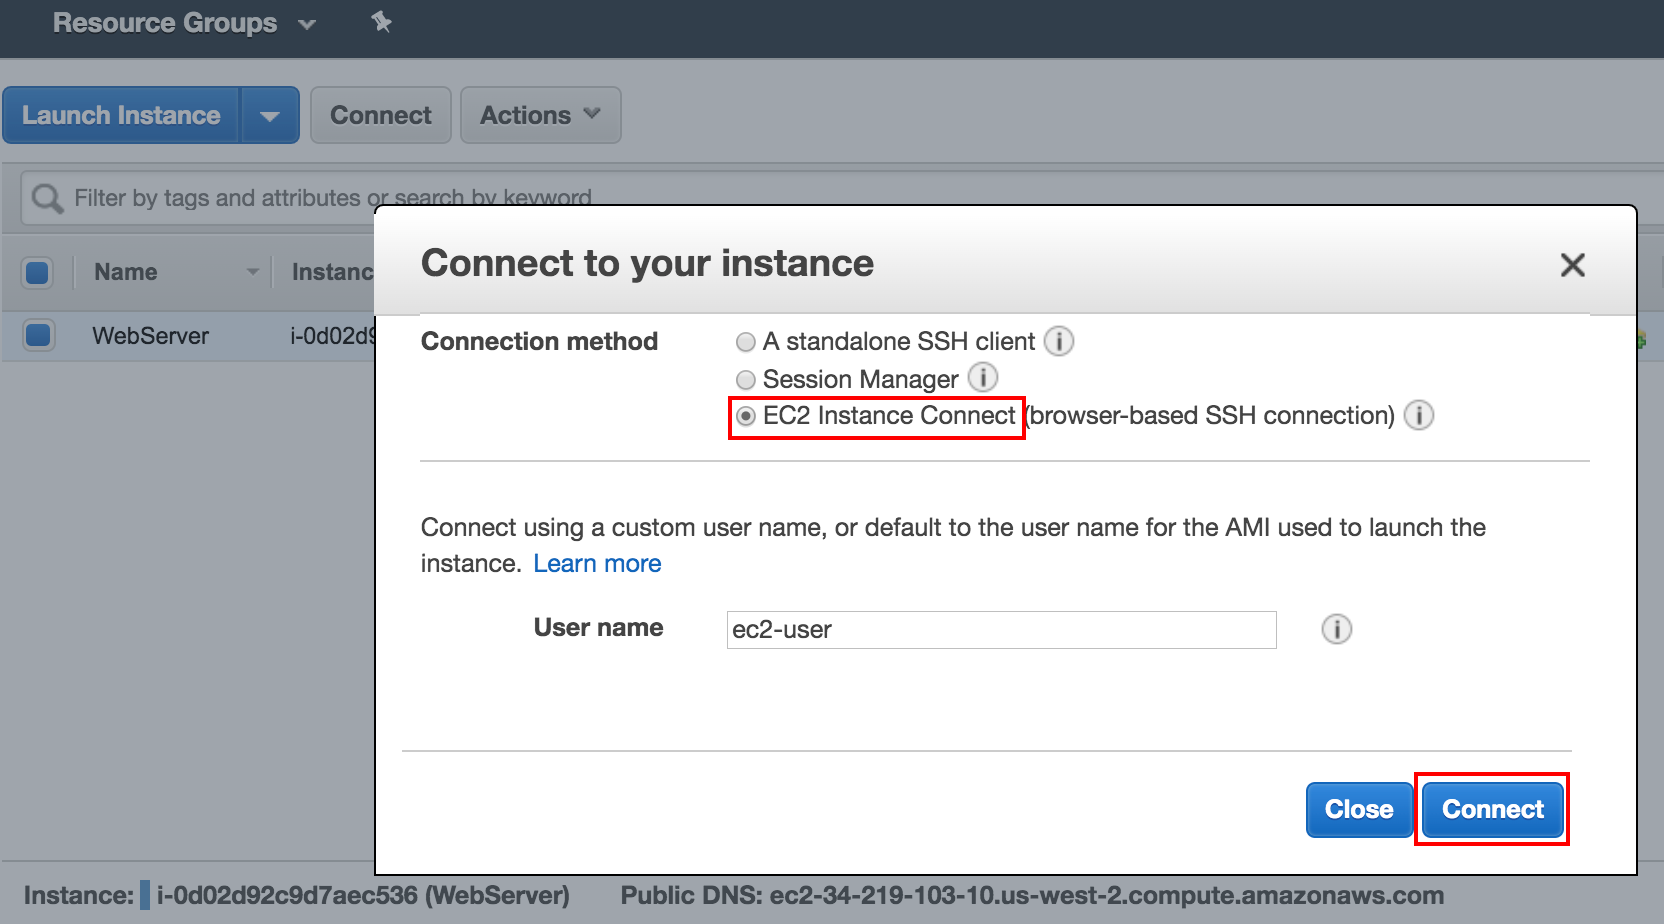
14. Choose a connection method
In the Connect to your instance dialog box, choose EC2 Instance Connect (browser-based SSH connection) and then choose Connect. A browser window opens displaying the EC2 instance command line interface (CLI).
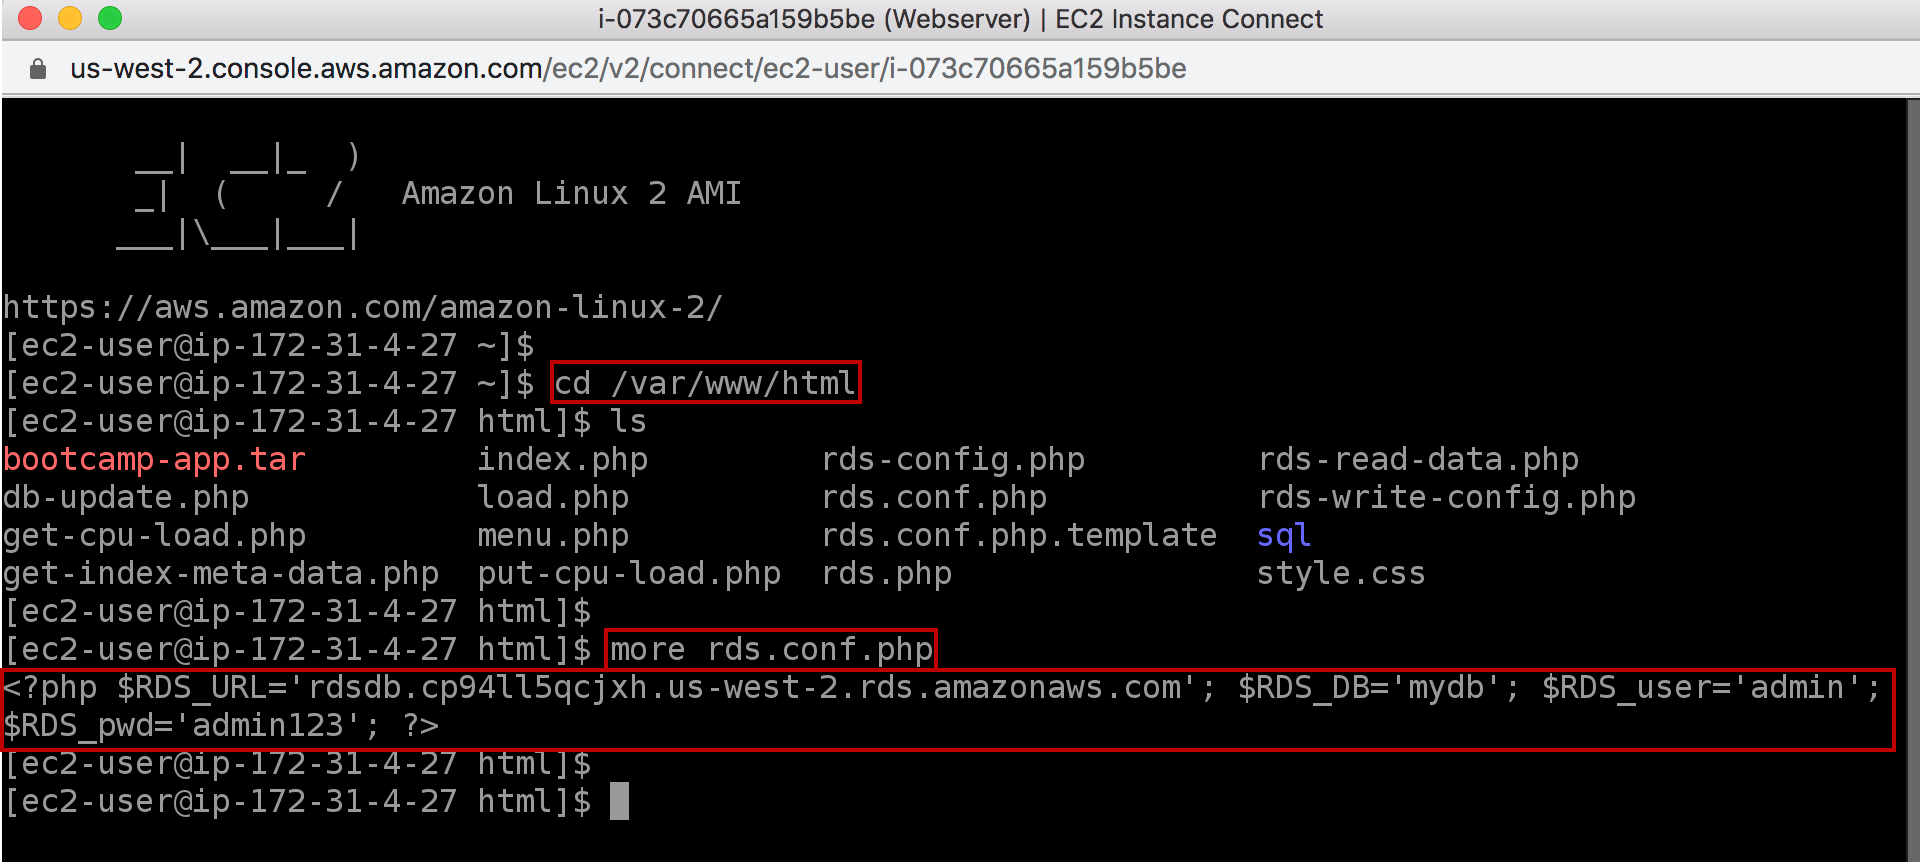
15. Review configuration
From the command line, navigate to the directory /var/www/html. List the files and directories by issuing ls command. View the content of the file rds.conf.php by using more command. This configuration file has captured the information about the Database Endpoint DNS name, credentials, and the name of database, which you had entered while connecting to the database from the application. You will also revisit this file later.
Create Aurora Read Replica
Amazon RDS uses the MySQL DB engines' binary log replication functionality to create a special type of DB cluster called an Aurora Read Replica for a source MySQL DB instance. Updates made to the source MySQL DB instance are asynchronously replicated to the Aurora Read Replica. In this step, you will create Aurora Read Replica and monitor the replication progress.
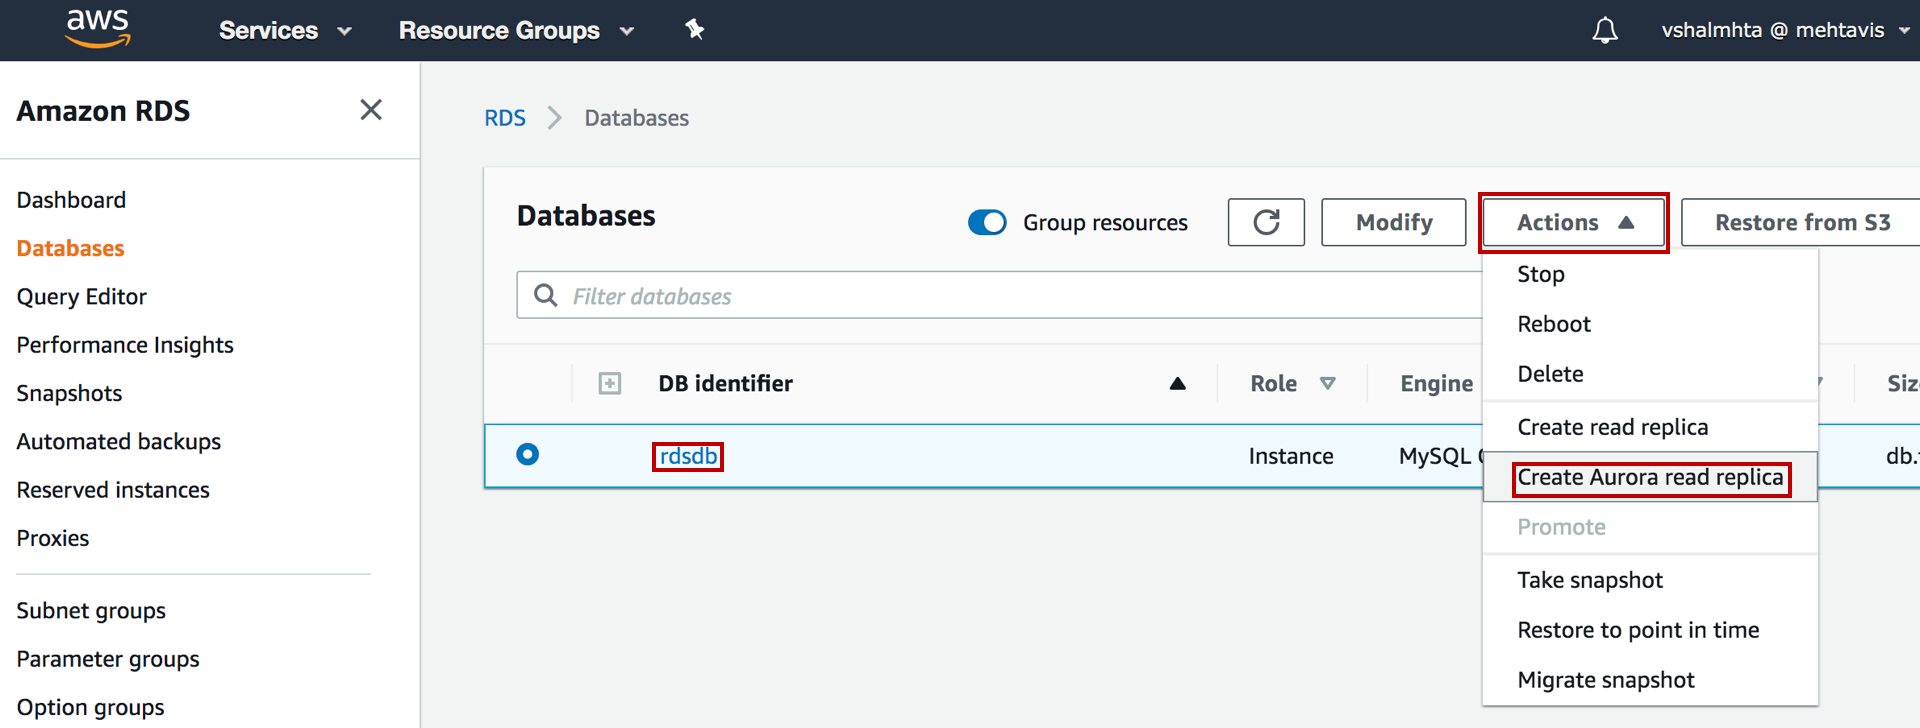
1. Create Aurora read replica
Open the Amazon RDS console, and from the left navigation pane, choose Databases, and then choose the MySQL DB instance that you want to use as the source for your Aurora Read Replica. Under the Actions drop down, choose Create Aurora read replica.
2. Configure replica settings
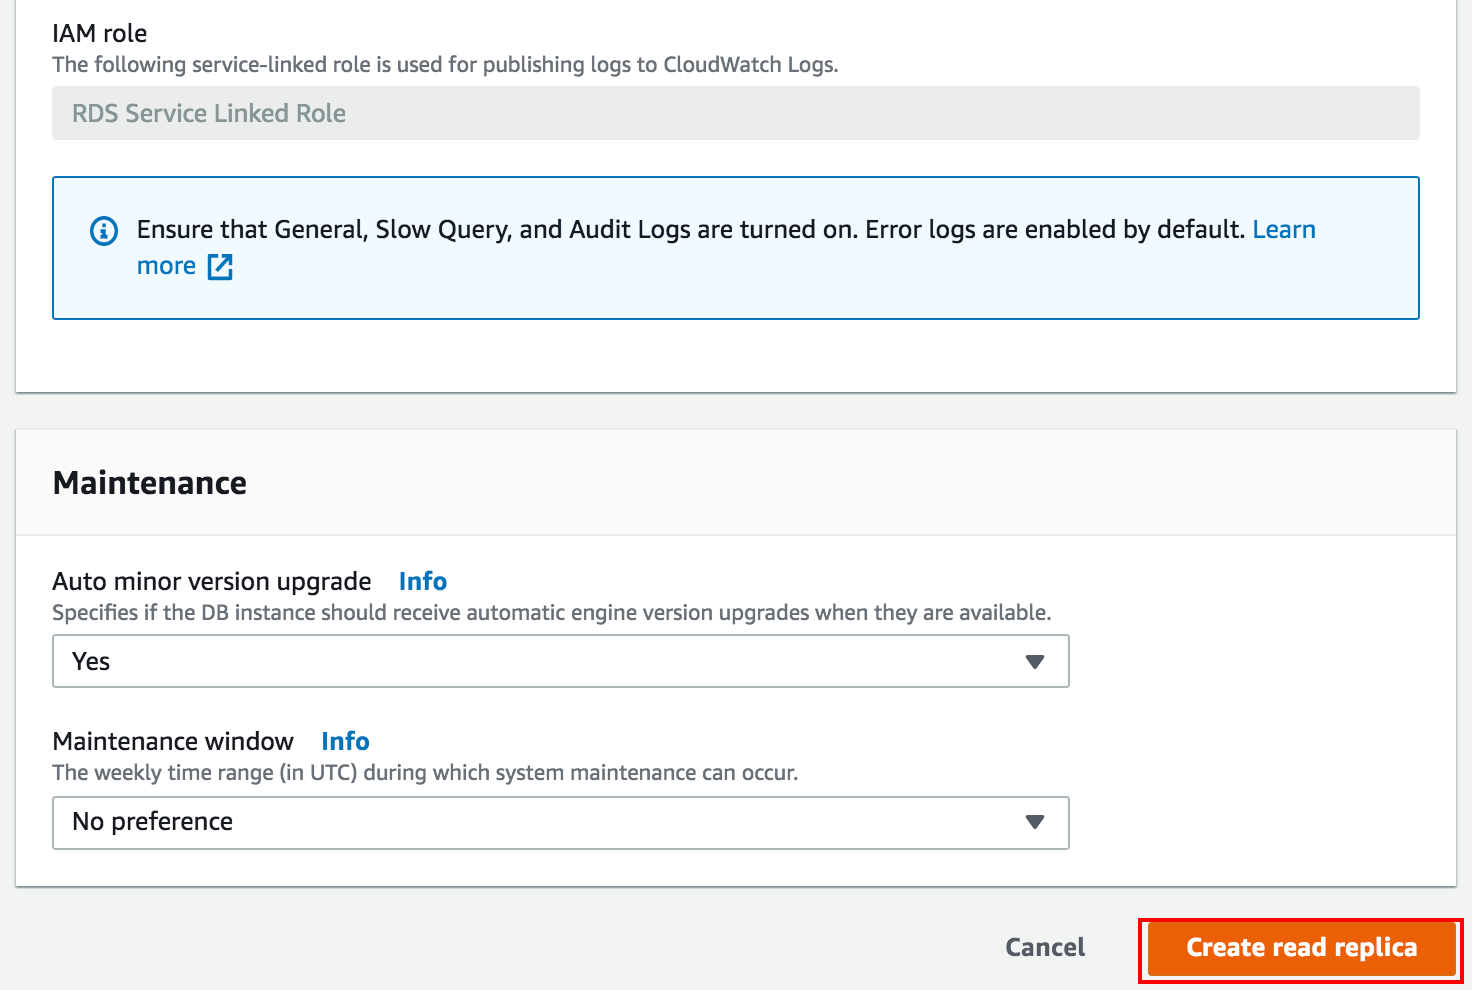
For the purpose of this tutorial, you will configure the Aurora Read Replica with default values and give the DB instance identifier an appropriate name as shown in the example.
Choose Create read replica

3. Create read replica
Choose Create read replica
4. Monitor creation status
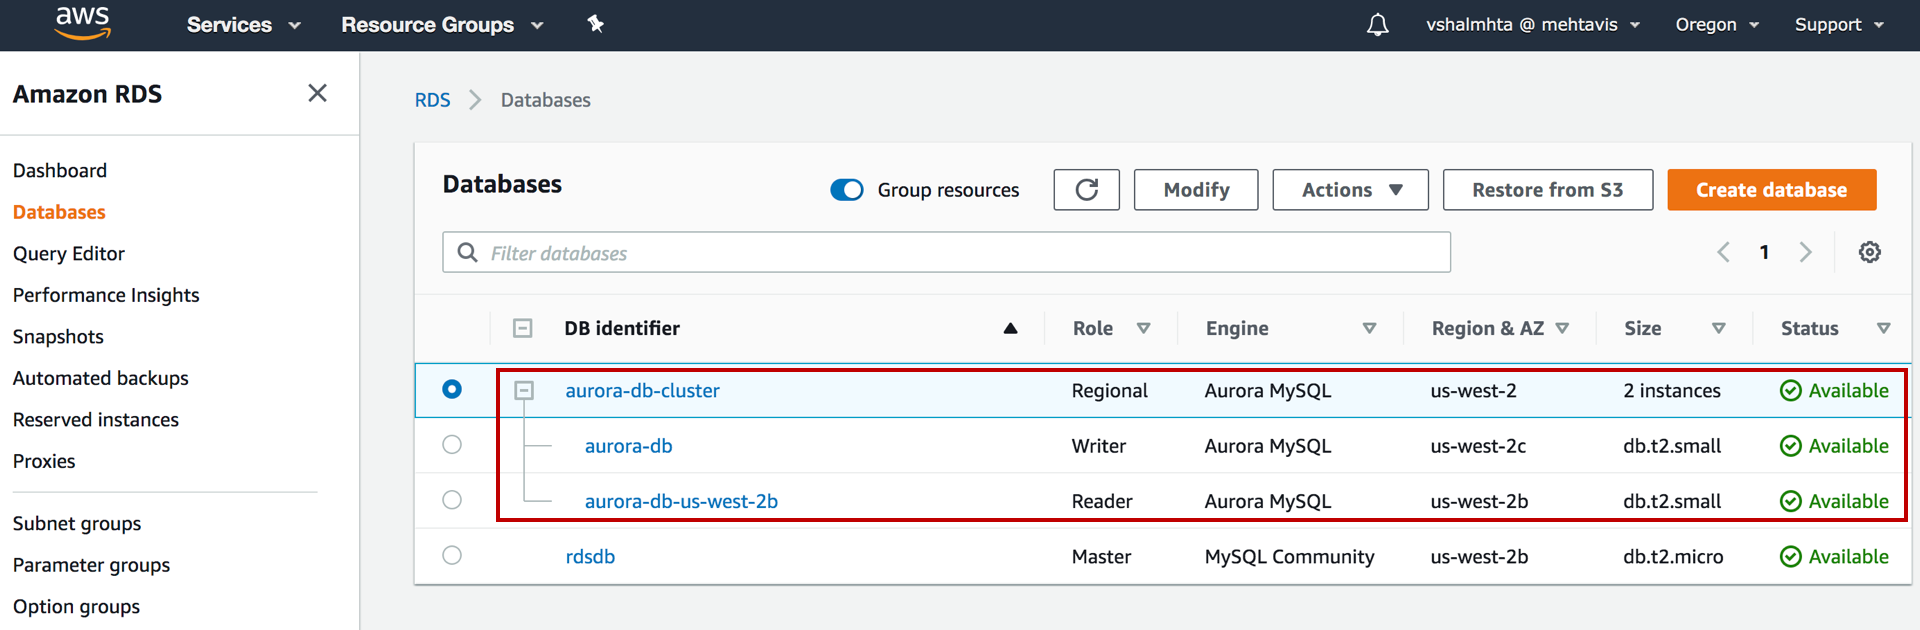
Aurora DB Cluster is created with 2 instances: writer and reader. After few minutes the status of the DB cluster changes to Available. Note that the source RDS DB Instance rdsdb Role changes to that of Master (from the role of Instance as seen in step 1)
5. View cluster details
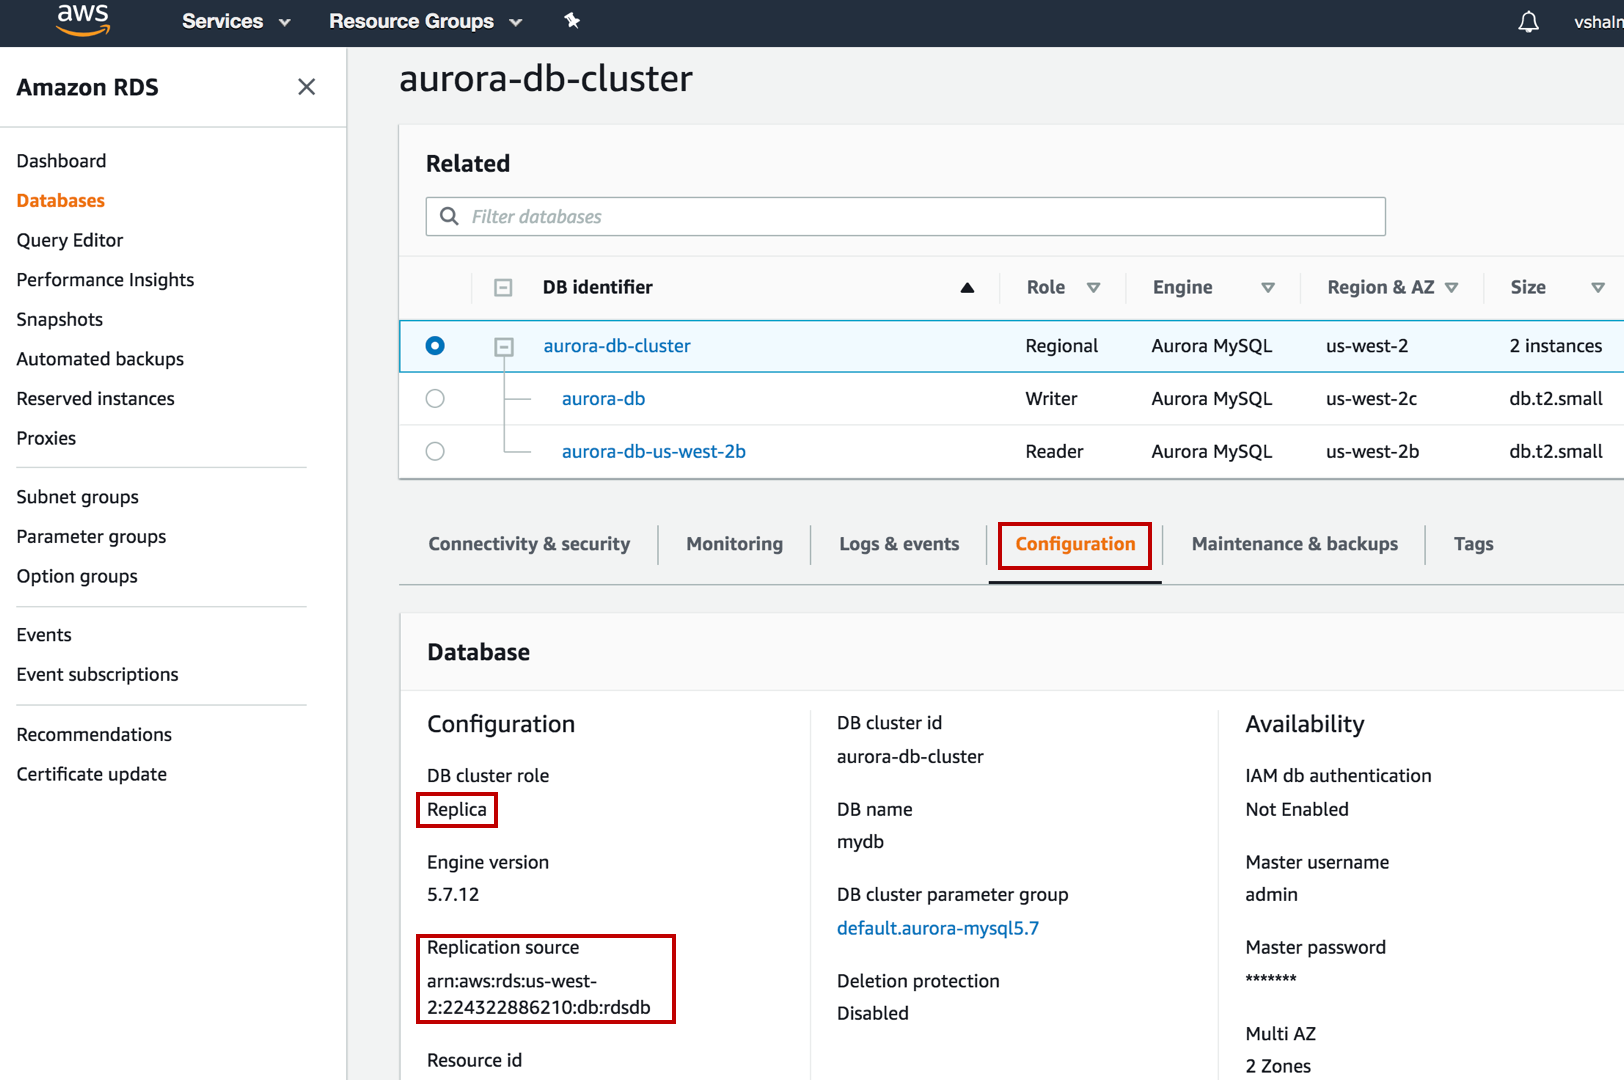
Click on the Aurora DB cluster to display its details. Click on Configuration tab, under Database section confirm the DB cluster role is Replica and the Replication source is the ARN of RDS MySQL DB Instance rdsdb.
6. Copy writer endpoint
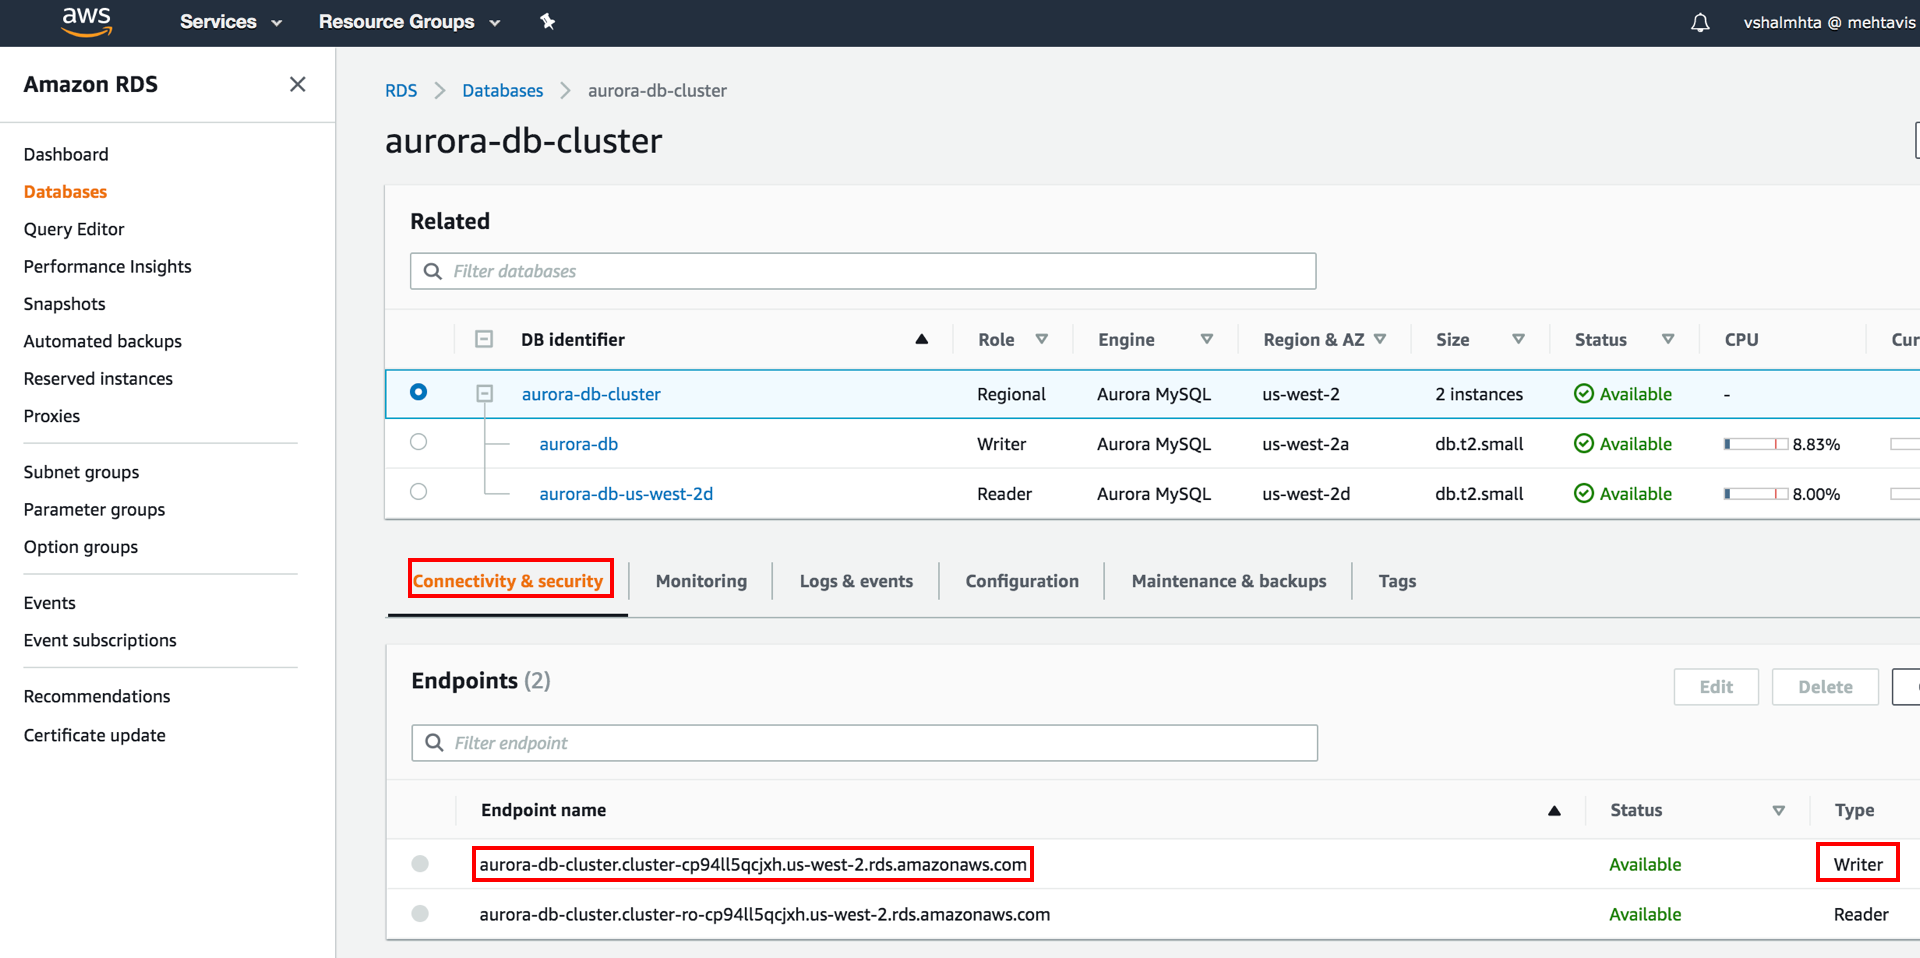
Click on Connectivity & security tab, under the Endpoints section note down the Endpoint name of Writer instance type – for this tutorial it is aurora-db-cluster.cluster-cp94ll5qcjxh.us-west-2.rds.amazonaws.com.
Change RDS DB instance to read-only mode
Before you can promote the Aurora Read Replica to a stand-alone DB cluster and redirect your application to the endpoint for the Aurora Read Replica, stop any write transactions from being written to the source RDS MySQL DB instance. The way to do this is by modifying the read_only parameter in the parameter group assigned to the RDS DB instance.
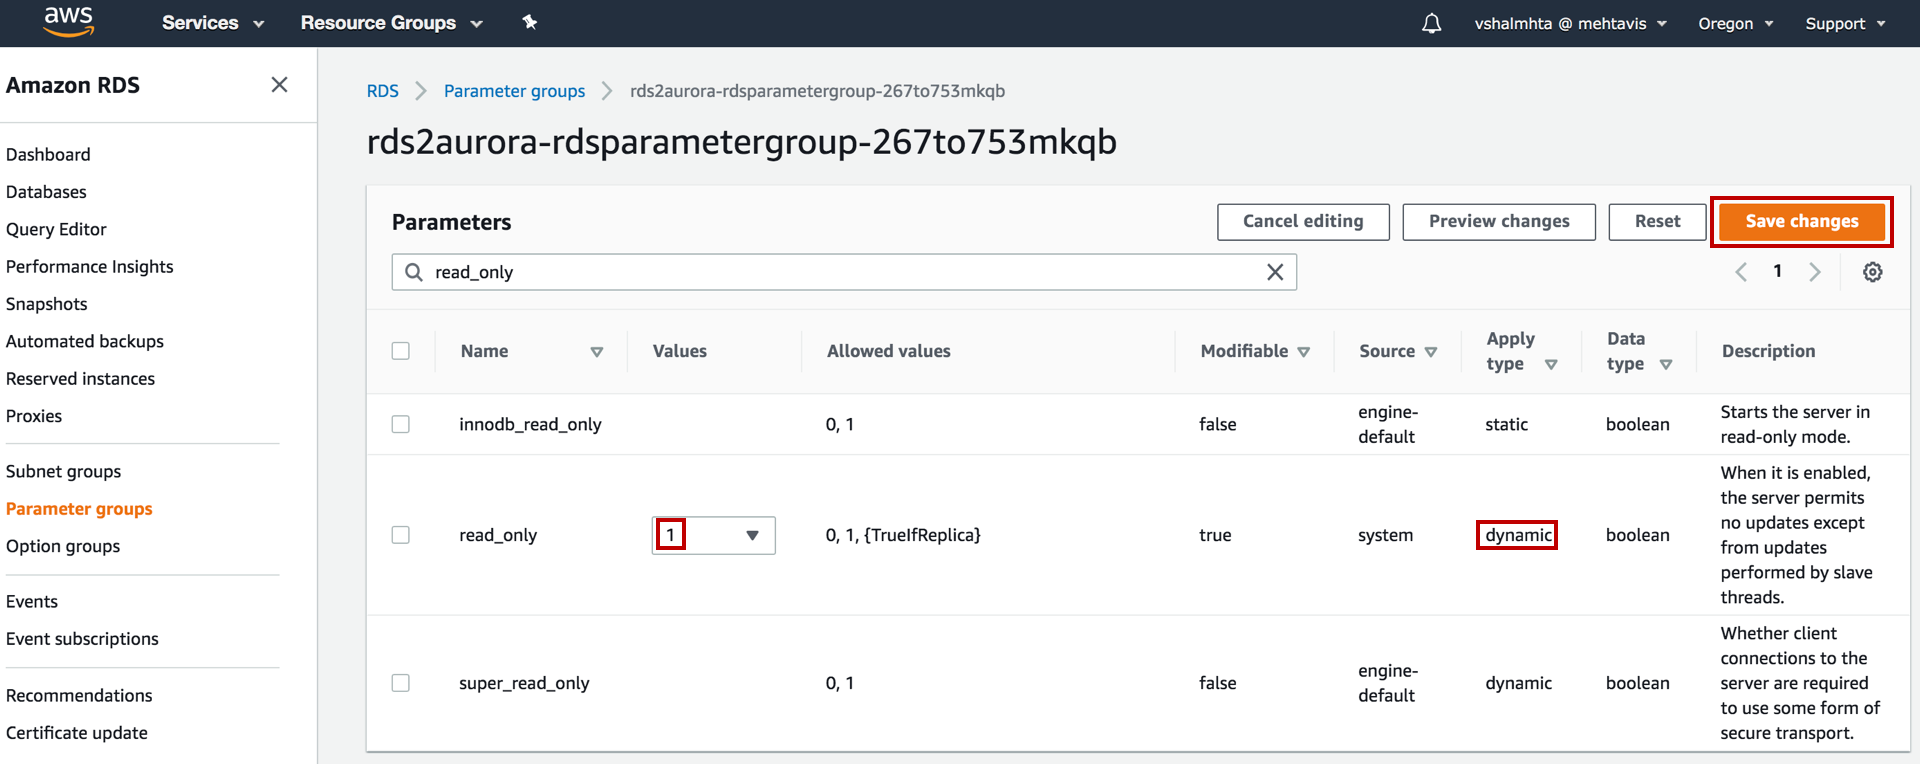
1. Open parameter group
From RDS console, navigate to Parameter group, and select the custom Parameter group (that was created by CloudFormation template) and for Parameter group actions, choose Edit.

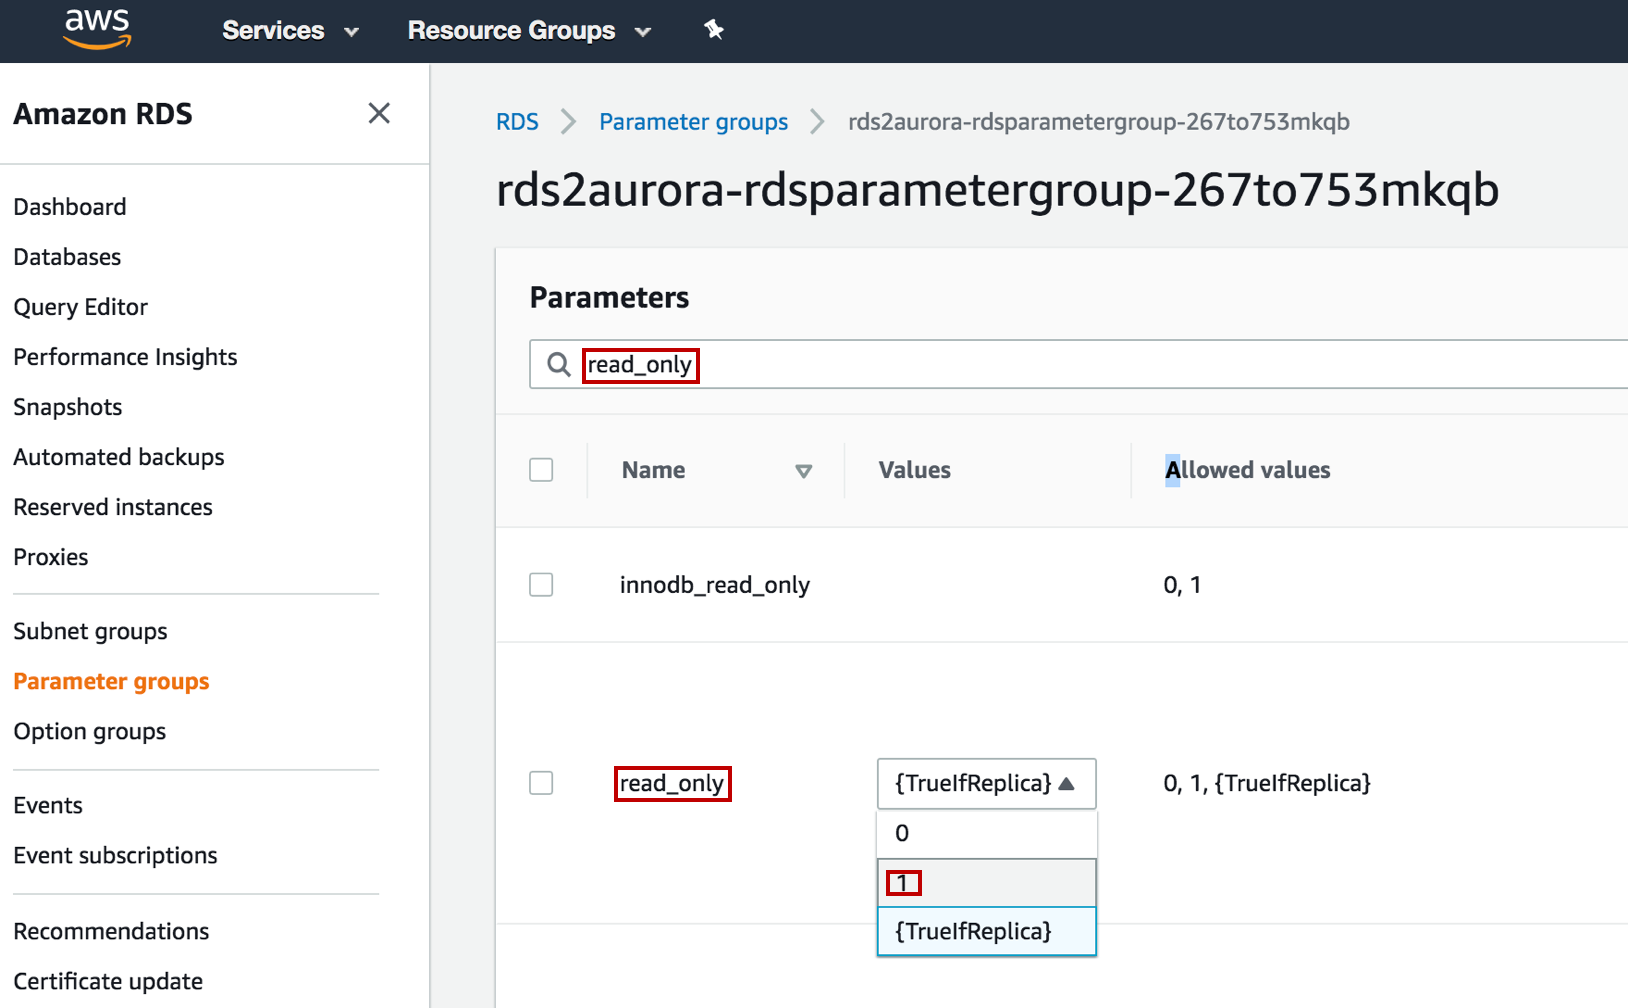
2. Modify read_only parameter
Under Parameters section, search for read_only parameter. The default value is{TrueIfReplica}. Explicitly set this value to 1, which converts the instance into a read-only mode.
3. Save parameter changes
Choose Save changes. This parameter has a dynamic apply type, which means that its setting takes effect immediately and doesn’t require a reboot.
Confirm the replication is complete from RDS to Aurora
1. Monitor the replication process
After the Amazon Aurora cluster has been created and loaded with the initial set of data, Amazon RDS service establishes binlog replication from the RDS MySQL instance to the Amazon Aurora cluster.
You can monitor this replication process by observing the CloudWatch metric Aurora Binlog Replica Lag on the Amazon Aurora cluster.
The AuroraBinlogReplicaLag metric is defined as the amount of time a replica DB cluster running on Aurora with MySQL compatibility lags behind the source DB cluster. Choose Monitoring tab and under CloudWatch section, search for binlog metric as shown.
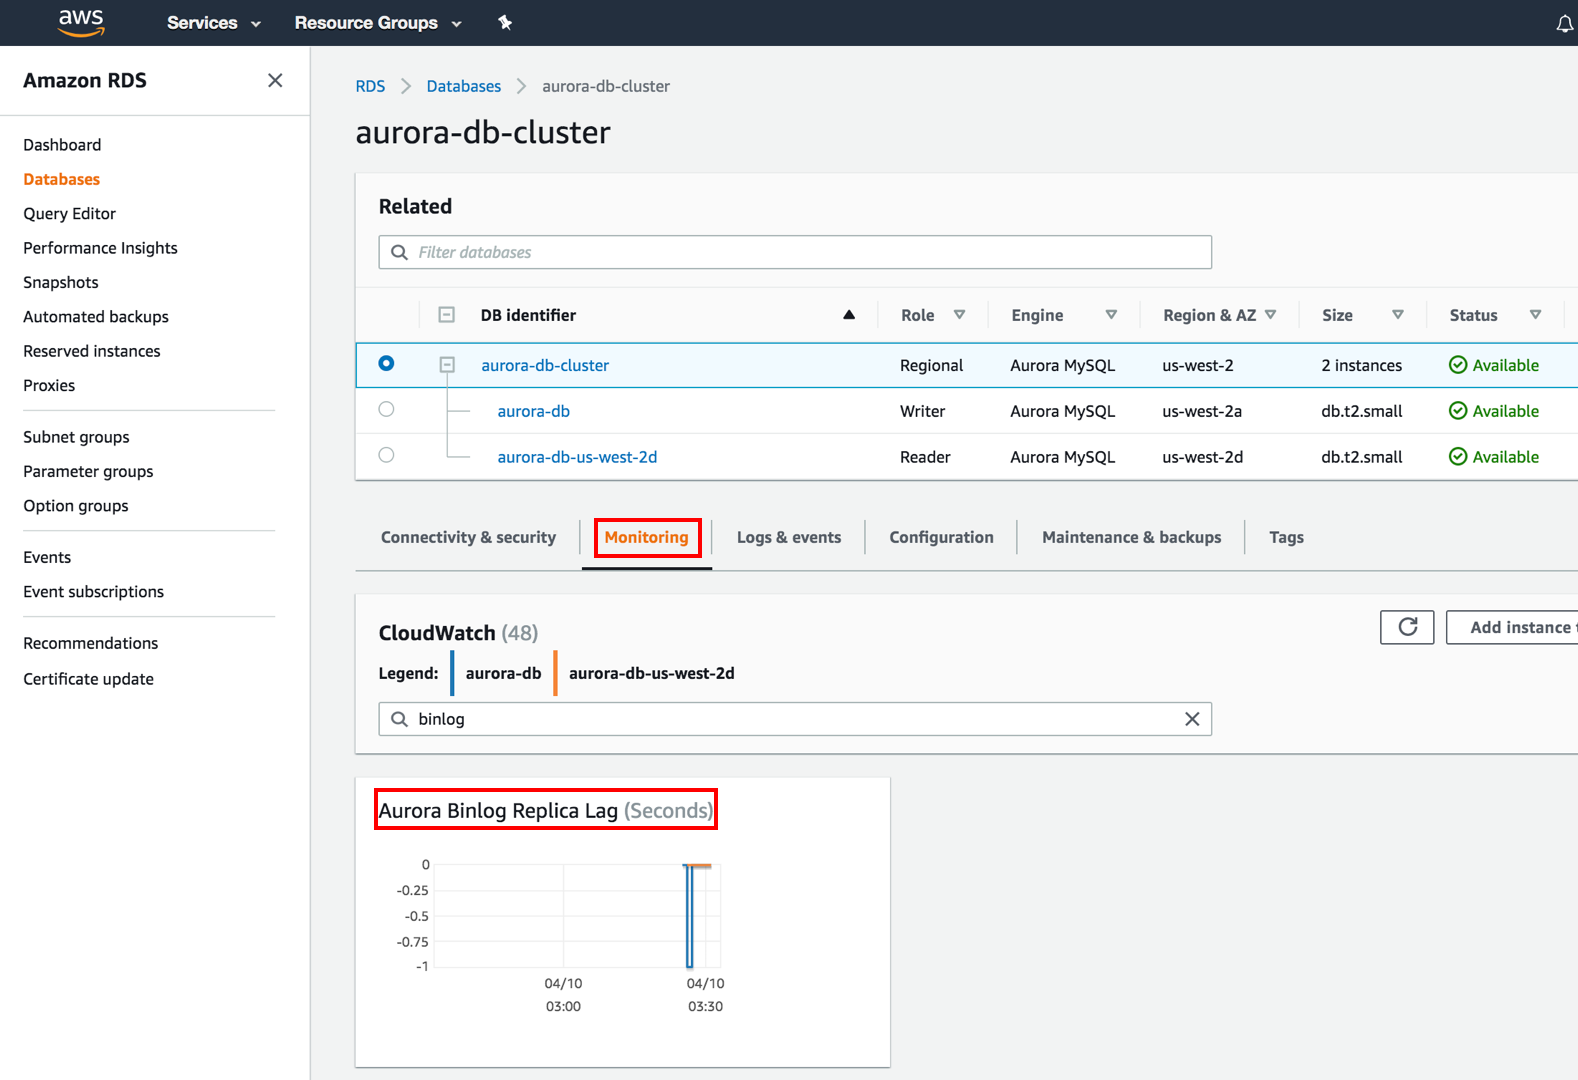
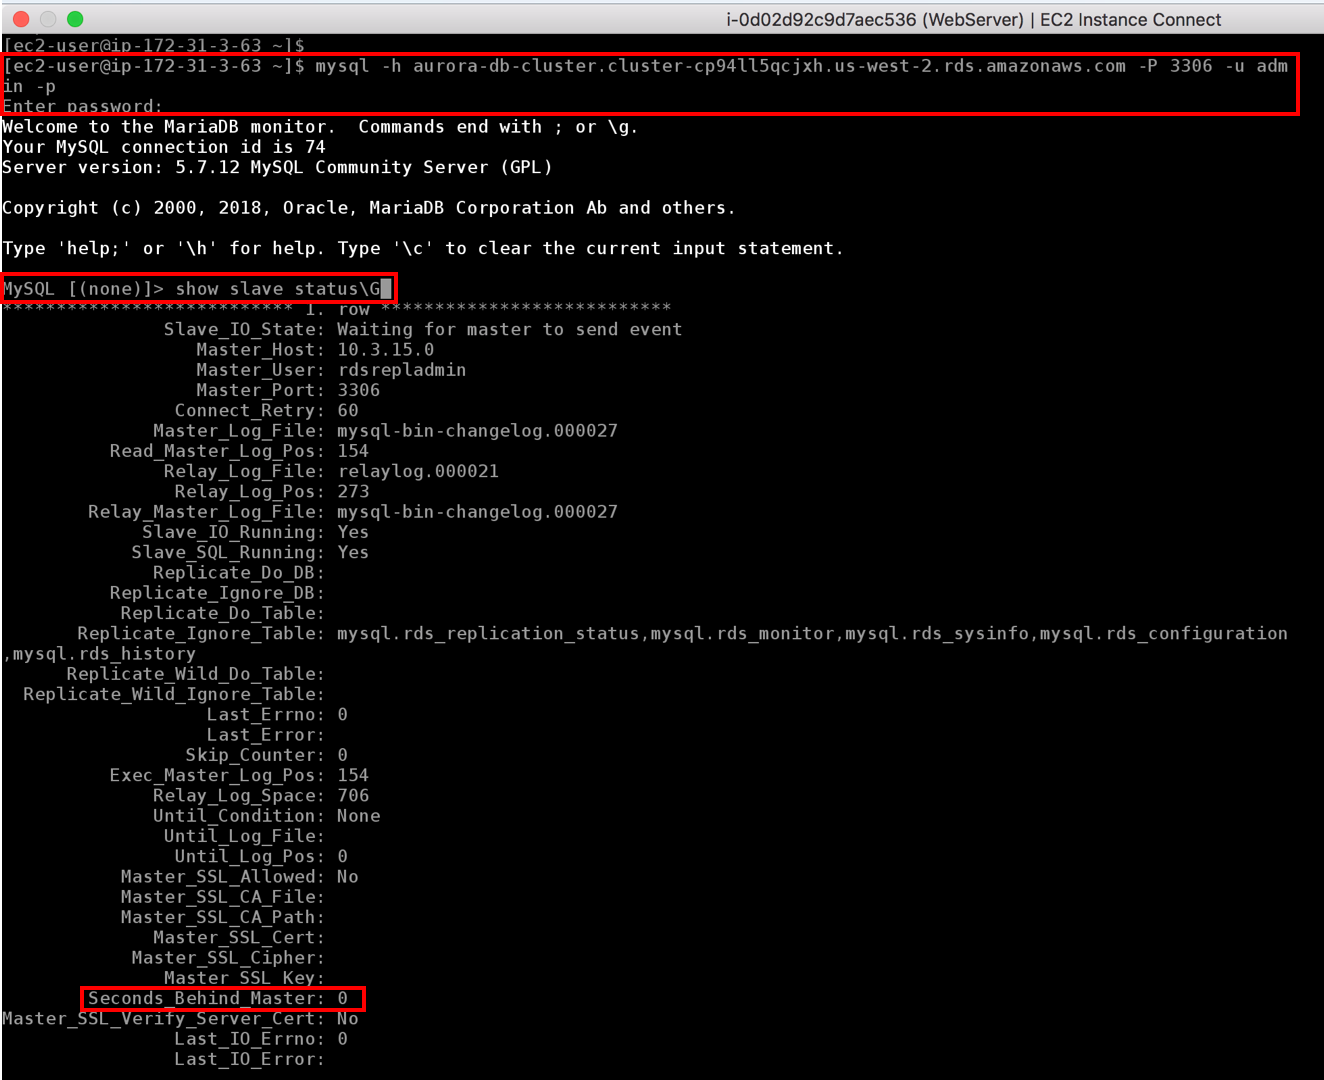
2. View the binlog replica lag
The CloudWatch metric Aurora Binlog Replica Lag gives you a high-level view of the binlog replica lag, you can find a more precise measurement by logging in to the newly created Amazon Aurora cluster. To do so, use the MySQL client and run the command show slave status\G. This command returns a lot of very useful information, but the specific metric that we want is Seconds_Behind_Master. When this metric reaches 0 i.e. there is no replication lag, your newly created Amazon Aurora cluster is in sync with your original RDS MySQL DB instance.
Follow the instructions to SSH into your EC2 instance and then connect to your Aurora DB Cluster’s Writer Endpoint aurora-db-cluster.cluster-cp94ll5qcjxh.us-west-2.rds.amazonaws.com and execute the command show slave status\G.
The Amazon Aurora cluster has the same master user name and master password as the source RDS DB instance.
At this point, the migration of database from the source RDS MySQL DB instance to Aurora DB Cluster is completed.
Promote Aurora Read Replica to Standalone Cluster
In this step, you will promote your Aurora Read Replica to be a Standalone Aurora Cluster. Promotion should complete fairly quickly, and you can read from and write to the Aurora Read Replica during promotion.
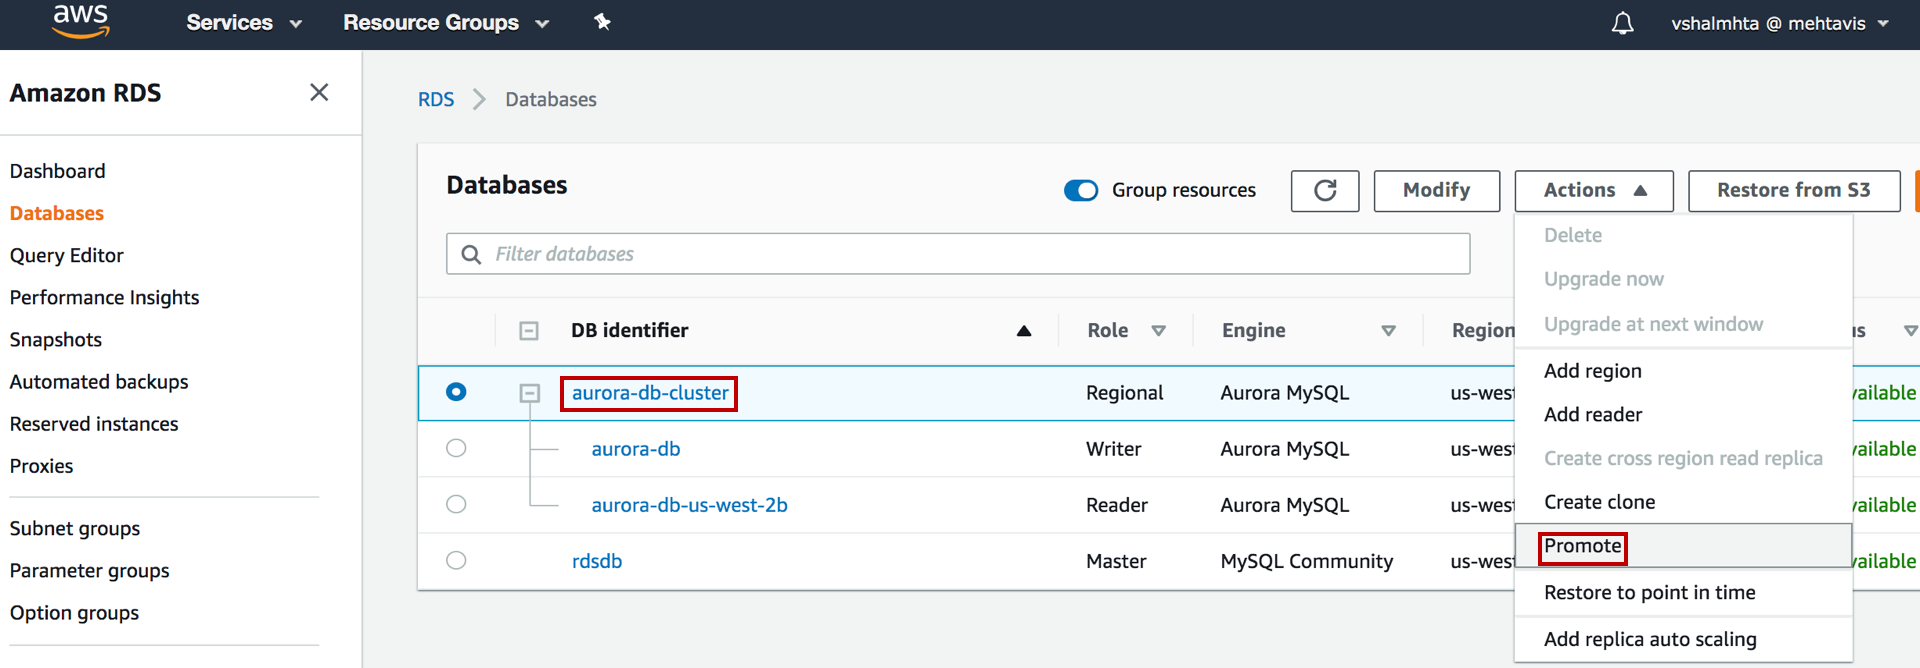
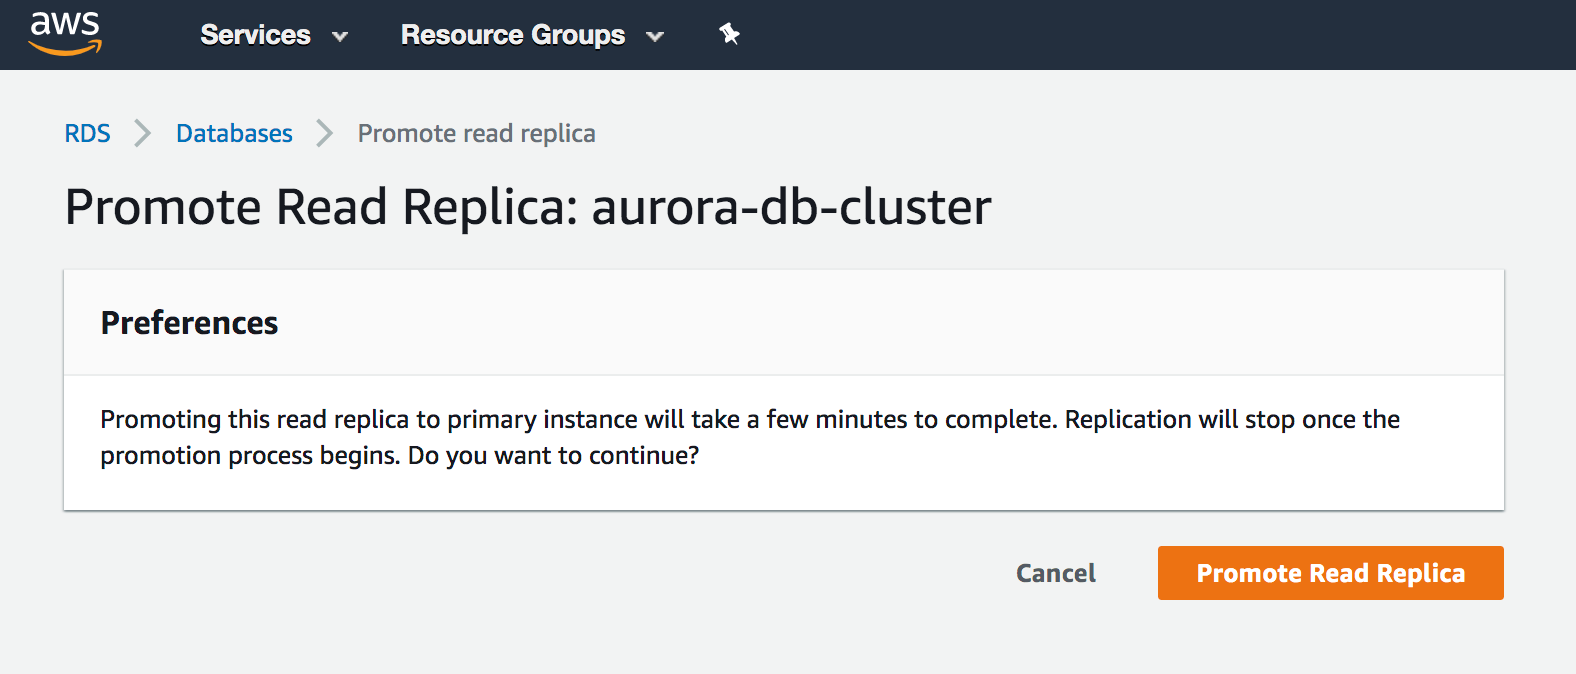
1. Promote the read replica
To promote an Aurora Read Replica to an Aurora DB cluster, navigate to Amazon RDS console. In the left navigation pane, choose Databases. Choose the DB cluster aurora-db-cluster for the Aurora Read Replica. For Actions, choose Promote.
2. Confirm promotion
Choose Promote Read Replica.
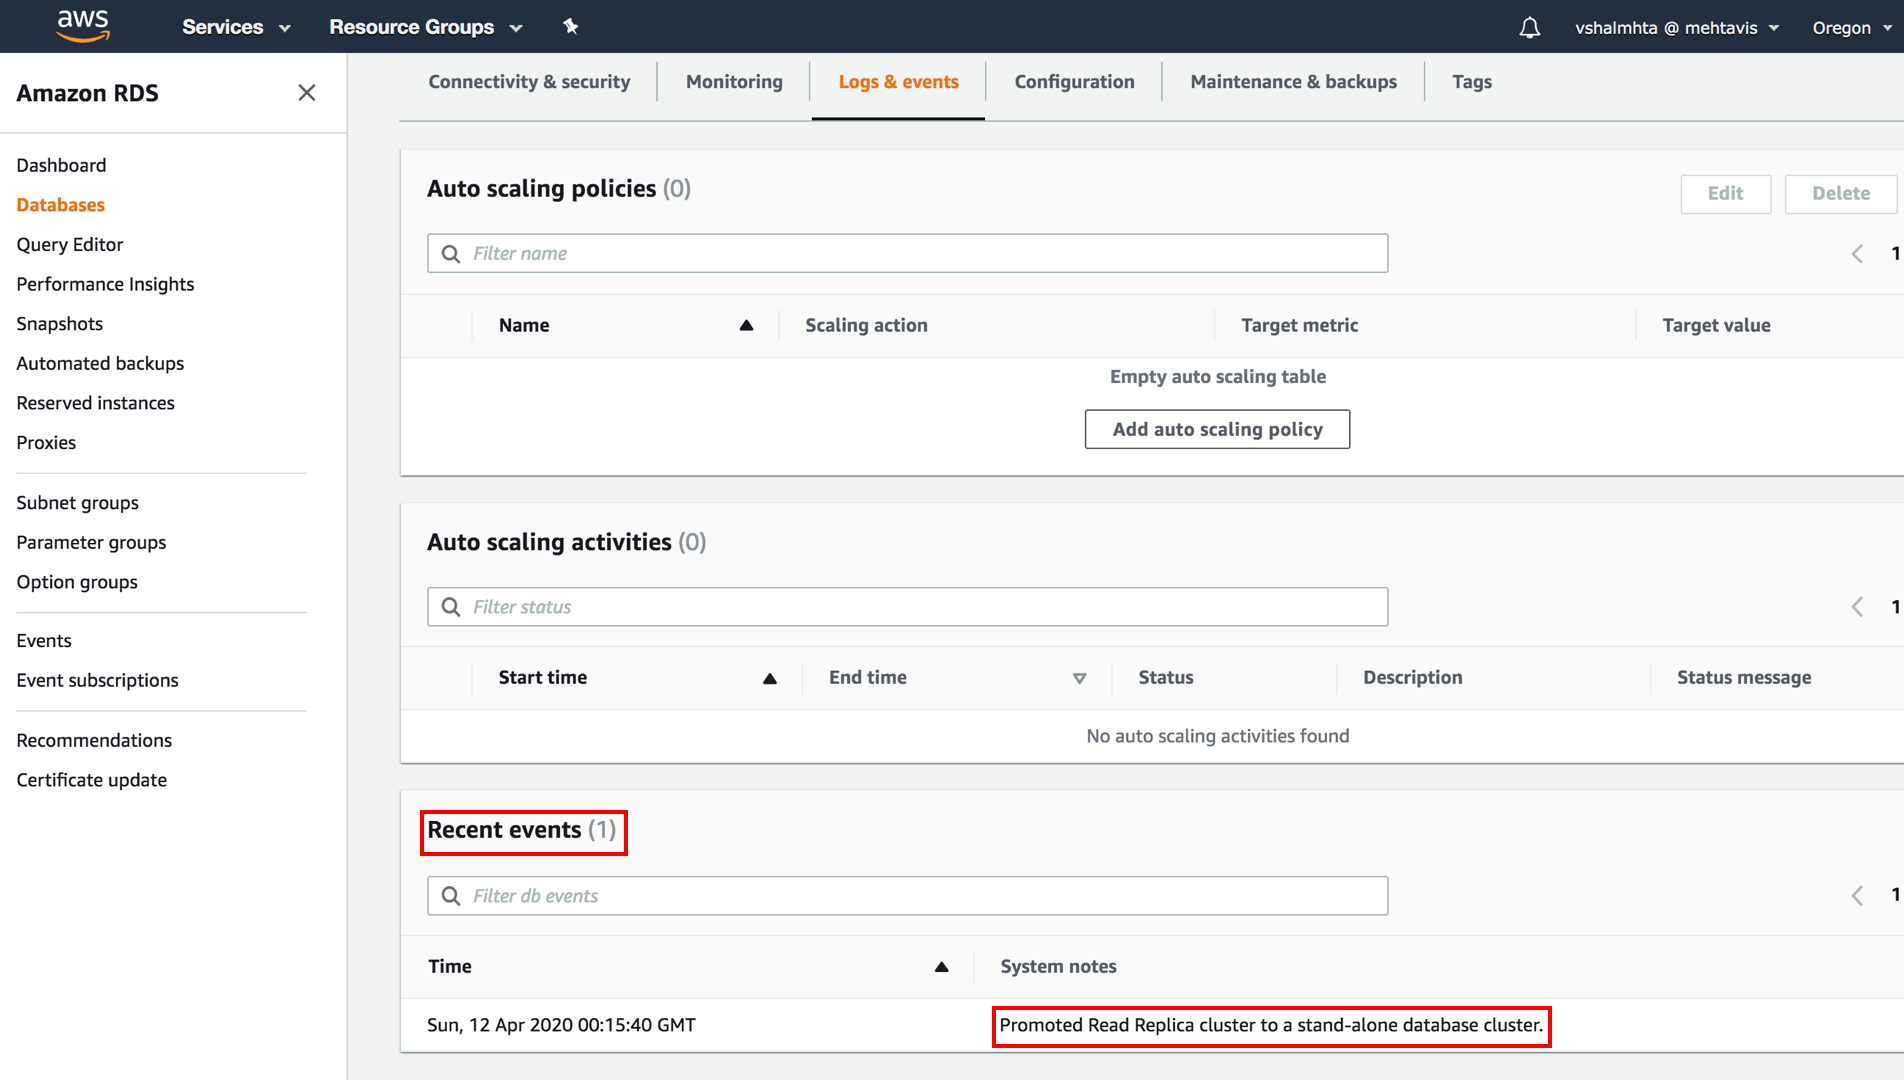
3. Verify promotion completed successfully
Confirm that the promotion process has been completed. Click on the Aurora DB cluster, choose Logs & events tab.

4. Confirm an event was logged
Scroll down to Recent events and confirm that there is a Promoted Read Replica cluster to stand-alone database cluster event logged.
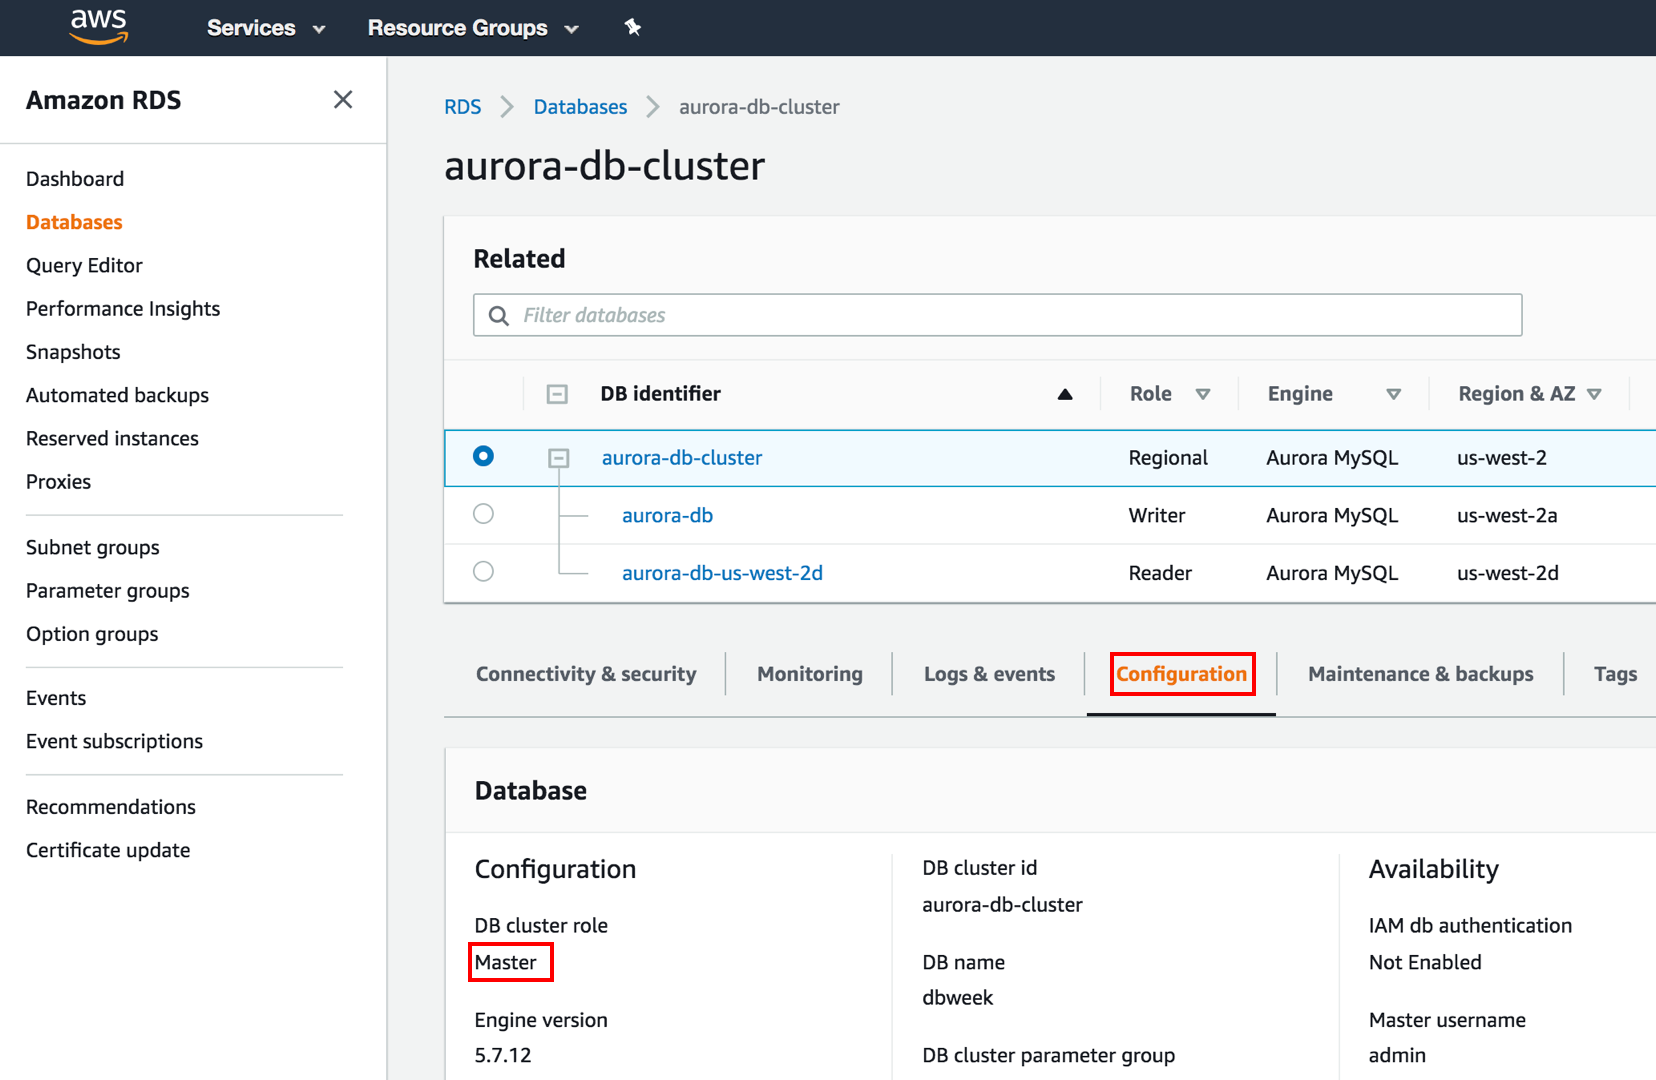
5. Verify the cluster role changed
The Aurora DB cluster role changes to Master as seen in Configuration tab under Database section. Prior to the Promotion event, the role was Replica.
6. Verify the database role changed
You will also notice that source RDS MySQL DB instance rdsdb is no longer in Master role (as seen in Step 2.3) and now has the role of Instance.

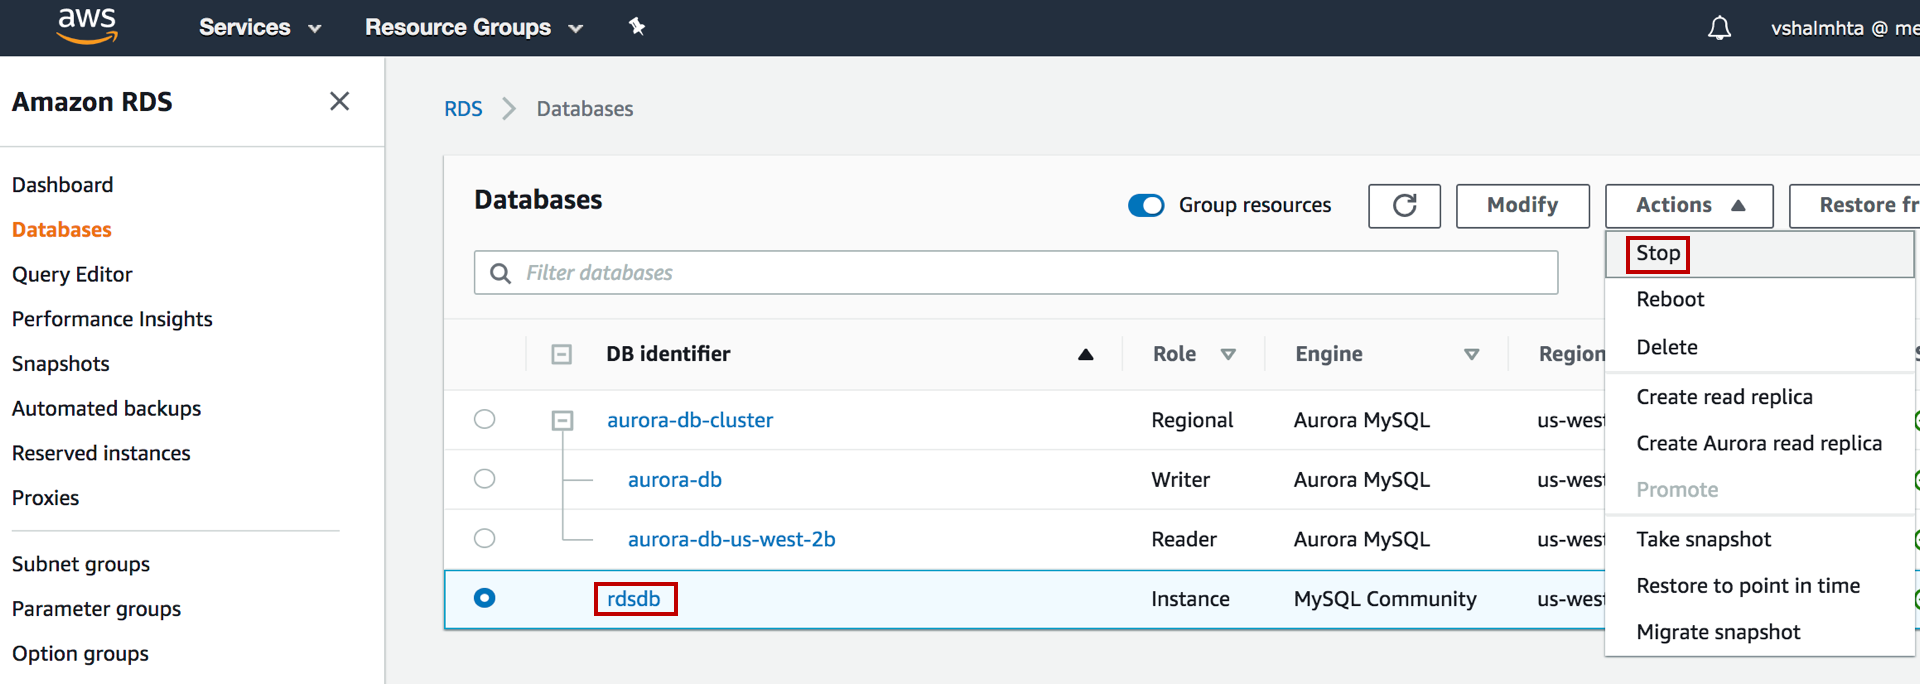
7. Stop the instance
After the promotion is complete, the source RDS MySQL DB Instance and the Aurora Read Replica are unlinked, and you can safely delete the RDS DB instance if you want to. AWS Recommends to take snapshot of production RDS DB Instance prior to its deletion.
In this tutorial, you are going to stop the RDS MySQL DB instance without creating snapshot. In the left navigation pane, choose Databases. Choose the source RDS DB instance rdsdb. For Actions, choose Stop.
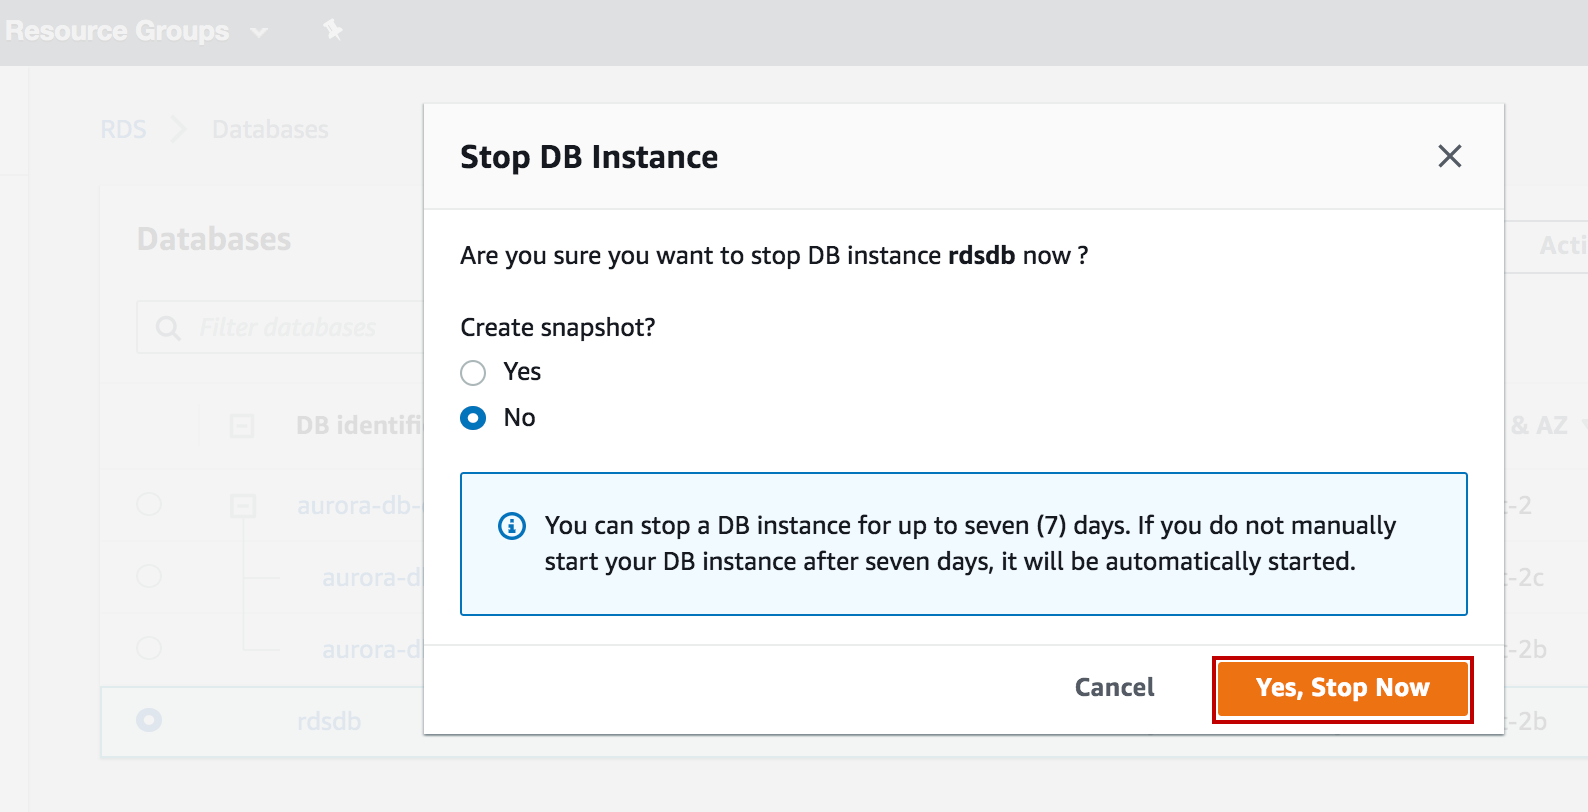
8. Confirm stop settings
Choose No for Create snapshot?
Then, choose Yes, Stop Now.
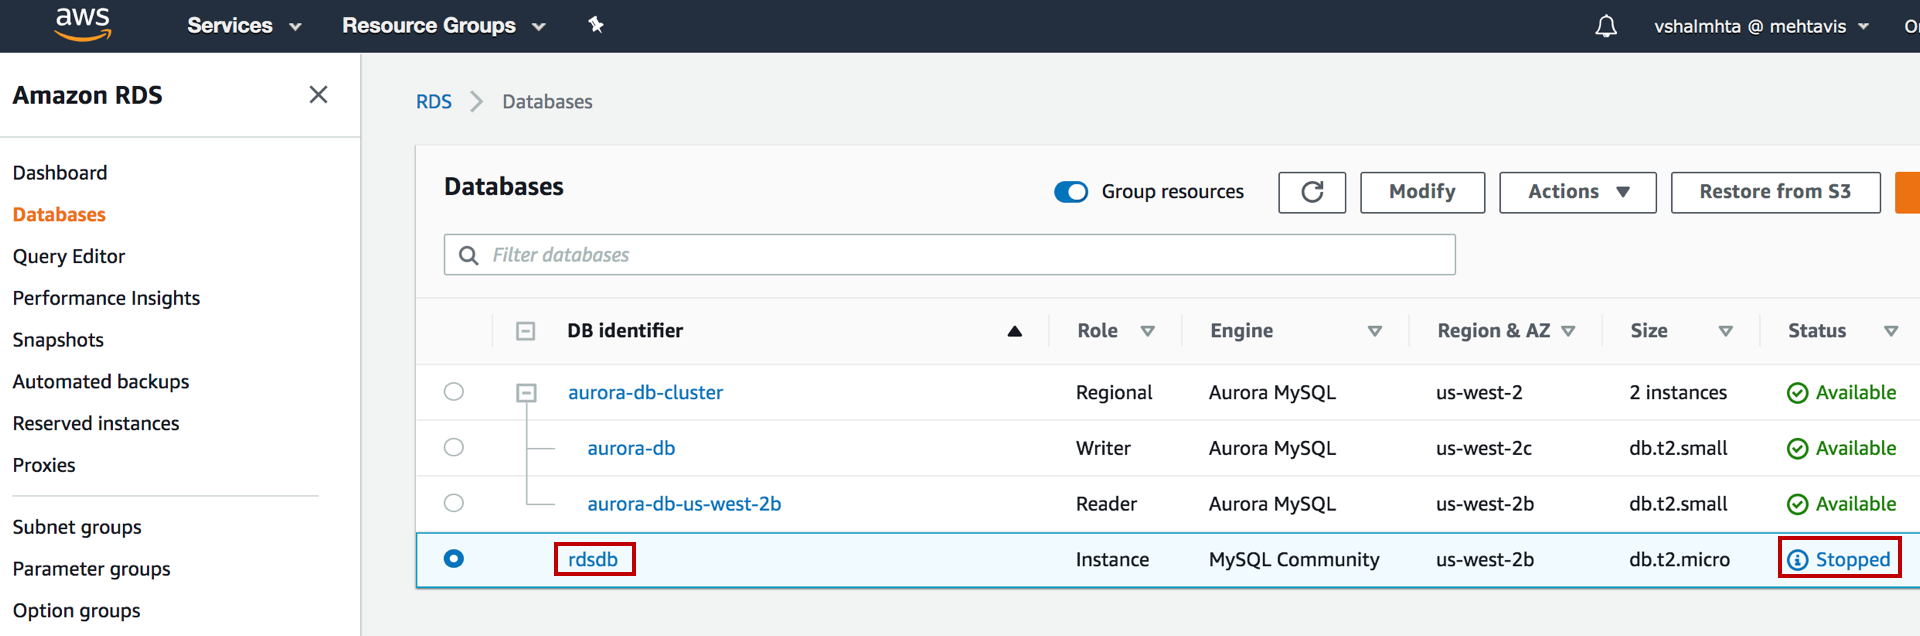
9. Verify the stopped state
You will see the RDS DB instance rdsdb is now in Stopped state.
Redirect application to use Standalone Aurora Cluster
The Application is now ready to start writing to Aurora Standalone Cluster.
1. Modify the configuration file
SSH into your web server EC2 instance, navigate to the directory /var/www/html. You will modify the file rds.conf.php by executing command sudo vi rds.conf.php.
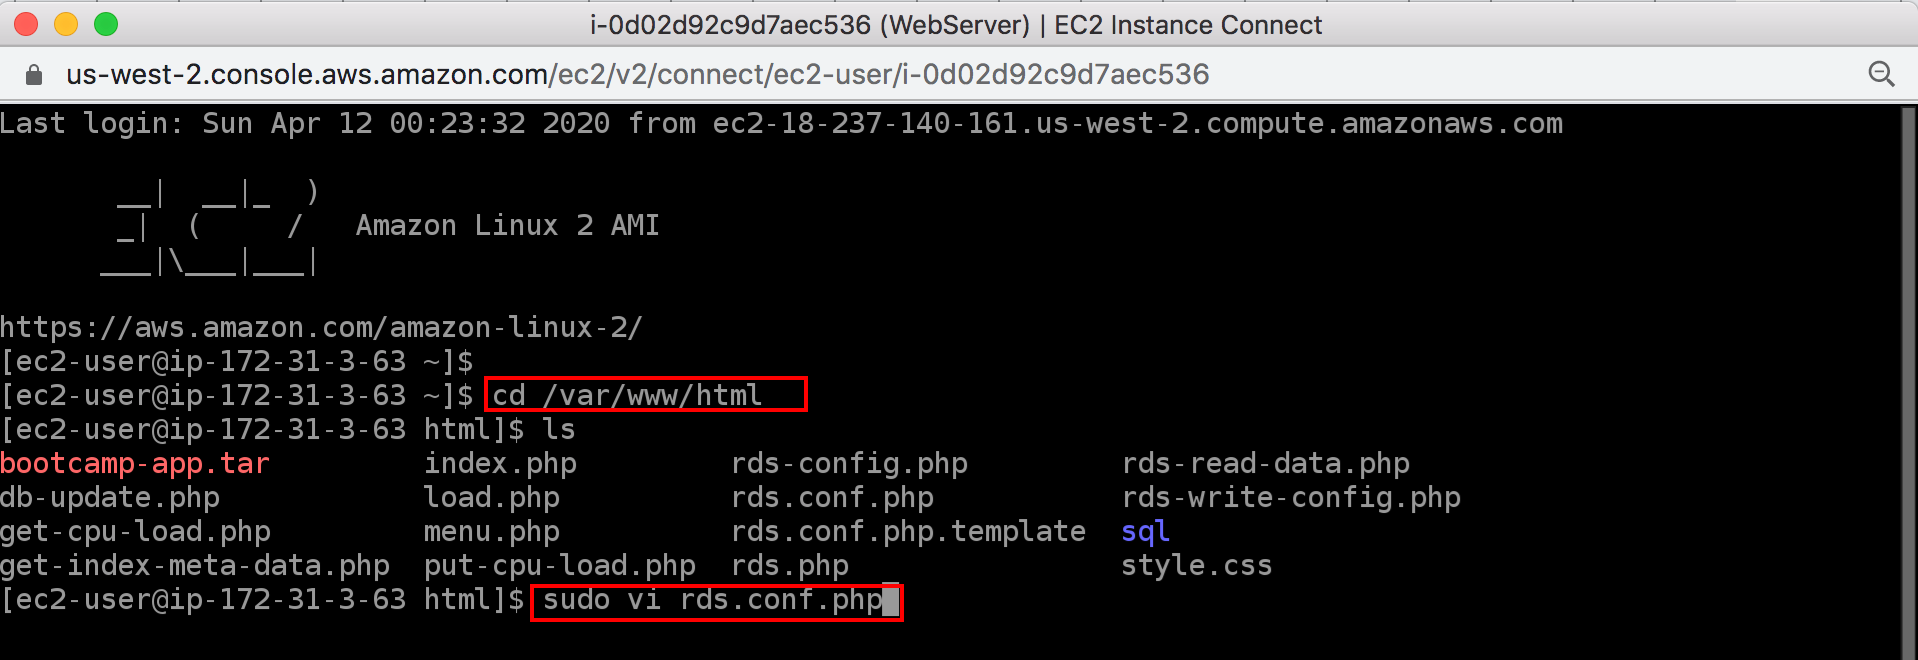
2. Configure the database endpoint
Change the RDS_URL parameter to Aurora Cluster Writer Node DNS name - aurora-db-cluster.cluster-cp94ll5qcjxh.us-west-2.rds.amazonaws.com. Then save the file.

3. View the configuration
Confirm that the changes are in effect, by reading the file again – cat rds.conf.php.
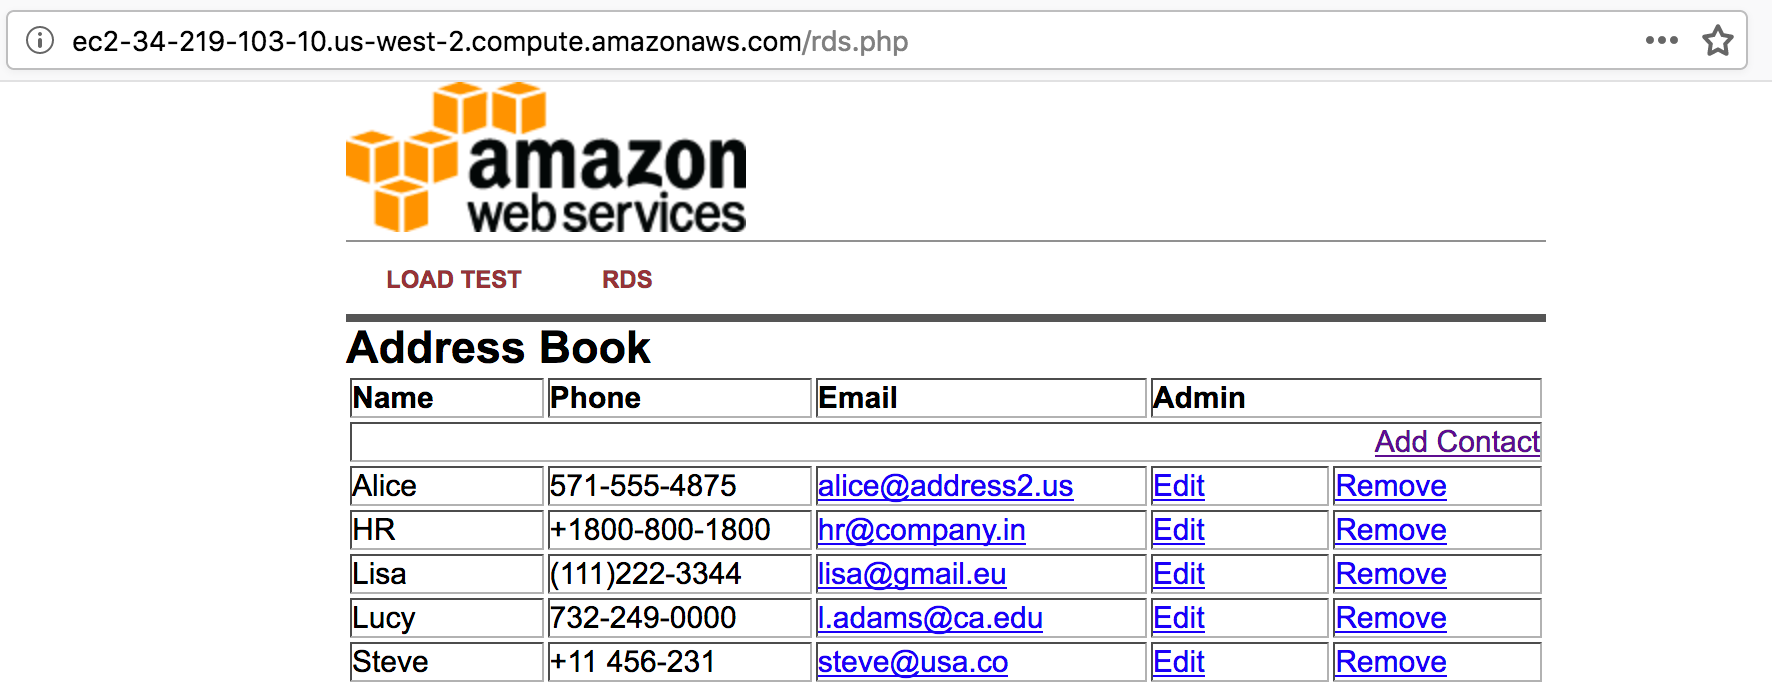
4. Check the application connection
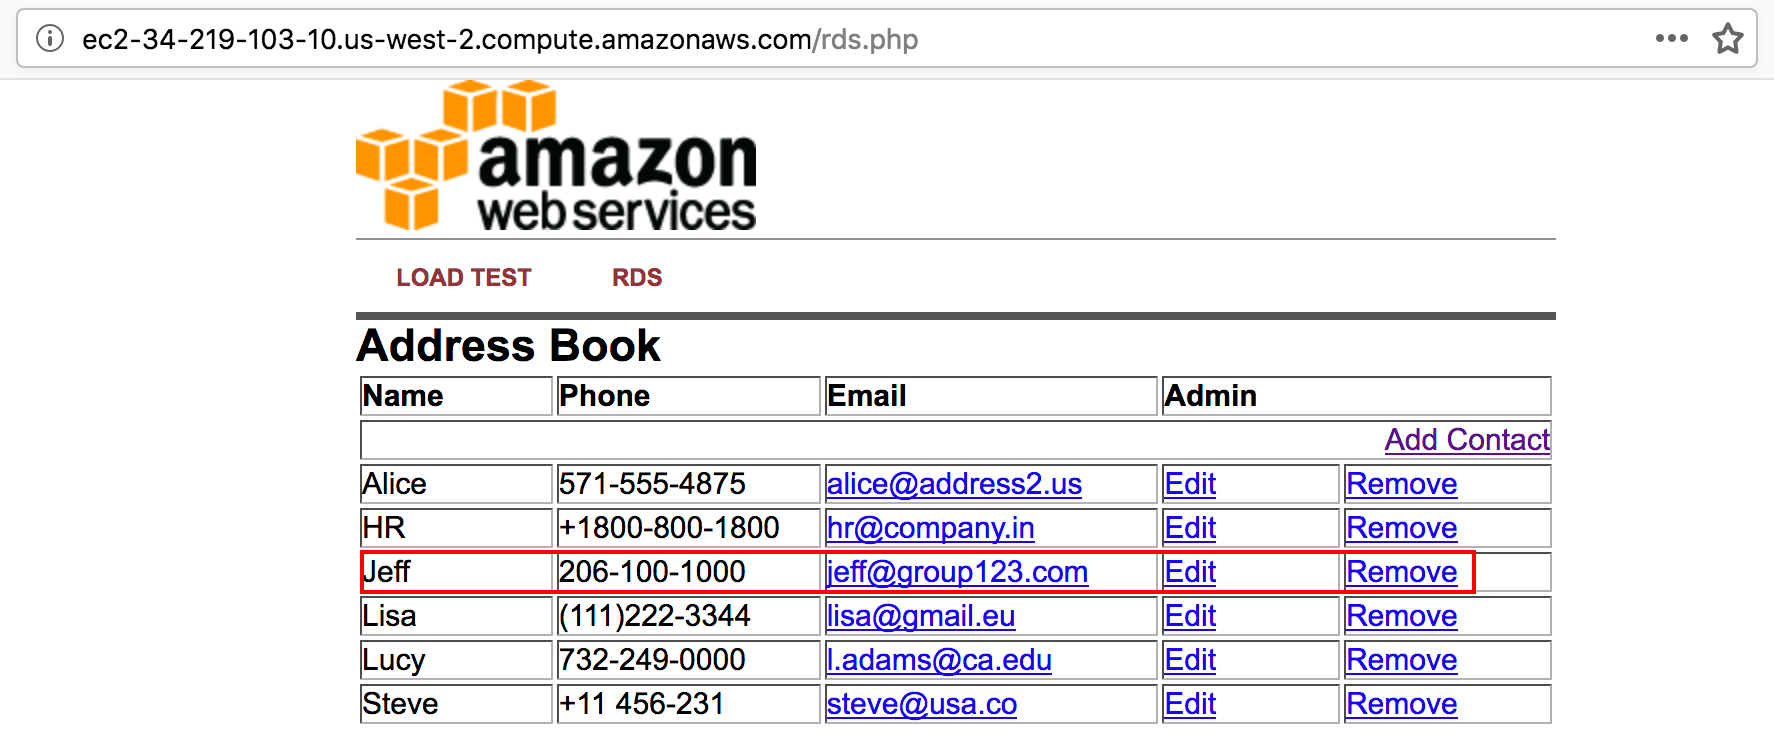
Open a new browser tab and navigate to the web server interface by entering the EC2 instance’s Public DNS name - ec2-34-219-103-10.us-west-2.compute.amazonaws.com into the browser. Choose the RDS tab. The web server connects to the Aurora Standalone Cluster and displays the same address book information from the database.
5. Verify database functionality
Confirm that you can also make the write transactions to this database hosted on Aurora Standalone Cluster. Feel free to play around with the address book and add/edit/remove content from your database by using the Add Contact, Edit, and Remove links in the Address Book. The changes made to the address book in this tutorial is shown.
Note: Some storage constraints are not factored in this tutorial and should be considered for your production migrations. For more details, refer to Migrating Your Databases to Amazon Aurora white paper and documentation.
Account cleanup
It is a best practice to delete instances and resources that you are no longer using so that you don’t keep getting charged for them. Remember that all running Amazon EC2 and RDS resources will incur an hourly on-demand charge.
1. Delete the Aurora instances
Delete all Aurora database instances created in this tutorial from the RDS Console.
Select the Aurora Reader instance, click on Actions, then Delete. Type in delete me in the field. Then press the Delete button.
Select the Aurora Writer instance, click on Actions, then Delete. Uncheck Create final snapshot and Retain automated backups (For production database you want to create the final snapshot in the event you need to restore the database). Click on I acknowledge checkbox and type in delete me in the field. Then press the Delete button. This will delete the Aurora DB Cluster as well.
2. Terminate the EC2 instance
Delete the EC2 instance created during the workshop. In the EC2 Console main page, click on Running Instances; or click on Instances on the left menu. Click on the checkbox next to the EC2 instance created for the web app. Then click on Actions, then Instance State, then Terminate. Confirm on Yes, Terminate when prompted.
3. Delete the key pair
Delete the EC2 keypair (if you created new key pair for this tutorial). Click on Key Pairs on the left menu under the EC2 Console. Click on the checkbox next to the key pair created. Then Delete.
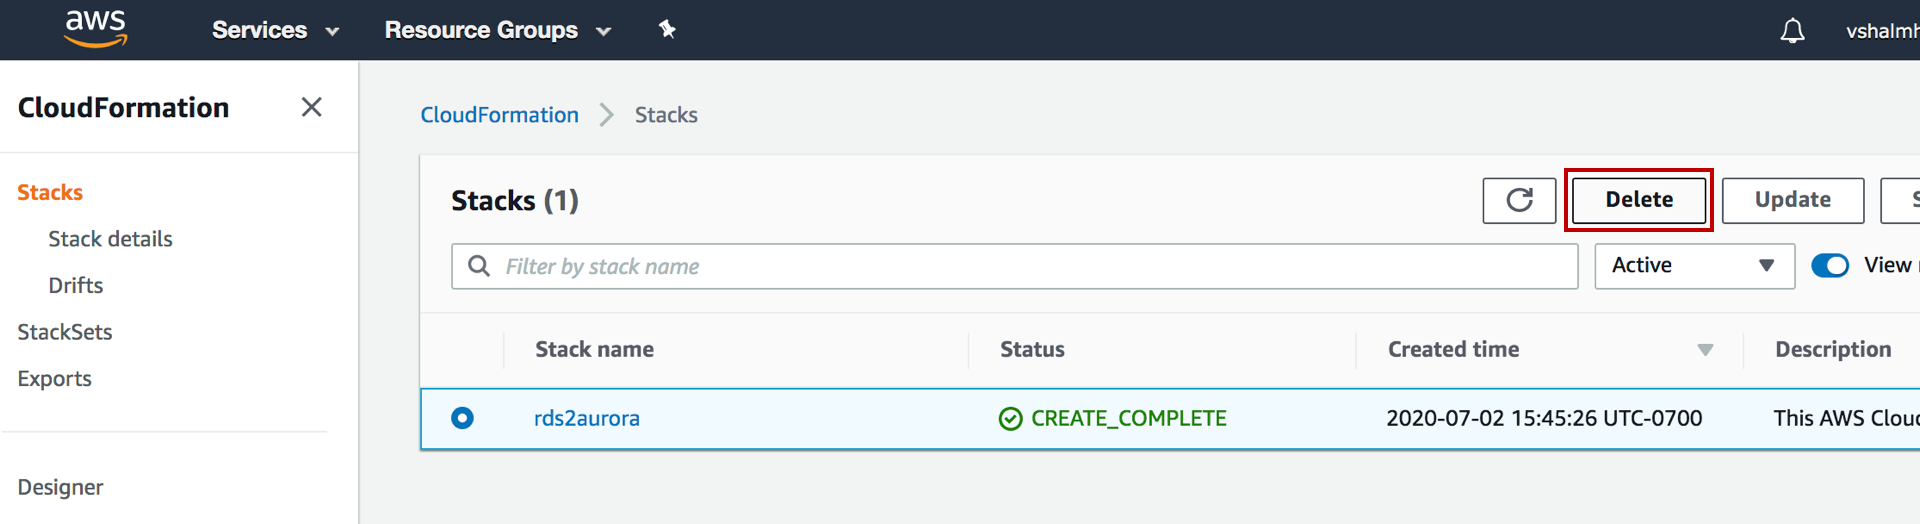
4. Delete the CloudFormation stack
Navigate to AWS CloudFormation console and then select the CloudFormation Stack that you created to deploy the resources for this tutorial. Click on the Delete button from the top right corner. CloudFormation will automatically remove all resources that it launched earlier.
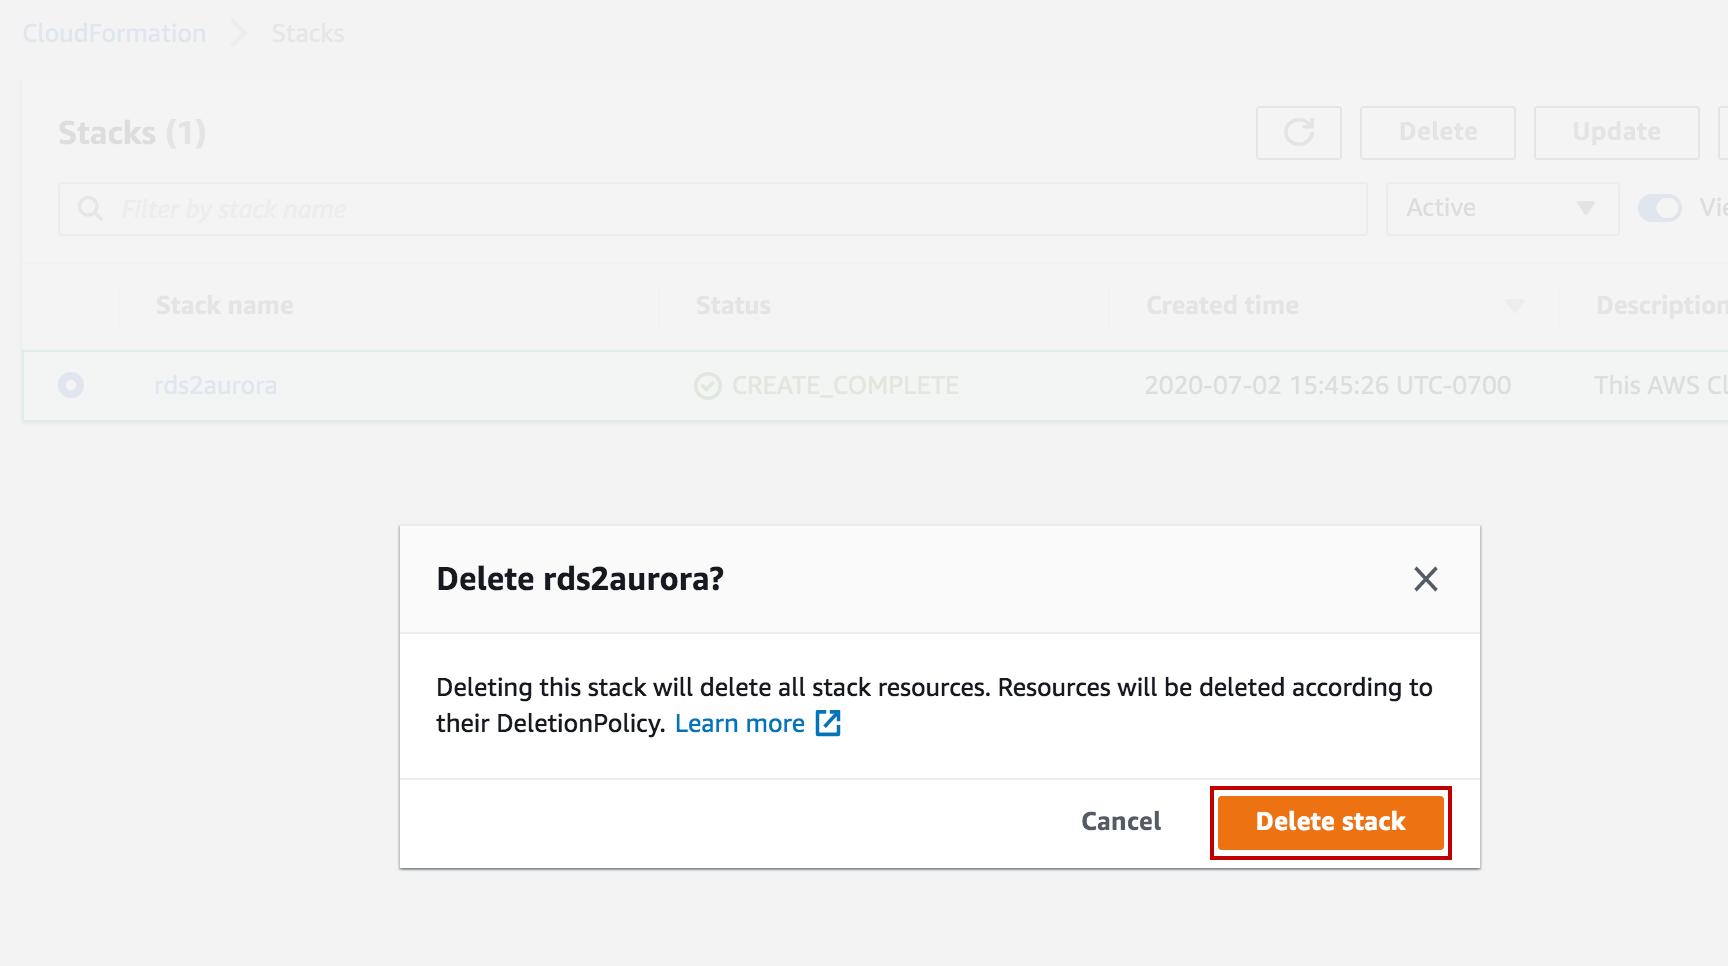
5. Delete stack
Click Delete stack and check the CloudFormation console to ensure the stack that you selected is deleted.
Congratulations!
In this tutorial, you learned how the Aurora Read Replica can be used, to achieve a near zero downtime, during migration from source MySQL DB instance to Amazon Aurora MySQL Cluster. You also learned how to monitor the replication, to stop writing to RDS MySQL DB instance after replication lag approaches zero, and to convert the Aurora Read Replica into a standalone Aurora MySQL DB cluster.
Next Steps
Now that you have learned how to migrate from RDS MySQL Database to Amazon Aurora MySQL Database cluster, you can learn more in-depth about data migration to Aurora by referring to the documentation.
Did you find what you were looking for today?
Let us know so we can improve the quality of the content on our pages