Business Productivity
Helping schools open safely with Amazon Honeycode
2020 has been a challenging time for any organization that needs to physically bring people together, and especially schools. A common approach to help teachers and school children come together safely, is to ask parents to provide information every day before dropping their kids off at school. This post highlights the key decisions and steps I took in building a daily questionnaire app that is now being used by St Johns Nursery School, which my daughter attends.
After reading this post, you can create a similar application using Amazon Honeycode. For an introduction to Honeycode, please review this introductory blog post, which shows some of the key features used in building the following application.
Improving on paper-based tracking
In the US, local governments have recently mandated that schools must have a parent or caregiver fill out a paper-based survey in advance of dropping off their children at school. My first experience with these paper-based forms was at my daughter’s summer camp were we had to fill out a long paper form that the camp had to keep track of. Each form must be manually signed, checked, and filed as an audit trail for state regulators. This can be inconvenient and time-consuming for parents, and cause extended drop-off times at the school.
At Amazon, we work backwards from our customers’ needs to solve their problems. We challenge ourselves to invent solutions for our customers. This important part of our culture is codified in our Leadership Principles.
The first time I used the paper form, I thought that there had to be a better way. I can already use my mobile device to receive information from the school regarding lesson schedules, report cards, and homework assignments. Why not use it for submitting surveys? A survey web app may be easier to submit, check, and store than a paper form. A centralized database allows for reporting and auditing, allowing parents to submit surveys from our mobile devices.
Choosing Honeycode to build a solution
The principal of my daughter’s school asked me to recommend a survey app. There were a few examples available but none could be customized to ask the questions needed.
Schools and other small organizations often the lack technical expertise to build their own mobile or web applications. There are many technologies to learn, such as React, JavaScript, and mobile identity management. To write a rudimentary application can take months.
Fortunately, Honeycode helps people build powerful mobile and web applications without writing code. Its visual application builder can be used to create highly interactive web and mobile applications. It is backed by a powerful AWS-built database to perform tasks like entering and checking data. Data is stored in database tables that are accessible like a spreadsheet, which makes it easier to store, format, and report on your data.
Over a weekend, I used Honeycode to build a mobile app for surveys. I chose Honeycode because I could get started quickly. I didn’t need to know about mobile app development, user authentication, or databases. I could focus entirely on the data I need to capture and the end user experience. Amazon Honeycode helps builders focus on the interface and data model, without needing the technical skills that are normally required to build mobile applications.
At its heart, Honeycode allows builders to connect a graphical user interface (GUI) directly to the application’s data. This means that builders don’t have to be concerned with the complexities of web browsers or mobile devices, GUI frameworks, or databases. They can drag and drop a GUI to a blank canvas and then connect directly to the tables. The GUI components can be used to display or edit data in a database table, which makes it useful for survey applications, among many others.
As Honeycode makes it easier to build apps, it’s also easier to iterate on those apps too. By helping build apps without code, it is also easier to add incremental features in the same way.
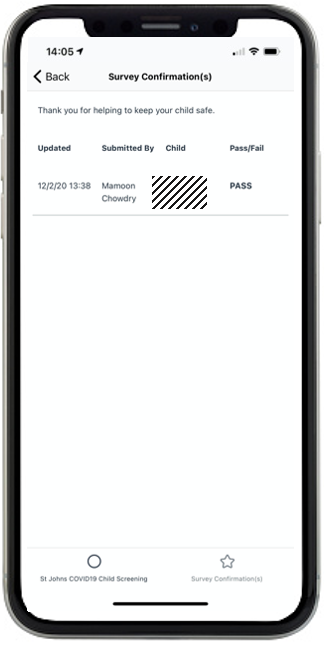
Each day, the school tested the latest version of the app and provided recommendations or feature requests in return. I could quickly make changes and show them a new version, sometimes in minutes. For example, the initial version of the app didn’t show the pass/fail result of each newly completed survey. The schoolteachers suggested that parents should be able to see a confirmation of a survey result, at any time. It took a few minutes to build and deploy a new screen to the app, with the relevant GUI components populated by the main data table.
The results
The app is now used by myself and 45 other staff and parents. Each day that my daughter goes to school, I complete a survey on my phone. When we arrive at school for drop-off, I show the survey confirmation screen to the teacher. This screen has a ‘pass or fail’ indication that the teachers can easily verify. There is no physical paper needed, making drop-offs contact-less for parents and teachers. The app has been approved by the school’s licensing authority, as it stores surveys in a database that provides an audit trail to show that children are being screened.
It’s now easier for my daughter’s school to systemically record the reported status of each child. Parents, teachers, and state regulators can be sure that the classroom environment is as safe as it possibly can be.
“Amazon Honeycode made it a lot easier for us to screen our children, in comparison to using paper forms. It made it easier for us to store the information we need to give to our state licensors. We can quickly show that each child was properly screened, before they started the school day”.
Kris Blue, Director, St Johns Nursery School
Working backwards
Talking with my daughter’s teachers and other parents, I realized the desired experience should:
- Have a welcome screen with some legal wording that the user must accept.
- Allow the user to quickly enter a survey for a child.
- Allow the user to quickly open a confirmation of the survey.
To achieve this, I created an app with three screens:
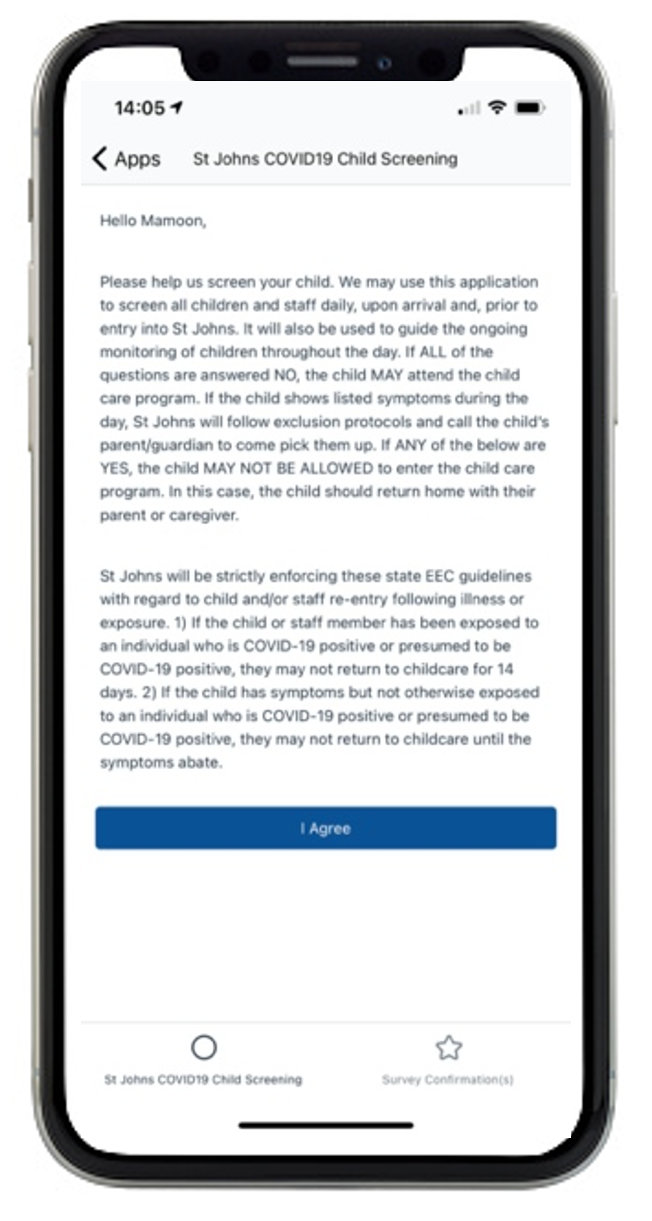
1) A start page or screen that uses a Content box object to display arbitrary text. A content box is a place holder for GUI components. For example, text boxes with the name of the school and the purpose of the app. The agreement button uses an Automation to navigate to the next screen (more on Automations later).
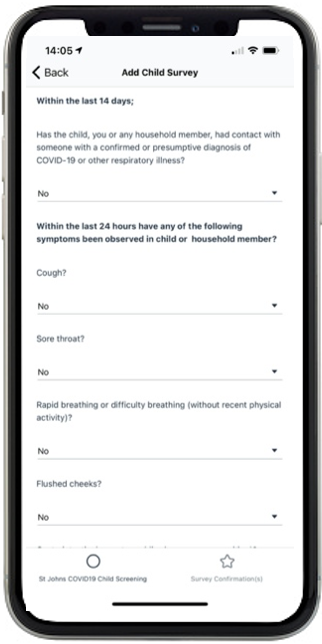
2) The data entry screen is where the user enters information for the survey. This example contains several dropdown boxes, which are pre-populated with two options for the user to select from: Yes and No. When the user chooses Submit, an Automation first writes a new record data to the SurveyHistory table, and then navigates to the final confirmation screen.
3) The confirmation screen uses a Column list object to display the new survey record, for the user. A Column list object is a GUI component that is connected to one or more records in a Honeycode table.
Viewing the data
At the core of any well-designed application is a thoughtfully designed data model. With Honeycode, we can quickly build a data model that represents all the important entities in our survey, like parents, children, questions, and responses and the relationships between them. Amazon Honeycode uses spreadsheet-like tables to store data. This diagram shows the tables I used to store these four entities, as our application data.
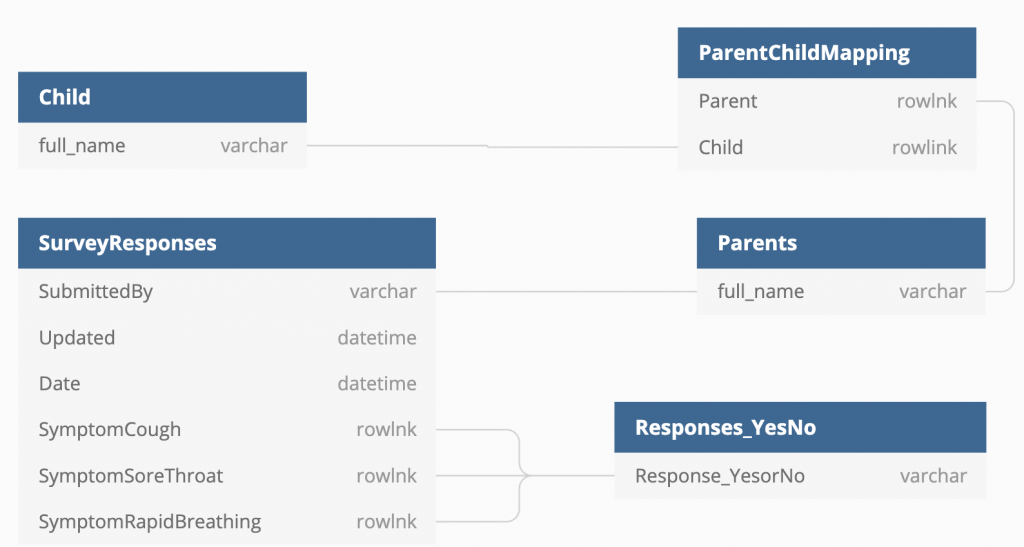
Amazon Honeycode introduces a concept called Rowlinks. These allow builders to create links between tables. They are a powerful version of VLOOKUP. Instead of returning a single value, a Rowlink returns an entire row of data, so they’re great for referencing and connecting tables. You can see that I used Rowlinks in a mapping table to store the relationships between parents and children. This enabled a data model with strong referential integrity.
Limiting form values with rowlinks
The app must restrict users to a Yes/No answer for a survey question. Rowlinks can help limit the possible values that a user can input. For the columns that represent the presence of a given symptom, such as SurveyResponses.answer, it must store values that are either Yes or No. A table of valid responses, which I call Responses_YesNo, is used to achieve this.

The columns in the SurveyResponses table can then be of type Rowlink with the source Responses_YesNo.
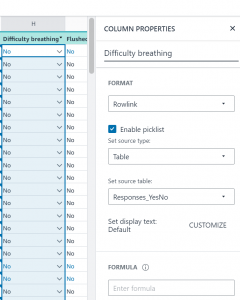
Not only does this constrain the data to the valid values defined in Responses_YesNo, but it also pre-populates any drop-down boxes that are mapped to this column. Those columns are Rowlinks to the Responses_YesNo table and each dropdown is then populated with a Yes and No as options for the user to select from:
Working with automations
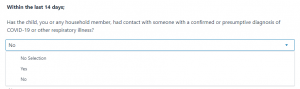
This is the data entry screen:

There are two main types of components on this form:
1) The Input fields are mapped directly to a column in the SurveyHistory table, which stores all survey responses.
2) The ‘Submit Survey’ button invokes an automation using the On click trigger. An automation can be used to add or update data in tables, send notifications, navigate to another screen, or set variables in current or target screens. Here the automation is used to write or update a record in the SurveyHistory table.
Editing a single record in a table
When a user submits a survey, it should not update all the rows in the SurveyHistory table. It should only add or change the row for the current child for the current date. This is done by putting all of the input fields inside a block object, which is like a parent container for other child UI objects.
A block object can be connected to a given dataset, which could be one or more records in a table. UI components that are placed inside this block are then explicitly connected to the rows needed.
You can define the data source for a block:

The expression for the source selects the survey record for a given child and date, which are passed in as parameters. The result of the expression is that any input/display field within the block only displays or changes the one single record in the source table.
Creating the pass/fail display
Rather than parents or teachers working out if a child is cleared, this app tells you if you pass or fail. It uses logic that is consistently and equally applied. It takes the response for every given symptom and evaluates if a child should be cleared to attend their school or not.

In Honeycode, you can add an automation that writes or updates a record in a table when you click a button. You can also write the result of a complex expression to a column in a table. For example, I created a new column called Pass/Fail. I updated the Submit Survey automation to populate it with the expression that evaluates to ‘Pass if all of the reported symptoms are ‘False.’
Planning for version 2
Like every successful app, iterating on the initial version is the key to meeting the changing needs of your users. After trialing this app, I discovered two more important requirements:
1) It is a government requirement that adult staff must complete a survey before starting their working day.
2) It is also important that staff can submit surveys for any child, in case a parent cannot use the app.
Thanks to Amazon HoneyCode I was able to quickly add and test these new capabilities over a second weekend.
Conclusion
Amazon Honeycode makes it easier to quickly build apps that help your team or organization be more effective and efficient. In this example, it made it easier for our local school to protect children and teachers. To make a similar app for your school or workplace, Honeycode can help you without requiring coding experience.
To start building your own applications today, go to Amazon HoneyCode.