AWS Messaging Blog
Building Your First Journey in Amazon Pinpoint
Note: This post was written by Zach Barbitta, the Product Lead for Pinpoint Journeys, and Josh Kahn, an AWS Solution Architect.
We recently added a new feature called journeys to Amazon Pinpoint. With journeys, you can create fully automated, multi-step customer engagements through an easy to use, drag-and-drop interface.
In this post, we’ll provide a quick overview of the features and capabilities of Amazon Pinpoint journeys. We’ll also provide a blueprint that you can use to build your first journey.
What is a journey?
Think of a journey as being similar to a flowchart. Every journey begins by adding a segment of participants to it. These participants proceed through steps in the journey, which we call activities. Sometimes, participants split into different branches. Some participants end their journeys early, while some proceed through several steps. The experience of going down one path in the journey can be very different from the experience of going down a different path. In a journey, you determine the outcomes that are most relevant for your customers, and then create the structure that leads to those outcomes.
Your journey can contain several different types of activities, each of which does something different when journey participants arrive on it. For example, when participants arrive on an Email activity, they receive an email. When they land on a Random Split activity, they’re randomly separated into one of up to five different groups. You can also separate customers based on their attributes, or based on their interactions with previous steps in the journey, by using a Yes/no Split or a Multivariate Split activity. There are six different types of activities that you can add to your journeys. You can find more information about these activity types in our User Guide.
The web-based Amazon Pinpoint management console includes an easy-to-use, drag-and-drop interface for creating your journeys. You can also create journeys programmatically by using the Amazon Pinpoint API, the AWS CLI, or an AWS SDK. Best of all, you can use the API to modify journeys that you created in the console, and vice-versa.
Planning our journey
The flexible nature of journeys makes it easy to create customer experiences that are timely, personalized, and relevant. In this post, we’ll assume the role of a music streaming service. We’ll create a journey that takes our customers through the following steps:
- When customers sign up, we’ll send them an email that highlights some of the cool features they’ll get by using our service.
- After 1 week, we’ll divide customers into two separate groups based whether or not they opened the email we sent them when they signed up.
- To the group of customers who opened the first message, we’ll send an email that contains additional tips and tricks.
- To the group who didn’t open the first message, we’ll send an email that reiterates the basic information that we mentioned in the first message.
The best part about journeys in Amazon Pinpoint is that you can set them up in just a few minutes, without having to do any coding, and without any specialized training (unless you count reading this blog post as training).
After we launch this journey, we’ll be able to view metrics through the same interface that we used to create the journey. For example, for each split activity, we’ll be able to see how many participants were sent down each path. For each Email activity, we’ll be able to view the total number of sends, deliveries, opens, clicks, bounces, and unsubscribes. We’ll also be able to view these metrics as aggregated totals for the entire journey. These metrics can help you discover what worked and what didn’t work in your journey, so that you can build more effective journeys in the future.
First steps
There are a few prerequisites that we have to complete before we can start creating the journey.
Create Endpoints
When a new user signs up for your service, you have to create an endpoint record for that user. One way to do this is by using AWS Amplify (if you use Amplify’s built-in analytics tools, Amplify creates Amazon Pinpoint endpoints). You can also use AWS Lambda to call Amazon Pinpoint’s UpdateEndpoint API. The exact method that you use to create these endpoints is up to your engineering team.
When your app creates new endpoints, they should include a user attribute that identifies them as someone who should participate in the journey. We’ll use this attribute to create our segment of journey participants.
If you just want to get started without engaging your engineering team, you can import a segment of endpoints to use in your journey. To learn more, see Importing Segments in the Amazon Pinpoint User Guide.
Verify an Email Address
In Amazon Pinpoint, you have to verify the email addresses that you use to send email. By verifying an email address, you prove that you own it, and you grant Amazon Pinpoint permission to send your email from that address. For more information, see Verifying Email Identities in the Amazon Pinpoint User Guide.
Create a Template
Before you can send email from a journey, you have to create email templates. Email templates are pre-defined message bodies that you can use to send email messages to your customers. You can learn more about creating email templates in the Amazon Pinpoint User Guide.
To create the journey that we discussed earlier, we’ll need at least three email templates: one that contains the basic information that we want to share with new customers, one with more advanced content for users who opened the first email, and another that reiterates the content in the first message.
Create a Segment
Finally, you need to create the segment of users who will participate in the journey. If your service creates an endpoint record that includes a specific user attribute, you can use this attribute to create your segment. You can learn more about creating segments in the Amazon Pinpoint User Guide.
Building the Journey
Now that we’ve completed the prerequisites, we can start building our journey. We’ll break the process down into a few quick steps.
Set it up
Start by signing in to the Amazon Pinpoint console. In the navigation pane on the right side of the page, choose Journeys, and then choose Create a journey. In the upper left corner of the page, you’ll see an area where you can enter a name for the journey. Give the journey a name that helps you identify it.
Add participants
Every journey begins with a Journey entry activity. In this activity, you define the segment that will participate in the journey. On the Journey entry activity, choose Set entry condition. In the list, choose the segment that contains the participants for the journey.
On this activity, you can also control how often new participants are added to the journey. Because new customers could sign up for our service at any time, we want to update the segment regularly. For this example, we’ll set up the journey to look for new segment members once every hour.

Send the initial email
Now we can configure the first message that we’ll send in our journey. Under the Journey entry activity that you just configured, choose Add activity, and then choose Send email. Choose the email template that you want to use in the email, and then specify the email address that you want to send the email from.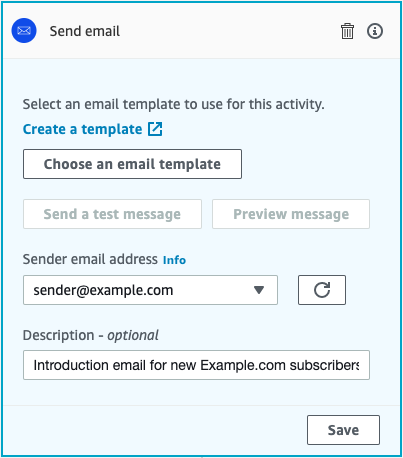
Add the split
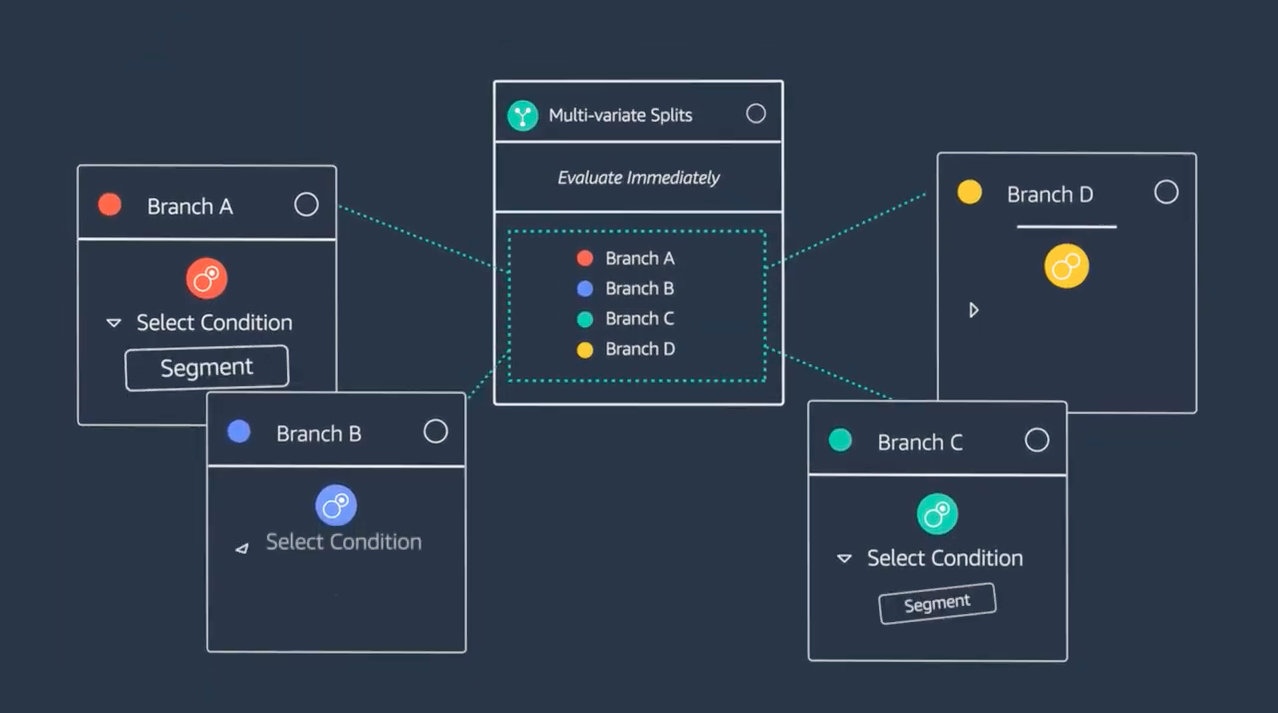
Under the Email activity, choose Add activity, and then choose Yes/no split. This type of activity looks for all journey participants who meet a condition and sends them all down a path (the “Yes” path). All participants who don’t meet that condition are sent down a “No” path. This is similar to the Multivariate split activity. The difference between the two is that the Multivariate split can produce up to four branches, each with its own criteria, plus an “Else” branch for everyone who doesn’t meet the criteria in the other branches. A Yes/no split activity, on the other hand, can only ever have two branches, “Yes” and “No”. However, unlike the Multivariate split activity, the “Yes” branch in a Yes/no split activity can contain more than one matching criteria.
In this case, we’ll set up the “Yes” branch to look for email click events in the Email activity that occurred earlier in the journey. We also know that the majority of recipients who open the email aren’t going to do so the instant they receive the email. For this reason, we’ll adjust the Condition evaluation setting for the activity to wait for 7 days before looking for open events. This gives our customers plenty of time to receive the message, check their email, open the message, and, if they’re interested in the content of the message, click a link in the message. When you finish setting up the split activity, it should resemble the example shown in the following image.
Continue building the branches
From here, you can continue building the branches of the journey. In each branch, you’ll send a different email template based on the needs of the participants in that branch. Participants in the “Yes” branch will receive an email template that contains more advanced information, while those in the “No” branch will receive a template that revisits the content from the original message.
To learn more about setting up the various types of journey activities, see Setting Up Journey Activities in the Amazon Pinpoint User Guide.
Review the journey
When you finish adding branches and activities to your journey, choose the Review button in the top right corner of the page. When you do, the Review your journey pane opens on the left side of the screen. The Review your journey pane shows you errors that need to be fixed in your journey. It also gives you some helpful recommendations, and provides some best practices that you can use to optimize your journey. You can click any of the notifications in the Review your journey page to move immediately to the journey activity that the message applies to. When you finish addressing the errors and reviewing the recommendations, you can mark the journey as reviewed.

Testing and publishing the journey
After you review the journey, you have a couple options. You can either launch the journey immediately, or test the journey before you launch it.
If you want to test the journey, close the Review your journey pane. Then, on the Actions menu, choose Test. When you test your journey, you have to choose a segment of testers. The segment that you choose should only contain the internal recipients on your team who you want to test the journey before you publish it. You also have the option of changing the wait times in your journey, or skipping them altogether. If you choose a wait time of 1 hour here, it makes it much easier to test the Yes/no split activity (which, in the production version of the journey, contains a 7 day wait). To learn more about testing your journey, including some tips and best practices, see Testing Your Journey in the Amazon Pinpoint User Guide.
When you finish your testing, complete the review process again. On the final page of content in the Review your journey pane, choose Publish. After a short delay, your journey goes live. That’s it! You’ve created and launched your very first journey!
Wrapping up
We’re very excited about Pinpoint Journeys and look forward to seeing what you build with it. If you have questions, leave us a message on the Amazon Pinpoint Developer Forum and check out the Amazon Pinpoint documentation.