Front-End Web & Mobile
Building fine-grained authorization using Amazon Cognito User Pools groups
This post was authored by Leo Drakopoulos, AWS Solutions Architect.
User authentication and authorization can be challenging when building web and mobile apps. The challenges include handling user data and passwords, token-based authentication, managing fine-grained permissions, scalability, federation, and more.
In this post, we show how to integrate authentication and authorization into an Angular web app by using AWS services. You can use Amazon Cognito to control permissions for different user groups in your app. This ensures that users have appropriate access to backend resources, determined by the group they belong to.
Amazon Cognito makes it easier for you to manage user identities, authentication, and permissions.
In this post, we explain how to use groups in Amazon Cognito User Pools, together with Amazon Cognito Federated Identities identity pools, to obtain temporary IAM credentials in your web app. The IAM credentials map to privileges that a user obtains after successfully authenticating with a user pool. Those privileges are determined by the role that is mapped to the user pool group that the user belongs to. User pools provide flexibility. You can use them to implement granular authorization architectures for authenticated users.
We then show how to use Amazon Cognito to control access to Amazon DynamoDB based on the user’s group membership. We create two users belonging to two different user pool groups. Each group establishes different permissions. The first group’s permissions allow a user to update rows in a DynamoDB table that are specific to that user. The second group’s permissions allow a user to perform a table scan of a specific DynamoDB table.
Here are the steps to implement this fine-grained authorization:
- Create a user pool to serve as a user directory.
- Register a user (User 1) in the user pool.
- Create an identity pool and configure it to integrate with the user pool.
- Create an IAM role that authorizes row-level access to a DynamoDB table. To achieve this, we use the unique ID that the identity pool assigns to each authenticated user.
- Create a group in the user pool and map the role we created in Step 4.
- Demonstrate how to achieve row-level authorization on a DynamoDB table by using the Amazon Cognito ID. The DynamoDB table is already populated. We then provide code that updates an existing item.
- We expand this example by creating another user pool group and adding another user. We create an additional IAM role to map to the new group. This user (User 2) only has read-only access to DynamoDB; the user cannot update any items.
To demonstrate these steps, we created an Angular.js application that calls the Amazon Cognito APIs using the AWS SDK for JavaScript. Code samples are presented throughout this article. We also provide the code for a completed sample on GitHub.
The following is an architectural diagram that reflects a high-level authentication and authorization flow, in steps, for User1 and User2. The users belong to different user pool groups.
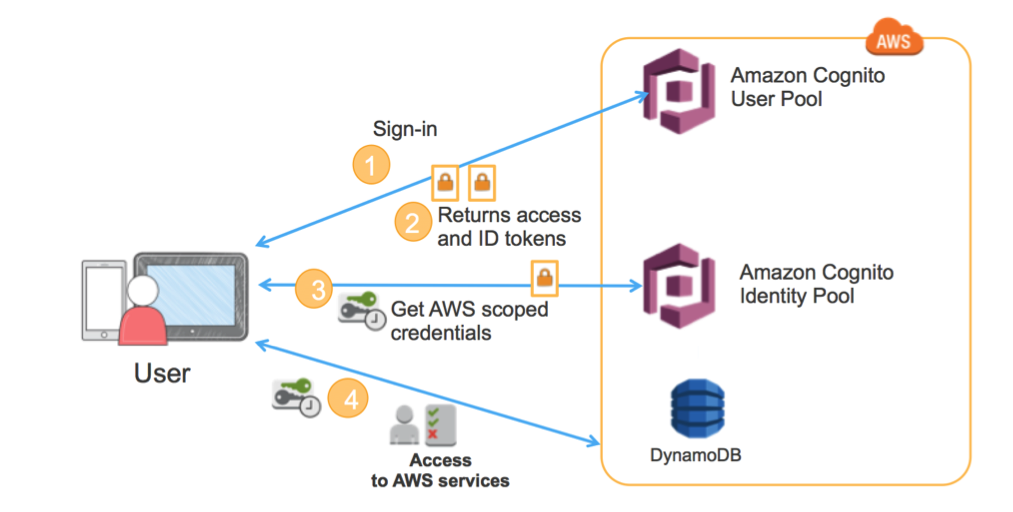
The details of this flow are as follows:
- Client authenticates against a user pool.
- The user pool assigns 3 JWT tokens (Id, Access, and Refresh) to the client.
- The Id JWT is passed to the identity pool and a role is chosen via the JWT claims. The user then receives IAM temporary credentials with privileges that are based on the IAM role that was mapped to the group that user belongs to.
- The user can then make calls to DynamoDB based on their privileges. Those privileges are dictated by IAM policies that we provide later in this post.
Step 1: Create a user pool
- Sign in to the Amazon Cognito console.
- On the Your User Pools page, choose Create a User Pool.
- For Pool name, type a name.

- Choose Step through settings.
- Choose Username and then choose Also allow sign in with verified email address. In addition, check email as a Required attribute.

- Choose Next step.
- In the Policies tab, choose the configurations of choice.
- Choose Next step until you get to the Devices page.
- Under Do you want to remember your user’s devices?, verify that No is selected.
- Choose Next step.
- Choose Add an app. Adding an app gives Amazon Cognito permission to call APIs that do not have an authenticated user.
- For App name, type a name.
- Clear Generate client secret.
- Choose Create app.
- Choose Next step until you get to the Review page.
- Review your sessions and choose Create pool.
Step 2: Register users to your user pool
To register 2 users to your user pool, download the Angular.js code provided as a companion to this post and follow the registration flow. Or follow the steps in Examples: Using the JavaScript SDK in the Amazon Cognito Developer Guide.
You will need to use populate your own Pool Id and App client id in your code after you have created your User Pool in Step 1. You can find the values you need to add to your code by navigating to the App clients tab in the Amazon Cognito console, as shown in the screenshots below.
Pool Id:

App Client Id:

Step 3: Create and configure an Identity pool
- Sign in to the Amazon Cognito console.
- Choose Manage Federated Identities.
- Choose Create Identity Pool.
- After the identity pool is created, choose Edit Identity Pool.
- In the Authentication Providers section, choose the Cognito tab and populate it with your User Pool Id and App client Id from Step 2.
- In the Authenticated Roles section, select Choose role from token. This role overrides the default authenticated role that was created when you created the identity pool.

Step 4: Create IAM Role
First, create a custom IAM Policy to allow for fine-grained row-level access to Amazon DynamoDB.
- Sign in to the IAM console.
- Choose the Policies tab and choose Create policy.
- For Create Your Own Policy, choose Select.
- Type a name for the policy in Policy Name, then copy and paste the following into Policy Document. Then choose Create Policy.
    "Version": "2012-10-17",
    "Statement": [
        {
            "Effect": "Allow",
            "Action": [
                "dynamodb:GetItem",
                "dynamodb:PutItem",
                "dynamodb:Query"
            ],
            "Resource": [
                "arn:aws:dynamodb: <YOUR_REGION>:<YOUR_AWS_ACCOUNT_ID>:table/<YOUR DYNAMODB_TABLE>"
            ],
            "Condition": {
                "ForAllValues:StringEquals": {
                    "dynamodb:LeadingKeys": [
                        "${cognito-identity.amazonaws.com:sub}"
                    ]
                }
            }
        }
    ]
}
This policy limits access to DynamoDB rows by checking the value of cognito-identity.amazonaws.com:sub. This value is the identity ID for the unique Amazon Cognito user.
- Sign in to the IAM console.
- Choose Create new role.
- Choose Role for identity provider access.
- For Grant access to web identity providers, choose Select.

- Choose Amazon Cognito as your identity provider. Paste the Identity Pool ID from Step 3.
- Verify the role trust, then choose Next step. This policy allows federated users from cognito-identity.amazonaws.com (the issuer of the OpenID Connect token) to assume this role.
- Search for the IAM policy that you created previously and choose Next step.
- Set a role name and choose Create role.
A trust relationship is established between the IAM role and the Amazon Cognito identity, as shown in the following figure.

Step 5: Create a user pool group
- Sign in to the Amazon Cognito console.
- For the user pool that you created in Step 1, in General Settings, choose Users and groups, then choose Groups.
- Choose Create group and populate the form with the appropriate information. Select the IAM role that you created in Step 4. There is no need to populate Precedence because we don’t have any users that belong to different groups at the same time.

- Choose Create group.
- Add User 1 to the group that you created.
Step 6: Amazon DynamoDB row-level authorization
For this post, we created an Amazon DynamoDB table in the Angular.js sample. For information on creating your own table, see Create Example Tables in the Amazon DynamoDB Developer Guide.
The Angular.js code (provided on GitHub) populates the DynamoDB table when you register a user and sign in with the appropriate credentials.
You can achieve row-level authorization in Amazon DynamoDB by using the Amazon Cognito ID as the hash key. As shown in the following image, the userid attribute is the hash key and is populated with the Amazon Cognito ID. Based on the policy created in Step 4, only an authenticated user whose ID matches the Amazon Cognito ID at a specific DynamoDB row can update an item.

The following code snippet updates the status attribute of an item in the preceding DynamoDB table. We pass the JWT Id token provided from the user pool in exchange for IAM credentials. The following code assumes that a user is already signed in to your app.
We use the Amazon Cognito APIs to get information about the signed in user. For example, by calling var cognitoUser = userPool.getCurrentUser(); in the following code sample, we get the current signed in user. By calling session.getIdToken().getJwtToken() we get the JWT Id token.
var data = {
  UserPoolId: <YOUR_USER_POOL_ID>,
  ClientId: <YOUR_USER_POOL_CLIENT_ID>,
};
var userPool = new AWSCognito.CognitoIdentityServiceProvider.CognitoUserPool(data);
var cognitoUser = userPool.getCurrentUser();

try {
  if (cognitoUser != null) {
    cognitoUser.getSession(function(err, session) {
      if (err) {
        console.log(err);
        return;
      }

      console.log('session validity: ' + session.isValid());
      console.log('session token: ' + session.getIdToken().getJwtToken());

      AWS.config.region = '<YOUR_REGION>';
      AWS.config.credentials = new AWS.CognitoIdentityCredentials({
        IdentityPoolId : '<YOUR_IDENTITY_POOL_ID>',
        Logins : {
          // Change the key below according to the specific region your user pool is in.
          `cognito-idp.${AWS.config.region}.amazonaws.com/${data.UserPoolId}` : session.getIdToken().getJwtToken()
        }
      });

      AWS.config.credentials.get(function(err) {
        if (!err) {
          var id = AWS.config.credentials.identityId;
          console.log('Cognito Identity ID '+ id);

          // Instantiate aws sdk service objects now that the credentials have been updated
          var docClient = new AWS.DynamoDB.DocumentClient({ region: AWS.config.region });
          var params = {
            TableName: '<YOUR_DYNAMODB_TABLE>',
            Item:{userid:id, status:<STATUS_CODE>}
          };
          docClient.put(params, function(err, data) {
            if (err)
			  console.error(err);
            else
			  console.log(data);
          });
        }
      });
    });
  } else {
    console.log(err);
    return;
  }
} catch (e) {
  console.log(e);
  return;
}
In the Angular.js application we developed for this post, we can output the Id JWT token in the console after a user authenticates with a username and password, as follows:

You can further inspect the JWT token at the jwt.io website. The following image shows how the role is passed via the claims of the JWT token. On the left is the value of the Id JWT token.

Step 7: Read-only access to DynamoDB by adding another user pool group
In this step, we expand this use case by adding another user pool group. This group provides read-only access to the DynamoDB items. To accomplish this, follow the same steps as in Step 4 to create a new IAM role, but use a different policy. The policy only allows a user to scan a DynamoDB table based on a filter expression.
Note:
Scanning is not always the most efficient way to retrieve DynamoDB items because it retrieves items from a DynamoDB table that might be stored in multiple DynamoDB partitions. We are using this as an example to showcase the different levels of authorization that you can achieve by using user pool groups.
The IAM policy to scan the DynamoDB table looks like the following:
{
 "Version": "2012-10-17",
    "Statement": [
        {
            "Sid": "Stmt1496912649000",
            "Effect": "Allow",
            "Action": [
                "dynamodb:Scan",
                "dynamodb:Query",
            ],
            "Resource": [ "arn:aws:dynamodb:<YOUR_REGION>:<YOUR_ACCOUNT_ID>:table/<YOUR_DYNAMODB_TABLE>"   ]
        }
    ]
}
Then follow Steps 5 and 6 to scan the DynamoDB table. For step 6, modify your code to scan DynamoDB as follows:
AWS.config.credentials.get(function(err){
  if (!err) {
    // Instantiate aws sdk service objects now that the credentials have been updated
    var docClient = new AWS.DynamoDB.DocumentClient({ region: '<YOUR_REGION>' });
    var ddbTable = '<YOUR_DYNAMODB_TABLE>';
    var params = {
      TableName: ddbTable
    };
    docClient.scan(params, function(err, data) {
      if (err) console.log(err);
      else console.log(data);
    });
  }
});
This use case can be expanded more by adding more groups that map to different IAM policies. For example, you can use an IAM policy mapped to a user pool group to allow users to access other AWS services, like Amazon S3 and Amazon API Gateway.
Summary
Following the steps in this post, you can create a fine-grained authorization system using user pool groups and identity pools. You can download the code we present in this tutorial on GitHub.
We hope this post helps with your authentication and authorization efforts. If you have questions or suggestions, please leave a comment.