Networking & Content Delivery
Accelerating WordPress with CloudFront using the AWS for WordPress Plugin
AWS for WordPress
WordPress is a technological marvel in the number of internet sites it powers and the momentum with which developers actively contribute to the community. Recent estimates put WordPress at powering more than 34% of internet sites, and more than 50,000 plugins are available through WordPress.org covering everything from security enhancements to SEO optimizations. Whether you use WordPress.com hosted services, or want to self-host on services such as AWS, WordPress is an accessible platform to quickly establish a high-quality web presence.
Last year, AWS launched its first WordPress plugin, Amazon Polly, which creates lifelike audio versions of your blog posts. The response to the plugin was impressive and we followed up with new functionality to translate text and audio content into a variety of languages using neural machine translation services. The additional AI/ML aspects of the plugin prompted us to rename the plugin as the Amazon AI plugin, and it has been downloaded hundreds of thousands of times with accelerating momentum.
Today, we are excited to announce additional enhancements. First is a new workflow to set up an Amazon CloudFront distribution with cache behaviors optimized for WordPress sites. Second is the rebranding of the plugin as the AWS for WordPress plugin to be a central point in which many AWS services can be easily configured.
In this blog, I’ll walk you through the end-to-end process of self-hosting a WordPress site with Amazon Lightsail, installing the plugin, and using the new CloudFront workflow. While I use Lightsail in my example, you can use the plugin with any web host that supports the WordPress platform such as Amazon EC2 or even WordPress.com itself.
To go through this example in its entirety, you’ll need a domain name. If you don’t already have one, you can purchase a domain from Amazon Route 53. Throughout the blog I will refer to the origin’s domain name as example.com and CloudFront’s alternate domain name used for viewer content delivery as www.example.com.
To learn more about accelerating websites, visit edge networking on AWS.
Step 1: Create a Lightsail Instance with a WordPress Blueprint
Amazon Lightsail is a great tool for quickly provisioning EC2 instances with the WordPress image already installed. This Lightsail instance will be the WordPress site’s origin which the CloudFront distribution will pull content from and then cache in CloudFront locations around the world.
To begin, sign in to the AWS Management Console, navigate to the Lightsail service, and then create a Lightsail instance using Linux/Unix as the platform and the WordPress 5.2.2-3 blueprint.

You can name your instance whatever you want or leave it as the default. After you click Create, wait a few minutes for Lightsail to complete the initial setup. Once it’s running, you can configure your Lightsail server.

Step 2: Create Lightsail Load Balancer
AWS always recommends securing your data and applications. The AWS for WordPress plugin uses the HTTPS protocol for both your viewer connections to CloudFront as well as for CloudFront’s connections to your Lightsail WordPress origin.
To enable HTTPS traffic on the Lightsail server we’ll need an SSL certificate for the Lightsail instance to use. To do this, you need to create a Lightsail load balancer to which the certificate can be attached.
From the main Lightsail home page, click on the Networking tab, then choose Create load balancer.
Using a Lightsail Load Balancer costs $18 USD per month. You can name your load balancer if you choose, or go ahead and click Create load balancer.

After you have created the load balancer attach it to your instance by selecting your instance in the Target instances section, and then click Attach.
Make note of your load balancer’s DNS name in the upper right corner of the page. You will need it when updating your DNS records in a subsequent section.

Step 3: Identify Origin Domain and Create Certificate
While in your Lightsail load balancer screen, choose the Inbound Traffic tab. To enable HTTPS traffic, you must now create a certificate. To do so, click Create certificate. When the field expands, enter the domain name of your origin.
Enter your origin’s domain name, such as example.com, under Primary Domain. You do not need to add any alternate domains or subdomains since we’ll be using CloudFront to handle any viewer-related domains which will fetch and cache content from the origin.
Click Create, to request the certificate.

After a few moments, the console will provide DNS records that need to be added to your domain registrar within 72 hours for the certificate validation process to complete. At the same time that you add these certificate validation records, it’s easiest to also add the DNS records for your load balancer you created before so that traffic to that domain will arrive at your Lightsail instance.
Before going to your domain registrar, copy the DNS name of your load balancer (located at the top of the page) as well as the CNAME records (both Name and Value) for your certificate.


The process for updating DNS records varies by registrar, so refer to their documentation for how to do so if you purchased your domain from a provider other than Amazon Route 53.
Assuming you are using Route 53, navigate to the service in the AWS Management Console. Go to the domain’s Hosted Zone and click Create Record Set. Then create an A Record to point traffic for your origin’s domain (such as example.com) to your Lightsail load balancer. For Name, keep the field blank since this is your origin domain name. For Type, choose A – IPv4 address. For Alias, choose Yes and enter your load balancer’s DNS name into the Alias Target then click Create.

After you’ve mapped your domain name to your Lightsail load balancer, now add the DNS records to validate the origin SSL certificate. Once again, click Create Record Set and enter the Name provided from the Lightsail certificate page. For Type, choose CNAME, and then enter the Value given from the Lightsail certificate page. Then click Create.

After you’ve created the DNS entries, go back to the Lightsail console, click Networking, click on your load balancer, and then choose Inbound Traffic to view the status of your certificate. It may take 30 minutes or longer for the changes to propagate and for AWS to validate the domain and issue the certificate. Refresh your browser periodically until you see that the status of the certificate validation is complete. When this is done, click the dropdown menu under HTTPS and choose the certificate to attach to the load balancer.

Step 4: Configure the Lightsail Origin to accept SSL traffic
The CloudFront distribution created through the AWS for WordPress plugin will redirect all HTTP requests to HTTPS and then make HTTPS connections back to the origin. To support this model, your origin must be configured to handle HTTPS.
Go back to the Lightsail Home page and connect to your Lightsail instance using the browser-based SSH client. Click on the instance name, and then Connect using SSH.

In the terminal screen, copy and paste the following command. Then press Enter.
sudo vim ./apps/wordpress/htdocs/wp-config.php

Next, type the following characters, in order. Note that these commands are case-sensitive.
98 G i
Use the arrow keys to move the cursor, and change http to https on following two lines so that the two lines look like this:
define('WP_SITEURL', 'https://' . $_SERVER['HTTP_HOST'] . '/');
define('WP_HOME', 'https://' . $_SERVER['HTTP_HOST'] . '/');
For emphasis, both lines should show https://, not http://.
Next, use the arrow keys to place the cursor below the two lines that you just modified in the previous step. Copy and paste the following lines:
In the end, this is what you should see.

If everything looks good, press Esc to exit the insert mode. Then type the following characters, in order. Again, the commands are case-sensitive.
: x
Then press Enter to write the updated configuration to the server.
While in the terminal, I recommend making another quick configuration to remove Bitnami’s branding from appearing at the bottom of the WordPress website.
In the terminal screen, copy and paste the following command. Then press Enter.
sudo /opt/bitnami/apps/wordpress/bnconfig --disable_banner 1
To make the changes effective, restart your Lightsail server by copying and pasting the following command and pressing Enter.
sudo /opt/bitnami/ctlscript.sh restart
After you complete these steps, leave the terminal open because we’ll use it again in the next step to retrieve your site’s login credentials.
Now that you have configured your DNS records and enabled your origin to accept HTTPS traffic, you should be able to visit your origin directly and view a default WordPress site.
MIDPOINT CHECK: Visit your site to test that everything is working correctly with https:// traffic. Do this by visiting your origin’s domain, such as https://example.com, and confirm the site renders with no issues. If there are no issues, proceed to the next step, otherwise you may need to go back and re-review the previous steps.
Step 5: Log into WordPress Admin Page
To get access to your WordPress site, you need to retrieve the default username and the system generated password. To get these credentials, follow Lightsail’s documentation for Getting the application user name and password for your ‘Powered by Bitnami’ instance in Amazon Lightsail.
In short, for WordPress sites created using Lightsail, the default username is User. The password is retrieved by connecting to the instance with the browser-based SSH client, just like the previous step, and typing in the following command, then pressing Enter.
cat bitnami_application_password
Your password, a series of alphanumeric characters, will be displayed on the next line. In the terminal screen, highlight the password, then choose the clipboard icon in the bottom right corner of the browser-based SSH client window. Doing this allows you to now select the password text and copy it into your local clipboard.
To login into your WordPress site, go to your site’s address followed by /wp-admin/ such as https://example.com/wp-admin/ and use the credentials to sign in as the site administrator.

Step 6: Update or Install the AWS for WordPress Plugin

The WordPress blueprint offered by Lightsail is powered by Bitnami and comes with a version of the plugin pre-installed.
To see if you have the plugin pre-installed, click on Plugins in the wp-admin dashboard on the left, then Installed Plugins. Depending on the version of the Lightsail blueprint used, and when you last updated your plugins in the wp-admin dashboard, the plugin may appear as the Amazon Polly or the Amazon AI plugin. If so, select the check box next to the plugin name and in the Bulk Action menu at the top of the page, choose Update, then Apply. This will update the plugin to the latest version of the AWS for WordPress plugin.

If you do not have the plugin pre-installed, click Add New either on the Plugins page or the navigation bar to the left. In the search bar type AWS for WordPress and click Enter. When the WordPress Plugin Directory has found the plugin, click Install Now and then click Activate.

Another way you can install the plugin is by downloading the plugin from https://wordpress.org/plugins/amazon-polly/, and then clicking Upload Plugin within the Add New screen of the Plugins dashboard and then Activate after it’s installed.

The plugin should now appear on the left side navigation menu of the WP Admin dashboard.
Step 7: Create IAM Role or User for Plugin
Now that the plugin is installed and activated, you need to create AWS credentials that the plugin will use to configure AWS services. This is done with either an Identity and Access Management (IAM) user or IAM role. If you are using a self-hosted environment on EC2, you can use an IAM role. For more information, see IAM Roles for Amazon EC2. In this example we will create an IAM user. Start by navigating to the IAM console from within the AWS Management Console.
In IAM, click Policies. Then choose Create policy. Choose JSON and delete everything in the policy text box and then paste or enter the following JSON policy into the text box:
{
    "Version": "2012-10-17",
    "Statement": [
        {
            "Effect": "Allow",
            "Action": "acm:DeleteCertificate",
            "Resource": "*",
            "Condition": {
                "StringEquals": {
                    "aws:RequestedRegion": "us-east-1"
                }
            }
        }
    ]
}
Choose Review policy and for Name, enter AWSForWordPressDeleteCert. Then click Create policy. This is one of two policies we’ll add to the user. Back in the IAM navigation pane, choose Users. Then choose Add user.
On the Set user details page, do the following:
- For User name, enter AWSForWordPressPluginPolicy.
- For Access type, choose Programmatic access.
- Choose Next: Permissions.
On the Set permissions page, do the following:
- Choose Attach existing policies directly.
- In the search box, enter WordPress, and then select the check boxes next to AWSForWordPressPluginPolicy and AWSForWordPressDeleteCert. Make sure to select the check boxes for both WordPress policies.
IMPORTANT NOTE: the AWS managed policy, AWSForWordPressPluginPolicy, gives the user permissions to use all the features included in the AWS for WordPress plugin. When new features are added to the plugin, AWS will update this policy to include the permissions necessary to use the new features.
- Choose Next: Tags.
- Choose Next: Review.
- Choose Create user.
A screen will then prompt you to Download .csv to save the user’s credentials (access key ID and secret access key) to your computer. This is the only time that you can save the user’s secret access key, so make sure to save it now because you need both to configure the plugin.
WARNING: Make sure you protect these keys and store them in safe place to prevent unauthorized access to your account.
Now that you have these keys, go back to the wp-admin dashboard and click on AWS in the left navigation pane. Once in the AWS for WordPress plugin, click on the General section within the plugin, enter your AWS access key and AWS secret key and choose your preferred AWS Region. Then click Save Changes.
NOTE: Regardless of which AWS Region you choose, the services used, and resources created, within the CloudFront workflow will always default to US-East N. Virginia. If you are searching for these resources within your AWS account, make sure your region is set to US-East N. Virginia to see resources such as the CloudFront distribution and AWS Certificate Manager certificates.

Step 8: Configure and Use CloudFront with the AWS for WordPress Plugin
When you use CloudFront with the AWS for WordPress plugin for site acceleration, the plugin uses a subdomain, also known as an alternate domain name or CNAME, to send your website’s traffic through CloudFront. This can reduce latency and improve the viewing experience by loading resources faster.
Without the plugin’s site acceleration, all the traffic of your website’s viewers goes to the server that hosts your WordPress website. After completing the steps in the following procedure, you can enable the plugin’s site acceleration, which gives viewers two options for visiting your website:
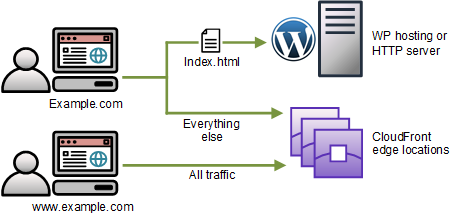
- When viewers use your website’s domain, such as example.com, almost all the traffic goes through CloudFront (see Figure 1).
- When viewers use your website’s alternate domain, such as www.example.com, all the traffic goes through CloudFront (see Figure 2).
Using either domain, your website’s viewers get lower latency and a faster, more reliable viewing experience. We recommend telling viewers to use your website’s alternate domain. The following diagrams show your viewers’ traffic with and without the plugin’s site acceleration.
Figure 1. Without the plugin’s site acceleration

Figure 2. With the plugin’s site acceleration
In the plugin navigation pane, choose CloudFront. Enter your Origin Domain Name. This is the domain name of the web server that hosts your website resources, such as example.com. Enter the Alternate Domain Name that viewers will use for your website’s accelerated experience. We recommend using ‘www’ in front of your website’s domain name, for example, www.example.com. Then click Initiate Setup.

CloudFront uses AWS Certificate Manager to create a certificate for your alternate domain name, and you must validate the certificate within 72 hours of the request. Follow the same process as before when you validated your origin’s certificate. Enter the CNAME Name and Value into your domain registrar’s DNS records.

After you add the DNS record, return to the setup page and click Check Status of SSL certificate. The plugin will continually check for the certificate validation status. This process may take 30 minutes or longer for the changes to propagate and for AWS to validate the domain and issue the certificate. When done, the plugin will automatically proceed to creating a distribution that is optimized for WordPress. Like before, this process may take 30 minutes or longer for the changes to propagate and for AWS to validate the domain and issue the certificate. The setup page automatically refreshes every ten seconds to keep you updated while the deployment is in progress.

After the deployment is complete, you will create one final DNS record to point your alternative domain name such as www.example.com to your new CloudFront distribution. The plugin will display the distribution domain name created for your WordPress site. Once you have that value, go to your domain registrar just like in prior steps and add the CNAME Name and Value.

Once completed, return to the plugin and perform the final check to make sure the final link is established by clicking Check status of CloudFront DNS record. You are now on the final stage of the plugin configuration for CloudFront’s site acceleration.
Choose Activate Site Acceleration, and then choose Save Changes.

Step 9: Verify Content is Served from CloudFront’s Cache
When you activate site acceleration, the AWS for WordPress plugin configures your website to serve the website’s resources—for example, CSS, JavaScript, and images—from your CloudFront distribution. You can verify that the plugin accelerates your website for viewers by viewing your website from a private browsing window, or by using a different browser outside of WordPress’s admin mode. Use your browser’s developer tools to inspect that your website’s resources are served from the alternate domain name that points to your CloudFront distribution.
When you inspect an object’s source, you should see that it is coming from the alternate domain name you set up, such as www.example.com.
Conclusion, Troubleshooting, and Taking the Next Steps
Congratulations! You now have gone through the end-to-end process of setting up a WordPress site hosted on Lightsail and using CloudFront to accelerate your site’s performance. If you experience any issues along the way, refer to the Troubleshooting guide within CloudFront’s documentation.
As a next step, I recommend two additional projects to dive a little deeper into configuring your site’s accessibility and security.
First, I encourage all users to explore the Amazon Polly and Amazon Translate functionality within the plugin. Now that the plugin has already been configured and has the IAM permissions necessary to use these services, you can quickly add text-to-speech and language translation capabilities in just a few clicks. Read the latter parts of Jeff Barr’s blog on Give Your WordPress Blog a Voice With Our New Amazon Polly Plugin for a good overview.
Second, I highly recommend that you enable HSTS headers for even more security. If you go to the Mozilla Observatory and enter your viewer domain such as www.example.com, click Scan Me and you’ll likely see a security score of D+.

You can enhance your domain’s security score by adding HSTS headers using CloudFront’s edge computing service Lambda@Edge. Read Jake Wells’ blog Adding HTTP Security Headers Using Lambda@Edge and Amazon CloudFront for a great step-by-step guide on how to add these headers using Lambda@Edge instead of configuring them on your origin server.
WARNING: Please note that adding security headers is not always a simple copy and paste operation with a one-size fits all template. Additional configuration may be required to make sure you have the right permissions in place to allow your website to properly render.
For example, within the content-security-policy headers line of the snippet provided in Jake’s blog, I made additional modifications to enable content to securely come from sites like fonts.gstatic.com as a font source, secure.gravatar.com as an image source, and fonts.googleapis.com as a style source. Below is the line I used in my own deployment but this will vary for your own site depending on your own content. Proceed with caution as this has the potential to affect the availability and rendering of your site.
response.headers['content-security-policy'] = [{ value: "default-src 'self'; font-src 'self' https://fonts.gstatic.com data:; img-src 'self' https://secure.gravatar.com; script-src 'self' h; style-src 'self' https://fonts.googleapis.com; object-src 'self'"}];For more information about working with Content Security Policy (CSP) headers, read Mozilla’s documentation. Once you have the correct security headers in place, you can Initiate Rescan of your website’s security summary and see your security score increase to an A+!
![]()