AWS Open Source Blog
Building and Bundling a ROS Application for AWS RoboMaker
中文版 – Twelve months ago, we started working on AWS RoboMaker, a cloud robotics service. One of the biggest questions looming over us was: How are we going to make it easy to run any ROS application on our service? Robot applications are a large mix of different packages with numerous dependencies. When simulation is mixed in, that list of dependencies grows. After much thought and research, we were inspired by appimage, flatpak, and snapcraft to create a single file format that can run in a local development environment and on our service. We call this format a bundle.
After deciding what kind of packaging artifact to design, we wanted to create a command line tool to make it easy to generate. It was very important to us that the tool fit within the existing ROS ecosystem. We decided to build on top of colcon, the latest and greatest in ROS build tooling. Colcon can build ROS1 and ROS2 applications. It is also highly extensible, and provides many of the important features we needed, out of the box.
This article explains the existing ROS build tooling and why colcon was chosen as the build tool for ROS2. Colcon does a ton of the heavy lifting for us, allowing us to focus on our specific functionality. In addition, colcon build replaces catkin_make and ament_make with no modifications to the packages being built. This means that, by building our tooling on top of colcon, AWS RoboMaker users can install a single tool and execute the full workflow to generate a bundle for use with AWS RoboMaker.
In this post, I will go over the normal workflow for creating a bundle to use with AWS RoboMaker, and some solutions for frequently-encountered issues. In the second section, I will dive deeper into the newest version of our ‘bundle’ file format and provide an overview of what happens when you execute colcon bundle to create a bundle.
Why a Bundle?
ROS simulation workflows require an environment with ROS and other runtime dependencies of the application installed. This is usually fulfilled by executing various apt-get install commands. That install takes a long time, and cannot be reproduced reliably because upstream package updates can occur at any time. For our service, we were concerned about the reliability of using apt to install a new environment for every simulation run, so we looked into various complete packaging formats. The most compelling and reliable distribution format for an entire ROS application was a Debian package. It can contain everything required to run the robot: ROS, boost or other external libraries, and the actual application code.
We decided not to go with a preexisting format because we wanted flexibility to add optimizations for downloading, creation, and updates. So we created the ‘bundle’ format and the corresponding tooling to support it. Our first iteration worked well, but it had some limitations:
- Updating a bundle with only workspace updates took about as much time as the initial
colcon bundleinvocation. - Deploying an updated bundle to a robot was not as fast as desired, in both the download and the extraction of the bundle contents.
We are excited to announce the second version of the bundle format with optimizations to reduce or remove these limitations! The format now supports partial downloads and partial extraction. This has three major benefits:
- We reduced bandwidth used by updates on bandwidth-constrained remote devices such as robots using 2G/3G.
- We only extract what we need to: if most of a bundle hasn’t changed, we don’t pay the cost of downloading or extracting it. On lower-end devices this results in significant time savings (we have seen a decrease in re-deployment time from 60 minutes to 1 minute on our TurtleBots).
- Now that the outer archive is not compressed, we are able to incrementally bundle. This reduces the re-bundle time from 5+ minutes down to seconds for simple workspace updates.
AWS RoboMaker supports this new version transparently. If you would like to try out these new improvements run sudo pip3 install -U colcon-bundle in your development environment. I will dive deeper into the implementation of this new format in the second part of this blog. If you have any questions, ideas, or issues, we’d love to read them in our issues on GitHub.
Using colcon to Build a Bundle for AWS RoboMaker
Bundling your workspace with colcon takes only two steps:
- Build your workspace with
colcon build. - Bundle your workspace with
colcon bundle.
Build
Every ROS package that can be built with catkin_make can also be built with colcon build. Over months working with ROS packages, we’ve encountered only minor issues building packages with colcon build. If you run into issues building packages with colcon build that build successfully with catkin_make, please report them in colcon-ros issues.
NOTE: The most noticeable change from catkin_make to colcon build is that there is no longer adevel directory. If you want to add your workspace to your local environment, execute source install/setup.sh instead.
Bundle
After your workspace has been built with colcon build, you should have a build and an install directory. To start bundling, execute colcon bundle. Our tool inspects your dependencies, downloads all of them, and compresses them along with your built workspace into a bundle to be used on AWS RoboMaker. The built bundle is located at bundle/output.tar
Common Build Issues
The standard build instructions for ROS1 development use catkin_make. Because colcon is relatively new, many ROS1 developers might not be familiar with it, but it is fully compatible with catkin builds. While building existing ROS packages (previously built with catkin_make) with colcon build we ran into a couple of minor issues, and want surface them here to save other developers some time and effort.
CMAKElists.txt in Nested Folders
A common build issue we encountered is colcon failing to properly enumerate all the packages in the workspace, leading to failed colcon bundle invocations and odd installation directory structures. This is usually caused by nested folder structures withCMakeLists.txt in the intermediate directories. This is required for building nested packages within directories withcatkin_make, but causes trouble with colcon. Colcon supports arbitrarily deep nested folder structures, and finds your packages automatically. Here’s a diagram for reference:
src/
├── package_1/
│ ├── package.xml
| └── CMakeLists.txt (OK)
└── intermediate_directory/
    ├── package_2
    | ├── package.xml
    | └── CMakeLists.txt (OK)
    ├── package_3
    | ├── package.xml
    | └── CMakeLists.txt (OK)
    └── CMakeLists.txt (REMOVE)
Missing Install Directives in CMAKELists.txt
Another issue we’ve run into is missing files. When using catkin_make, the devel directory and itssetup.sh adds all the local packages into the search paths for ROS tools. Colcon works differently: it installs all the targets you specify into theinstall directory, which means that all your CMake install() directives are executed. If you are experiencing errors like: [a_launchfile] is neither a launch file in package [a_package] nor is [a_package] a launch file name or [rosrun] Couldn't find executable named my_node below /opt/ros/kinetic/share/my_package, then adding calls to install() in yourCMakeLists.txt could fix the issue. There are excellent examples of how to do this on the ROS Wiki.
Common Bundling Issues
These are the most frequent issues we’ve run into while working with bundles of applications on AWS RoboMaker.
Cannot Locate rosdep Definition for [Package Name]
Ensure that you are using the correct ROS package name for the package you want to depend on. A package might be named ros-kinetic-packagename in apt, but in your package.xml it should be packagename. Search the ROS distro GitHub repo to see if the package is in the existing rosdep database. If it is not, you can follow one of the tutorials for adding dependencies to rosdep.
Missing Dependencies
The most common problem we saw while bundling various open source ROS libraries was missing dependencies. Much of the time, the build environment already has a dependency installed because of another package, and everything builds fine, but after the package is bundled that dependency is missing. The common error messages when a dependency is missing are Could not load libxzy.so, No such file or directory some_script.py, or Could not load module 'python_dependency'. To solve this, add the dependency to the package.xml of the package that requires it, and re-bundle.
If you use dependencies in your applications from your own apt or pip repository, you need to include those repositories in your colcon bundle invocation. To resolve this, try the following:
- You can override the
sources.listused bycolcon bundle‘saptinstaller with the--apt-sources-listargument. We recommend that you include all the sources we currently use, to avoid resolution errors for base OS and ROS packages. Check out this examplesources.list on GitHub. - To override
piporpip3sources, use the--pip-argsand--pip3-argsarguments. The string after this argument is passed directly topip.Example:--extra-index-urlhttps://my-custom-pip-repo/index
Build and Bundle Complete
Now you can build and bundle your application to simulate on AWS RoboMaker! To upgrade to the latest version of our packages run: sudo pip3 install -U colcon-bundle colcon-ros-bundle in your development environment. If you have any questions or run into issues, please post on the relevant GitHub repo, we will be happy to help. If you’re interested in what is actually happening when colcon bundle is executed, read on!
Bundle Deep Dive
This section is a technical deep dive into the internals of the bundle format and the implementation of colcon bundle. At the end of this section you will come out with an understanding of what’s happening when colcon bundle executes. After you see how easy it is, we hope you’ll want to build your tooling on top of the colcon ecosystem and contribute it back to the community.
Bundle File Format
A ‘bundle’ is the packaging format used by AWS RoboMaker to run an entire ROS application. It contains the entire transitive closure of robot or corresponding simulation application. ROS has already defined a standard packaging format which specifies how to declare dependencies and what build tool to use. Using colcon, our tooling collects this information, invokes various package installers (currently pip and apt) to pull down the dependencies, installs those dependencies into a local staging area, and then packages them along with the local built workspace into a bundle for consumption by AWS RoboMaker.
That workflow produces what we call a ‘bundle’ (we know, it’s a boring name – if you have a naming idea for this format, please open an issue in our repository!). The specification of the bundle format is located in the colcon-bundle repository. I’ll give an overview here.
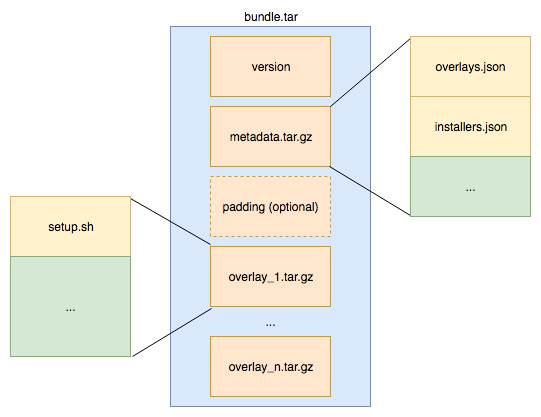
This diagram shows V2 of our bundle format. You can view the history here. A ‘bundle’ file follows the standard GNU tar format. It has a minimum of three components:
- A version file, which can be used to differentiate bundle versions with backwards-incompatible changes.
- A metadata tarball that contains at minimum a list of overlays contained within the bundle, and also contains any other metadata the consumer of the bundle might be interested in.
- At least one overlay. ROS workspaces support the concept of workspace overlaying; we took this concept and applied it to the entire application. This allows AWS RoboMaker to run a ROS application on top of a base Linux operating system with no modifications to the base OS.
I outlined the benefits of the latest version of our format up above. These are the major changes between V1 and V2:
- Change the outer formatting from
.tar.gzto.tar. This allows random access within the file. This is great because it allows consumers who already have part of the contents to only download the contents that changed. Compressing the individual overlays does cause a hit to the overall file size, becausegzipisn’t as efficient with multiple smaller files. We don’t think this is a problem because, for the major update use case, we can now download only what changed. - Change from a single overlay to an arbitrary number of overlays and
gzipeach overlay. This greatly increases the flexibility of the bundle format. With the above change to a straighttar, each overlay is now accessibly individually. We now have the flexibility to have as many overlays as desired in order to optimize for the update use case. At the most granular level, each library could live in a separate overlay, and if a single library changes, that is the only change that would have to be downloaded by the robot (if it is otherwise up to date). This is a huge savings in time and bandwidth for remote devices. - Add
overlays.jsonto the metadata. This file contains the ordered list of overlays to apply to the workspace, and hashes that can be used to compare between versions of the overlay. This metadata enables having an arbitrary number of overlays, but ensures the environment is set up correctly, in order. The hashes allow for intelligent download and extraction since a changed hash indicates the particular overlay has changed.
Overall, we are very happy with these improvements. If you have any ideas, we’d love to read them in our issues on GitHub.
colcon bundle Execution Flow
In this section I will dive into what is actually happening when you execute colcon bundle. (It has been a great experience building our tooling on top of colcon. If you are looking to create specialized build tooling, I highly recommend seeing if colcon could provde value as a base framework.)
The colcon ecosystem is made up of individual Python packages that rely only on direct dependencies and colcon-core as a base. Almost all of the functionality ofcolcon is modeled as ExtensionPoints defined by base infrastructure in colcon-core. colcon leverages setuptools entry points as its plugin mechanism to fulfill its goal of modularity and loose coupling.
To extend the command line interface, colcon supports adding commands via VerbExtensionPoints. To build our functionality, we created the bundle verb and registered it in our setup.cfg. That’s all we had to do to get an integrated command into this awesome tool. (All the work from there on was specific to our domain.) If you’re looking to build tooling around your ROS workflows, use colcon! I can’t recommend it enough.
Once colcon bundle has been invoked, a series of actions occur, some provided to us by thecolcon infrastructure, and some written by us. I’ll outline them here, but I encourage you to dive into the code for a deeper understanding of how everything works.
- Our
VerbExtensionPoint,BundleVerb, is invoked. We are passed thecontextwhich contains all the arguments we registered along with arguments from other extension points. - We then invoke some of the
colcon-corefunctionality to crawl the workspace file tree and identify packages. This then creates aPackageDescriptorfor each package to be included in the execution ofbundle. Package identification is done using PackageIdentificationExtensionPoints. The extension registered to identify ROS packages is RosPackageIdentification defined in colcon-ros. When it identifies a ROS package, it sets thetypein thePackageDescriptortoros.cmake,ros.catkin, orros.ament. - Once all the packages have been identified
colconexecutes anyPackageAugmentationExtensionPointsthat have been registered for a given package type. Along with identification,RosPackageIdentificationalso provides an augmentation that parses the package’spackage.xmland adds build, test, and run-time dependencies to the package descriptor metadata. - Now back into our code, we inspect the dependency metadata attached to each
PackageDescriptorto determine if anything has changed since the last invocation. If nothing has changed, we skip further dependency analysis and continue to bundle up the built workspace with the existing dependency overlay. If we determine that dependencies have changed, we continue with full dependency analysis. - During full dependency analysis, for each
PackageDescriptor, we invoke its corresponding bundle task. We currently supportros.catkin,ros.cmake, andpythonpackage types. This support is registered incolcon-bundle/setup.cfgandcolcon-ros-bundle/setup.cfg. New package types can be supported by adding a corresponding bundle task. For each package type, the corresponding bundle task collects the dependencies and then invokes the appropriateBundleInstallerExtensionPointfor each dependency. Our ROS tasks userosdepto convert from the ROS dependency name into the matching system package name. - Once all dependencies have been registered in the installers and the full transitive closure has been determined, we apply a blacklist to the system package list since we don’t want to install
libc*,gazebo*, and other packages provided by our infrastructure. If you want to override the blacklist behavior, you can provide your own blacklist with the--apt-package-blacklistargument. - After blacklisting, we invoke
install()on all the registeredBundleInstallerExtensionPointsthat have been used during the dependency registration step. The installers install everything into a directory within the--bundle-base(default: bundle) directory. Once the downloading and installation is complete, we copy in oursetup.sh,which enables overlaying, and thentarandgzipthe folder intodependencies.tar.gz. - After the dependencies have been archived, we archive the latest built
installfolder. Wetarandgzipthe entire--install-base(default: install) directory into a separate overlay with asetup.shto enable overlaying. - After both archives have been created, we collect all the metadata that has been produced during the bundling process and add metadata describing the size, offset, and ordering of the overlays. We then
tarand compress that metadata intometadata.tar.gz. - We then
tarthe various archives together to create the ‘bundle’ and write it to disk atbundle/output.tar. The bundle is now usable locally on on AWS RoboMaker.
Using a Bundle to Run an Application
The bundle format can be used locally just like we use it on AWS RoboMaker. Doing this could be useful in your application, or just as a debugging tool. We will soon publish the GoLang library we have built to consume colcon bundle archives in our services. For now, I’ll summarize the steps of how we currently read and consume a colcon bundle archive:
-
- Extract
versionandmetadata.tar.gzfrom the archive. - Check
versionto see what compatibility mode we should use (from this step on, I am going to assume that the bundle is version 2). - Extract
overlays.jsonfrommetadata.tar.gz - Parse
overlays.jsonto collect the list of archives to be extracted to disk.overlays.jsoncontainssha256hashes of the overlays. These hashes are used to determine whether an overlay has changed and should be re-extracted. They can also be used to verify the integrity of the overlays. - Once the overlays have been extracted to disk they need to be sourced into the environment in the order they are listed in
overlays.json. To add an overlay into the environment, execute:BUNDLE_CURRENT_PREFIX=<path_to overlay_folder> source <path_to_overlay_folder>/setup.shTheBUNDLE_CURRENT_PREFIXenvironment variable is required, because when sourcing a file we cannot determine where the file is located. - Your environment is now set up to execute as if the ROS workspace and dependencies in the bundle are installed locally.
- Extract
Wrapping Up
We are happy with latest the latest iteration of our format and tooling, and we look forward to continuing to improve upon what we have. The colcon bundle implementation is extensible to more package types and installers. If you’re interested in extending the functionality, we welcome issues and contributions incolcon-bundle and colcon-ros-bundle. If you want to build your own tools on top ofcolcon, check out the colcon contribution documentation.