- AWS Builder Center
- builders.flash
AWS Device Farm で構築するモバイルゲームの自動テスト環境
2025-03-03 | Author : 森下 真孝
はじめに
ゲームなみなさんこんにちは、Game Solutions Architect の森下です。
この投稿では、物理デバイスを管理せずにモバイルゲームの自動テストを実行する方法として、AWS Device Farm をご紹介します。
builders.flash メールメンバー登録
AWS for Games
AWS for Games ではより早い開発、よりスマートな運営、そしてより楽しいゲームへの成長という Build、Run、Grow の 3 つの柱に沿ってサポートします。本記事は Build の柱、 クラウドゲーム開発のお話になります。
アプリケーション開発における E2E テスト
アプリケーション開発において、ユーザーの操作を再現する E2E テストは、クラッシュなどの重大な問題や UI 上のバグが発生していないかを確かめる重要な工程です。E2E テストを定期的に実行することでバグの早期発見が期待できますが、手間と時間のかかるこの工程を毎回手動で実行すると、多大な人的コストが発生してしまいます。そこで、E2E テストは自動化することが望ましいと考えられています。
ゲーム開発における例
ゲーム開発では、チュートリアルや特定のイベントモードなど、普段の開発業務ではめったに触れることのない、限定的な機能が多く存在します。このような機能がアップデートによって壊れた場合、定期的なテストをしていないと発見が遅れることがあります。「リリース前に行われるマニュアルチェックによってチュートリアルのバグが発覚したが、どこが影響して壊れているか分からない」という経験をされた方もいらっしゃるかもしれません。
あるいはゲーム開発では、非エンジニアを含めた開発者が実機で動作をテストできるよう、日毎で作成されたビルドをチーム全体で利用することがよくあります。このとき、動作確認用ビルドに問題が生じ、ゲームが起動できなくなったり、特定の機能が使えなくなったりすることがあります。その結果、チーム全体の開発業務に影響が出る、という可能性も十分に考えられます。
これらのようなケースにおいても、自動化された E2E テストは有効に働きます。滅多に触れることのない機能については定期的な自動テストを実施することで健全性を担保でき、多くの開発者が触れる機能については日毎やビルド実行時などに自動テストを実行することで、ビルドの問題を早期発見することができます。
自動化された E2E テストを構築する際の課題
E2E テストの有効性について述べましたが、実際に構築する際にはデバイスの管理が課題になることがあります。
E2E テストを実行するためには、アプリを実行するデバイスが必要です。エミュレータを利用する手もありますが、環境の再現性には限界があるほか、iOS デバイスのエミュレーションには Mac マシンが必要になります。
物理デバイスを用意すればこれらの課題は解決できますが、テストを実行するマシンと、それに常時接続する物理デバイスを管理する必要があります。デバイスの故障やアップデートにも対応しなければなりません。
ゲーム開発固有の課題
また、ゲーム開発固有の課題として、テストフレームワークが UI 要素を直接取得できない点が挙げられます。
Flutter や ReactNative のような汎用アプリ向けのアプリケーションフレームワークでは、UI が構造化されており、テストフレームワークが UI 要素を直接取得して操作することが可能です。
一方で Unity や UnrealEngine などのゲームエンジンでは、UI がピクセルベースで構築されているため、汎用アプリ向けテストフレームワークが UI 要素を直接取得することができません。
この課題に対処するため、ゲームにおける E2E テストではパターンマッチングなどの画像処理を行う必要があります。
AWS Device Farm とテストフレームワークによる自動テスト
AWS Device Farm は、AWS 上にホストされた実機で自動テストを実行できるサービス*です。デバイスとテスト実行用のマシンは全て AWS が管理するため、前述した管理コストに関する問題を解消することができます。AWS Device Farm はその他にも、各種メトリクスの自動収集や録画機能、VPC とのセキュアな接続(プライベートデバイスのみ)などの機能もサポートしています。
* AWS Device Farm には物理デバイスをリモートで操作できる Remote Access の機能もあるのですが、こちらに関しては今回取り上げません。
パブリックデバイスとプライベートデバイス
AWS Device Farm にはパブリックデバイスとプライベートデバイスの 2 つのプランがあります。
パブリックデバイスは従量課金のプランで、ラインナップされているデバイスプールの中から好きなものを選んで利用できます。データはテスト終了時にリセットされますが、デバイスは他の利用者と使い回しになるため、端末情報を認証情報に紐づけないようにするなど配慮が必要になります。
プライベートデバイスは買い切りのプランで、利用したいデバイスモデルを指定して購入することができます。デバイスは専有となり、他の利用者に共有されることは決してありません。また、プライベートデバイスでは、VPC-ENI を利用したセキュアな VPC への接続もサポートしています。
パブリックデバイスとプライベートデバイスの違いを以下の表にまとめます。
|
|
パブリックデバイス |
プライベートデバイス |
|---|---|---|
|
課金形態 |
従量課金 |
買い切り |
|
デバイスの所有形態 |
他の利用者と使い回し |
専有 |
|
データの取り扱い |
テスト終了時にリセット |
契約終了時に破棄 |
|
利用できるデバイス |
ラインナップされているものから選択 |
好きなものを指定可能* |
|
VPC への接続方法 |
AWS Client VPN を利用した VPN 接続 |
VPC-ENI を利用したセキュアな接続 |
*AWS Device Farm サービスチームへの問い合わせが必要です
サンプル: Android アプリを対象とした E2E テスト構築手順
本稿では、Android アプリを対象とした E2E テストをサンプルに、AWS Device Farm の使い方について解説していきたいと思います。なお、iOS アプリでもほぼ同様の流れになりますが、アプリ署名に一手間必要なため今回は割愛させていただきます。
Android アプリを利用した E2E テストの全体像は以下の通りです。
必要なものはアプリケーションファイル (.apk) とテストスイート (.zip) の 2 つになります。この 2 つを用意すれば、あとはマネジメントコンソール上から AWS Device Farm でテストを実行し、結果を得ることができます。
アーキテクチャ図
前提知識
構築手順に入る前に、本稿で利用しているテストフレームワークについて簡単に紹介します。
-
Appium はモバイルアプリケーションのための自動テストフレームワークです。AWS Device Farm では唯一クロスプラットフォームで対応しているフレームワークであり、iOS, Android 両方のテストを行いたい場合は第一選択肢になり得ます。なお後述しますが、Appium は簡単なパターンマッチングによるピクセルベースでのテストをサポートしており、本稿ではこちらを利用します。
-
WebdriverIO は、Node.js を基盤とするテストフレームワークであり、Web/モバイルの UI 操作を自動化するために利用されます。Appium は言語として JavaScript, Python, Java, Ruby をサポートしていますが、JavaScript を選択した場合のクライアント実装はこの WebdriverIO を利用することになります。
1. 準備
サンプルアプリのダウンロード
まず、テスト対象となるサンプルアプリをダウンロードします。本稿では、AWS Device Farm Workshop で利用されているサンプルアプリを利用します。
ダウンロードは こちら から。
なお、このアプリはゲームエンジンで作られているわけではなく、UI も構造化されていますが、本稿はモバイルゲームの自動テスト環境を想定しているため、あえてピクセルベースで組まれていると見立てて話を進めていきます。

テストスイートのダウンロード
次に、本稿で利用するテストスイートをダウンロードします。
ダウンロードは こちら から。
ダウンロードが完了したら、zip を解凍してください。テストスイートは以下のようなファイル構成です。
.├── package-lock.json├── package.json└── test ├── config │ ├── wdio.base.conf.js │ ├── wdio.devicefarm.conf.js │ └── wdio.local.conf.js ├── images │ ├── step1.png │ ├── step2.png │ └── step3.png └── specs └── example.e2e.js2. テストスイートの内容について
実行に移る前に、テストスイートの主要なファイルの内容について、簡単に説明させていただきます。
test/config
このディレクトリ以下に、WebdriverIO の実行設定が格納されています。
wdio.base.con.js に基本的な設定が記述されており、それを拡張する形で wdio.local.conf.js にローカル実行の設定が、wdio.devicefarm.conf.js に AWS Device Farm 上における実行の設定が記述されています。
test/specs/example.e2e.js
こちらのファイルに、テストケースが記載されています。 基本的には browser.pause(3000) で待機しつつ、Appium の Image セレクター機能を利用して test/images/ 以下にある画像ファイルで要素の選択、クリックを行っています。 Appium の Image セレクター機能は、テンプレートマッチングを利用した要素検出を行う機能です。test/images/ 以下にはクリックして欲しい要素の画像が保存されており、うまく行けば順番に要素をクリックしてくれます。
describe('Nested View Test', () => {
    it('should perform image selector test', async () => {
        try {
            browser.updateSettings({
                fixImageTemplateSize: true,
                fixImageTemplateScale: true,
            });

            await browser.pause(3000);
            await $(`./test/images/step1.png`).click();

            await browser.pause(3000);
            await $(`./test/images/step2.png`).click();

            await browser.pause(3000);
            await $(`./test/images/step3.png`).click();

            expect(true);
        } catch (error) {
            console.error('Test failed:', error);
            throw error;
        }
    });
});
3. テストスイートの zip ファイル作成
AWS Device Farm では、テストスイートを .zip ファイルでアップロードします。また、Appium の言語として Node.js を選択する場合は、npm-bundle した結果をアップロードする必要があります。そのため、テストスイートの zip ファイルを作成するために以下の手順を実行していきます。
なお、この手順を実行するには Node.js のインストールが必要です。まだお済みでない場合は別途インストールをお願いいたします。
テストスイートのディレクトリへ移動
まず、手順 1 でダウンロードしたテストスイートのディレクトリへ移動します。
% ls
node_modules/      package-lock.json  package.json       test/
npm-bundle コマンドを実行
次に、テストスイートのディレクトリで npm-bundle コマンドを実行します。
% npm-bundle
androidsampletest-1.0.0.tgz
.zip ファイルを作成
最後に、zip コマンドを実行して .zip ファイルを作成します。
% zip MySampleAndroidTests.zip *.tgz
adding: androidsampletest-1.0.0.tgz (deflated 0%)
ディレクトリの内容を表示
ここまで実行した際のディレクトリの内容は以下の通りです。
% ls
MySampleAndroidTests.zip     node_modules/                package.json
androidsampletest-1.0.0.tgz  package-lock.json            test/
4. AWS Device Farm 上での実行
それでは、AWS Device Farm 上でテストを実行したいと思います。
プロジェクトの作成
まず、AWS マネジメントコンソール上で AWS Device Farm のページへ移動します。
そうしたら、左側のメニューから「Projects」をクリックします。
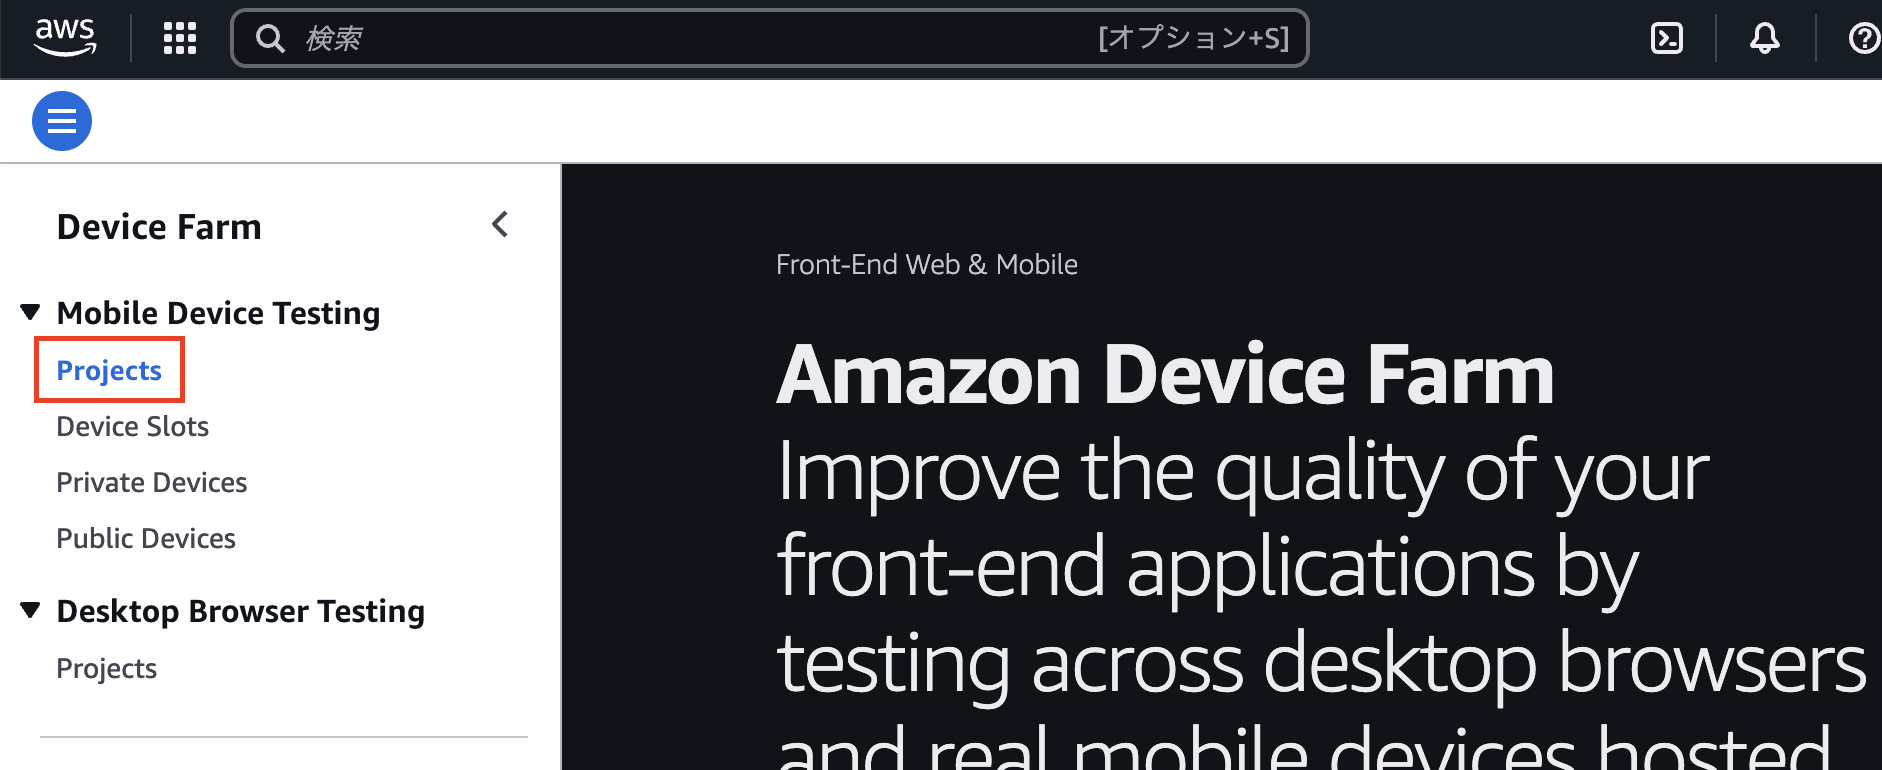
「Create mobile project」をクリック
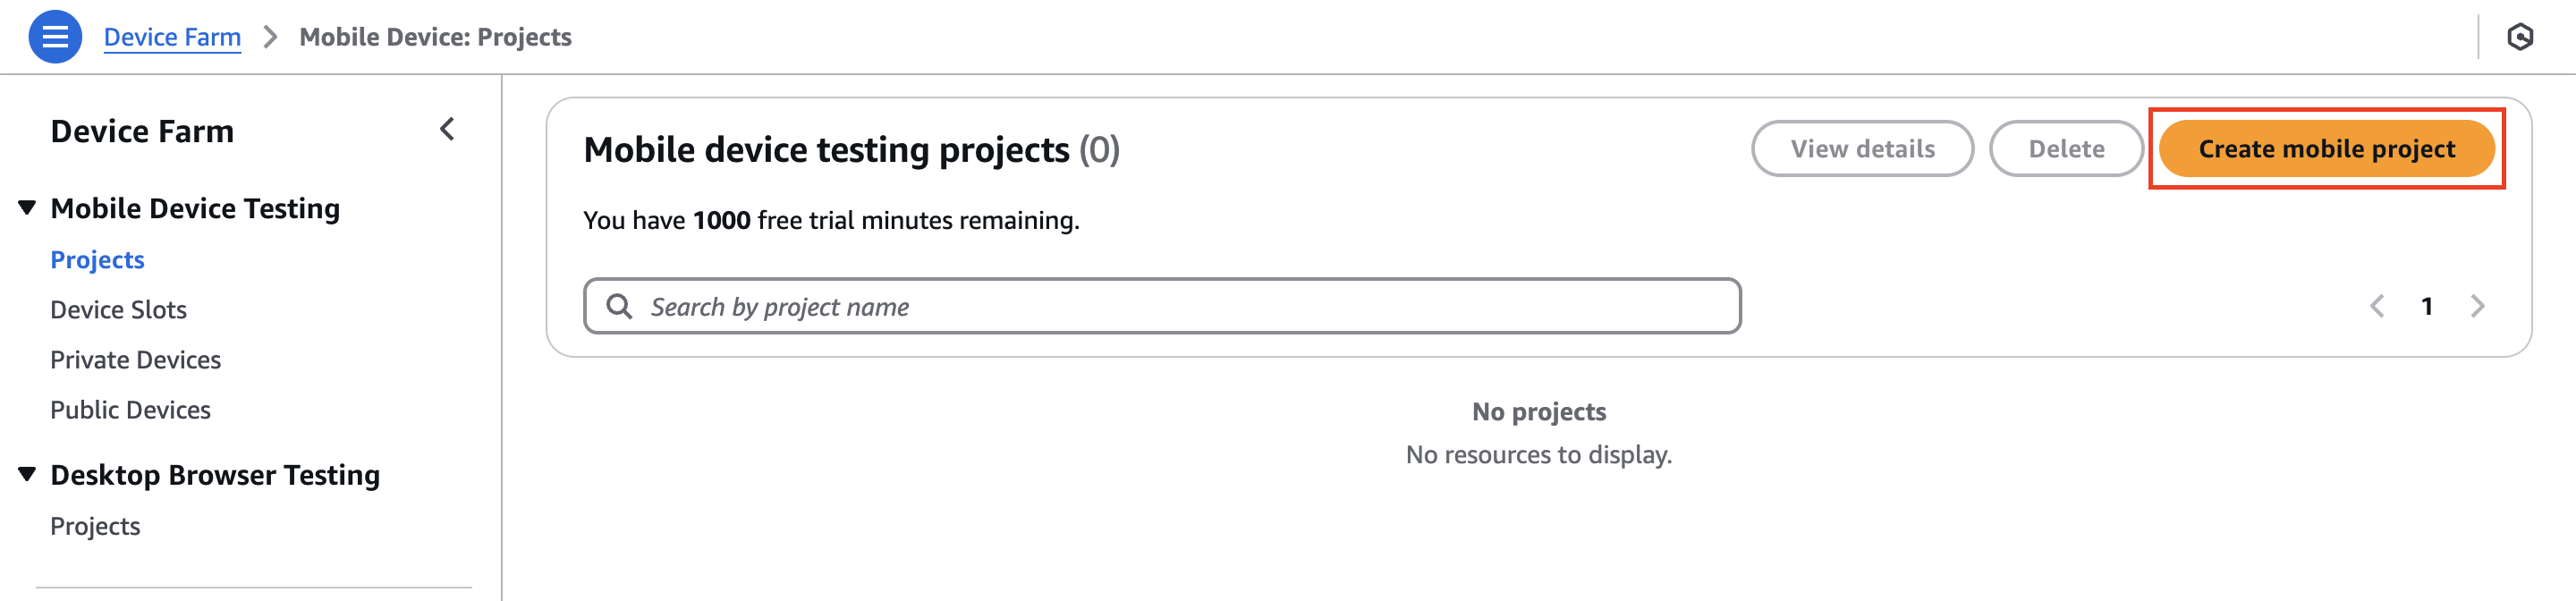
プロジェクト一覧のページに遷移したら、「Create mobile project」をクリックします。
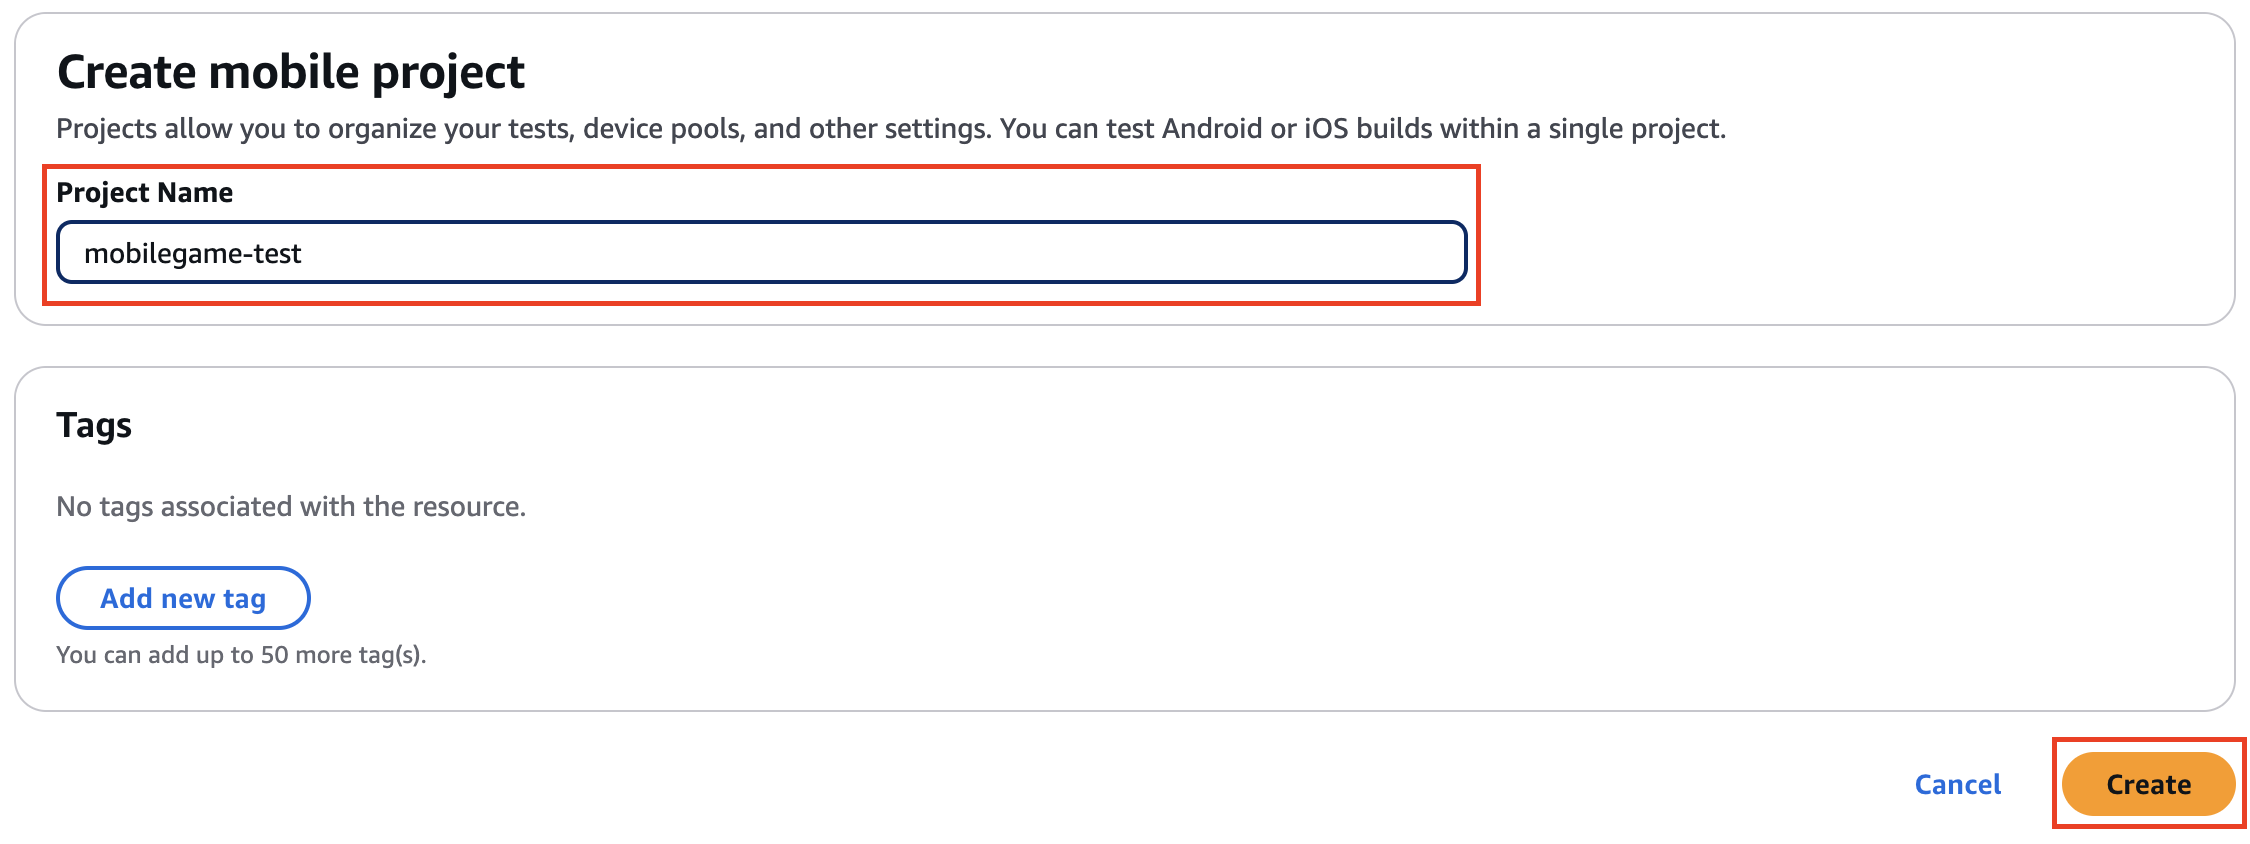
「Project Name」を設定
「Project Name」の欄に mobilegame-test などと入力して、「Create」をクリックします。
これでプロジェクトの作成が完了しました。
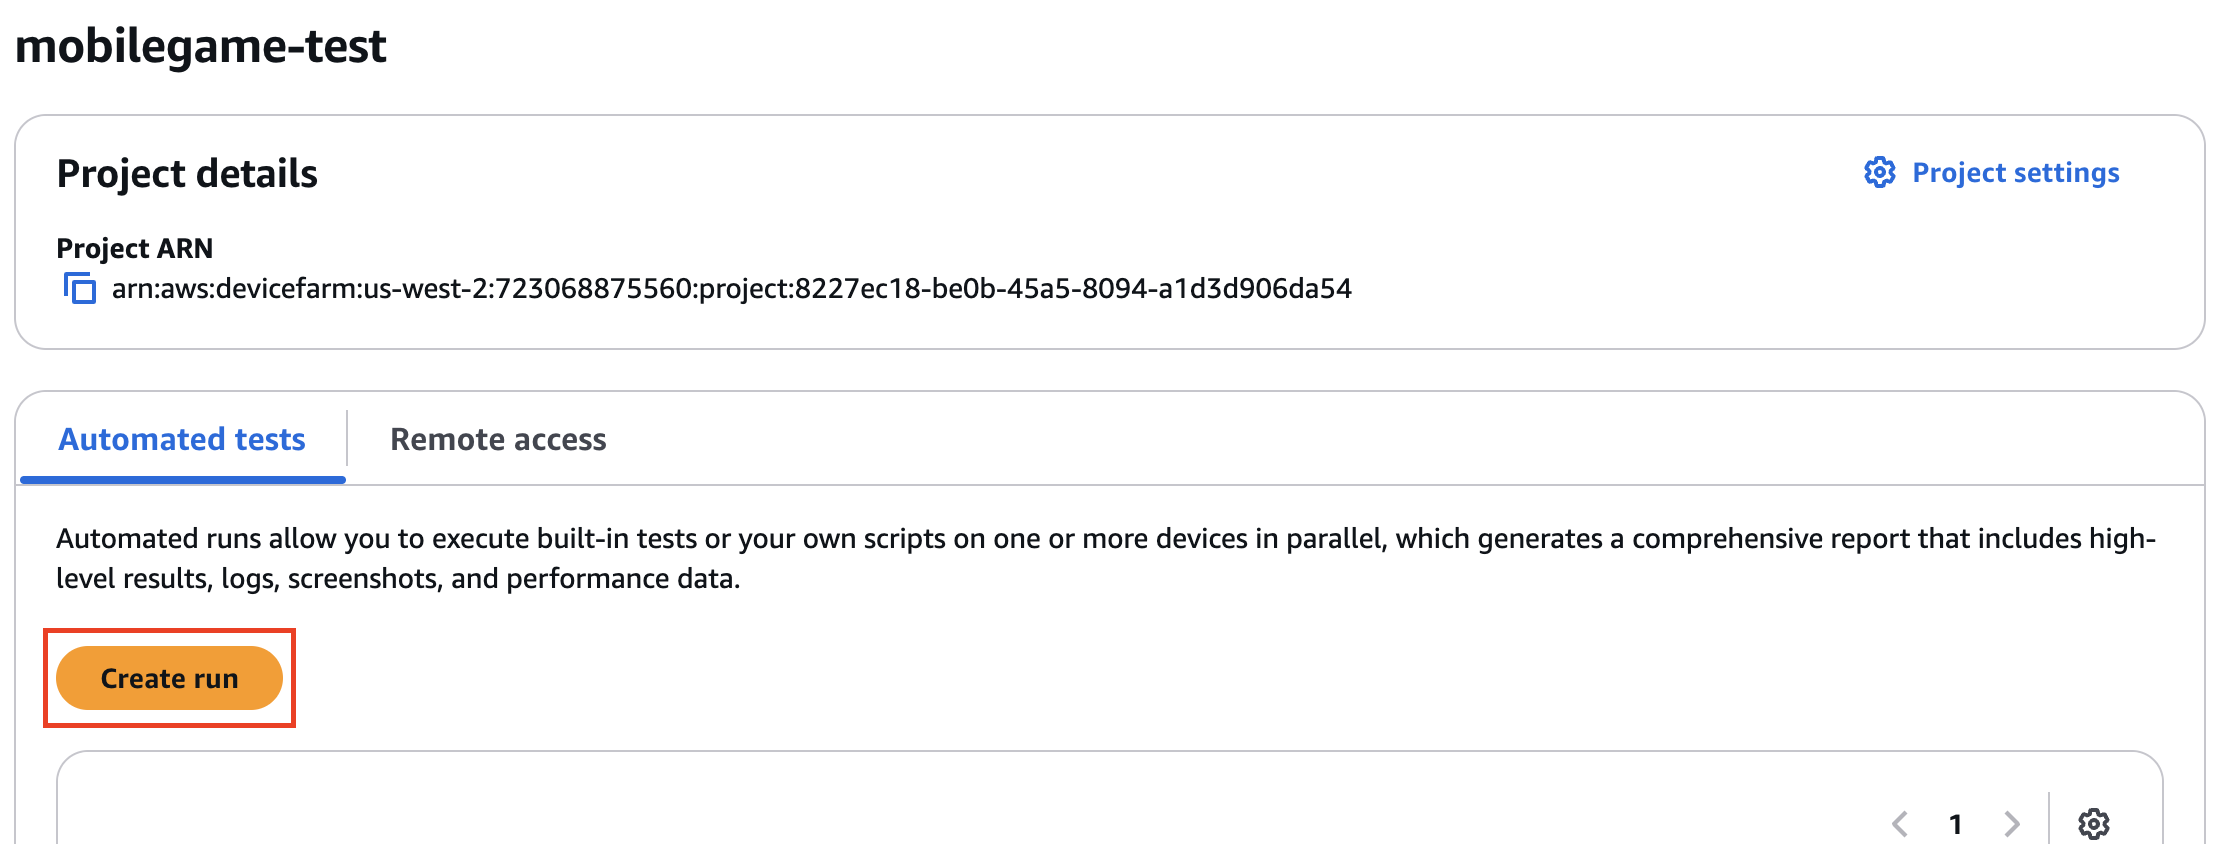
プロジェクトを作成すると、自動的にプロジェクト画面へ遷移します。別の画面にいる場合は、再度左のメニューから「Projects」をクリックし、先ほど作成したプロジェクトを選択してください。
テスト実行の開始
プロジェクト画面で、中央のタブが「Automated tests」であることを確認し、「Create run」をクリックします。
aws-devicefarm-sample-app.apk をアップロード
「Choose application」の画面では、「Choose File」をクリックし、手順 1 でダウンロードした aws-devicefarm-sample-app.apk をアップロードします。
アップロードが完了したら、「Next」をクリックします。

MySampleAndroidTests.zip をアップロード
「Configure」の画面では、「Appium Node.js」を選択し、「Choose File」をクリックして、手順 3 で作成した MySampleAndroidTests.zip をアップロードします。
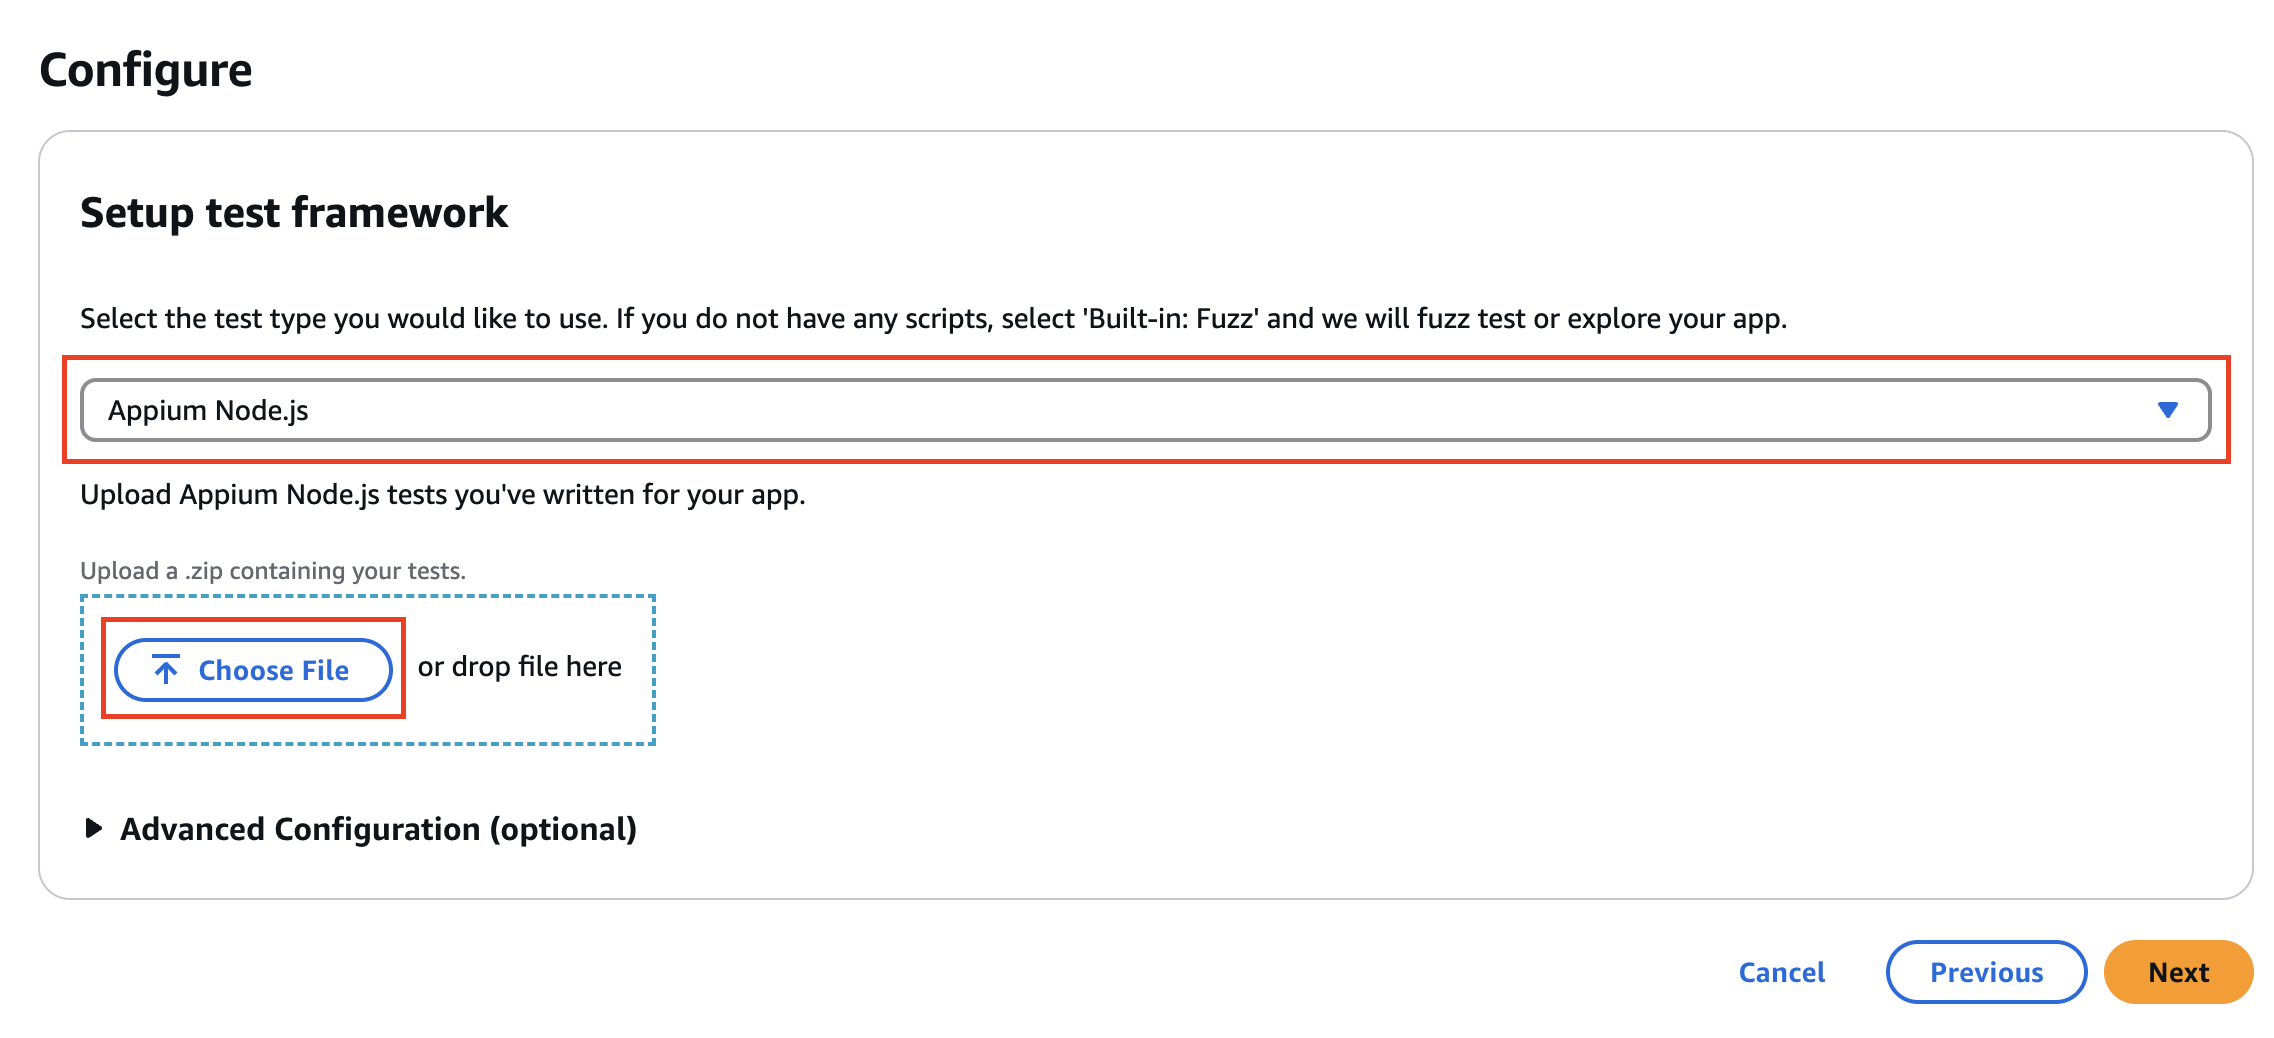
「Create a TestSpec」をクリック
アップロードが完了したら、TestSpec の入力欄が現れます。右下の「Create a TestSpec」をクリックしてください。
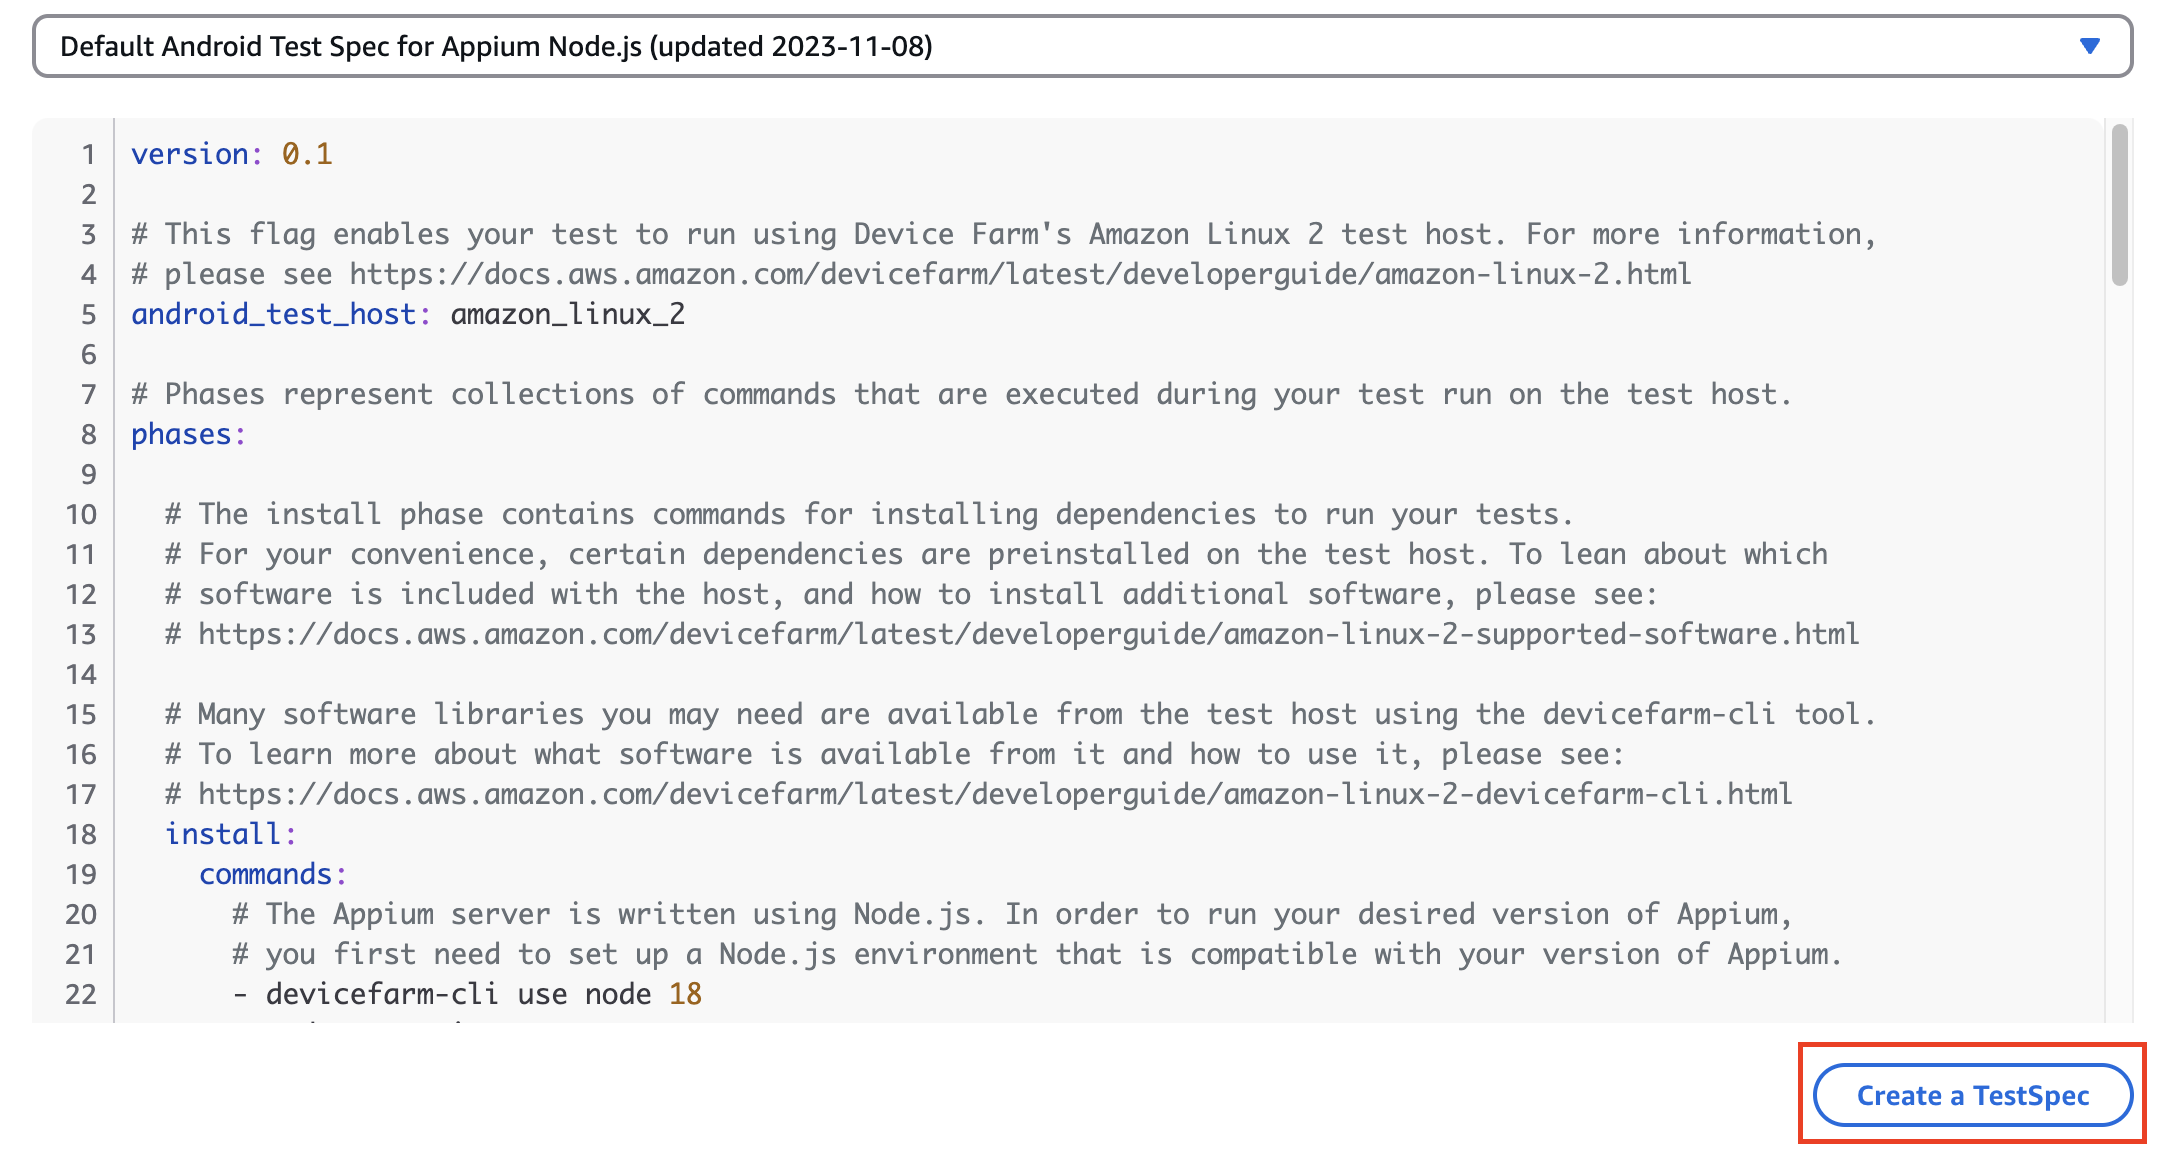
TestSpec にコードを貼り付け
TestSpec の入力欄が表示されますので、以下の内容を貼り付けてください。
version: 0.1
# This flag enables your test to run using Device Farm's Amazon Linux 2 test host. For more information,
# please see https://docs.aws.amazon.com/devicefarm/latest/developerguide/amazon-linux-2.html
android_test_host: amazon_linux_2
# Phases represent collections of commands that are executed during your test run on the test host.
phases:
# The install phase contains commands for installing dependencies to run your tests.
# For your convenience, certain dependencies are preinstalled on the test host. To lean about which
# software is included with the host, and how to install additional software, please see:
# https://docs.aws.amazon.com/devicefarm/latest/developerguide/amazon-linux-2-supported-software.html
# Many software libraries you may need are available from the test host using the devicefarm-cli tool.
# To learn more about what software is available from it and how to use it, please see:
# https://docs.aws.amazon.com/devicefarm/latest/developerguide/amazon-linux-2-devicefarm-cli.html
install:
commands:
# The Appium server is written using Node.js. In order to run your desired version of Appium,
# you first need to set up a Node.js environment that is compatible with your version of Appium.
- devicefarm-cli use node 20
- node --version
# Use the devicefarm-cli to select a preinstalled major version of Appium.
- devicefarm-cli use appium 2
- appium --version
# The Device Farm service automatically updates the preinstalled Appium versions over time to
# incorporate the latest minor and patch versions for each major version. If you wish to
# select a specific version of Appium, you can use NPM to install it.
# - npm install -g appium@2.1.3
# For Appium version 2, Device Farm automatically updates the preinstalled UIAutomator2 driver
# over time to incorporate the latest minor and patch versions for its major version 2. If you
# want to install a specific version of the driver, you can use the Appium extension CLI to
# uninstall the existing UIAutomator2 driver and install your desired version:
- appium driver uninstall uiautomator2
- appium driver install uiautomator2@2.44.0
- appium plugin install images
# We recommend setting the Appium server's base path explicitly for accepting commands.
- export APPIUM_BASE_PATH=/wd/hub
# Install the NodeJS dependencies.
- cd $DEVICEFARM_TEST_PACKAGE_PATH
# First, install dependencies which were packaged with the test package using npm-bundle.
- npm install *.tgz
# Then, optionally, install any additional dependencies using npm install.
# If you do run these commands, we strongly recommend that you include your package-lock.json
# file with your test package so that the dependencies installed on Device Farm match
# the dependencies you've installed locally.
- cd node_modules/*
- npm install
# The pre-test phase contains commands for setting up your test environment.
pre_test:
commands:
# Appium downloads Chromedriver using a feature that is considered insecure for multitenant
# environments. This is not a problem for Device Farm because each test host is allocated
# exclusively for one customer, then terminated entirely. For more information, please see
# https://github.com/appium/appium/blob/master/packages/appium/docs/en/guides/security.md
# We recommend starting the Appium server process in the background using the command below.
# The Appium server log will be written to the $DEVICEFARM_LOG_DIR directory.
# The environment variables passed as capabilities to the server will be automatically assigned
# during your test run based on your test's specific device.
# For more information about which environment variables are set and how they're set, please see
# https://docs.aws.amazon.com/devicefarm/latest/developerguide/custom-test-environment-variables.html
- |-
appium --use-plugins=images --base-path=$APPIUM_BASE_PATH --log-timestamp \
--log-no-colors --relaxed-security --default-capabilities \
"{\"appium:deviceName\": \"$DEVICEFARM_DEVICE_NAME\", \
\"platformName\": \"$DEVICEFARM_DEVICE_PLATFORM_NAME\", \
\"appium:app\": \"$DEVICEFARM_APP_PATH\", \
\"appium:udid\":\"$DEVICEFARM_DEVICE_UDID\", \
\"appium:platformVersion\": \"$DEVICEFARM_DEVICE_OS_VERSION\", \
\"appium:chromedriverExecutableDir\": \"$DEVICEFARM_CHROMEDRIVER_EXECUTABLE_DIR\", \
\"appium:automationName\": \"UiAutomator2\"}" \
>> $DEVICEFARM_LOG_DIR/appium.log 2>&1 &
# This code will wait until the Appium server starts.
- |-
appium_initialization_time=0;
until curl --silent --fail "http://0.0.0.0:4723${APPIUM_BASE_PATH}/status"; do
if [[ $appium_initialization_time -gt 30 ]]; then
echo "Appium did not start within 30 seconds. Exiting...";
exit 1;
fi;
appium_initialization_time=$((appium_initialization_time + 1));
echo "Waiting for Appium to start on port 4723...";
sleep 1;
done;
# The test phase contains commands for running your tests.
test:
commands:
# Your test package is downloaded and unpackaged into the $DEVICEFARM_TEST_PACKAGE_PATH directory.
# When compiling with npm-bundle, the test folder can be found in the node_modules/*/ subdirectory.
- cd $DEVICEFARM_TEST_PACKAGE_PATH/node_modules/*
- echo "Starting the Appium NodeJS test"
# Enter your command below to start the tests. The command should be the same command as the one
# you use to run your tests locally from the command line. An example, "npm test", is given below:
- npm run wdio-device-farm
# The post-test phase contains commands that are run after your tests have completed.
# If you need to run any commands to generating logs and reports on how your test performed,
# we recommend adding them to this section.
post_test:
commands:
# Artifacts are a list of paths on the filesystem where you can store test output and reports.
# All files in these paths will be collected by Device Farm.
# These files will be available through the ListArtifacts API as your "Customer Artifacts".
artifacts:
# By default, Device Farm will collect your artifacts from the $DEVICEFARM_LOG_DIR directory.
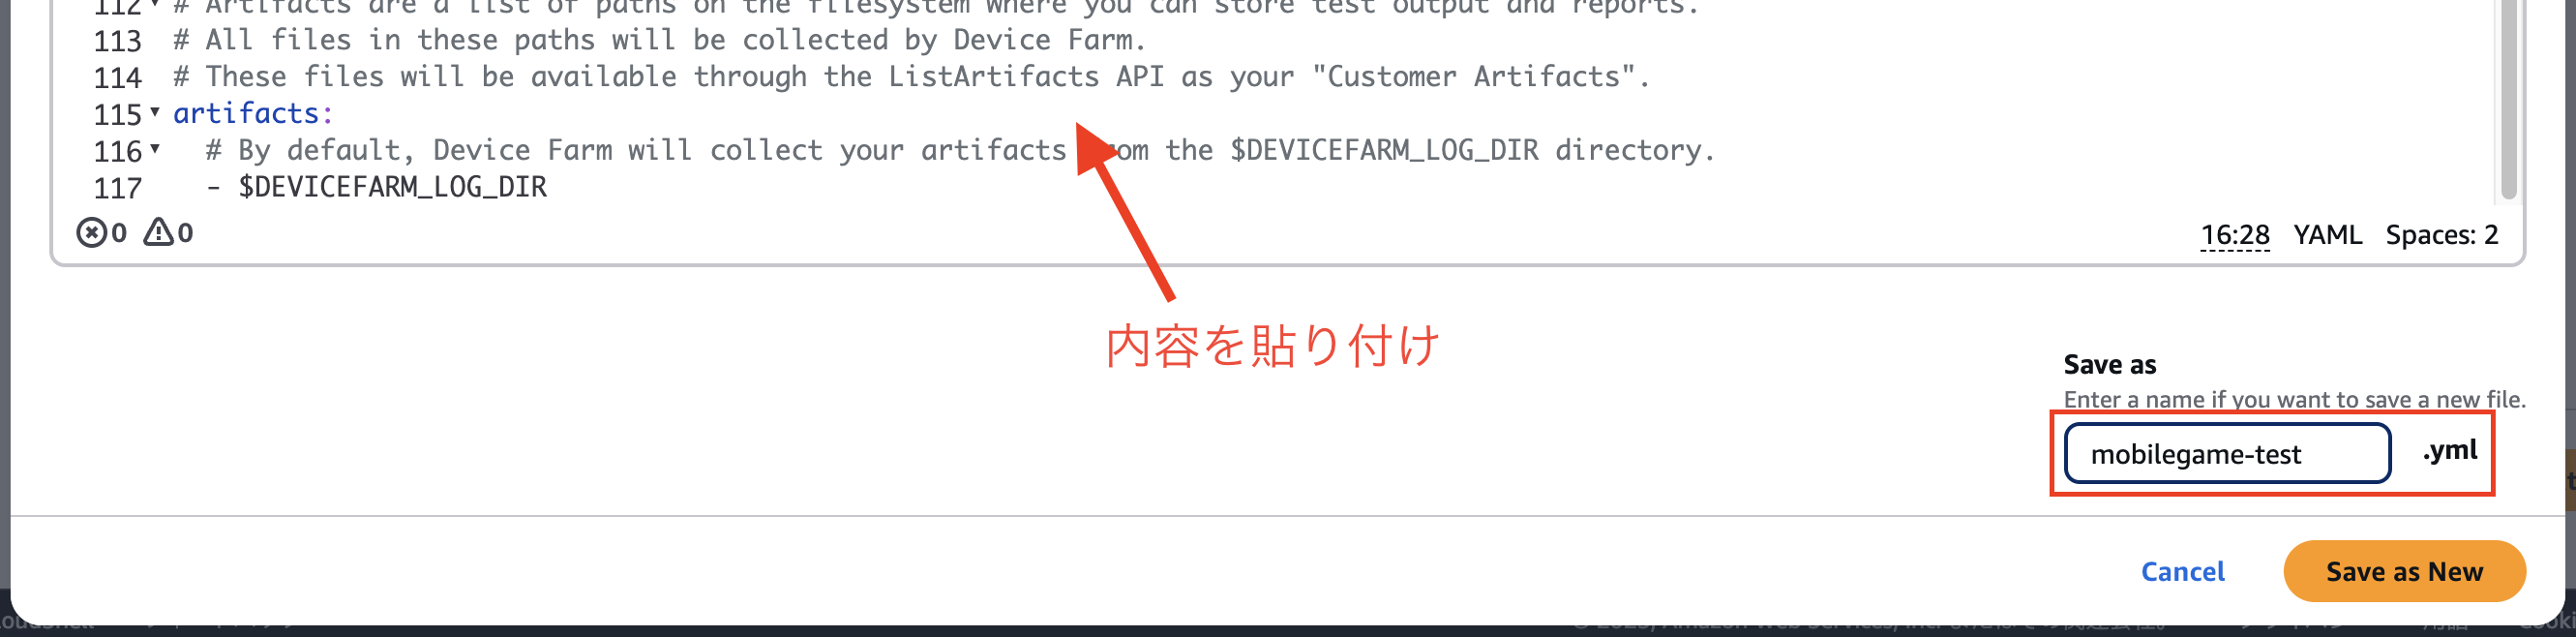
- $DEVICEFARM_LOG_DIRコードを保存
内容を貼り付けたら、右下の「Save as」欄に mobilegame-test と入力して「Save as New」をクリックします。
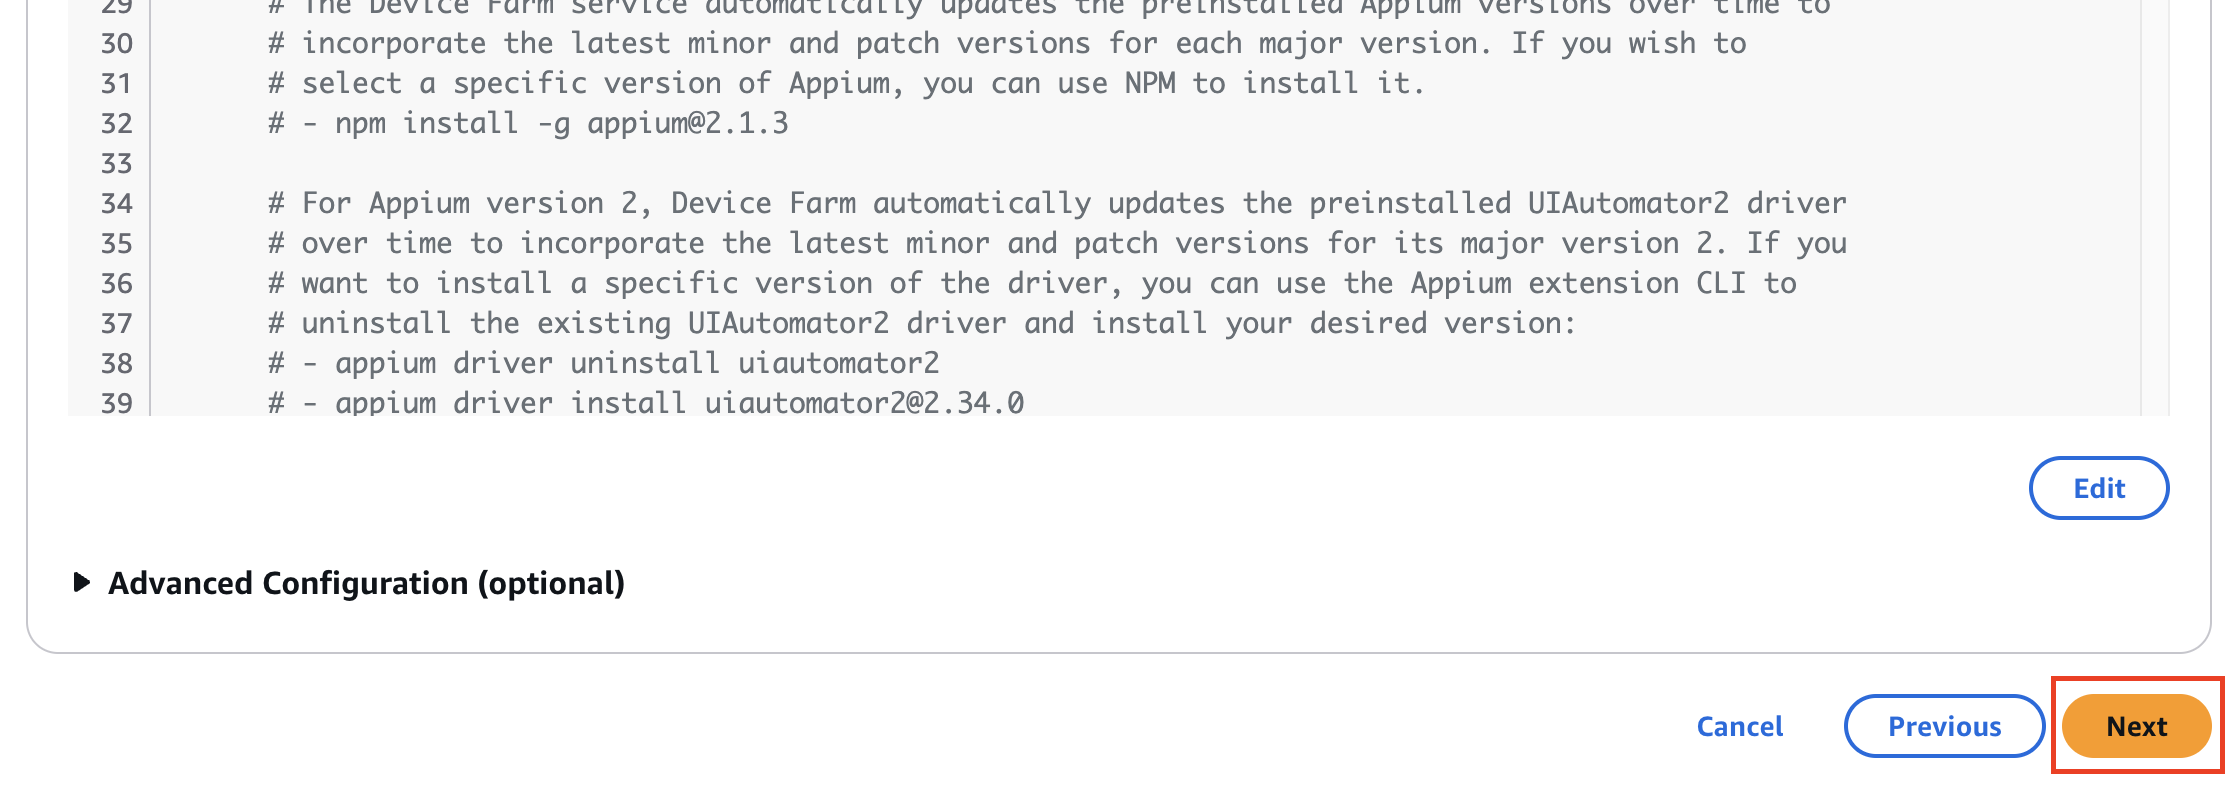
次へ進む
全ての工程が終わったら、ページの一番下にある「Next」をクリックします。
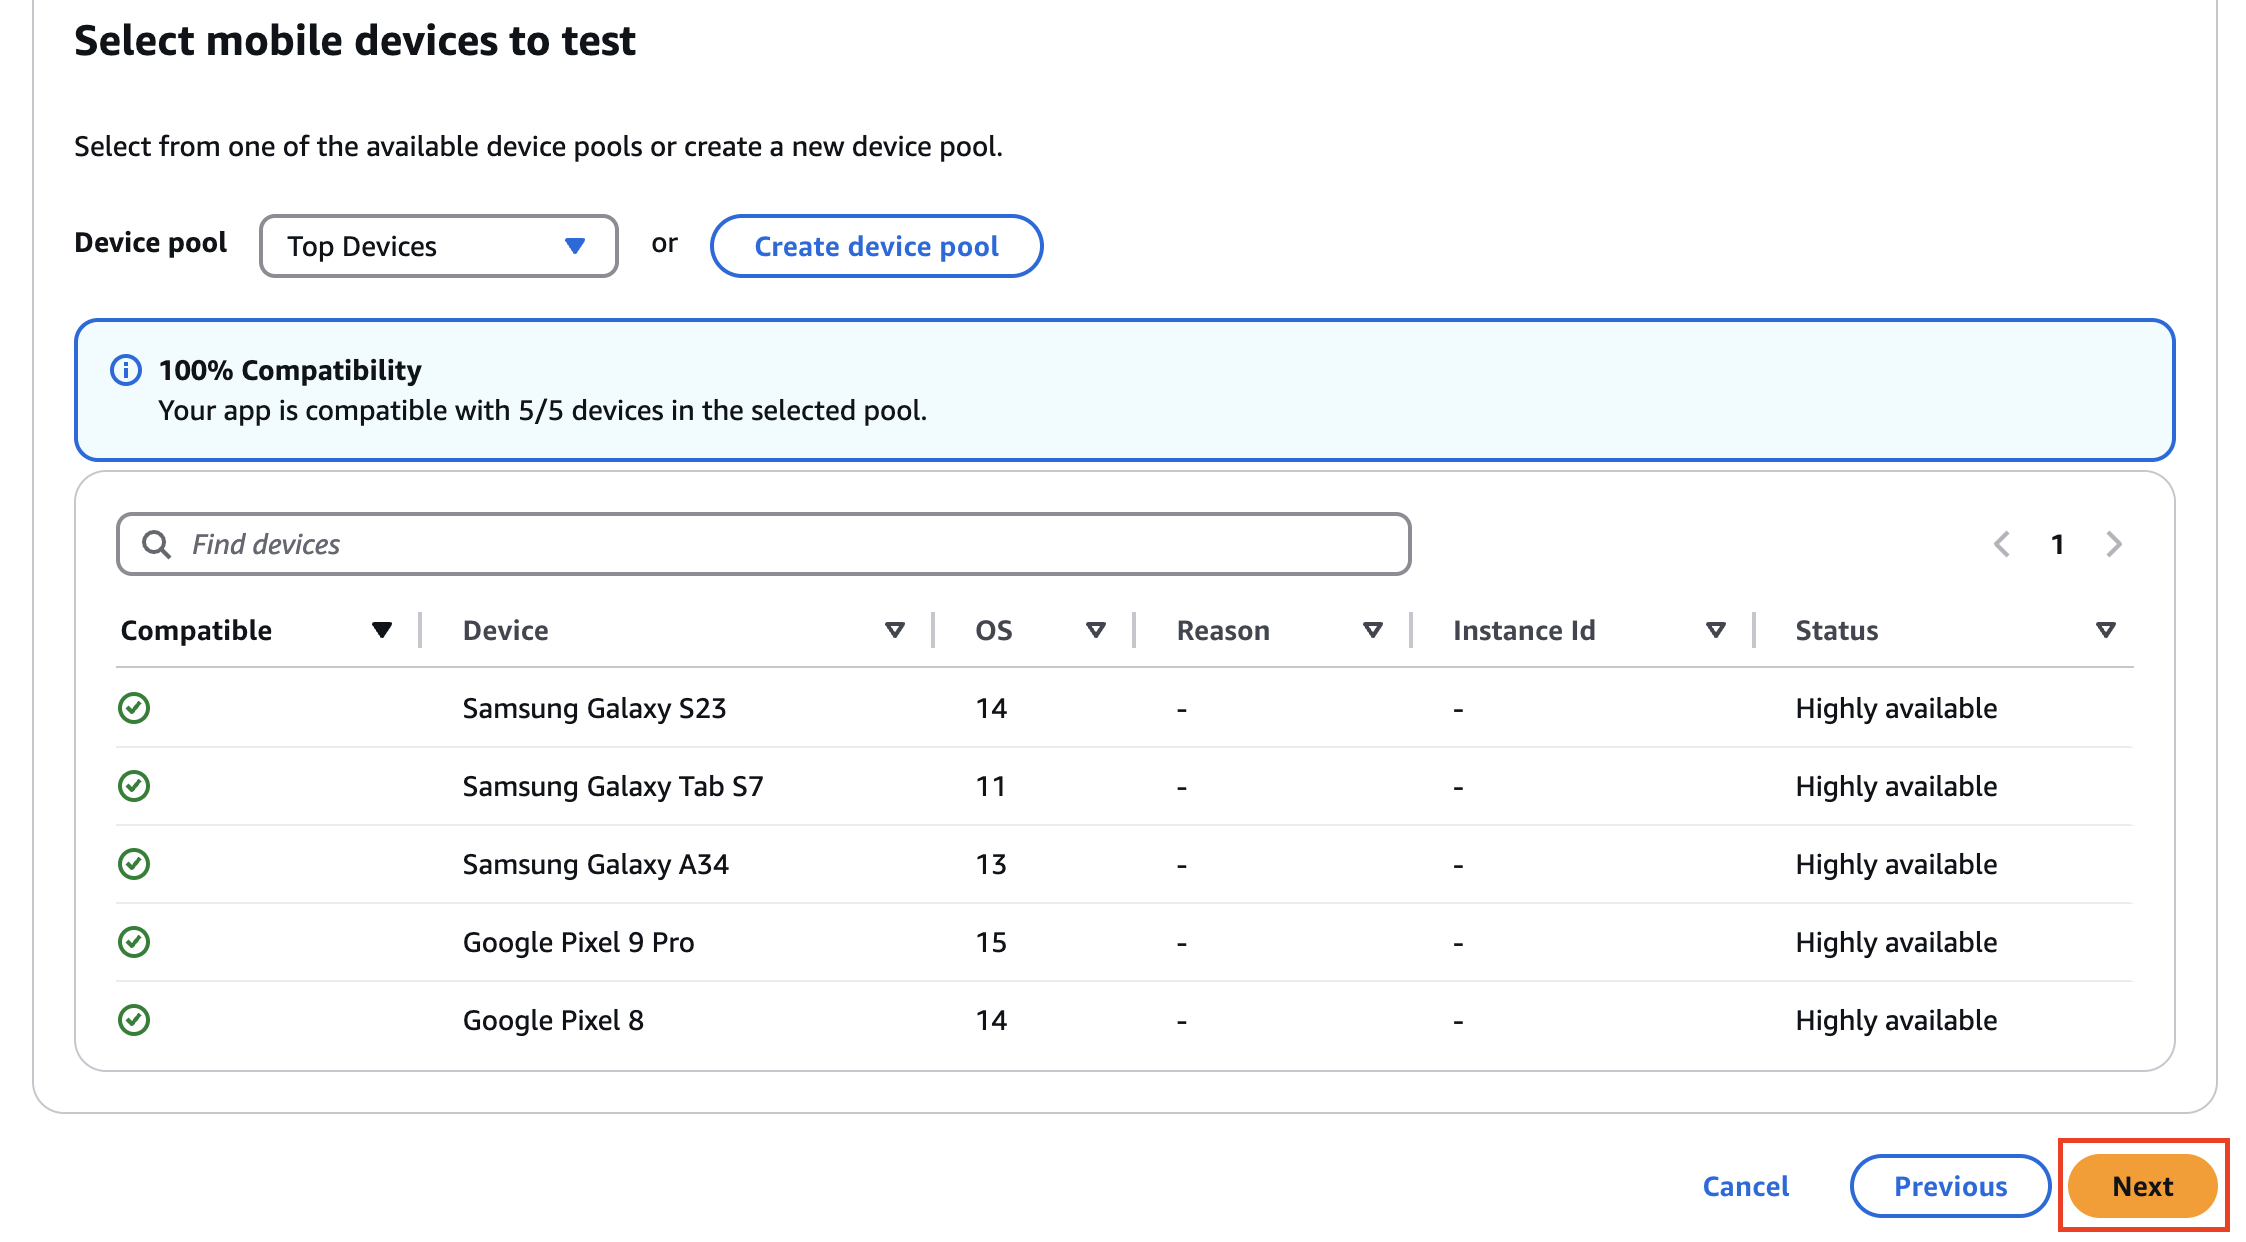
デバイスプールを選択
「Select mobile devices to test」では、Top Devices が選択されていることを確認して「Next」をクリックします。このデバイスプールでは、世界的によく利用される Android デバイスが 5 つ選択されています。
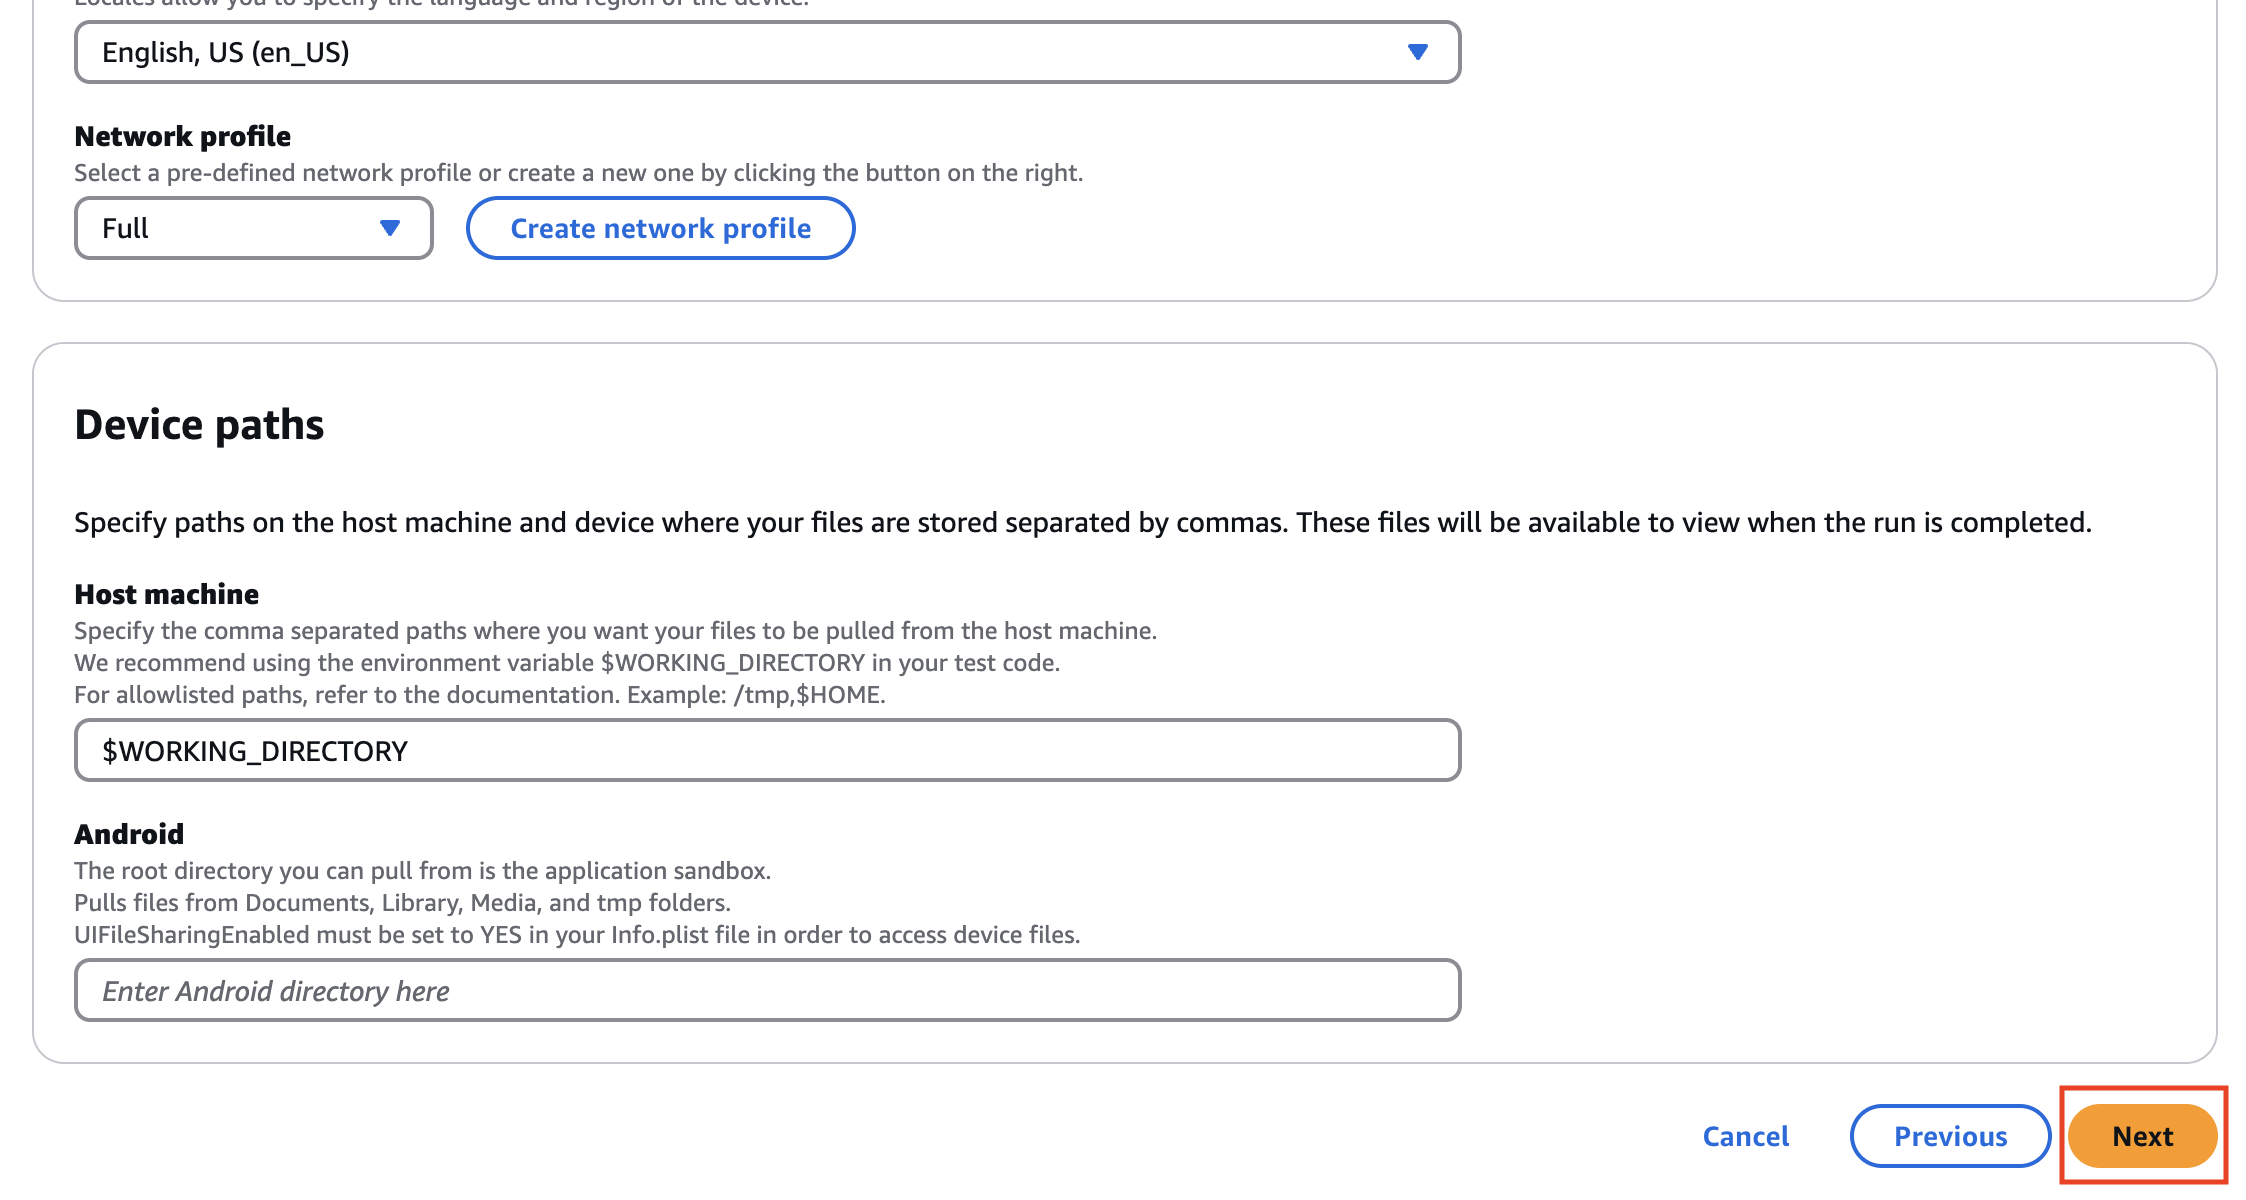
設定完了
「Specify device state」では、何も変更せずに「Next」をクリックします。
最後の「Review and start run」で、入力内容を確認しつつ、一番下の「Confirm and start run」をクリックすればテストが開始されます!
5. 結果の確認
テストを開始すると、テストジョブのステータスが表示されます。

しばらく待つと、ステータスが確定します。

テストの結果について確認しましょう。任意のデバイスを選択すると、テスト結果の画面に遷移します。

各タブで、テスト結果の内容を確認できます。
-
Suites では、各スイート毎のステータスを確認できます。基本的には Setup, Tests, Teardown の 3 つになります。
-
Video では、テスト実行中の画面録画を確認できます。
-
Test Specification Log では、テストフレームワーク(本稿の場合は WebdriverIO)のログを確認できます。
-
Logs では、テストハーネスとデバイスのログを確認できます。
-
Performance では、パフォーマンスメトリクスを確認できます(実行時に有効化していた場合のみ)
-
Files では、テストスイートや Logcat など、各種ファイルをダウンロードできます。
-
Screenshots では、テスト中にスクリーンショットを取っていた場合に確認することができます。
このテストで得られた録画の例を示します (自動操作している部分だけ切り抜いて gif 画像化しています)

以上で、AWS Device Farm による E2E テストが実行できました。お疲れ様でした !
6. 後片付け
本稿のハンズオンでは、後片付けするリソースはありません。
このように、自動テストを必要なときに必要なだけ実行でき、後片付けも不要という手軽さは AWS Device Farm の魅力と言って良いでしょう。
今後の展望
本稿では、Android アプリを対象とした AWS Device Farm による自動テスト環境を構築しましたが、現状ではいくつかの改善点が考えられます。
より強力なゲーム向け自動テストフレームワークの採用
今回のサンプルでは Appium の基本的なテンプレートマッチング機能を利用しましたが、モバイルゲームの UI は複雑なアニメーションや装飾を伴うことが多く、画像認識の精度が低下する可能性があります。また、テンプレート用の画像を切り出してディレクトリに配置し、それを Test Spec から参照するという方法は、実際にはとても手間のかかる作業になります。
これらの課題を解決する方法として、より強力なゲーム向け自動テストフレームワークを採用することが考えられます。例えば NetEase 社が提供する Airtest は、画像処理機能に加えて、テスト実装のための専用 IDE も提供しています。さらに、Unity などのゲームエンジンが持つメタ情報を活用できる Poco と組み合わせることで、より安定したテストの実行が可能になります。
AWS Device Farm で Airtest を実行する方法については、Akatsuki 様による事例が公開されています。より実践的なテスト環境の構築を検討されている方は、そちらも参考にされることをお勧めします。
生成 AI の活用
昨今、生成 AI の画像認識精度は飛躍的な進歩を遂げています。本稿執筆時点 (2025 年 2 月) でも、画面のスクリーンショットと自然文による指示を与えることで、必要な操作手順を回答させるくらいは十分可能です。さらに、Anthropic Claude の Computer Use のように、生成 AI に自動で操作を行わせる技術も登場し始めています。
これらの技術を活用することで、テストフレームワークに関する知識がなくても、自然文でテスト内容を指示できる期待が持てます。現時点では、これらの技術を簡単に組み合わせる方法はまだ確立されていませんが、良い実現方法が登場した際には、改めて記事として取り上げたいと思います。
なお、Anthropic Claude の Computer Use による自動操作については、先月の builders.flash で触れられていますので、ご興味のある方はそちらもご覧いただければと思います。
まとめ
今回は、AWS Device Farm を利用したモバイルゲームの自動テスト環境を構築しました。AWS Device Farm は物理デバイスを管理せずに自動テストを実行できるサービスであり、より効率的なテスト環境の構築に役立つと考えられます。
今回解説した内容が、皆様のゲーム開発の助けになれば幸いです。
筆者プロフィール
森下 真孝
アマゾン ウェブ サービス ジャパン合同会社
ソリューションアーキテクト
国内のモバイルゲーム開発会社でサーバーサイドからクライアントサイドまでを担当。
ゲーム業界向けのソリューションアーキテクトとしてゲーム開発に携わるお客様をご支援しております。

Did you find what you were looking for today?
Let us know so we can improve the quality of the content on our pages